|
Author
|
Message
|
|
Miranda (RL)
|
Miranda (RL)
Posted 7 Years Ago
|
|
Group: Administrators
Last Active: 4 Years Ago
Posts: 1.8K,
Visits: 11.2K
|
Introduction
The process of bringing an animated CC character into the Unreal Engine can be tedious. This is exacerbated by the inordinate amount of time it would take to manually assign every material property, adjust texture settings, modify animation properties, model configuration, along with other complicated manual tasks. In response, we are providing this plugin to trim your production time by automating the aforementioned idiosyncrasies.
Starting from Beta 1.0 released on 1/15/2019 till now, we have been working on updating the auto-setup procedure. Now in Beta 2.0, besides using Unreal Digital Humans shader to up the ante on visual quality, we have also improved several parts of the auto-setup process (see the full release note). The new procedure for Beta 2.0 is described in detail below. Keep in mind, however, that the tutorial will not be updated.
Installation
- Make sure to match the version of the Unreal Engine you possess. Currently, only 4.20 / 4.21 / 4.22 are supported.
- Go to the Plugins folder, copy the appropriate CC_Character_Auto_Settings_Unreal_x.xx_xxx_xx folder into the UE plugin folder.
- For one time installation, copy the plugin into C:\Program Files\Epic Games\[UE_version]\Engine\Plugins directory.
- For project level installation, copy the plugin into C:\Users\[User_Name]\Documents\Unreal Projects\[Project_Name]\Plugins.
- If you'd like to apply some custom shaders to improve upon the look of your project, you can copy the Content folder into C:\Users\[User_Name]\Documents\Unreal Projects\[Project_Name]\.
Related InformationPlugin Download & Update History
To download the Auto-Settings Plugin, and find the update history, please check HERE.
|
|
|
|
|
Miranda (RL)
|
Miranda (RL)
Posted 7 Years Ago
|
|
Group: Administrators
Last Active: 4 Years Ago
Posts: 1.8K,
Visits: 11.2K
|
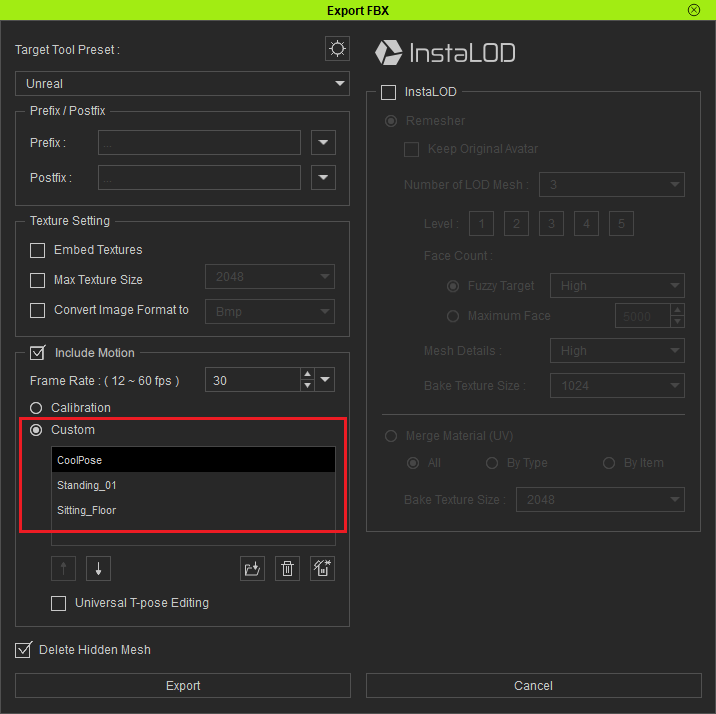
Step 1 - Export a FBX character from Character Creator 3
- Set the preset type to Unreal.
- Make sure to not activate Embed Textures as the plugin will automatically connect the material channels to the textures inside the export directory.
- Match the frame rate to Unreal Engine at 30 frames per second.
*From CC v3.04 onward, the A-pose will be automatically included as the first motion for character retargeting when the preset type is Unreal.
|
|
|
|
|
Miranda (RL)
|
Miranda (RL)
Posted 7 Years Ago
|
|
Group: Administrators
Last Active: 4 Years Ago
Posts: 1.8K,
Visits: 11.2K
|
|
|
|
|
|
Miranda (RL)
|
Miranda (RL)
Posted 7 Years Ago
|
|
Group: Administrators
Last Active: 4 Years Ago
Posts: 1.8K,
Visits: 11.2K
|
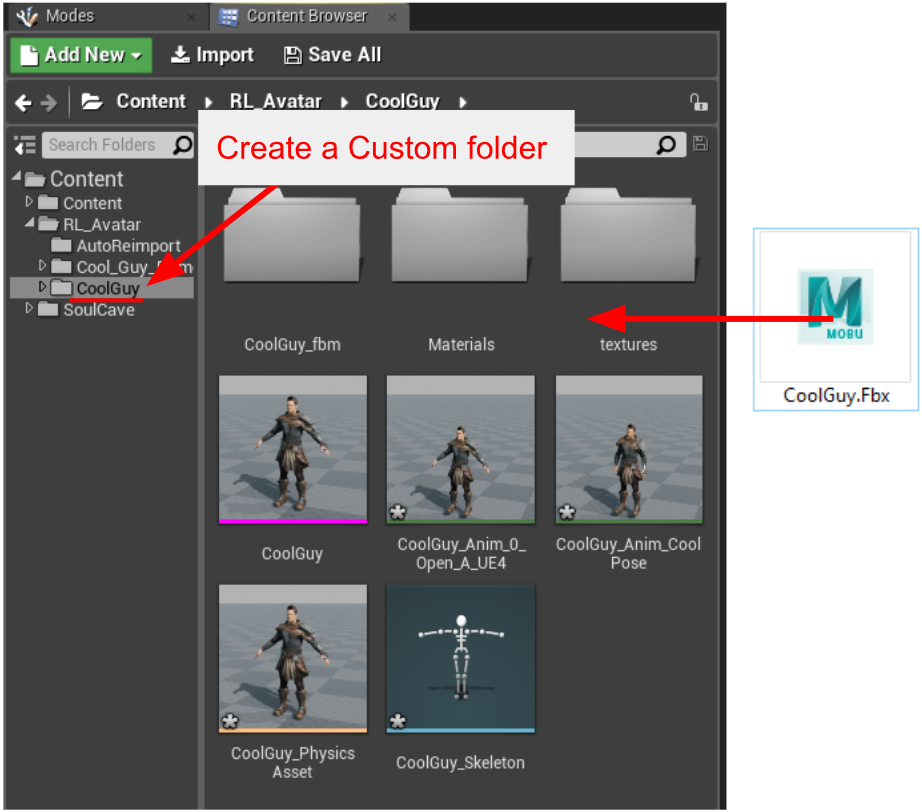
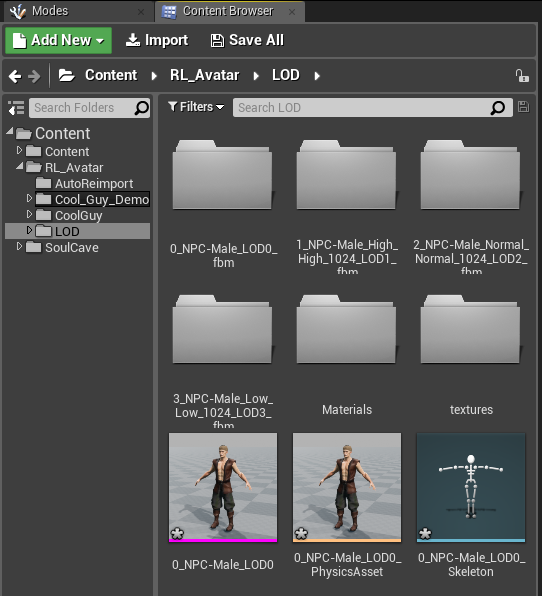
Step 3 - Import the FBX file into the Unreal Engine
Import One Single FBX File- Drag and drop the FBX character file into the Content Browser. FBM and texture folders will be automatically assigned by the plugin upon import.
Note: Make sure to have the character files reside in a specific parent directory in order to prevent conflicts from files with identical names.
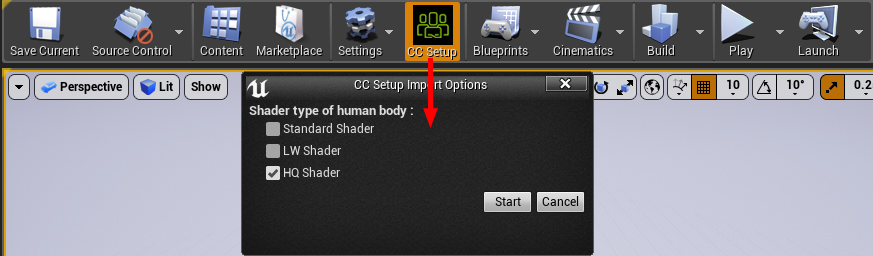
- Make sure that CC Setup is enabled, choose the desired material, and click on the Next button. If the CC Setup is disabled then all subsequent processing for CC characters must go through the CC Setup button on the Unreal Engine toolbar. This is identical to the older procedure covered in the process of Plugin Beta 1.0 where users must first bring in the FBM file and textures and start the auto-setup process. This way of processing is also suitable for projects where the character already exists.
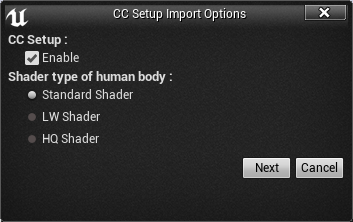
*Related information: Shader Usage instructions
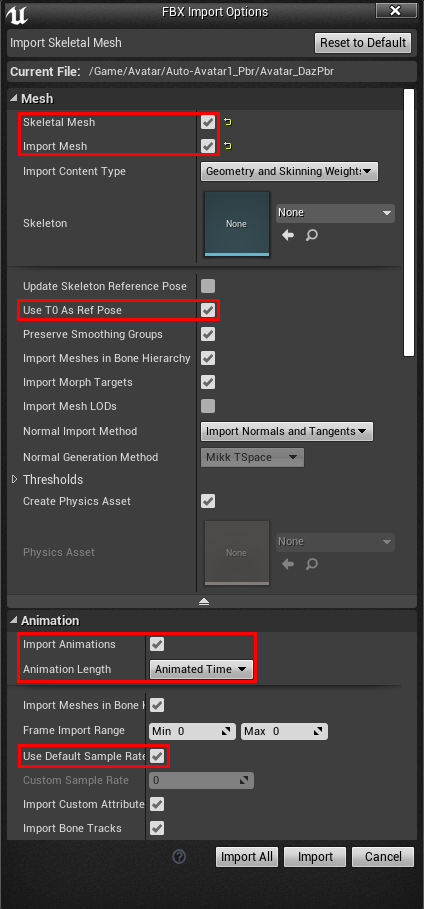
- Adjust the settings for the FBX import.
- Pay attention to the following parameters:
- Enable Skeletal Mesh.
- Enable Import Mesh.
- Select None for the Skeleton drop-down list.
- Enable T0As Ref Pose.
- Enable Import Morph Targets.
- Select Import Normals and Tangents for the Normal Import Method.
- Enable Import Animations.
- Select Animated Time for the Animation Length.
- Enable Use Default Sample Rate.
- Import All supports multiple FBX files. Since we are only importing one FBX file at a time in this guide, you can use either Import or Import All.
Import LOD Files- Drag and drop the LOD 0 FBX file (with file name starting with 0_) into the Content Browser. FBM and texture folders will be automatically assigned by the plugin upon import.
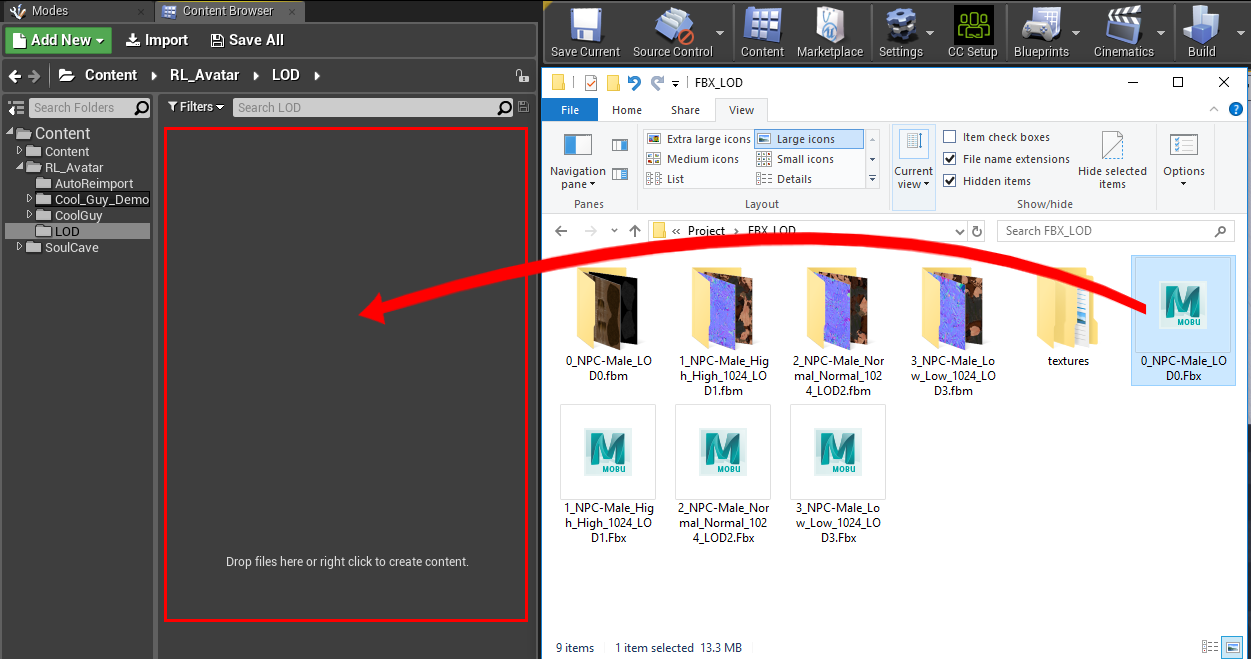
- LW and HQ shaders are meant for base level geometry and not intended for LOD meshes, in which case, we recommend using the "Standard Shader".

- Adjust the settings for the FBX import as what we do for single FBX file import.
- You will find the LOD characters have been set up automatically.
|
|
|
|
|
Miranda (RL)
|
Miranda (RL)
Posted 7 Years Ago
|
|
Group: Administrators
Last Active: 4 Years Ago
Posts: 1.8K,
Visits: 11.2K
|
Step 4 - Export the motions for the character from CC3
- If you need additional expressions or motions, you'll have to export them from Character Creator.
- Export another FBX including as much motion as you want.
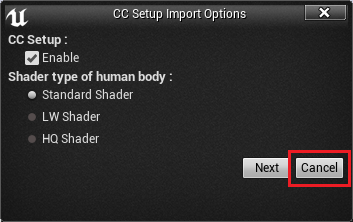
- Take a look at Step 3 for drag and dropping the FBX character file into the Content Browser. If you are bringing a file to update the character motions, then you won't need to use the plugin; In this case, you can skip the CC Setup import options by pressing the Cancel button.
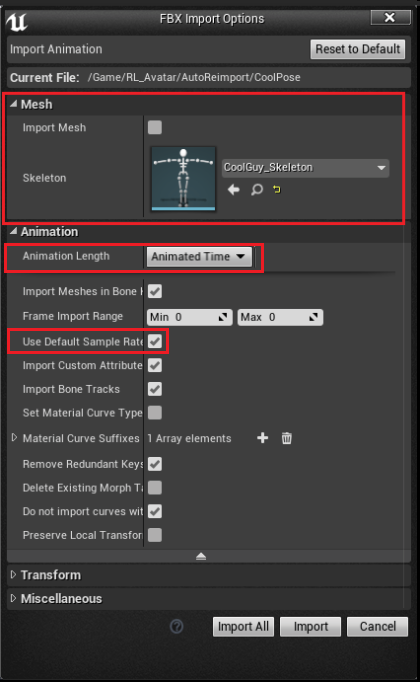
- Use the following configuration for the Unreal Engine import settings. Pay attention to the following parameters:
- Deactivate Import Mesh.
- Set the Skeletonto use the one from the previously imported CC character.
- Select Animated Time for the Animation Length.
- Enable Use Default Sample Rate.
|
|
|
|
|
Miranda (RL)
|
Miranda (RL)
Posted 7 Years Ago
|
|
Group: Administrators
Last Active: 4 Years Ago
Posts: 1.8K,
Visits: 11.2K
|
Step 5 - Initialize the plugin and setup the character
Currently there is not way to intelligibly assign the Blend Mode: Masked or Translucent. Therefore we recommend setting everything besides the eyelashes to Masked and only use Translucent for semi-transparent surfaces. 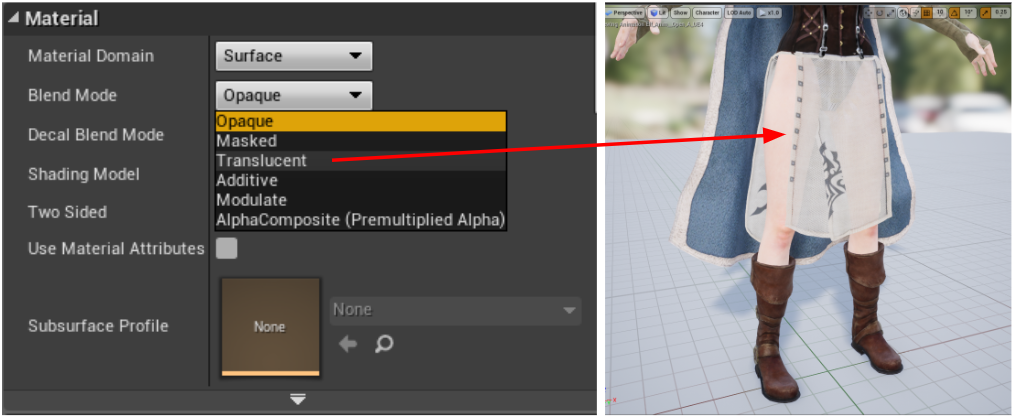 See this tutorial for more details: https://youtu.be/ZSBrR8L2lsA?t=565
|
|
|
|
|
Miranda (RL)
|
Miranda (RL)
Posted 7 Years Ago
|
|
Group: Administrators
Last Active: 4 Years Ago
Posts: 1.8K,
Visits: 11.2K
|
Three Shader Types & CC Shader Usage InstructionsThe CC shader has 3 settings: Standard, LW and HQ shader. 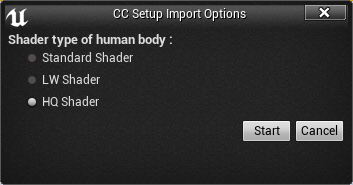 - The Standard Shader is the default Unreal shader which is suitable for non-player characters.
- LW Shader (lightweight shader) uses the Unreal Digital Human shader which is a light-weight shader at the UE Paragon game. It makes improvements for the skin shader while staying efficient, making it suitable for sidekick characters.
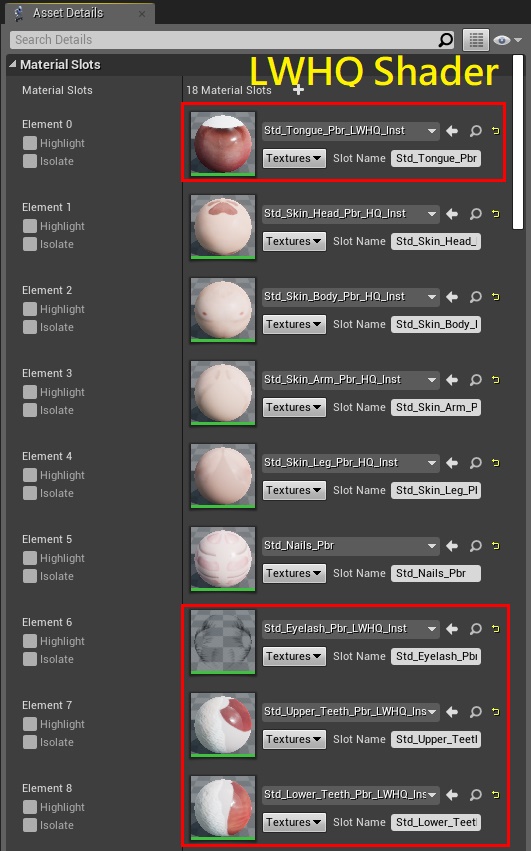
- Head & Body: LW shader
- Hair, Eyes, Tongue, Teeth: LWHQ shader
- HQ Shader (high-quality shader) uses the Unreal Digital Human shader which improves upon the appearance of the skin but at cost of system performance. This shader is suitable for the playable characters.
- Head & Body: HQ shader
- Hair, Eyes, Tongue, Teeth: LWHQ shader
CC Shader Usage Instructions (take HQ Shader for head as an example):
- You can find the desired material from the plugin's Skin Shader directory, turn it into a material instance, and move it to the CC_Auto_Setup_Material_Instances folder to replace the original set.
- Edit the material instance and find the source material under General > Parent.
- The plugin will assign the needed textures to corresponding channels.
- Other channel textures have been made into a profile which the plugin will find within the CC_Shaders folder and does not need user input.
- On the top most portion of the Material Instance Editor, you will see several adjustable attributes. Here you have access to advanced settings such a color value, normal strength and reflectivity.
- You can switch materials at any moment by pressing on the CC Setup button on the top tool-bar.
|
|
|
|
|
Miranda (RL)
|
Miranda (RL)
Posted 7 Years Ago
|
|
Group: Administrators
Last Active: 4 Years Ago
Posts: 1.8K,
Visits: 11.2K
|
Important Considerations- There is only full support for Character Creator 3 G1 and G3 characters with FBX being the primary format of exchange.
- Characters and motions should all be exported from Character Creator. Be aware that characters processed directly from iClone or 3DXchange may need some manual re-assignments for motion re-targeting.
- Please process only one character at a time (including LOD), otherwise you may experience unexpected results. For example, exporting multiple characters can lead to conflicts with identical texture names.
- Make sure to organize different characters into separate folders in Unreal Engine, otherwise there could be conflicts between the various assets with identical names.
- Avoid using reserved key words that are crucial for the plugin's proper operation. These include the following: diffuse - ao - normal - metallic - roughness - glow - specular - transparency - hair - eyelash - ga_skin_body - skin - loop - LOD0~N - displacement - pbr - tra - opacity.
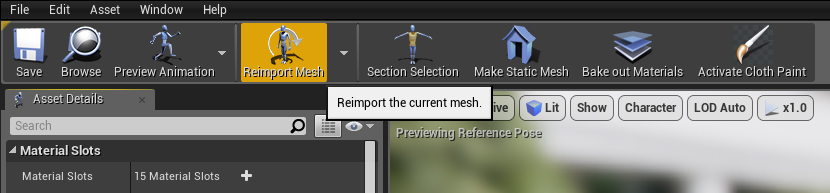
- You can fix the disappearance of morph data by opening up the Content Browser, selecting the skeleton mesh, and click on the Reimport the current mesh button.
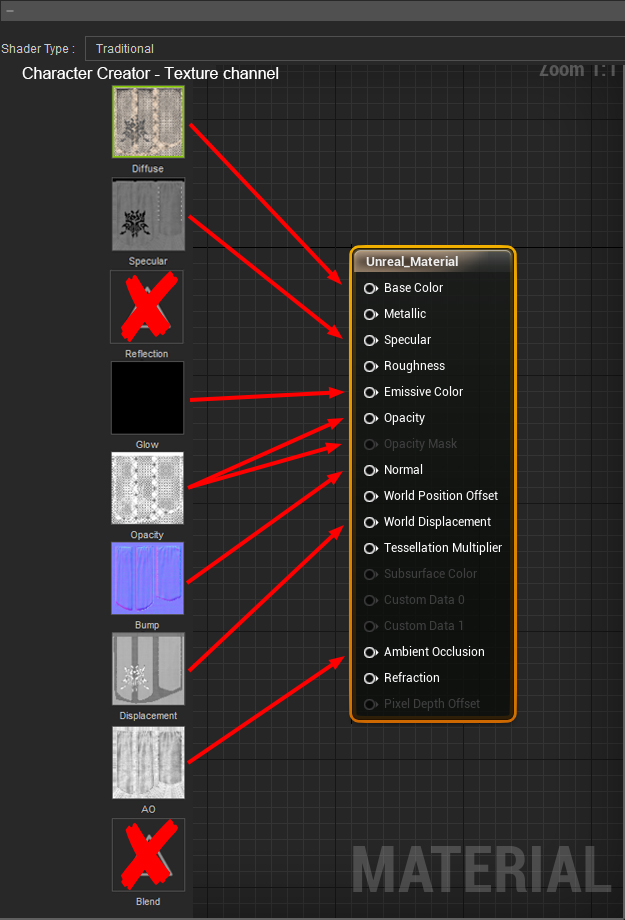
- Unreal Engine's PBR shader does not support CC's blend channel.
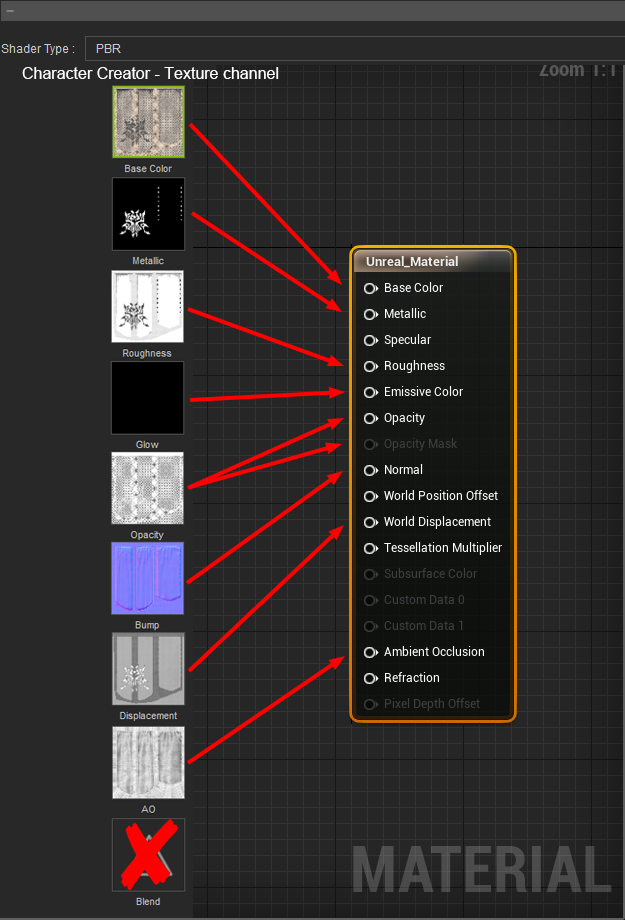
- Unreal Engine's traditional shader does not support CC's blend and reflection channel.
- The plugin will search for _ORM texture files as a priority which is broken down into it's separate components by taking apart it's RGB channels:
- Red: Ambient Occlusion
- Green: Roughness
- Blue: Metallic
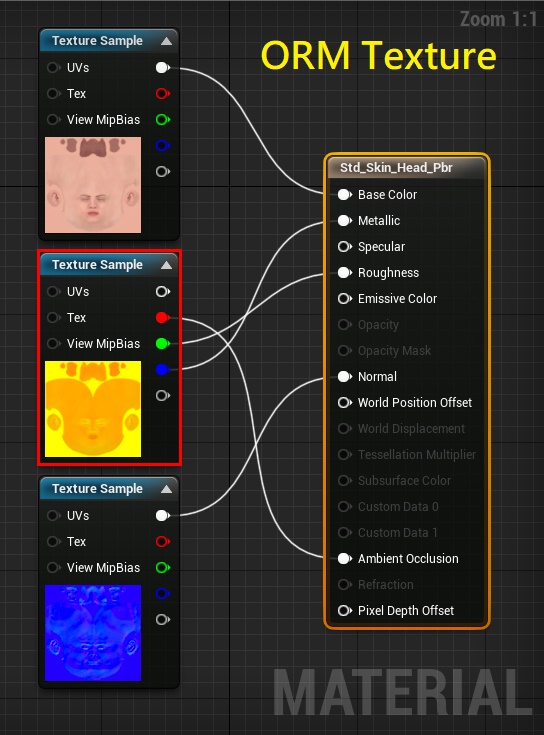
- If the _ORM texture is not found, then the plugin resorts to find separate maps for each material channel.
- LW and HQ shaders are only used for the head and body. Other parts of the body will adopt the LWHQ shader. Note: LW and HQ shaders are not suitable for cloths and accessories.
- LW and HQ shaders are meant for base level geometry and not intended for LOD meshes, in which case, we recommend using the "Standard Shader".
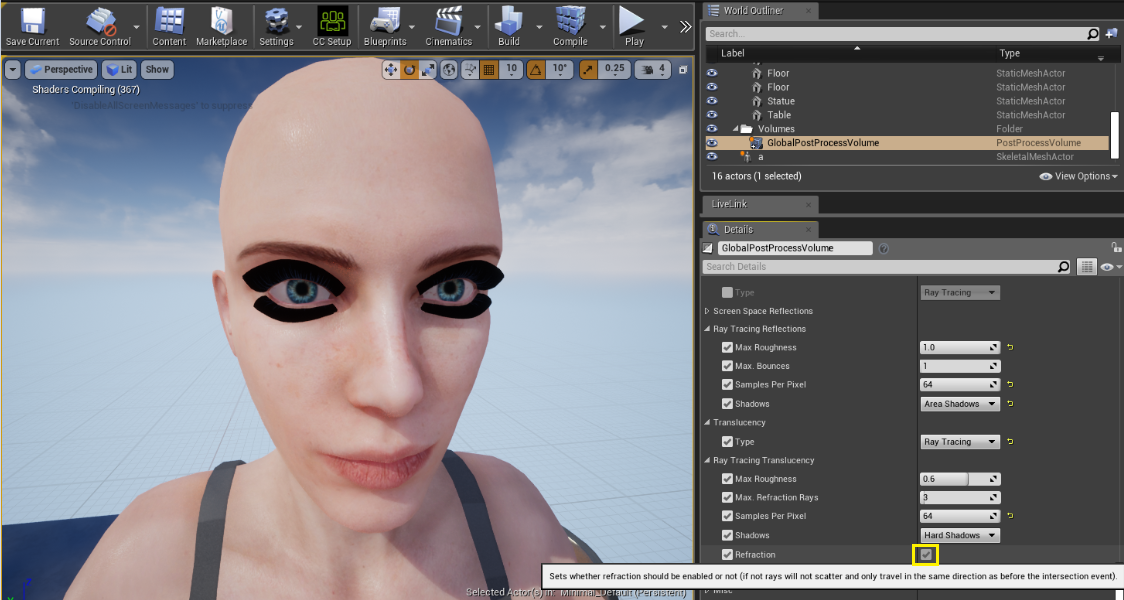
- In Unreal Engine 4.22, the transparency effect is not working when enabling the Refraction option under Ray Tracing Translucency, which is likely to be the defect in version 4.22. The workaround is disabling the Refraction option.
|
|
|
|
|
StyleMarshal
|
StyleMarshal
Posted 7 Years Ago
|
|
Group: Forum Members
Last Active: 2 Years Ago
Posts: 5.8K,
Visits: 14.3K
|
Hi Miranda ,
The new Script is sooo cool , I did some CC3 tests , see below :-)
|
|
|
|
|
SWGames
|
SWGames
Posted 7 Years Ago
|
|
Group: Forum Members
Last Active: 4 Years Ago
Posts: 7,
Visits: 144
|
The hair shader looks very weird to me, it's has a lot of pixels and just dosen't look realistic at all, like it should in digital humans.
|
|
|
|