|
By Miranda (RL) - 7 Years Ago
|
Introduction
The process of bringing an animated CC character into the Unreal Engine can be tedious. This is exacerbated by the inordinate amount of time it would take to manually assign every material property, adjust texture settings, modify animation properties, model configuration, along with other complicated manual tasks. In response, we are providing this plugin to trim your production time by automating the aforementioned idiosyncrasies.
Starting from Beta 1.0 released on 1/15/2019 till now, we have been working on updating the auto-setup procedure. Now in Beta 2.0, besides using Unreal Digital Humans shader to up the ante on visual quality, we have also improved several parts of the auto-setup process (see the full release note). The new procedure for Beta 2.0 is described in detail below. Keep in mind, however, that the tutorial will not be updated.
Installation
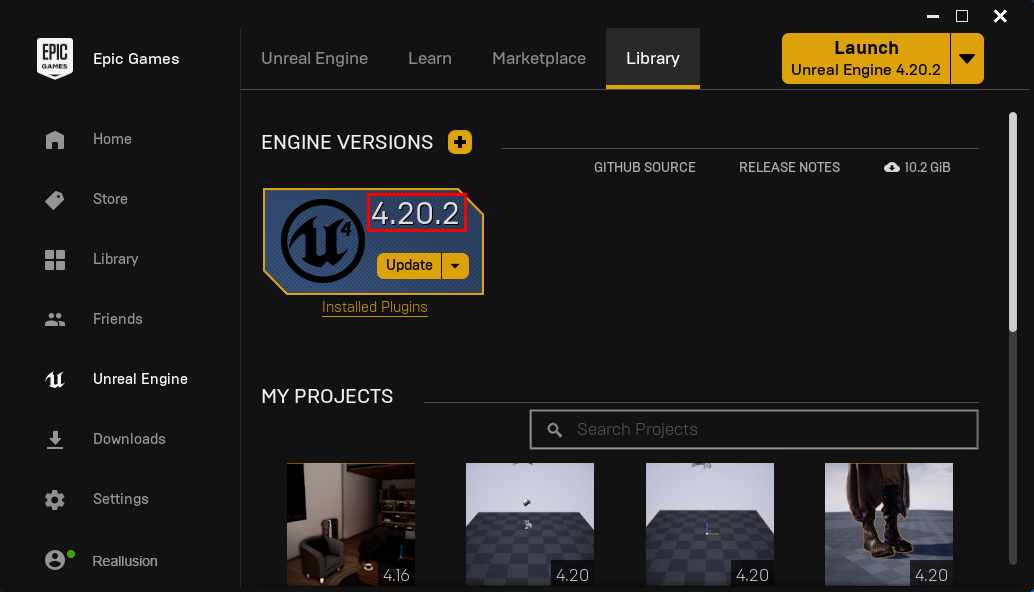
- Make sure to match the version of the Unreal Engine you possess. Currently, only 4.20 / 4.21 / 4.22 are supported.
- Go to the Plugins folder, copy the appropriate CC_Character_Auto_Settings_Unreal_x.xx_xxx_xx folder into the UE plugin folder.
- For one time installation, copy the plugin into C:\Program Files\Epic Games\[UE_version]\Engine\Plugins directory.
- For project level installation, copy the plugin into C:\Users\[User_Name]\Documents\Unreal Projects\[Project_Name]\Plugins.
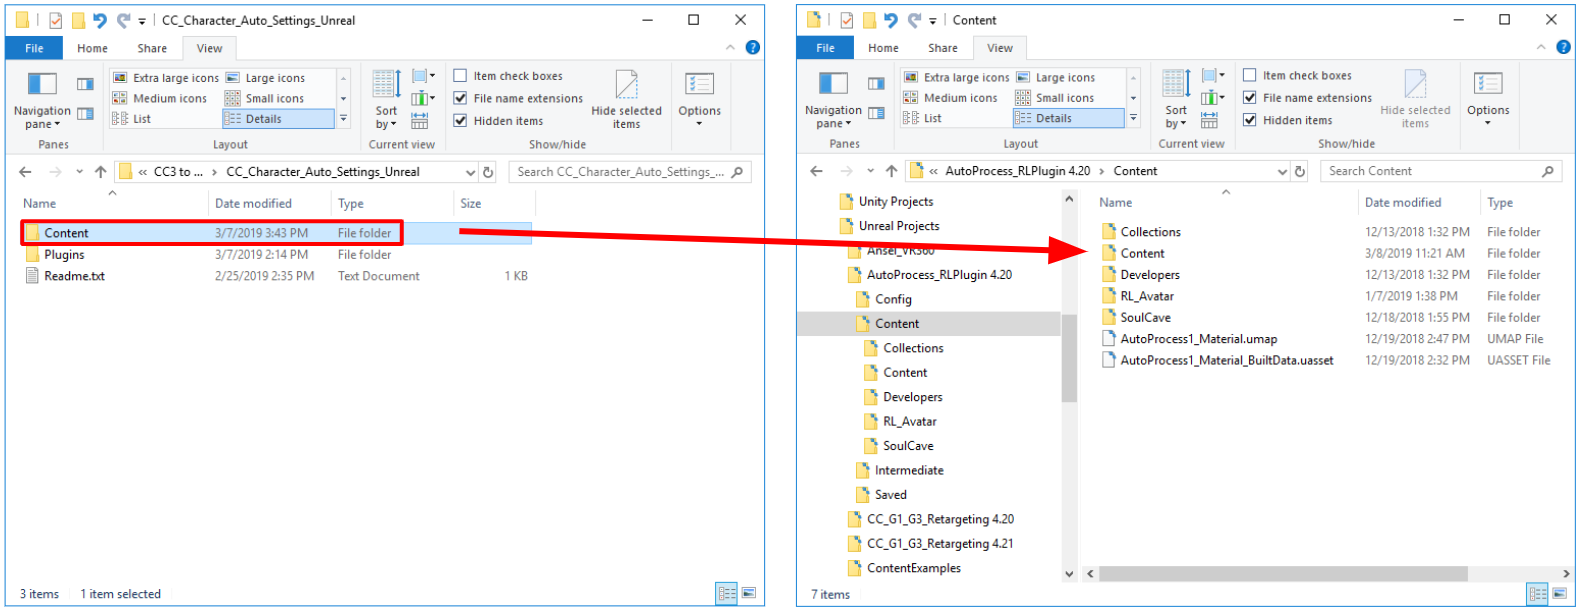
- If you'd like to apply some custom shaders to improve upon the look of your project, you can copy the Content folder into C:\Users\[User_Name]\Documents\Unreal Projects\[Project_Name]\.
Related Information
Plugin Download & Update History
To download the Auto-Settings Plugin, and find the update history, please check HERE.
|
|
By Miranda (RL) - 7 Years Ago
|
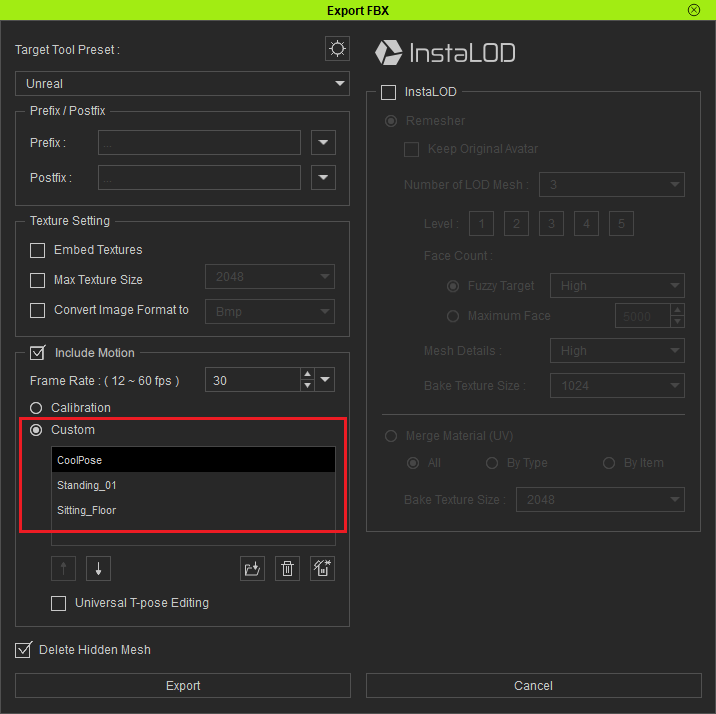
Step 1 - Export a FBX character from Character Creator 3
- Set the preset type to Unreal.
- Make sure to not activate Embed Textures as the plugin will automatically connect the material channels to the textures inside the export directory.
- Match the frame rate to Unreal Engine at 30 frames per second.
*From CC v3.04 onward, the A-pose will be automatically included as the first motion for character retargeting when the preset type is Unreal.
|
|
By Miranda (RL) - 7 Years Ago
|
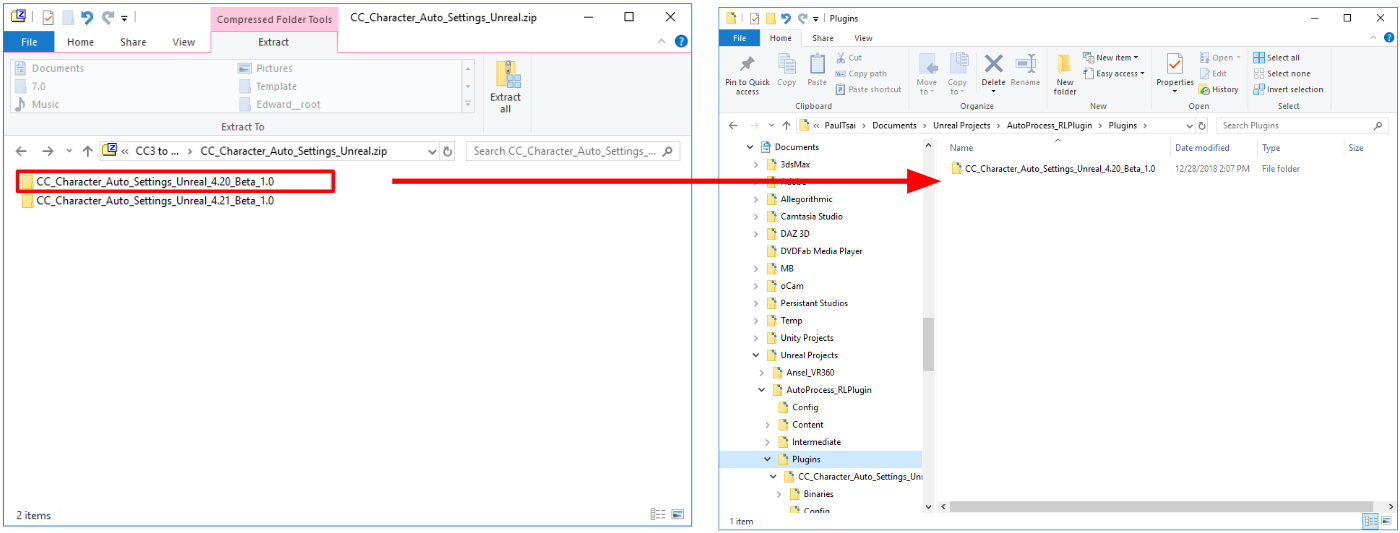
Step 2 - Download and install the auto-configuration plugin
- Choosing the right plugin.
- Check the Unreal Engine version number and choose the plugin version to match.
- Make sure to not put more than 1 plugin inside the same directory -delete any preexisting plugins.
- Currently, only version 4.20 and 4.21 of Unreal are supported.

- Download and install the plugin.
- The download location is as follows:
- There are two ways to install:
- Put the RL plugin folder inside the Plugins folder for Unreal Engine.

- Put the RL plugin folder inside the Plugins folder for the specific U.E. project (make a new folder by the same name if it doesn't already exist).
- For shaders, you'll have to add the Content folder to the directory for the specific Unreal Project.
Note: the plugin will work as usual even without the content folder, except for the shader options which will be disabled.

- Initialize the Unreal Engine RL plugin and restart the application.
- Open up Unreal Editor and browse the plugins list to enable the CC_Character_Auto_Settings plugin.
- Restart the Unreal Editor after initializing the said plugin.
If the RL plugin folder is inside the Plugins folder for Unreal Engine:  If the RL plugin folder is inside the Plugins folder for the specific U.E. project: 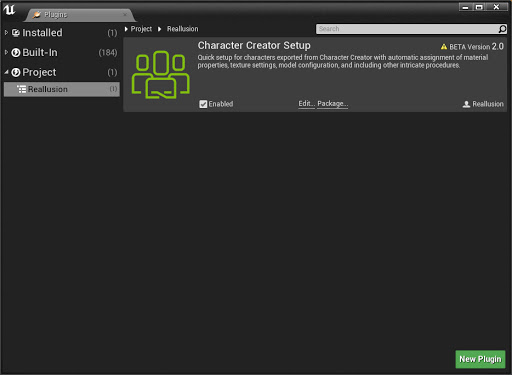
|
|
By Miranda (RL) - 7 Years Ago
|
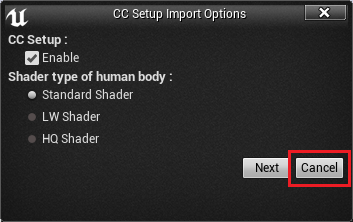
Step 3 - Import the FBX file into the Unreal Engine
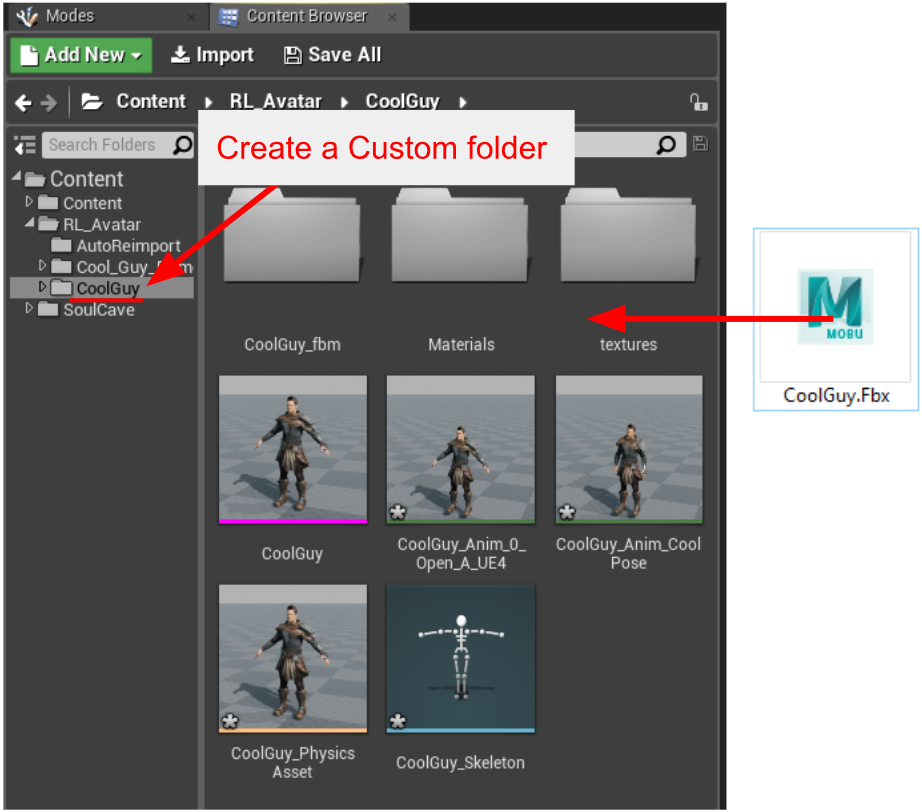
Import One Single FBX File
- Drag and drop the FBX character file into the Content Browser. FBM and texture folders will be automatically assigned by the plugin upon import.
Note: Make sure to have the character files reside in a specific parent directory in order to prevent conflicts from files with identical names.
- Make sure that CC Setup is enabled, choose the desired material, and click on the Next button. If the CC Setup is disabled then all subsequent processing for CC characters must go through the CC Setup button on the Unreal Engine toolbar. This is identical to the older procedure covered in the process of Plugin Beta 1.0 where users must first bring in the FBM file and textures and start the auto-setup process. This way of processing is also suitable for projects where the character already exists.
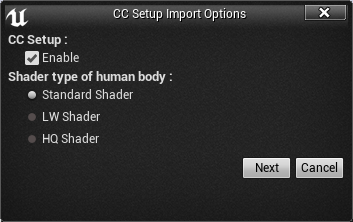
*Related information: Shader Usage instructions
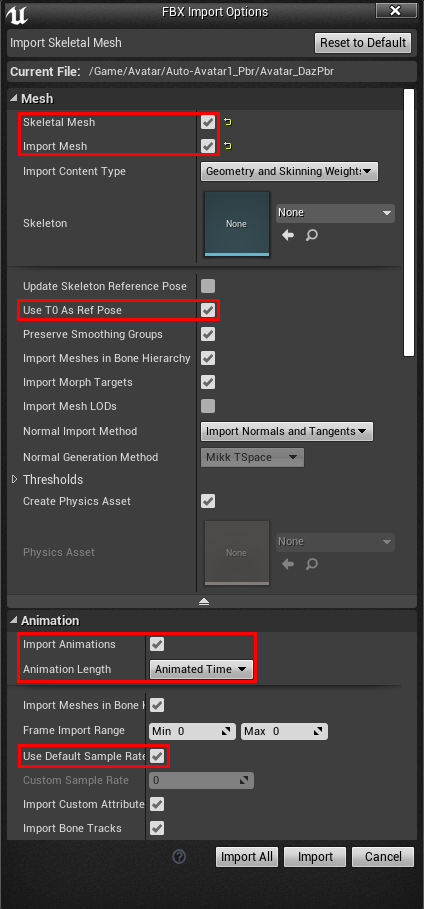
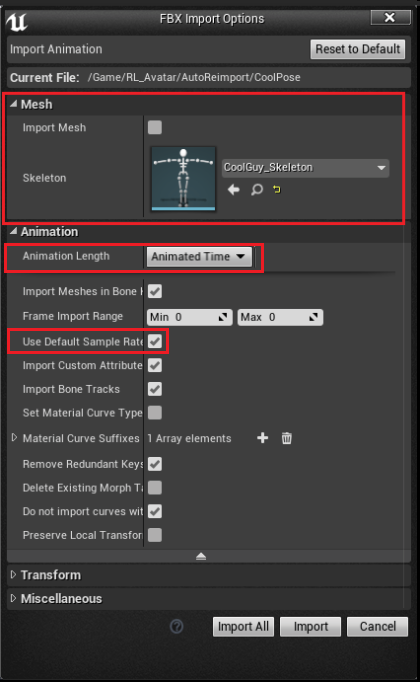
- Adjust the settings for the FBX import.
- Pay attention to the following parameters:
- Enable Skeletal Mesh.
- Enable Import Mesh.
- Select None for the Skeleton drop-down list.
- Enable T0As Ref Pose.
- Enable Import Morph Targets.
- Select Import Normals and Tangents for the Normal Import Method.
- Enable Import Animations.
- Select Animated Time for the Animation Length.
- Enable Use Default Sample Rate.
- Import All supports multiple FBX files. Since we are only importing one FBX file at a time in this guide, you can use either Import or Import All.
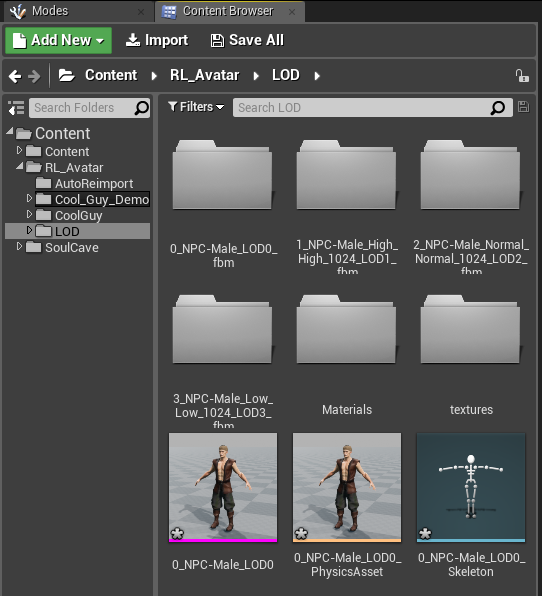
Import LOD Files
- Drag and drop the LOD 0 FBX file (with file name starting with 0_) into the Content Browser. FBM and texture folders will be automatically assigned by the plugin upon import.
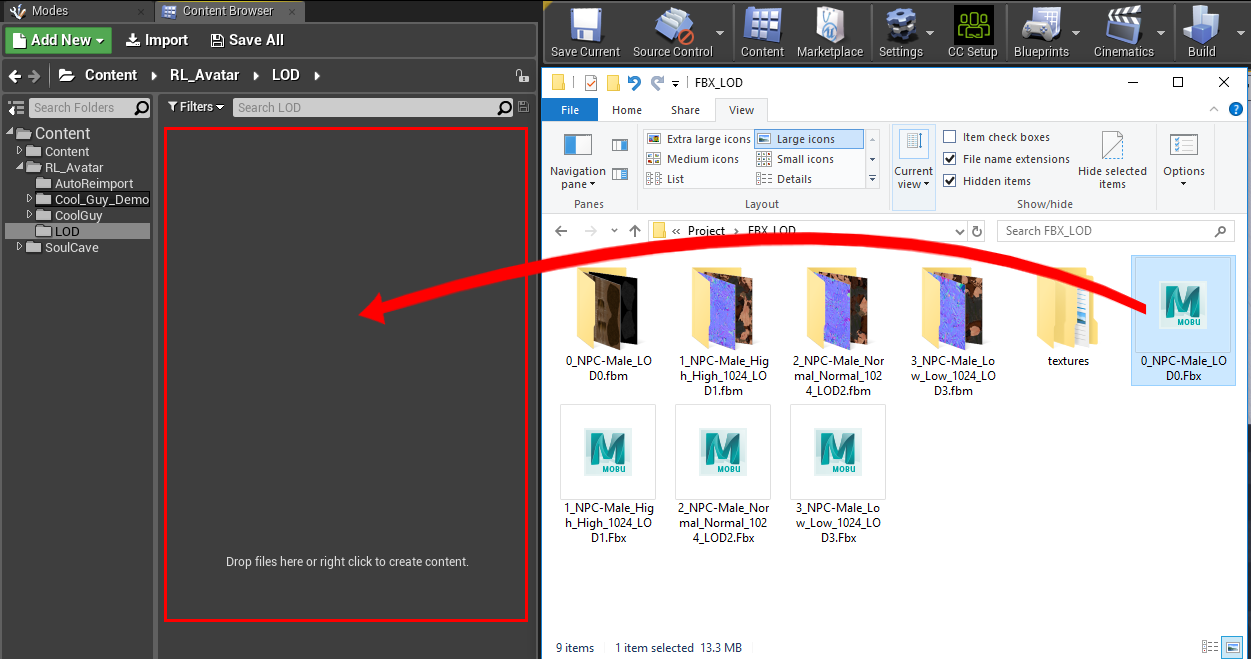
- LW and HQ shaders are meant for base level geometry and not intended for LOD meshes, in which case, we recommend using the "Standard Shader".

- Adjust the settings for the FBX import as what we do for single FBX file import.
- You will find the LOD characters have been set up automatically.
|
|
By Miranda (RL) - 7 Years Ago
|
Step 4 - Export the motions for the character from CC3
- If you need additional expressions or motions, you'll have to export them from Character Creator.
- Export another FBX including as much motion as you want.
- Take a look at Step 3 for drag and dropping the FBX character file into the Content Browser. If you are bringing a file to update the character motions, then you won't need to use the plugin; In this case, you can skip the CC Setup import options by pressing the Cancel button.
- Use the following configuration for the Unreal Engine import settings. Pay attention to the following parameters:
- Deactivate Import Mesh.
- Set the Skeletonto use the one from the previously imported CC character.
- Select Animated Time for the Animation Length.
- Enable Use Default Sample Rate.
|
|
By Miranda (RL) - 7 Years Ago
|
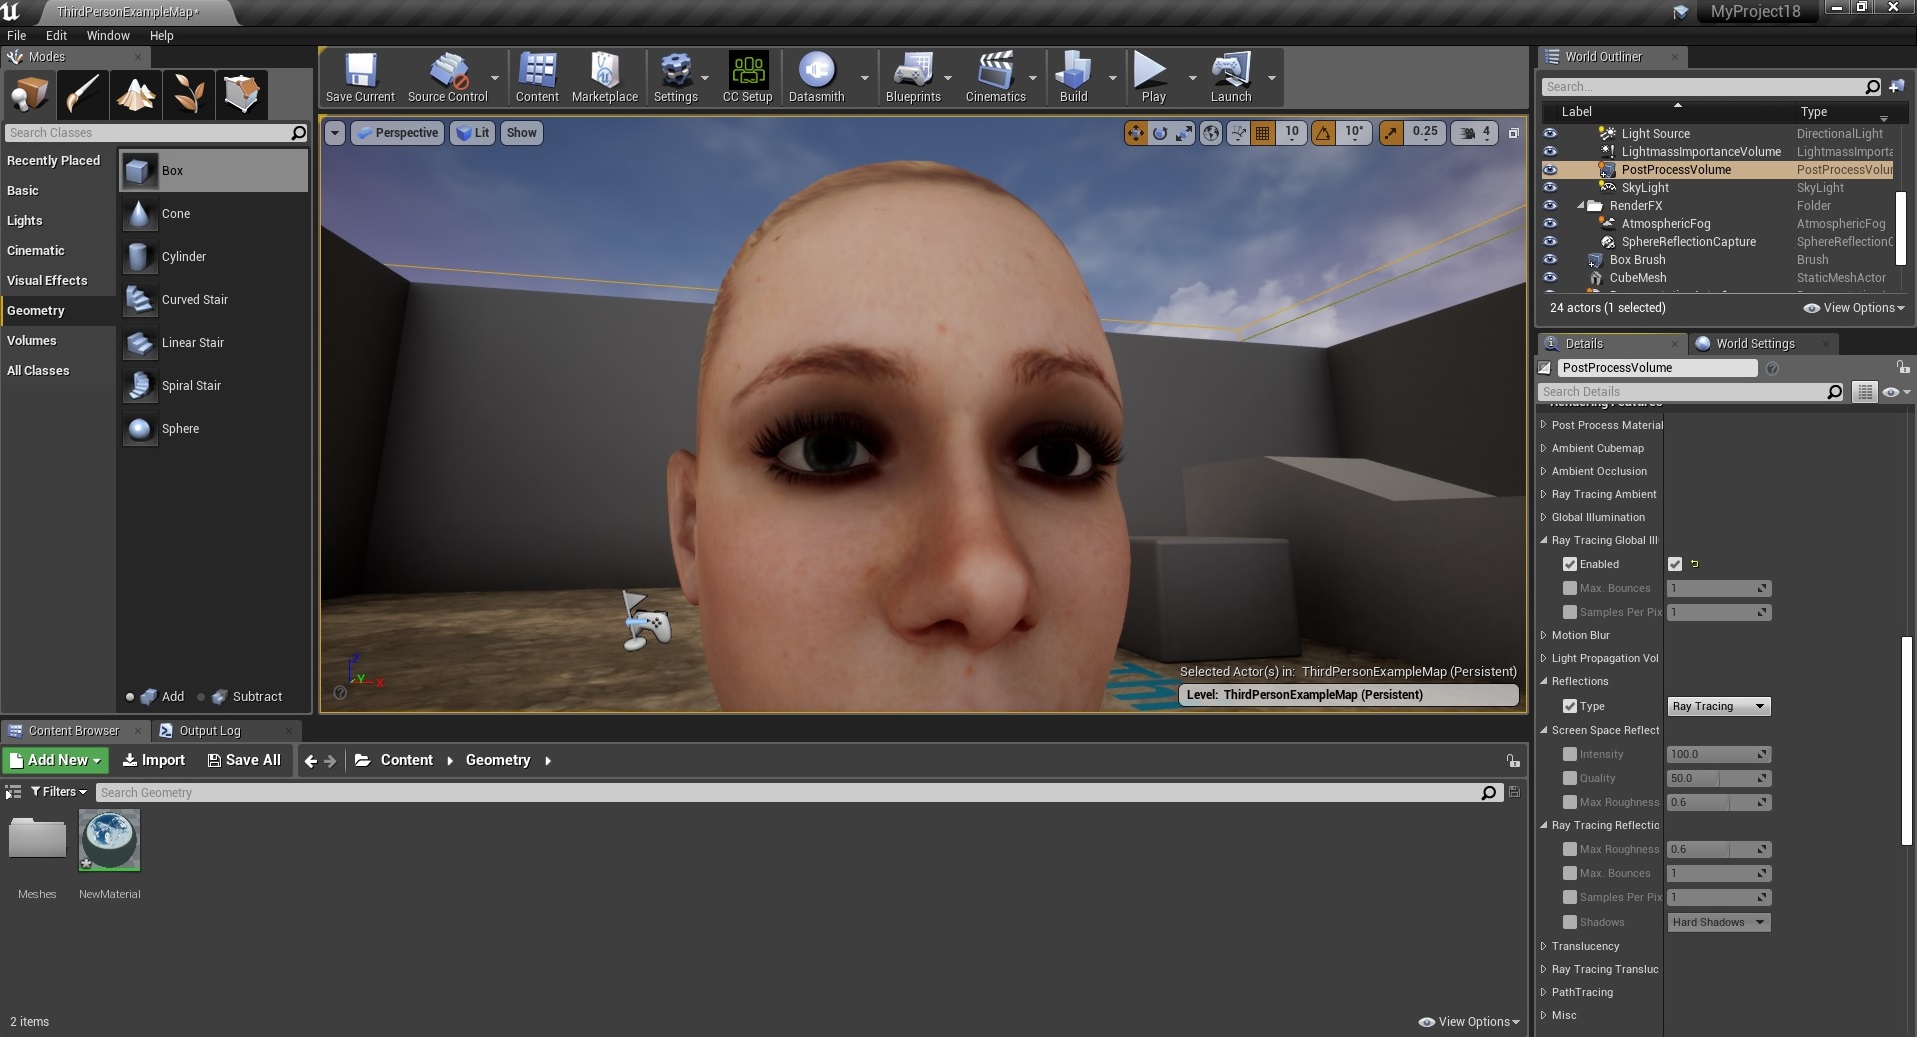
Step 5 - Initialize the plugin and setup the character
Currently there is not way to intelligibly assign the Blend Mode: Masked or Translucent. Therefore we recommend setting everything besides the eyelashes to Masked and only use Translucent for semi-transparent surfaces.
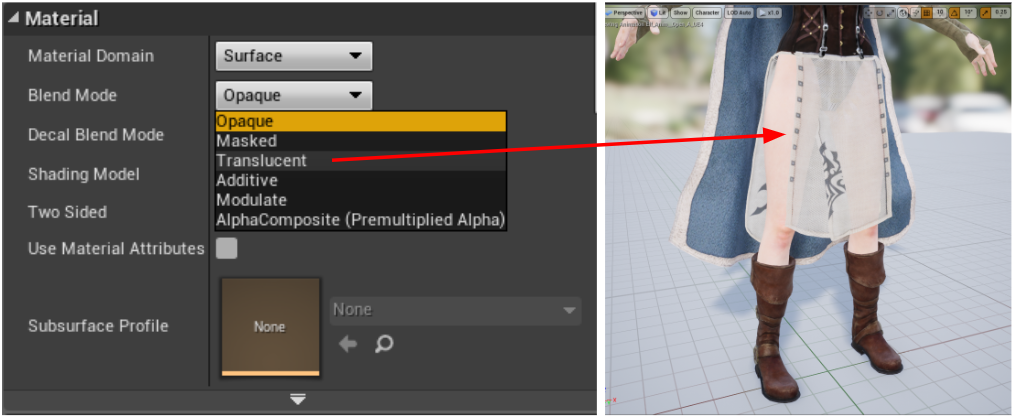
See this tutorial for more details: https://youtu.be/ZSBrR8L2lsA?t=565
|
|
By Miranda (RL) - 7 Years Ago
|
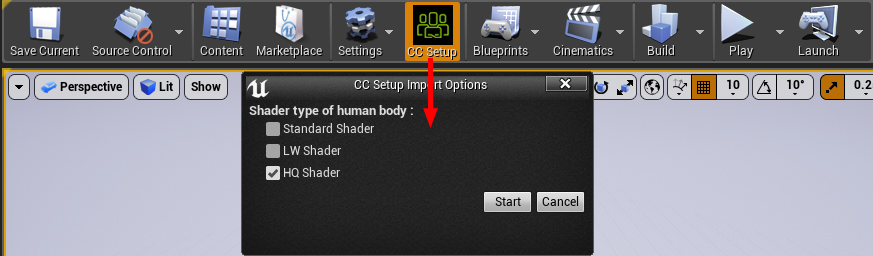
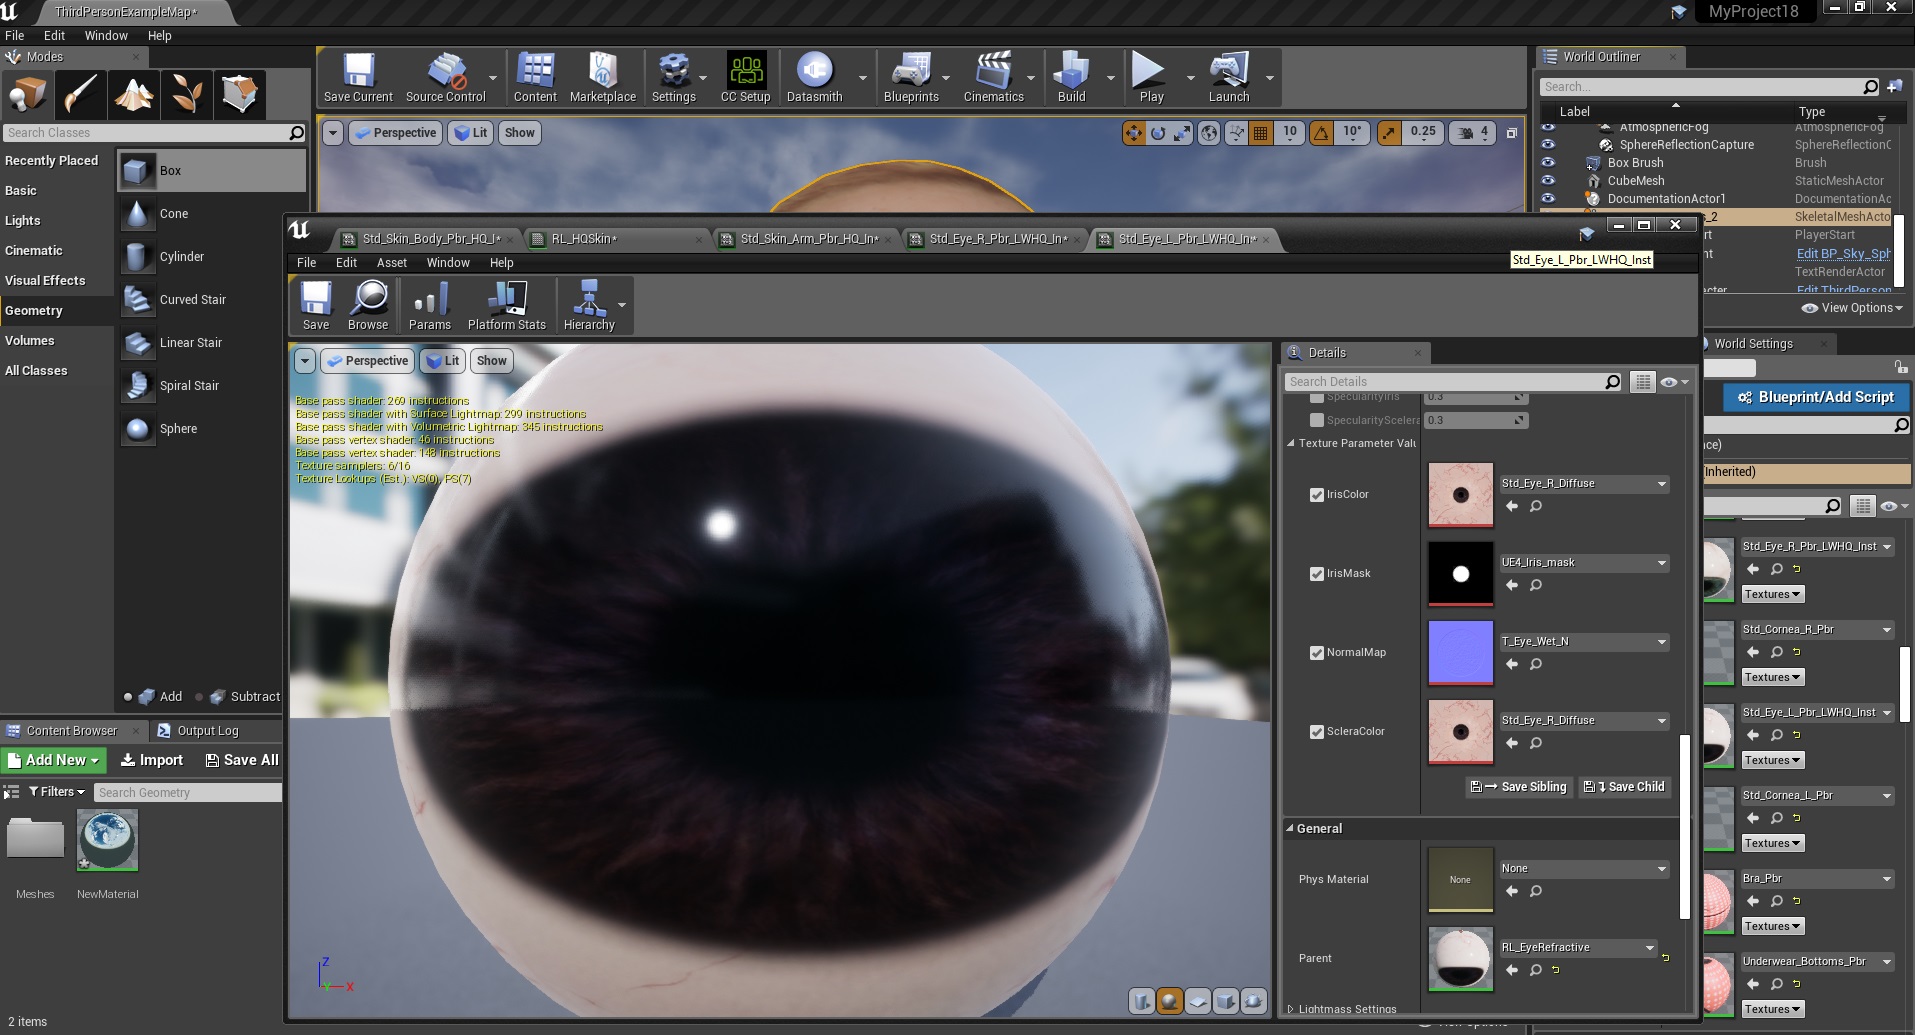
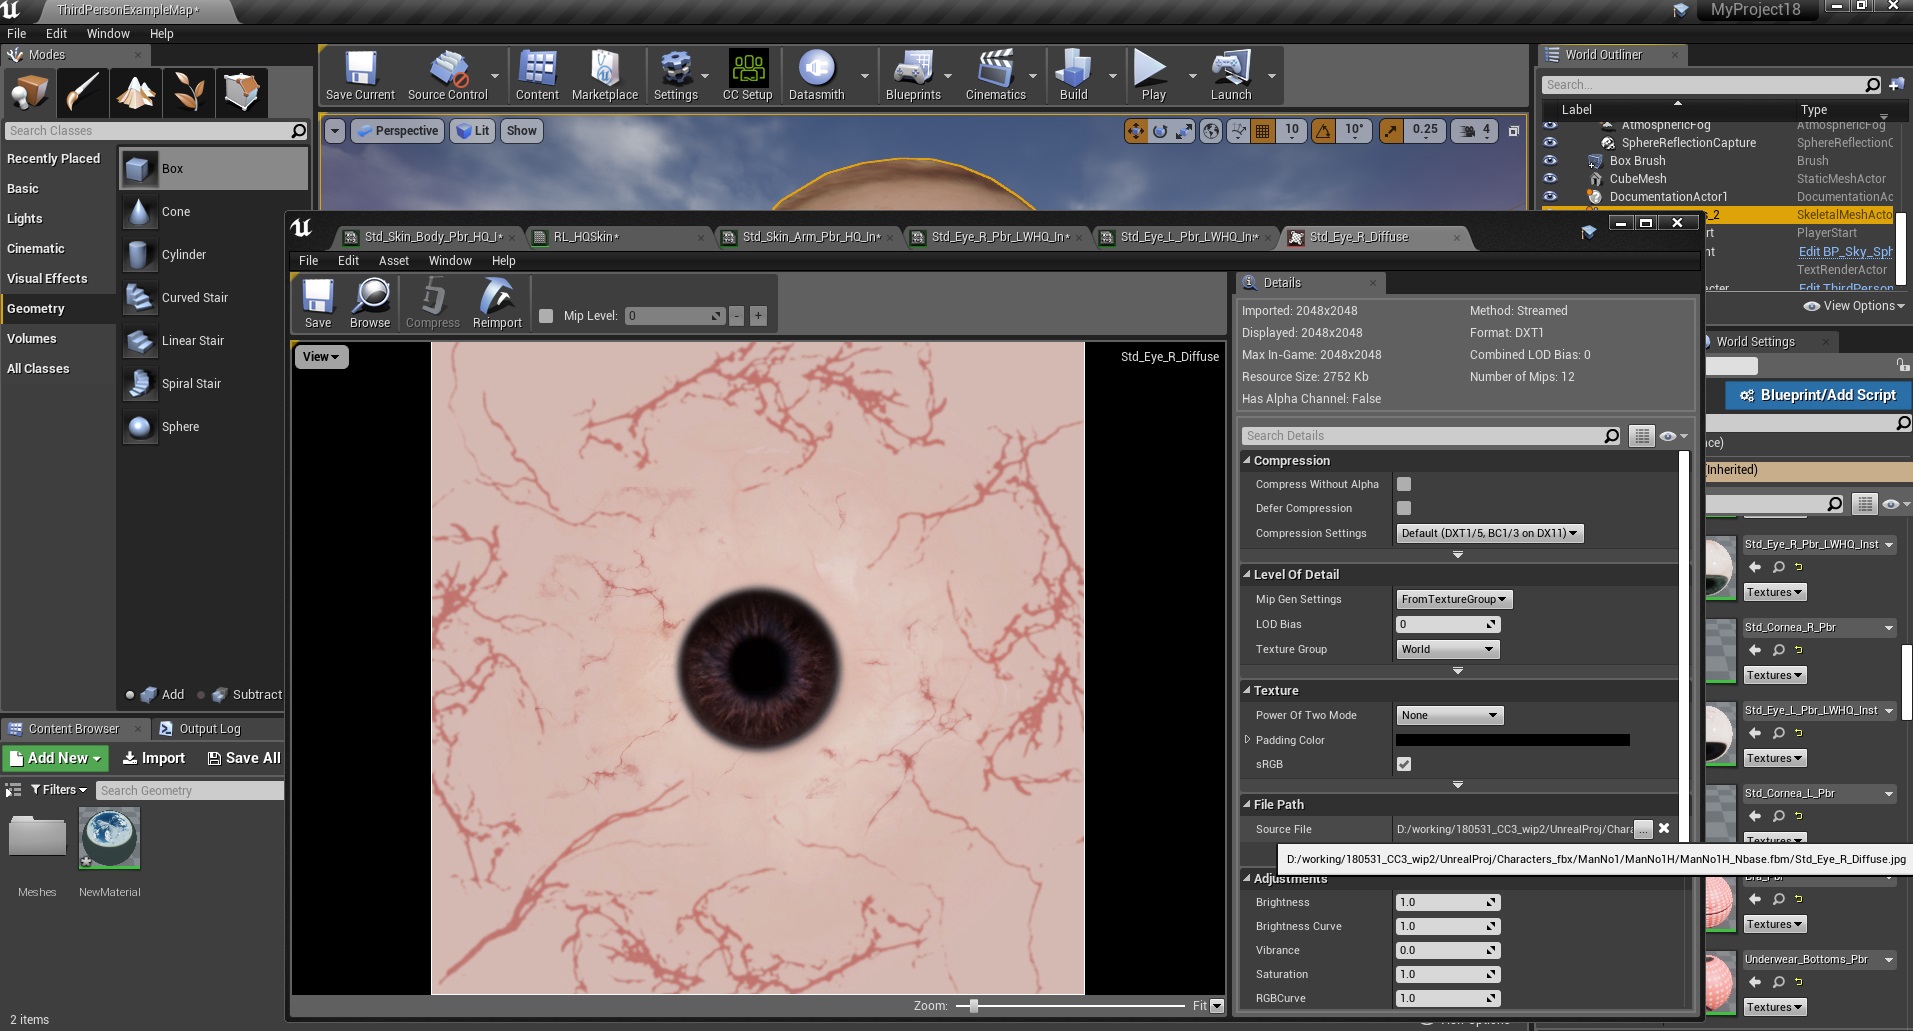
Three Shader Types & CC Shader Usage Instructions
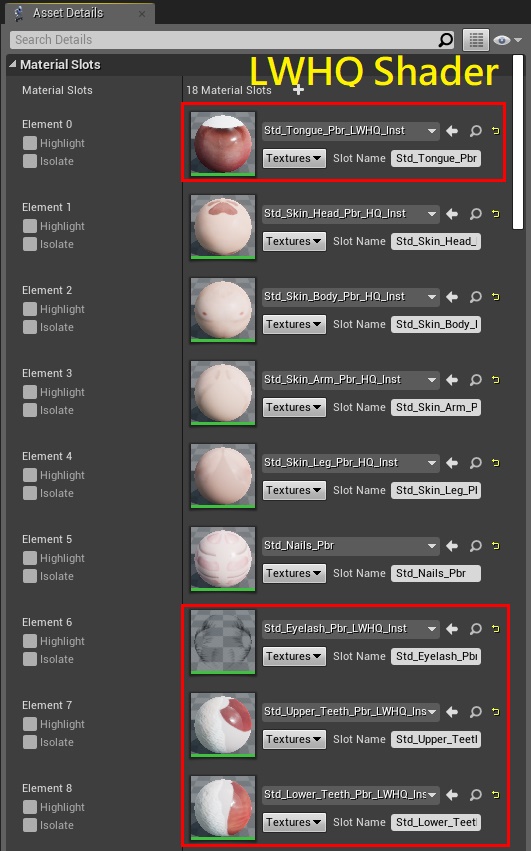
The CC shader has 3 settings: Standard, LW and HQ shader.
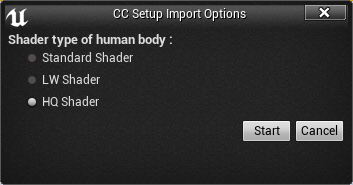
- The Standard Shader is the default Unreal shader which is suitable for non-player characters.
- LW Shader (lightweight shader) uses the Unreal Digital Human shader which is a light-weight shader at the UE Paragon game. It makes improvements for the skin shader while staying efficient, making it suitable for sidekick characters.
- Head & Body: LW shader
- Hair, Eyes, Tongue, Teeth: LWHQ shader
- HQ Shader (high-quality shader) uses the Unreal Digital Human shader which improves upon the appearance of the skin but at cost of system performance. This shader is suitable for the playable characters.
- Head & Body: HQ shader
- Hair, Eyes, Tongue, Teeth: LWHQ shader
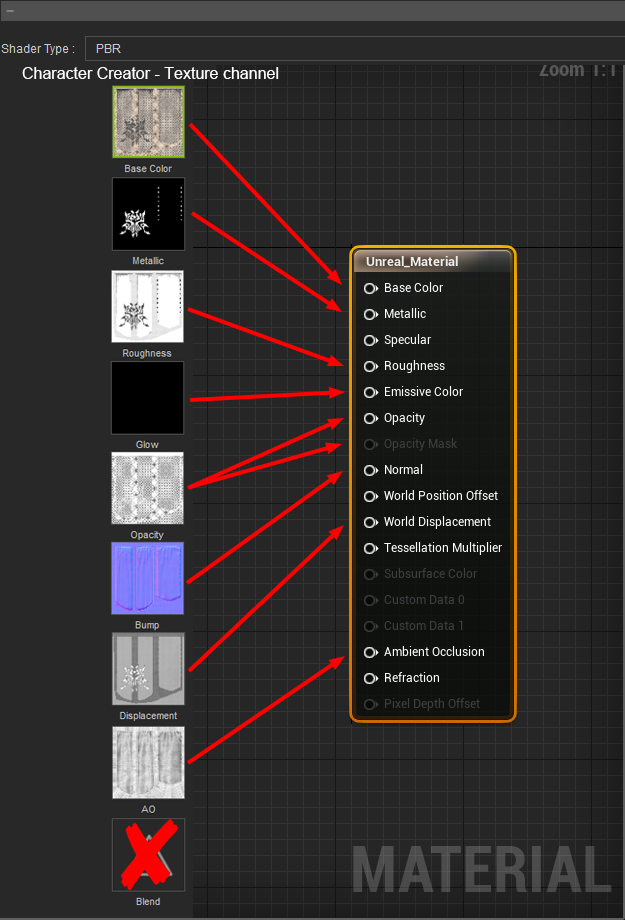
CC Shader Usage Instructions (take HQ Shader for head as an example):
- You can find the desired material from the plugin's Skin Shader directory, turn it into a material instance, and move it to the CC_Auto_Setup_Material_Instances folder to replace the original set.
- Edit the material instance and find the source material under General > Parent.
- The plugin will assign the needed textures to corresponding channels.
- Other channel textures have been made into a profile which the plugin will find within the CC_Shaders folder and does not need user input.
- On the top most portion of the Material Instance Editor, you will see several adjustable attributes. Here you have access to advanced settings such a color value, normal strength and reflectivity.
- You can switch materials at any moment by pressing on the CC Setup button on the top tool-bar.
|
|
By Miranda (RL) - 7 Years Ago
|
Important Considerations- There is only full support for Character Creator 3 G1 and G3 characters with FBX being the primary format of exchange.
- Characters and motions should all be exported from Character Creator. Be aware that characters processed directly from iClone or 3DXchange may need some manual re-assignments for motion re-targeting.
- Please process only one character at a time (including LOD), otherwise you may experience unexpected results. For example, exporting multiple characters can lead to conflicts with identical texture names.
- Make sure to organize different characters into separate folders in Unreal Engine, otherwise there could be conflicts between the various assets with identical names.
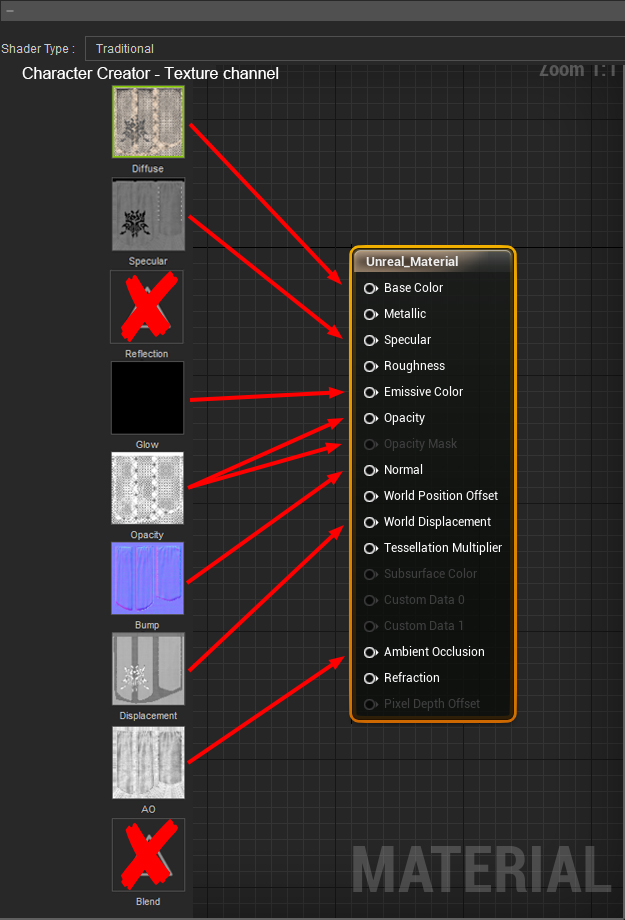
- Avoid using reserved key words that are crucial for the plugin's proper operation. These include the following: diffuse - ao - normal - metallic - roughness - glow - specular - transparency - hair - eyelash - ga_skin_body - skin - loop - LOD0~N - displacement - pbr - tra - opacity.
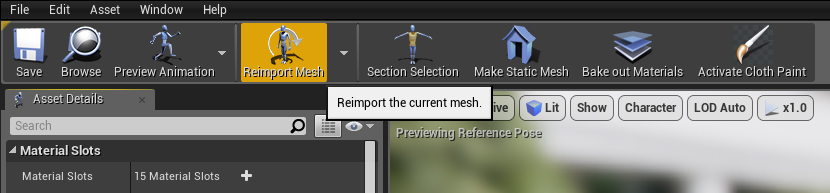
- You can fix the disappearance of morph data by opening up the Content Browser, selecting the skeleton mesh, and click on the Reimport the current mesh button.
- Unreal Engine's PBR shader does not support CC's blend channel.
- Unreal Engine's traditional shader does not support CC's blend and reflection channel.
- The plugin will search for _ORM texture files as a priority which is broken down into it's separate components by taking apart it's RGB channels:
- Red: Ambient Occlusion
- Green: Roughness
- Blue: Metallic
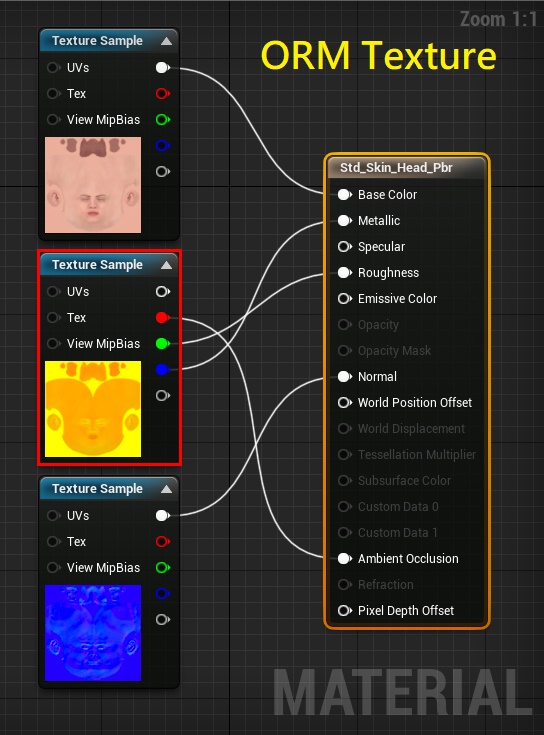
- If the _ORM texture is not found, then the plugin resorts to find separate maps for each material channel.
- LW and HQ shaders are only used for the head and body. Other parts of the body will adopt the LWHQ shader. Note: LW and HQ shaders are not suitable for cloths and accessories.
- LW and HQ shaders are meant for base level geometry and not intended for LOD meshes, in which case, we recommend using the "Standard Shader".
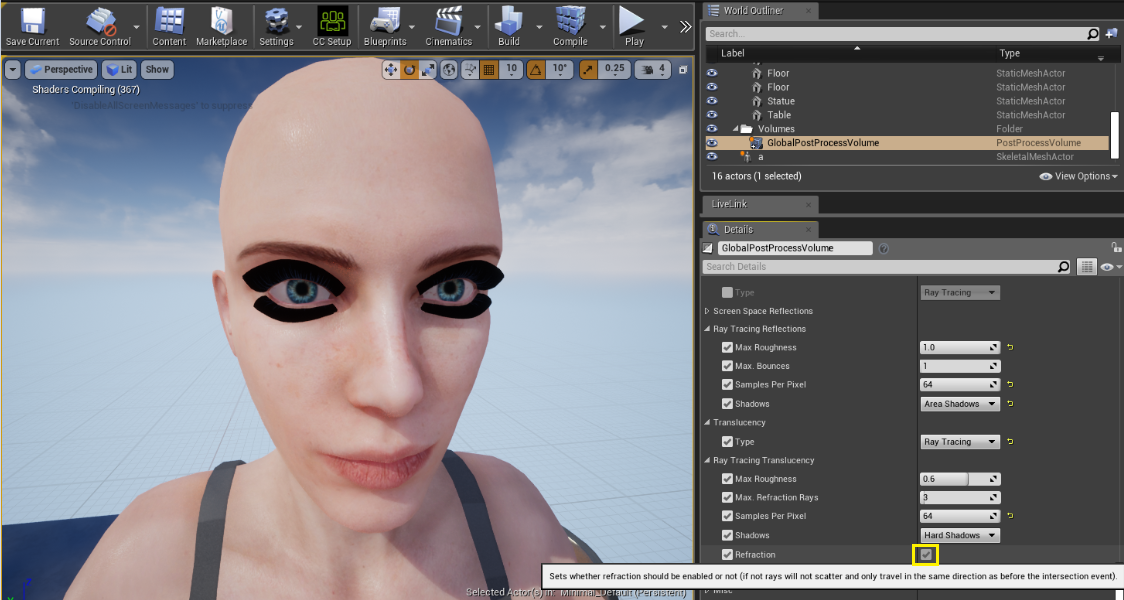
- In Unreal Engine 4.22, the transparency effect is not working when enabling the Refraction option under Ray Tracing Translucency, which is likely to be the defect in version 4.22. The workaround is disabling the Refraction option.
|
|
By StyleMarshal - 7 Years Ago
|
Hi Miranda ,
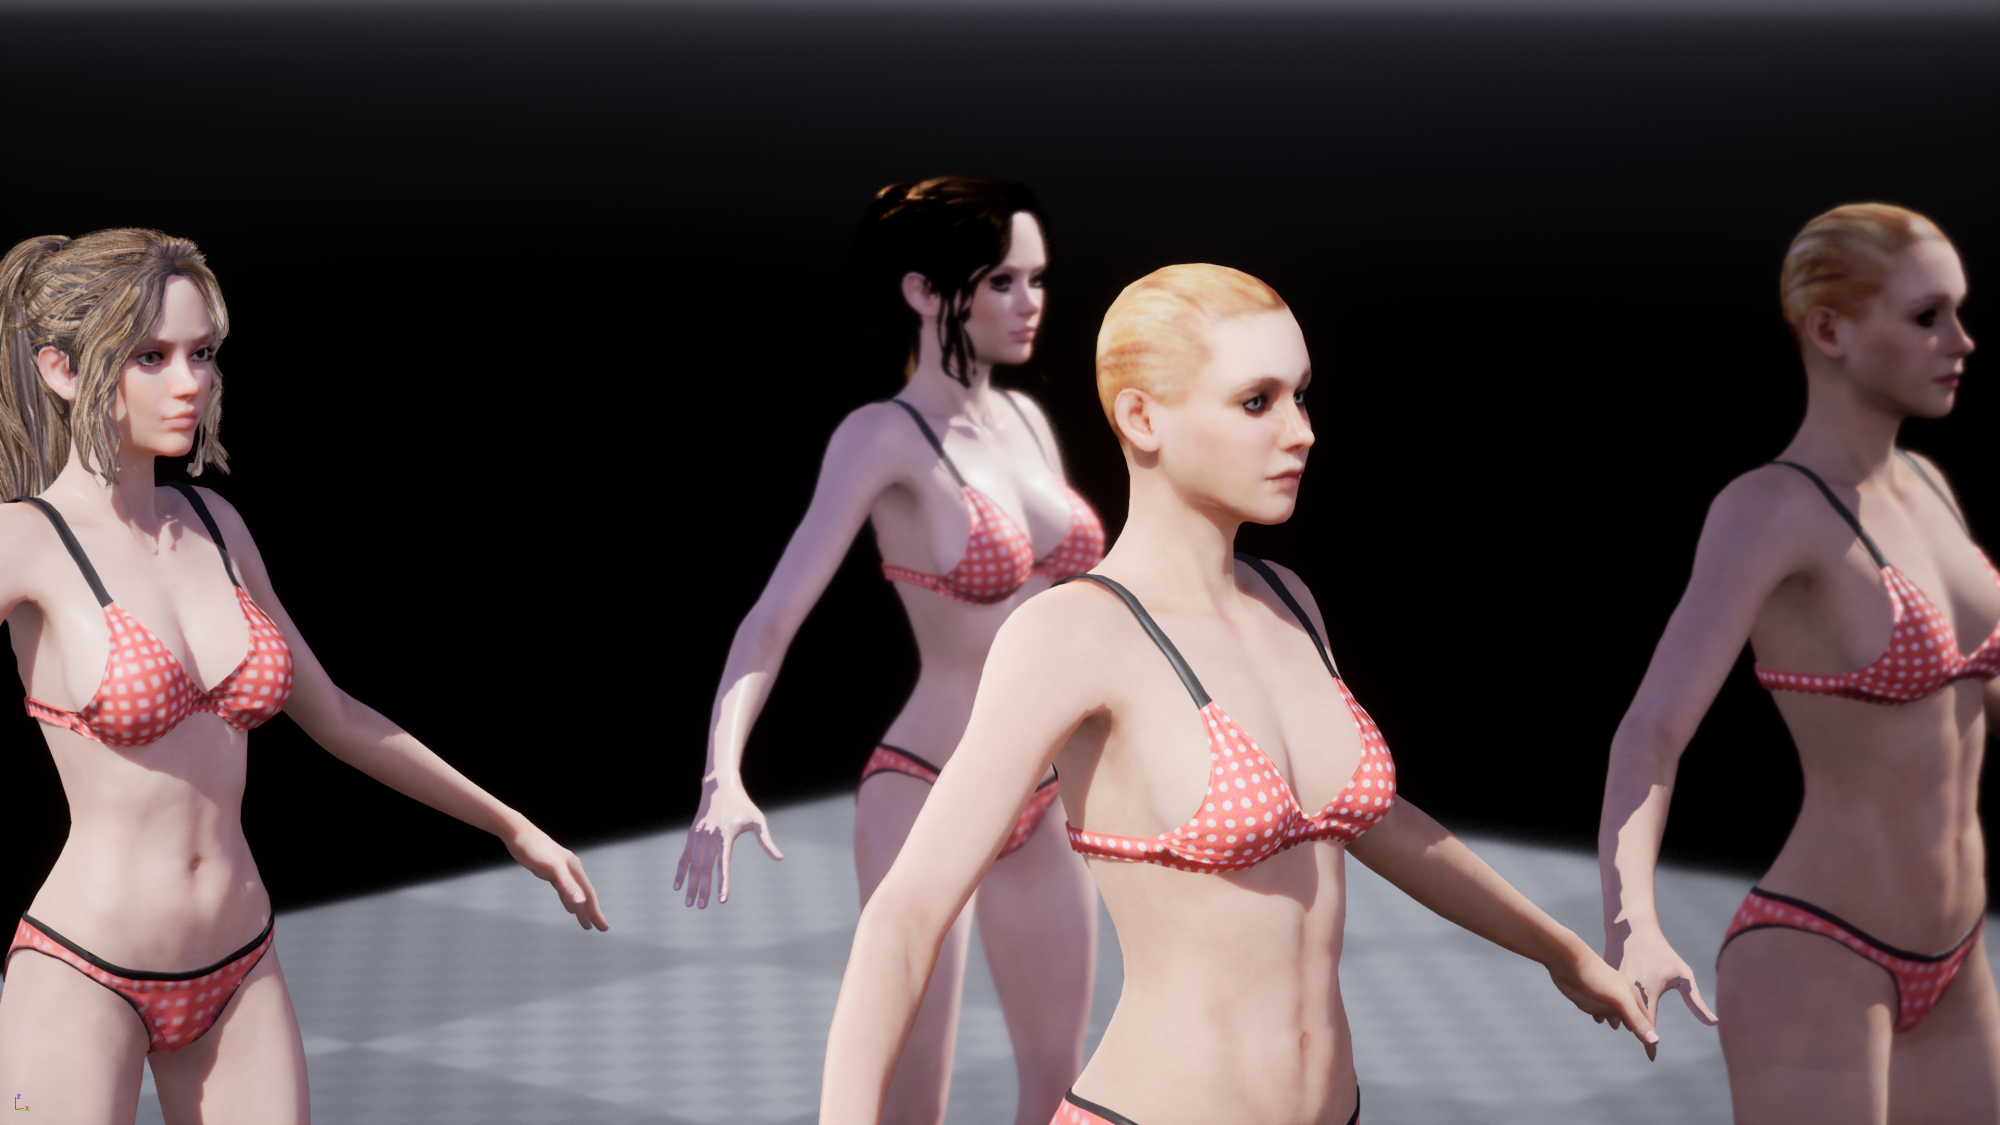
The new Script is sooo cool , I did some CC3 tests , see below :-)
|
|
By SWGames - 7 Years Ago
|
|
The hair shader looks very weird to me, it's has a lot of pixels and just dosen't look realistic at all, like it should in digital humans.
|
|
By zeoniknights - 7 Years Ago
|
|
Thanks for this but I really wish you had an easy way to change Hair Color. everything going golden for hair in Unreal 4 engine ??? I started with Red or mix.
|
|
By Miranda (RL) - 7 Years Ago
|
@Bassline303, they are beautiful!! Look nice in the demo project.
@SWStudio, hair is indeed the most difficult part of visual fine tuning.
Can you show us the image? From your words, you can try to enable TAA, or use the standard shader to see if it helps.
@zeoniknights, did you mean the color is auto tweaked during the import?
|
|
By SWGames - 7 Years Ago
|
I can't select the HQ Shader option in Unreal Engine 4.22 only the standard one works, I tried the same character in UE 4.21 and it works just fine, so there is something wrong or not working with the Digital Human shaders in UE 4.22.
It would be great if you could have a look at it.
|
|
By Miranda (RL) - 7 Years Ago
|
|
SWStudio (4/11/2019)
I can't select the HQ Shader option in Unreal Engine 4.22 only the standard one works, I tried the same character in UE 4.21 and it works just fine, so there is something wrong or not working with the Digital Human shaders in UE 4.22.
It would be great if you could have a look at it.
Hi SWStudio,
We are unable to reproduce this issue on our side.
Please help to check:
1) ff the Content folder is copied to the right directory for this specific Unreal Project.
2) if the plugin is the latest version CC_Character_Auto_Settings_Unreal_4.22_Beta_2.0
If it still goes wrong, please send us the Unreal project file (via Private Message), or record a short clip to let us see the process. Thanks.
|
|
By 1552249360 - 7 Years Ago
|
|
It seems don't support source engine?
|
|
By SWGames - 7 Years Ago
|
|
SWStudio (11.04.2019)
I can't select the HQ Shader option in Unreal Engine 4.22 only the standard one works, I tried the same character in UE 4.21 and it works just fine, so there is something wrong or not working with the Digital Human shaders in UE 4.22.
It would be great if you could have a look at it.
Yep thanks I fixed it, the CC_Shaders folder needs to be in the Content folder directly, but I really try to keep my Content folder as clean as possible.
EDIT: I have a question, will you add scatter textures for the head, so light can shine through ears? Here is what I mean: http://prntscr.com/ncn8gj
|
|
By Miranda (RL) - 7 Years Ago
|
|
1552249360 (4/14/2019)
It seems don't support source engine?
Hello,
I'm afraid not.
Since we don't provide the source code along with the plugin, you can only use the official UE to import characters, and bring the characters to your projects in source engine.
|
|
By Miranda (RL) - 7 Years Ago
|
SWStudio (4/16/2019)
EDIT: I have a question, will you add scatter textures for the head, so light can shine through ears? Here is what I mean: http://prntscr.com/ncn8gj
Yes, both LW Shader & HQ Shader support SSS. :)
|
|
By SWGames - 7 Years Ago
|
Miranda (RL) (17.04.2019)
SWStudio (4/16/2019)
EDIT: I have a question, will you add scatter textures for the head, so light can shine through ears? Here is what I mean: http://prntscr.com/ncn8gj Yes, both LW Shader & HQ Shader support SSS. :)
Oh nice, so I just need to use the HQ Shader and the scatter will work?
|
|
By jens_123957 - 7 Years Ago
|
I am having difficulties getting the plugin to work, After importing the model I have exported from Character Creator and saved all files. I try to run the CC Setup tool, but I get the message box telling me to "please press "Save All" of your project before executing CC setup".
I have done this many times, all data is saved, but the message still shows up.
What does the CC Setup tool actually do anyway, is it necessary to get the character working?
The software I am using
- Windows 10 Build 17763- Character Creator 3.04.1422.1 Trial
- Unreal Editor 4.22.1-6063286
- CC_Character_Auto_Settings_Unreal_4.22_Beta_2.0 plugin
|
|
By Miranda (RL) - 7 Years Ago
|
Hi jens_123957,
Can you record a short video to demonstrate the process?
jens_123957 (5/5/2019)
I am having difficulties getting the plugin to work, After importing the model I have exported from Character Creator and saved all files. I try to run the CC Setup tool, but I get the message box telling me to "please press "Save All" of your project before executing CC setup". I have done this many times, all data is saved, but the message still shows up. What does the CC Setup tool actually do anyway, is it necessary to get the character working? The software I am using - Windows 10 Build 17763 - Character Creator 3.04.1422.1 Trial
- Unreal Editor 4.22.1-6063286
- CC_Character_Auto_Settings_Unreal_4.22_Beta_2.0 plugin
|
|
By kmitchell.12catblackstudios - 7 Years Ago
|
|
Is there a way to override which standard material is used for clothing since that is just a standard material that we cant modify? Like is i put a RL_Cloth in the path is it possible?
|
|
By Miranda (RL) - 7 Years Ago
|
|
kmitchell.12catblackstudios (6/23/2019)
Is there a way to override which standard material is used for clothing since that is just a standard material that we cant modify? Like is i put a RL_Cloth in the path is it possible?
Hi Kevin,
We don't quite understand what you want. May you specify it? Any image or video as references will be appreciated.
|
|
By labs - 7 Years Ago
|
|
Hi - What's the status of the LiveLink plugin?
|
|
By Miranda (RL) - 7 Years Ago
|
|
labs (6/29/2019)
Hi - What's the status of the LiveLink plugin?
Hello! LiveLink Plugin will be launched in late July or early Aug.
|
|
By TonyDPrime - 7 Years Ago
|
Does anyone notice the eyes come in weird, first the right eye will have the proper color and then the left eye will be dark, almost black.
But then, there is this strange shadow over the iris, that you can't get rid of when raytracing. Just very bizarre, like a black fog.
I have tried numerous ways to resize the iris and pupil scale in the master material with no success, there is always a black foggy circle where the iris should be.
Then, even if you make everything into a solid white color there is still this black foggy iris shadow over the iris for some reason. I cannot hunt this thing down.
Also, the eyelashes seem to render okay, but the shadow cast by them is weird, it is cast solid....like as if the lashes are solid, without opacity.
Weird shadowing somehow with the eyes when raytracing.
|
|
By Miranda (RL) - 7 Years Ago
|
Hi Tony,
Any reference images?
Thanks!
TonyDPrime (7/11/2019)
Does anyone notice the eyes come in weird, first the right eye will have the proper color and then the left eye will be dark, almost black.
But then, there is this strange shadow over the iris, that you can't get rid of when raytracing. Just very bizarre, like a black fog.
I have tried numerous ways to resize the iris and pupil scale in the master material with no success, there is always a black foggy circle where the iris should be.
Then, even if you make everything into a solid white color there is still this black foggy iris shadow over the iris for some reason. I cannot hunt this thing down.
Also, the eyelashes seem to render okay, but the shadow cast by them is weird, it is cast solid....like as if the lashes are solid, without opacity.
Weird shadowing somehow with the eyes when raytracing.
|
|
By TonyDPrime - 7 Years Ago
|
|
Miranda (RL) (7/11/2019)
Hi Tony,
Any reference images?
Thanks!
Hi Miranda!
2 things
1) Dark Left-eye import issue - for some reason the import sets up the wrong eye texture for the Left eye. So we have -
(a) Std_Eye_L_PBR_LWHQ_Inst
(b) Std_Eye_R_PBR_LWHQ_Inst
Both are the parent materials having sub textures.
On import, it looks like the Right eye parent material pulls in the correct PBR eye diffuse texture that CC 3.04 had exported out with FBX, it is called "Std_Eye_R_PBR_Diffuse" on import.
Plugin assigns this to the UE4 Right-eye Sclera and Iris color correctly.
But the Left eye parent material pulls in another map, almost looks like some default CC Texture, called "Std_Eye_R_Diffuse".
And it looks like a default RL-created CC eye texture of some sort, that has a purple Iris.
And the plugin assigns this map to UE4 Left-eye Sclera and Iris color.
So ultimately it seems both the L and R eye should be inputting whatever L and R eye CC3 had exported out, buyt for some reason Left eye is inputting some default purple eye texture.
2) Eye and lashes shadow RTX GI issue-
This occurs whenever you apply Raytracing Global Illumination, in Post Processing.
RTX GI Off
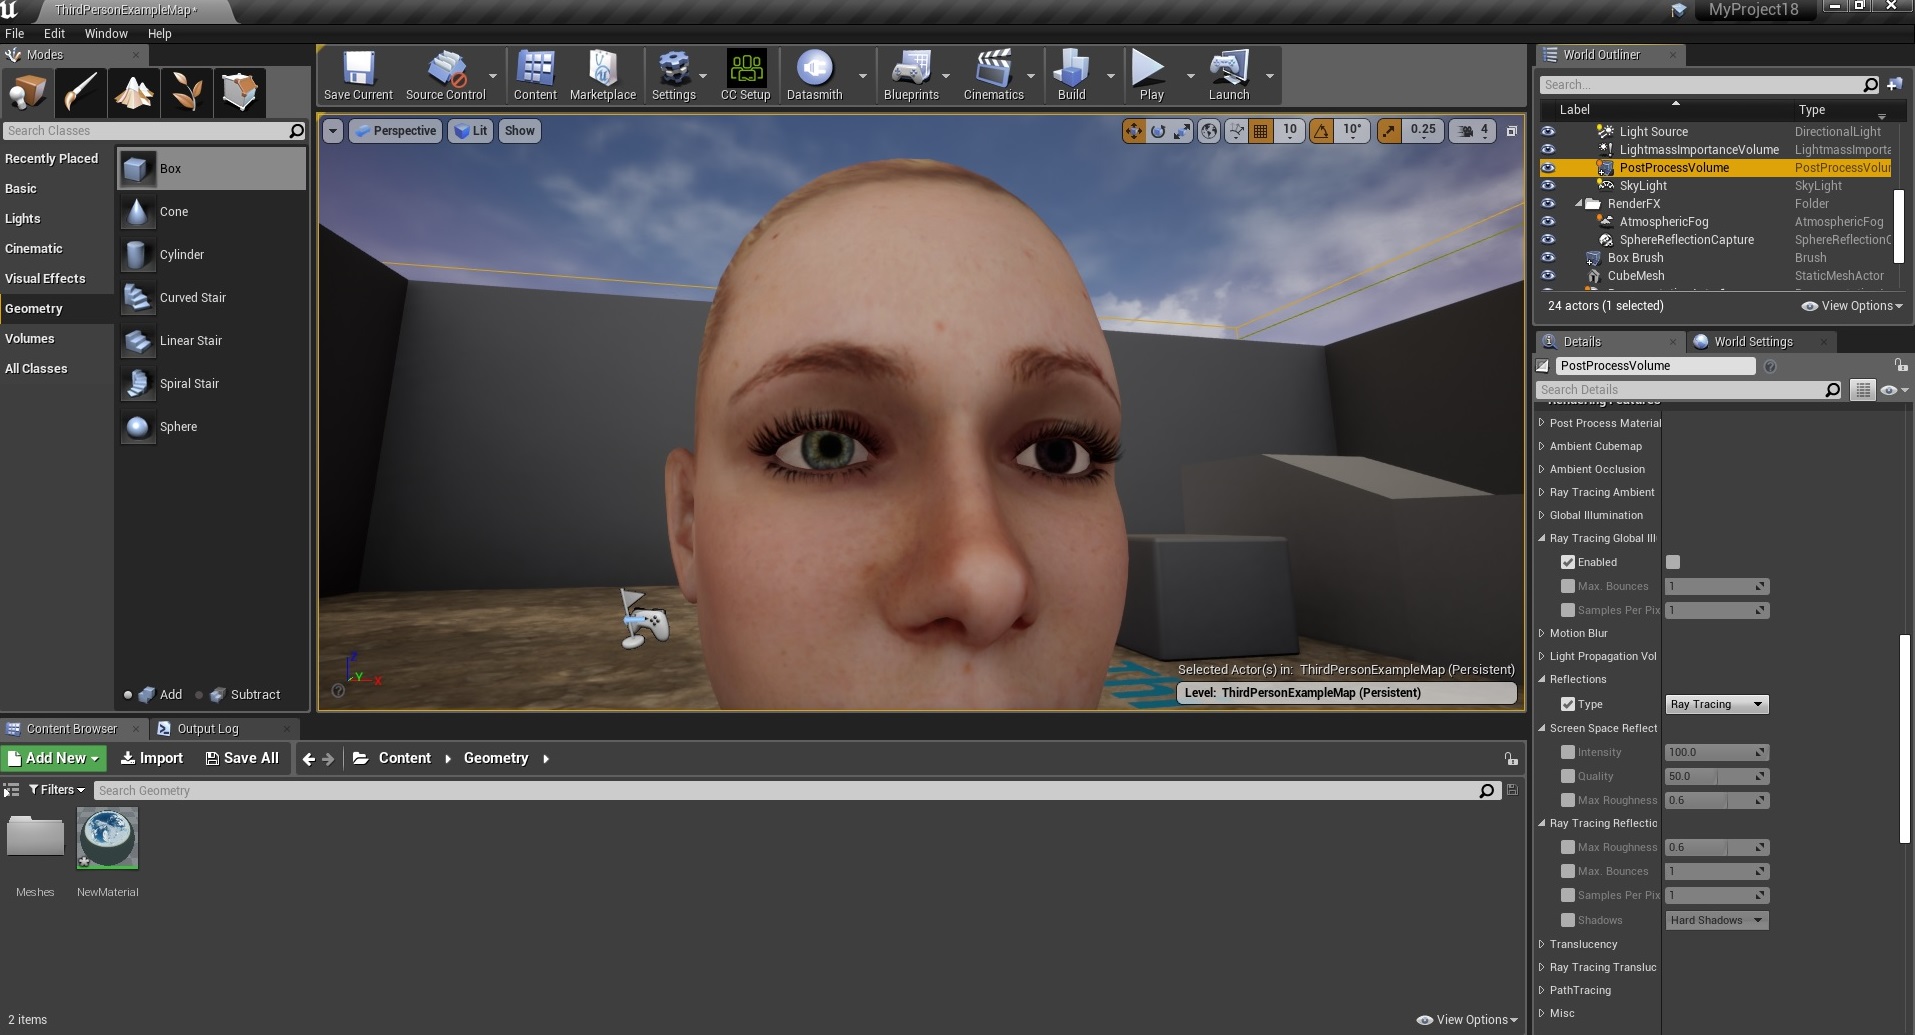
RTX GI On
Now, I would think just lighting scene better would fix, right?
But no, the shadow always remains, essentially continually darkening the eye geometry. You can flood the scene heavy and you will alwys see these 2 shadows, and the eye looks like it has a giant pupil. tweaking the scale doesn't help either because its a shadow that is always there.
Seems like this would be more a "Known Issue" with UE4 sort of thing.
|
|
By TonyDPrime - 7 Years Ago
|
Miranda, just another thing with this. GI will allow for those soft shadows in your scene, so you want to have this.
But maybe the eye material itself, meaning the parent, could be tweaked so that it doesn't have to receive those shadows or something.
Perhaps someone at RL could discuss with a contact at Unreal about whether there is, or could be, an option in a material to reduce the effect of GI has on it, as far as shadowing.
Because this may happen not just on the eye and lashes, but also on hair, or wherever transparency is used. So it could be a larger issue.
This is the avatar with a full point light on, with the scene having raytracing GI enabled. You can still see the shadow over Iris and lashes.
(BTW - all of these images I had left the defaulted purple Left-eye in, that is why there is a color difference.)

Thank you so much, Miranda!!!
EDIT - I can confirm that the shadow on the Iris is coming from the Cornea, because when I change Cornea from Translucent to Masked, and then set the Opacity to "0", which is completely see-through, the Iris and Eye then shows correctly without shadow.
So it is in fact a situation with Translucent materials and GI shadowing the Mesh, not the visual Translucency. Reminds me of iClone and its Alpha Threshold slider.
|
|
By TonyDPrime - 7 Years Ago
|
Hey Miranda!
Guess What!!!
UE4 has a 4.23 Preview, and the shadowing issue with Raytraced Global Illumination seems to be fixed.
So, am not getting the shadows on lashes or iris.
Only weird issue I am still yet seeing, but in the engine itself, is that Mirrors don't handle Translucent materials yet, so anything that has Translucent (ie Hair, Cornea, Lashes) gets reflected back as black solid mesh.
Hopefully that gets rectified soon on the Unreal Engine end of things.
|
|
By Miranda (RL) - 7 Years Ago
|
Hello Tony!
Thank you for sharing, and keeping updating us your findings.
About the wrong texture on the left eye, it's verified on our side, and will be fixed in the next version of Auto-setup tool.
The workaround at the moment is to manually assign the texture, or apply the standard material ball.
|
|
By TonyDPrime - 7 Years Ago
|
Hi Miranda,
Can you ask if the team it has ability to make a 4.23 Preview version for the plugin?
Currently works on 4.22 (all versions), but on 4.23 Preview it gives message that the scene needs to be rebuilt with 4.22 in order to use Reallusion's latest plugin.
THX!
|
|
By Miranda (RL) - 7 Years Ago
|
Hi Tony,
The Preview version may not be stable, and some functions might be changed afterward, so we will integrate with the official version. Hope you understand. :)
TonyDPrime (7/23/2019)
Hi Miranda,
Can you ask if the team it has ability to make a 4.23 Preview version for the plugin?
Currently works on 4.22 (all versions), but on 4.23 Preview it gives message that the scene needs to be rebuilt with 4.22 in order to use Reallusion's latest plugin.
THX!
|
|
By magikshow - 7 Years Ago
|
|
how to transfer audio from iclone to unreal engine 4?
|
|
By Miranda (RL) - 7 Years Ago
|
|
magikshow (7/27/2019)
how to transfer audio from iclone to unreal engine 4?
Hello magikshow,
May you specify what audio you are referring to? Lipsync?
|
|
By magikshow - 7 Years Ago
|
|
From MotionPlus
|
|
By Miranda (RL) - 7 Years Ago
|
|
magikshow (7/29/2019)
From MotionPlus
iClone doesn't support exporting the sound from MotionPlus directly, instead, iClone supports exporting sound from "the whole project" into a single audio file.
|
|
By TonyDPrime - 7 Years Ago
|
Hi Miranda!
2 Questions-
1) can you ask team if they can expand out shader Blend to have 2 or 3 maps available, as opposed to just the 1?
2) I can't, using latest Live Link shaders, seem to get any mesh-smoothing effect from the Displacement Tessellation.
Is it supposed to be working or is it not working? Just wasn't sure because adjusting settings don't seem to do anything, even when activating texture map.
Thank you! Can't wait for the new CC3 suite of creation tools/shaders coming.
|
|
By magikshow - 7 Years Ago
|
what's the name of this knight's outfit? can't find on the market!
https://www.youtube.com/watch?v=s7uEjtmyM7A
|
|
By TonyDPrime - 7 Years Ago
|
|
TonyDPrime (7/30/2019)
Hi Miranda!
2 Questions-
1) can you ask team if they can expand out shader Blend to have 2 or 3 maps available, as opposed to just the 1?
2) I can't, using latest Live Link shaders, seem to get any mesh-smoothing effect from the Displacement Tessellation.
Is it supposed to be working or is it not working? Just wasn't sure because adjusting settings don't seem to do anything, even when activating texture map.
Thank you! Can't wait for the new CC3 suite of creation tools/shaders coming.
Miranda, as an update I had turned off Displacement in the Master Skin mat
When I reactivated, Tess and Displacement now are both working in the material instances. Tess works great, the masks are doing there job great!!!
YEY!!!!
|
|
By Miranda (RL) - 7 Years Ago
|
|
TonyDPrime (8/2/2019)
Miranda, as an update I had turned off Displacement in the Master Skin mat
When I reactivated, Tess and Displacement now are both working in the material instances. Tess works great, the masks are doing there job great!!!
YEY!!!!
Hello Tony,
I sent you an email two days ago to double confirm if it's related to Auto Setup 1.0, because 1.0 is not compatible with CC yet. Good to know that it works now. :P
|
|
By Miranda (RL) - 7 Years Ago
|
Hi magikshow,
You are good at observation :P
It comes from our Armor pack, which will be released in Q3.
|
|
By Miranda (RL) - 7 Years Ago
|
Miranda (RL) (8/2/2019)
Hi magikshow, You are good at observation :P It comes from our Armor pack, which will be released in Q3.
Hello!
It's available now >> https://forum.reallusion.com/420060/Fantasy-Playset-Paladin-Now-Available
|
|
By kmitchell.12catblackstudios - 7 Years Ago
|
Miranda (RL) (6/24/2019)
kmitchell.12catblackstudios (6/23/2019)
Is there a way to override which standard material is used for clothing since that is just a standard material that we cant modify? Like is i put a RL_Cloth in the path is it possible?Hi Kevin, We don't quite understand what you want. May you specify it? Any image or video as references will be appreciated.
Well for the import currently you auto apply a skin material instance to the skin that is based off a material master. You do the same for hair. I have custom modifications that I have added to these material masters that work with my games character customization setup to allow material parameters to be changed by the UI. But for the clothing objects there is a simple material created for each clothing material. So when I import I have to go though and manually apply a material instance to each of the clothing and then setup the texture links for the clothing. I was wondering if there was a way to have a clothing master that auto applys to clothing instead of making a standard material for each clothing peice.
|