|
By Miranda (RL) - 9 Years Ago
|
|
Hi everyone,
A Generation of PBR-enabled 3D Characters Arrives!  Reallusion has enhanced Character Creator 2 into a better character design tool infused with the power of Physically-based Rendering (PBR). Character Creator 2 releases before the arrival of iClone 7, letting those who were unable to join the iClone 7 Early Access have a taste of the high visual standard offer by PBR shaders. With the brand new PBR-based Cloth Appearance Editor, you can choose customized input maps, embedded textures, and material generators to quickly create amazing set of materials. The workflow pipeline with other 3D tools/platform is improved as well, for instance, users are able to export Unreal-rigged characters from CC and apply Mixamo motions in Unreal. In addition, one can publish CC Characters to Sketchfab for animated real-time web sharing. What's more, the content usage and creation becomes more flexible with options of conforming or not conforming skinned contents with the ability to edit mesh for accessories. New Features
Visual Enhancements: Physically-based Rendering (PBR) & Image-Based Lighting (IBL)- New real-time Physically-based Rendering (PBR) shading system for rendering realistic Metallic and Roughness effects.
- With the new Image Based Lighting (IBL) system, one can use an HDR image to simulate real-world lighting. IBL has the following features:
- Supports independent UI for Adjust color
- IBL Light hot key: hold Shift+I for light rotation.
- Select different IBL effects from the Atmosphere panel.
- Complete light adjustment control.
- Provided a Visual panel for selecting whether to use the real-time AO (Ambient Occlusion) or the user's imported AO for adjustment.
- Provided a Visual panel for adjusting better shadows let models pop with robust 3D look and feel.
>> Know more about Visual Enhancements. Export- New easy button for uploading to Sketchfab.
- Export to FBX now supports Unreal Engine 4 skeletal structure and normal direction correction for external 3D solutions.
- One can now freely choose to package all related files when exporting to FBX.
- Export PBR iAvatar for Character Creator 2 & iClone 7 or export non-PBR version iAvatar for Character Creator 1.5 & iClone 6.5.
>> Know more about Export. Content Creation & Usage
- Clothes, hair, and shoes can now enable or disable Conform Clothing, letting one choose to have the object maintain its original form or conform to the shape of the body underneath.
- When enabled and using Reset to Default, the shape will return to its auto-conformed state.
- When disabled and using Reset to Default, the shape will return to its content default state.
- Mesh Editor now works for accessory mesh editing, greatly enhancing flexibility.
- The new CTRL+A hotkey under Mesh Editor mode can select all of the mesh faces at once to increase productivity.
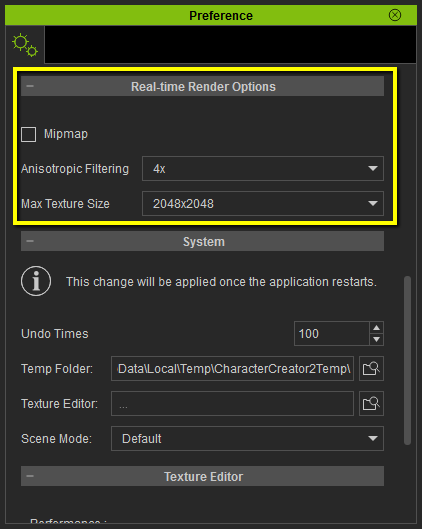
>> Know more about Conforming Options & Accessory Mesh Editing. Preference- New Zoom to Mouse Position option under Preference allows one to zoom in out of the scene while centering on the cursor.
- New Quick Thumbnail Generation can save more time when adding objects to the library due to more performant screenshot and thumbnail creation.
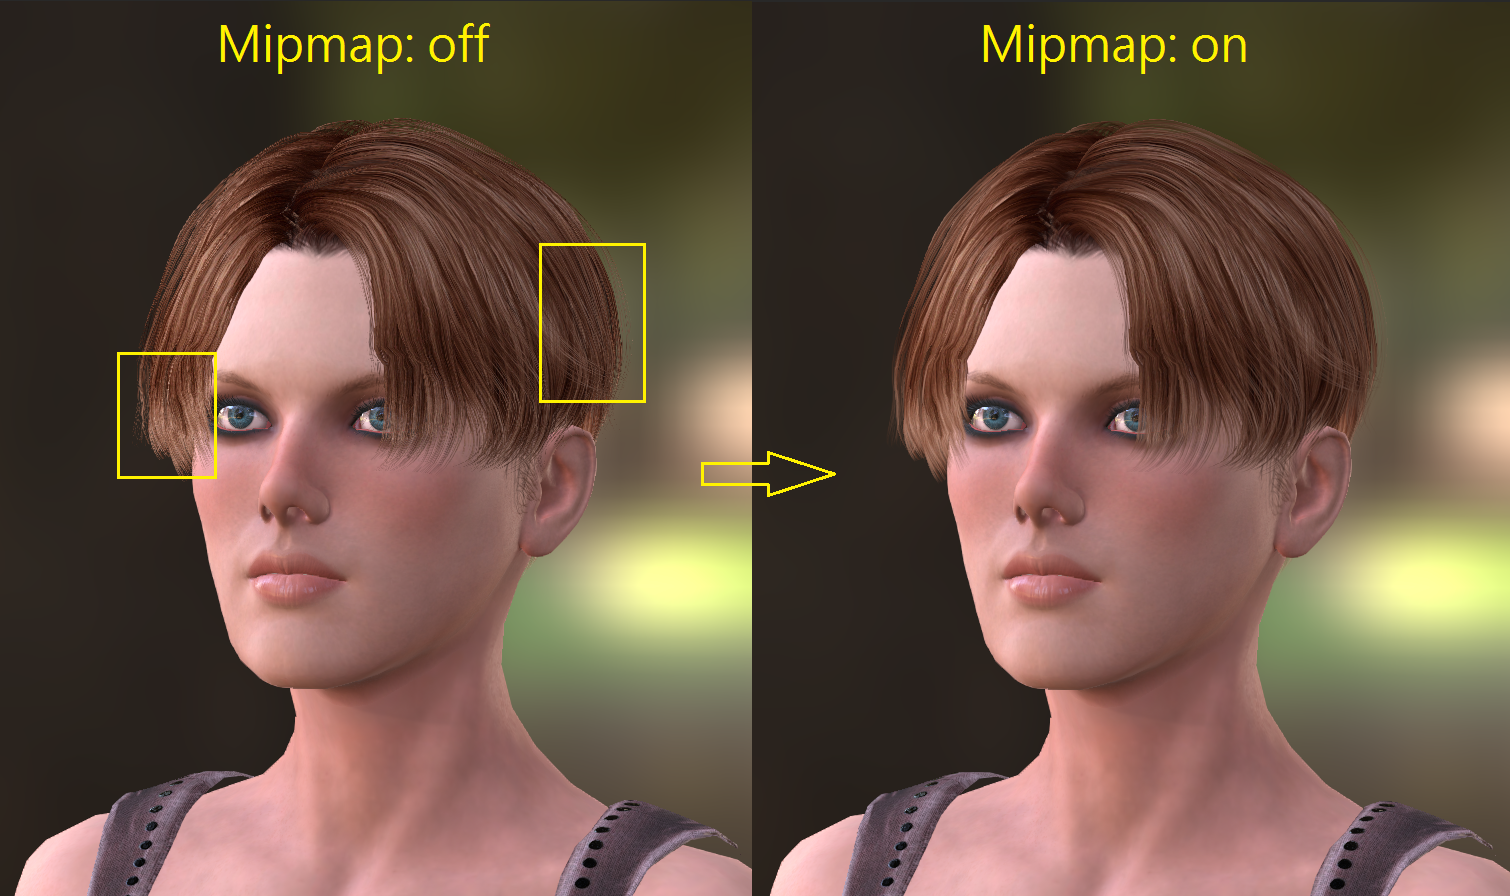
- Turning on Mipmap gives much better anti-aliasing visual result, especially you can see smooth hair render on fine detailed meshes.
>> Know more about Preference. Enhancements- Appearance Editor can switch between Traditional/PBR shading systems.
- Appearance Editor allows importing of SBSAR files.
- Appearance Editor allows the saving of presets which can be stored and reapplied later.
- Appearance Editor can now switch between sub-graphs for convenient operation.
>> Know more about Appearance Editor Enhancements. - Expanded the number of male and female poses under the Calibration menu for optimal character presentation.
- A CC project can now be set as the default project scene upon initiation of Character Creator. (Feedback Tracker)
- Added parameters under the Modify panel to edit the displacement settings.
- Product version number will now be displayed in the lower left-hand corner of the thumbnails inside the Content Manager.
>> Know more about those Enhancements. Fixed Bugs(from Open Beta Program)
- Sync to Sky becomes disabled after the Atmosphere is swapped out. Now the user can swap out the Atmosphere and Sync to Sky will re-enable itself for improved usability. (Feedback Tracker)
- Switching between ccProjects will not change out the environment, only the avatars.
- IBL light hotkey has changed to Shift+I eliminating the incompatibility issues of international keyboards.
- Fixed the issue where AO maps will only effect IBL created shadows. (Feedback Tracker)
- Fixed an issue where the glow effect disappears after importing an image into Material > Texture Settings > Glow channel. (Feedback Tracker)
- Fixed an issue where the texture map disappears after importing a PNG file into Material > Texture Settings and using Adjust Color > Image Invert. (Feedback Tracker)
- Fixed a crash issue when adjusting the iris color in Appearance Editor and saving the avatar. (Feedback Tracker)
Any issues should be reported to the Feedback Tracker for efficient problem resolution. Know more about Technical Issues Thread.
Hardware Requirements
DirectX 11 is required, and the other hardware requirements of Character Creator 2 is exactly the same as Character Creator 1's. Please find the details HERE. Performance Optimization
- Appearance Editor: When turning on the Appearance Editor for a content which already uses multiple Color IDs, the program will prompt you how many channels are being used, which helps to determine which Substance to load based on the real channel demand.
- Mipmap: Mipmapping is a technology that processes texture files into progressively lower resolution sequence of images. Since mipmapping is calculation intense, turning off Mipmap saves around 40% of time in opening a project or loading clothes. We recommend turning on Mipmap when you perform showcase screenshots.
- Quick Thumbnail Generation: If you would like to speed up the time in saving contents, you can consider turn on the Quick Thumbnail Generation
>> Know more about Performance Optimization. Additional Information for iClone 6.5 / CC 1.5 Users - CC 2.0 is mainly designed to work with PBR-based iClone 7, however, all iClone 6 PRO users are welcomed to experience the PBR effects in CC 2.0, along with other new features.
>> Click HERE to know how to get your CC 2.0 license - CC 2.0 will be installed as an independent executable program with its own content folder, which will not overwrite the official CC 1.x program, so everything you work in CC 2.0 won't affect the current projects.
- CC 2.0 provides an option to export iClone 6 & CC 1.5 compatible iAvatar, but there are some limitations.
>> Click HERE to know more about the CC 1.x content usage, Traditional and PBR content conversion, limitations and workaround of iAvatar exporting, etc.
Manual & WhitepaperTutorials- Intro to Light and Shadow
- Image-based Lighting & Sky Sync
- Non-PBR to PBR Material Conversion
- Tweak Material Color and PBR effects using CC 2.0 Appearance Editor
- Unreal Engine 4 Rig Export
- Quick Mixamo Import to Unreal 4
And much more... stay tuned! User Showcase
See users' creations during CC 2 Open Beta Program HERE. Post your new creations HERE.
|
|
By Miranda (RL) - 9 Years Ago
|
New Feature 1 - Visual Enhancements
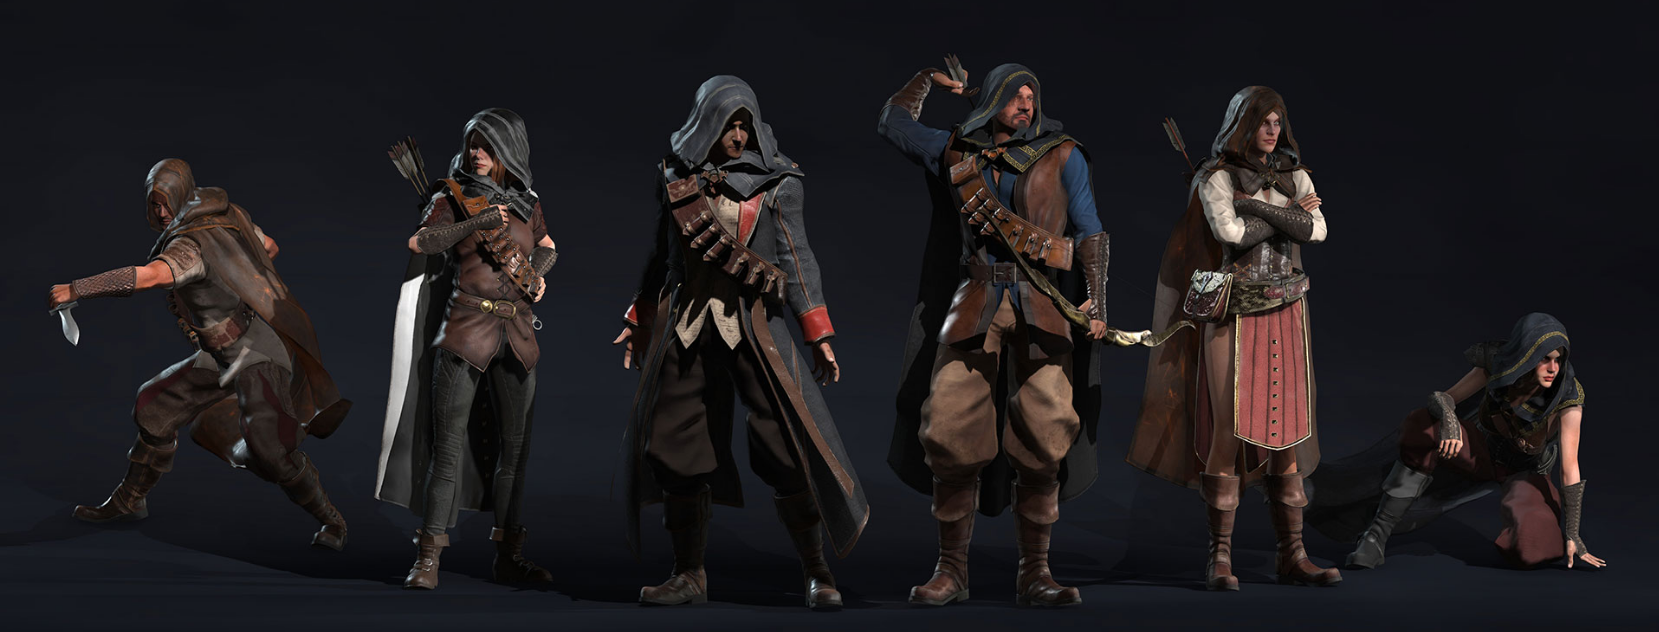
* This image is from the content pack of Fantasy Playset - Assassins.
New real-time Physically-based Rendering (PBR) shading system for rendering realistic Metallic and Roughness effects. With the new Image Based Lighting (IBL) system, one can use an HDR image to conveniently simulate real-world lighting. Others
Check webpage HERE.
* Please be noted that the features above have been introduced to users in the CC 2.0 Open Beta Program, so we make the hyperlinks for easier finding the information. If there is any spec-wise updates, we will mark it on those posts directly.
|
|
By Miranda (RL) - 9 Years Ago
|
New Feature 2 - Export
Check webpage HERE.
* Please be noted that some features above have been introduced to users in the Open Beta Program, so we make the hyperlinks for easier finding the information. If there is any spec-wise updates, we will mark it on those posts directly.
|
|
By Miranda (RL) - 9 Years Ago
|
New Feature 3 - Conforming Options & Accessory Mesh Editing
Conforming Options
One advantage of using Character Creator is that apparels and accessories can be made to fit around the shape of the character.For Character Creator 2.0, we have improved the said design by adding the Enable Conforming option. This allows one to decide whether or not an article on the character should shape according to the underlying body shape. This capability is very much need for non-conforming objects such as hair, hard material apparels (armour etc.), hard material accessories (belt etc.) Steps of Operation in Conforming Clothing- Click on a target apparel, hair, or shoes and open the Conform Clothing window.
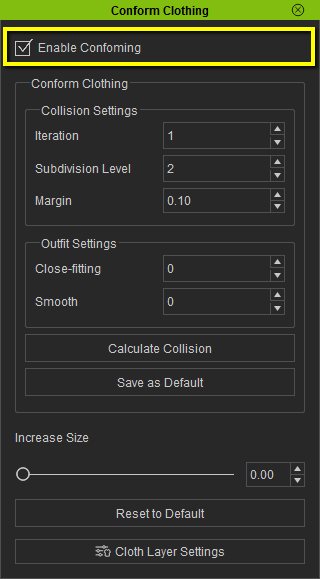
- Decide whether or not to use Enable Conforming:
- Checked (default setting)
- The asset will conform to the underlying body shape.
- When enabled and using Reset to Default, the shape will return to its auto-conformed state.
* If the adjusted shape is not satisfying or if you distort the meshes too much that you want to retrieve the original conforming result, you can use this function to retrieve the auto-conforming result.
- Unchecked
- The asset will maintain its original shape ignoring the underlying body shape.
- When disabled and using Reset to Default, the shape will return to its content default state.
- If conform is disabled and body shaping is complete, then one can rely on Edit Mesh Mode to adjust the details of the geometry.
When to Not Conform the Cloth
Problem 1: The shape of the hair has being altered by the morph in the body.  Steps to fix: - Uncheck Conform > Conform Clothing > Enable Conforming
- Click the Reset to Default button bring the hair back to its original shape.
- Use Modify > Mesh Modifier > Edit Mesh Mode to adjust the hair geometry if necessary.
Problem 2: Hard surfaces such as this knife bends to conform with the shape of the body:  Steps to fix Steps to fix: - Uncheck Conform > Conform Clothing > Enable Conforming to bring the knife back to its original shape.
- Use Modify > Mesh Modifier > Edit Mesh Mode to adjust the position of the knife and Hide defects in the mesh.
You can re-enable auto-conforming at any time:  Steps Steps: - Check Conform > Conform Clothing > Enable Conforming. The geometry will now conform to the changes in the shape of the body.
- Click the Reset to Default button to conform the geometry to the shape of the body.
Check Online Manual HERE.Two Enhancements in Mesh Editing- Mesh Editor now works for accessory mesh editing, greatly enhancing flexibility

- The new CTRL+A hotkey under Mesh Editor mode can select all of the mesh faces at once to increase productivity.
Check Online Manual HERE.
|
|
By Miranda (RL) - 9 Years Ago
|
New Feature 4 - Preference- New Quick Thumbnail Generation can save more time when adding objects to the library due to more performant screenshot and thumbnail creation.
- New Zoom to Mouse Position option under Preference allows one to zoom in and out of the scene while centering on the cursor.
Example of Zoom to Mouse Position function:
- Turning on Mipmap gives much better anti-aliasing visual result, especially you can see smooth hair render on fine detailed meshes.
* Since mipmapping is calculation intense, turning off Mipmap saves around 40% of time in opening a project or loading clothes. We recommend turning on Mipmap when you perform showcase screenshots.
|
|
By Miranda (RL) - 9 Years Ago
|
Enhancement 1 - Appearance Editor
Appearance Editor 2.0 - Enhanced with PBR Materials
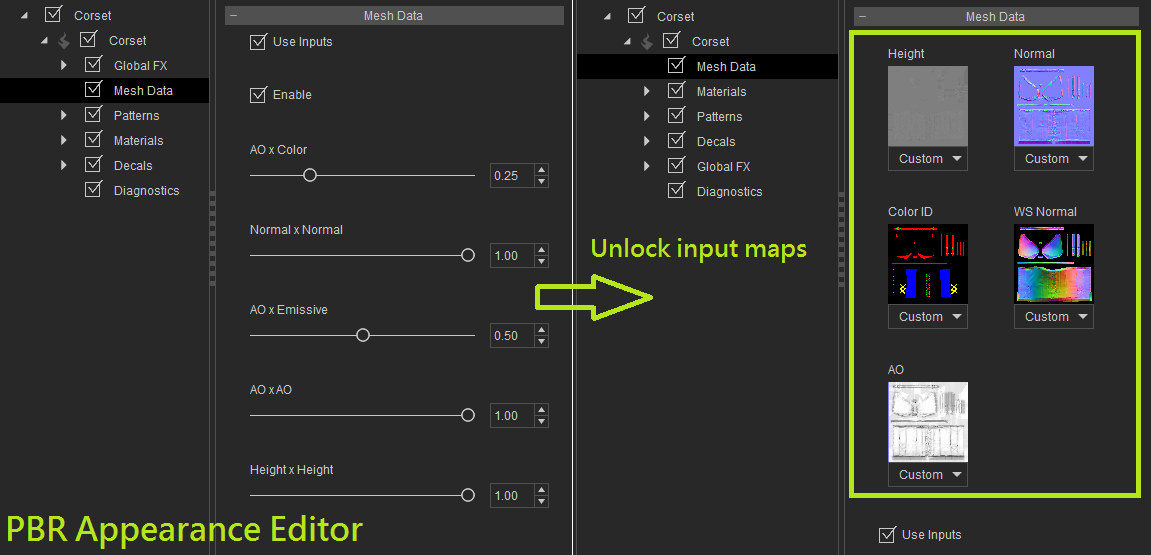
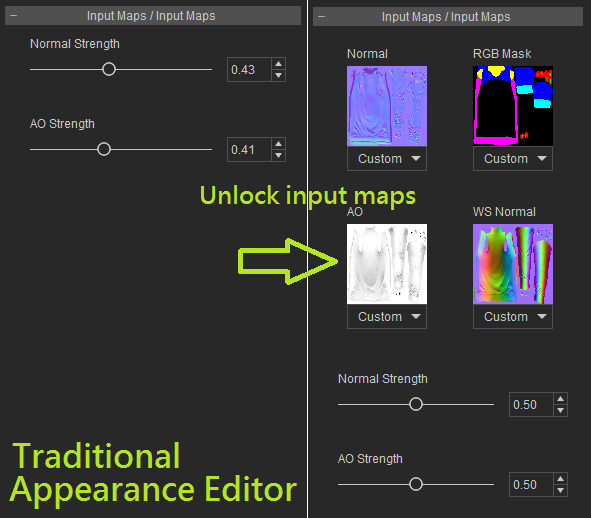
The new Appearance Editor 2.0 is a total overhaul from the previous CC 1.0 Fabric generator. it levels up CC assets with brand new PBR visuals, allowing you to dynamically generate realistic Leather, Wood, Metal and Fabric materials. It also make your Character Creator content compatible with all latest PBR game engines such like Unreal and Unity. 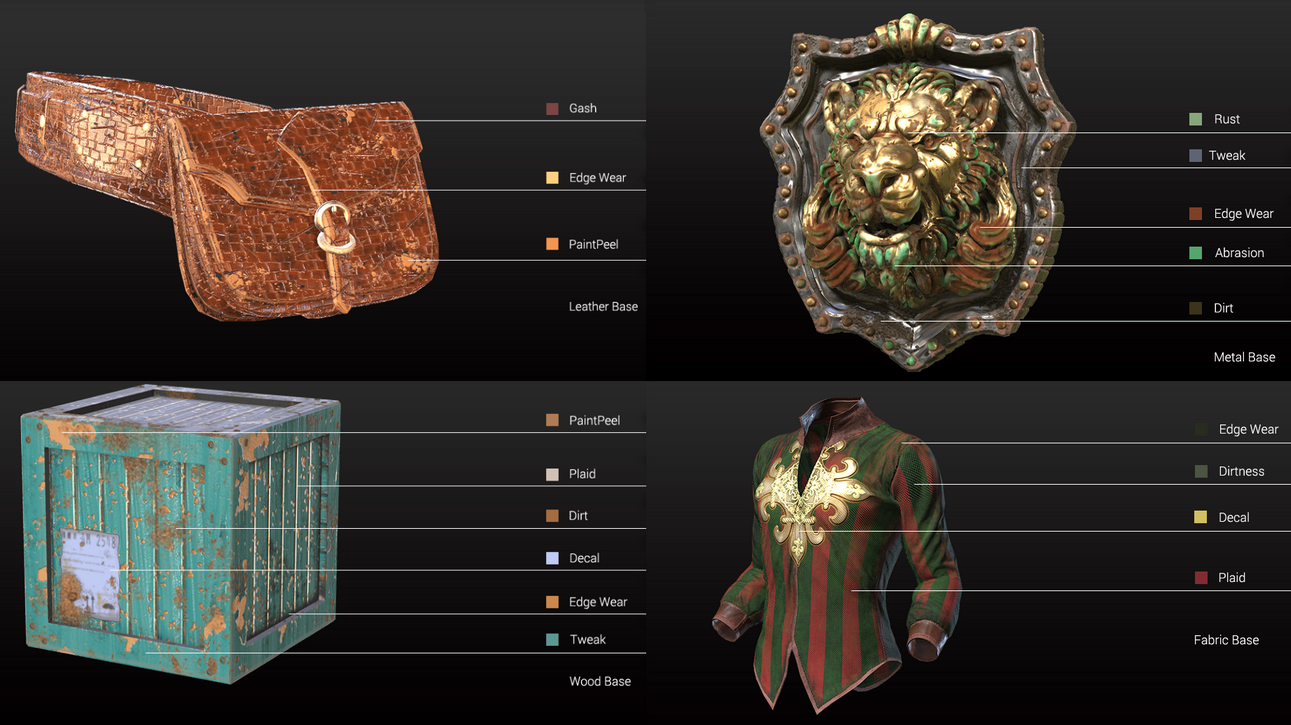 Basic Concept of PBR Appearance Editor Basic Concept of PBR Appearance EditorWhat is Mesh Data? Mesh Data is a set of texture maps sharing the same UV layout for a specific 3D model. They are crucial for creating procedural material effects. Mesh Data maps usually include Albedo (Color), Normal, World Space Normal (WS Normal), Ambient Occlusion (AO), Heightmap, Metallic, Roughness, or Curvature. Appearance Editor Cloth (AE Cloth) uses 4 mesh data maps: Normal, WS Normal, Height, Ambient Occlusion. These maps can be generated by tools such as ZBrush, XNormal, Substance Designer, 3D Coat, etc.
More Introductions Embedded Texture GeneratorsConvert the Traditional Character to PBR Character
Other Enhancements About Appearance Editor
- Appearance Editor allows importing SBSAR files.
- Appearance Editor allows the saving of presets which can be stored and reapplied later.
- Appearance Editor can now switch between sub-graphs for easier operation.
>> Know more about Substance Preset & sbsar Import. Check webpage HERE.Sample Content Made by PBR Appearance Editor
To test out the PBR Appearance Editor, you can access the sample contents made by PBR Appearance Editor from Content Manager / Accessory / Others.
Unlock the Input Maps
The input maps of Appearance Editor utilities can be unlocked by purchasing any Reallusion-made CC packs, such as Essential Clothing & Fabric, Essential Morphs & Skin, Professional Outfits, Party Fun: 3D Hairs and Accessories, Fantasy Assassins, and the upcoming Reallusion-made CC PBR cloth packs.
|
|
By Miranda (RL) - 9 Years Ago
|
Enhancement 2 - Others
CC has expanded the number of male and female poses under the Calibration menu by adding 9 male poses and 9 female poses. Users can apply the suitable pose on the character, and use Edit > Edit Pose to modify it if necessary. * The poses in the Calibration section are designed for testing the cloth collision or for cloth developers to test the skin-bone rig using other 3D tools. 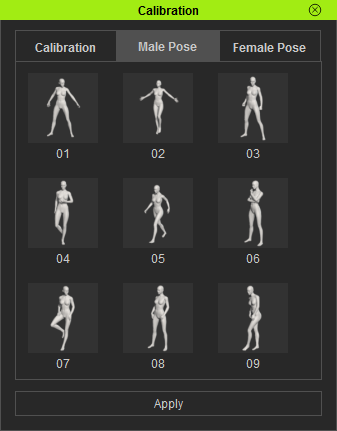 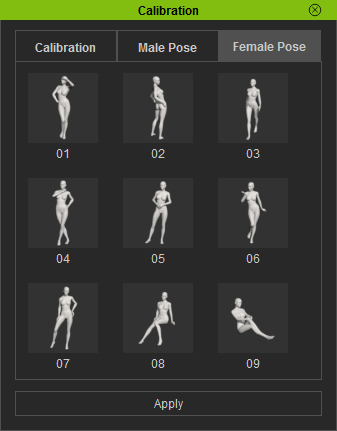 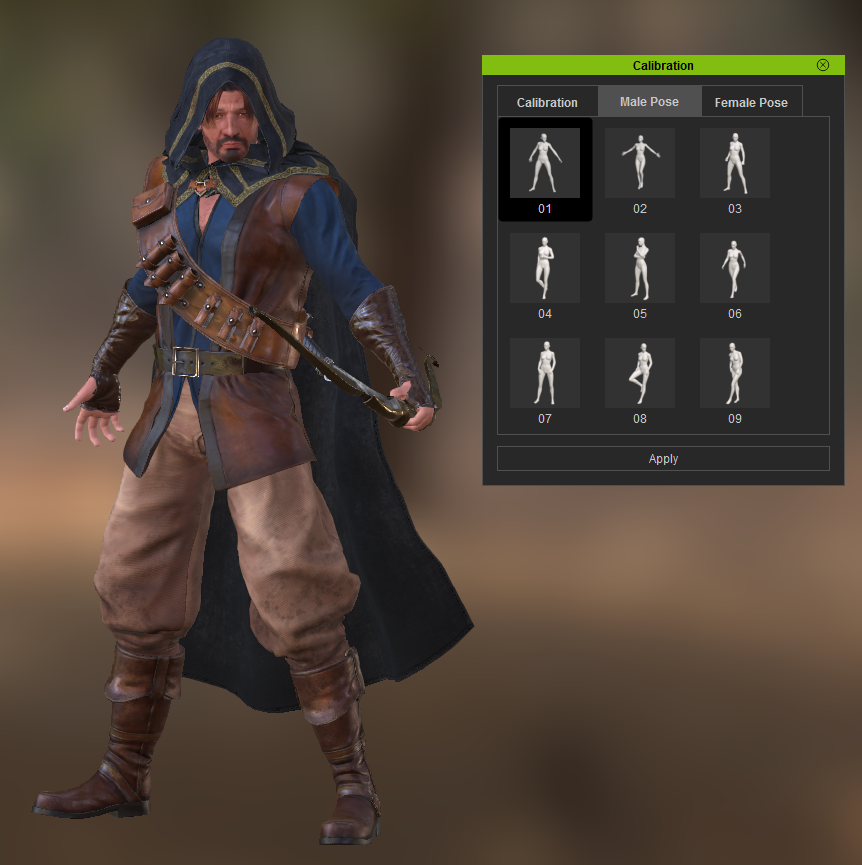 A CC project can now be set as the default project scene upon initiation of Character Creator. 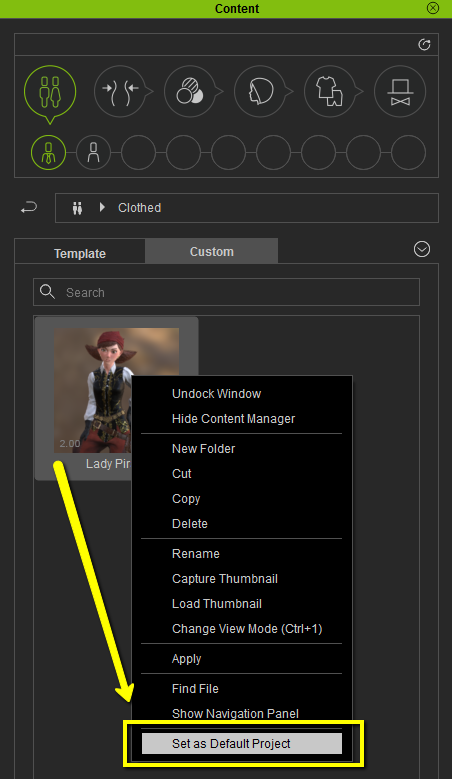 Added parameters under the Modify panel to edit the displacement settings. 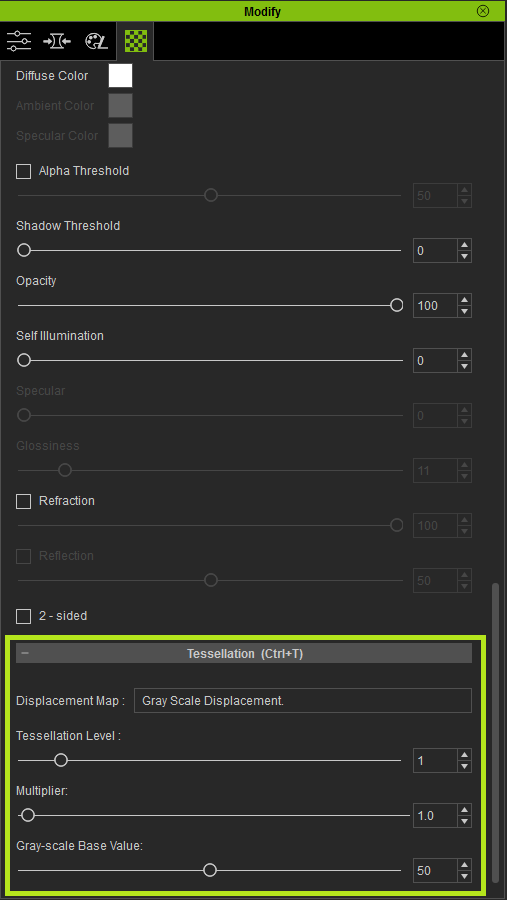 Product version number will now be displayed in the lower left-hand corner of the thumbnails inside the Content Manager. From CC 2.0 and onward, software version will be recorded on each item when it is created in the Content Manager. This will facilitate auto-conversion and instruction for managing differences in the different version specifications. 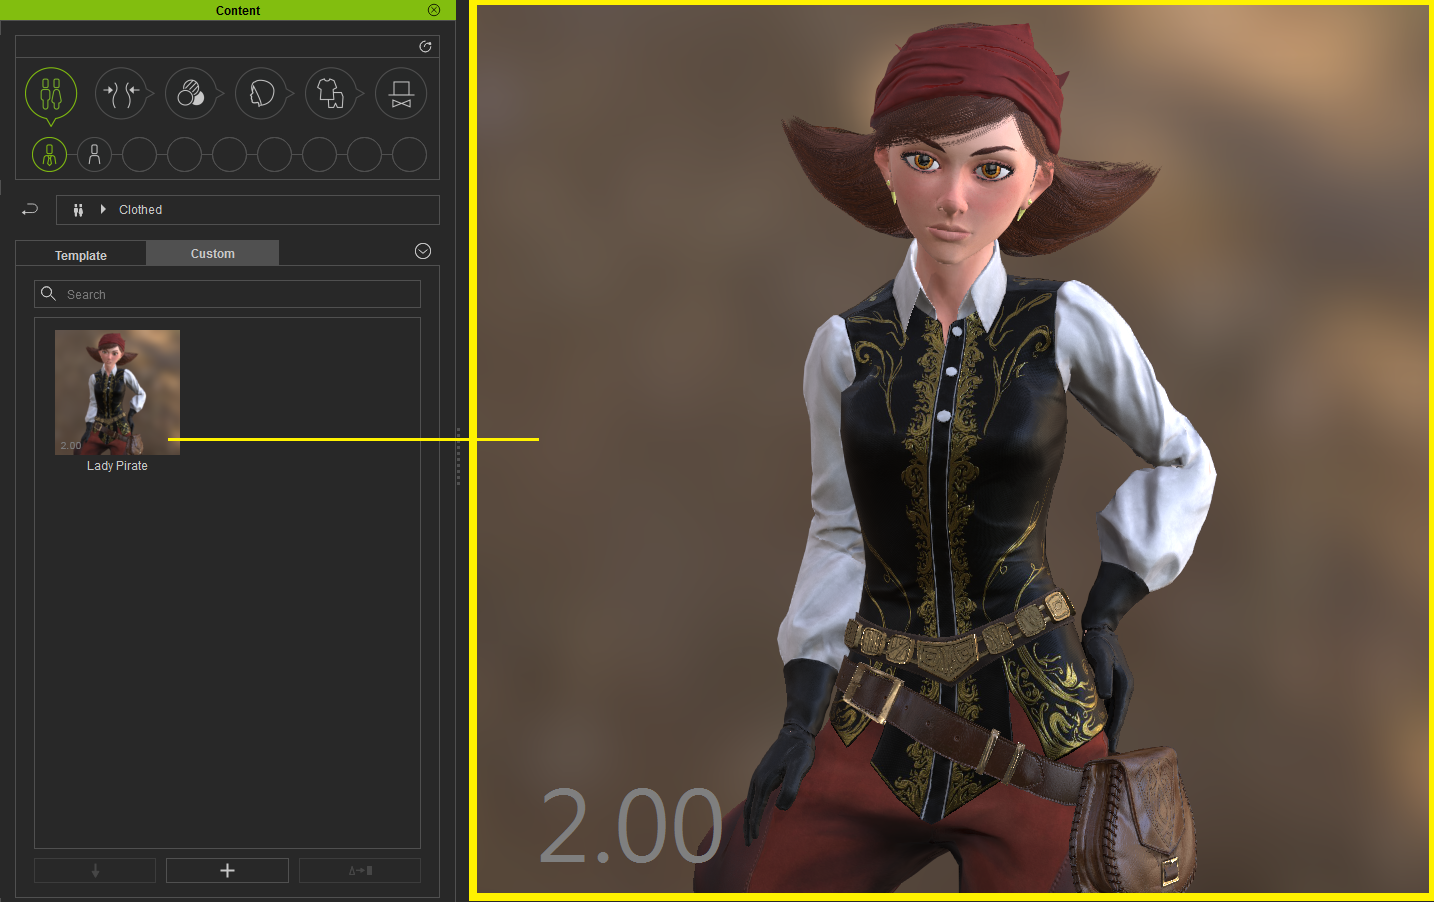 |
|
By Miranda (RL) - 9 Years Ago
|
Performance Optimization
The following processes described in this post can create a load on the system. Read further to know about the workarounds for improving the performance of your software.
Appearance Editor
When you turn on the Appearance Editor, the program will load all Substance materials for procedural material adjustments. The newly-developed PBR_Cloth.sbsar supports up to 7 channels of Color ID, which could drastically slow down the editing system when maxed out. In order to keep the optimal editing speed, you can choose the lighter version of PBR_V1_3CH with only 3 channels to design your new PBR materials. When turning on the Appearance Editor for a content which already uses multiple Color IDs, the program will prompt you on how many channels are being used, which helps to determine which Substance to load based on the needs of the material.
Mipmap
Mipmapping is a technology that processes texture files into progressively lower resolution sequence of images. These images are then saved in memory as a set of mipmaps which allows real-time swapping depending on the distance from the camera.Turning on Mipmap gives much better anti-aliasing visual results, for example: smooth hair render on fine detailed meshes. - Since mipmapping is calculation intense, turning off Mipmap saves around 40% of time in opening a project or loading clothes.
- We recommend turning on Mipmap when you perform showcase screenshots.
- Settings: Edit / Preference / Real-time Render Options / Mipmap (defaulted as off)
Quick Thumbnail Generation When the system processes thumbnail generation, it will unload the character, render the item you selected, and reload the character to complete the process. The Quick Thumbnail Generation will only capture the screen image of the selected item, but you will see the background image or other body portions. - If you would like to speed up the time in saving contents, you can consider turn on the Quick Thumbnail Generation
- Settings: Edit / Preference / Control / Quick Thumbnail Generation (defaulted as on)
|
|
By Joevolve - 8 Years Ago
|
I plan to upgrade to iclone 7 pro pipeline, and I was wondering if the characters created in character creator 2 can be exported with 4k texture maps(4096) for use in other 3d applications
|
|