Here we finally put together the heightmap design process for whoever has the previous experience over Earth Sculptor.
http://www.reallusion.com/iclone/icnb_home.aspSome Nice Features For The New Heightmap Terrain System1. Large Terrain Size- around 9 times of iClone4 terrain size
2. Using multiple texture tiles instead one big texture image, save memory space
3. Much better rendering performance when LOD on (Ctrl-L)
4. Fast picking, easier to apply plantation (grass, tree), snap or walk on terrain, and terrain physics collision
5. Better self-cast shadow quality
6. Keep high texture detail in close view
7. keep high texture detail on vertical surface, such as cliffs
8. Future Terrain Expansion - connect height map terrains to form a bigger terrain; or endless terrain navigation
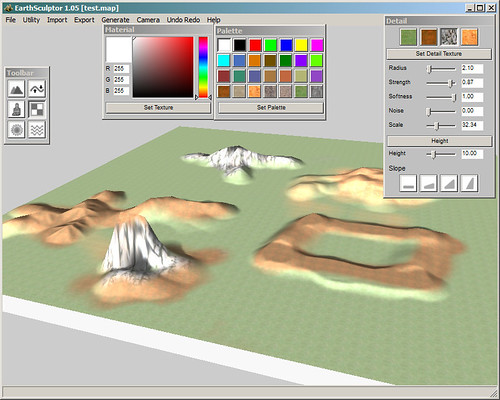
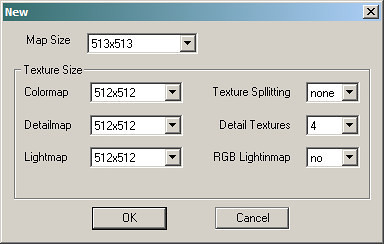
Here is the design procedure1. Generate 3D Terrain from EarthSculpter, with map size 513x513
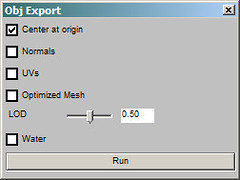
2. Export either OBJ or gray scale height map
You can use either obj or jpeg heightmap, we suggest you use obj for better detail
* Approach A: Load OBJ as the terrain mesh for iClone5 (smooth, higher detail)
* please don't turn on other settings, only "center on origin"
* Approach B: Load Height map (png, jpg, bmp) as the terrain for iclone5 - this can be easily edited by image editor
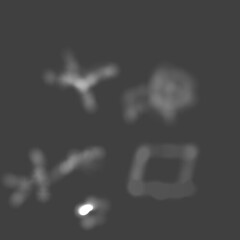
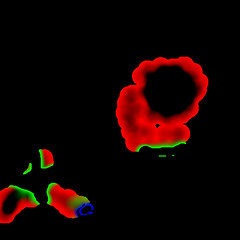
3. Use Earth Sculpter to create the color Mask file for 4 terrain textures
>>
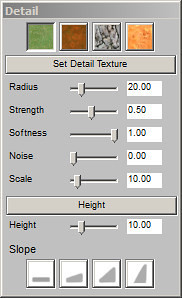
4. Save map, you will see all related texture maps are created in the same map folder
- the xxx_d.png file is the mask file using RGB+Alpha to keep the 4 color channel information
5. Edit the INI file, please see the sample terrain file
download the sample from here
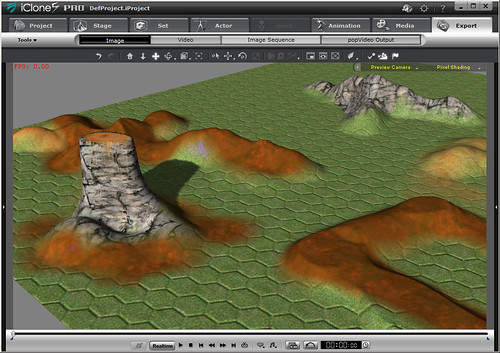
http://dl.dropbox.com/u/2471042/Forum/terrain-test.zip6. Under iClone5 Terrain tab, press
Alt-Shift-J to load Terrain defined in the INI file
===
Terrain Script in the INI fileSupported Image Formats: JPEG, PNG, BMP
[HeightMap]
file = "test.obj" ; file name for gray scale height map image or obj model
cell_unit = 100 ; 100 cm
height_scale = 50.0 ; relative scale, 50 = 1:1 to OBJ file
offset_x = -12800.0 ; no use
offset_y = -12800.0 ; no use
offset_z =0 ; 0 to align default height of iclone 0,0,0 world axis
[MaskMap]
file = "test_d.png" the mask file generated from EarthSculptor
[Material]
count = 4 ; total material number
[Material0]
diffuse_r = 1.0
diffuse_g = 1.0
diffuse_b = 1.0
specular_r = 0.0
specular_g = 0.0
specular_b = 0.0
ambient_r = 1.5
ambient_g = 1.5
ambient_b = 1.5
shininess = 0.5
shineStrength = 1.0
decal_uv_tile_x = 24.0 ;; color map tiling x
decal_uv_tile_y = 24.0 ;; color map tiling y
decal_uv_tile_z = 24.0 ;; color map tiling z for vertical surface, eg. cliff
decal_uv_offset_x = 0.0
decal_uv_offset_y = 0.0
decal_uv_offset_z = 0.0
decal_uv_rotate = 0
detail_uv_tile_x = 60.0 ;; detail map (blend map)
detail_uv_tile_y = 60.0
detail_uv_offset_x = 0.0
detail_uv_offset_y = 0.0
detail_uv_offset_z = 0.0
detail_uv_rotate = 0
bump_uv_tile_x = 10.0 ;; bump map
bump_uv_tile_y = 10.0
bump_uv_tile_z = 10.0
bump_uv_offset_x = 0.0
bump_uv_offset_y = 0.0
is_normal_bump = false ;; if using normal map, value = true
bump_map_weight = 0.5 ; same as iclone strength setting
decal_map = "shortGrass.png" ;;decal map = diffuse map or color map
bump_map="beehive001.jpg"
detail_map="stoneWall1_tileable_1024.jpg"
[Material1]
diffuse_r = 1.0
diffuse_g = 1.0
diffuse_b = 1.0
specular_r = 0.0
specular_g = 0.0
specular_b = 1.0 ;; you can see blue specular on brown sand
ambient_r = 1.5
ambient_g = 1.5
ambient_b = 1.5
shininess = 0.5
shineStrength = 1.0
decal_uv_tile_x = 12.0
decal_uv_tile_y = 12.0
decal_uv_tile_z = 12.0
decal_uv_offset_x = 0.0
decal_uv_offset_y = 0.0
decal_uv_rotate = 0
detail_uv_tile_x = 15.6842
detail_uv_tile_y = 15.6842
detail_uv_offset_x = 0.0
detail_uv_offset_y = 0.0
detail_uv_rotate = 0
bump_uv_tile_x = 1.0
bump_uv_tile_y = 1.0
bump_uv_tile_z = 1.0
bump_uv_offset_x = 0.0
bump_uv_offset_y = 0.0
decal_map = "brownsand.png"
[Material2]
diffuse_r = 1.0
diffuse_g = 1.0
diffuse_b = 1.0
specular_r = 0.0
specular_g = 0.0
specular_b = 0.0
ambient_r = 1.5
ambient_g = 1.5
ambient_b = 1.5
shininess = 0.5
shineStrength = 1.0
decal_uv_tile_x = 12.0
decal_uv_tile_y = 12.0
decal_uv_tile_z = 24.0
decal_uv_offset_x = 0.0
decal_uv_offset_y = 0.0
decal_uv_rotate = 0
detail_uv_tile_x = 15.6842
detail_uv_tile_y = 15.6842
detail_uv_offset_x = 0.0
detail_uv_offset_y = 0.0
detail_uv_rotate = 0
bump_uv_tile_x = 3.0
bump_uv_tile_y = 3.0
bump_uv_tile_z = 3.0
bump_uv_offset_x = 0.0
bump_uv_offset_y = 0.0
decal_map = "bigRockFace.png"
[Material3]
diffuse_r = 1.0
diffuse_g = 1.0
diffuse_b = 1.0
specular_r = 0.0
specular_g = 0.0
specular_b = 0.0
ambient_r = 1.5
ambient_g = 1.5
ambient_b = 1.5
shininess = 0.5
shineStrength = 1.0
decal_uv_tile_x = 12.0
decal_uv_tile_y = 12.0
decal_uv_tile_z = 12.0
decal_uv_offset_x = 0.0
decal_uv_offset_y = 0.0
decal_uv_rotate = 0
detail_uv_tile_x = 15.6842
detail_uv_tile_y = 15.6842
detail_uv_offset_x = 0.0
detail_uv_offset_y = 0.0
detail_uv_rotate = 0
bump_uv_tile_x = 1.0
bump_uv_tile_y = 1.0
bump_uv_tile_z = 3.0
bump_uv_offset_x = 0.0
bump_uv_offset_y = 0.0
decal_map = "orangesand.png"
*sample project in iclone5
*sample project in Earth Sculptor