Profile Picture

[Demo WIP] 2024 Reallusion 3D Character Contest - Lady Hippo

Posted By Mythcons 2 Months Ago
You don't have permission to rate!

[Demo WIP] 2024 Reallusion 3D Character Contest - Lady Hippo

Author
Message
Mythcons
Mythcons
Posted 2 Months Ago
View Quick Profile
Distinguished Member

Distinguished Member (7.2K reputation)Distinguished Member (7.2K reputation)Distinguished Member (7.2K reputation)Distinguished Member (7.2K reputation)Distinguished Member (7.2K reputation)Distinguished Member (7.2K reputation)Distinguished Member (7.2K reputation)Distinguished Member (7.2K reputation)Distinguished Member (7.2K reputation)

Group: Forum Members
Last Active: Last Month
Posts: 455, Visits: 3.2K

Greetings,

My name is Peter Alexander, also known as Mythcons to the RL community. I've competed in these contests in previous years, they are great fun. I've never actually won! It's the journey and effort that counts, in my opinion. You compete to win a prize, but most importantly compete against yourself. Character Creator gives people the ability to express their character designs very effectively, more so than any software I've ever used. So, I’m a lifelong fan of the platform. With that said, while I'm not competing this year, I'd like to post a couple Demo WIP threads to aid in the contest. I am going to try to model the character on the left from the CC3+ base mesh. A couple years ago I made a similar attempt, which can be seen on the right (or bottom). This past attempt removes a lot of the uncertainty that the CC3+ base mesh can be successfully stretched out to this extent.


This concept has been assisted with some AI. I would recommend that if you plan to use AI, don’t let it do all the work of your concept. Try to have a foundation for your work before you have AI assist you. As with anything, it’s a tool, not a one-shot solution. Be involved in the direction of your design concepts. In my case, I had the old render used as the basis for an upgraded concept.

I will have some updates as I progress with the project. I did some work on this character in the lead-up to this post, so I’m a bit further ahead than just the concept.

Enjoy the process of your characters! These events don't come around that often, take advantage of it.

Mythcons
Mythcons
Posted 2 Months Ago
View Quick Profile
Distinguished Member

Distinguished Member (7.2K reputation)Distinguished Member (7.2K reputation)Distinguished Member (7.2K reputation)Distinguished Member (7.2K reputation)Distinguished Member (7.2K reputation)Distinguished Member (7.2K reputation)Distinguished Member (7.2K reputation)Distinguished Member (7.2K reputation)Distinguished Member (7.2K reputation)

Group: Forum Members
Last Active: Last Month
Posts: 455, Visits: 3.2K
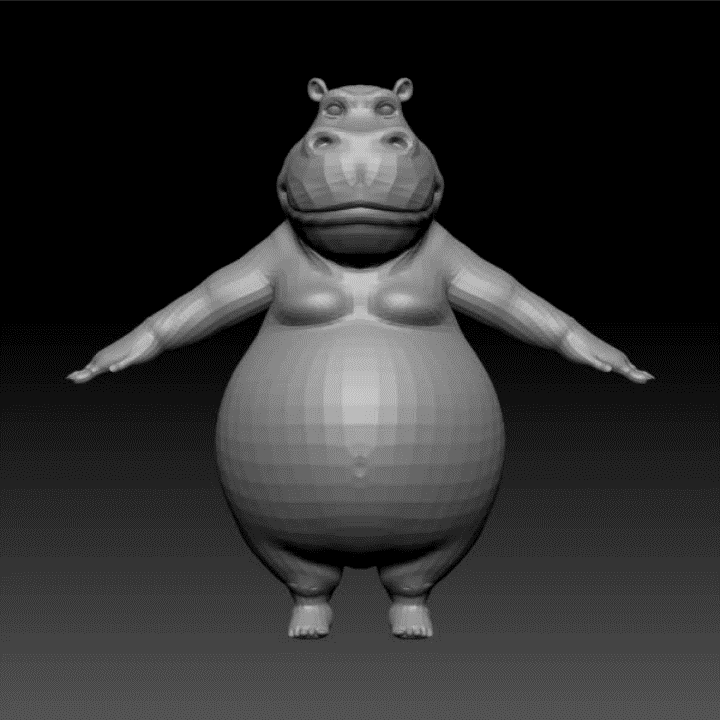
This is the current state of the Lady Hippo project. I exaggerated the mesh to more closely match the concept. My next goal is to sculpt higher resolution details, polypaint the mesh, and also work on creating a dress. Thanks to the new GoZ Plus addon, I'll be able to transfer the Color Map and Normal Map details over to Character Creator with a single command, after I've created those details.
https://forum.reallusion.com/uploads/images/202d1b4e-bdac-4c63-898d-fce4.gif

To create a dress, I masked the main character in the shape a dress, and then clicked 'Extract' in the Subtools menu. I set the Thickness to zero, giving me a single sided mesh.


To be a cleaner mesh, I created some polygroups, checked 'Keep Polygroups' in the Zremesh options, then used Zremesh with Smooth Groups dialed up to 1. After this, if I I need to Zremesh again, I turn the SmoothGroups down to Zero (as they are already smoothed; smoothing them further will deform the low resolution mesh).


I did some basic work on the teeth. Hippos have spare but large teeth, so I hid every tooth but the relevant front ones. By hid, I mean I push the meshes into the gums so that they are not visible. Don't actually hide the mesh, otherwise it will not be rigged as Teeth when you sent it over to Character Creator (it will just be a polymesh asset).


I did a basic UV unwrap in Zbrush, but I will probably have to send it to Blender for proper UV mapping and also mesh editing.


I've created a basic flower, which I will duplicate within Character Creator and assigned as a 'Hair Accessory', and parent the objects to her head. 

Edited
2 Months Ago by Mythcons
Mythcons
Mythcons
Posted 2 Months Ago
View Quick Profile
Distinguished Member

Distinguished Member (7.2K reputation)Distinguished Member (7.2K reputation)Distinguished Member (7.2K reputation)Distinguished Member (7.2K reputation)Distinguished Member (7.2K reputation)Distinguished Member (7.2K reputation)Distinguished Member (7.2K reputation)Distinguished Member (7.2K reputation)Distinguished Member (7.2K reputation)

Group: Forum Members
Last Active: Last Month
Posts: 455, Visits: 3.2K
I have sent the Lady Hippo over to Blender using the CC Blender Pipeline add-on. My first task in Blender was to properly edit the mesh and apply cleaner UV maps. The mesh is now divided into three main parts, in addition to some minor buttons near the top of the dress.

image
image

I recently found a really nice texturing add-on for Blender called UCUPaint. It takes a little bit to get into it, but once you do it’s quite powerful (in many ways rivaling Substance Painter). I was able to give the dress some nice textures very quickly, with little effort. I haven’t quite figured out how best to use this addon to paint the actual character, but I’m sure its possible.


image

I exported the character through the Blender Pipeline add-on successfully imported the character into Character Creator 4. One of the larger tasks was still ahead of me – the Facial Profile. This is what allows Character Creator and iClone to use lip-syncing and facial expression tools.

Not too long ago Reallusion released Face Tools, which is a Zbrush Plugin that allows for the optimization of some facial animation data and the creation of wrinkle maps. It is very efficient.


imageimage

With some practice, you can optimize a stylized character in as little as ~30 minutes, though I would recommend that you employ the Facial Profile Editor as well for the best results. It’s a longer list of things to edit, but it uses the Zbrush pipeline.

Here is an animated render of the character, including an expression demonstration.


Edited
2 Months Ago by Mythcons
Eric C (RL)
Eric C (RL)
Posted 2 Months Ago
View Quick Profile
Distinguished Member

Distinguished Member (11.4K reputation)Distinguished Member (11.4K reputation)Distinguished Member (11.4K reputation)Distinguished Member (11.4K reputation)Distinguished Member (11.4K reputation)Distinguished Member (11.4K reputation)Distinguished Member (11.4K reputation)Distinguished Member (11.4K reputation)Distinguished Member (11.4K reputation)

Group: Administrators
Last Active: Yesterday
Posts: 547, Visits: 5.9K
Mythcons (7/3/2024)

Greetings,

My name is Peter Alexander, also known as Mythcons to the RL community. I've competed in these contests in previous years, they are great fun. I've never actually won! It's the journey and effort that counts, in my opinion. You compete to win a prize, but most importantly compete against yourself. Character Creator gives people the ability to express their character designs very effectively, more so than any software I've ever used. So, I’m a lifelong fan of the platform. With that said, while I'm not competing this year, I'd like to post a couple Demo WIP threads to aid in the contest. I am going to try to model the character on the left from the CC3+ base mesh. A couple years ago I made a similar attempt, which can be seen on the right (or bottom). This past attempt removes a lot of the uncertainty that the CC3+ base mesh can be successfully stretched out to this extent.


This concept has been assisted with some AI. I would recommend that if you plan to use AI, don’t let it do all the work of your concept. Try to have a foundation for your work before you have AI assist you. As with anything, it’s a tool, not a one-shot solution. Be involved in the direction of your design concepts. In my case, I had the old render used as the basis for an upgraded concept.

I will have some updates as I progress with the project. I did some work on this character in the lead-up to this post, so I’m a bit further ahead than just the concept.

Enjoy the process of your characters! These events don't come around that often, take advantage of it.


Hi Mythcons,
Thanks for sharing this and keep it up!! 


Reading This Topic