Profile Picture

How to Adjust Texture on ActorCore Characters using Adobe Substance Player

Posted By Bridgette (RL) 3 Years Ago
Rated 5 stars based on 1 vote.

How to Adjust Texture on ActorCore Characters using Adobe Substance...

Author
Message
Bridgette (RL)
Bridgette (RL)
Posted 3 Years Ago
View Quick Profile
Distinguished Member

Distinguished Member (1.6K reputation)Distinguished Member (1.6K reputation)Distinguished Member (1.6K reputation)Distinguished Member (1.6K reputation)Distinguished Member (1.6K reputation)Distinguished Member (1.6K reputation)Distinguished Member (1.6K reputation)Distinguished Member (1.6K reputation)Distinguished Member (1.6K reputation)

Group: Administrators
Last Active: Last Month
Posts: 66, Visits: 567
https://forum.reallusion.com/uploads/images/73c2f5ed-10c5-4a2a-aa2e-2e71.png

This step by step guide will talk about how to adjust ActorCore characters' colors, including hair, skin, clothes, and shoes using Adobe Substance Player. By doing so you can have alternative looks for your ActorCore characters.

If you have iClone, the workflow will be much easier to adjust texture on ActorCore characters. Check out this topic in Forum.

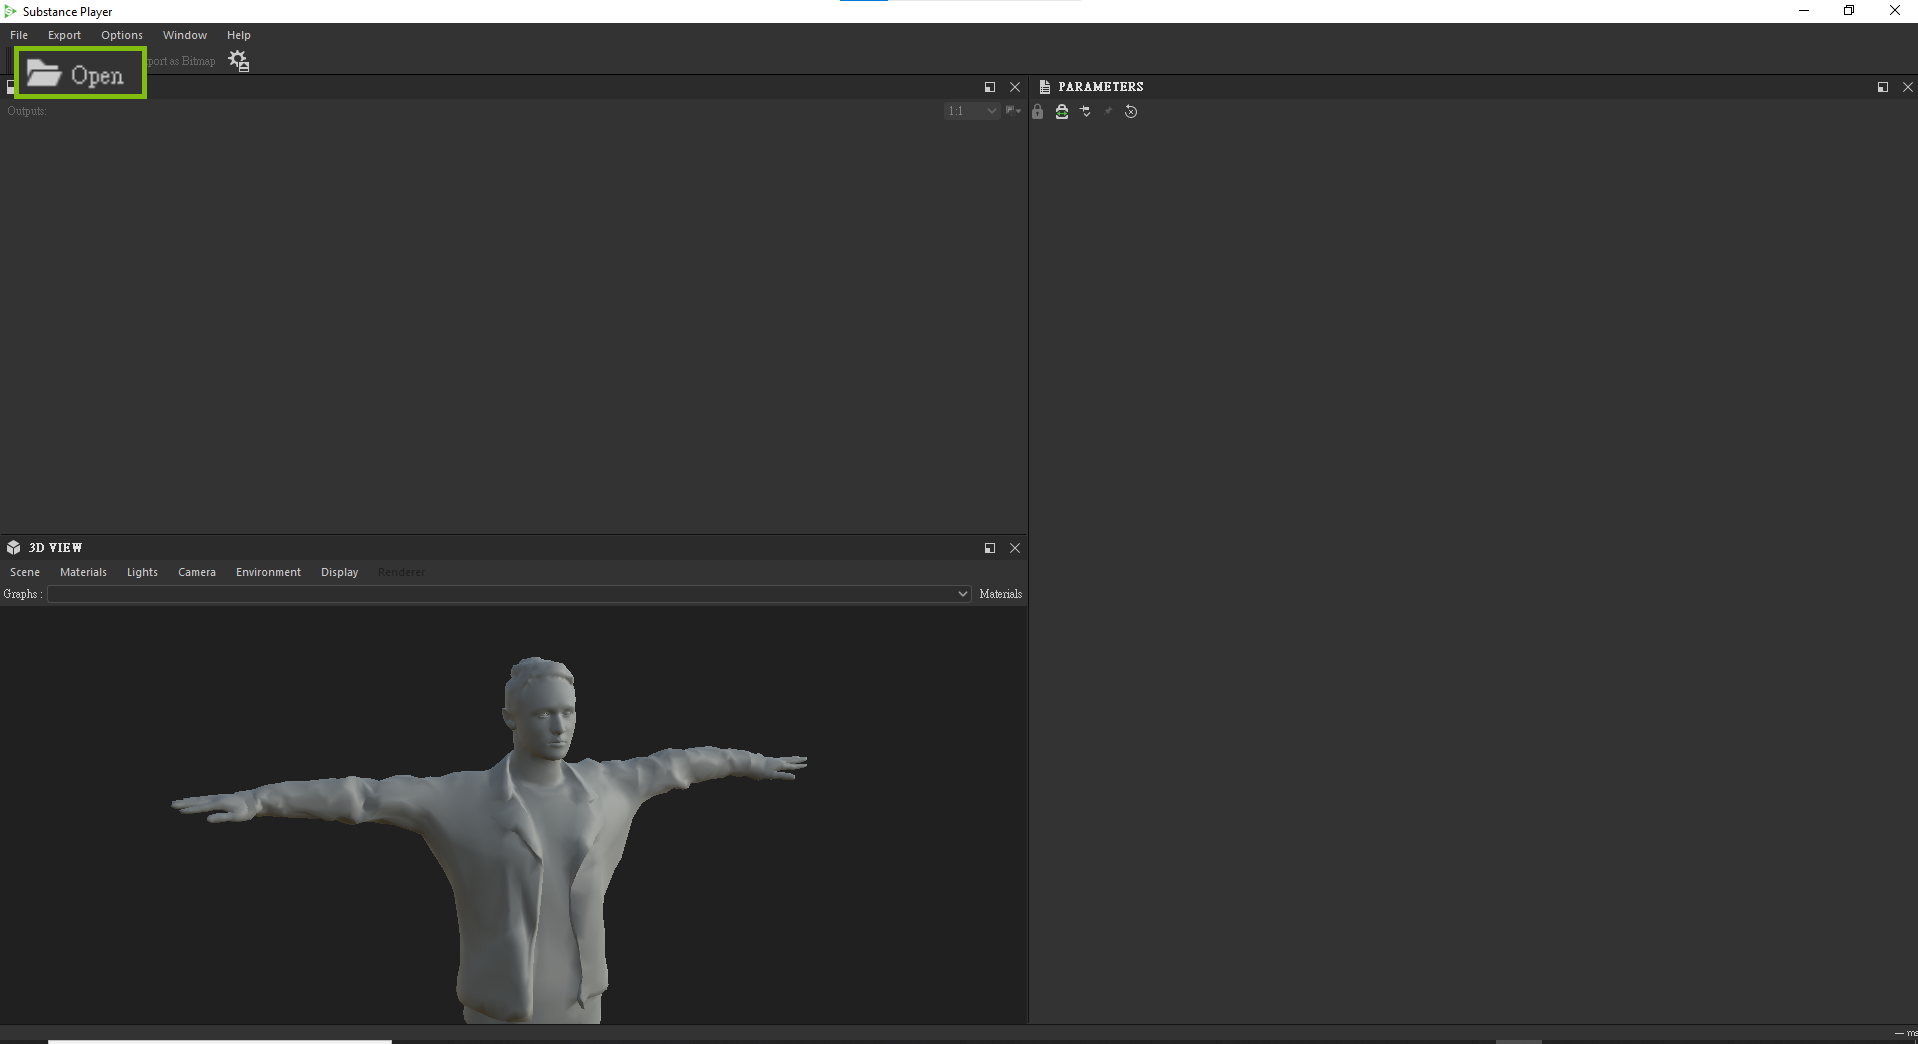
Please note: ActorCore characters have been updated, adding two new maps: Character_Color ID and Character_RGB.  If you downloaded characters before, please redownload them to get the updated data.
https://forum.reallusion.com/uploads/images/c0a04413-4dde-4353-89f9-2a26.png


Next, you need to download the MaterialModifier.sbsar file and Adobe Substance Player.
Open the Substance Player, import the ActorCore character FBX file.
https://forum.reallusion.com/uploads/images/f6806347-c450-400d-87f9-6b52.png


Import the MaterialModifier.sbsar file.
https://forum.reallusion.com/uploads/images/d46f144e-4a24-4511-95be-b41e.png


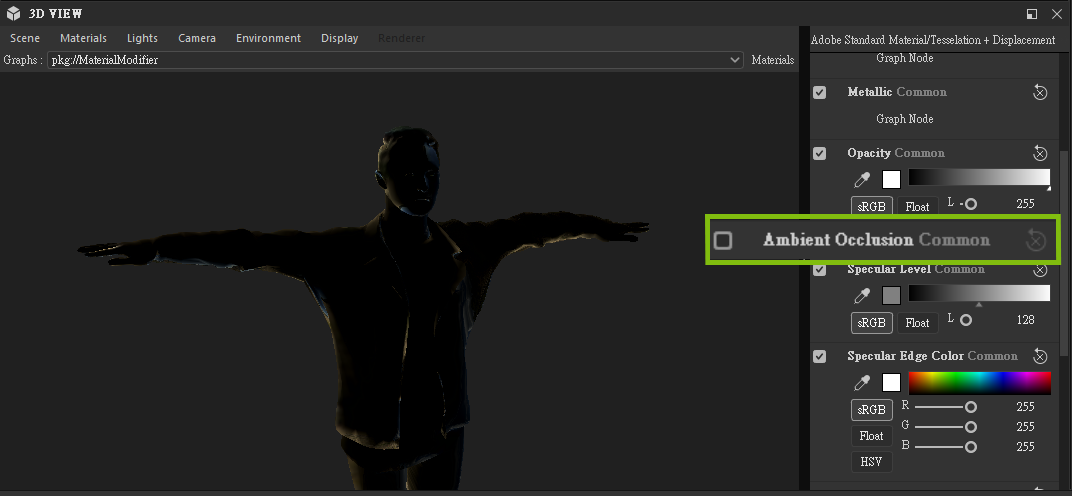
You will find the mesh of the character is totally black in the viewport. Go to the 3D View panel >> Material >> Character >> Edit to disable the Ambient Occlusion.
https://forum.reallusion.com/uploads/images/31c0e1ed-a646-43ba-9fdf-7d3c.png


https://forum.reallusion.com/uploads/images/e6521b3b-fa40-4043-a4e6-a869.png


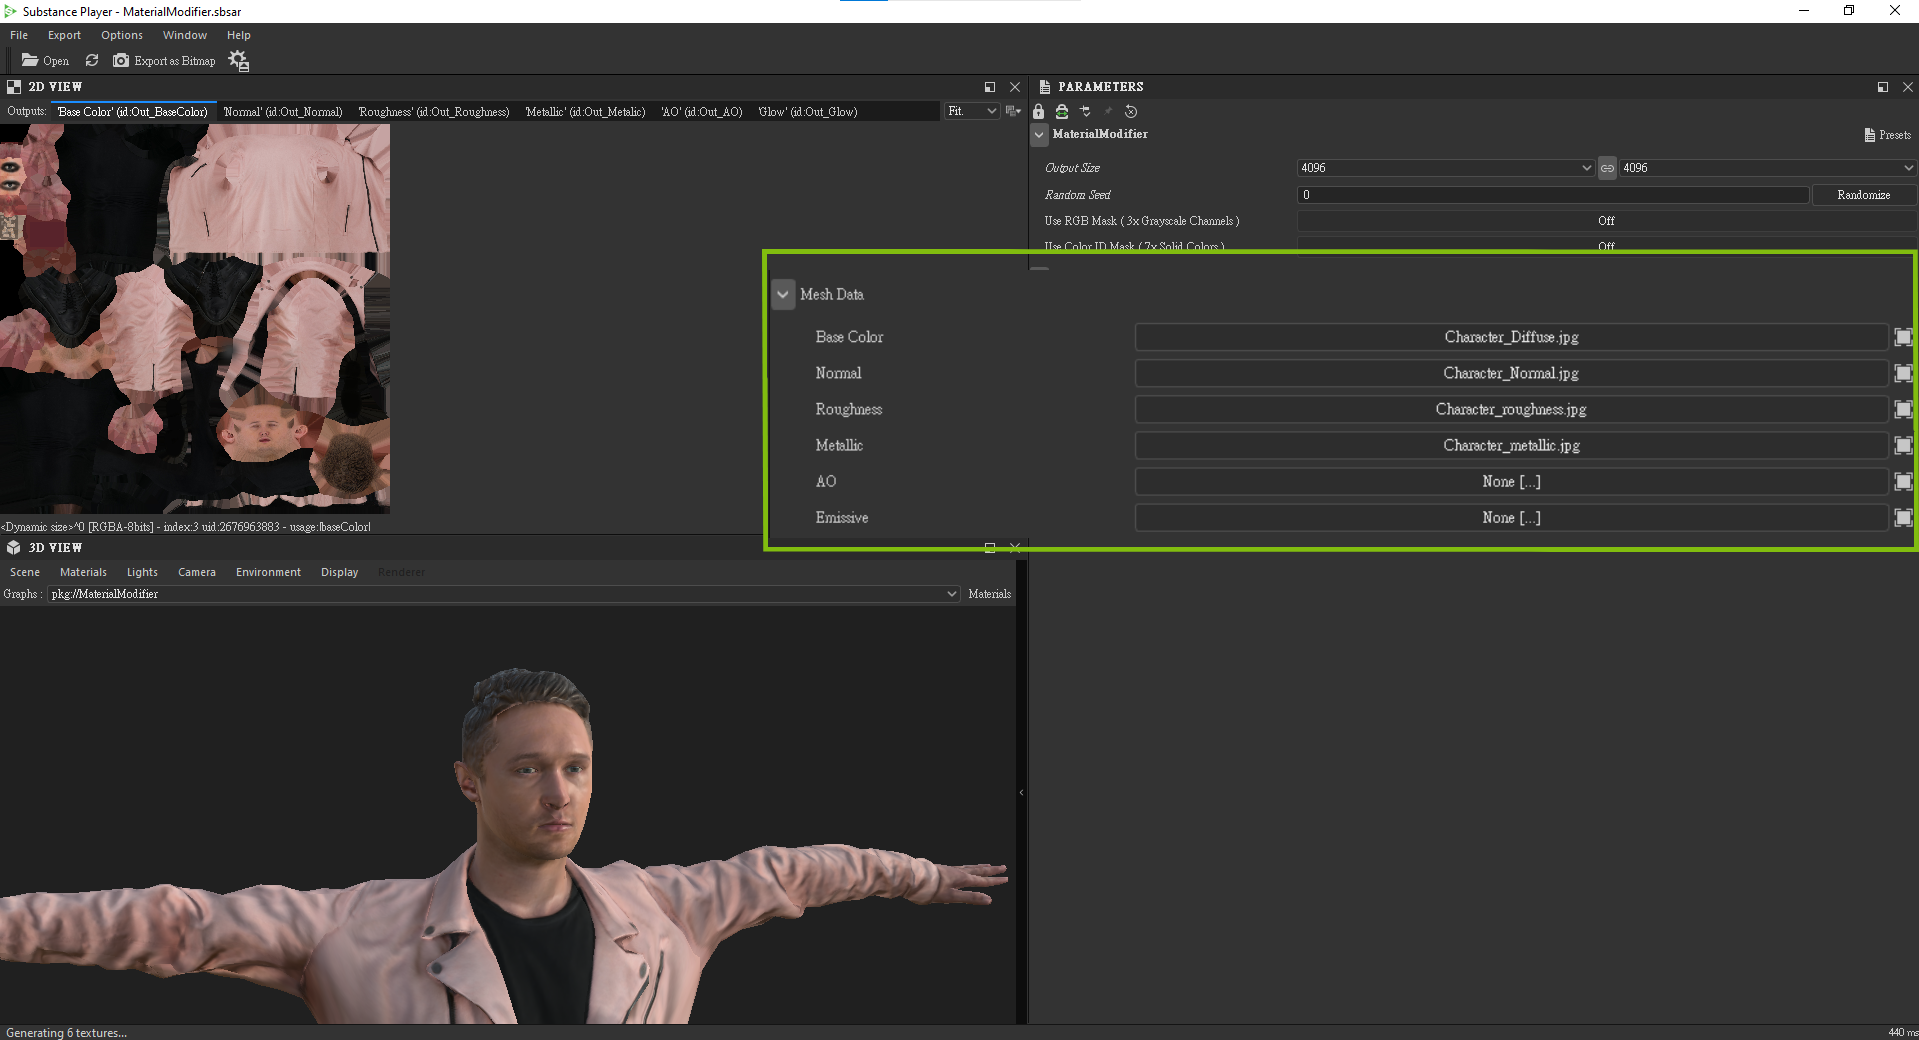
Import the maps into the corresponding field in Substance Player.
https://forum.reallusion.com/uploads/images/d4c91c48-1a72-47c6-b6fe-e859.png


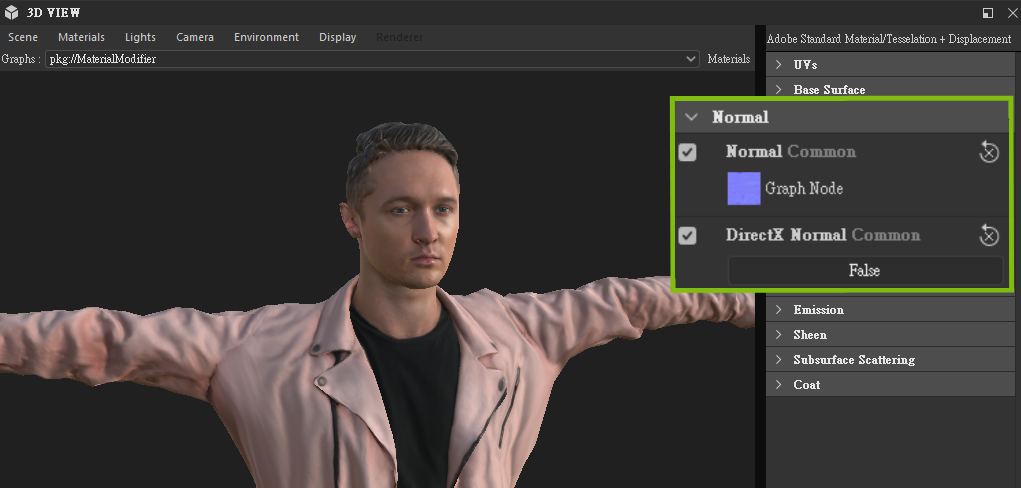
Once you've imported, you will find some problems with the appearance of the character because of the Normal axis direction difference.
https://forum.reallusion.com/uploads/images/bd806849-8f40-43cd-b521-1fbf.png


Go to the 3D View panel >> Material >> Character >> Edit, and change the DirectX Normal to False.
https://forum.reallusion.com/uploads/images/a933e6a6-1bfa-4dd6-b5c7-b62c.png


Activate Use RGB Mask and Use Color ID Mask, and then import the Character_RGB and Character_Color ID maps.
https://forum.reallusion.com/uploads/images/5fb7e16f-6812-4793-9506-c8ad.png


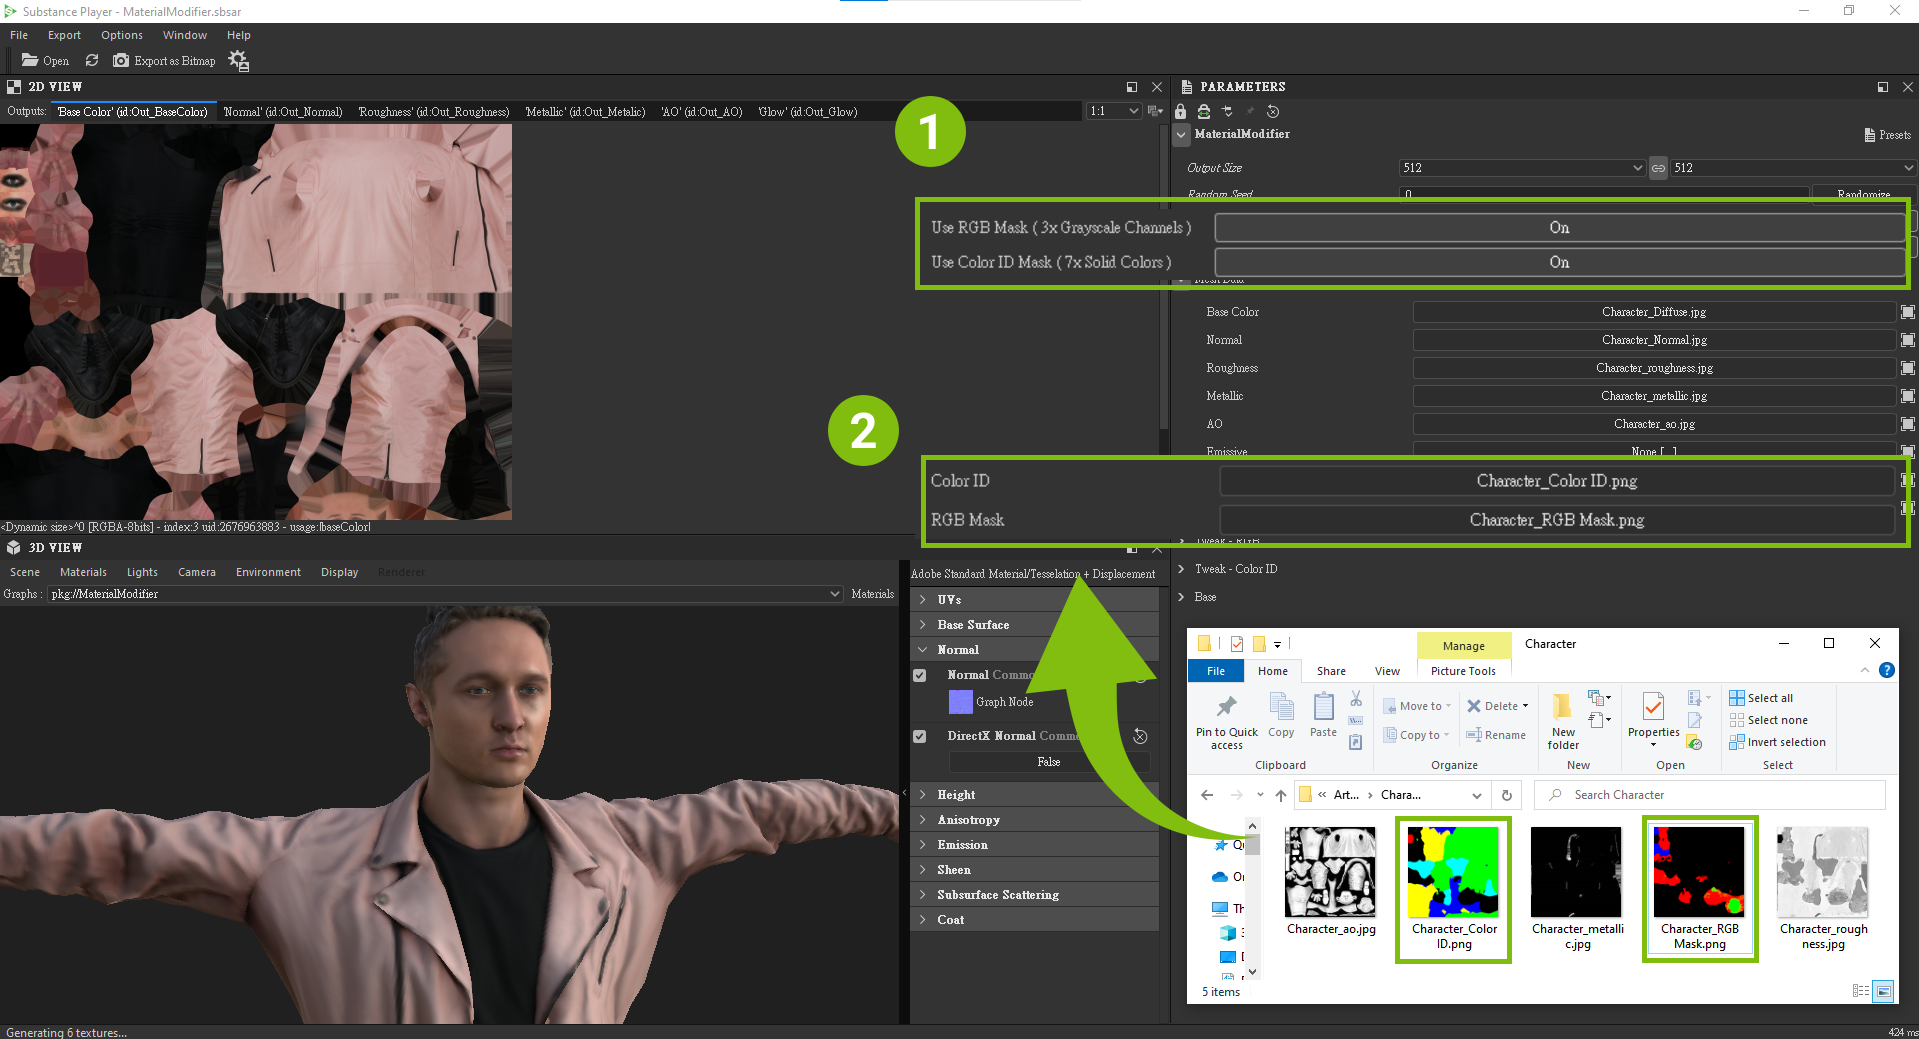
The Base section is for tweaking the entire material, the RGB Mask and Color ID are for partials (eg: hair, clothes).
https://forum.reallusion.com/uploads/images/926b4cca-9cd9-4905-8649-6163.png

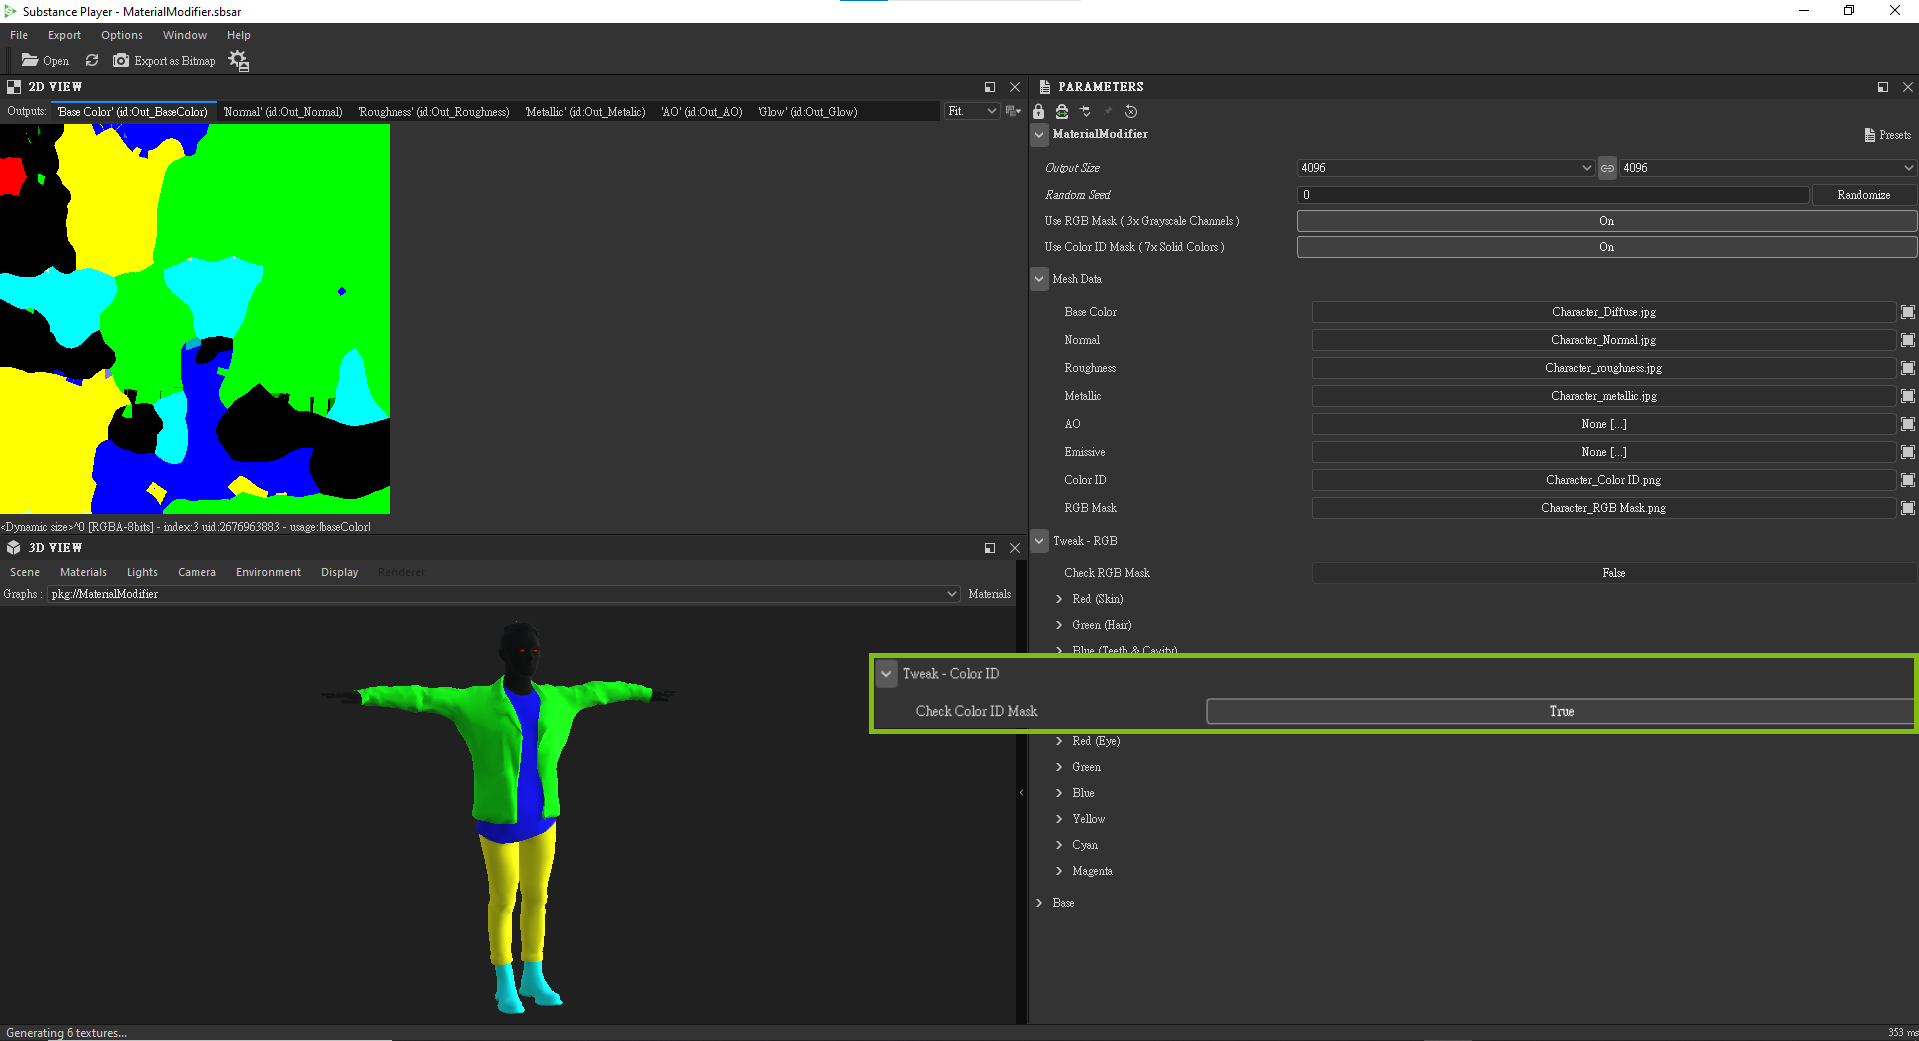
Once you’ve enabled Use RGB Mask and Use Color ID Mask, you’ll see the Tweak - RGB and Tweak - Color ID adjustment sections.
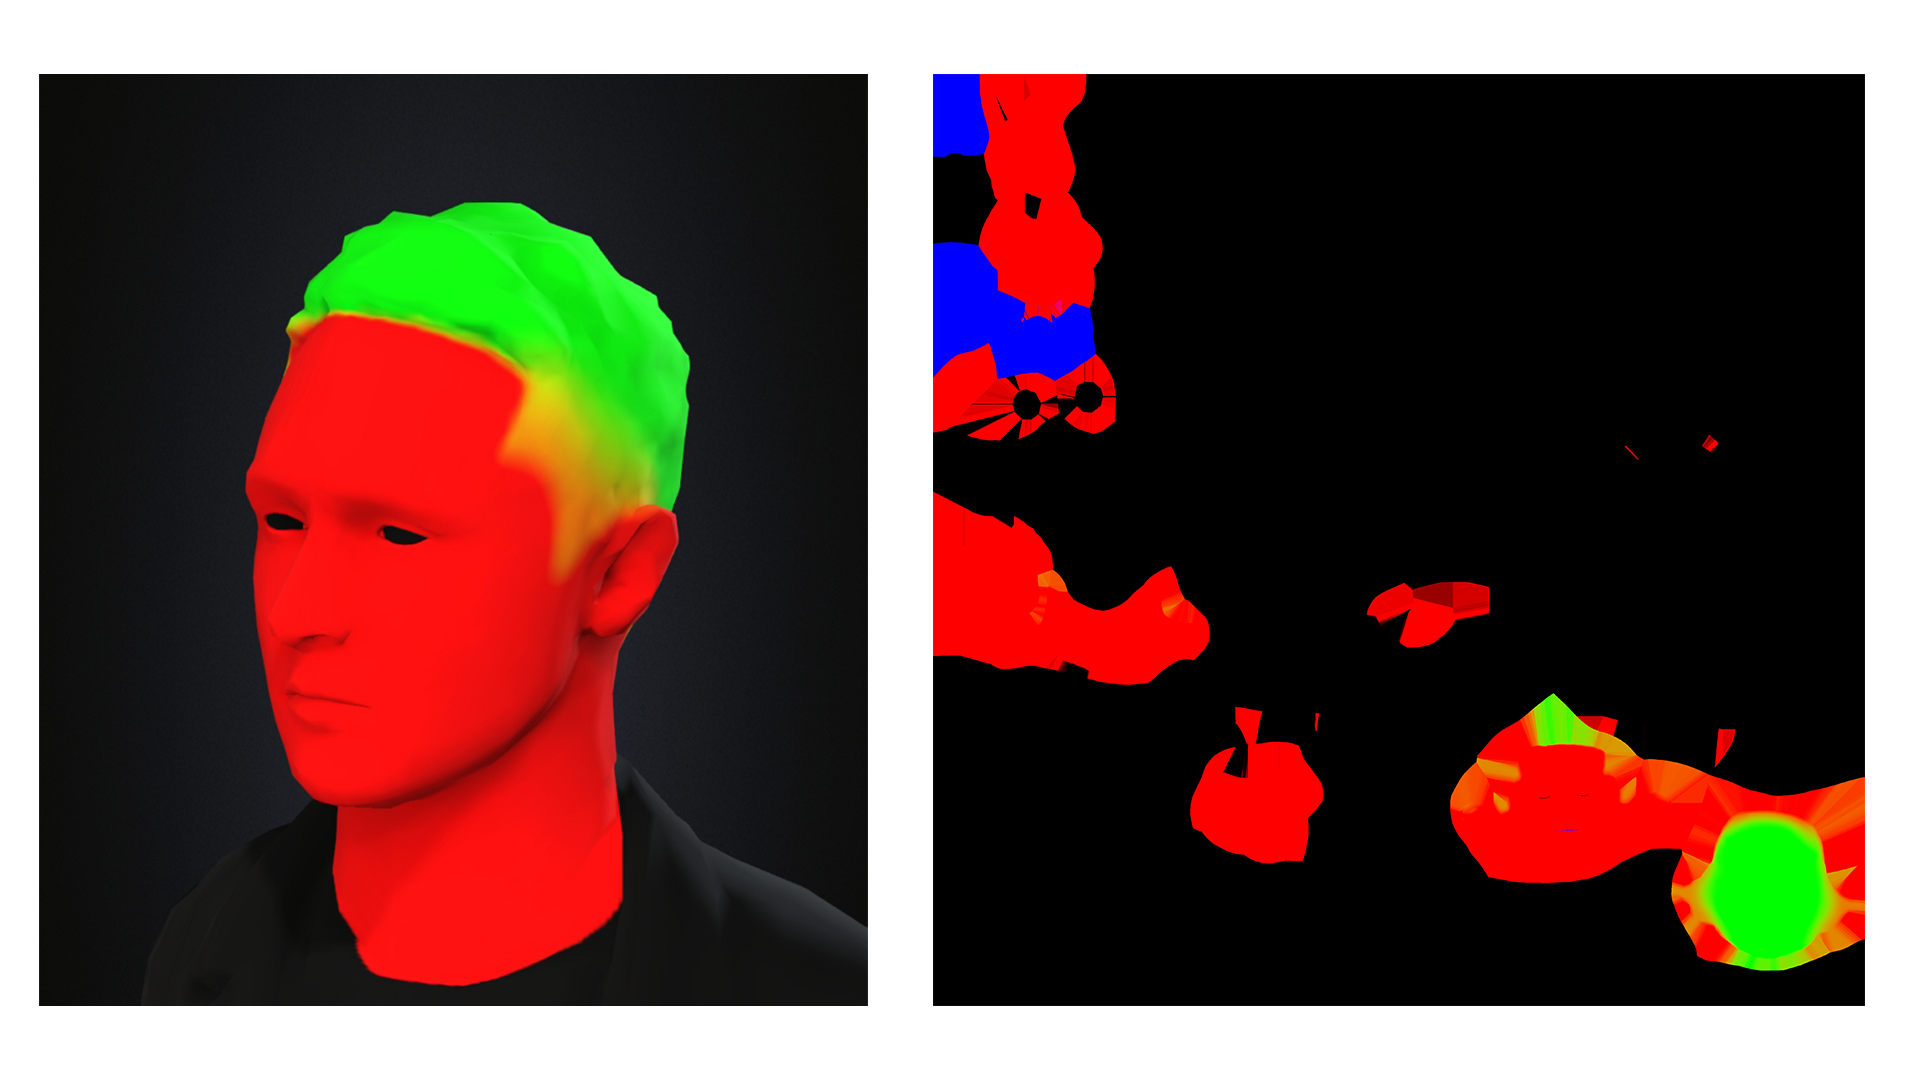
These two color maps are used for separately controlling the components of the character's Base Color map. For example, Green is for hair color and Red is for skin color in the RGB Mask map. Green is for jacket color and Blue is for pants color, etc. in Color ID Mask map.

You can enable the Check Mask in each section to check the colors and find out which controls which part.

https://forum.reallusion.com/uploads/images/1eaf88e3-fdfb-4faa-b9e0-7adf.png

https://forum.reallusion.com/uploads/images/f4f0c867-ec22-4281-b867-93e6.png

https://forum.reallusion.com/uploads/images/a4cc6444-a55f-4f3c-91cf-a118.png


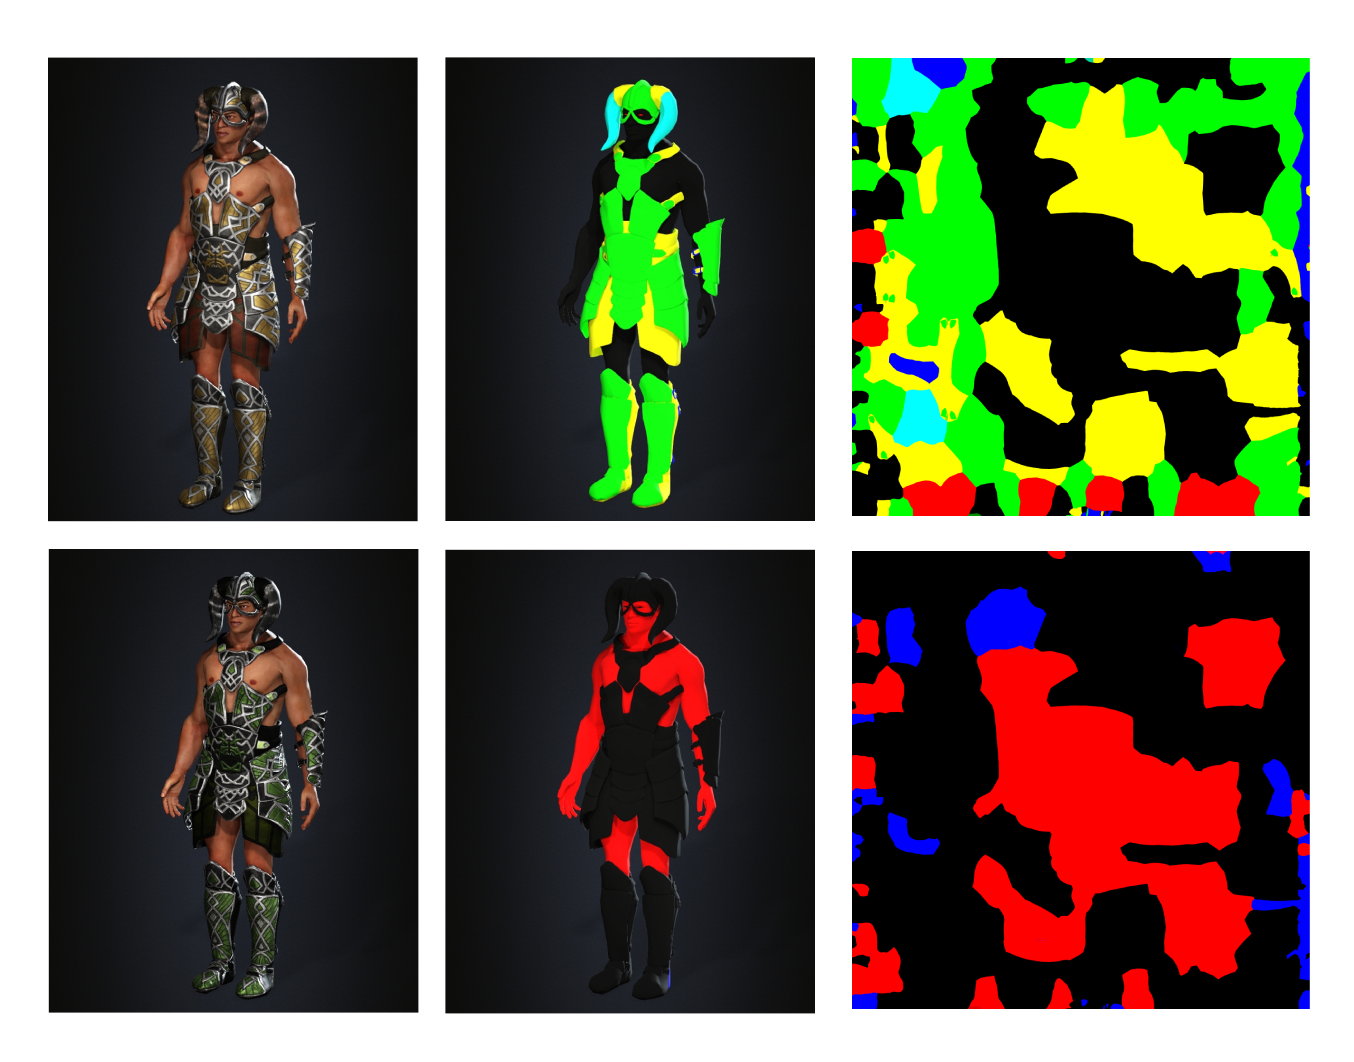
Every character has its own color map which you can customize the color for different kinds of accessories, eg: the armor.
https://forum.reallusion.com/uploads/images/bd008ba1-e3f6-462f-93c0-05f4.png


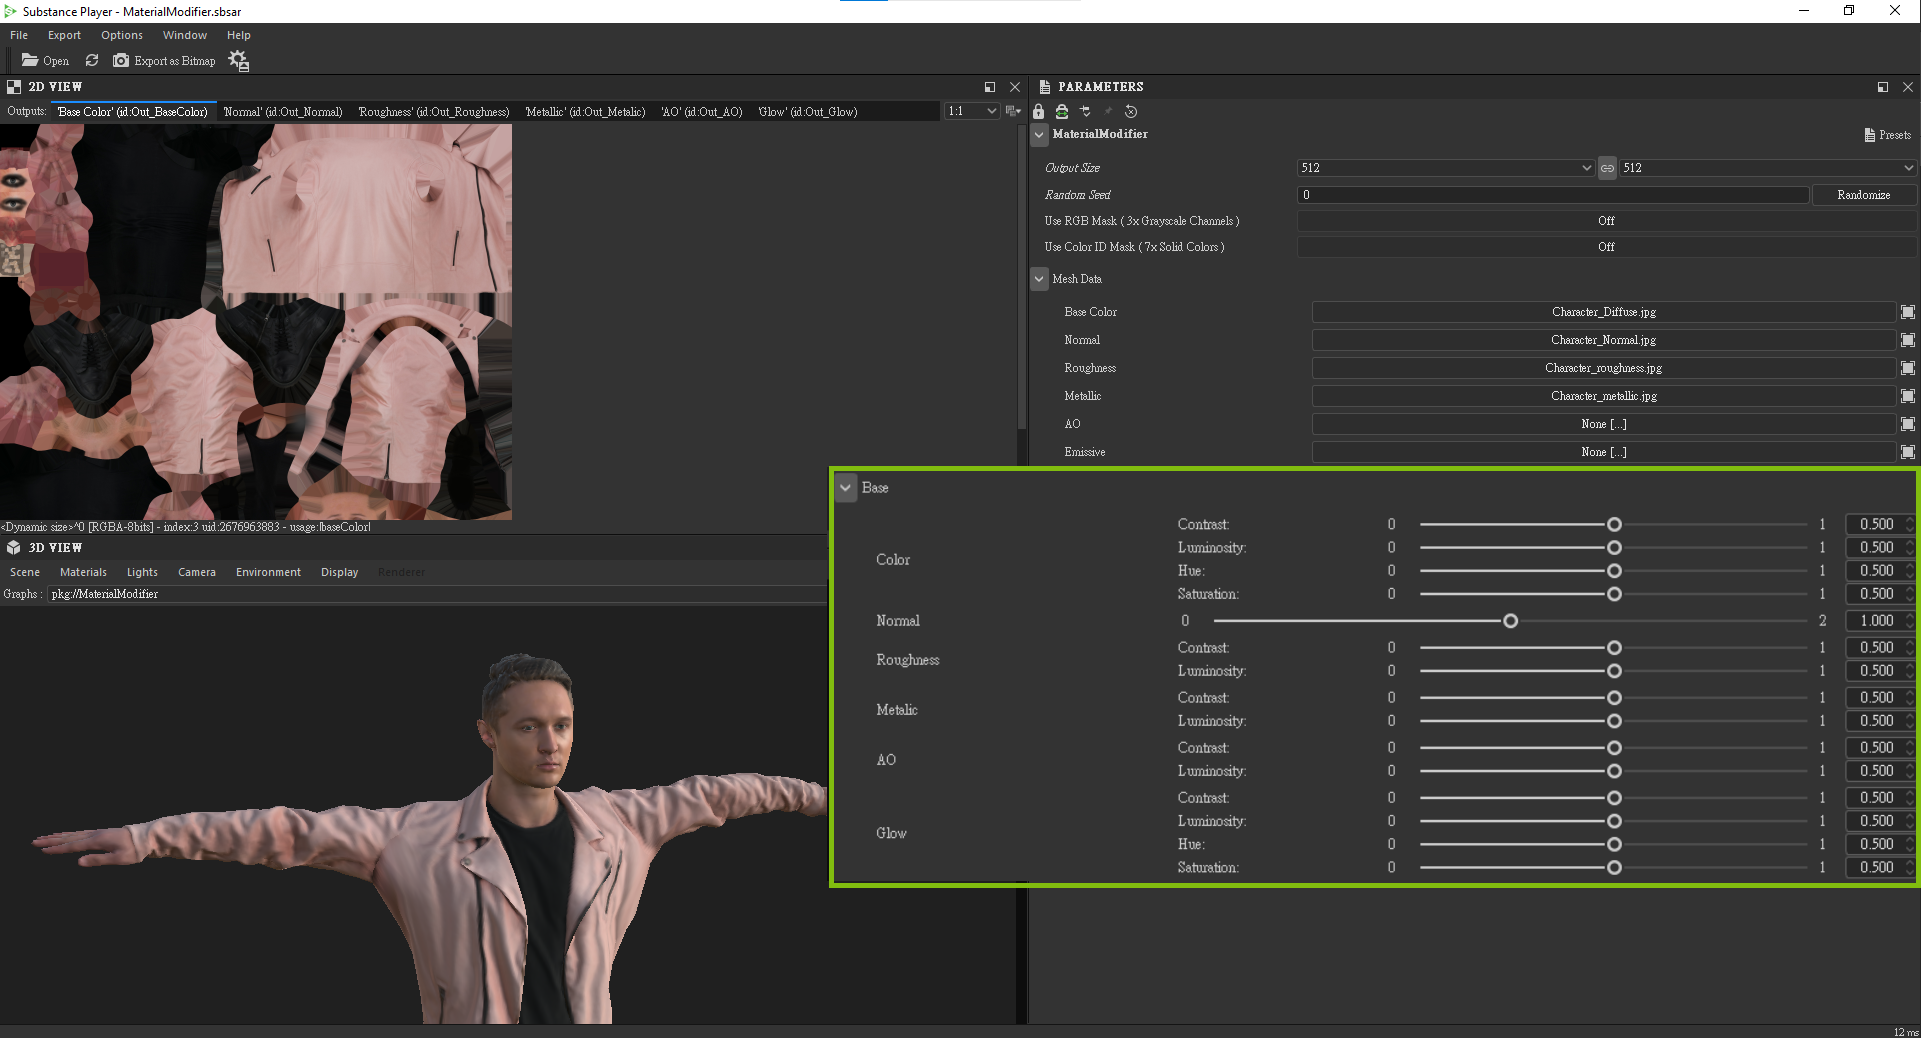
There are Contrast and Luminosity tweaking options in every map. Base Color has four tweaking options: Contrast, Luminosity, Hue and Saturation which allow you to do the more detailed adjustment.

You can see that if you change the color of the jacket, the Base color map will change as well.

https://forum.reallusion.com/uploads/images/06b70d0c-0af0-40ec-8496-1da7.png

https://forum.reallusion.com/uploads/images/5f88c6d3-a591-4a57-87e8-3653.png

You can tweak Roughness and Metallic to make a jacket like this.
https://forum.reallusion.com/uploads/images/8313d4e0-797f-4758-899b-6704.png
For hair, you will need the RGB Mask and adjust the color gradient. The RGB Mask allows you to tweak the gradient of the map, so you can use the Blur and the Position of Mask to make the hairline more natural.

https://forum.reallusion.com/uploads/images/16493db5-3699-410d-aa4b-763b.png

https://forum.reallusion.com/uploads/images/5699b33e-4ab0-4cb2-86c5-f23f.png
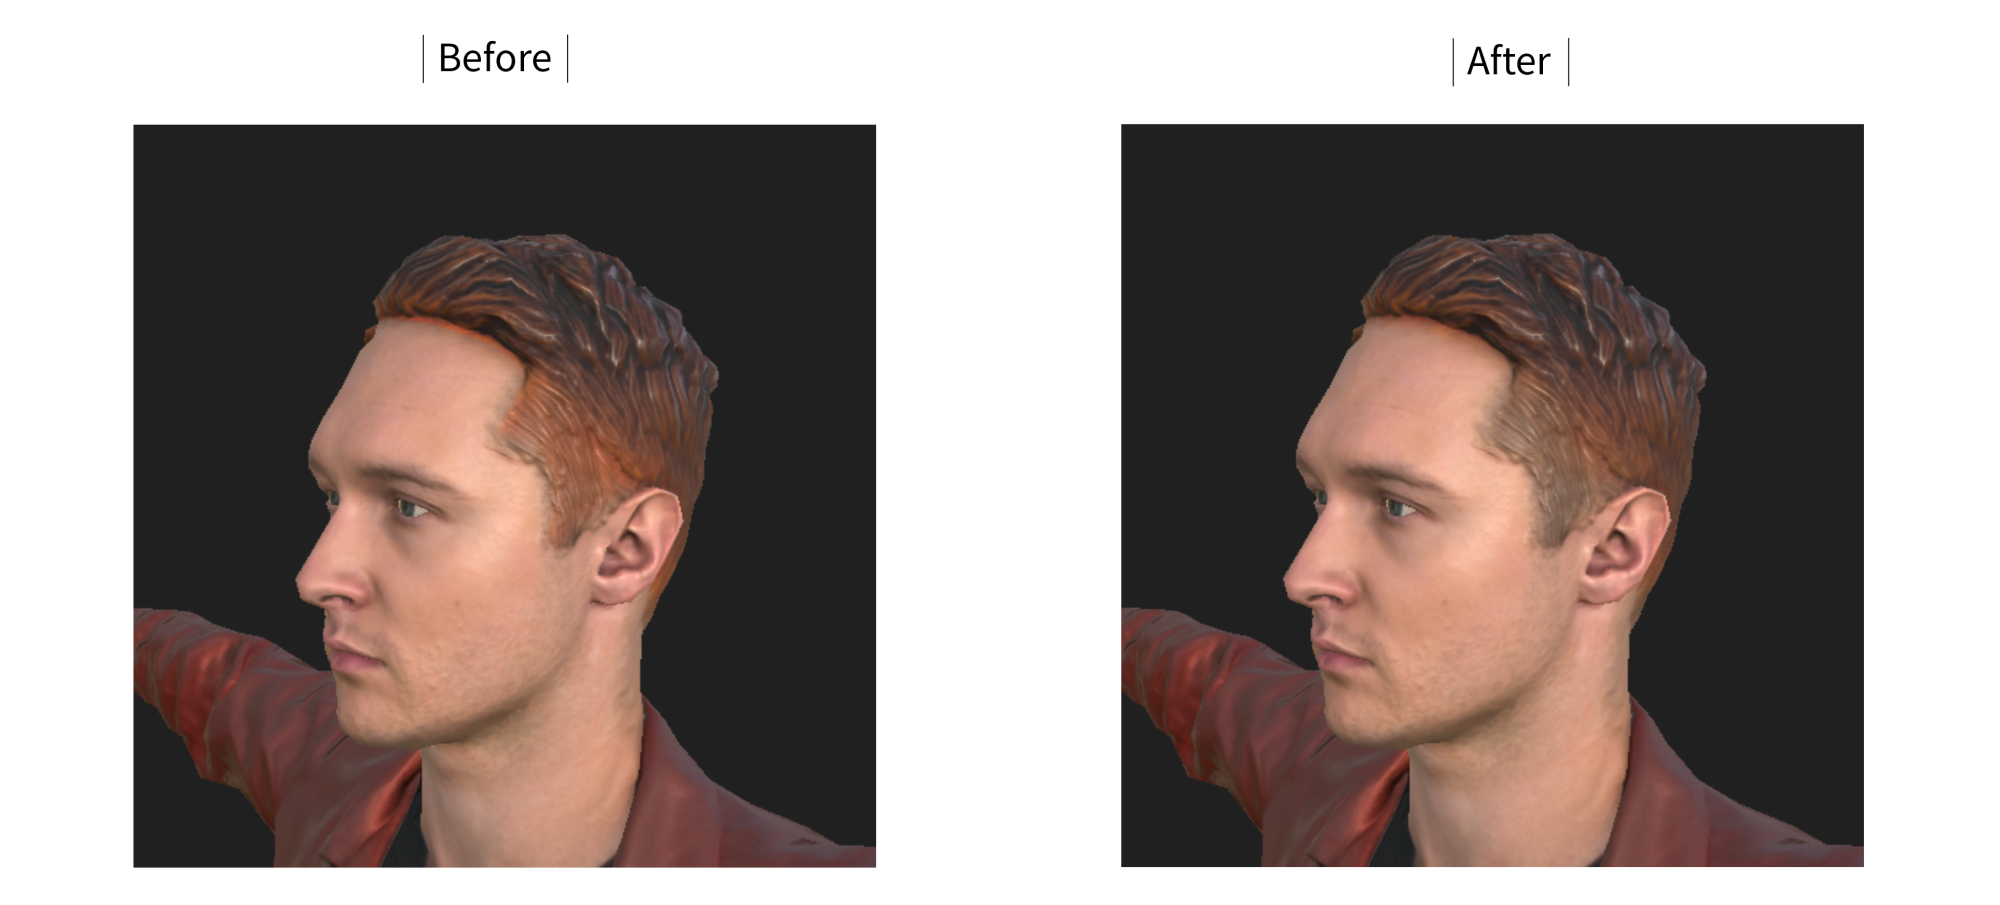
Before:Blur = 0.00, Mask.Position = 0.5
After:Blur = 1.00, Mask.Position = 0.3


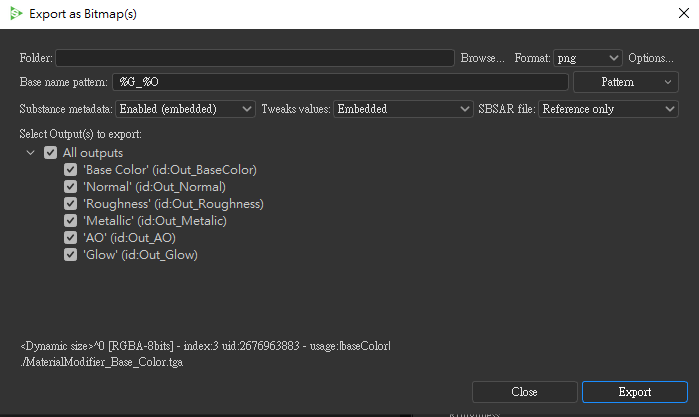
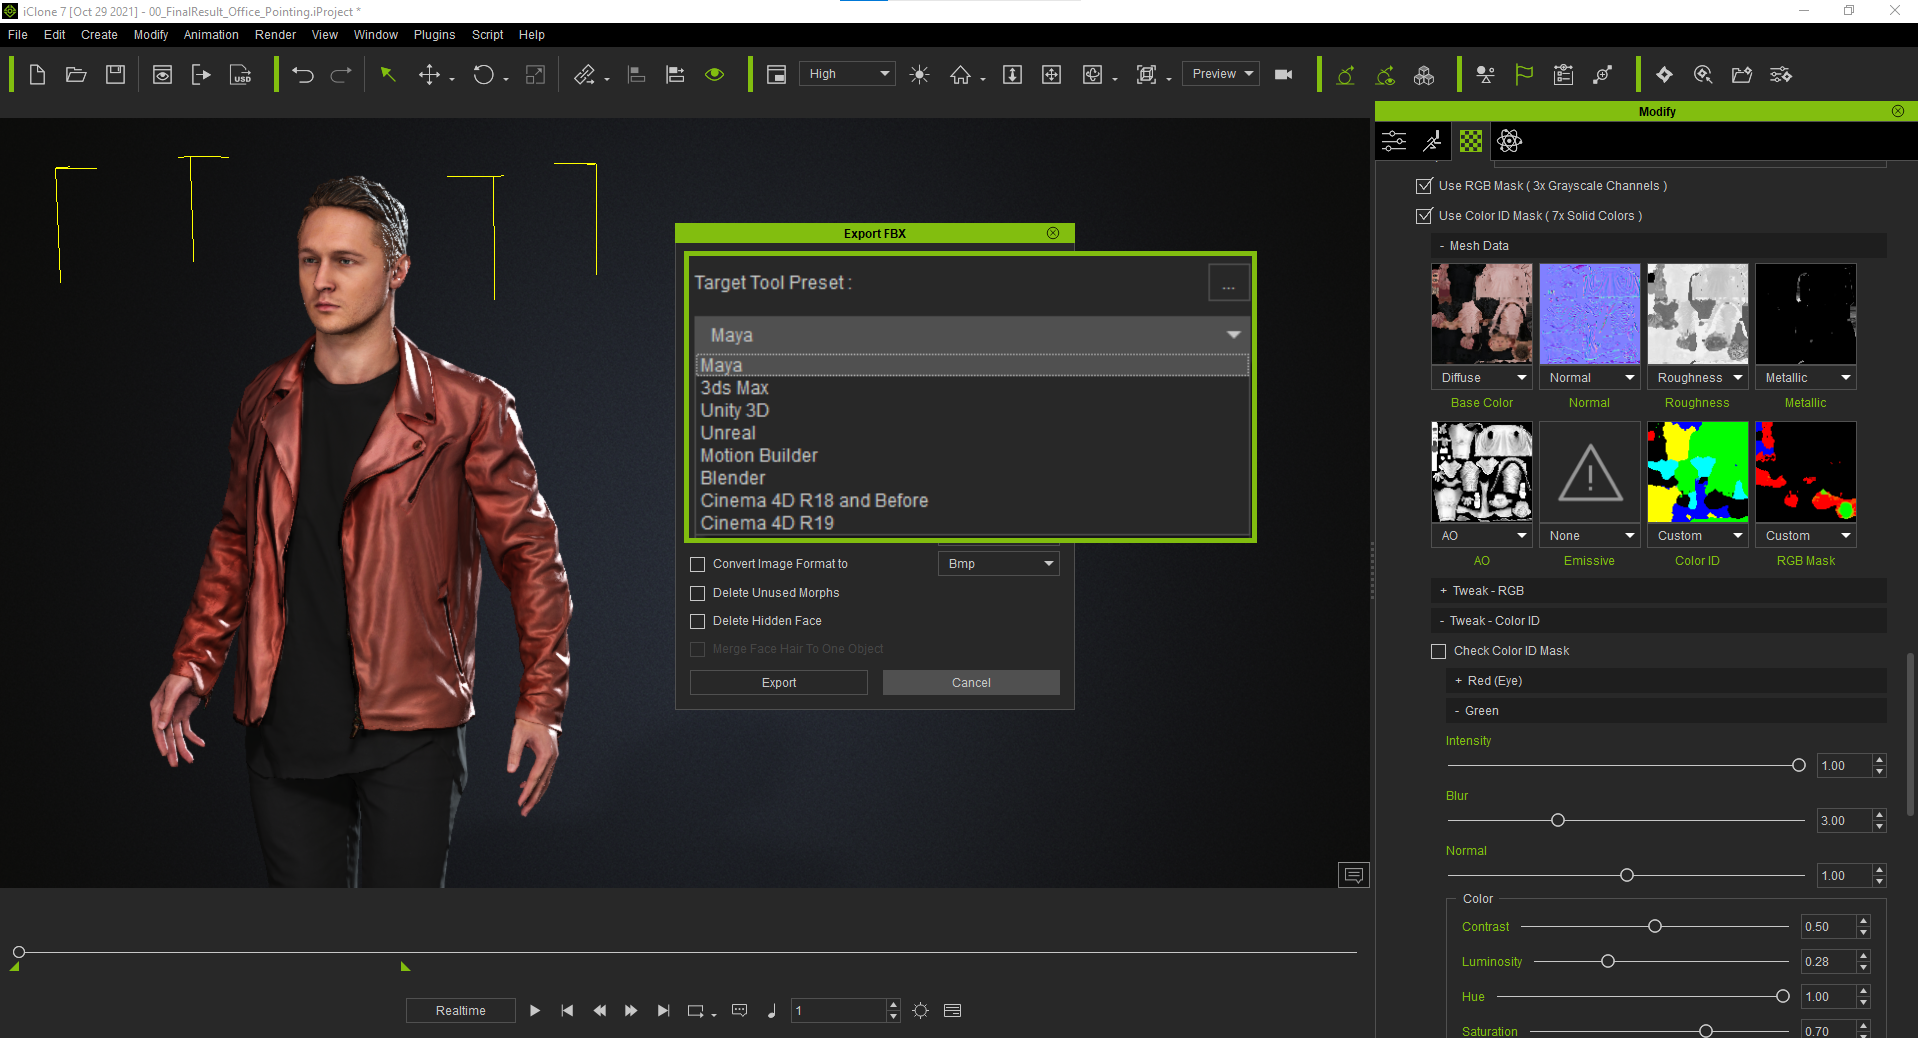
Finally, if you are satisfied with your work, go to the left top and Export as Bitmap to export the map you want. If you only want to change the color of your character, export Base Color map only.
https://forum.reallusion.com/uploads/images/fdb7572c-f831-4fa8-92fa-a8da.png

https://forum.reallusion.com/uploads/images/3ebe1701-9d84-48af-a76d-6e40.png

https://forum.reallusion.com/uploads/images/33ccaa1b-68a9-4391-84f7-3bac.png

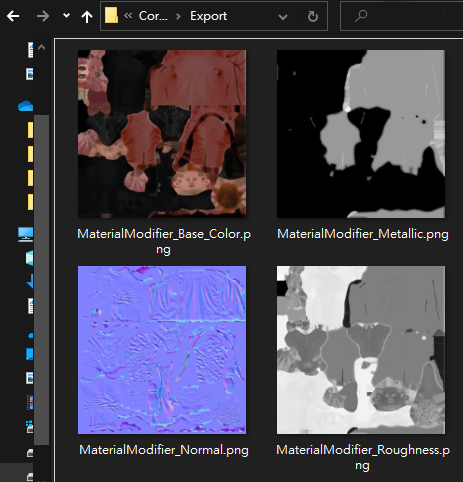
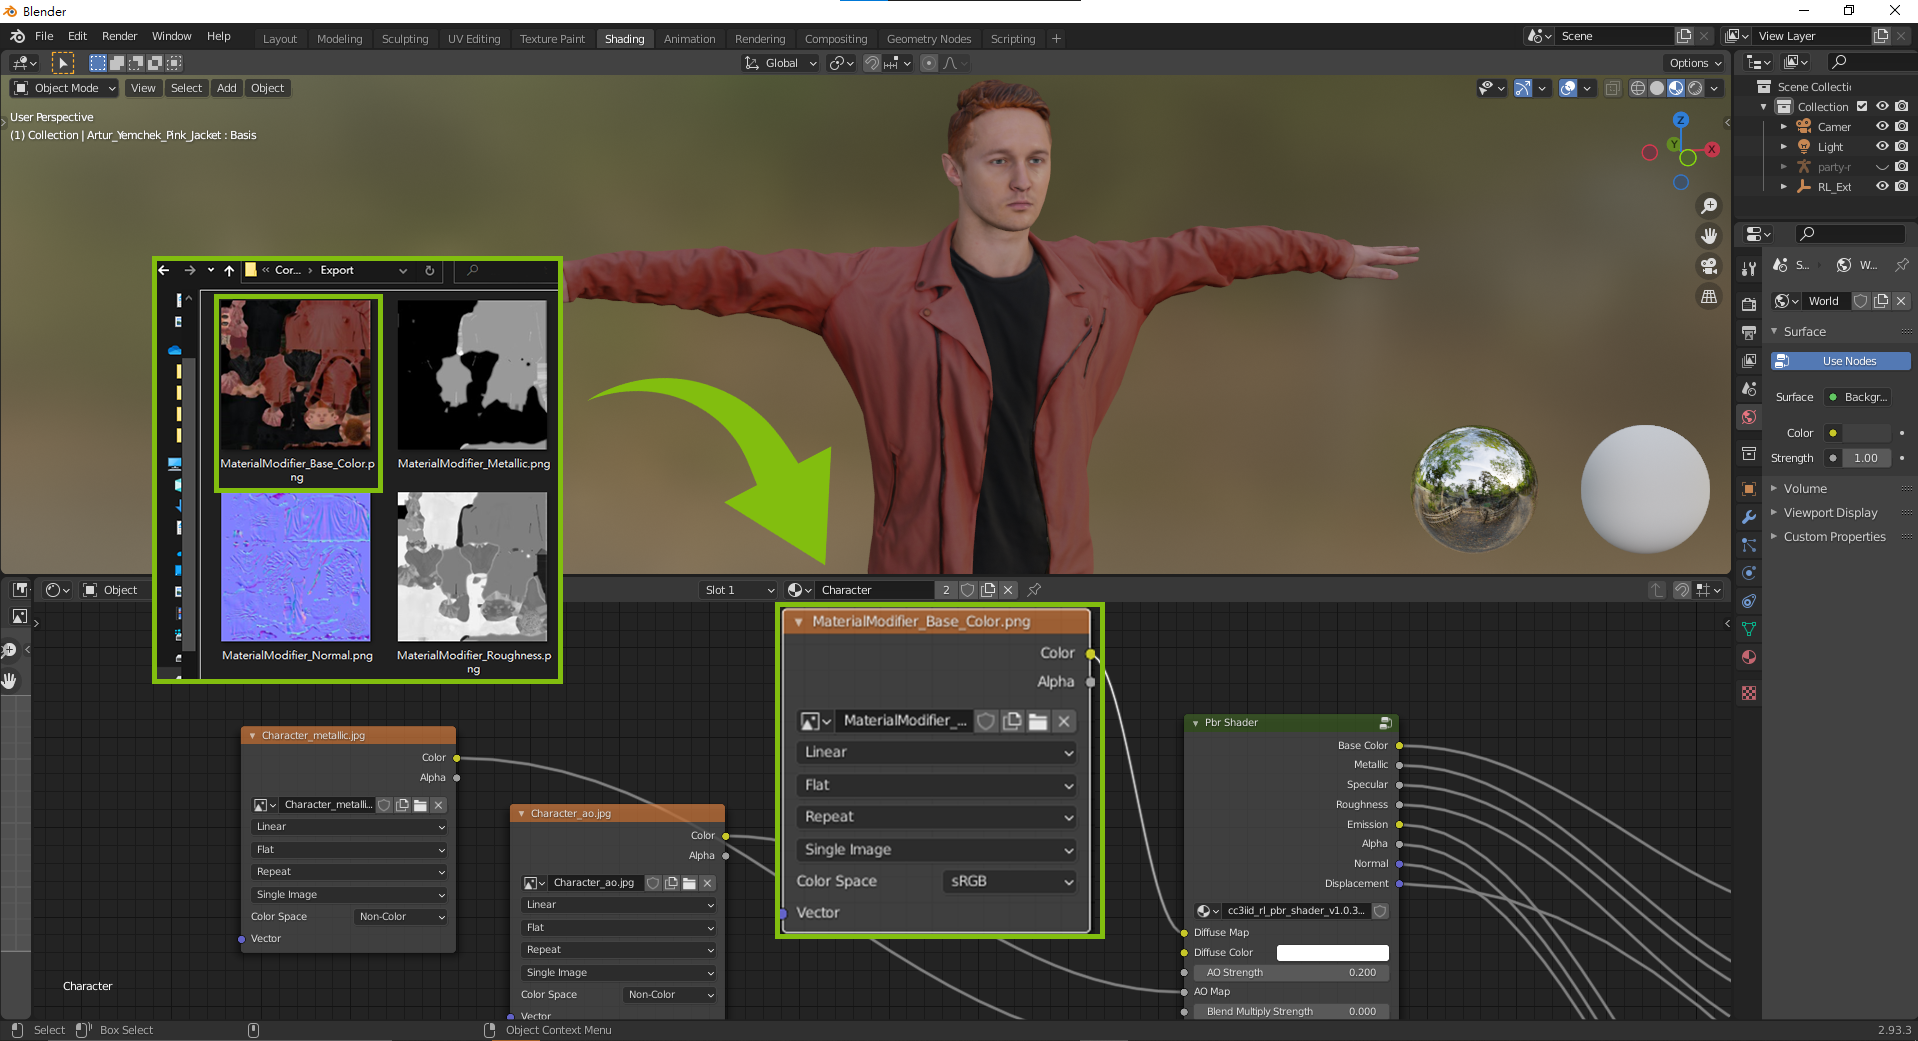
You have got the new map now. Go to your target application and replace the map of your character. Here we will show the way to replace maps in different 3D tools.
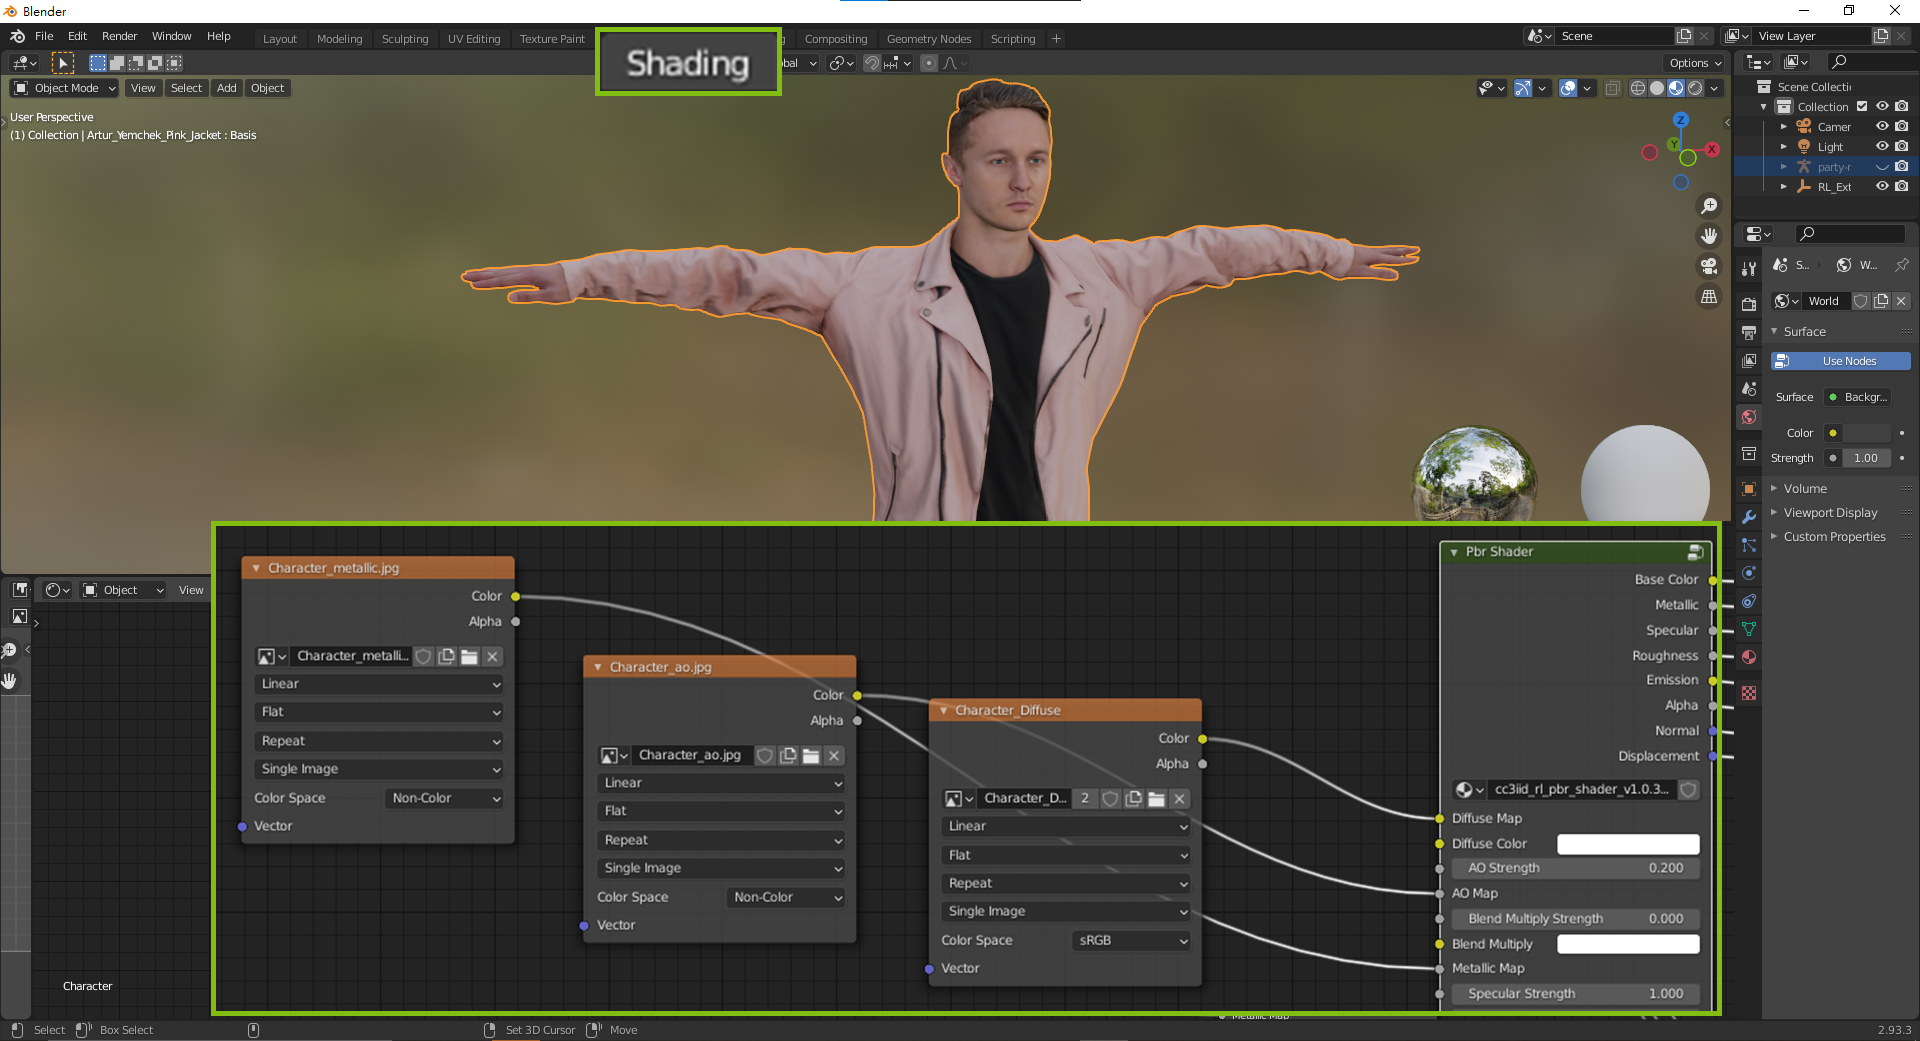

Blender:

Use the CC3 Blender Tools (Auto Setup) to import, and go to the Shading tab to change the image of the corresponding node.
https://forum.reallusion.com/uploads/images/64a31848-2ae6-4565-a33c-4ae4.png

https://forum.reallusion.com/uploads/images/ed796c0c-63fa-4ea9-b796-921a.png

How to use the CC3 Blender Tools to import ActorCore characters:

Step by Step Guide:


3ds Max

Import and do mapping processing of your textures. Please follow the tutorial:
ActorCore Tutorial - Animating ActorCore Characters in 3ds Max

https://forum.reallusion.com/uploads/images/32a74598-f771-446d-b879-d0c6.png

Step by Step Guide:
ActorCore - Retarget 3D Characters and Motions To 3ds Max 


Maya

Import and do mapping processing of your textures. Please follow the tutorial: 
https://forum.reallusion.com/uploads/images/42f47f6e-e3d2-42b6-bd87-3e97.png

Step by Step Guide:
ActorCore - Retarget 3D Characters and Motions To Maya 


Unity

If you just want to adjust the color or Normal strength of characters, you can use the procedure above to replace maps in Unity.
https://forum.reallusion.com/uploads/images/cda480c3-c4be-49e5-8413-1766.png

How to use the Unity Auto Setup to import ActorCore characters:
ActorCore to Unity Tutorials 

Step by Step Guide:
ActorCore - Retarget 3D Characters and Motions To Unity


Unreal Engine 

If you just want to adjust the color or Normal strength of characters, you can use the procedure above to replace maps in Unreal.
https://forum.reallusion.com/uploads/images/979b6dbb-c9bd-4d10-bc3b-030f.png

How to use the Unreal Auto Setup to import ActorCore characters:
ActorCore to Unreal Engine Tutorials 


For your information, to reduce the calculating resource, Unity and Unreal combine these three maps (Roughness, Metallic, AO) into one map.

Unity → HDRP
Unreal → ORM

Therefore you cannot use Substance Player only to export the particular map.  We recommend you to use iClone in this case.

https://forum.reallusion.com/uploads/images/23e58845-b9de-4f02-8878-f495.png


You can simply export your characters to any target application as a FBX file in iClone with 3DXchange Pipeline required.

https://forum.reallusion.com/uploads/images/07b45dac-79fe-469c-98cc-2cd1.png

If you still want to tweak the Roughness, Metallic and AO map, please download the ActorCore character by Blender preset to get these three maps.
Edited
3 Years Ago by Bridgette (RL)


Reading This Topic