|
Author
|
Message
|
|
harris.josephd
|
harris.josephd
Posted 3 Years Ago
|
|
Group: Forum Members
Last Active: 11 Months Ago
Posts: 252,
Visits: 810
|
A while ago, I introduced my three year old to the concept of ninjas in the context of kids' stories she had heard at school. This evolved into her demanding stories of ninjas and me creating Mei the ninja. Mei spends a lot of her time being invisible and doing ninja magic. As of now, we're up to eight different Mei stories that each mutate ever so slightly with each telling.
Mei is inquisitive, bright, cheerful and a great vehicle to teach lessons.
So please meet Mei.
As a technical question, I am using LUT 200 and the Iray extension. All of this is rendered native in CC. Does anyone have any tips or tricks for improving photorealism? I have the avatar shaped to where I want her. I have her hair and brows shaped where I want them. Somewhere between the roughness maps, the LUTs and IRAY lighting, we can get a little deeper into the uncanny valley. I am just at a loss on how to do so. Any ideas would help. Suggestions are very welcome.
|
|
|
|
|
planetstardragon
|
planetstardragon
Posted 3 Years Ago
|
|
Group: Forum Members
Last Active: 4 Months Ago
Posts: 11.5K,
Visits: 46.0K
|
I can give you a fish or teach you to fish :p -hands over a fishing pole- Compare the difference in saturation, highlights and shadows...you tell me. Use reference photos. - recognizing your target is the first step at hitting it. 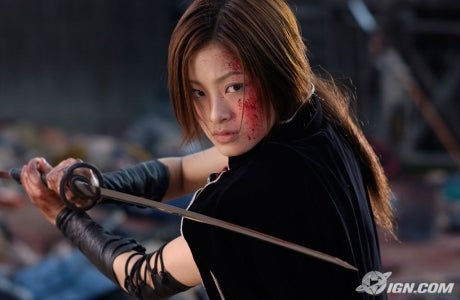 and this is using my photo editor with filters on your photo trying to match the difference from that movie real life photo. - you may be limited to how much you can do with just iclone tools. 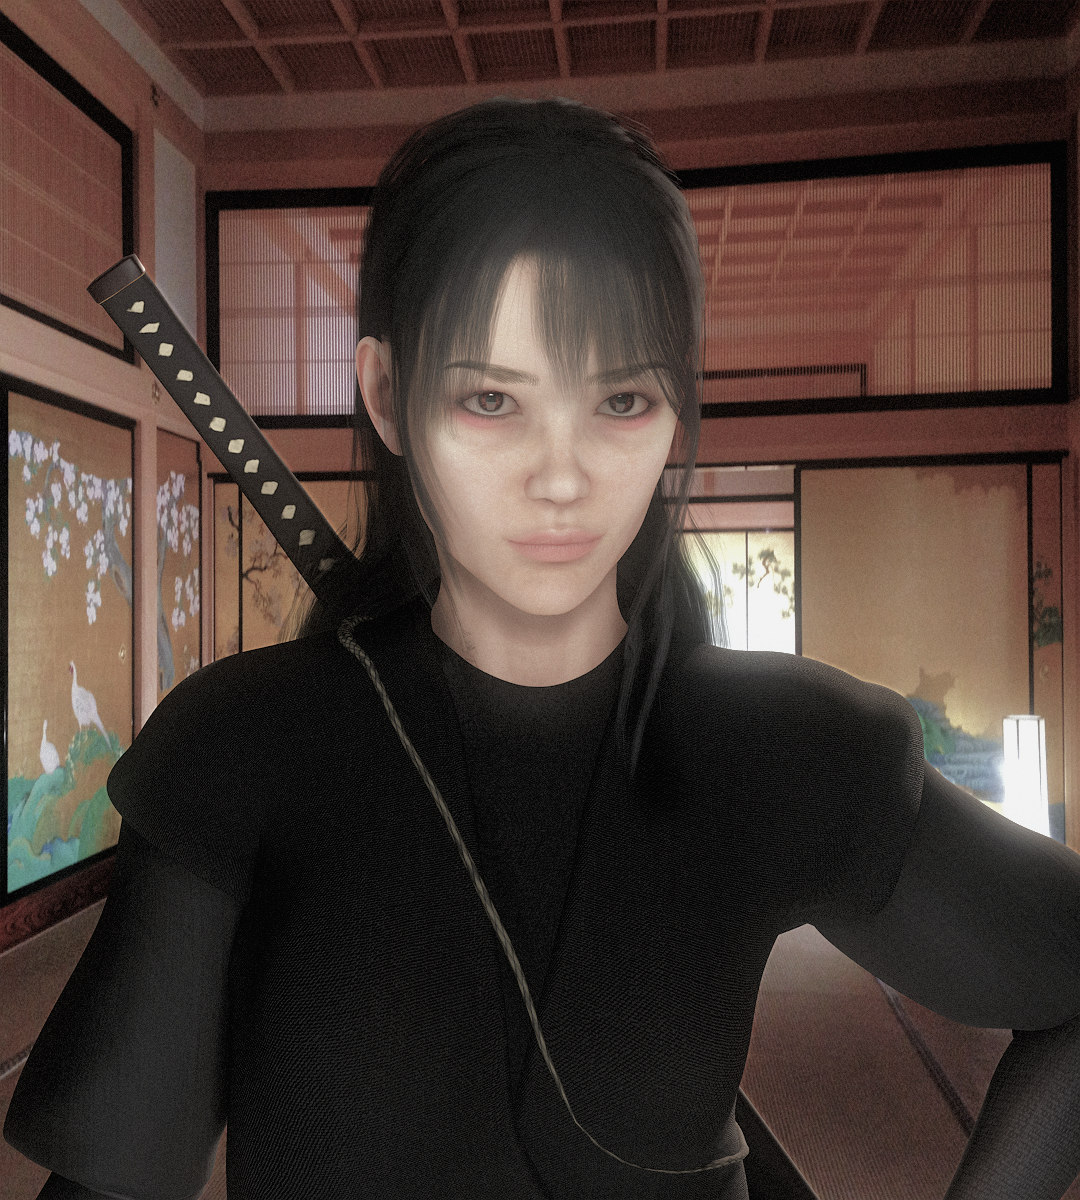
☯🐉 "To define Tao is to defile it" - Lao Tzu
|
|
|
|
|
harris.josephd
|
harris.josephd
Posted 3 Years Ago
|
|
Group: Forum Members
Last Active: 11 Months Ago
Posts: 252,
Visits: 810
|
planetstardragon (3/14/2022)
I can give you a fish or teach you to fish :p -hands over a fishing pole- Compare the difference in saturation, highlights and shadows...you tell me. Use reference photos. - recognizing your target is the first step at hitting it. Right... I really am trying to improve my skills. That's my only reason for posting here. I obviously feel that more can be done to improve the photo-realism, otherwise I would not have asked and just telling me to use reference photos is not helpful. If you have a specific suggestion like "like try using a desaturation LUT" or "place a new back light in such and such a position" or "alter the reflectivity of her hair" that might be helpful. EDIT Thank you for adding the suggestion about saturation. I may well need to start doing more post processing.
|
|
|
|
|
planetstardragon
|
planetstardragon
Posted 3 Years Ago
|
|
Group: Forum Members
Last Active: 4 Months Ago
Posts: 11.5K,
Visits: 46.0K
|
well that's the point, you have to see the realism target first to know what tools to go for. you have to study the shadows ...which you can fix with the darkness in lights, you have to study the saturation so you don't over saturate and hide details, you have to study the way things glow that highlights the hair ...it's not 1 filter. To better your skills you have to see what the difference is first, then know which tools to address that difference. Learning the tools is easy, learning to compare the real photo to your render is where the skills come in. The ability to notice the difference and patterns, then knowing which tools to adjust them. How to make the photo more real, is not the same question as how to make an image brighter without causing glares. One is based on analysis, the other is finding a technical limitation. Once you understand the technical limitations, then you know where to stop in one software and pick it up in another, because software A doesn't have to tools you need for the extra fine detail. It's the difference between knowing when to use an axe and a scalpel
☯🐉 "To define Tao is to defile it" - Lao Tzu
|
|
|
|
|
harris.josephd
|
harris.josephd
Posted 3 Years Ago
|
|
Group: Forum Members
Last Active: 11 Months Ago
Posts: 252,
Visits: 810
|
planetstardragon (3/14/2022)
well that's the point, you have to see the realism target first to know what tools to go for. you have to study the shadows ...which you can fix with the darkness in lights, you have to study the saturation so you don't over saturate and hide details, you have to study the way things glow that highlights the hair ...it's not 1 filter.
To better your skills you have to see what the difference is first, then know which tools to address that difference. Learning the tools is easy, learning to compare the real photo to your render is where the skills come in. The ability to notice the difference and patterns, then knowing which tools to adjust them.
How to make the photo more real, is not the same question as how to make an image brighter without causing glares. One is based on analysis, the other is finding a technical limitation.
Except for three things: 1. Brightening the image the way you did ruins the overall composition, and while playing with saturation has merits, what you presented needs to restore contrast and color depth. I feel that your improvement is honestly a worse image than the original. The photo you used as a reference is of someone outside in bright, but slightly overcast light. Mine is indoors and a much less brightly lit environment with much less ambient light. The sun is not reflecting off bright rocky ground. I think it was a bad idea to try to use the reference photo you did to match. 2. Obviously, the shadows in the orginal are a little off. Again, I would not have asked for advice if I didn't already notice. Telling me to look at more reference photos is a little unfair. 3. If you are telling me that you don't think it is possible using only the CC native tools, that is useful, but if you are telling me I can get a better effect in CC, then please be more specific as to how.
|
|
|
|
|
planetstardragon
|
planetstardragon
Posted 3 Years Ago
|
|
Group: Forum Members
Last Active: 4 Months Ago
Posts: 11.5K,
Visits: 46.0K
|
Good, now we are getting some where. My objective was to get you to analyze and compare, and you did just that. The next question would be, what could you have done in your original render to make my adjustments look better. My goal was to adjust the saturation and bring out the highlights to match the real image, now you say it got washed out ....which is correct ...so what could you have done to your image to preserve those details in my adjustments. the shadows as I said before could have been adjusted in the darkness settings in the lights. what I learned from this process I'm sharing was how I needed to render something in CC to give me the image I need to tweak in another software. While software A may not have the tools I need for fine details, I could still render all the details I need for fine tuning in another software.
☯🐉 "To define Tao is to defile it" - Lao Tzu
|
|
|
|
|
Jeffster The Mighty
|
Jeffster The Mighty
Posted 3 Years Ago
|
|
Group: Forum Members
Last Active: Last Year
Posts: 308,
Visits: 1.2K
|
Though this doesn't answer your question, I would do my LUTs in the video editing software, rather than iClone. That way, if you change your mind, especially for multiple scenes, you can just do that later. I also record all voice and instruments dry and add effects later.
You can also experiment with DOF. While DOF isn't equivalent with realism, it's a nice touch. Your color is good, but DOF might help. So many images I see have a flat color, and slight DOF (don't overdo it) might be enough to make your subject pop. iClone lets you dial down the strength of the blur.
|
|
|
|
|
jeff.davies
|
jeff.davies
Posted 3 Years Ago
|
|
Group: Forum Members
Last Active: 2 Years Ago
Posts: 300,
Visits: 1.5K
|
The lighting in the real-world picture is done professionally.Specifically the backlight brings out the highlights of her hair, further separating her from the background. Before resorting to image editing tools, I suggest focusing on the lighting of the original first. Now I may be biased here, because at this point I consider lighting to be my #1 challenge, but if you don't start with a great image, post-processing is going to be difficult to impossible.
- Jeff
The Adventures of Capt Sanchez
Cybernautic Studios
|
|
|
|
|
harris.josephd
|
harris.josephd
Posted 3 Years Ago
|
|
Group: Forum Members
Last Active: 11 Months Ago
Posts: 252,
Visits: 810
|
jjdigitalgraphics (3/14/2022)
Though this doesn't answer your question, I would do my LUTs in the video editing software, rather than iClone. That way, if you change your mind, especially for multiple scenes, you can just do that later. I also record all voice and instruments dry and add effects later.
You can also experiment with DOF. While DOF isn't equivalent with realism, it's a nice touch. Your color is good, but DOF might help. So many images I see have a flat color, and slight DOF (don't overdo it) might be enough to make your subject pop. iClone lets you dial down the strength of the blur.Depth of field is definitely something to do. I wanted to sort out the shadows first, but I agree.
|
|
|
|
|
harris.josephd
|
harris.josephd
Posted 3 Years Ago
|
|
Group: Forum Members
Last Active: 11 Months Ago
Posts: 252,
Visits: 810
|
jeff.davies (3/14/2022)
The lighting in the real-world picture is done professionally.Specifically the backlight brings out the highlights of her hair, further separating her from the background. Before resorting to image editing tools, I suggest focusing on the lighting of the original first. Now I may be biased here, because at this point I consider lighting to be my #1 challenge, but if you don't start with a great image, post-processing is going to be difficult to impossible.I agree with that too, but I am not certain the image presented by the other commentor is a photo. Right now, my current plan is to add a weak directional light to simulate reflections from the shiny wooden floor and add another contrast filter. That will highlight her hair without damaging the overall darkness of the room.
|
|
|
|