Profile Picture

Good tutorials on how to import and set up CC3 characters into Blender?

Posted By oonabe 4 Years Ago
You don't have permission to rate!

Good tutorials on how to import and set up CC3 characters into...

Author
Message
oonabe
oonabe
Posted 4 Years Ago
View Quick Profile
Veteran Member

Veteran Member (901 reputation)Veteran Member (901 reputation)Veteran Member (901 reputation)Veteran Member (901 reputation)Veteran Member (901 reputation)Veteran Member (901 reputation)Veteran Member (901 reputation)Veteran Member (901 reputation)Veteran Member (901 reputation)

Group: Forum Members
Last Active: 2 Years Ago
Posts: 79, Visits: 1.4K
Hi,

I've been struggling for months with getting my characters into Blender and make them look good. I've managed to get them look decent but I'm still missing a lot of information on how to set up the textures as these don't get really set up on import as fbx.

The only maps that get automatically set up are diffuse and normal maps, but I see alot more texture maps in the fbx export folders and cannot always find a solution on how to set them up to make my character look as good in blender as it does in CC3, specially when I start rendering and have to deal with subsurface scattering or transmission maps.

Blender has a tool called Node Wrangler that helps a little bit with roughness and metallic maps by selecting the principled BDSF texture and pressing Ctrl+Shift+T then selecting all texture maps from the folder that matches the selected texture, but it doesn't set up things like the subsurface scattering map or the micronormals, transmission... and my character ends up looking much more like plastic in Blender even using cycles at a high sample resolution as it does when I render with iRay directly in CC3.

Here is an example of what I say, the render on the left is done in blender/cycles while the one on the right is iRay in CC3:

https://forum.reallusion.com/uploads/images/3ca7174f-7424-4317-846f-d9ea.jpg

ddoes anybody know of some good tutorials on how to set up those texture maps so I can improve my workflow between CC3 and Blender? All I could find was a tutorial by Markom3D on how to import a CC3 character into blender and rig it with autorig, but it's very basic and doesn't go into detail with the texture settings.

Any help would be appreciated, thanks
Victor.Soupday
Victor.Soupday
Posted 4 Years Ago
View Quick Profile
Distinguished Member

Distinguished Member (5.8K reputation)Distinguished Member (5.8K reputation)Distinguished Member (5.8K reputation)Distinguished Member (5.8K reputation)Distinguished Member (5.8K reputation)Distinguished Member (5.8K reputation)Distinguished Member (5.8K reputation)Distinguished Member (5.8K reputation)Distinguished Member (5.8K reputation)

Group: Forum Members
Last Active: 2 days ago
Posts: 569, Visits: 9.0K
I've seen the Markom3D video you mentioned, and I'm not convinced it's right with regard to the specular and roughness, I don't think they should be inverted.


I have had some success with the following node setup for the skin shaders: I'll show each shader input independently for clarity.
(All textures should be non-colour except the diffuse texture which is sRGB)

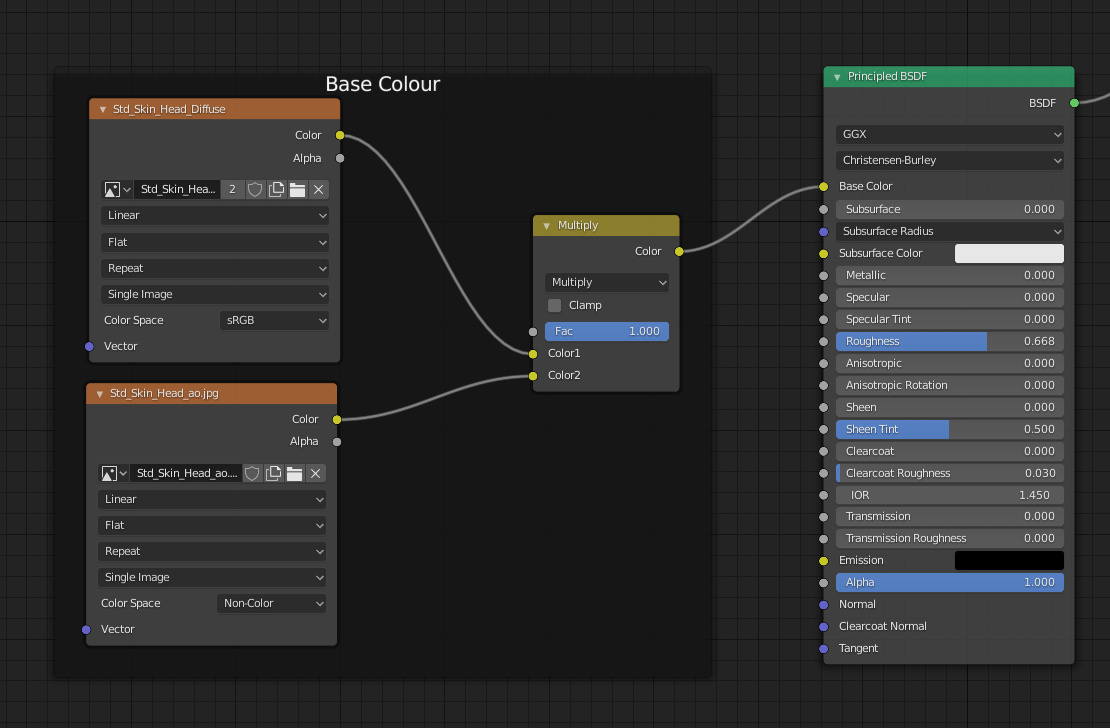
Base Colour:
https://forum.reallusion.com/uploads/images/52b0508b-ba3c-4e8a-a628-54b9.jpg

Multiply the diffuse texture by the Ambient Occlusion map in a MixRGB/Multiply node.

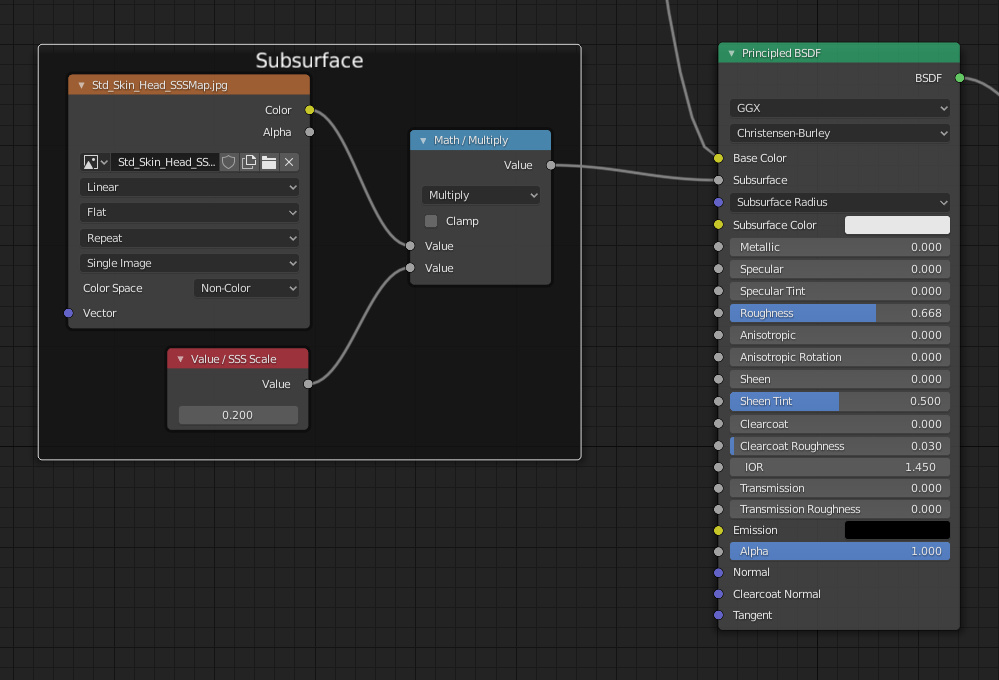
Subsurface:
https://forum.reallusion.com/uploads/images/9cad28b9-d7be-4f25-91a4-a2c4.jpg

The subsurface map defines where light can scatter across the skin. Subsurface settings are really sensitive and work best with very low values. Multiply the Subsurface map by a scaling factor (good values are 0.1 to 0.2) with a Math/Multiply node.

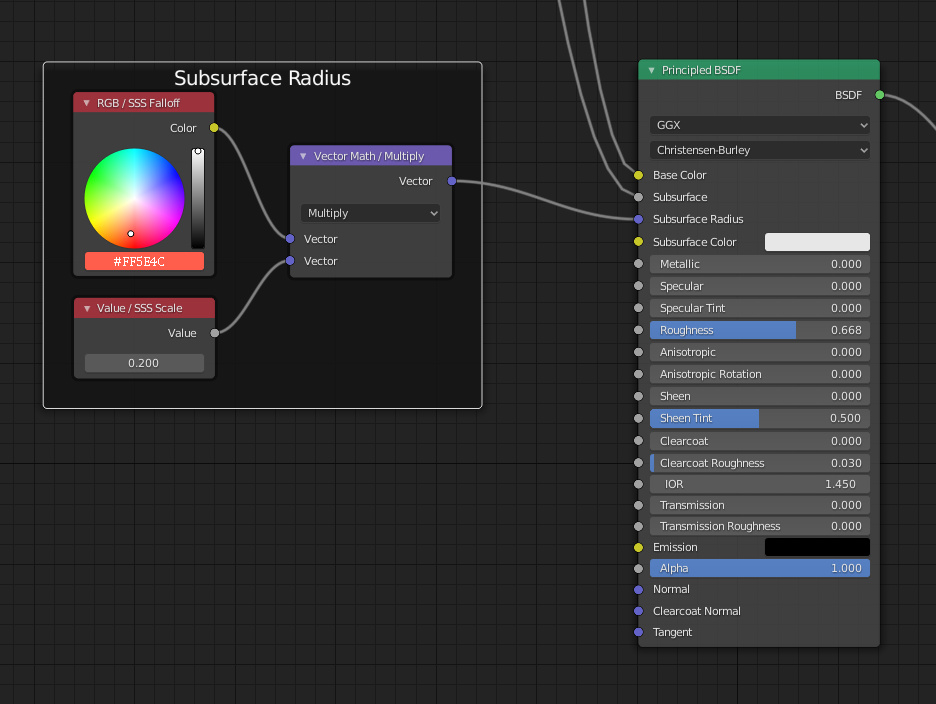
Subsurface Radius:
https://forum.reallusion.com/uploads/images/0f754eb0-9194-49b0-ba3e-0ef4.jpg

The subsurface radius is a vector that defines how the light from the subsurface colour scatters in the red, green and blue colours. The three radii seem to be in the same proportion as the subsurface falloff colour. To get the radii, multiply the subsurface falloff colour (#ff5e4c) by the scaling factor in a Vector Math/Multiply node. This turns the falloff colour into the scattering radii vector with the same scale as the subsurface input. Blender seems to prefer these two inputs are of a similar scale, this also means you can increase or decrease the subsurface effect with just one parameter.

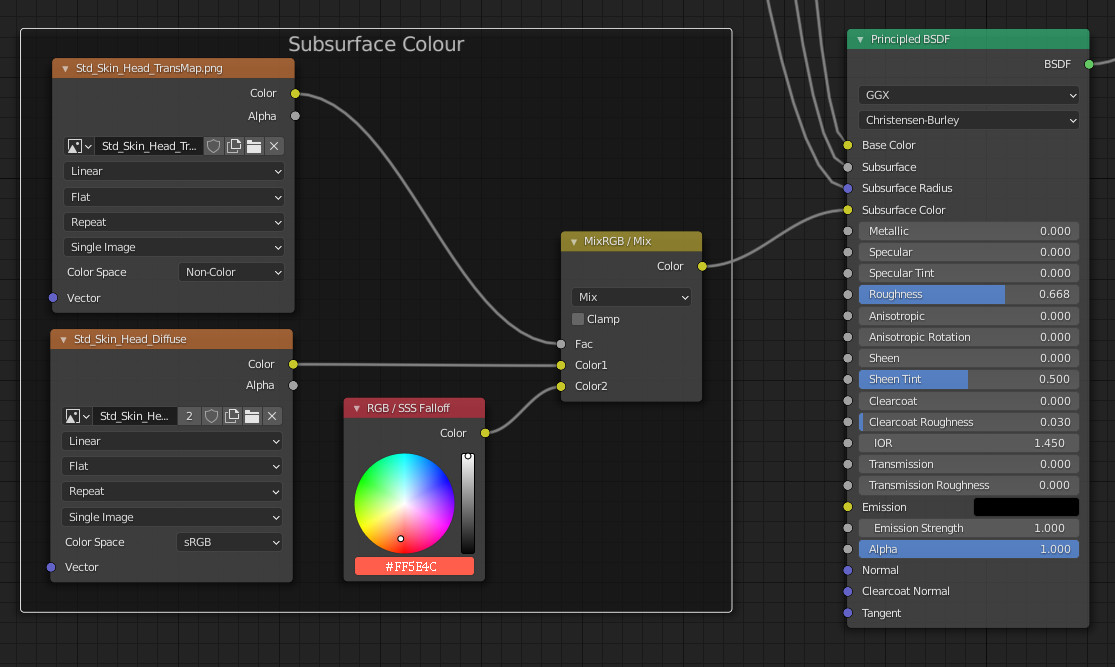
Subsurface Colour:
https://forum.reallusion.com/uploads/images/8822c814-f35e-4388-a0b6-3d4b.jpg

The transmission map defines where light can travel through the skin. as light travels through the skin, the scattering effect turns the colour from the base colour towards the falloff colour. To emulate this effect use the subsurface transmission map as a blend factor in a MixRGB/Mix node, to mix the diffuse base colour with the subsurface falloff colour where the skin is most transmissible/translucent to create the overall subsurface colour. To complete the transmission effect turn on the subsurface translucency in the materials settings, this is what creates the 'light through the ears' effect when strong lights are behind the head.

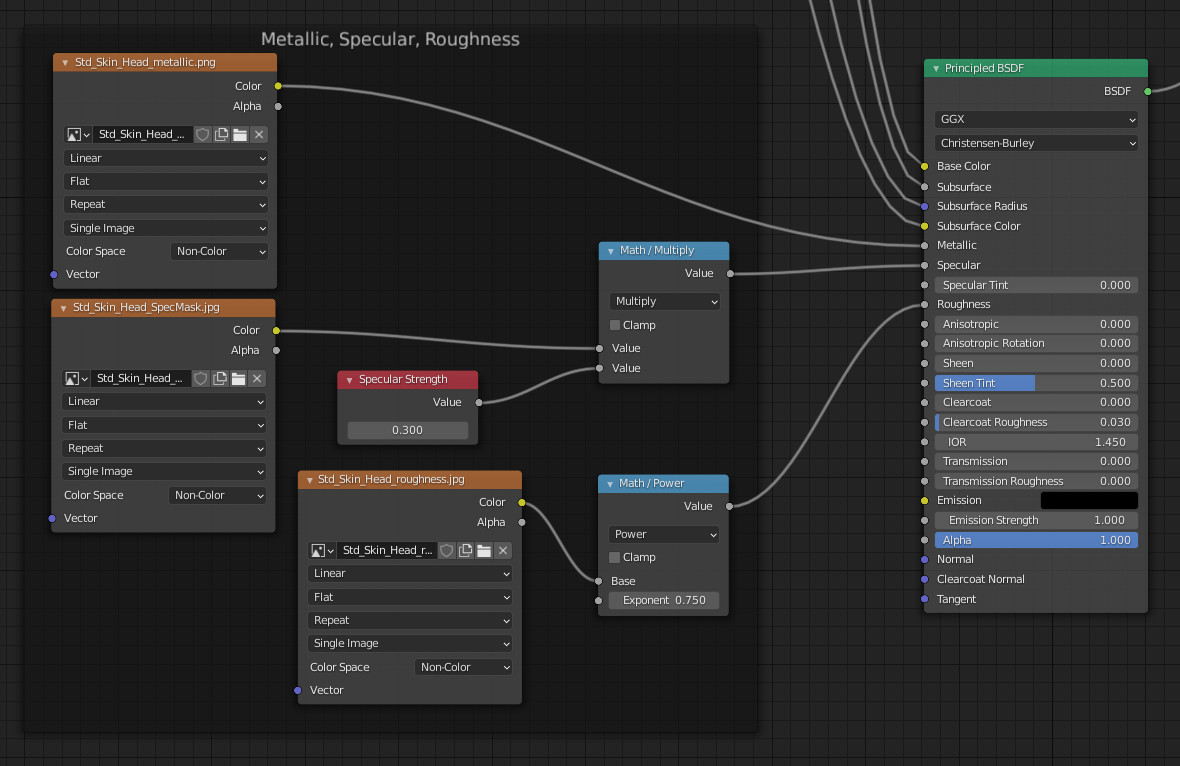
Metallic, Specular, Roughness:
https://forum.reallusion.com/uploads/images/e8914f06-be63-47a6-8762-88f7.jpg

Plug the metallic map in directly (or set to zero if there isn't one).
The specular strength value should be roughly between 0.2 and 0.4. The specular mask map, if it exists, should directly multiply this specular strength in a Math/Multiply node, otherwise just plug in the specular strength value directly.
Blender tends to over exaggerate the roughness and smoothness compared to CC3 so reduce the power of the roughness map by passing it though a Math/Power node (good values are 0.75 - 0.9).

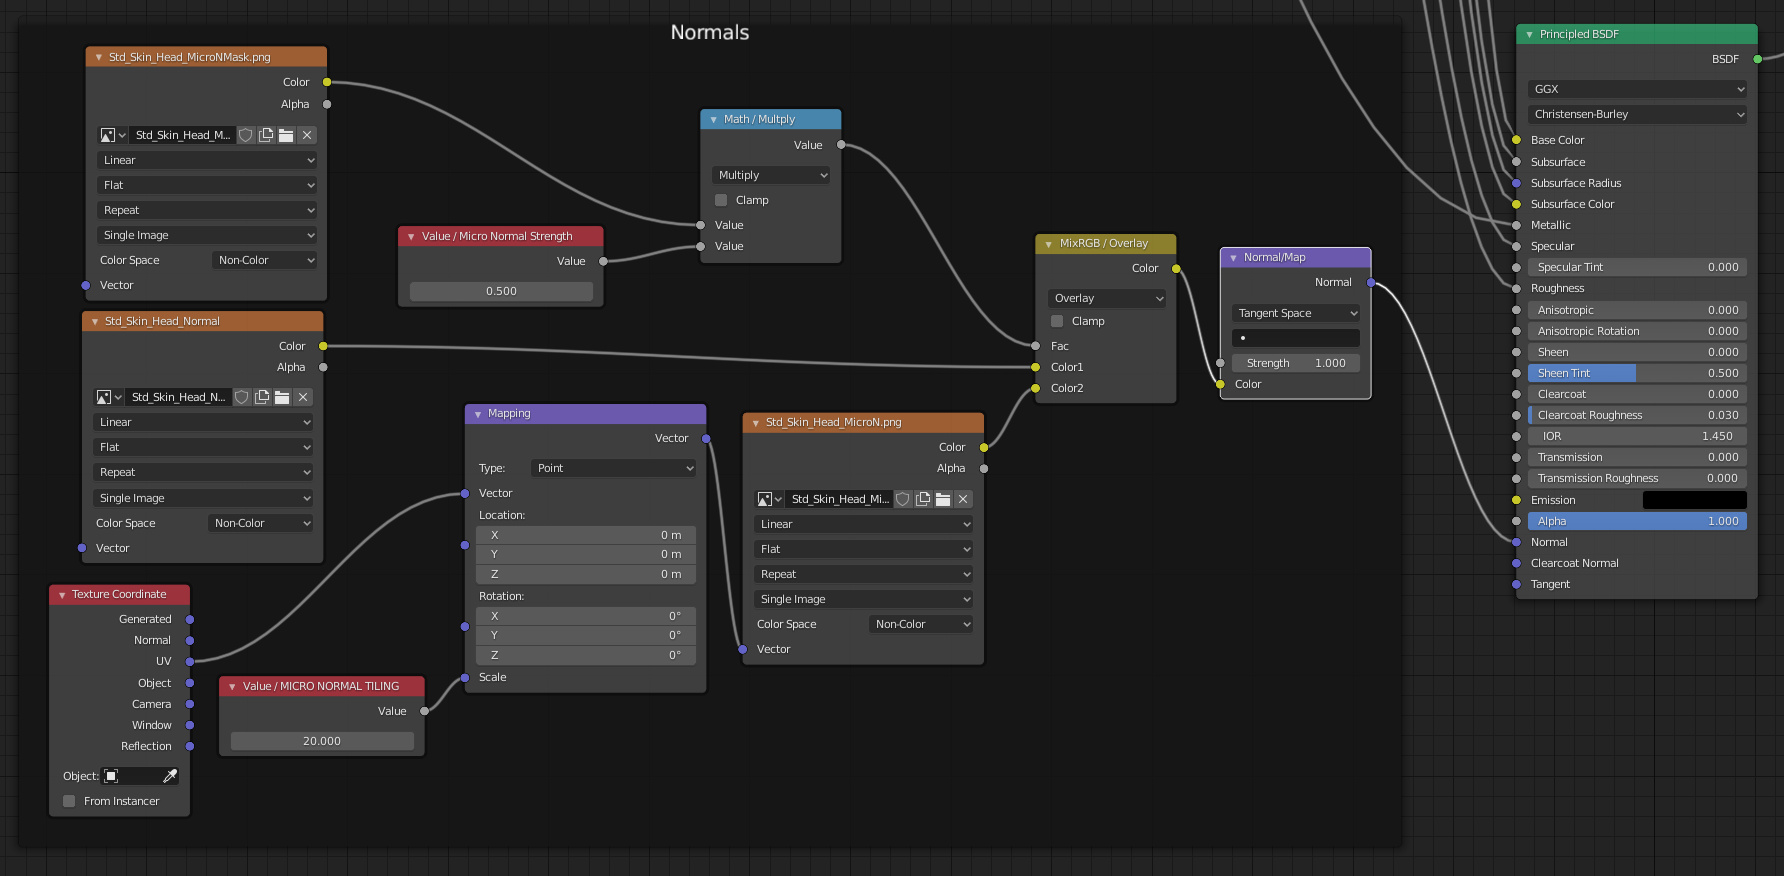
Normals:
https://forum.reallusion.com/uploads/images/1944e9bc-6769-4aa3-8bac-1aa6.jpg

Mix the normal map with a micro normal map by using a MixRGB/Overlay node. The micro normal mask map can be used as a blend factor for the micro normal overlay by multiplying the micro normal mask by a micro normal strength value before plugging into the MixRGB blend factor. To tile the Micro Normal Map it needs a mapping node. Press Ctrl-T on the micro normal texture to automatically create the mapping nodes then set the mapping scale to 20-25.


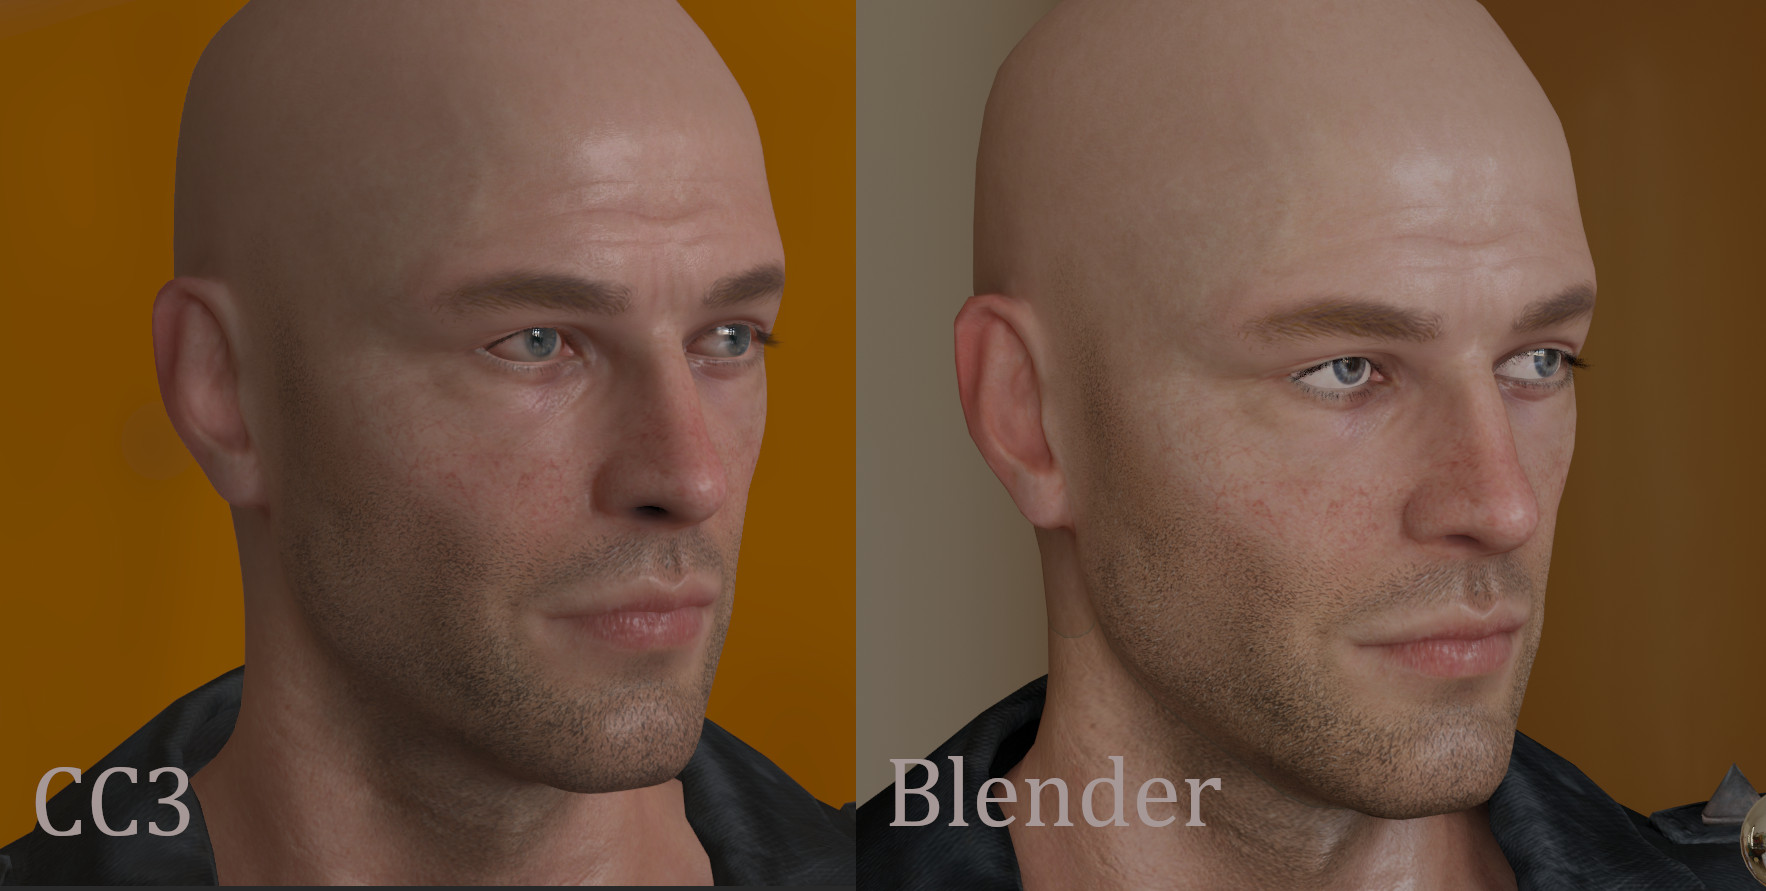
This is how I understand it, I could be wrong of course, there's no clear documentation so some of this is guess work, especially the subsurface inputs. It's not perfect, but it gets quite good results. This is a comparison between CC3 (default renderer) and blender (Eevee) with this node setup. (here the subsurface scaling factor is 1.0 and the micro normal strength is 0.8 and the specular strength is 0.25)
https://forum.reallusion.com/uploads/images/f1693614-f47f-4602-84ec-5c54.jpg


(Edit: Spelling)
AutoDidact
AutoDidact
Posted 4 Years Ago
View Quick Profile
Distinguished Member

Distinguished Member (6.1K reputation)Distinguished Member (6.1K reputation)Distinguished Member (6.1K reputation)Distinguished Member (6.1K reputation)Distinguished Member (6.1K reputation)Distinguished Member (6.1K reputation)Distinguished Member (6.1K reputation)Distinguished Member (6.1K reputation)Distinguished Member (6.1K reputation)

Group: Forum Members
Last Active: Last Week
Posts: 2.1K, Visits: 13.6K
Hi 
I would only add that you can control the distribution
of the subsurface scattering effect with the scatter masks
located in users/Public documents/Reallusion/SharedTemplates/Digital_Human_Shader_Resource
as well as the skin micro normal maps
https://forum.reallusion.com/uploads/images/7450294a-6b78-46c7-b84f-84b8.jpg


RAG DOLL COLLISION ANIMATIONS FOR ICLONE 8 & 7
---------------------------------------------------------------------------------------------------------------------
Ghost Origins
My latest Feature length film created with Iclone.
https://forum.reallusion.com/uploads/images/adf9b210-df59-4cb6-aa1b-9de5.jpg
My Sci- Fi Graphic Novel on Amazon: https://a.co/d/9k3cwoY


oonabe
oonabe
Posted 4 Years Ago
View Quick Profile
Veteran Member

Veteran Member (901 reputation)Veteran Member (901 reputation)Veteran Member (901 reputation)Veteran Member (901 reputation)Veteran Member (901 reputation)Veteran Member (901 reputation)Veteran Member (901 reputation)Veteran Member (901 reputation)Veteran Member (901 reputation)

Group: Forum Members
Last Active: 2 Years Ago
Posts: 79, Visits: 1.4K
Hey, thanks a lot for the quick and very detailed answer, I learned a lot from your post and it was exactly the kind of information I was looking for, I already tested it on my model and could see some improvements, and found out that also the lighting I have has definitely an effect on how the model looks, but I'm glad I know now how to apply the CC3 textures in Blender for them to work properly, the micronormals were completely missing and also Subsurface Scattering wasn't working right with my previous attempts...

I'll try to do some renders under different lighting conditions and share them here too to see the improvements.

Thanks a lot again :)
Smit_R
Smit_R
Posted 4 Years Ago
View Quick Profile
Veteran Member

Veteran Member (721 reputation)Veteran Member (721 reputation)Veteran Member (721 reputation)Veteran Member (721 reputation)Veteran Member (721 reputation)Veteran Member (721 reputation)Veteran Member (721 reputation)Veteran Member (721 reputation)Veteran Member (721 reputation)

Group: Forum Members
Last Active: Last Year
Posts: 83, Visits: 5.5K
@Victor.Soupday
This node setup is just insane and greatly improved my renders!
Thanks for sharing!
Victor.Soupday
Victor.Soupday
Posted 4 Years Ago
View Quick Profile
Distinguished Member

Distinguished Member (5.8K reputation)Distinguished Member (5.8K reputation)Distinguished Member (5.8K reputation)Distinguished Member (5.8K reputation)Distinguished Member (5.8K reputation)Distinguished Member (5.8K reputation)Distinguished Member (5.8K reputation)Distinguished Member (5.8K reputation)Distinguished Member (5.8K reputation)

Group: Forum Members
Last Active: 2 days ago
Posts: 569, Visits: 9.0K
This monstrosity is the eye shader I've been using:

https://forum.reallusion.com/uploads/images/4bac86fb-714d-441b-929d-5bd7.jpg

It's looks complicated, but the idea behind it is fairly simple. It uses an iris mask to layer the iris on top of the sclera. Using a mask to overlay the two parts of the eye it can apply separate roughness, subsurface and normals to the iris and the sclera and can also modify the colours independently. It also uses UV scaling to enlarge or shrink the iris.

The Iris Mask section procedurally generates a circle texture with smoothed edges, using Blenders gradient texture node, to act as the mask texture. The mask is used as a mix/blend factor to layer the input channels.

The mapping structure on the diffuse texture keeps the texture centred as it is scaled. A procedurally generated shadowing mask is mixed into the diffuse colour to add the reddening of the eyes as you go further from the iris, this creates the reddening at the corners of the eyes (as this is not part of the diffuse texture). The two hue/saturation/brightness nodes on the diffuse texture can adjust the colouring of the iris and sclera independently.

The iris mask keeps the subsurface colouring from affecting the iris area, so only the whites of the eyes get the slight brightening due to the subsurface effect. The iris is completely smooth with no normal details while the scelra is slightly rough and has a fine almost micro-normal texture, these are also mixed together using the iris mask.

If that shader setup is too much, this is a simpler version:

https://forum.reallusion.com/uploads/images/95de1063-f7f5-46cf-aecd-92c4.jpg

There is no iris scaling, colour adjustment, subsurface or roughness/normal layers, but it does include the eye reddening shadow effect. Even at a fairly short distance it is virtually indistinguishable from the advanced shader above. Unless your taking extreme close-ups of the face & eyes, this is probably the better shader to use, certainly the easiest to setup.


Edit: I forgot to show the comparison of the results:
https://forum.reallusion.com/uploads/images/a5a31a3d-6617-4bed-9a10-4881.jpg

Smit_R
Smit_R
Posted 4 Years Ago
View Quick Profile
Veteran Member

Veteran Member (721 reputation)Veteran Member (721 reputation)Veteran Member (721 reputation)Veteran Member (721 reputation)Veteran Member (721 reputation)Veteran Member (721 reputation)Veteran Member (721 reputation)Veteran Member (721 reputation)Veteran Member (721 reputation)

Group: Forum Members
Last Active: Last Year
Posts: 83, Visits: 5.5K
Wow, thanks for this info. :exclamationmark:
Gonna try that one out asap.
oonabe
oonabe
Posted 4 Years Ago
View Quick Profile
Veteran Member

Veteran Member (901 reputation)Veteran Member (901 reputation)Veteran Member (901 reputation)Veteran Member (901 reputation)Veteran Member (901 reputation)Veteran Member (901 reputation)Veteran Member (901 reputation)Veteran Member (901 reputation)Veteran Member (901 reputation)

Group: Forum Members
Last Active: 2 Years Ago
Posts: 79, Visits: 1.4K
This information is gold, thanks a lot for sharing it... I'm going to try the easy one first then the other one just to see if the differences are worth it for my renderings. So long I've only been adding some specular value and correcting the roughness for the eye corneas since they didn't have any specularity and looked dry and dead, but these nodes will definitely help me making them look more realistic, thanks a lot :)


Reading This Topic