|
Author
|
Message
|
|
Dan Miller
|
Dan Miller
Posted 7 Years Ago
|
|
Group: Forum Members
Last Active: 6 Months Ago
Posts: 374,
Visits: 1.8K
|
I could use a tip on how to match the skin from the headshot photo with the rest of the head and body of the character. I'm using a well lit photo with diffuse lighting and the software recognizes the face with no problem. Initially I'm selecting a RTL character, Gabriel I believe with 4K texture. When I import the headshot photo, using Pro, I'm selecting body type current, and clean rough on the skin type. If I select no mask then it looks really messed up on the side of the face and head. I attempted to edit the Base Color map in Affinity Photo by selecting an area of my skin from the front of the head and then healing around the sides of the face. This did not look very good so started over. I was thinking the skin matching was automatic but at the very least if someone can give a tip on how to match the skin that would help. Thanks.
|
|
|
|
|
Kelleytoons
|
Kelleytoons
Posted 7 Years Ago
|
|
Group: Forum Members
Last Active: 2 Years Ago
Posts: 9.2K,
Visits: 22.1K
|
A bit long but it covers all the basics.
Alienware Aurora R16, Win 11, i9-149000KF, 3.20GHz CPU, 64GB RAM, RTX 4090 (24GB), Samsung 870 Pro 8TB, Gen3 MVNe M-2 SSD, 4TBx2, 39" Alienware Widescreen Monitor
Mike "ex-genius" Kelley
|
|
|
|
|
Dorothy Jean
|
Dorothy Jean
Posted 7 Years Ago
|
|
Group: Forum Members
Last Active: 2 Years Ago
Posts: 266,
Visits: 1.1K
|
danmiller (11/24/2019)
I could use a tip on how to match the skin from the headshot photo with the rest of the head and body of the character. I'm using a well lit photo with diffuse lighting and the software recognizes the face with no problem. Initially I'm selecting a RTL character, Gabriel I believe with 4K texture. When I import the headshot photo, using Pro, I'm selecting body type current, and clean rough on the skin type. If I select no mask then it looks really messed up on the side of the face and head.
I attempted to edit the Base Color map in Affinity Photo by selecting an area of my skin from the front of the head and then healing around the sides of the face. This did not look very good so started over. I was thinking the skin matching was automatic but at the very least if someone can give a tip on how to match the skin that would help. Thanks.Could you post an example of the issue you are facing? So far I have not had any issues matching colors so please let me know so I can help! Thanks!
|
|
|
|
|
Dan Miller
|
Dan Miller
Posted 7 Years Ago
|
|
Group: Forum Members
Last Active: 6 Months Ago
Posts: 374,
Visits: 1.8K
|
Kelleytoons (11/24/2019)
A bit long but it covers all the basics.The video is helpful, however, in addition to color it is a matter of older rough skin and smooth younger looking skin. When I import the photo it textures more of a frontal view but leaves the sides of the face and neck with different, unchanged, looking skin.
|
|
|
|
|
Dan Miller
|
Dan Miller
Posted 7 Years Ago
|
|
Group: Forum Members
Last Active: 6 Months Ago
Posts: 374,
Visits: 1.8K
|
Dorothy Jean (11/24/2019)
danmiller (11/24/2019)
I could use a tip on how to match the skin from the headshot photo with the rest of the head and body of the character. I'm using a well lit photo with diffuse lighting and the software recognizes the face with no problem. Initially I'm selecting a RTL character, Gabriel I believe with 4K texture. When I import the headshot photo, using Pro, I'm selecting body type current, and clean rough on the skin type. If I select no mask then it looks really messed up on the side of the face and head.
I attempted to edit the Base Color map in Affinity Photo by selecting an area of my skin from the front of the head and then healing around the sides of the face. This did not look very good so started over. I was thinking the skin matching was automatic but at the very least if someone can give a tip on how to match the skin that would help. Thanks.Could you post an example of the issue you are facing? So far I have not had any issues matching colors so please let me know so I can help! Thanks! Here is an example but a little hard to see in this picture. If you look at the lower forehead it has the texture brought in with the headshot photo. Notice the older, rougher looking skin. Then the rest of the forehead is just smooth skin. I'm trying to figure out how to texture the whole face and neck so it looks like it belongs to the character. 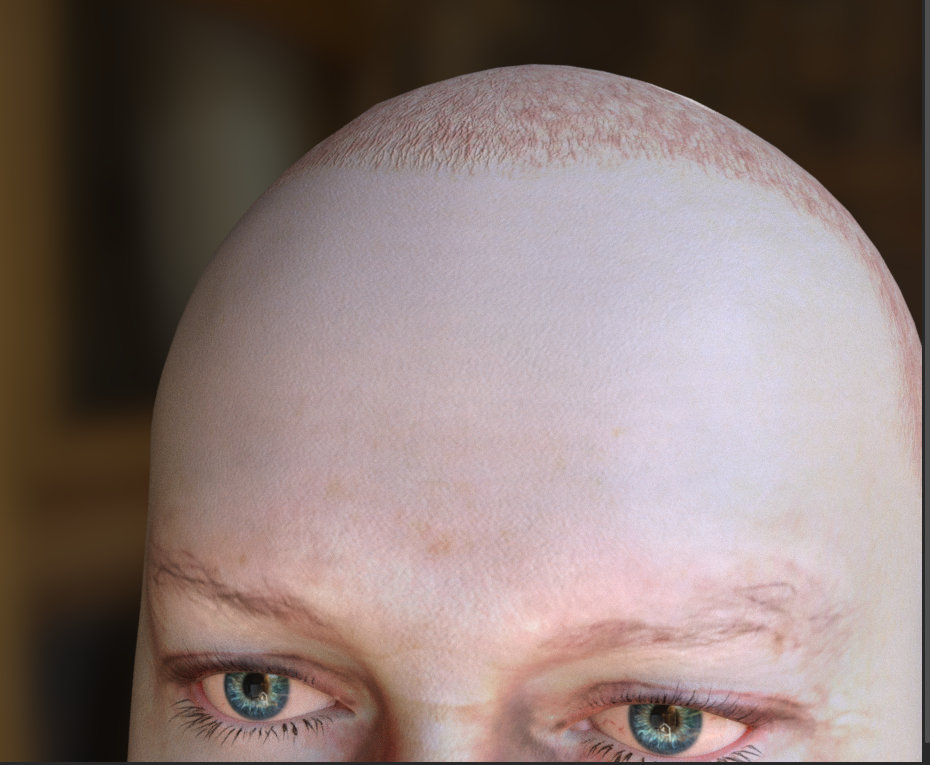
|
|
|
|
|
SeanMac
|
SeanMac
Posted 7 Years Ago
|
|
Group: Forum Members
Last Active: 3 Years Ago
Posts: 416,
Visits: 3.4K
|
Hi danmiller,
May I suggest that you post the make and model of your monitor and state whether or not it has been colour calibrated?
Regards
SeanMac
|
|
|
|
|
Kelleytoons
|
Kelleytoons
Posted 7 Years Ago
|
|
Group: Forum Members
Last Active: 2 Years Ago
Posts: 9.2K,
Visits: 22.1K
|
danmiller (11/24/2019)Here is an example but a little hard to see in this picture. If you look at the lower forehead it has the texture brought in with the headshot photo. Notice the older, rougher looking skin. Then the rest of the forehead is just smooth skin. I'm trying to figure out how to texture the whole face and neck so it looks like it belongs to the character. Headshot doesn't do the neck or extend the skin beyond certain areas on the face. For the face if there is aging using one of the "old" masks will put wrinkles and such over the entire face, which helps (nothing like that is available for the neck -- the team is aware that the neck does need some way of blending into the face and will be working on that). For now you will need to work in your favorite editor and extend those textures -- in Photoshop the rubber stamp tool along with healing brush will help. It's much the same as I show in that video tutorial above. You nearly always need to do *some* editing to the diffuse and/or normals/roughness maps after they are generated, no matter the starting image. The micro normals map will help a lot in texturing so it's worth understanding how it works and playing with it some.
Alienware Aurora R16, Win 11, i9-149000KF, 3.20GHz CPU, 64GB RAM, RTX 4090 (24GB), Samsung 870 Pro 8TB, Gen3 MVNe M-2 SSD, 4TBx2, 39" Alienware Widescreen Monitor
Mike "ex-genius" Kelley
|
|
|
|
|
Dorothy Jean
|
Dorothy Jean
Posted 7 Years Ago
|
|
Group: Forum Members
Last Active: 2 Years Ago
Posts: 266,
Visits: 1.1K
|
danmiller (11/24/2019)
Dorothy Jean (11/24/2019)
danmiller (11/24/2019)
I could use a tip on how to match the skin from the headshot photo with the rest of the head and body of the character. I'm using a well lit photo with diffuse lighting and the software recognizes the face with no problem. Initially I'm selecting a RTL character, Gabriel I believe with 4K texture. When I import the headshot photo, using Pro, I'm selecting body type current, and clean rough on the skin type. If I select no mask then it looks really messed up on the side of the face and head.
I attempted to edit the Base Color map in Affinity Photo by selecting an area of my skin from the front of the head and then healing around the sides of the face. This did not look very good so started over. I was thinking the skin matching was automatic but at the very least if someone can give a tip on how to match the skin that would help. Thanks.Could you post an example of the issue you are facing? So far I have not had any issues matching colors so please let me know so I can help! Thanks! Here is an example but a little hard to see in this picture. If you look at the lower forehead it has the texture brought in with the headshot photo. Notice the older, rougher looking skin. Then the rest of the forehead is just smooth skin. I'm trying to figure out how to texture the whole face and neck so it looks like it belongs to the character. What I do is take the photo I used to create the texture and blend it with the texture from CC3. If you have some photoshop skills its pretty easy. Just use a mask. Plus the clone tool and patch tool come in very handy as well. If you can get a side and angle shot of the person too then you can make a really good texture. There are a ton of tutorials on youtube. Here is one!
|
|
|
|
|
Dan Miller
|
Dan Miller
Posted 7 Years Ago
|
|
Group: Forum Members
Last Active: 6 Months Ago
Posts: 374,
Visits: 1.8K
|
SeanMac (11/24/2019)
Hi danmiller,
May I suggest that you post the make and model of your monitor and state whether or not it has been colour calibrated?
Regards
SeanMac
Triple ASUS VS248. They are not color calibrated so I will look into that. Thank you.
|
|
|
|
|
Dan Miller
|
Dan Miller
Posted 7 Years Ago
|
|
Group: Forum Members
Last Active: 6 Months Ago
Posts: 374,
Visits: 1.8K
|
Kelleytoons (11/24/2019)
danmiller (11/24/2019)Here is an example but a little hard to see in this picture. If you look at the lower forehead it has the texture brought in with the headshot photo. Notice the older, rougher looking skin. Then the rest of the forehead is just smooth skin. I'm trying to figure out how to texture the whole face and neck so it looks like it belongs to the character. Headshot doesn't do the neck or extend the skin beyond certain areas on the face. For the face if there is aging using one of the "old" masks will put wrinkles and such over the entire face, which helps (nothing like that is available for the neck -- the team is aware that the neck does need some way of blending into the face and will be working on that).For now you will need to work in your favorite editor and extend those textures -- in Photoshop the rubber stamp tool along with healing brush will help. It's much the same as I show in that video tutorial above. You nearly always need to do *some* editing to the diffuse and/or normals/roughness maps after they are generated, no matter the starting image. The micro normals map will help a lot in texturing so it's worth understanding how it works and playing with it some.
Sounds good, I will learn how to use the rubber stamp tool and use the healing brush. It also sounds like I better spend some time learning about micro normals. Thank you for your suggestions. It is likely time well spent before moving on.
|
|
|
|