|
stephenq80
|
stephenq80
Posted 6 Years Ago
|
|
Group: Forum Members
Last Active: 3 Years Ago
Posts: 26,
Visits: 96
|
Hi, Thanks for reading my post. I recently created a clothing item in Zbrush and Substance Painter. The final item looks great in Substance Painter when rendered. However, I noticed that when loading the model and textures into CC3, it does not look as good as in Substance Painter. I have all the maps from Substance painter plugged into the right slots in CC3; but, something is up. See the two photos below. Here is an image of the shoulder area in Substance Painter: 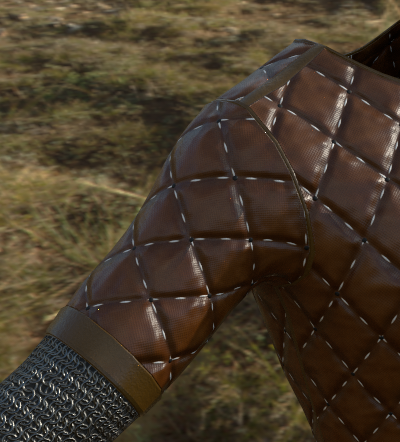 Here is the same area in CC3:  To me, it almost looks like the normal, and height maps aren't doing what they are supposed to do. Also, I noticed that it seems to not be possible to load a curvature map. Is this so? Any thoughts or tips would be much appreciated. Thank you.
|
|
animagic
|
animagic
Posted 6 Years Ago
|
|
Group: Forum Members
Last Active: 2 days ago
Posts: 15.8K,
Visits: 31.3K
|
One thing to check is to open the clothing in the Appearance Editor and see what the map size is. You can currently increase that to 2K (4K later this year with AE updated).
|
|
justaviking
|
justaviking
Posted 6 Years Ago
|
|
Group: Forum Members
Last Active: Last Year
Posts: 8.2K,
Visits: 26.5K
|
Is it safe for us to assume you set your Shader in iClone to PBR?
Some of the "color" and related appearance could easily be due to lighting.
But...
Yeah, something is wrong with those normals.
Did you correctly tag the Normal map as "Normal Map" rather than Bump Map?
Are your Normals "OpenGL" or "DirectX"?
ADDED... It's been a while since I've done this... Did you Bake your Normals in Painter?
Wow, it's been way too long since I've done that pipeline. I miss it. I've done Blender-to-Painter-to-iClone... so many details where one can go wrong.
If you want to (and can) share your model with me (including the Painter file), just PM me. If not, that's fine too.
iClone 7... Character Creator... Substance Designer/Painter... Blender... Audacity...
Desktop (homebuilt) - Windows 10, Ryzen 9 3900x CPU, GTX 1080 GPU (8GB), 32GB RAM, Asus X570 Pro motherboard, 2TB SSD, terabytes of disk space, dual monitors.
Laptop - Windows 10, MSI GS63VR STEALTH-252, 16GB RAM, GTX 1060 (6GB), 256GB SSD and 1TB HDD
|
|
stephenq80
|
stephenq80
Posted 6 Years Ago
|
|
Group: Forum Members
Last Active: 3 Years Ago
Posts: 26,
Visits: 96
|
Thanks so much for the responses. Yep, the normals were indeed off. I needed to "Flip Y." It is a selection once the normal map is loaded. Once I did that, everything looked great!
Thank you!
|
|
justaviking
|
justaviking
Posted 6 Years Ago
|
|
Group: Forum Members
Last Active: Last Year
Posts: 8.2K,
Visits: 26.5K
|
That's wonderful news. Thanks for letting us know you got it fixed. :)
iClone 7... Character Creator... Substance Designer/Painter... Blender... Audacity...
Desktop (homebuilt) - Windows 10, Ryzen 9 3900x CPU, GTX 1080 GPU (8GB), 32GB RAM, Asus X570 Pro motherboard, 2TB SSD, terabytes of disk space, dual monitors.
Laptop - Windows 10, MSI GS63VR STEALTH-252, 16GB RAM, GTX 1060 (6GB), 256GB SSD and 1TB HDD
|