Profile Picture

My Cloth Creation For CC Using Blender Workflow

Posted By Delerna 7 Years Ago
Rated 5 stars based on 1 vote.
Author
Message
Delerna
Delerna
Posted 7 Years Ago
View Quick Profile
Distinguished Member

Distinguished Member (8.2K reputation)Distinguished Member (8.2K reputation)Distinguished Member (8.2K reputation)Distinguished Member (8.2K reputation)Distinguished Member (8.2K reputation)Distinguished Member (8.2K reputation)Distinguished Member (8.2K reputation)Distinguished Member (8.2K reputation)Distinguished Member (8.2K reputation)

Group: Forum Members
Last Active: 2 Years Ago
Posts: 1.5K, Visits: 14.8K

INTRODUCTION
I find video tutorials to be good to watch but when I started working with Blender I wish I had something like this because I find it hard to find something in a video that I saw but cant remember the exact process. I don't know if anyone will agree on this but I thought I would post this similar to my workflow for cloth flow. This is more about what I have learnt about modelling in Blender and how I use these things to model clothes and well as props.
There is a fair bit of topics needed for this that are already covered in my flowing clothes workflow Here. Particularly exporting and importing characters and clothes between CC and Blender. So I wont be covering those here.
Also there are a lot of things Blender users need to learn about the UI as well as process. I am not going to show these basics as a separate topic. Rather I will try and cover these things as I progress through the process of creating this clothing I am making for this demonstration of how you can use Blender.

There are also some great tutorials for modelling CC content in Blender here

If you are interested in doing your own modelling then I hope you find this helpful.

UPDATES
1st to 3rd Oct 2017 :- added the first 8 Posts with basic descriptions
3rd Oct 2017 :- added the 9th post called   Use The Template To Make Clothing
15th Nov 2017 :- added a manual method of setting pivot points to models in 
                           to the 2nd Post  First Important Modifier Tool For You To Learn


i7-3770 3.4GHz CPU 16 GB Ram   
GeForce GTX1080 TI 11GB
Windows 10 Pro 64bit
Edited
7 Years Ago by Delerna
Delerna
Delerna
Posted 7 Years Ago
View Quick Profile
Distinguished Member

Distinguished Member (8.2K reputation)Distinguished Member (8.2K reputation)Distinguished Member (8.2K reputation)Distinguished Member (8.2K reputation)Distinguished Member (8.2K reputation)Distinguished Member (8.2K reputation)Distinguished Member (8.2K reputation)Distinguished Member (8.2K reputation)Distinguished Member (8.2K reputation)

Group: Forum Members
Last Active: 2 Years Ago
Posts: 1.5K, Visits: 14.8K

INITIALISATION

IMPORT A CC CHARACTER TO USE AS A GUIDE FOR CREATING THE CLOTHING
This has already been covered in my workflow for creating Flowing clothes for iClone so check the link in the introduction section at the top of this page.

The FIRST Point To Learn Is Rotating Around The Character
I find the key point here is to never move or rotate the character itself. Rather we should move or rotate the scene around the character instead.
Press and hold the mouses middle button and then move the mouse around to rotate the scene around the character
Scroll the middle mouse button forward or backwards to move the scene closer or further from the character
Hold the keyboards Shift key and press and hold the middle mouse button. Them move the mouse around to move the scene up, down, left or right of the character.

There are other ways to do these things...I am just showing the methods I use
Also these methods work the same in  Object Mode and Edit Mode

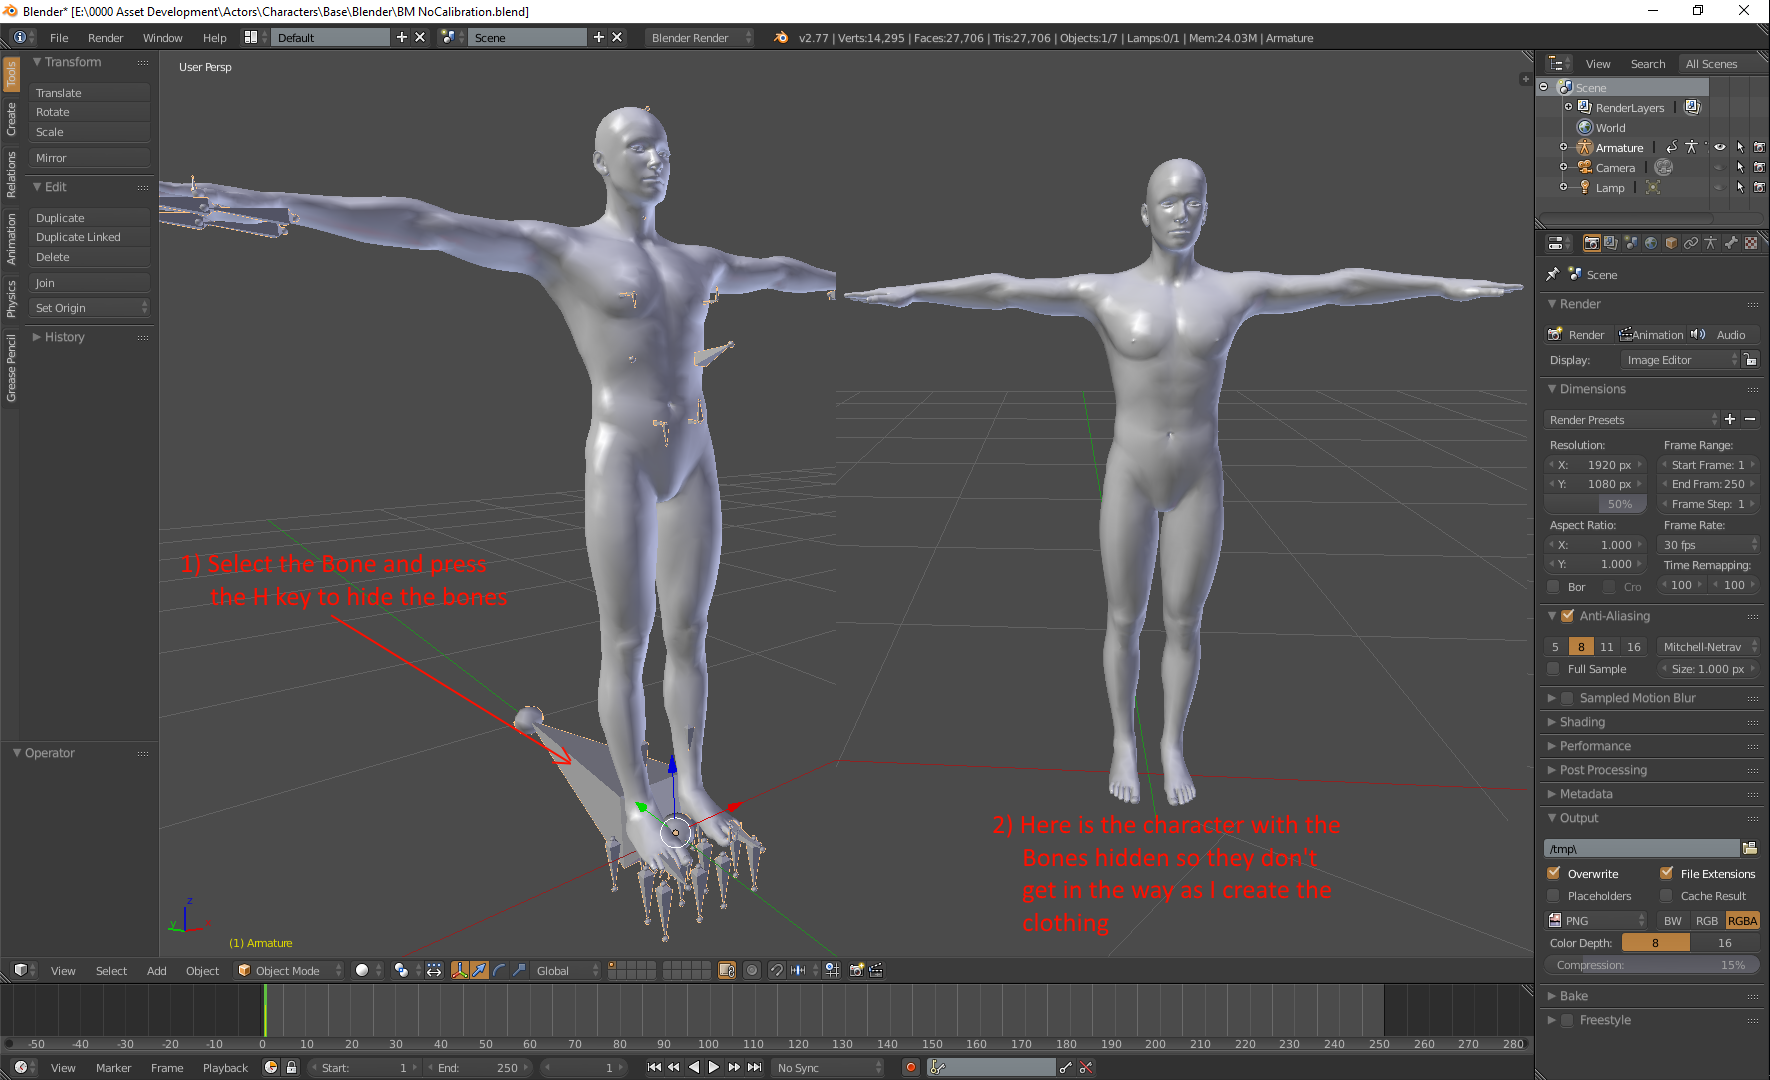
HIDE THE CHARACTERS BONES

I find the bones get in the way of my modelling clothes as well as my visual recognising my current progress of creating the clothing I am trying to making.
So this image demonstrates how to do that. I have also assumed that you are using Blender with its default UI settings so if you have changed any of those in your Blender then you will need consider that difference.
By default, to select something in Blender you need to click on it with your right mouse button. Also, to re-show anything that has been hidden then just go into object mode press and hold the alt key and press the h key to unhide everything

https://forum.reallusion.com/uploads/images/af3a52bd-8b5f-4807-b574-7777.png


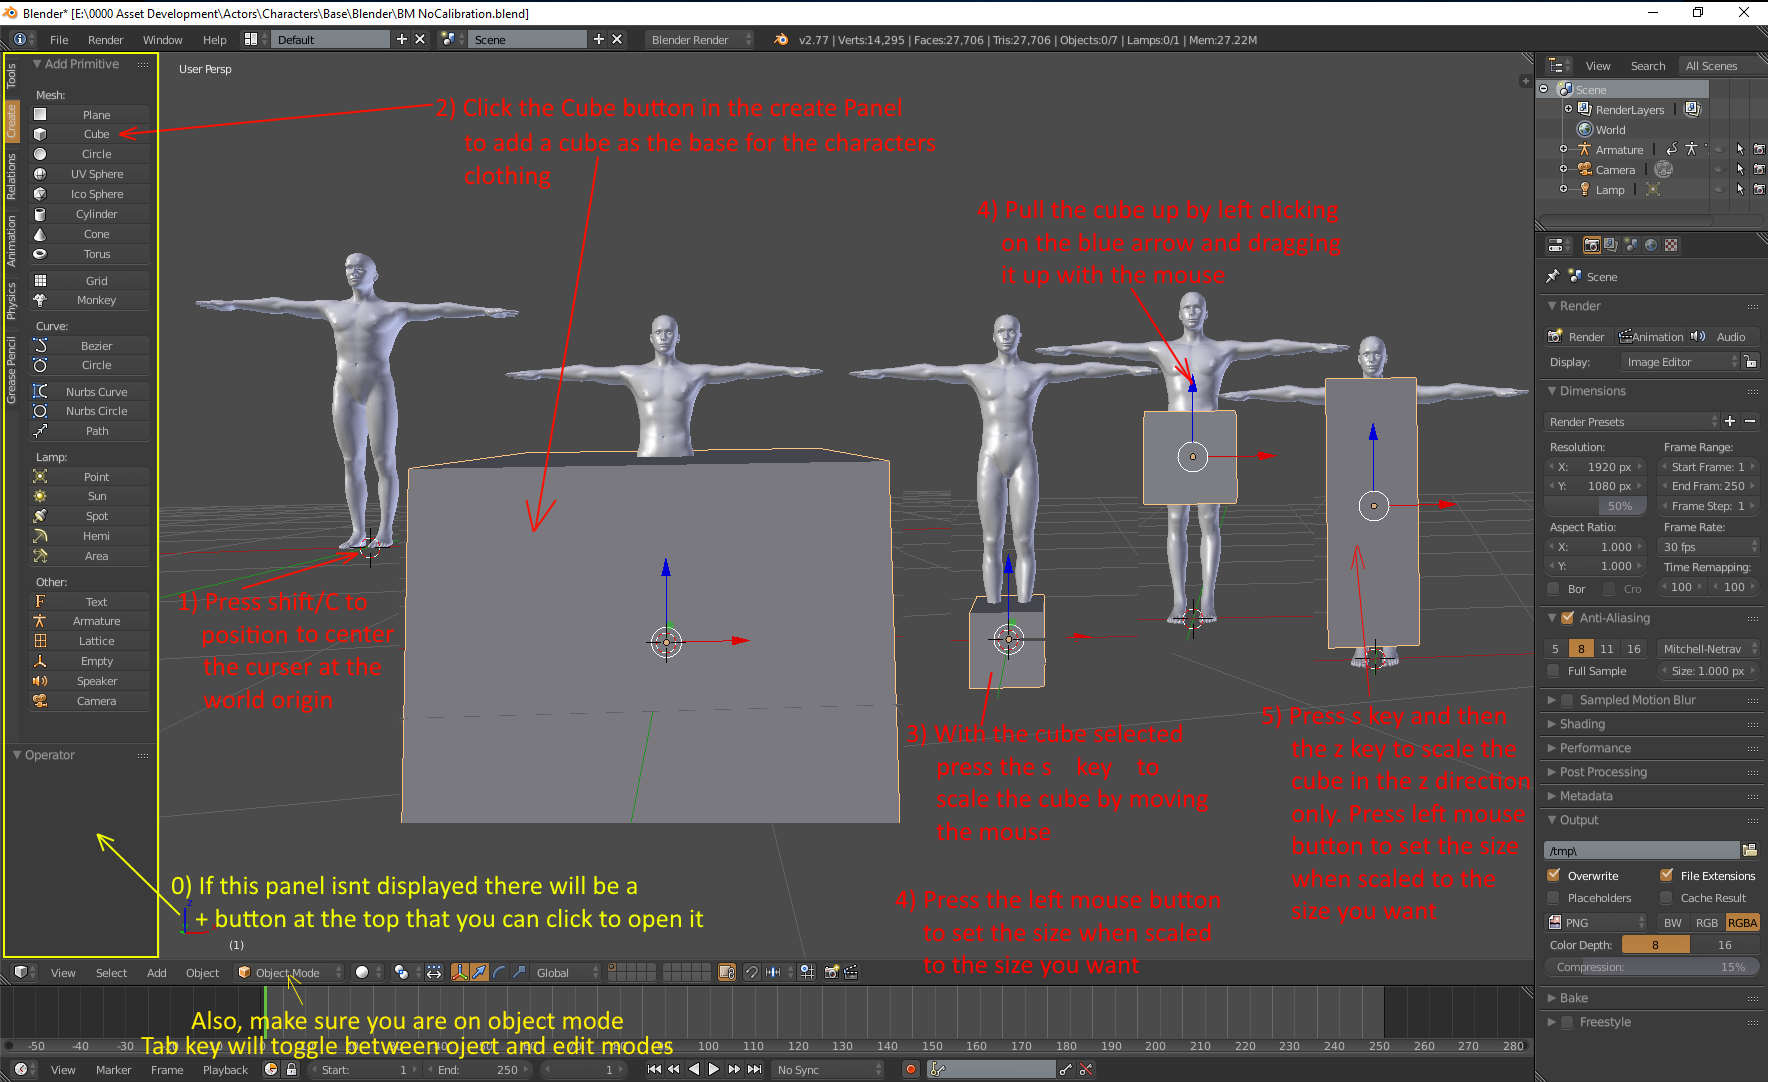
CREATE A BASE MESH TO BUILD THE CLOTHING FROM

I usually use a cube to start from but you could use a cylinder if you prefer. If your new to Blender I suggest you do it as I have just so what I say might be easier for you to follow.
Also, in the image below I said if the Tools Panel isn't displayed there is a + button at the top. If you don't understand that then look at the top right of the image below to the left of the word SCENE.
There is also a similar small + button there.

Step 1  in the image positions the world cursor. Whenever you create a new mesh it will be positioned wherever that cursor is. Left clicking your mouse in the scene will move the cursor to where you clicked.
Shift c puts it back at the world center.

https://forum.reallusion.com/uploads/images/cdc62ba5-42e8-46b5-a9aa-051e.png


i7-3770 3.4GHz CPU 16 GB Ram   
GeForce GTX1080 TI 11GB
Windows 10 Pro 64bit
Edited
5 Years Ago by Delerna
Delerna
Delerna
Posted 7 Years Ago
View Quick Profile
Distinguished Member

Distinguished Member (8.2K reputation)Distinguished Member (8.2K reputation)Distinguished Member (8.2K reputation)Distinguished Member (8.2K reputation)Distinguished Member (8.2K reputation)Distinguished Member (8.2K reputation)Distinguished Member (8.2K reputation)Distinguished Member (8.2K reputation)Distinguished Member (8.2K reputation)

Group: Forum Members
Last Active: 2 Years Ago
Posts: 1.5K, Visits: 14.8K

FIRST IMPORTANT MODIFIER TOOL FOR YOU TO LEARN

I am going to end up showing you several modifiers in this workflow.
But Yes, The mirror modifier is one of the most useful tools that will save you a ton of work. Any model that is symmetrical on 2 or even 4 sides.
If its symmetrical on 2 sides this means you only need to model 1/2 of your model. The mirror modifier will automatically duplicate anything you model on the opposite side.
It it is symmetrical on 4 sides then you only need to model 1/4 of the model.

SETUP YOUR MESH FOR PROPPER MIRRORING
========================================
The first thing needed for this is for the objects pivot point to be positioned on the edge where the modifier will start duplicating your model in reverse. That is why I did the loop cut and slide on the center of the cube and then deleted the vertices on the right face. When I created the cube the pivot point was in its center. Now the pivot point is on the right hand side, you can see that by the blue red and green arrows are in the first image of the cube and character.

https://forum.reallusion.com/uploads/images/d75d4a40-17a4-491b-9527-7a2b.png


NOW ADD THE MIRROR MODIFIER
============================
So now when I add the mirror modifier that is where it duplicates from. So if ever you have a problem with the mirrored mesh not starting from where you expected. Check out where the pivot point is.
Also, The axis sets the direction in which the mirrored mesh will flow. X is the red arrow on the pivot point so that is the direction the duplication occurs.
The next important setting for what I am demonstrating is the clipping checkbox. With that ticked it means any vertices that is at or moved to the center will automatically merge as a single vertex and also you wont be able to separate them once that happens. Well you actually can separate them it you accidentally do that to a vertice you didn't mean to. Just untick that checkbox, separate them and then tick it again.

https://forum.reallusion.com/uploads/images/ed9fd56e-5efb-4574-ad41-a78f.png


SETTING THE PIVOT POINT MANUALLY

In the description above I showed one way of setting the pivot point to where it is needed for the mirror modifier to work.
Thought I would show another way of setting the pivot point also. I am writing all of my workflow to hopefully help others who want to model clothes and props in Blender but find Blender difficult.
But I am also doing this as a lookup for myself so I don't have to rely on my memory for everything I do.

Anyway, here is the method
https://forum.reallusion.com/uploads/images/efb1bdce-9b07-444f-9634-e888.png


i7-3770 3.4GHz CPU 16 GB Ram   
GeForce GTX1080 TI 11GB
Windows 10 Pro 64bit
Edited
7 Years Ago by Delerna
Delerna
Delerna
Posted 7 Years Ago
View Quick Profile
Distinguished Member

Distinguished Member (8.2K reputation)Distinguished Member (8.2K reputation)Distinguished Member (8.2K reputation)Distinguished Member (8.2K reputation)Distinguished Member (8.2K reputation)Distinguished Member (8.2K reputation)Distinguished Member (8.2K reputation)Distinguished Member (8.2K reputation)Distinguished Member (8.2K reputation)

Group: Forum Members
Last Active: 2 Years Ago
Posts: 1.5K, Visits: 14.8K

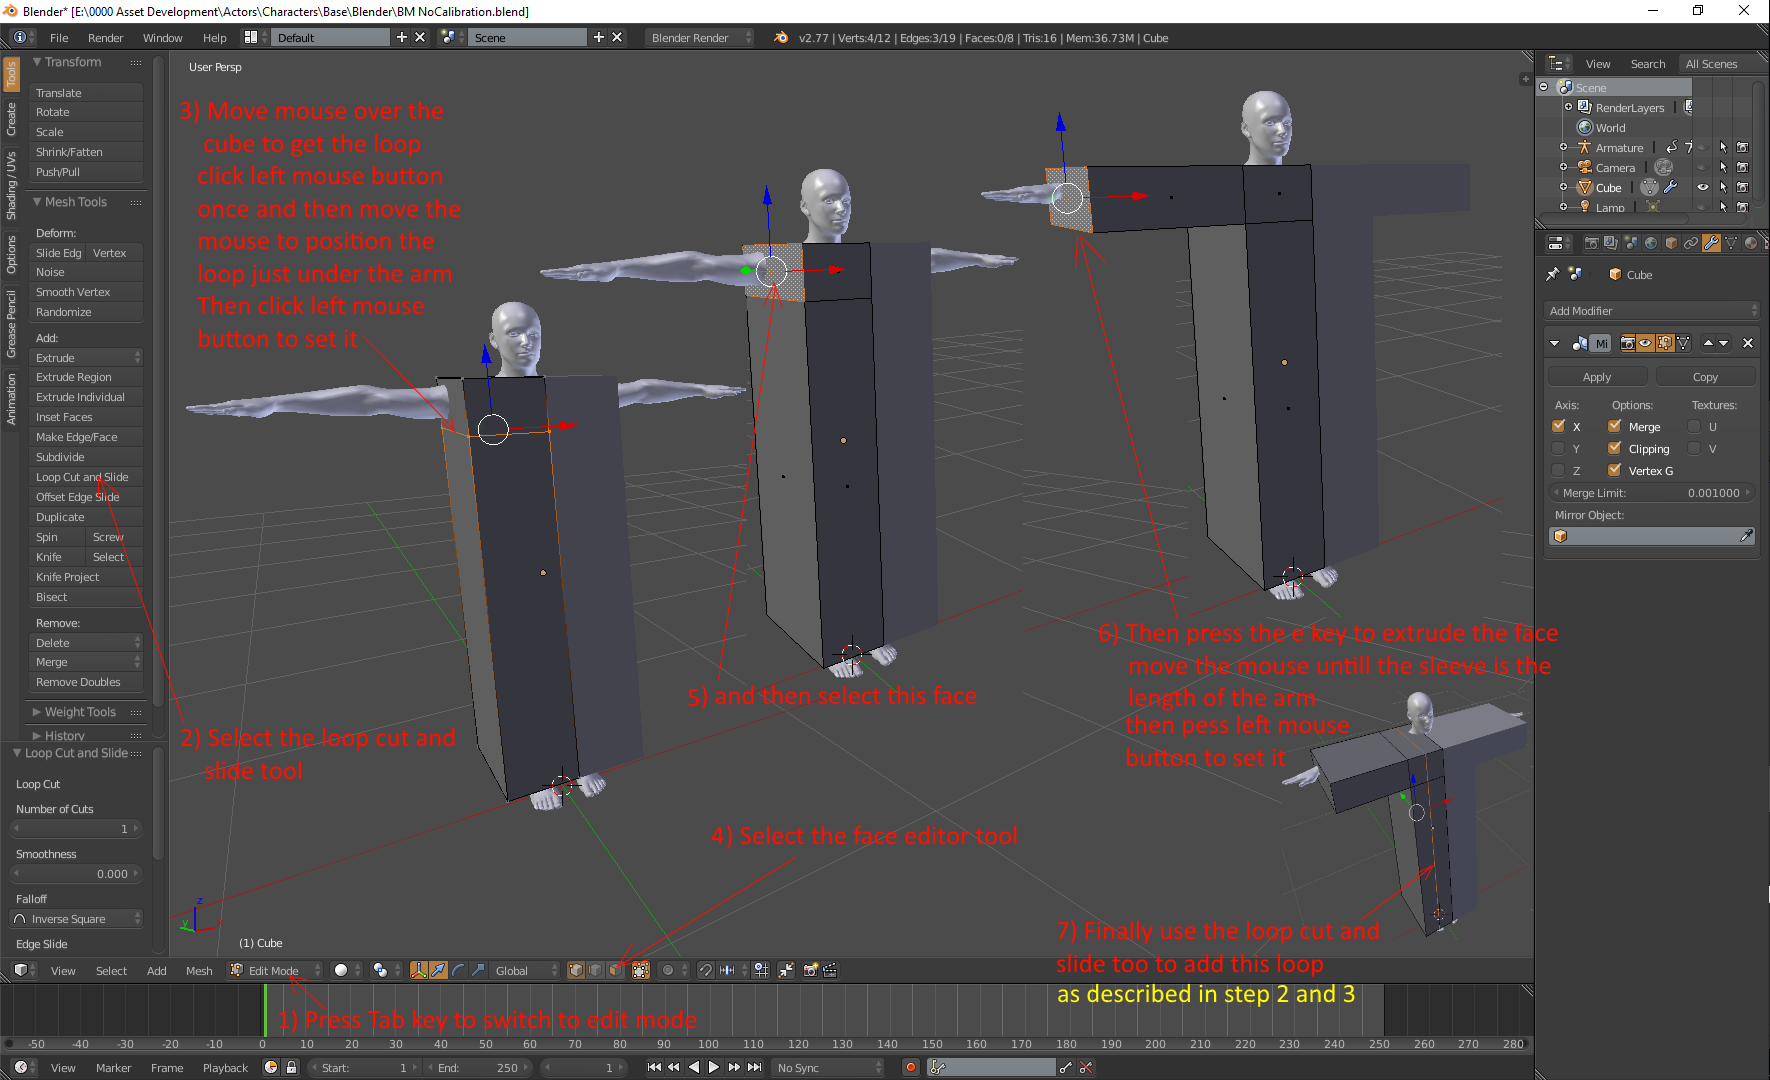
EXTRUDING EXTRA MESHING

ADD THE SLEEVES
================
The extrude tool is another good tool for you to learn. It provides an easy way for you to use parts of your existing mesh in order to create more meshing for your model. One benefit of doing it that way is the meshes stay aligned with each other and it is easy to do. In the image I stated the keyboard shortcut to extrude but if you go into the tools panel you can also select extrude there with your mouse if that's what you prefer. I personally prefer both. Keyboard shortcuts for the few things I use a lot  and pressing a button with my mouse for everything else. Remembering lots of keyboard shortcuts is just too difficult for me anymore. The point of me saying that is that the tools panel on the left hand side is one you should investigate and get familiar with. A lot of what you will use as your skills improve can be found there.
https://forum.reallusion.com/uploads/images/c5e5e079-ca68-4ada-8bb5-63c2.png


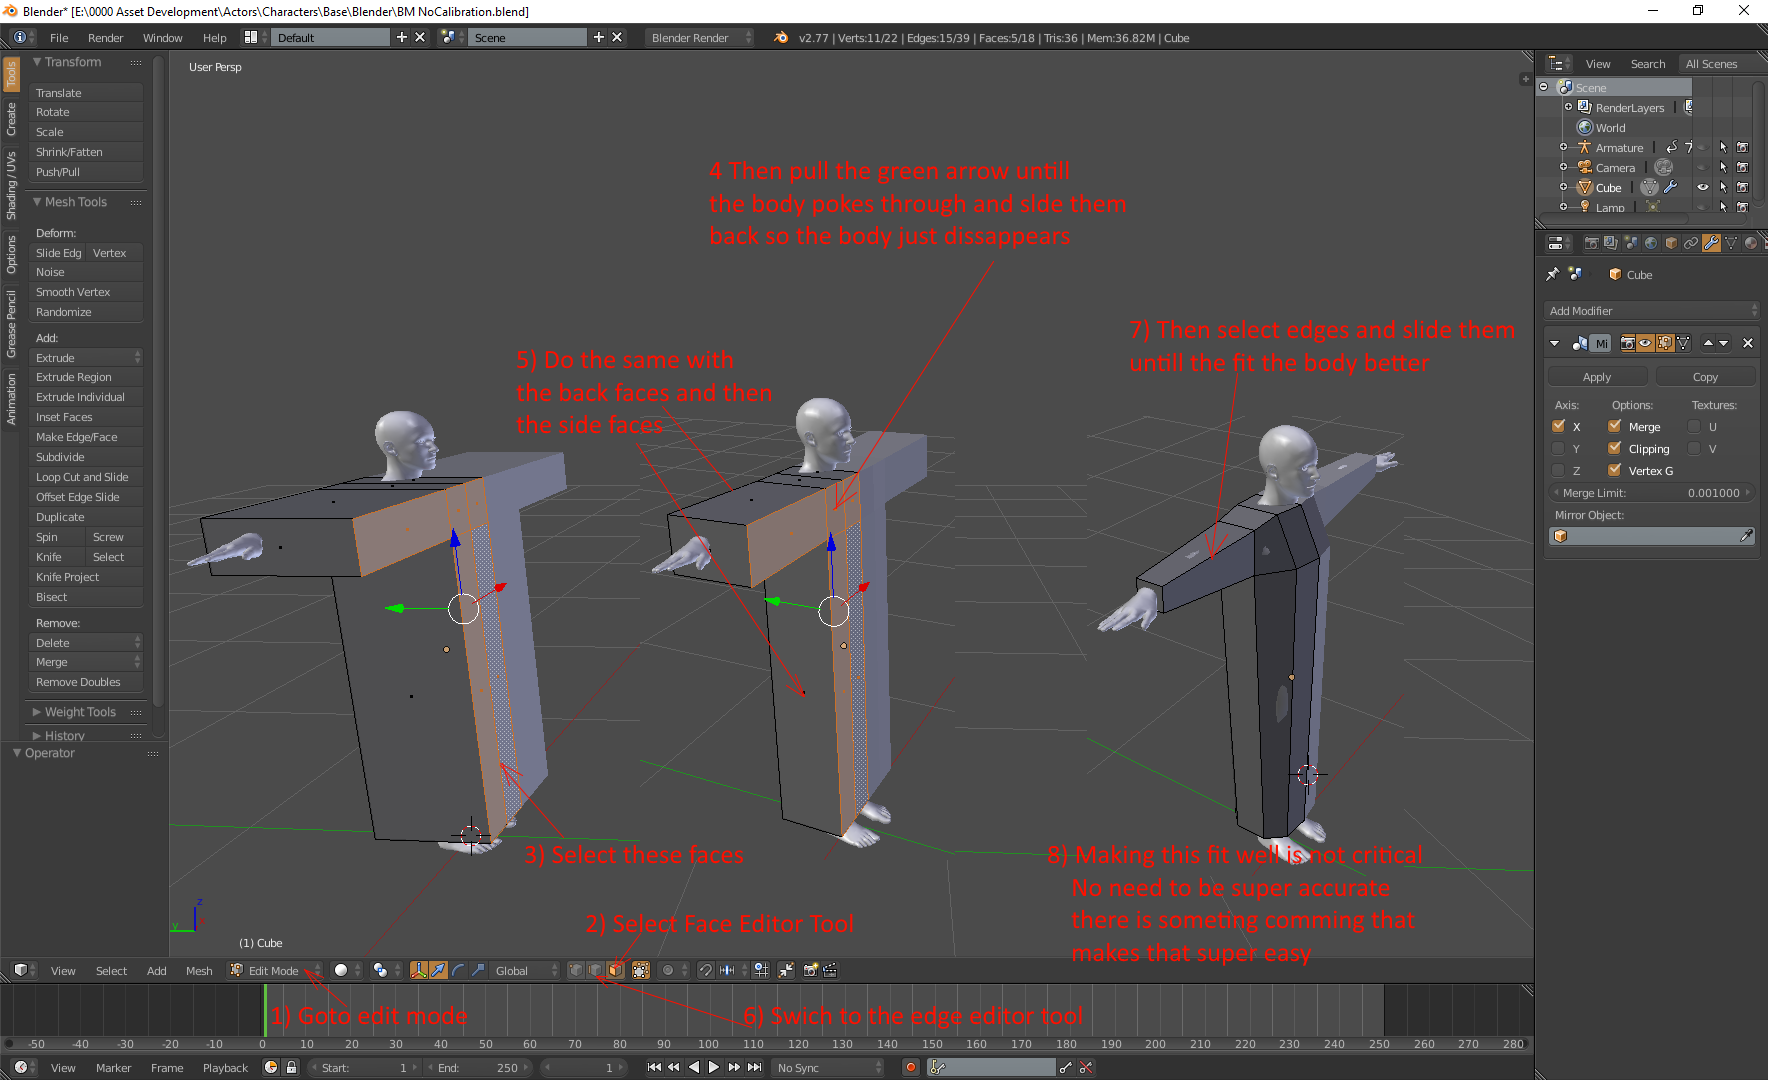
CONFORM THE CURRENT SIMPLE MESHING TO FIT THE BODY

FORM THE BASE TO THE BODY
==========================
There is no need to be too perfect with this. I will soon be showing you a way to make the mesh fit the body perfectly and it will only take seconds.
Once upon a time I used to spend hours and hours positioning my vertices to fit the body. Since then I have discovered this tool and wish I knew it ages ago.
So, really, I am just positioning the mesh reasonably close to the body so the tool I show you does a good job.

https://forum.reallusion.com/uploads/images/18e3ad9a-52b3-48a8-a444-377b.png


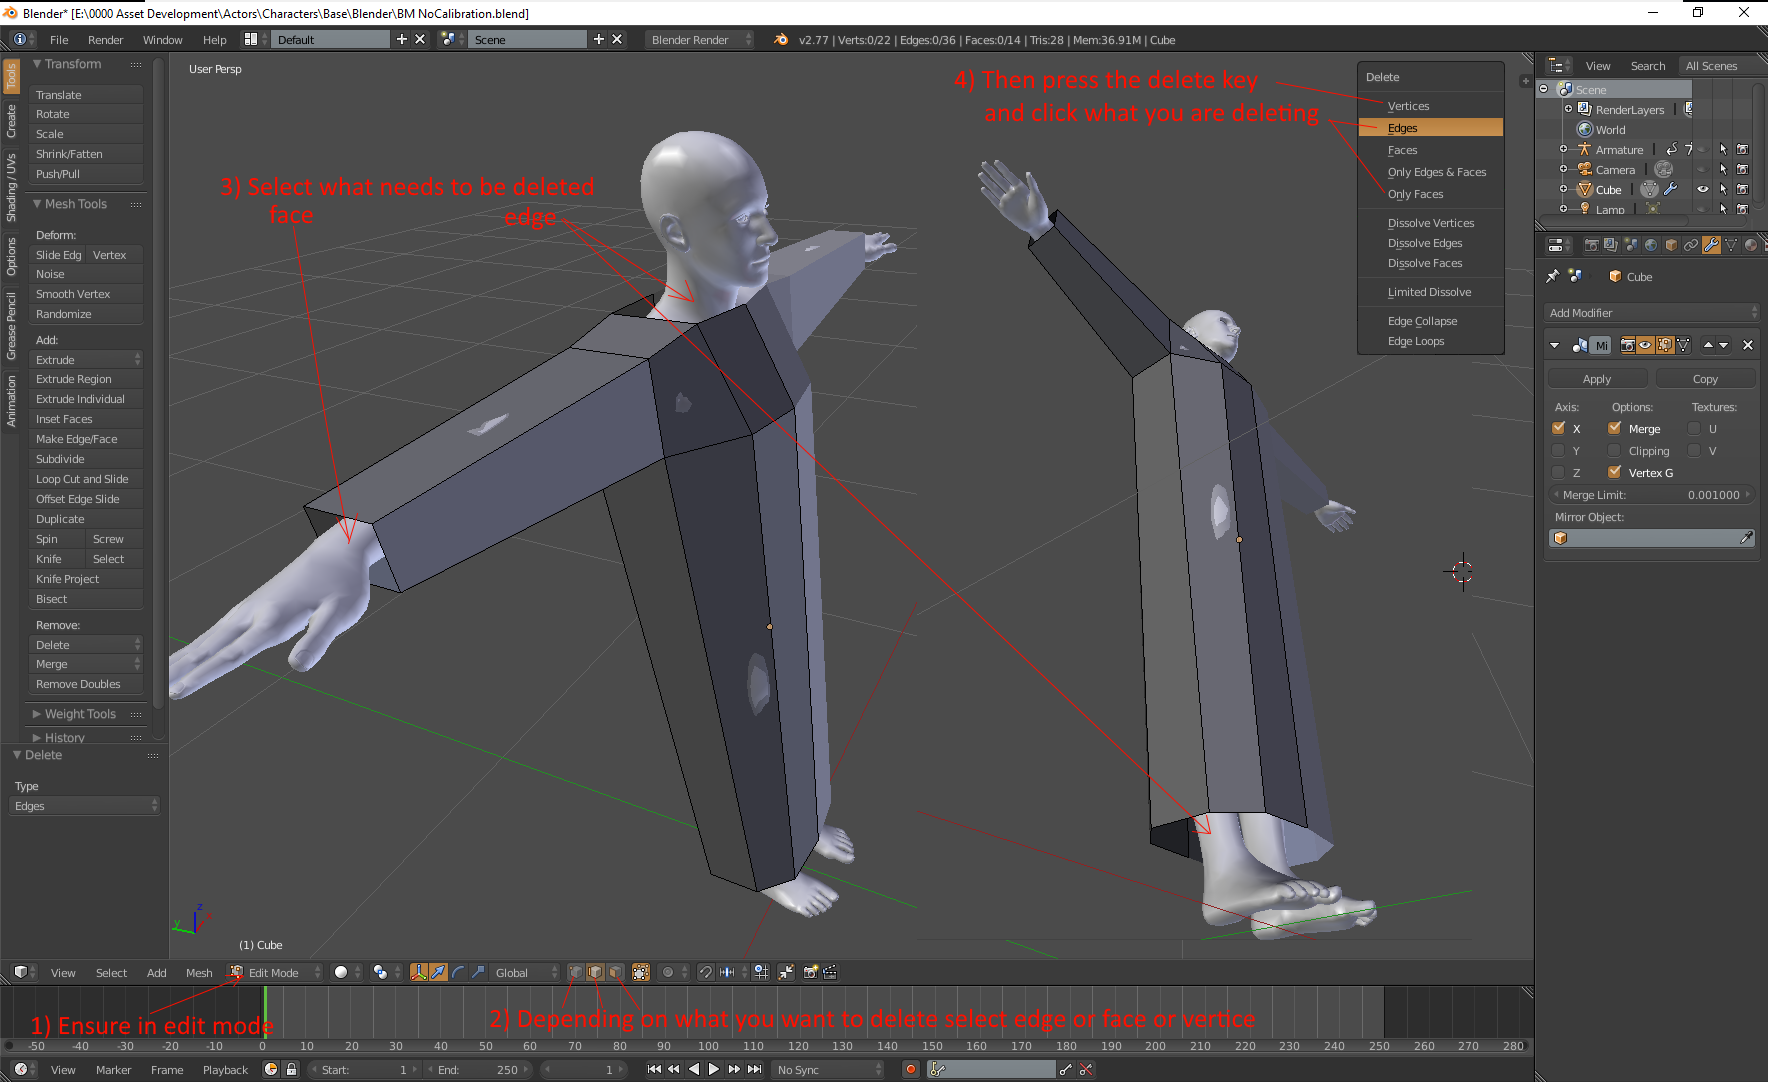
REMOVE UN-NEEDED POLYGONS
============================
Yep, I don't think I need to explain much here

https://forum.reallusion.com/uploads/images/361803c6-d5f8-49b1-8289-e068.png


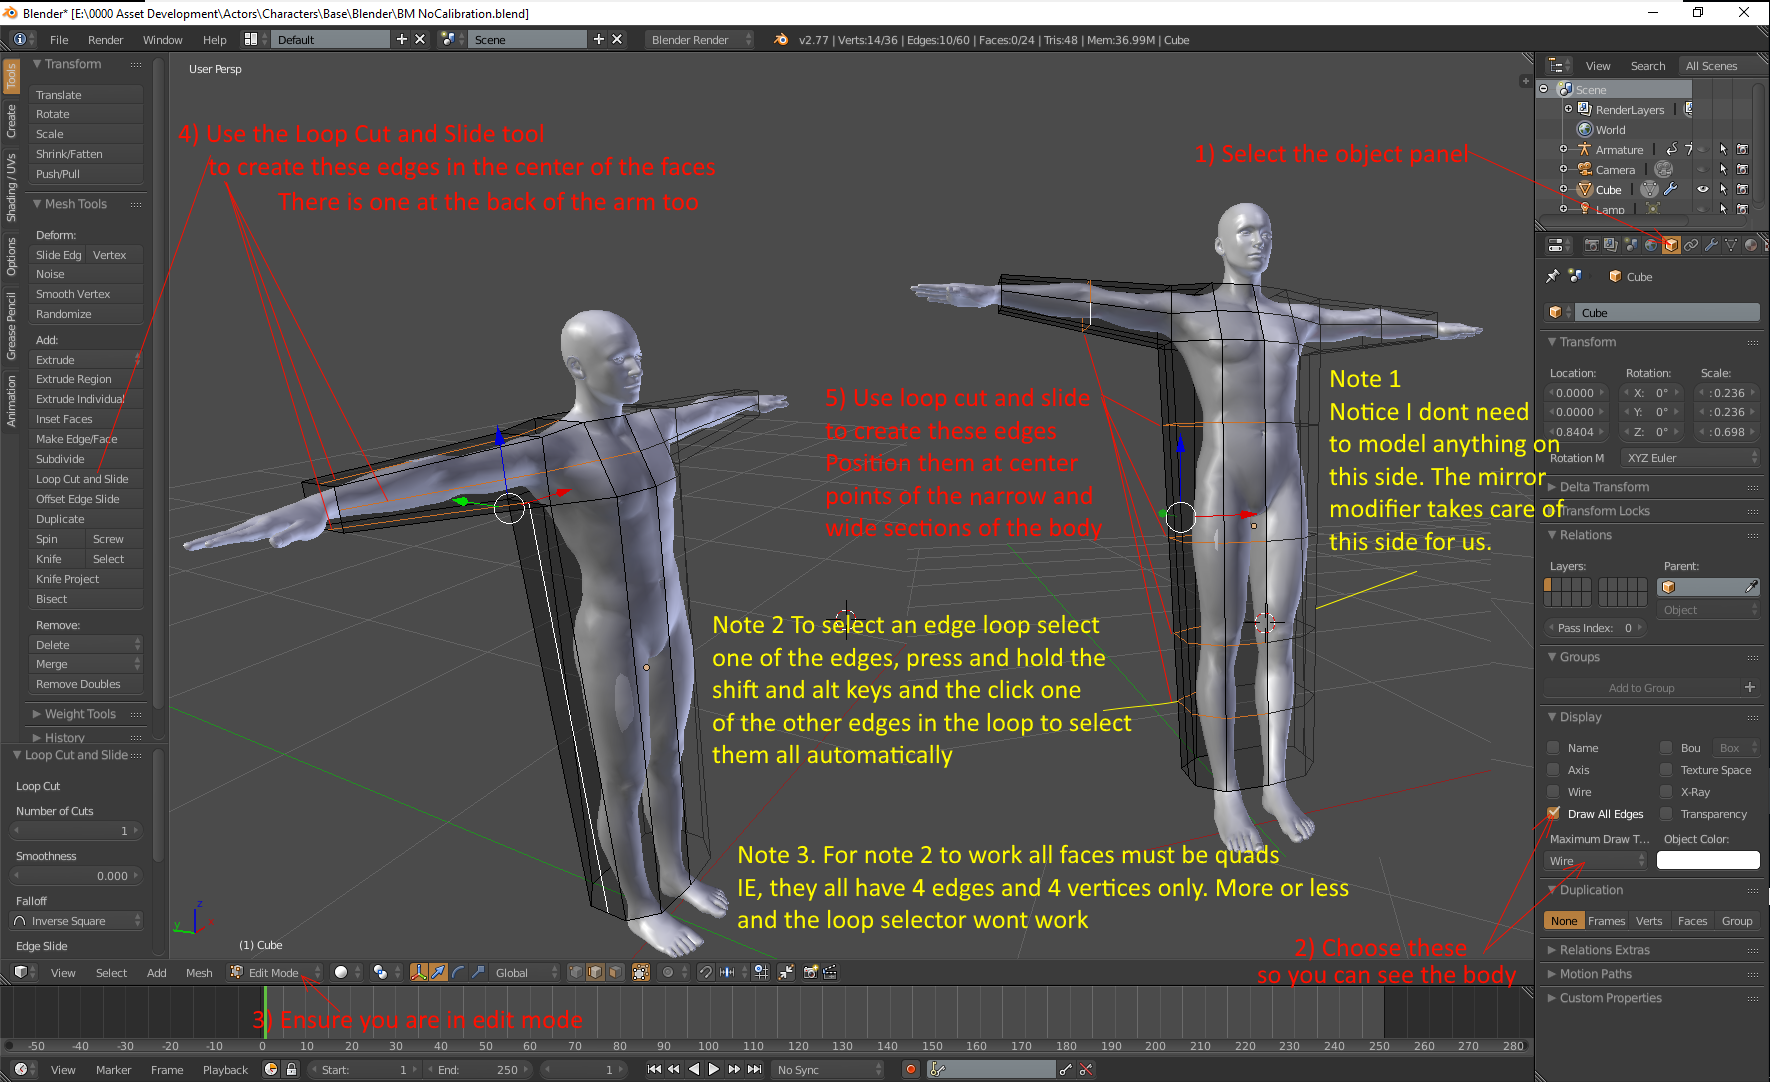
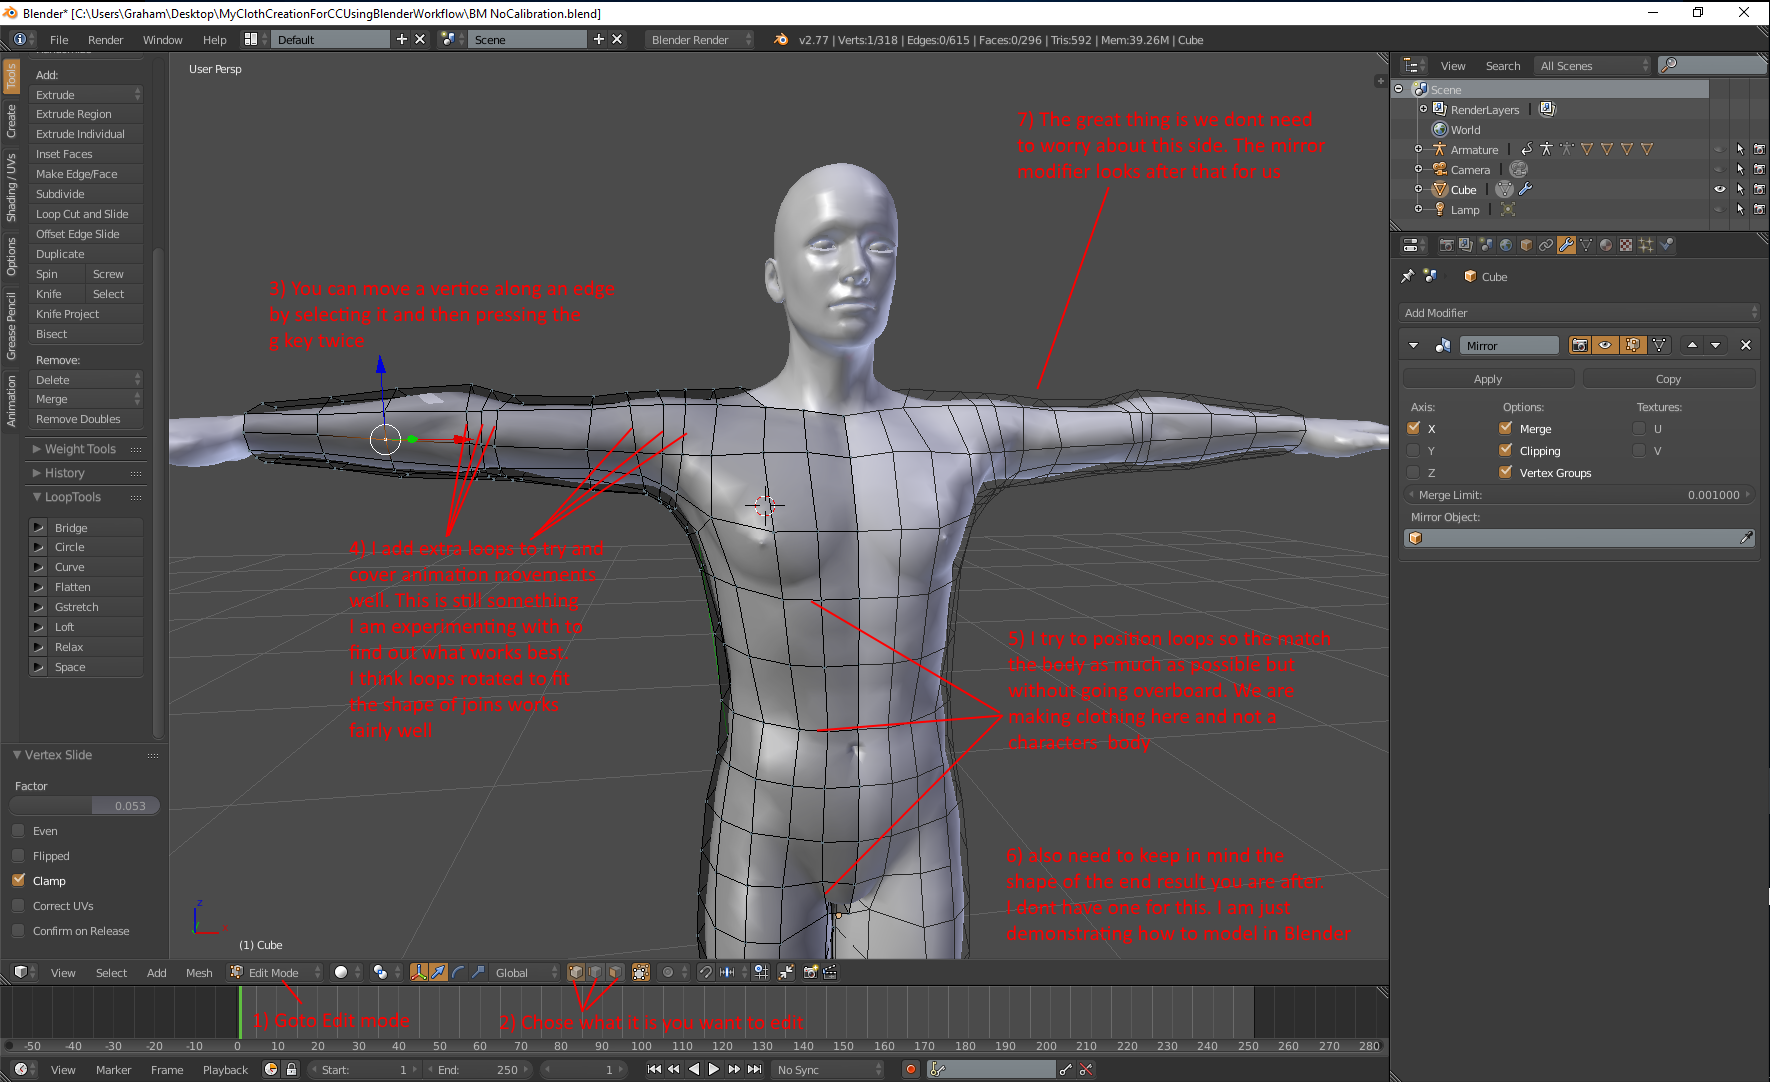
IMPROVE THE MESH SO IT FITS THE BODY BETTER

ADD EDGES TO THE CLOTHING AT THE CHARACTERS BODY CENTER AREAS.
================================================================
By this I mean you want to put primary edges where the body parts bend
This is so the clothing will bend with the characters body better during animations
So around the waist, around the elbows, around the knees.

Also we want edges where the body thickens or thins.
This is so when we scale the meshes closer to the body the mesh doesn't penetrate the body.
If the mesh penetrates the body then the tool I am about to show you wont do so well.
Also, The clothing I am constructing I am keeping the mesh as low polly as possible because it makes making changes easier.
As we progress then we will start increasing the meshing so we can start adding detail.. So for now, keep it as simple as possible

https://forum.reallusion.com/uploads/images/392fb618-aec1-44f2-93b9-154c.png


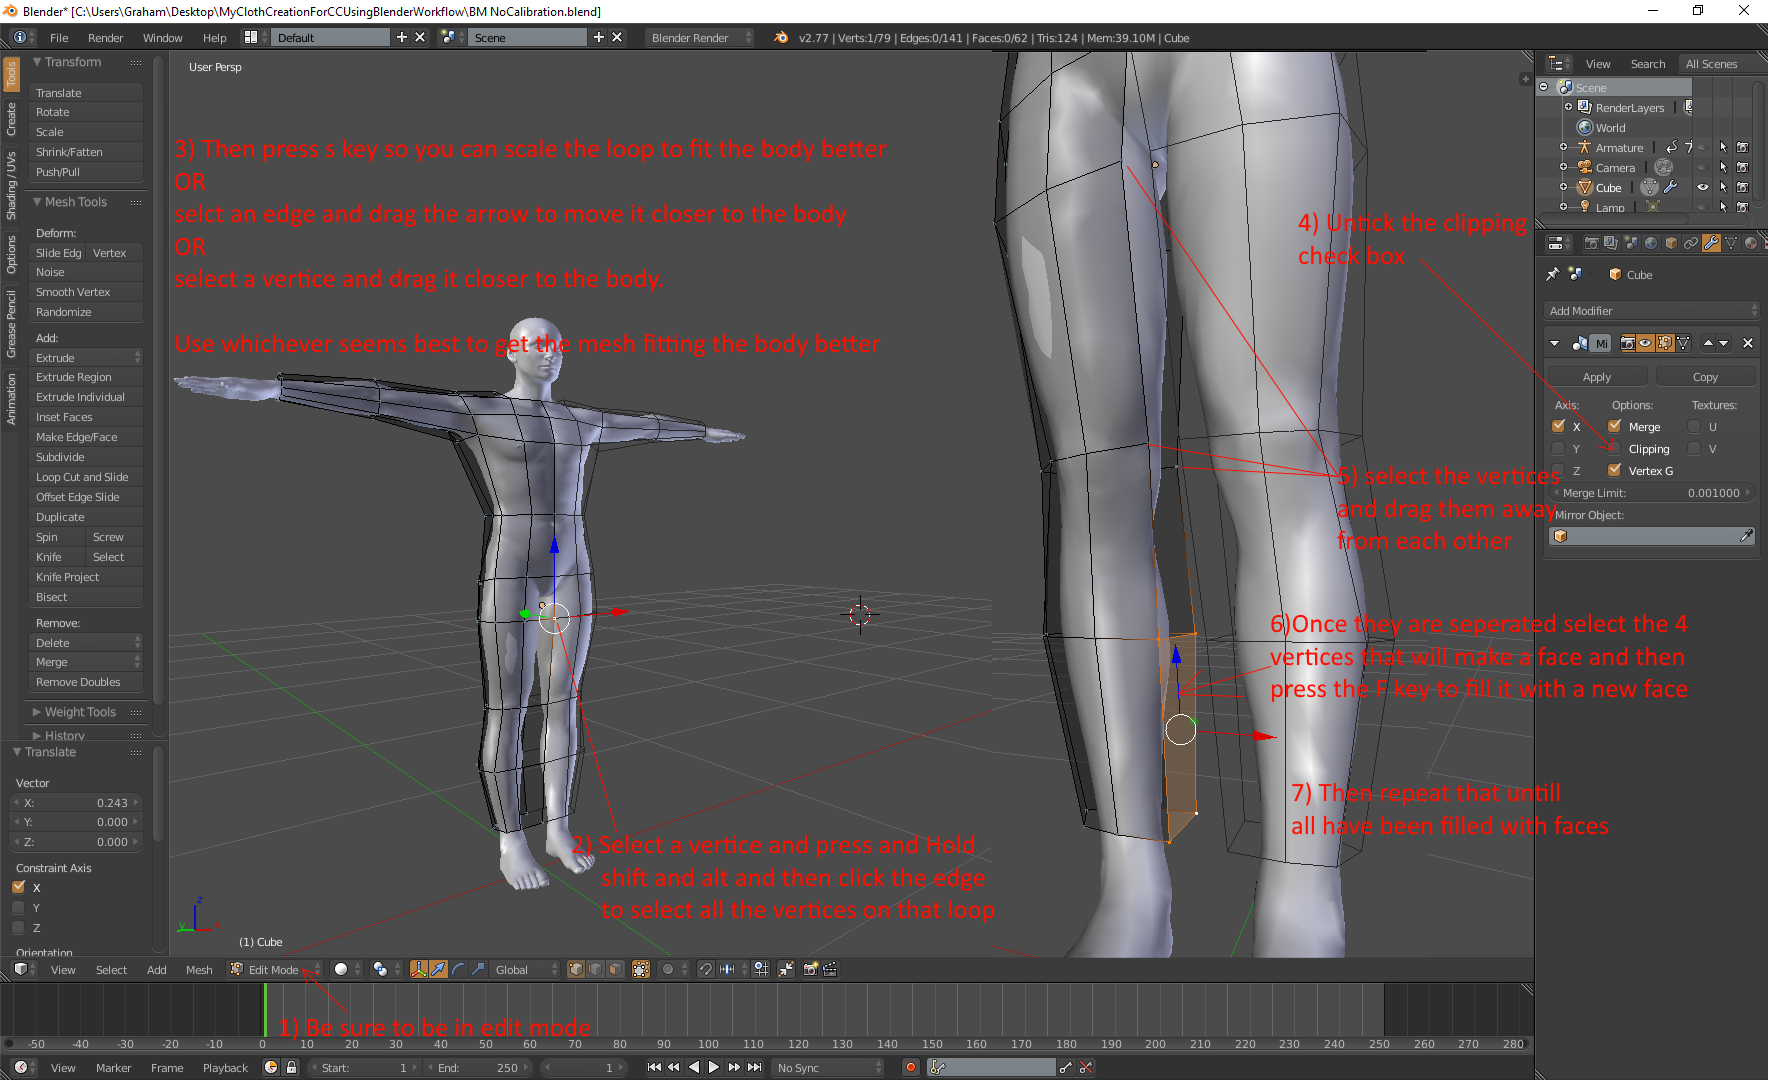
SEPERATE AND FILL THE MESH FOR THE LEGS
=======================================
If I was creating a template for dresses then obviously I wouldn't be doing this bit. But for my demo here I am doing pants for a man
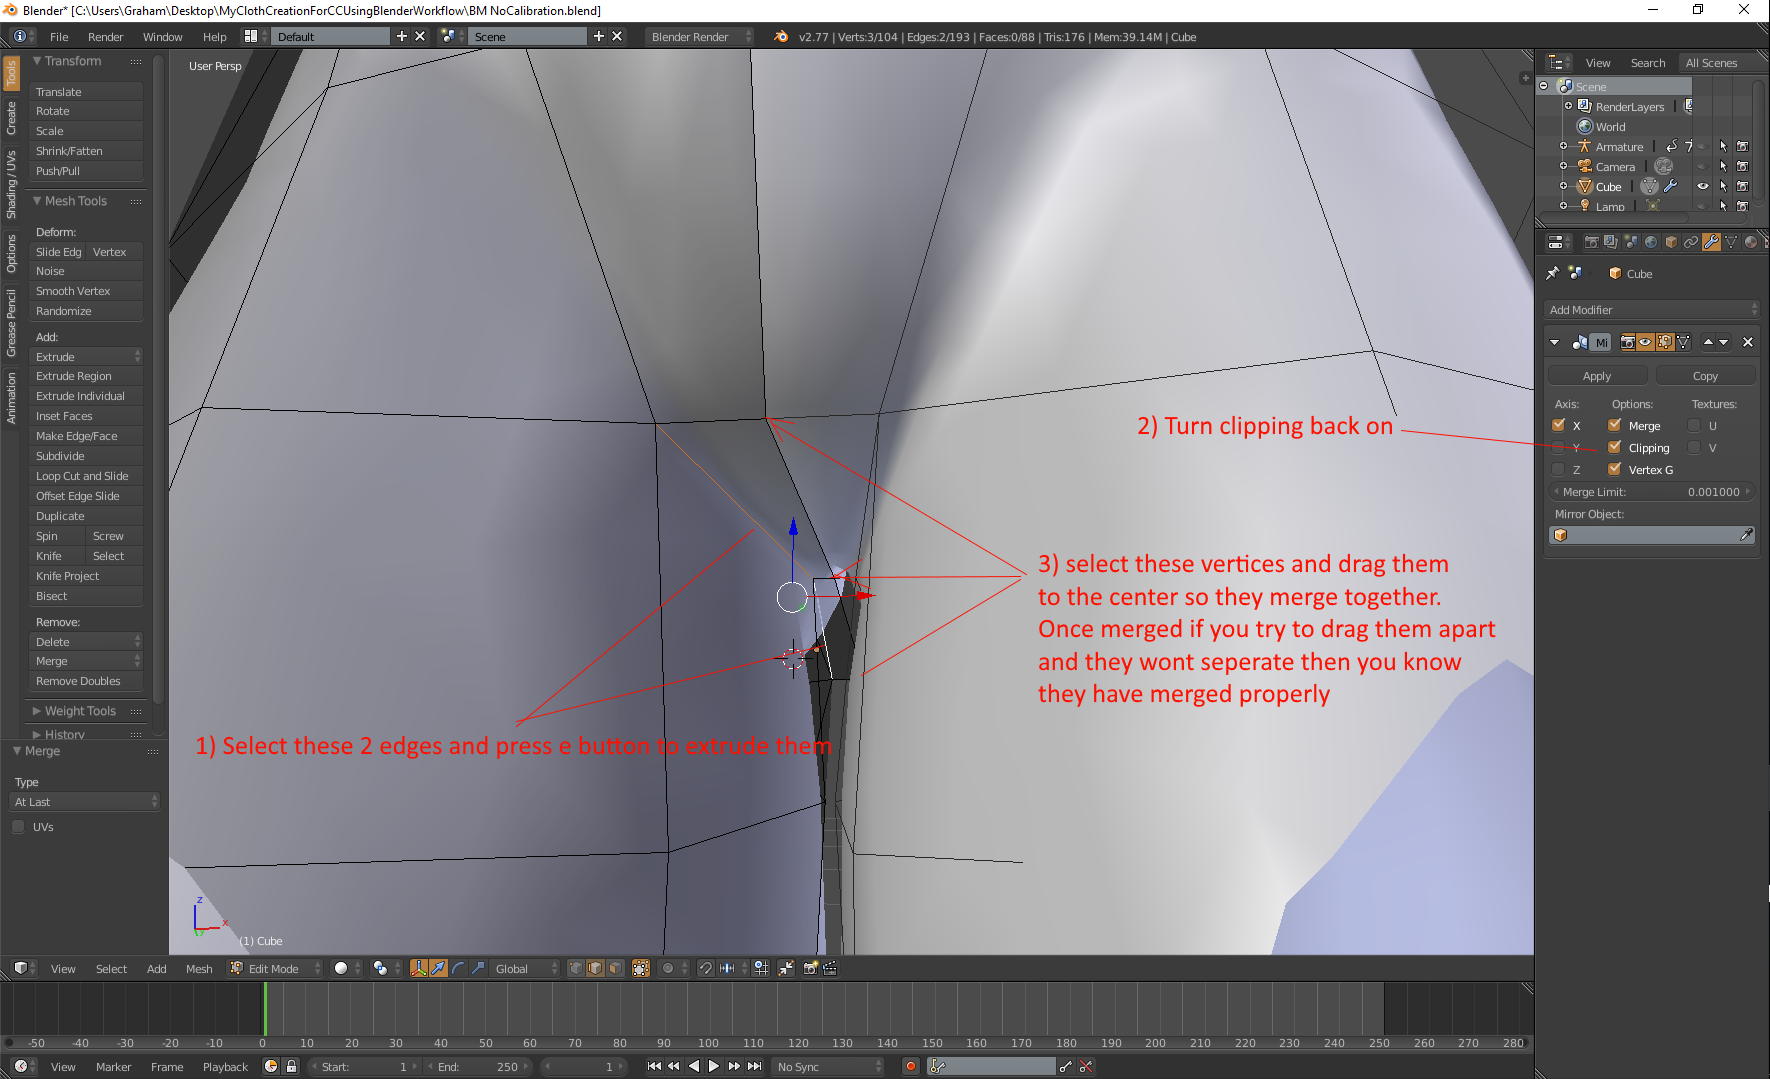
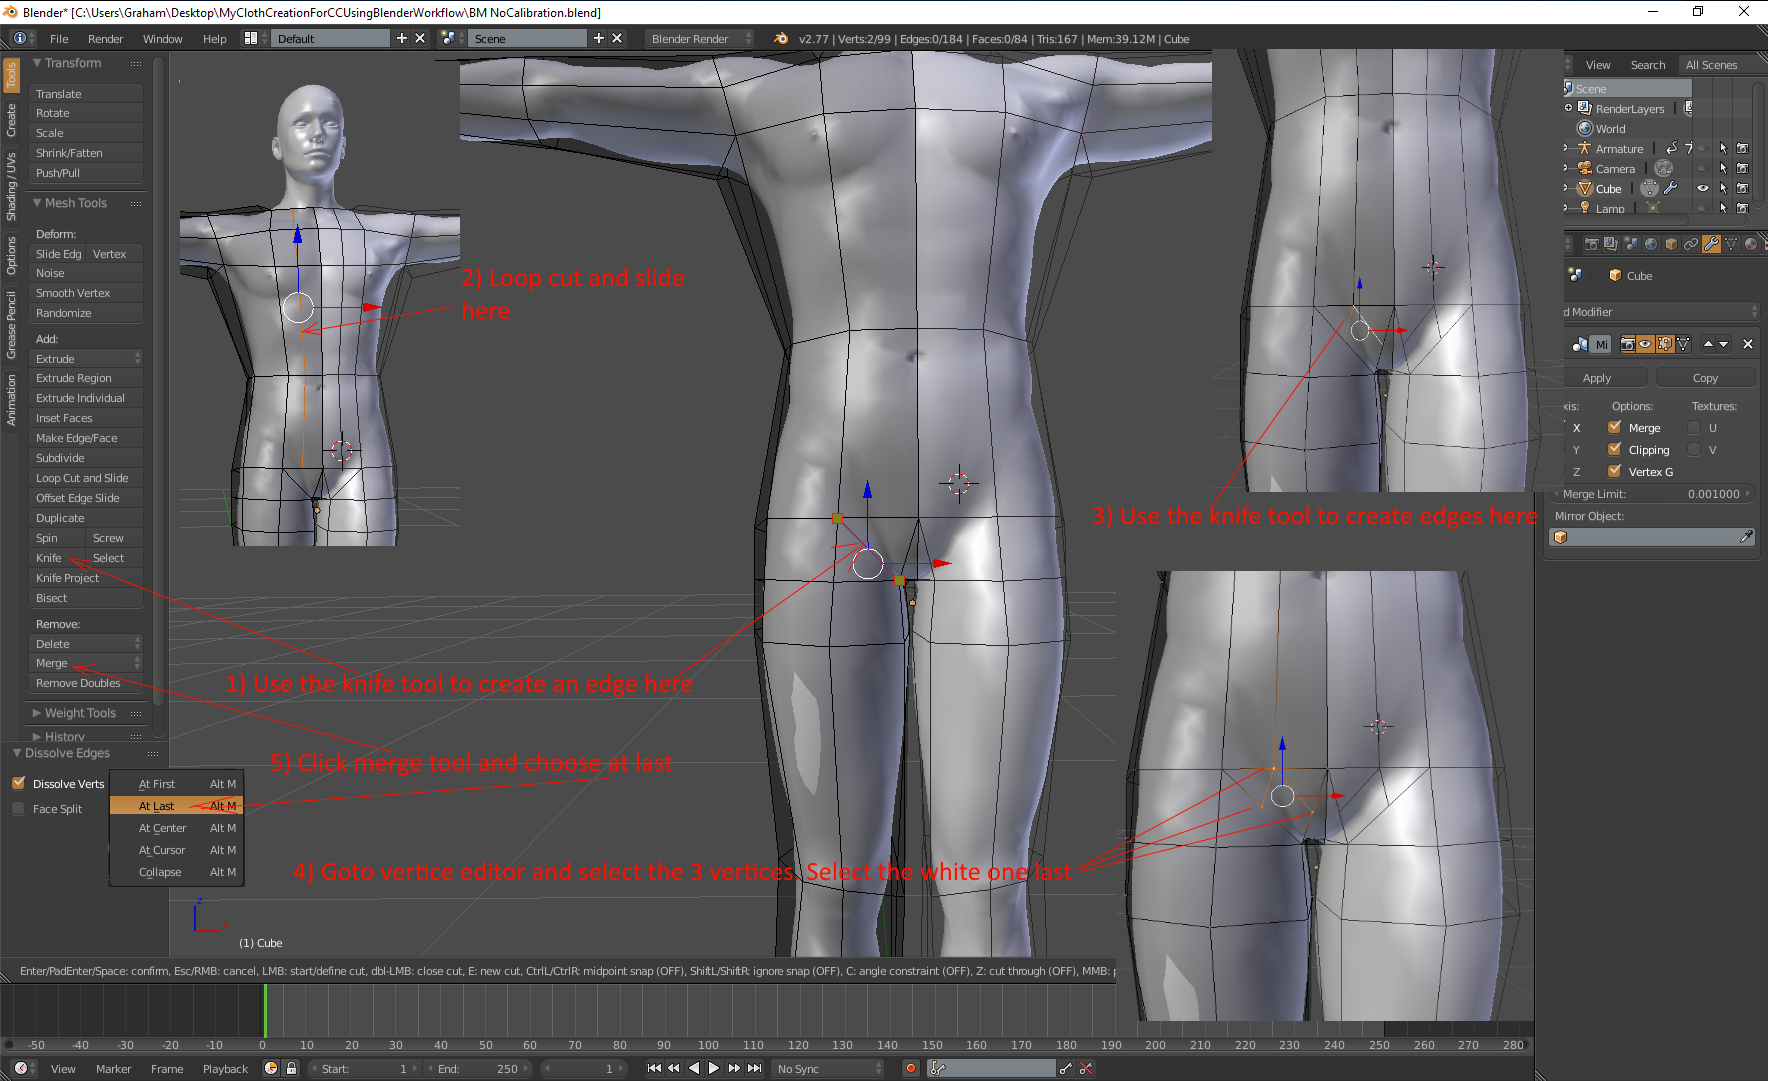
https://forum.reallusion.com/uploads/images/9ac732df-d410-4924-8e2e-0347.png


CREATE THE CRUTCH
==================
Sorry, I did this and forgot to screenshot it in progress so the next 2 images aren't in proper progress. However if you look and think..... I think you will see what to did.
First, after filling the inner leg edges, switch to edge edit mode select the top 2 edges and extrude them to create the crutch faces. Then switch to vertice edit mode, tick the clipping checkbox in the mirror modifier and then drag the center vertices so they merge together in the middle.
https://forum.reallusion.com/uploads/images/6d4d5f3b-dca9-4062-8ca6-3925.png

ENSURE ALL FACES ARE QUADS
===========================
Next we need to set all faces as quads so to remove the tri faces at the front and back of the crutch.
Step 1 was so when I did step 2 the loop cut and slide didn't go all the way to the ankle
step 4 was done so I could easily get rid of the 3 triangle faces at the front of the crutch.
I then did the same thing at the back
The image above is actually how it look once all of this is complete. Sorry for that, I'm getting tired.

https://forum.reallusion.com/uploads/images/4d4b04c3-a04a-4e06-8032-88c4.png


i7-3770 3.4GHz CPU 16 GB Ram   
GeForce GTX1080 TI 11GB
Windows 10 Pro 64bit
Edited
7 Years Ago by Delerna
Delerna
Delerna
Posted 7 Years Ago
View Quick Profile
Distinguished Member

Distinguished Member (8.2K reputation)Distinguished Member (8.2K reputation)Distinguished Member (8.2K reputation)Distinguished Member (8.2K reputation)Distinguished Member (8.2K reputation)Distinguished Member (8.2K reputation)Distinguished Member (8.2K reputation)Distinguished Member (8.2K reputation)Distinguished Member (8.2K reputation)

Group: Forum Members
Last Active: 2 Years Ago
Posts: 1.5K, Visits: 14.8K


GET THE MESHING READY TO FIT THE BODY


CREATE THE SHOULDER LOOP
==========================
https://forum.reallusion.com/uploads/images/00ca2d2b-1bb0-4149-b0b5-12ac.png


CONVERT ALL TRIANGULAR FACES TO QUADS
=======================================

https://forum.reallusion.com/uploads/images/b2bd485b-36f7-43db-a20a-2d64.png


TURN ALL PENTAGONAL FACES INTO QUADS
======================================
Why?
Because good 3D modelling tools enable you to select or create vertice, edge or face loops with a single click to help speed up the modeling process. But this only works with quads so in your modelling, especially at the early stage we are at the moment, work constantly to keep everything as quads. A few times I have used the knife tool to create an edge  before I used the Loop cut and slide tool to create the loop.
I did that so there would be a non quad face in the way to prevent the loop cut and slide tool from putting edges where I didn't want them to go. That saves me from having to select those extra edges and using delete/dissolve edges to get rid of them. Although doing that did make me have to remove the triangular faces so its a bit related on your choice on how to model that determines the actual methods you choose. I find doing it this way doesn't create edges that ends up confusing me. But you might find my way to be more confusing for you? Whatever the case. The primary point is that however you add extra meshing you want to finalise it so everything is put back as quads.

https://forum.reallusion.com/uploads/images/86f3a268-760c-43f1-bc9f-8bc9.png

CREATING LOOPS
===============
The tool for creating edge loops is the loop cut and slide tool. It is called that because
1) You click the tool and move your mouse to the mesh section where you want the LOOP s to be created
2) You scroll the middle mouse button to CUT that mesh section into as many extra loops as you want and then click the left mouse button once to set that number of loops
3) Now you can move the mouse to SLIDE the new loops to where you want them in the mesh section and click the left mouse button again to finalise it.

SELECTING LOOPS
================
1) Right click one of the edges, vertices or faces in the loop you want to select
2) Press and hold shift/alt keys and right click on another edge in the loop you want to select
Now you have that loop selected and you can move its position , scale it, rotate it etc etc.


i7-3770 3.4GHz CPU 16 GB Ram   
GeForce GTX1080 TI 11GB
Windows 10 Pro 64bit
Edited
7 Years Ago by Delerna
Delerna
Delerna
Posted 7 Years Ago
View Quick Profile
Distinguished Member

Distinguished Member (8.2K reputation)Distinguished Member (8.2K reputation)Distinguished Member (8.2K reputation)Distinguished Member (8.2K reputation)Distinguished Member (8.2K reputation)Distinguished Member (8.2K reputation)Distinguished Member (8.2K reputation)Distinguished Member (8.2K reputation)Distinguished Member (8.2K reputation)

Group: Forum Members
Last Active: 2 Years Ago
Posts: 1.5K, Visits: 14.8K

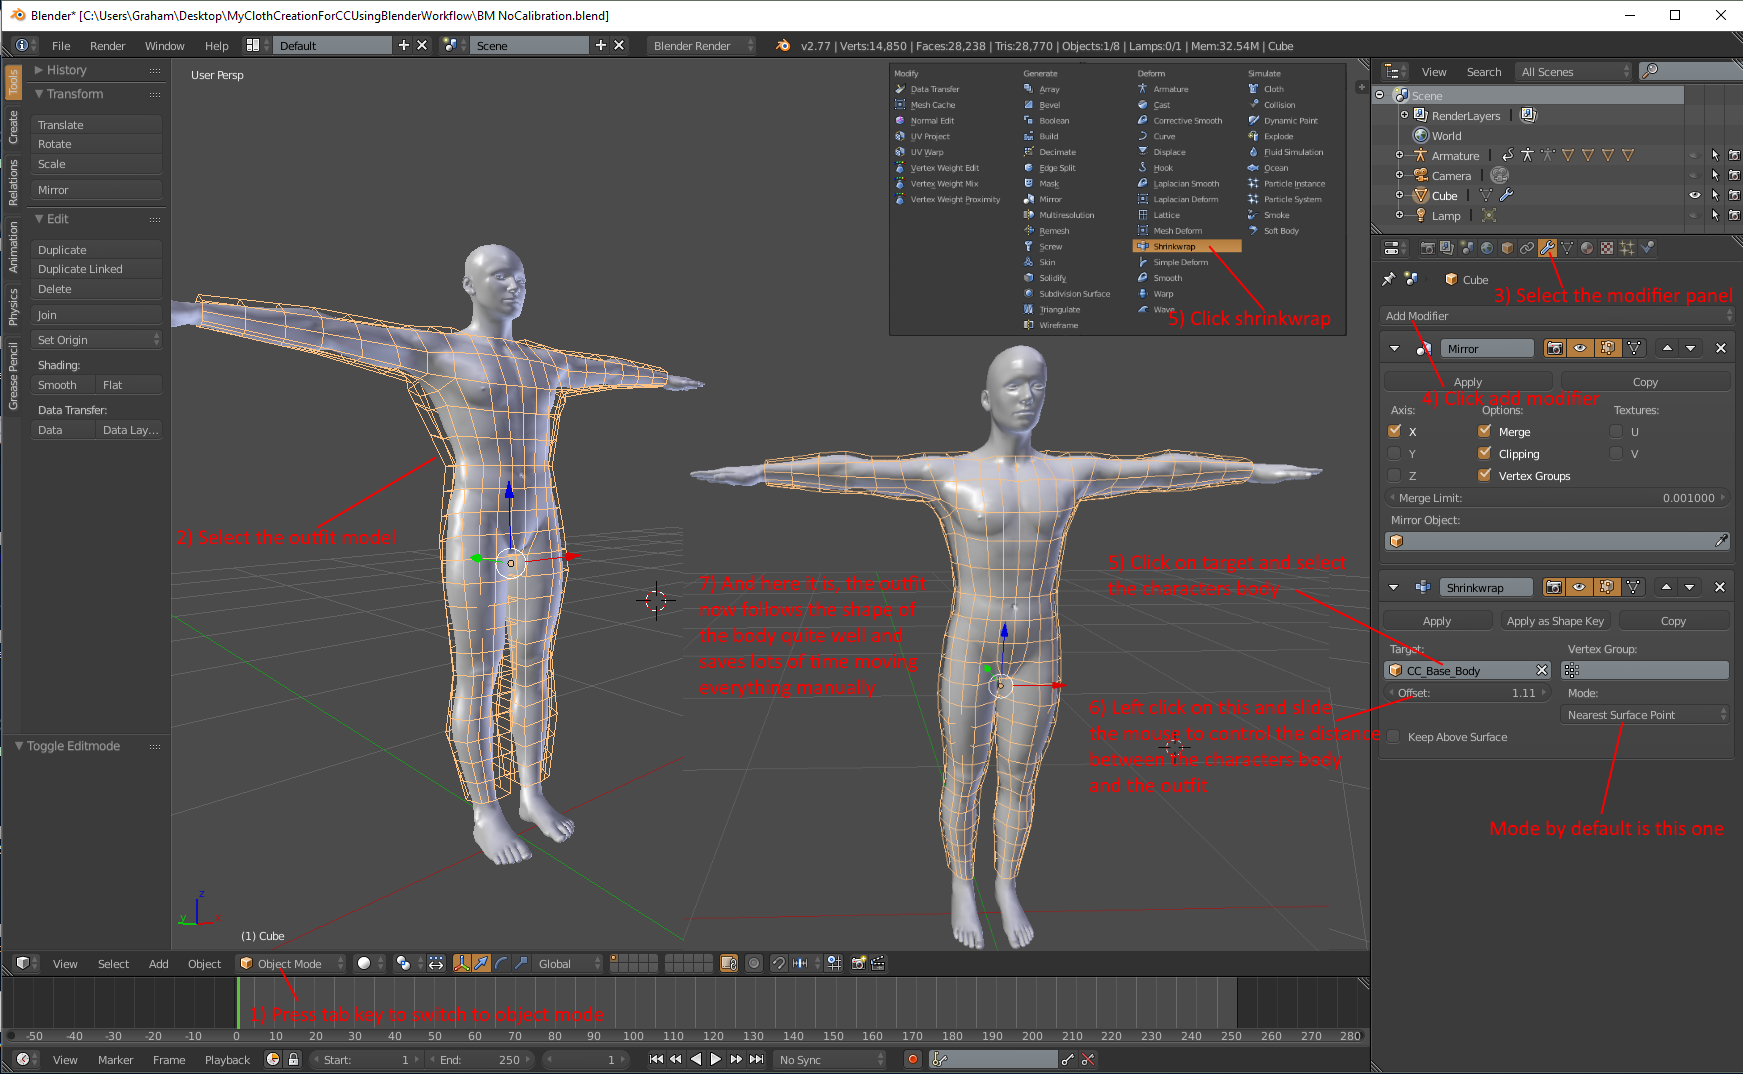
SECOND IMPORTANT MODIFIER TO LEARN

SHRINKWRAP
===========
This is the tool I was talking about earlier. You add this modifier to the object you want it to shrink and wrap. Then you tell the modifier which object you want it to shrink and wrap this object around and finally you tell it how close you want this object to shrink to the target object. I find this is also a good tool for making templates for multilayered clothes. For example singlet template, shrink it very close to the characters body. Shirt templet, shrink it so its a bit further away from the body than the singlet. Coat template, shrink it so it is a bit further away from the body than the shirt. Then you can export all those to iclone and test its animation to see whether cloth penetration occurs. If it does then adjust the distances a bit further and try the test again.

https://forum.reallusion.com/uploads/images/b5f1bf82-b04d-4099-a4b8-d321.png

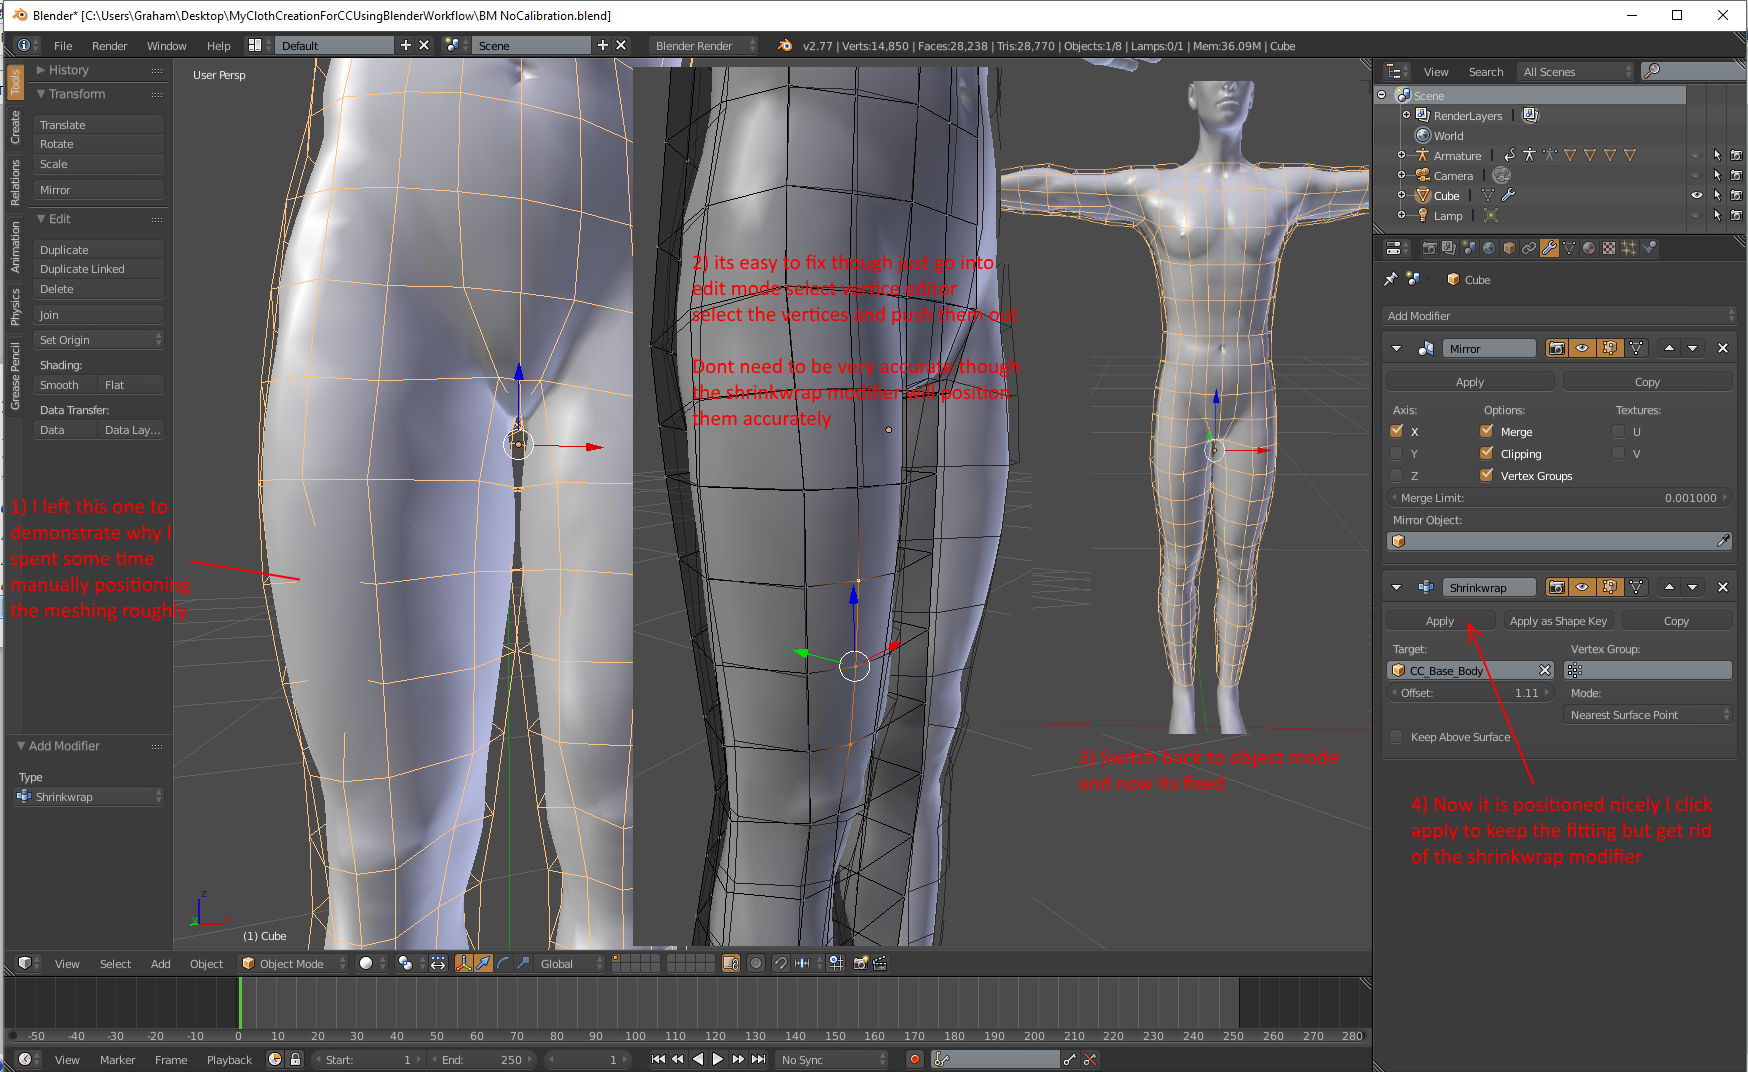
PERFORM ANY MODIFICATIONS NEEDED AND APPLY THE SHRINKWRAP
============================================================
Once the mesh fits the body reasonably I apply the shrinkwrap modifier to get rid of it because I find in edit mode the mesh looks confusing with the modifier still there because there are two sets of meshes The original one we made and the modified mesh. So I get rid of it so in edit mode there is only one mesh not 2. In the future if I need to make the mesh fit the body again I will just add a new shrinkwrap modifier and apply it. Note, once you start creating the details of your outfit you don't want to use this modifier anymore or you will start to loose the details. This is just a good tool to get the base mesh fitting the body well

https://forum.reallusion.com/uploads/images/0e18f809-0c0a-4542-b85c-ea37.png


i7-3770 3.4GHz CPU 16 GB Ram   
GeForce GTX1080 TI 11GB
Windows 10 Pro 64bit
Edited
7 Years Ago by Delerna
Delerna
Delerna
Posted 7 Years Ago
View Quick Profile
Distinguished Member

Distinguished Member (8.2K reputation)Distinguished Member (8.2K reputation)Distinguished Member (8.2K reputation)Distinguished Member (8.2K reputation)Distinguished Member (8.2K reputation)Distinguished Member (8.2K reputation)Distinguished Member (8.2K reputation)Distinguished Member (8.2K reputation)Distinguished Member (8.2K reputation)

Group: Forum Members
Last Active: 2 Years Ago
Posts: 1.5K, Visits: 14.8K

FINALISE THE BASE MESHING

Now the outfit is getting closer to the shape of the character its time to start positioning things so it will animate well where the body parts fold.

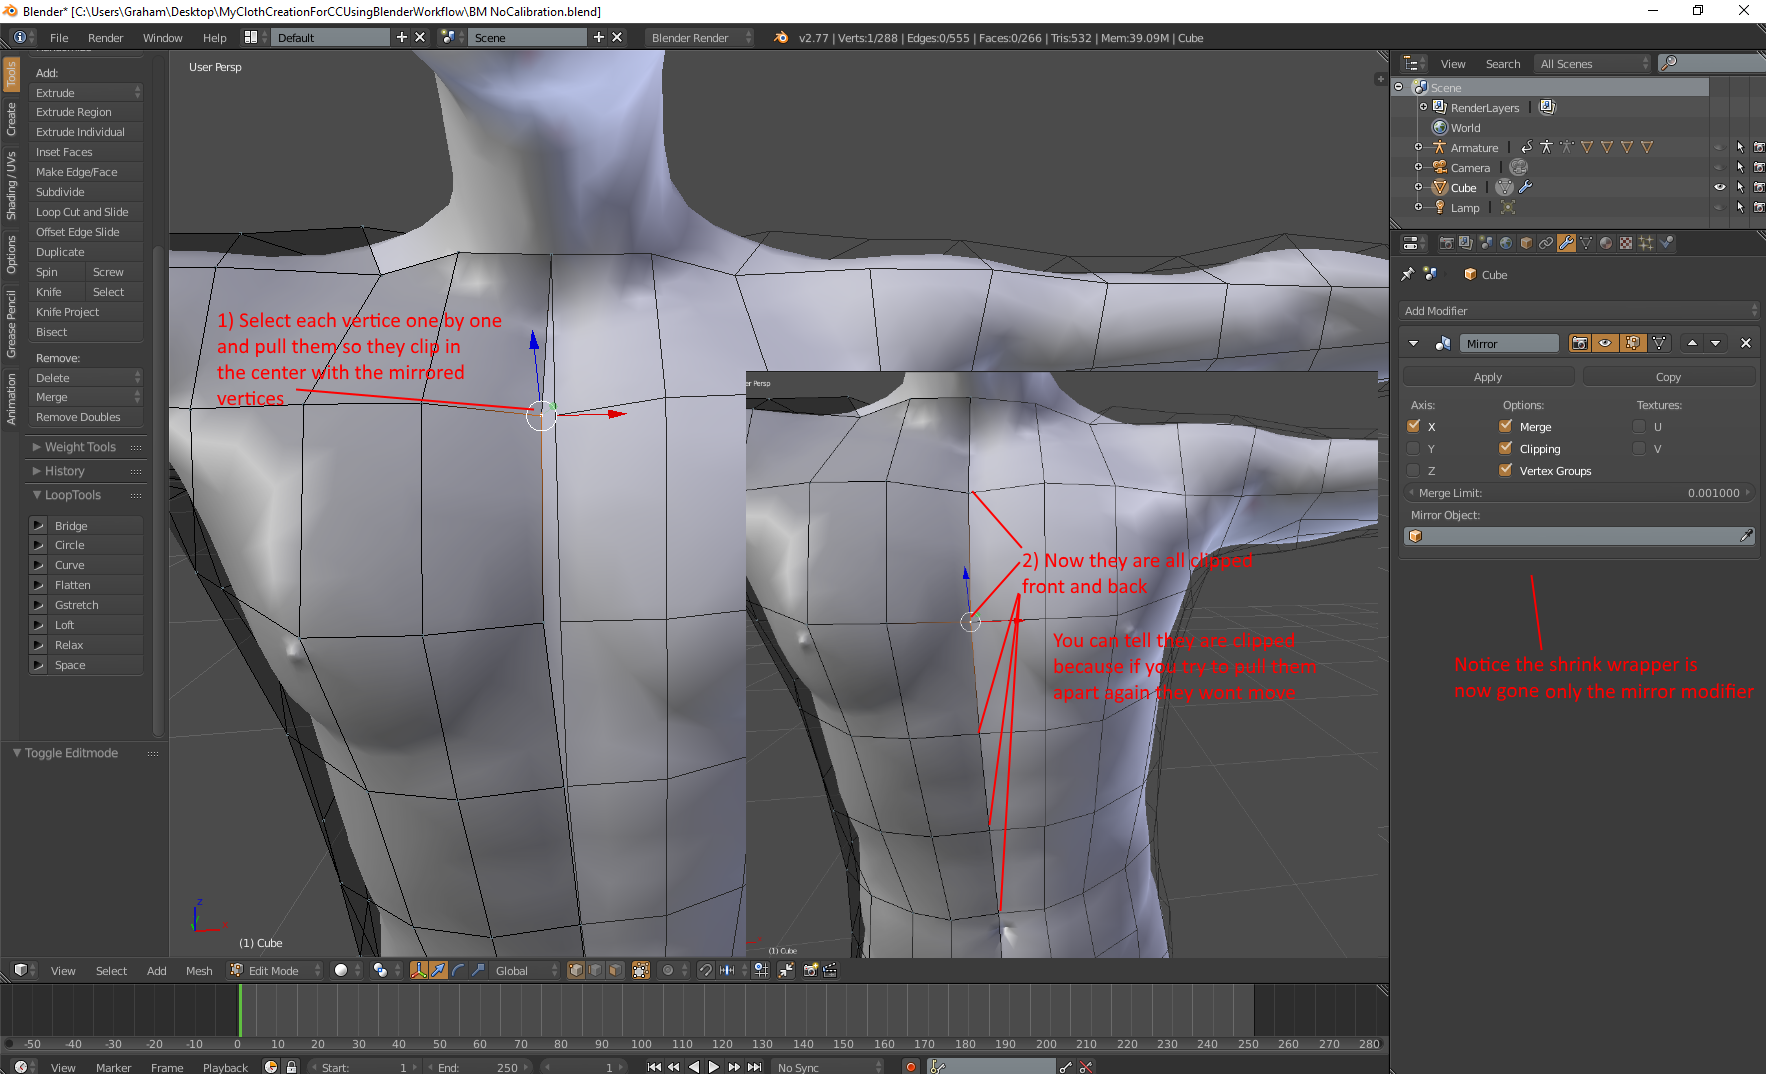
FIX THE MIRROR MODIFIER CLIPPING
The shrink wrap modified didn't take any notice of the mirror modifier because it was added to the model after the mirror modifier so now the vertices in the middle aren't clipping. I should have moved the shrinkwraper up before I applied it but oh well, this demonstrates the importance of the order of the modifiers and its not hard to fix this time because the mesh is still pretty basic. This is why I keep the mesh as simple as possible for what I am trying to achieve. Less meshing means changes are easier. Don't add lots of meshing until you are ready to start adding clothing details.

https://forum.reallusion.com/uploads/images/e4d342de-05f5-494f-a672-a9b5.png


POSITION AND ADD LOOPS TO FINALISE THE BASE
==========================================
Now I start to finalize the meshing according to what I think will work best. This is something you will need to experiment with if you really want to find the best way.
Doing it my way may or may not be the best way. I have discovered to many times that someone comes along and shows a way of doing something that kills what I have insisted to be the best way.
That is why I am just demonstrating how I do it and not insisting that that is how you must do it. Watch what I do, watch what other people do, grow your imagination and apply whatever to how you do it.

 This model I am building here is just a base model. Once I have this completed I will save it as a base template. I will then be able to use that base template as the starting point for many clothes I want to make. I also have a base template like this for dresses rather than pants. That is the goal for what I have shown so far. I will complete this base and then I will demonstrate how I use it to build detailed clothing.

https://forum.reallusion.com/uploads/images/5bdddb84-46df-4bfa-b5d5-9224.png

TEST CLOTH FLOW IN ICLONE
=========================
Once I have the base mesh complete it is at that point I start testing how the outfit flows and animates in iClone as described in my other workflow. The link to that workflow in in the INTRODUCTION post at the top of this page. I don't try to get it perfect because this is just a base mesh. My intent here is just to make sure my ideas on positioning loops actually work as I expected and the clothing will flow correctly and there is no drastic cloth penetration through the characters body. I think it is better to find any big problems with my meshing now while it is simple rather than complete all the detail and then discover those huge issues. The more meshing you have the more work it will take to fix those problems. Penetration through the knee for example only requires repositioning a few vertices. But if I increased the meshing so the knee had knee wraps or straps or whatever and then discovered severe penetration then I would have a lot of vertices I need to move which would be likely to upset the shape of what I made so now I have to reshape it again. Yep, I think it is better to find big problems while the mesh is simple.


i7-3770 3.4GHz CPU 16 GB Ram   
GeForce GTX1080 TI 11GB
Windows 10 Pro 64bit
Edited
7 Years Ago by Delerna
Delerna
Delerna
Posted 7 Years Ago
View Quick Profile
Distinguished Member

Distinguished Member (8.2K reputation)Distinguished Member (8.2K reputation)Distinguished Member (8.2K reputation)Distinguished Member (8.2K reputation)Distinguished Member (8.2K reputation)Distinguished Member (8.2K reputation)Distinguished Member (8.2K reputation)Distinguished Member (8.2K reputation)Distinguished Member (8.2K reputation)

Group: Forum Members
Last Active: 2 Years Ago
Posts: 1.5K, Visits: 14.8K

LEARN TO USE THE LOOP TOOLS

Here is a great set of tools that will help you a lot with modelling. I highly encourage you to learn them. Don't forget my best friend if you want some extra info on this or anything else actually.
Who is my best friend?........................GOOGLE

ADDING LOOP TOOLS PERMANENTLY TO BLENDER
==============================================
These tools are great for simplifying the task of smoothing up the meshing you have created, rotated, transformed and scaled using  the methods I have demonstrated so far.
Once you get used to using these you will find they make neatening up your model much more enjoyable and less time consuming than trying to line them up using the methods I have shown so far.
Use the above methods to get basic shaping and these tools to neaten things up.

https://forum.reallusion.com/uploads/images/7169f8a5-3029-4940-ba1e-3208.png

EVENLY SPACING VERTICES
========================
I'm just demonstrating the tools here I may or may not do these in my finished base template. I'm just showing you 2 useful tools that I use a lot for creating clothes.
Trying to position vertices so they are evenly spaced by moving each vertice individually is very annoying once you get used to modelling. This is much quicker and way more enjoyable

https://forum.reallusion.com/uploads/images/65997bab-a9df-4d82-b629-f859.png

RELAXING THE VERTICES
======================
This is the one I use most of all. I move vertices so they are basically where I want them to go and then I use this tool to relax them so they flow well without sharp points and edges

https://forum.reallusion.com/uploads/images/fe841e87-0656-4967-81d4-7564.png


LEARN ABOUT NORMALS

HOW TO CONTROL TRANSFORM DIRECTIONS
======================================
https://forum.reallusion.com/uploads/images/09140359-f8e2-4ccc-a3fc-898f.png

WHAT ARE NORMALS
==================
https://forum.reallusion.com/uploads/images/b25beeb4-fdba-4b57-b4b3-4e5c.png


i7-3770 3.4GHz CPU 16 GB Ram   
GeForce GTX1080 TI 11GB
Windows 10 Pro 64bit
Edited
7 Years Ago by Delerna
Delerna
Delerna
Posted 7 Years Ago
View Quick Profile
Distinguished Member

Distinguished Member (8.2K reputation)Distinguished Member (8.2K reputation)Distinguished Member (8.2K reputation)Distinguished Member (8.2K reputation)Distinguished Member (8.2K reputation)Distinguished Member (8.2K reputation)Distinguished Member (8.2K reputation)Distinguished Member (8.2K reputation)Distinguished Member (8.2K reputation)

Group: Forum Members
Last Active: 2 Years Ago
Posts: 1.5K, Visits: 14.8K

USE THE TEMPLATE TO MAKE CLOTHING

Now that I have my base mesh I will save it as a template that I can use to make all kinds of clothing. That way I don't need to do all that work again, I just load the template, save it as a new file named to suit what I am going to make and start from there. One of the first things I might do is separate that single object into several individual objects. So I will demonstrate that now by turning the template object into 3 separate objects. Pants, shirt and belt.

CREATE AND SEPERATE THE BELT
=============================

I actually want to keep the mesh I will use for the belt in the template for the pants and shirt. So I will select the meshes I want to use for the belt and duplicate them. Then I can extrude and scale them to get the basic shape for my belt.
https://forum.reallusion.com/uploads/images/91ca85b0-b2ff-438c-b1d2-b1fa.png


Then I separate the belt from the template object into its own object
https://forum.reallusion.com/uploads/images/f024061f-71f0-409d-a942-b7d9.png


SEPERATE THE PANTS
===================
This time I don't want to keep the mesh I use for the pants in the template. So I just select the faces for the pants and separate them from the template as their own object.
Once I do that the mesh left in the template object will be for the shirt. So no need to separate the shirt because everything else has been separated from it.

Oh, by the way, if you ever want to merge 2 objects into a single object.
1) Goto object mode
2) Select the 2 objects you want to merge
3) Press and hold Ctrl key and then press the j key to join them into a single object

https://forum.reallusion.com/uploads/images/01062bf6-0dce-4f20-a8fa-278b.png


NAME THE 3 OBJECTS
===================
Good to do this so we know what each object is. Also the name we enter here is the name that will be applied to each object when we import them into reallusions character creator.
Also in the image below you might notice the loop I added as the separating point between the shirt and the pants is in the middle of the belt so hopefully the belt will be enough to hide the merging between the shirt and the pants.
If not we can add more meshing to the pants and the shirt to get around that.

https://forum.reallusion.com/uploads/images/6652be2a-e97a-4b13-8d7c-5320.png


i7-3770 3.4GHz CPU 16 GB Ram   
GeForce GTX1080 TI 11GB
Windows 10 Pro 64bit
Edited
7 Years Ago by Delerna
Delerna
Delerna
Posted 7 Years Ago
View Quick Profile
Distinguished Member

Distinguished Member (8.2K reputation)Distinguished Member (8.2K reputation)Distinguished Member (8.2K reputation)Distinguished Member (8.2K reputation)Distinguished Member (8.2K reputation)Distinguished Member (8.2K reputation)Distinguished Member (8.2K reputation)Distinguished Member (8.2K reputation)Distinguished Member (8.2K reputation)

Group: Forum Members
Last Active: 2 Years Ago
Posts: 1.5K, Visits: 14.8K

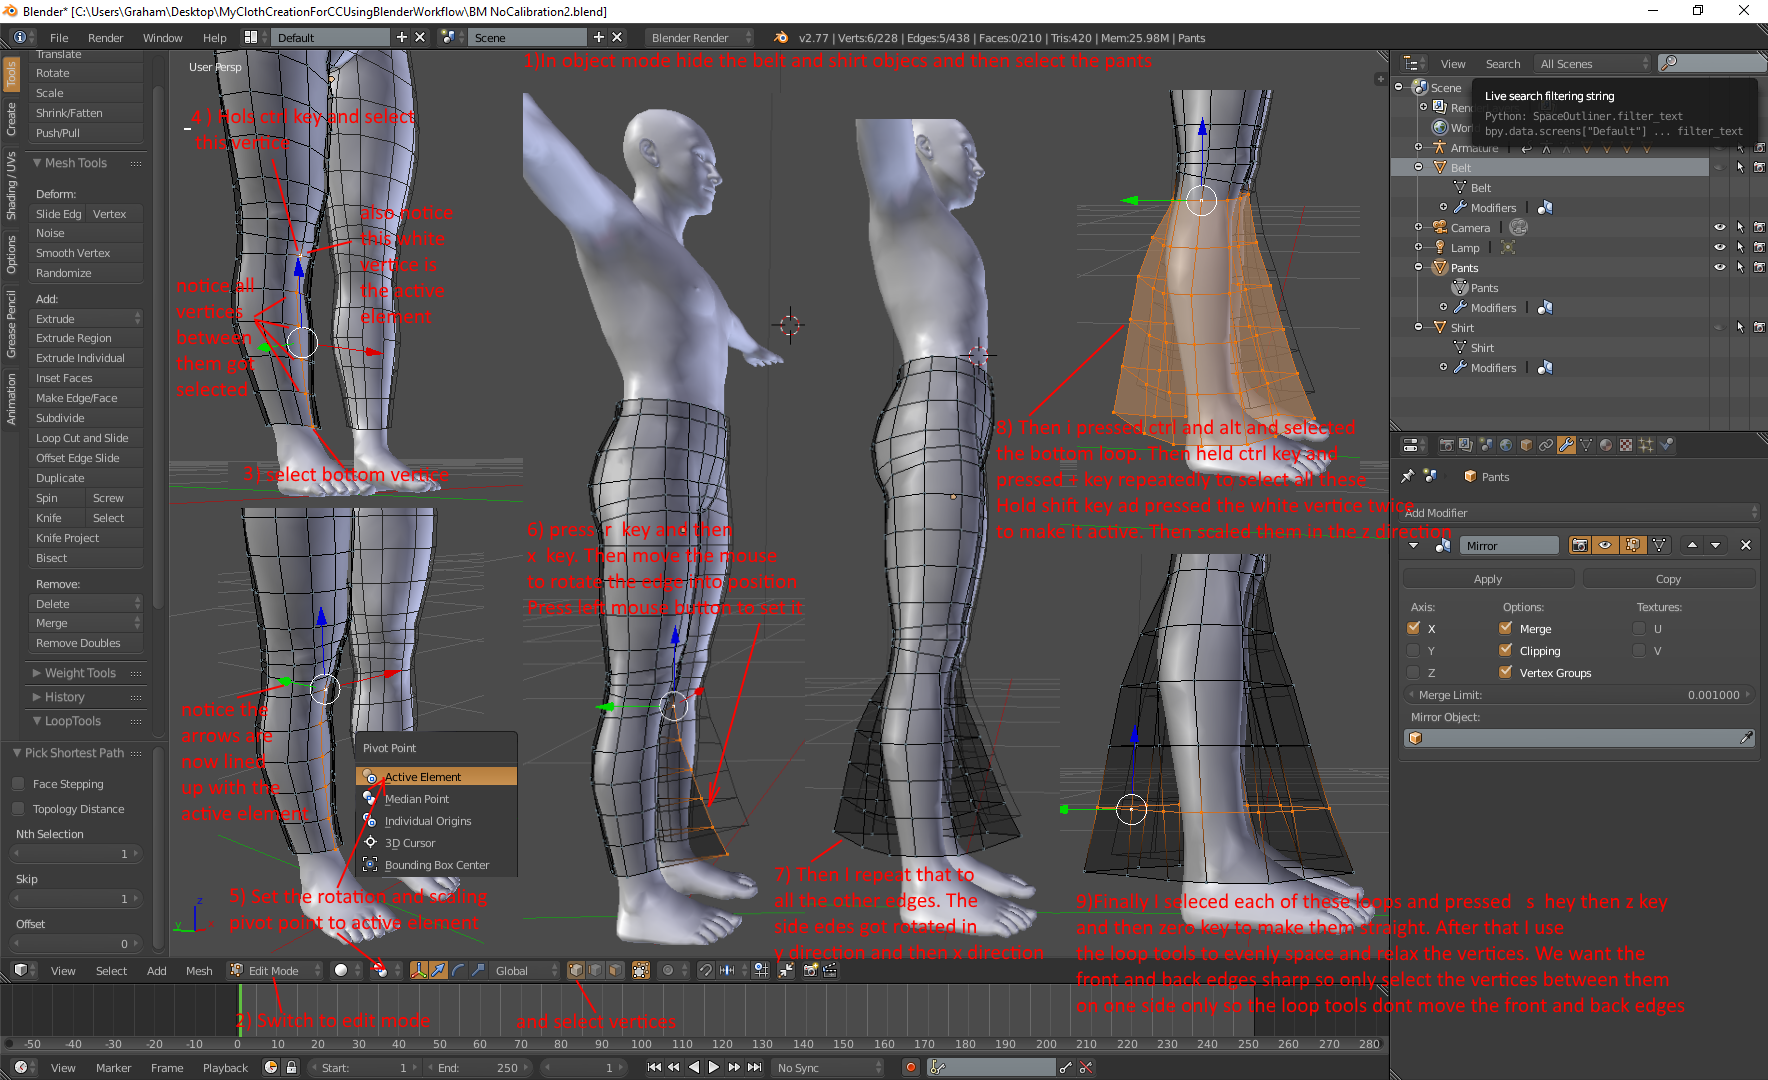
START ADDING SIMPLE DETAILS TO THE PANTS

CREATE BELL BOTTOMS ON THE CALFS
=================================
Here I am trying to highlight the tool for controlling the rotation and scaling control of the pivot point when you do those things. But also re-iterating how to use some of the other modelling methods I have already shown in order to achieve shapes you want to make. Particularly loop selection, loop tools, rotation and scaling of selected elements. If any of these are unclear then rereading previous topics should help you to see what I am saying. I hope......geeze it gets hard to explain things when you get old,  LOL. I'm not sure I am explaining well. It makes sense to me but I know what I m trying to say. so....????

https://forum.reallusion.com/uploads/images/7ef35866-6aee-469f-8822-1b7c.png


ADD BASIC POCKETS
==================


i7-3770 3.4GHz CPU 16 GB Ram   
GeForce GTX1080 TI 11GB
Windows 10 Pro 64bit
Edited
7 Years Ago by Delerna


Reading This Topic