|
By Miranda (RL) - 7 Years Ago
|
Introduction
The process of bringing an animated CC character into the Unity can be tedious. This is exacerbated by the inordinate amount of time it would take to manually assign every material property, adjust texture settings, modify animation properties, model configuration, along with other complicated manual tasks. In response, we are providing this plugin to trim your production time by automating the aforementioned idiosyncrasies.
Starting from Beta 1.0 released on 11/30/2018 till now, we have been working on updating the auto-setup procedure. In Beta 2.0, skin material was supplemented with a Detail Map along with proper subsurface scattering (SSS) settings for HDRP Rendering Pipeline. The Official "Character Creator & iClone Auto Setup" 1.01 has been released on 8/29/2019, please see the full release note for details.
Installation
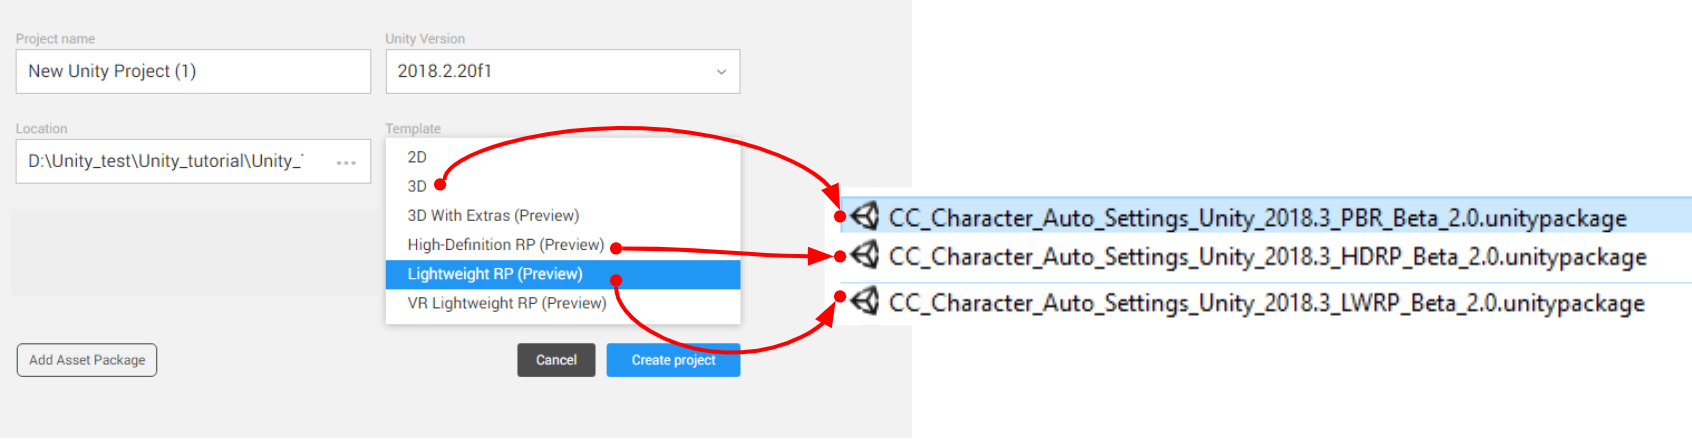
The Character Creator & iClone Auto Setup can be manually installed into Unity folder in order to be applicable in Unity.
- Download the installation file.
- Execute the file and you will get an Auto Setup folder under C:\Program Files\Reallusion\Shared Plugins\Auto Setup by default.
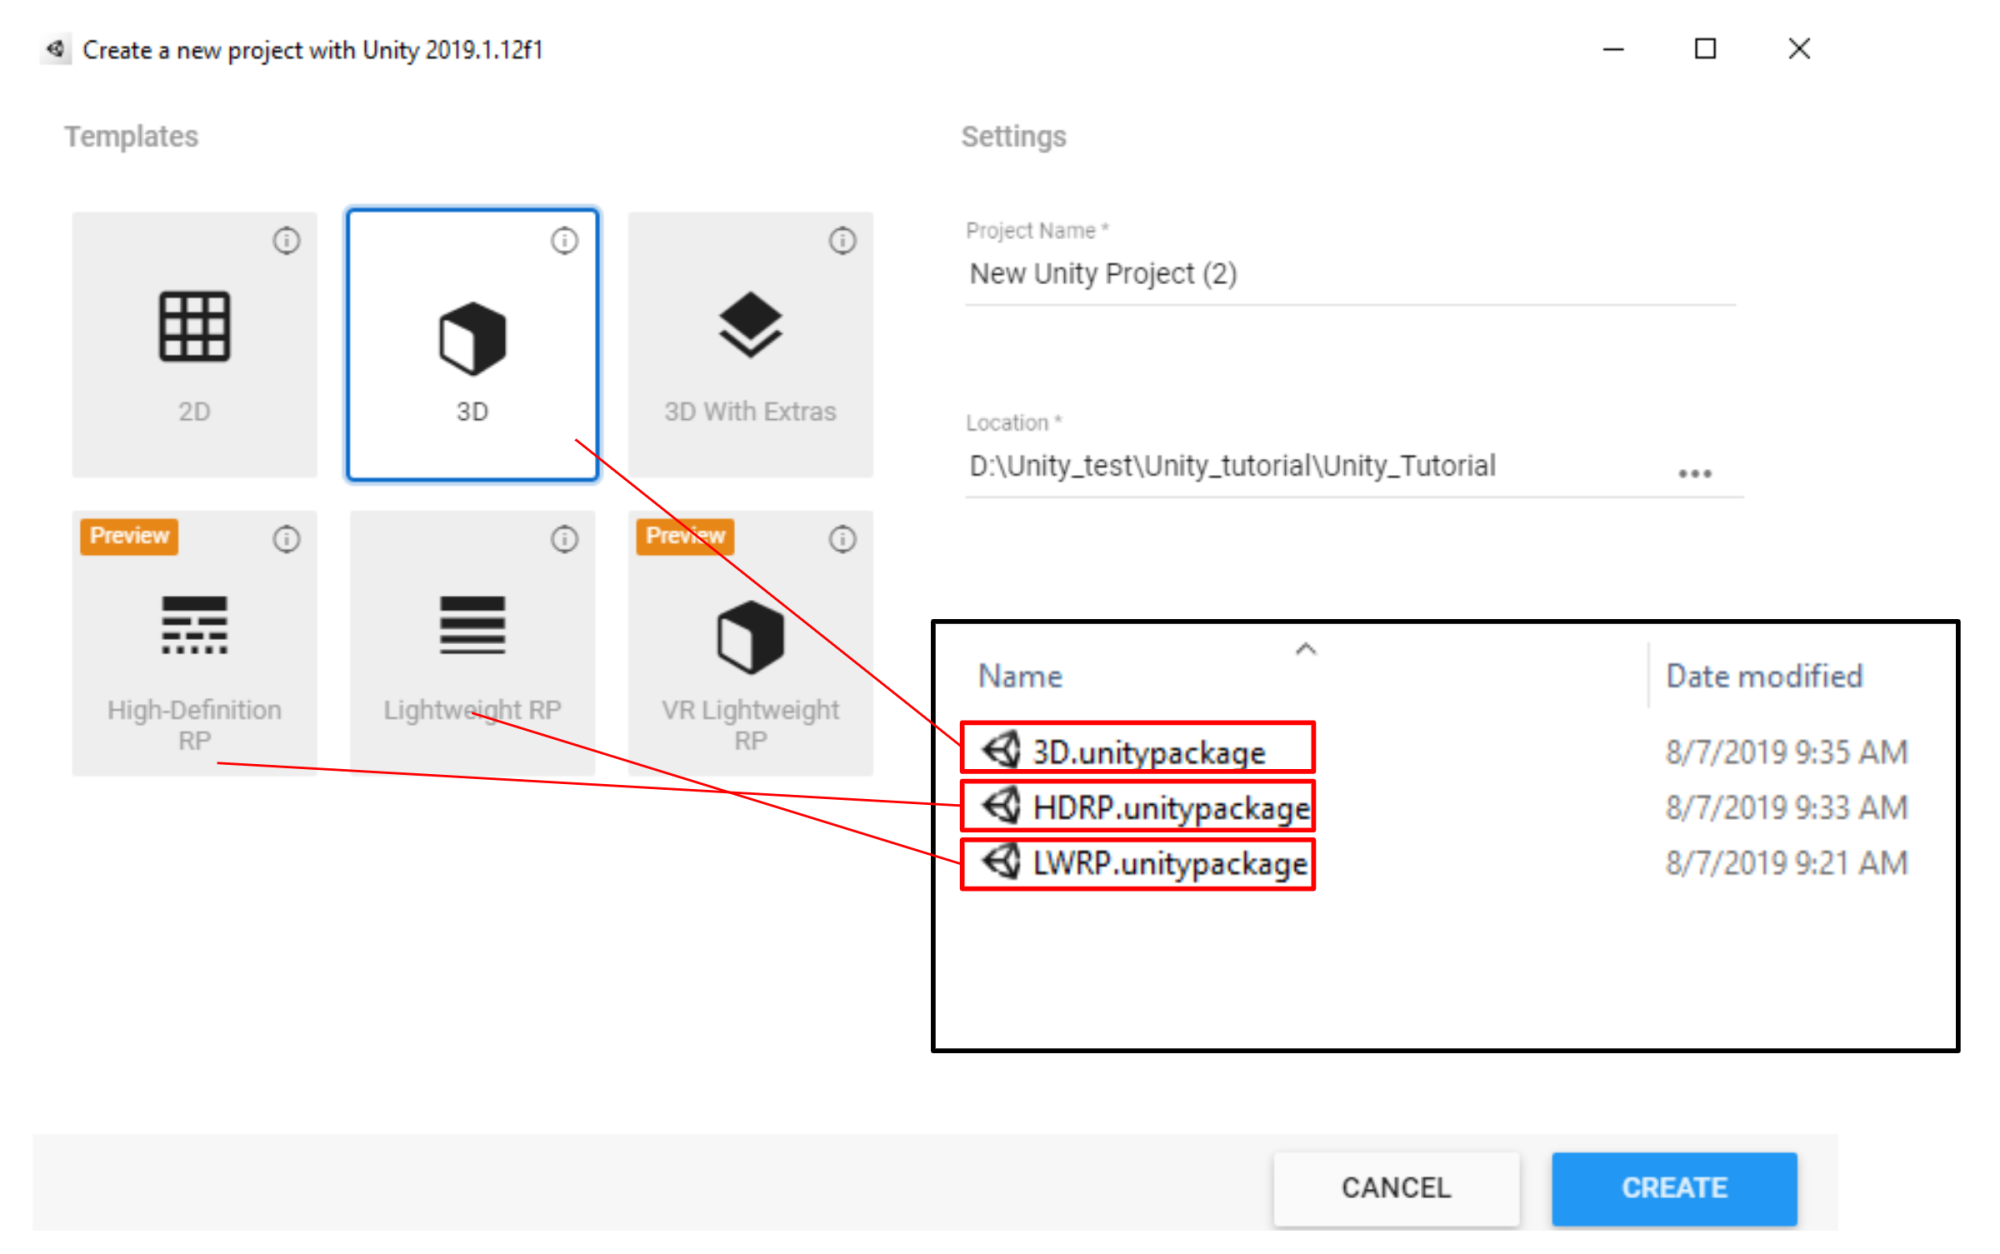
- Open the sub-folder named Unity, and you will find three folders which indicate different versions of Unity.
- Open the folder ideal for your version of Unity, and drag the unitypackage to the Assets folder in Unity.
- The Editor folder and the CC_Assets folder will be automatically generated under the Assets folder after installed.
We will provide 3 template scripts from which you can use according to your needs.
Tutorials
https://www.reallusion.com/character-creator/tutorial.html#unity
Process Overview
Related InformationImportant Notice: Update Guide for Existing UsersIf you have installed the Beta version before, please visit Reallusion FAQ to check How to Remove and How to Update the auto-setup tool. Script Download & Update History
To download the Character Creator & iClone Auto Setup, and find the update history, please check HERE.
|
|
By Miranda (RL) - 7 Years Ago
|
Step 1 - Export FBX from Character Creator 3
- Choose the Target Tool Preset as Unity 3D.
- Uncheck the Embed Textures option. Auto-Setup Script will automatically connect all textures to the proper channels in Unity.
- Characters and motions can be exported from Character Creator. If one needs motions from iClone, please save them in rlMotion or iMotionPlus format and bring them into the Character Creator workflow.
*From CC v3.04 onward, the T-pose will be automatically included as the first motion for character retargeting when the preset type is Unity 3D.
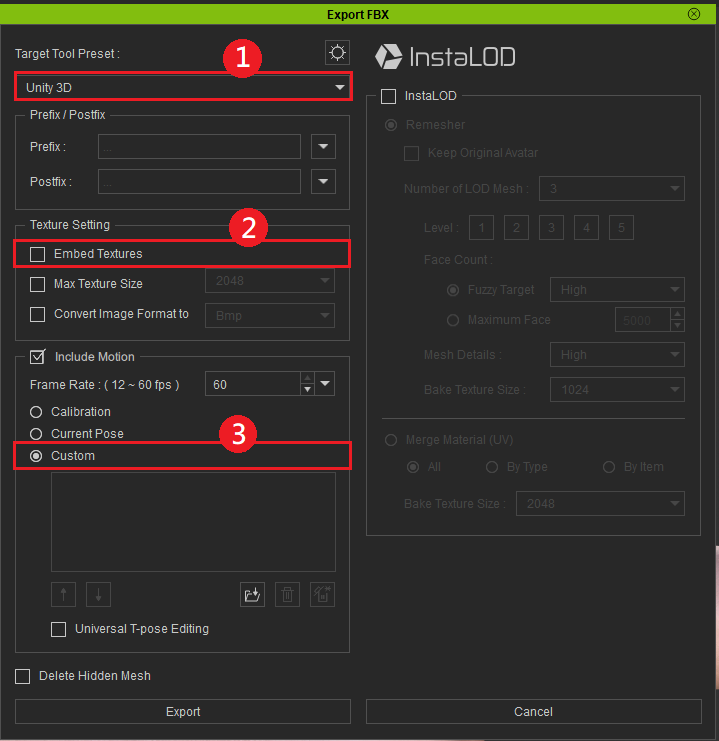
- Please create a new folder for each new character import. Importing multiple characters into the same folder directory will create problems with texture map configurations.
|
|
By Miranda (RL) - 7 Years Ago
|
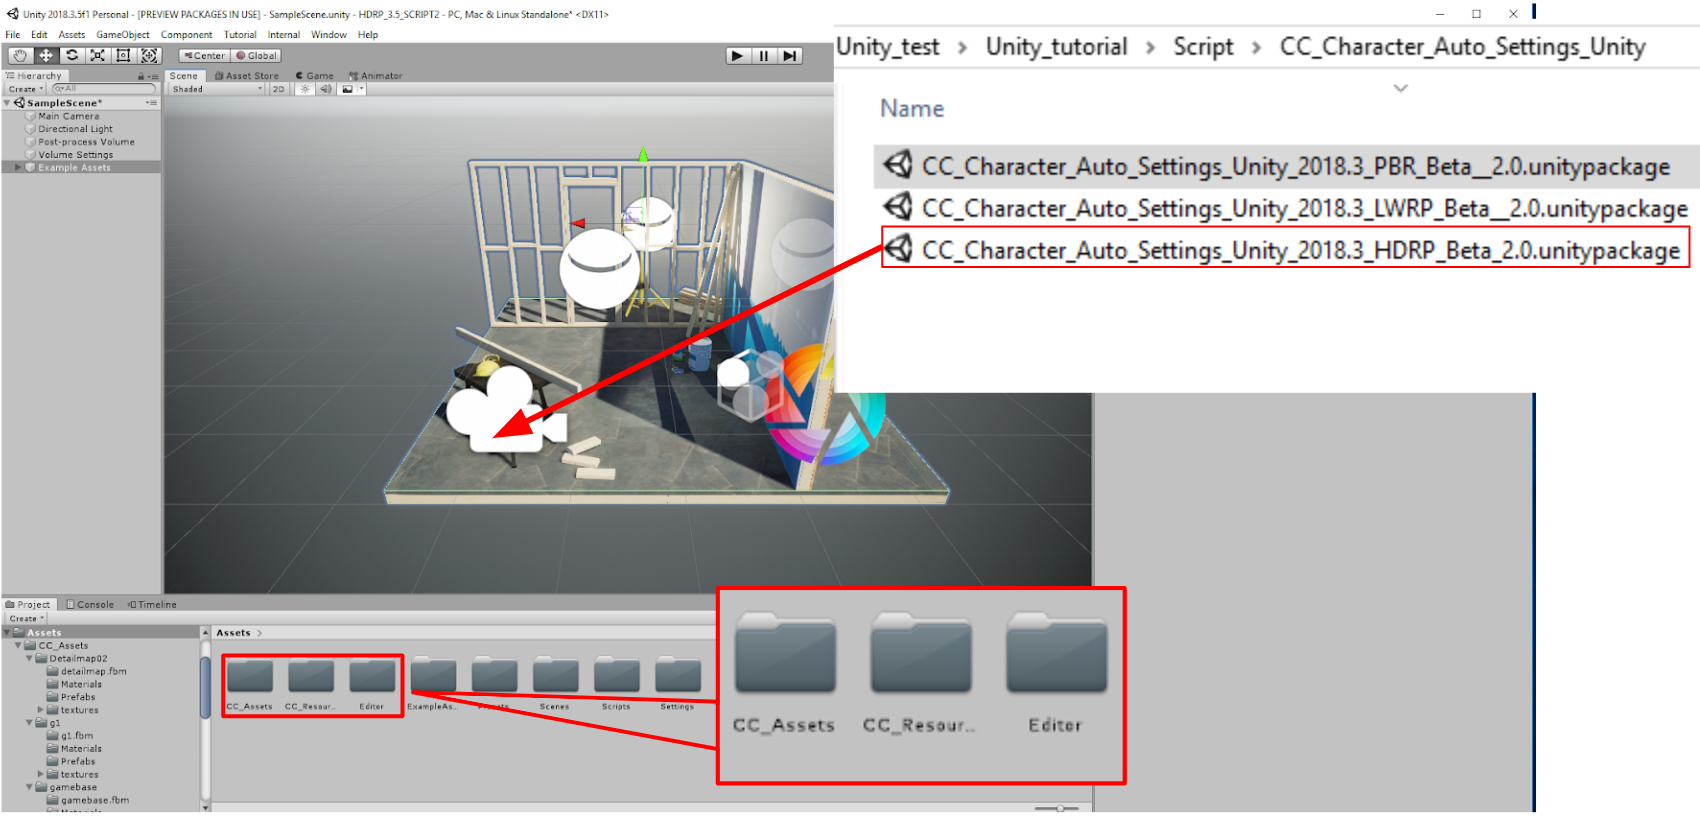
Step 2 - Download and Install the Auto-Setup Script
There are two ways to install the Auto-Setup Script in Unity.
The Editor folder and the CC_Assets folder will be automatically generated under the Assets folder after installed.- Drag the Auto-Setup Script to the Assets folder in Unity
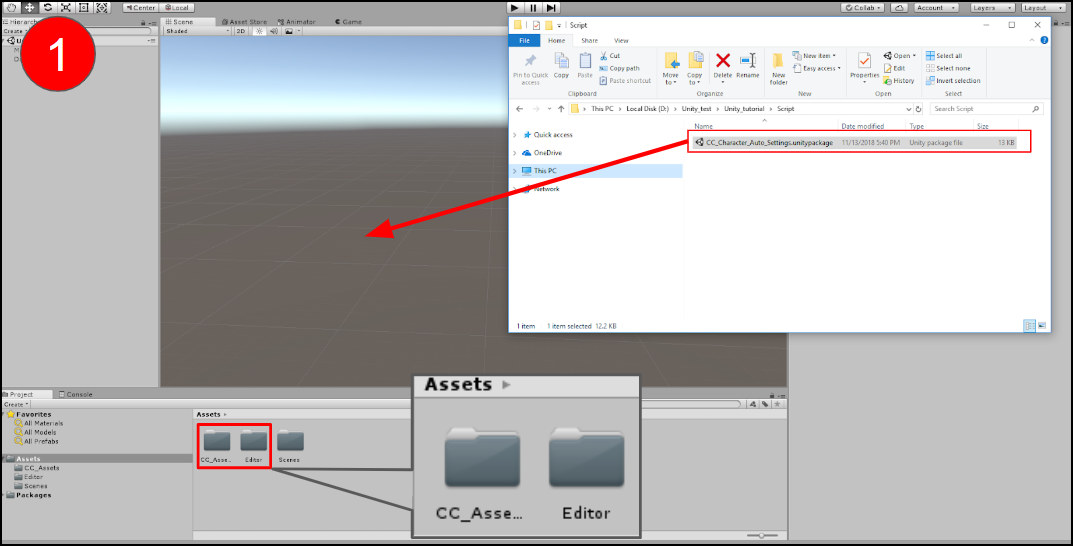
- Import the Auto-Setup Script by right-clicking the Assets folder.
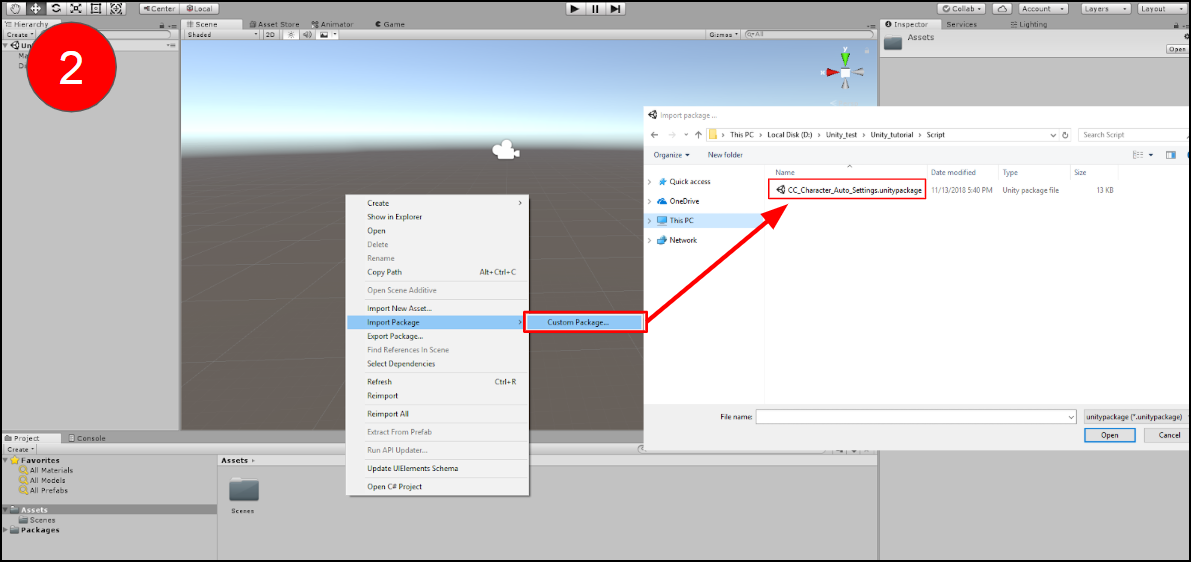
If you are installing HDRP script, the Editor folder, the CC_Assets folder, and the CC_Resource folder will be automatically generated under the Assets folder.- Take method 1 for example - drag the Auto-Setup Script to the Assets folder in Unity
|
|
By Miranda (RL) - 7 Years Ago
|
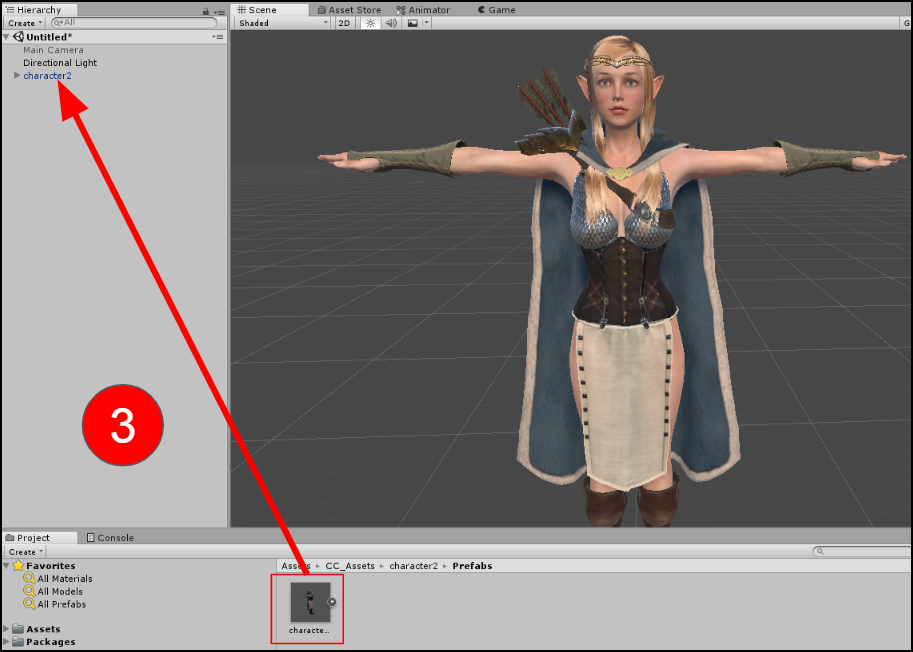
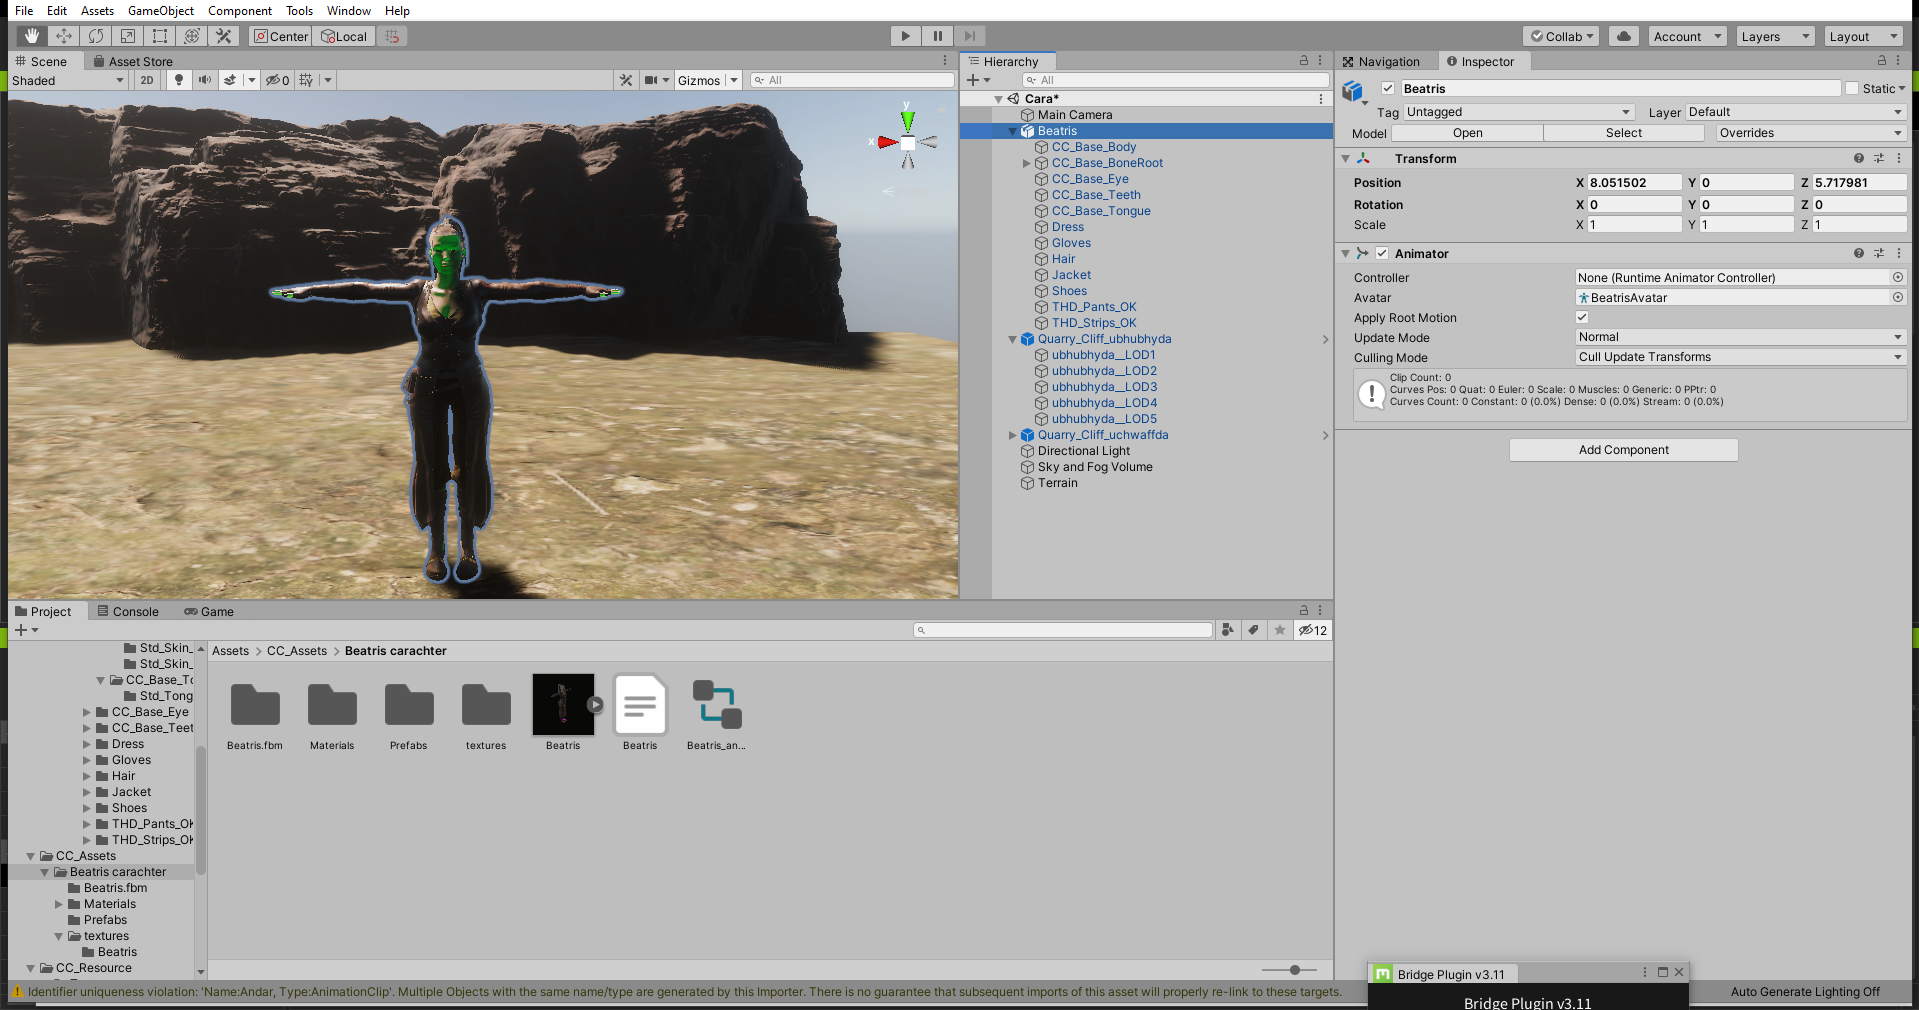
Step 3 - Import the FBX File into Unity to Prompt Auto-Setup Process
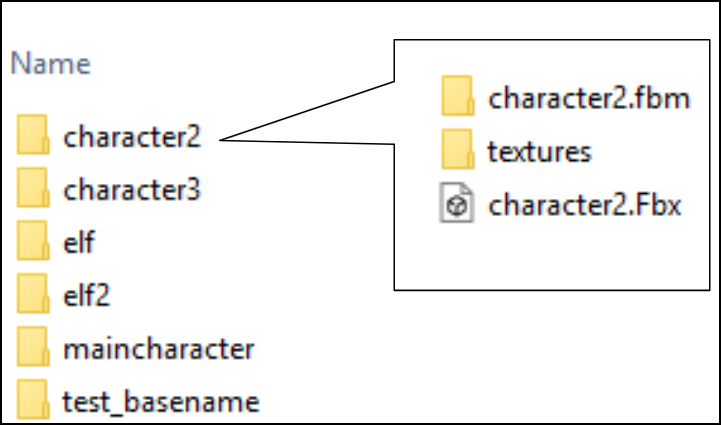
- Drag the exported folder which contains .fbm, textures, .fbx to the CC_Assets Folder.
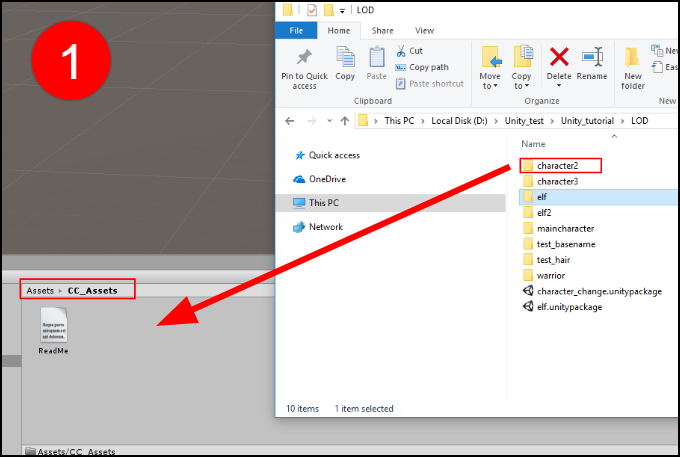
- There will be a Prefabs folder, a Materials folder, and an animator controller file generated after processing.
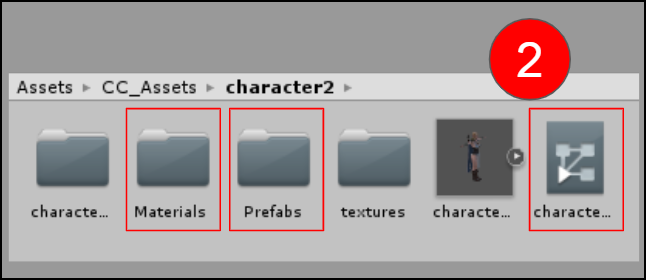
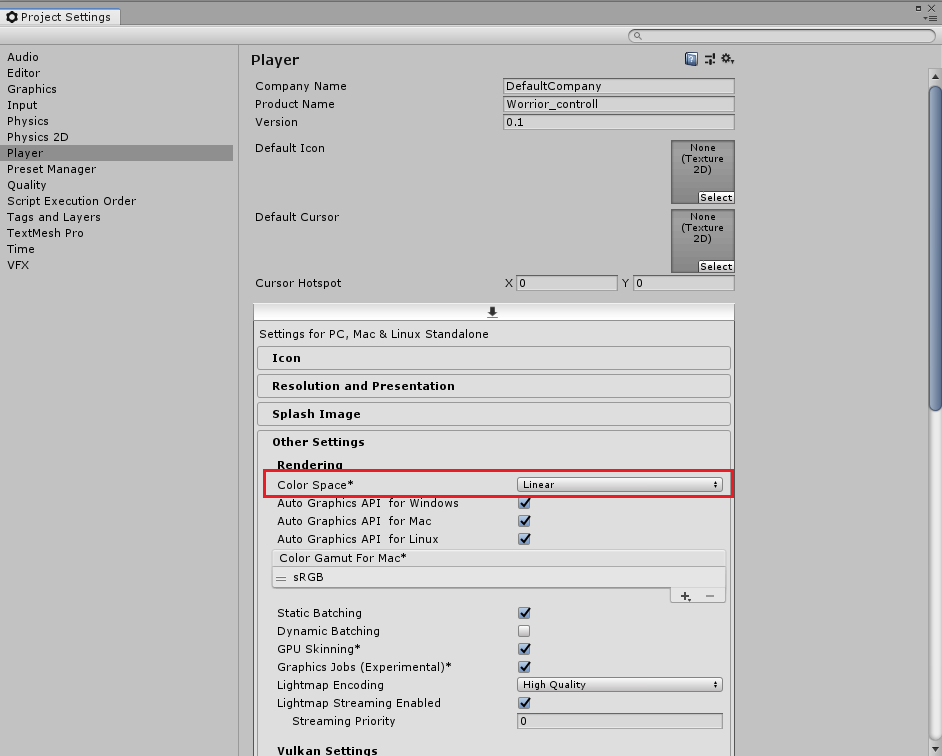
- Character will be shown up after dragging the file (.prefab) under the Prefabs folder to the scene.
- We recommend changing the project Color Space to "Linear" for consistency with the visual representation in Character Creator, especially for metallic and roughness material effects.
|
|
By Miranda (RL) - 7 Years Ago
|
Step 4 - Adjust Some Settings in Unity (Optional)- Correct the Rendering Mode for each element. Take the warrior overskirt for reference.
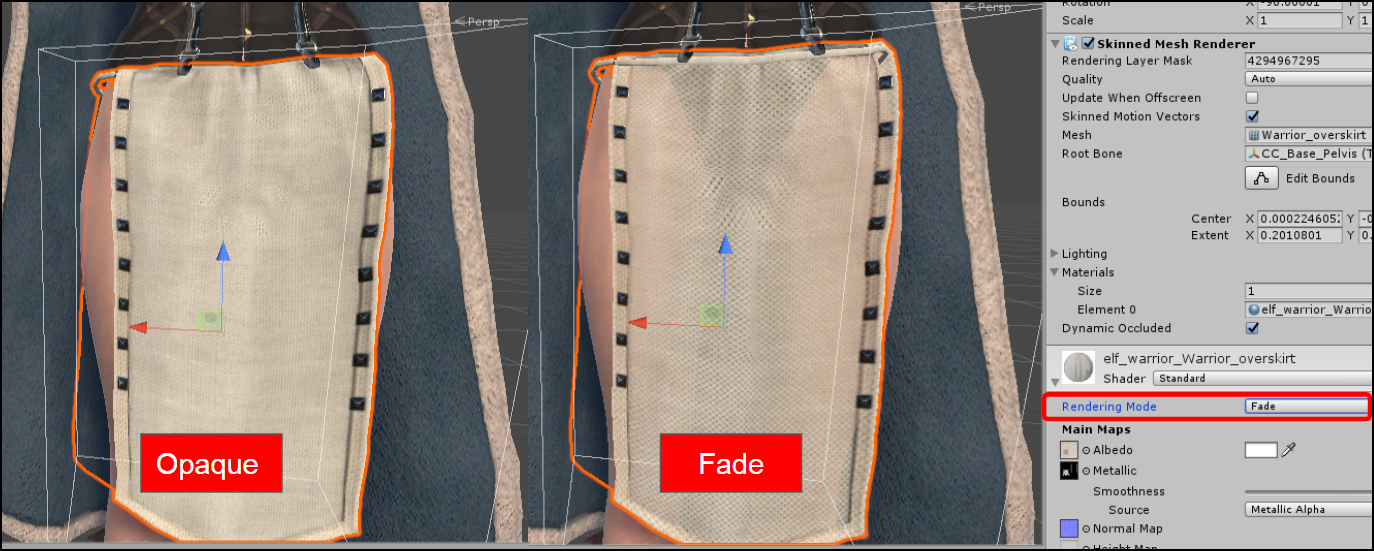
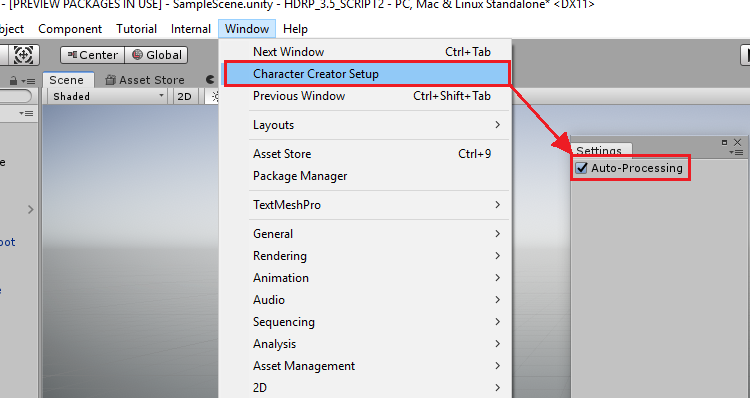
- Before adjusting the settings of the imported CC assets, make sure that Character Creator Setup > Auto-Processing is turned off. These adjustments can include tweaking motions and replacing materials.
|
|
By Miranda (RL) - 7 Years Ago
|
Important Considerations
To run the auto-processing effectively, please read the following notices first:
- There is only full support for Character Creator 3 G1 and G3 characters with FBX being the primary format of exchange.
- Characters and motions should all be exported from Character Creator. Be aware that characters processed directly from iClone or 3DXchange may need some manual re-assignments for motion re-targeting.
- Please import each character separately as unexpected issues may arise from importing multiple characters at once; such as improper linkages to texture files.
- Some special keywords in the naming of FBX file and/or materials can interfere with the auto-processing procedure. Since the following keywords are used to identify specific features for configuration, it is best to avoid using them: diffuse - ao - normal - metallicAlpha - metallic - roughness - glow - specular - transparency - hair - eyelash - ga_skin_body - skin - loop LOD0~N
- There is no support for auto-assignment of Blend, Displacement and Reflection channels.
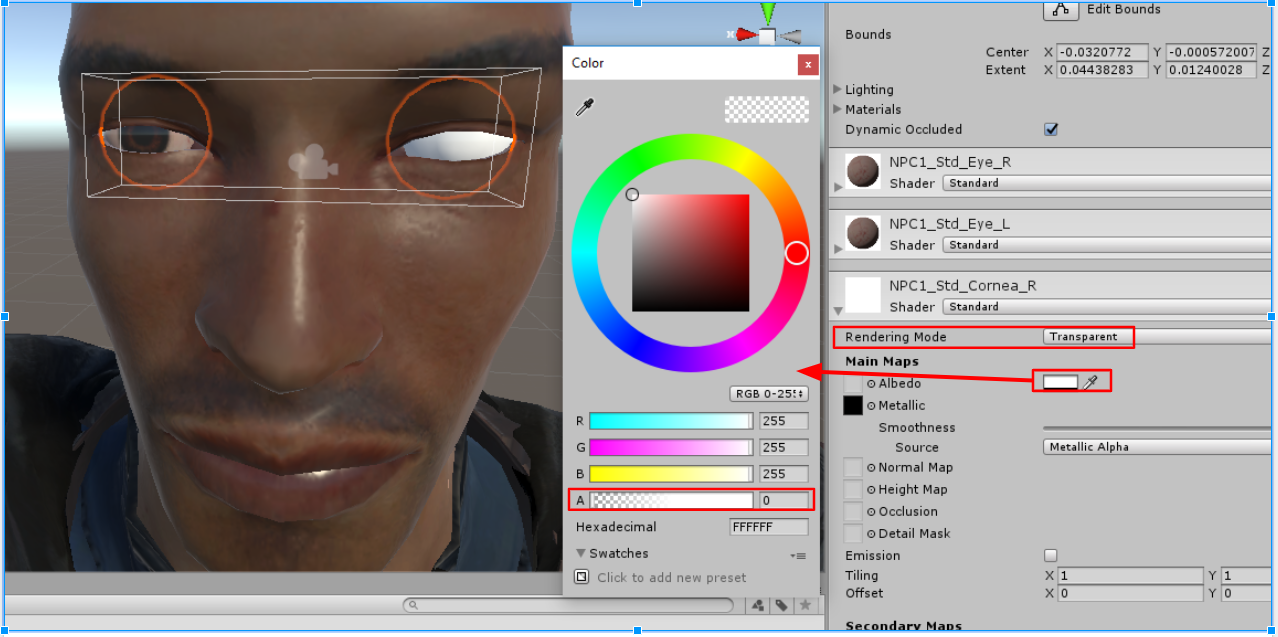
- Daz characters in CC that have not undergone replacement for the eyeballs will cause the eyes to turn white when imported into Unity. This issue will be addressed in a future update (Script Beta 1.1), for now, one can easily remedy this issue by changing the cornea material's Rendering Mode to Transparent and changing the Albedo alpha to zero in Unity.
- Unity and Character Creator calculates mesh normals in a fundamentally different manner which can cause mesh edges to appear hard inside Unity. Fix this by trying out different settings for the Normal & Tangents > Normals parameter. However, before doing so, don't forget to disable Auto-Processing.
- Character mouth will be open if applying motions without jaw bone value like Mixamo's. You can refer to this WORKAROUND to fix the issue.
|
|
By Jfrog - 7 Years Ago
|
Hi Miranda,
Thanks for the update! I made a quick test exporting a CC3 character. For me the default skin looks really overcook (brown) and overwet . This was using the HD script within an HD project. I don't have much time to try it now but will do more tests soon. I am just curious to see if someone else had the same problem.
Thanks again.
|
|
By Miranda (RL) - 7 Years Ago
|
Hi Jfrog,
Do you have any updates on this case?
If it's duplicated, please provide some images for reference, thanks!
|
|
By Jfrog - 7 Years Ago
|
Hi Miranda,
My apologizes for the delay. I finally had the time to do more tests with the HD pipeline this morning. It seems to work pretty well. I can't recreate the dark skin color I had in my first test (probably something I was doing wrong) and lowering the smoothness value for both the body and head solved the wet skin look issue.
Thank you for the quick reply. :)
|
|
By Miranda (RL) - 7 Years Ago
|
|
Got it, thanks Jfrog!!
|
|
By smileyep1 - 7 Years Ago
|
Hi, you mentioned that we need to go through CC3 to have our animations from iClone in Unity. Is there any tutorial that explains this stuff ?
I have Game Base characters and want to create general purpose animations in iClone that will be shared with all of my characters. Until now i am only able to use the iClone animations with the exact model that comes with the iClone fbx export. Things i have tried:
-Importing my character in iClone as a iAvatar and animating it. The result was what i described above.
-Exporting the iClone animation as a motion and importing it into CC3. Then exporting the character again. Problem is i cant find the motions that are added to the character until i export them. Where do i have to look in CC3 UI.
-Using the 3DXchange software like in a iClone6 tutorial video. Does not work properly. But i noticed that it will export with face bones instead of the blend shapes that a Game Base has.
Thanks in advance.
|
|
By Miranda (RL) - 7 Years Ago
|
|
smileyep1 (3/27/2019)
Hi, you mentioned that we need to go through CC3 to have our animations from iClone in Unity. Is there any tutorial that explains this stuff ?
Yes, please find the fifth video "Animation Retargeting in Unity" from this link:
https://www.reallusion.com/character-creator/tutorial.html#unity
I have Game Base characters and want to create general purpose animations in iClone that will be shared with all of my characters. Until now i am only able to use the iClone animations with the exact model that comes with the iClone fbx export. Things i have tried:
-Importing my character in iClone as a iAvatar and animating it. The result was what i described above.
-Exporting the iClone animation as a motion and importing it into CC3. Then exporting the character again. Problem is i cant find the motions that are added to the character until i export them. Where do i have to look in CC3 UI.
The process you go through is correct. There is no motion preview interface in the CC3 now, you just use CC3 to export character & motion files to have right skeleton profile for animation retargeting.
-Using the 3DXchange software like in a iClone6 tutorial video. Does not work properly. But i noticed that it will export with face bones instead of the blend shapes that a Game Base has.
Thanks in advance.
3DXchange is the traditional workflow. We suggest to use the CC3 workflow, which supports auto-processing.
|
|
By Veganism - 7 Years Ago
|
Hello, this thread is great. The problem is that I followed the Youtube tutorials, and did not know about this thread. So I had the hard edges problem that you mentioned, but I spent an hour or two to find out myself that it was the normals that have to be changed to "Import" (except that I did not know about the Auto-Processing option, so I thought I will have to do everything manually until you fix it, but now I know!)
I wanted to post the solution, and that is when I found this thread and found you already had the solution. So maybe you should add a note in the Youtube video description or something? Or maybe I should look at the forum instead of Youtube so that I have updated info.
|
|
By Miranda (RL) - 7 Years Ago
|
|
Veganism (4/12/2019)
Hello, this thread is great. The problem is that I followed the Youtube tutorials, and did not know about this thread. So I had the hard edges problem that you mentioned, but I spent an hour or two to find out myself that it was the normals that have to be changed to "Import" (except that I did not know about the Auto-Processing option, so I thought I will have to do everything manually until you fix it, but now I know!)
I wanted to post the solution, and that is when I found this thread and found you already had the solution. So maybe you should add a note in the Youtube video description or something? Or maybe I should look at the forum instead of Youtube so that I have updated info.
Hi Veganism,
This is a thoughtful suggestion! We will do it right now.
Thanks for your comment, and sorry for wasting your time in trying back and forth.
|
|
By michael.pickering - 7 Years Ago
|
Hi Miranda,
Unity3D 2019.1 just landed! There seem to be some cool new features, including a new hair shader!! Any idea when the auto-setup script will be migrated or updated to work with the 2019.1 Unity release?
TIA!
|
|
By Miranda (RL) - 7 Years Ago
|
|
michael.pickering (4/16/2019)
Unity3D 2019.1 just landed! There seem to be some cool new features, including a new hair shader!! Any idea when the auto-setup script will be migrated or updated to work with the 2019.1 Unity release?
Yes, we are checking the changes of 2019.1 now!
We will keep you posted when the delivery date is firmed. Thanks! :)
|
|
By wiverson - 7 Years Ago
|
It would be really helpful to understand what the script is doing. Either a detailed list of steps and/or posting the source for review.
Thanks!
|
|
By J__s - 7 Years Ago
|
|
wiverson (4/22/2019)
It would be really helpful to understand what the script is doing. Either a detailed list of steps and/or posting the source for review.
Thanks!
hi Wiverson
You can check the information on the link below.
Does this helps?
https://forum.reallusion.com/394632/Upcoming-Tutorials-Auto-Assignment-ScriptPlugin-for-Unity-Unreal?PageIndex=1
|
|
By e.l.thomas - 7 Years Ago
|
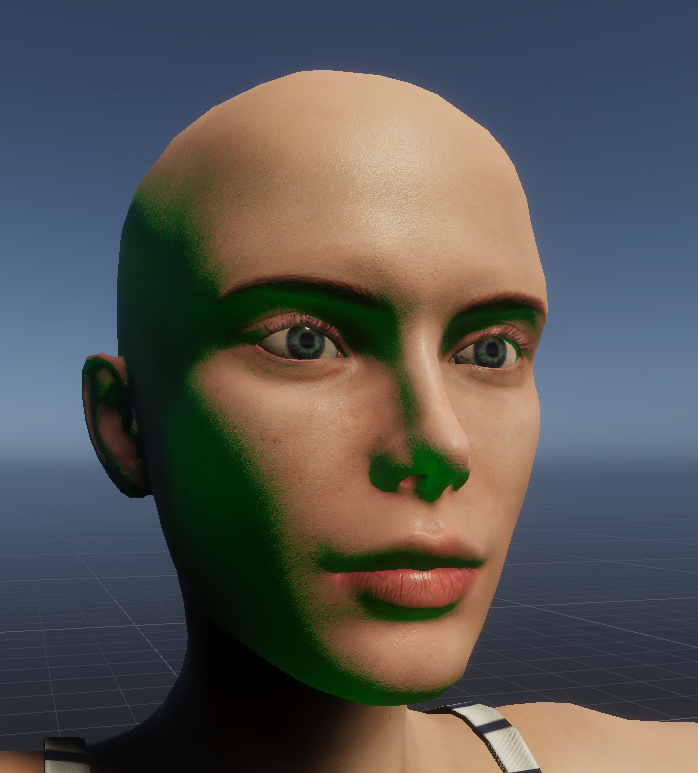
Just tried this with Unity 2019.2 and HDRP 6.9.1 and I'm getting a strange green lighting effect.
|
|
By michael.pickering - 7 Years Ago
|
|
Wow, I didn't even know that 2019.x was supported yet! Green light is weird though...
|
|
By Scyra - 7 Years Ago
|
Yeah, the auto-setup script works only as far as 2018.4 currently (update at end of this month?), but you can probably export the prefab to 2019 versions after setting it up in 2018.4.
|
|
By michael.pickering - 7 Years Ago
|
Given that there's been no official update on support for newer Unity releases from RL, I've been holding on Unity 2018.3.x for some time now. If any of you could please confirm that Autosetup script works fine on 2018.4 -- or better, 2019.x
-- it would be greatly appreciated!
|
|
By Scyra - 7 Years Ago
|
I'm using it on 2018.4.5 (the latest version). It doesn't work on 2019 last I checked. You can probably (haven't tried yet) export your processed character from 2018 to 2019 without much difficulty.
Hey...I posted this yesterday...Déjà vu.
Update: Just brought over a character to the new version of Unity—no problems exporting a CC3 character from 2018.4 to 2019.2.
|
|
By michael.pickering - 7 Years Ago
|
|
Thanks!
|
|
By e.l.thomas - 7 Years Ago
|
|
So all I had to do to fix the green light issue was untick Transmission in the Surface Options of the shader.
|
|
By Miranda (RL) - 7 Years Ago
|
|
Scyra (8/10/2019)
Yeah, the auto-setup script works only as far as 2018.4 currently (update at end of this month?), but you can probably export the prefab to 2019 versions after setting it up in 2018.4.
The update in end of month will be compatible with Unity 2019.1.
Meanwhile, we will take time in verifying 2019.2.
Thank you!
|
|
By michael.pickering - 7 Years Ago
|
Thanks Miranda, glad to know we'll soon be able to move to Unity 2019.x!!
|
|
By interloko - 6 Years Ago
|
Hi, can someone please tell me a way to correctly import a character using HDRP?
For a regular 3D project I haven't any issue, it works as expected but I've tried the HDRP script in a HDRP project with no luck at all. Tried several Unity versions and several HDRP versions too.
Is there any "100% guaranteed" combination?

|
|
By michael.pickering - 6 Years Ago
|
|
I just did an import into a new 2019.1 HDRP project with no significant issues, though there were some minor rendering tweaks that improved the look, particularly for hair.
|
|
By interloko - 6 Years Ago
|
|
michael.pickering (1/23/2020)
I just did an import into a new 2019.1 HDRP project with no significant issues, though there were some minor rendering tweaks that improved the look, particularly for hair.
Hi! can you please tell me the exact version of HDRP are you using?
Edit:
I got some progress but it doesn't look good enough.
First I drag the folder, and then I must go to the material tab of the character and set the Location to "Use External Materials" and Search to "Local Materials Folder"
Now the main issue is the cloth displayed in a very low quality compared to CC3.
I just exported the model as is (no poligon reduction)

|
|
By michael.pickering - 6 Years Ago
|
|
Apologies, I just did an install of the latest version of 2019.1 but was on an older version before: 0f2. I'll check the HDRP version itself shortly, and also will be trying another import with 2019.1.14f1.
|
|
By michael.pickering - 6 Years Ago
|
|
I just checked in Unity package manager and my HDRP version is 5.7.2. I'll be upgrading to 5.16.1 soon!
|
|
By interloko - 6 Years Ago
|
|
michael.pickering (1/23/2020)
I just checked in Unity package manager and my HDRP version is 5.7.2. I'll be upgrading to 5.16.1 soon!
Thanks for the response.
I've edited my latest message about the mesh quality (cloth) I'm getting in Unity. Can you help me with that?
|
|
By michael.pickering - 6 Years Ago
|
|
Happy to give it a try, others on here have certainly helped me! Let me see if I can find your edited post...
|
|
By michael.pickering - 6 Years Ago
|
|
So what version of Unity and which script are you using? Is it possible to get to one of the 2019.1 subversions of Unity, and corresponding autosetup script? I have found the best results with this combination so far!
|
|
By interloko - 6 Years Ago
|
|
michael.pickering (1/23/2020)
So what version of Unity and which script are you using? Is it possible to get to one of the 2019.1 subversions of Unity, and corresponding autosetup script? I have found the best results with this combination so far!
The example is from 2019.1.0f2 & AutoSetup 1.01 for Unity 2019.1 (HDRP.unitypackage)
The HDRP is 5.13.0 I've updated from 5.7.2 (I think) because I've the same result
|
|
By michael.pickering - 6 Years Ago
|
|
Hmm, that's the same Unity version as I had! Can you provide more details on how the character looks in Unity? In particular, which materials don't look right to you? Did you try turning off the auto setup script and tweaking the rendering settings for the suspect materials in Unity?
|
|
By interloko - 6 Years Ago
|
|
michael.pickering (1/23/2020)
Hmm, that's the same Unity version as I had! Can you provide more details on how the character looks in Unity? In particular, which materials don't look right to you? Did you try turning off the auto setup script and tweaking the rendering settings for the suspect materials in Unity?
I fixed the materials thing loading them after the import. Now my issue is with the character quality. Cloath looks very low quality compared to how it looks in CC3.
I exported this character as is, no poligons reduction at all
Here is a comparision between Unity and CC3
|
|
By animagic - 6 Years Ago
|
@interloko: is there a texture size setting when export/import?
I believe textures are combined, which may reduce their original size. Also, is there a smoothing option for the mesh?
|
|
By interloko - 6 Years Ago
|
I got it!
First I found that in my case the importer doesn't apply the textures. Now I find that doesn't apply the smoothing angle.
Now I must find out if the invisible body is another not well applied setting in my end
|
|
By michael.pickering - 6 Years Ago
|
|
Do you have auto-hide set to on? Did you check the box to remove hidden meshes?
|
|
By interloko - 6 Years Ago
|
|
michael.pickering (1/24/2020)
Do you have auto-hide set to on? Did you check the box to remove hidden meshes?
I've checked the "Delete Hidden Faces" box when exporting, that might be the issue (I think it was recommended to do that) or maybe is an issue from the Unity side.
Where is the auto-hide setting?
Edit:
Now it don't create the prefab, the materials doesn't have the correct settings...
I will take a break from this now.. it's driving me crazy
|
|
By Miranda (RL) - 6 Years Ago
|
Hi interloko,
If you'd like to adjust any settings on the model, remember to untick the checkbox "Auto-Processing".
After adjusting the smoothing angle, please check the option back, or auto setup won't work when importing new character.
We tested HDRP 5.7.2 and 5.16.1, both versions worked.

Miranda
|
|
By interloko - 6 Years Ago
|
Thanks Miranda but it works diferent everyday
I got this error, but later on I got another error but not this one.
Now I got the message that the character is not in T-Pose, tried going to Rig... Configure and then Pose... Enforce T-Pose and after the process it still says is not in T-Pose.
Disabled Auto-Processing before any change but no luck.
Now it worked (bad) as before, no T-Pose error but bad rig. To fix it I go to Pose... Reset.
Is there a place where I could see the "correct" import options and settings after the import. The script is not working well on my side =/
|
|
By Ryan Hayle - 6 Years Ago
|
The Character Creator and iClone Auto Setup for Unity does not work in Unity 2019.3.0f6, please fix asap.
TypeLoadException: Could not resolve type with token 01000086 (from typeref, class/assembly UnityEditor.Experimental.Rendering.HDPipeline.HDEditorUtils, Unity.RenderPipelines.HighDefinition.Editor, Version=0.0.0.0, Culture=neutral, PublicKeyToken=null) RLPlugin.RLEditor.OnPostprocessAllAssets (System.String[] kImportedAsset, System.String[] kDeletedAssets, System.String[] kMovedAssets, System.String[] kMovedFromAssetPaths) (at <ebd3e7ff7281451abb96146f9f827b50>:0) System.Reflection.MonoMethod.Invoke (System.Object obj, System.Reflection.BindingFlags invokeAttr, System.Reflection.Binder binder, System.Object[] parameters, System.Globalization.CultureInfo culture) (at <437ba245d8404784b9fbab9b439ac908>:0) Rethrow as TargetInvocationException: Exception has been thrown by the target of an invocation. System.Reflection.MonoMethod.Invoke (System.Object obj, System.Reflection.BindingFlags invokeAttr, System.Reflection.Binder binder, System.Object[] parameters, System.Globalization.CultureInfo culture) (at <437ba245d8404784b9fbab9b439ac908>:0) System.Reflection.MethodBase.Invoke (System.Object obj, System.Object[] parameters) (at <437ba245d8404784b9fbab9b439ac908>:0) UnityEditor.AssetPostprocessingInternal.InvokeMethod (System.Reflection.MethodInfo method, System.Object[] args) (at <6f28216fea9f453abf2e05b770ed3ee4>:0) UnityEditor.AssetPostprocessingInternal.PostprocessAllAssets (System.String[] importedAssets, System.String[] addedAssets, System.String[] deletedAssets, System.String[] movedAssets, System.String[] movedFromPathAssets) (at <6f28216fea9f453abf2e05b770ed3ee4>:0) UnityEditorInternal.InternalEditorUtility:ProjectWindowDrag(HierarchyProperty, Boolean) UnityEngine.GUIUtility:ProcessEvent(Int32, IntPtr)
|
|
By ptrefall - 6 Years Ago
|
|
You must first import with their plugin in 2019.1 (see what version is supported) and the generated prefab (and folders) can then be copied over to the latest version without issue.
|
|
By Ryan Hayle - 6 Years Ago
|
|
Nice idea, but I do not wish to have to install multiple versions of Unity, just to import a character.
|
|
By Ryan Hayle - 6 Years Ago
|
|
It would also be nice to know why Reallusion choose to put this asset in a DLL? As it would be nice to update/fix the plugin, instead of spending days just waiting for a reply.
|
|
By e.l.thomas - 6 Years Ago
|
|
Ryan Hayle (2/5/2020)
It would also be nice to know why Reallusion choose to put this asset in a DLL? As it would be nice to update/fix the plugin, instead of spending days just waiting for a reply.
Yeah I was also wondering this, seems really pointless.
The plugin currently works for me on 2019.3, although it throws a seemingly harmless error about not being able to find a "hips" transform. This is using the built-in renderer though.
|
|
By Miranda (RL) - 6 Years Ago
|
Hi interloko,
Are you trying to copy avatar definition from other rigging target?
We duplicated the issue by doing so, so would like to confirm if this is the case.
It seems that the auto-setup tool can't properly applying avatar definition from other source.
When you encountered this issue, you have to manually reset the pose, and enforce T-pose again.

interloko (1/31/2020)
Thanks Miranda but it works diferent everyday I got this error, but later on I got another error but not this one. Now I got the message that the character is not in T-Pose, tried going to Rig... Configure and then Pose... Enforce T-Pose and after the process it still says is not in T-Pose. Disabled Auto-Processing before any change but no luck. Now it worked (bad) as before, no T-Pose error but bad rig. To fix it I go to Pose... Reset. Is there a place where I could see the "correct" import options and settings after the import. The script is not working well on my side =/
|
|
By Miranda (RL) - 6 Years Ago
|
Hi Ryan Hayle, e.l.thomas,
I will bring your suggestions and findings back to the Dev Team. Thank you!
Miranda
|
|
By AlbinosGambit - 6 Years Ago
|
This also seems to fix many of the issues directly Inside unity! I tried downloading a character from Mixamo, had the same issues, maybe this could help without the script.-)
|
|
By AlbinosGambit - 6 Years Ago
|
|
Would there also be an existing similar way to replicate the same thing in Unreal?
|
|
By Dan Miller - 6 Years Ago
|
|
Hello, is Version 1.01 (Release Date: 2019-08-29) the most recent script? It doesn't show support for Unity 2019.3.
|
|
By alex_ey - 6 Years Ago
|
Hello. I have a problem with "Auto Setup for Unity". After import "HDRP.unitypackage" and "LWRP.unitypackage", i get these errors all the time: "Assembly 'Assets/Editor/CC_and_IC_Auto_Setup_for_HDRP.dll' will not be loaded due to errors:Unable to resolve reference 'Unity.RenderPipelines.HighDefinition.Editor'. Is the assembly missing or incompatible with the current platform?""Assembly 'Assets/Editor/CC_and_IC_Auto_Setup_for_LWRP.dll' will not be loaded due to errors:Unable to resolve reference 'Unity.RenderPipelines.Core.Runtime'. Is the assembly missing or incompatible with the current platform?"I tried to import all versions of auto setup "AutoSetup 1.01 for Unity 2018.3", "AutoSetup 1.01 for Unity 2018.4" and "AutoSetup 1.01 for Unity 2019.1", but still getting these errors. How can this be fixed?
|
|
By michael.pickering - 6 Years Ago
|
|
I see that you're using Unity 2019.2. I don't believe that the script works on that release. I've had it work on 2019.1. Others may have reported some success with some 2019.3 releases also. I suggest that you try downgrading your Unity version.
|
|
By Miranda (RL) - 6 Years Ago
|
Hi alex_ey,
It seems that the error message is from using the incorrect package for template you are choosing. Can you help to double check? Thanks!
|
|
By polycular - 6 Years Ago
|
maybe I'm blind but I can't find the download link for beta 2.0 it always just refers me to the main download site https://www.reallusion.com/character-creator/unity-auto-setup.html where there is just version 1.01 to download
please if you could supply us with the beta for HDR pipeline test would be awesome...
|
|
By Ryan Hayle - 6 Years Ago
|
This is the latest version, the betas are the older versions. However we just got this news today:
To be compatible with the latest released version of Unity (2019.3) and Unreal Engine (4.25), we will release new versions of Unity Auto Setup and Unreal Auto Setup this month (May).
The new version of Auto Setup tools will be compatible with Character Creator 3.22 and iClone 7.22.
The specific release date is not firmed yet, please wait for further announcement, thank you!
|
|
By polycular - 6 Years Ago
|
|
thx than it is a not very logical version numbering system...
|
|
By Light_Show_55 - 6 Years Ago
|
Hi When i Issert my caracher on unity the skin is green ... Plis can anyone help plis ?
|
|
By Ryan Hayle - 6 Years Ago
|
|
That's normal, add the skin profile or turn off sub surface scattering. You can read about it in the docs.
|
|
By Miranda (RL) - 6 Years Ago
|
Hi gametuturiaisone,
We collected the issues from recent posts, and made a report yesterday.
https://forum.reallusion.com/451720/Auto-Setup-11-for-Unity-compatible-with-CC-33-iClone-78
Here is the feedback for the issue you asked:
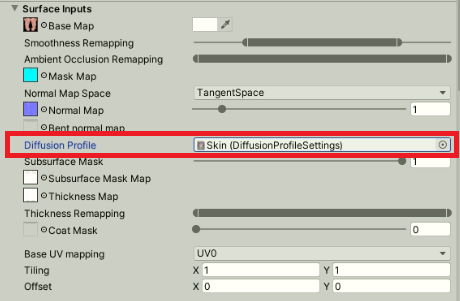
Cause: Diffuse profile isn't automatically assigned for skin; it displays as "None".
Workaround: We are still searching the solution to set diffuse profile via Unity C#, before it fixed, please manually set to the correct one.
|
|
By Miranda (RL) - 6 Years Ago
|
Hi everyone,
It's fixed in version 1.1. There is no need to manually change the diffuse profile.
Please download the tool, and try again, thank you!
|
|
By jerome.dipietro - 6 Years Ago
|
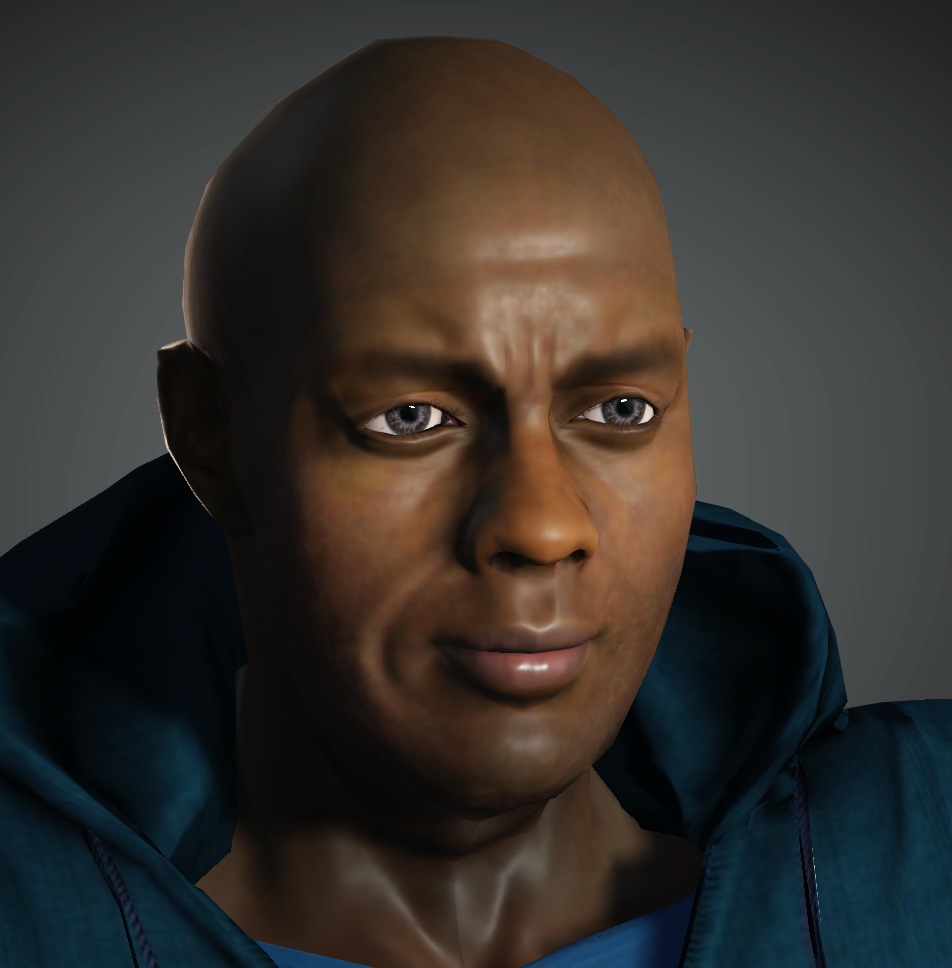
Still fairly new to CC3 so apologies if I'm being stupid, but I've not previously had a problem with this (when using CC3.2, AutoSetup 1.02 and same version of Unity, i.e. 2019.3)
Followed the optimisation recommendations, converted character body to a GameBase and swapped eyes to GameEyes_OneUV. This is the result in CC3:
Imported into Unity 2019.3.13 using AutoSetup 1.1 (URP package, as project is set to use that render pipeline) I get this:
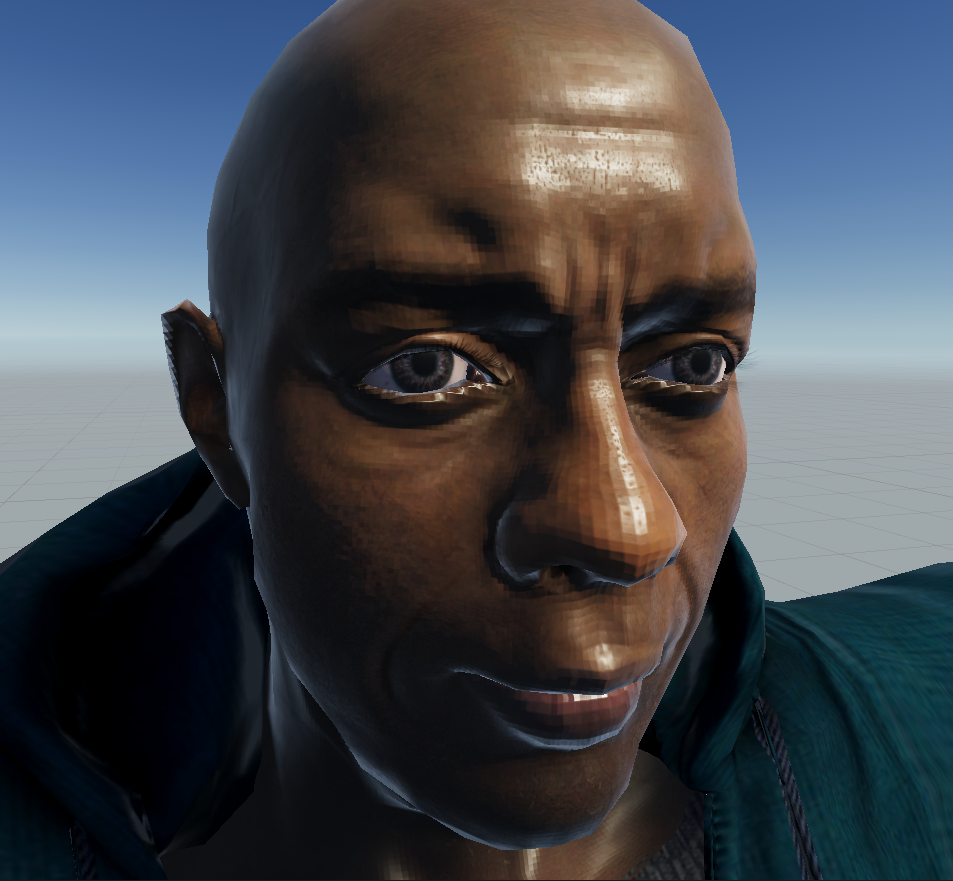
Not only is the mesh not smoothed properly but the face actually looks different (eye and nose are different proportions somehow).
[as a minor point the T-Shirt material is also wrong, but that's not what I'm most worried about]
Import settings in Unity are set to this (by the AutoSetUp I assume?):
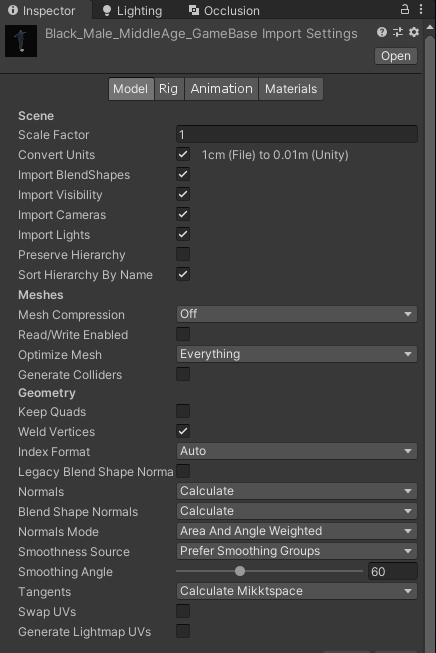
I tried changing the smoothness Source but it didn't help.
As an additional sanity check, I then imported the unoptimised character (original body but GameEyes). Got this:
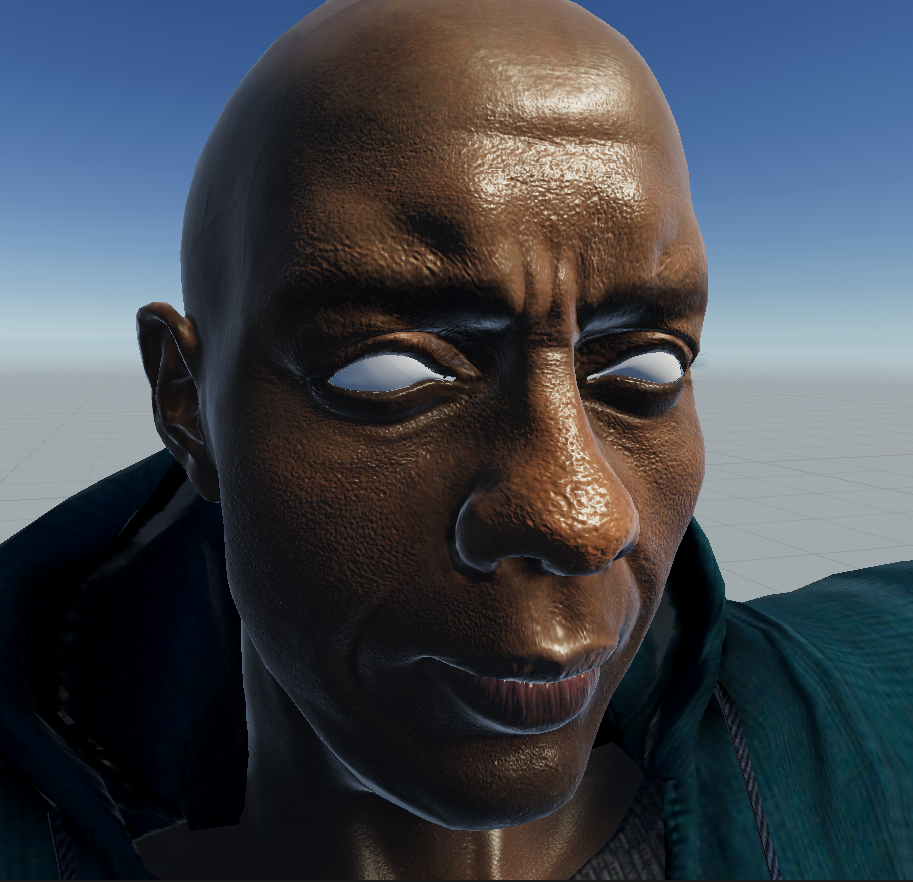
I can tweak the overzealous normals (but surprised I'd have to...) and the eyes are doing that thing I've seen mentioned in the docs that Daz characters are meant to do if not prepared properly. But this is all 100% CC3.3
Am I doing something massively wrong, or are these CC3+ meshes not quite ready for prime time in Unity?
|
|
By tmhspeechdev - 6 Years Ago
|
|
Thanks a million for this info Miranda! "7. Unity and Character Creator calculates mesh normals in a fundamentally different manner which can cause mesh edges to appear hard inside Unity. Fix this by trying out different settings for the Normal & Tangents > Normals parameter. However, before doing so, don't forget to disable Auto-Processing. "
I was wondering what was wrong with my normal map since it looked good when I imported the mesh directly to Unity from Zbrush. But when it went from Zbrush to CC3 and then to Unity It had facets. Now I'm happy again :) Thank you!
|