|
By Data Juggler - 7 Years Ago
|
I am trying to create a poker chip from a cylinder that is collapsed down very small as shown below. Is this a good use case for 3D Coat?
Thanks, I tried applying an image as a material texture and that didn't work, or I didn't know how to do it.
And I would like to apply this image to both sides:

And for double jeopardy bonus point question, a way to paint the side of the chip similar to one of these chips:

|
|
By animagic - 7 Years Ago
|
In this case it would be easier just to apply the image directly through iClone with an image editor.
My iClone is tied up right now rendering, but if I remember correctly the cylinder has a straightforward mapping of top, bottom, and side.
|
|
By Data Juggler - 7 Years Ago
|
Any clues as to how I apply the image? I tried just dragging the image like you can do for a plane, but that didn't apply correctly.
|
|
By 4u2ges - 7 Years Ago
|
DJ, you have to start digging into the UV maps. Unless you have understanding what UV map is and how to use it for properly shading objects, you would not move ahead of texturing planes by dragging images on to it.
Here is a base iClone cylinder and its UV map opened in Photoshop. Start painting over and saving it as a Base Color (diffuse) map and everything would fall in place.
|
|
By Delerna - 7 Years Ago
|
I was going to show you something like what 4U2ges showed when I got home. This is definitely something to get used to if you want to highly control your texturing from iClone.
There is 1 extra thing I am going to add though.
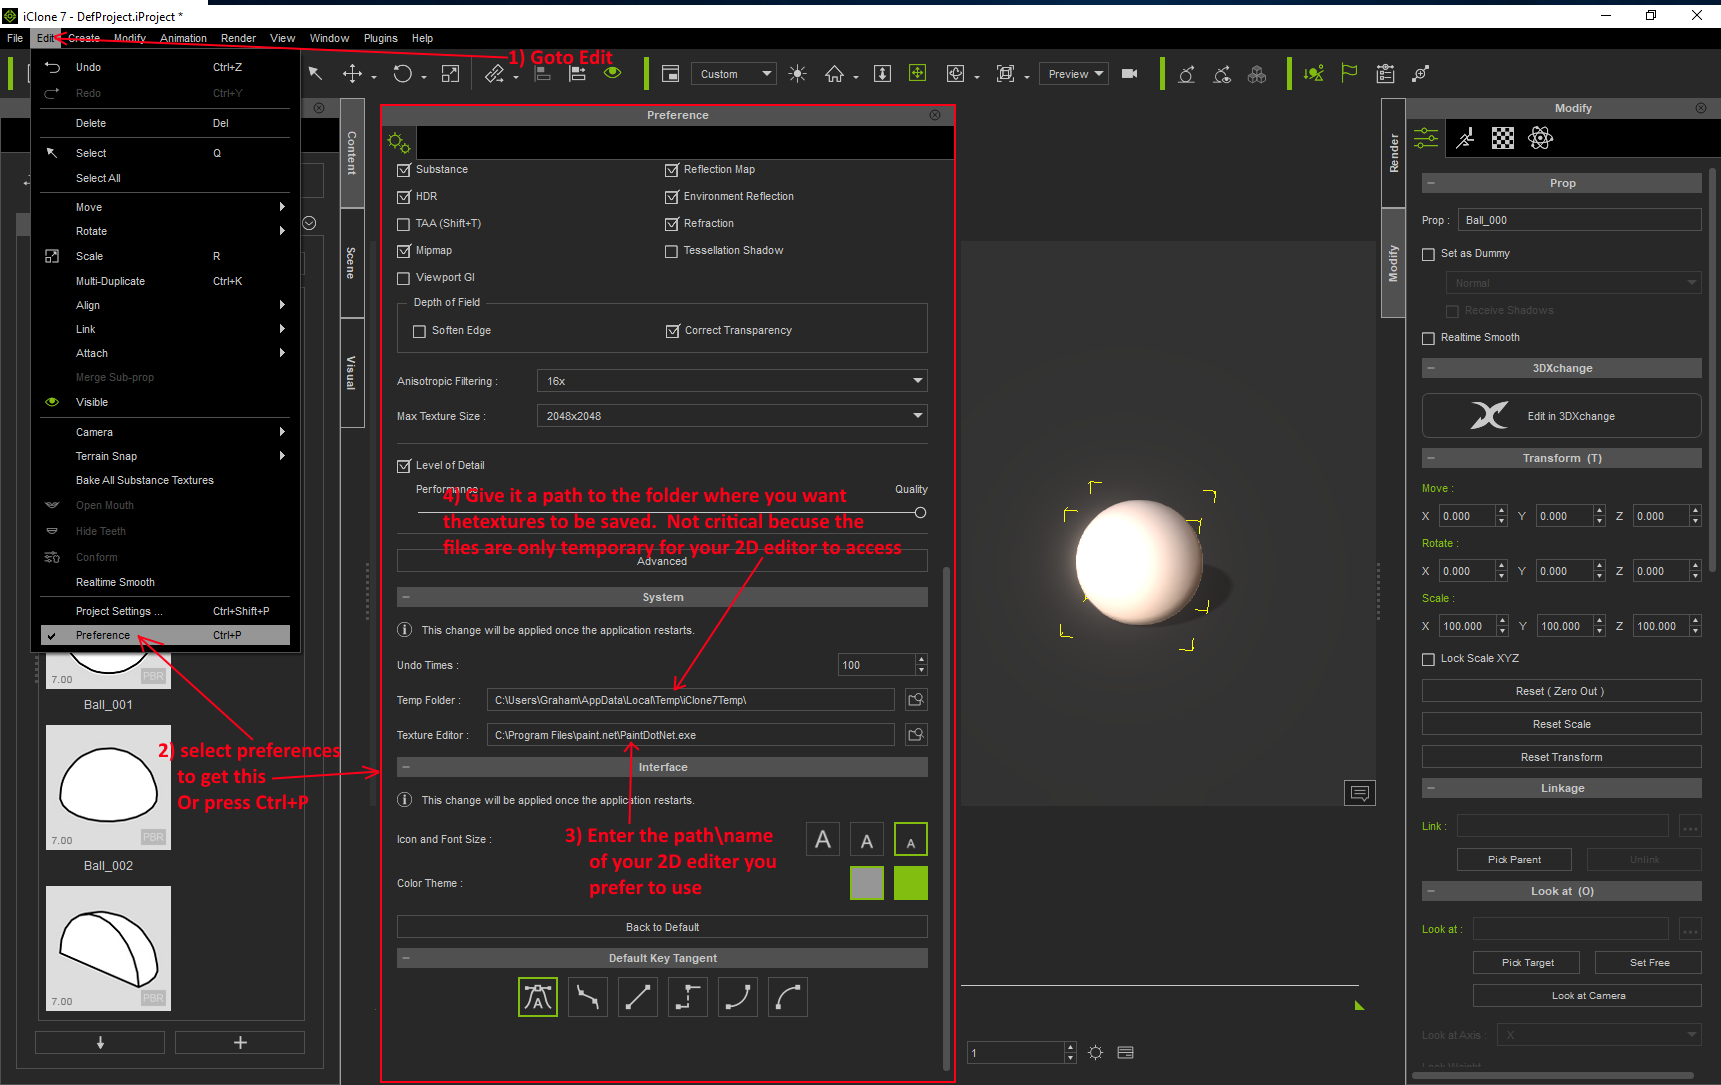
I am guessing that most likely you do not have a 2D program connected to iClone. So clicking the buttons to edit the textures won't work.
You need to goto iClones properties panel and tell it what 2D program you want it to use when you click those buttons
You also need to link it to a folder where you want the temporary files of the textures to be saved
Here is an image displaying where it is
|
|
By Data Juggler - 7 Years Ago
|
4U2Ges. Let's start at the beginning, because you seem to assume I understand more about UV Maps than I do (which is absolutely nothing).
Does UV stand for Ultra Violet?
I did watch a couple videos last night, and they explained U V are like X & Y, but this was for Maya, maybe they are the same with IClone?
But other than that, I don't know what you mean by Paint on it. Should I edit over the same file with the same name?
I even attempted to find this in the manual, but I didn't see anything that explained UV Maps, or maybe I missed it if it is there.
--
And I already had PaintDotNet set as my external 2D Editor, but thank you for your reply.
|
|
By justaviking - 7 Years Ago
|
@DataJuggler,
I am resisting my natural urge to write a long explanation for you. Why? Becasue I've done it more than once before already, so I'm going to search for my older posts and give you a link or two. In theory that will be more efficient than writing it all over again from scratch. Stand by while I search...
Here is one to get you started.
The picture at the bottom of this post will show some pink areas that are very similar to what you see in the screenshot that 4u2ges shared.
https://forum.reallusion.com/FindPost346976.aspx
Stay tuned for more...
Man, I really should make a tutorial sometime. Some of my own typing I'm looking might might actually exist in a different forum. I know it's explained a thousand ways on the internet already, but I have a way of explaining it that (naturally) makes sense to me. It would be easier to show that to type all the time, and then all I'd need to so is make a link to the video.
So, why is it called "UV"? --- No, you silly person, it does not stand for Ultra Violet. :P
On a 2D surface, like paper or a computer screen, we have X-Y coordindates. X=Horizontal, Y=Vertical.
In a 3D world, we have X-Y-Z coordinates for width, height, and depth.
When you want to paint a 3D object, you will eventually have your painting applied to a 2D canvas. So "texture" files are typicall JPG or PNG files.
To achieve the ability to paint a flat canvase that get's "wrapped" onto a 3D object, think about the sewing patterns used by a tailor or dress maker. The cloth lays flat on the 2D table, is cut into pieces, and then is sewn together and you put the shirt on your 3D body.
Well, how does the computer know which part of your 2D texture goes onto what part of the 3D body? That is what the UV map does. It provides a "map" - a link or cross-reference - between the 3D model and the 2D image. It is like skinning a bear, laying the bear skin on the floor. paining on it, and putting the skin back on the bear.
Okay, so why is it called UV? Simply because "XY" is already used. Strangely, but honestly, it avoids confusion. U is horizontal and V is vertical, and a UV point on the texture is then linked to a XYZ position on the model.
That "purple mesh" that 4u2ges showed is the UV map for a cylinder. It is the cylinder cut into pieces and laid flat. It is the "dress-makers pattern" for cutting the cloth that could be wrapped onto a soup can. Again, we call is a "UV map" because it provides the link betwen the 2D textures and the 3D object.
The UV maps for characters are actually quite horrifying, since it is the skin from your character, peeled off, and layed out on a table. Ugh.
I don't know if that was comprehensible or not. Let me know.
|
|
By Keith_MPS - 7 Years Ago
|
You could also try the built-in UV-type "cylindrical capped". The choices are at the bottom of the material panel.
Here's a link to it in the iClone 6 manual. The iClone 7 version doesn't have pictures, but it's the same.
http://manual.reallusion.com/iclone_6/enu/pro_6.0/15_Multiple_Channel_Texture_Mapping/Model_Mapping_method.htm
You'll probably have to align the correct axis and make the image tile twice to get it looking right. Plus, try the offset settings if the edge stripes don't line up with each other.
|
|
By justaviking - 7 Years Ago
|
Of course... NOW I found what I was looking for. It was in another forum, as I suspected.
https://forum.allegorithmic.com/index.php/topic,24840.msg97195/#msg97195
When I talk about stretchy or rubbery fabric, it sort of explains why people can end up wiht blurry or distored textures on their models.
Like everything in iClone, this can be a very deep subject. This is the space where "texture artists" live and breath.
|
|
By Data Juggler - 7 Years Ago
|
Thanks for all the replies, and I read part of the other thread.
I think I get it now, when I get off work I will try your suggestions.
And yes you should make a tutorial series; I search YouTube first for a lot of stuff just to see them clicking it.
It is the difference of reading a guitar playing book or watching a guitar playing video.
|
|
By animagic - 7 Years Ago
|
I like to show you how you could texture your chip quite easily. I think it will help in understanding the process.
I'm using a simple and free text editor called paint.net, which you may have already. It has a layer functionality, which means that an image can be composed of parts on top of each other. We will be using the layer function to add the texture for the chip on top of the UV map of the cylinder.
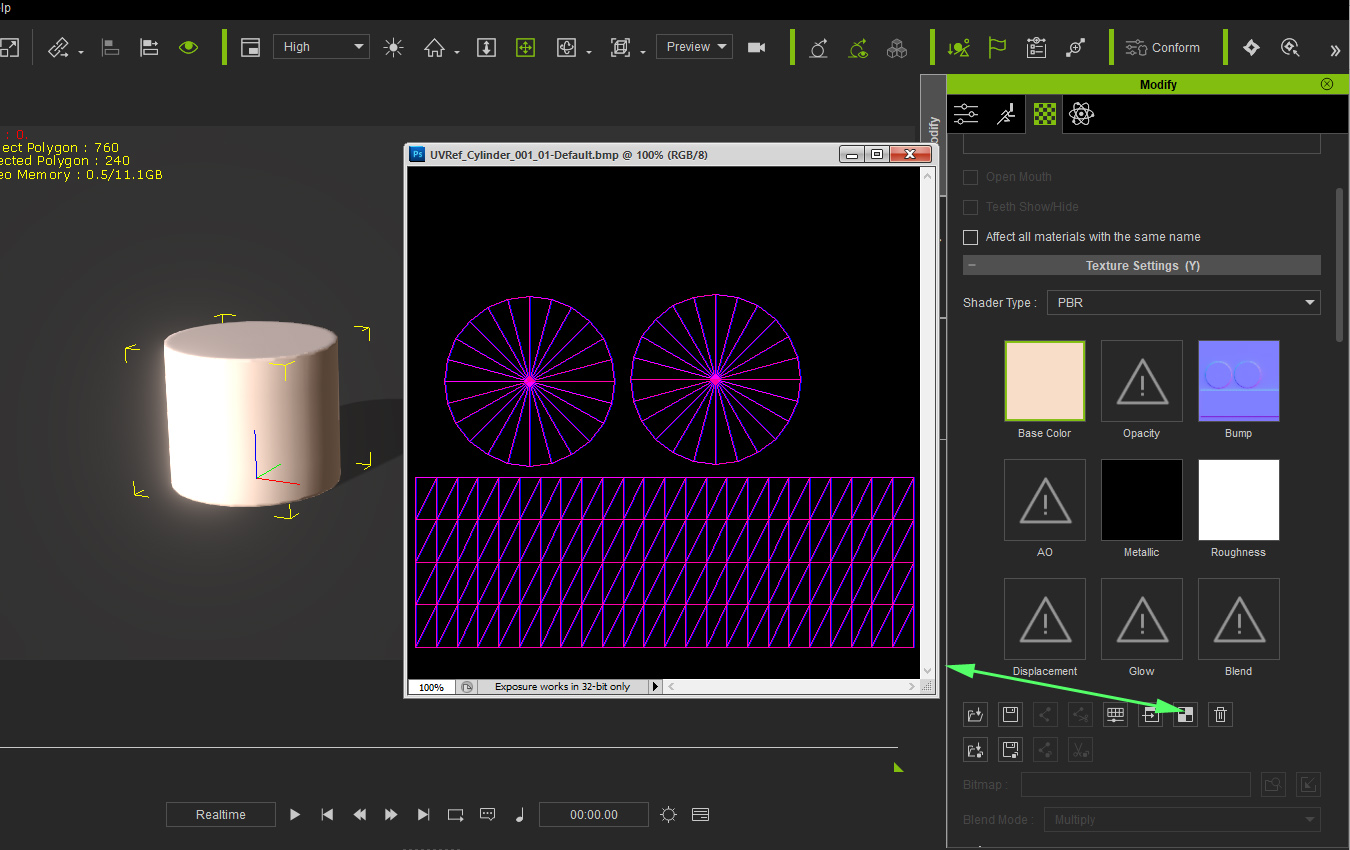
1. After loading a cylinder into your scene, the first thing to do is save out the UV map for the cylinder:

Assuming you have set your graphics editor (as explained in this thread), it will open with the UV map:

What you see are the top, bottom, and side of the cylinder mapped in 2D space.
2. We will be texturing with the two textures you provided, which I saved to my to my laptop. I call them chip-top and chip-side.


I rotated the side texture 90 degrees, as that is the orientation on the UV map.
3. Add a new layer to the UV map image, and copy/paste the chip-top image to that layer (Layer 2):

4.The image is too small, so resize and move it so that it covers one circular section of the UV map.

5. Copy the resized chip-top texture, and move it to cover the second circular section of the UV map:

6. Add a new layer, and copy/paste the side texture into it:

7. Resize and move chip-side, so that it covers the rectangular section of the UV map:

8. Merge the layers to a single layer:

9. Save the chip texture as a file (remember the location...).
10. In iClone load the saved texture. Double-click on the Diffuse map icon, which will open a file browser. Navigate to the texture and load it.

11. Resize the cylinder as required.
|
|
By justaviking - 7 Years Ago
|
@Animagic,
Great step-by-step example. Very clear. Very well done.
Two comments:
A) In Step #10, you can also drag-and-drop the texture from Windows Explorer onto the texture slot in iClone. That can be a convenient shortcut.
B) The "rectangular" textures should not have been rotated 90-degrees, it just needed to be stretched to fit. But that does not undo your great example. In fact, it provides additional insight into the process. So I choose to belive you did that on purpose.
Bonus comment:
C) Actually, the "rectangular" image probably needs to be scaled a lot, and then tiled 6 times so that you have 6 blue segments going around the chip. Then probably rotate the "top" image so the blue segments of the top chip line up with the blue sides of the top chip, if needed.

|
|
By Data Juggler - 7 Years Ago
|
Actually I showed you the wrong image for the side of the chip. That image I showed is a stack of chips in a rack, but I get the idea of what you are talking about now.
When I uploaded my book to Audible that had a similar template for Front of Book, Back of Book and Spine.
The side of the chip would just be something like this (this was made real fast because I am at work still)

Thanks
|
|
By justaviking - 7 Years Ago
|
@DataJuggler,
Follow the stops Animagic layed out so nicely. Once you do it, the lights will turn on and things will quickly start to fall into place. The next thing you know, you'll be texturing wizard. :)
For more advanced work, you will eventually want a tool that allows you to paint directly onto the 3D model, and it will generate the 2D texture for you. 3D Coat and Substance Painter are a couple of popular applications. But even this basic functionality shown here today will take you a long ways, and you'll have a much better understanding of how things work.
Good luck, and have fun.
|
|
By animagic - 7 Years Ago
|
|
Data Juggler (9/11/2018)
Actually I showed you the wrong image for the side of the chip.
That tells you I'm not a gambling man...:P
|
|
By Data Juggler - 7 Years Ago
|
Thank you very much. The first draft came out almost perfect (at least the front and back).

I will have to play around to get the sides to match up, but now that I know how to do it, it should be pretty easy.
Here is the file I ended up with:

Now that I understand, it seems easy. If the purple lines had a label with 'Front', 'Back' and 'Side' instead of a bunch of purple wavy lines, I would have probably figured it out on my own.
|
|
By justaviking - 7 Years Ago
|
|
Data Juggler (9/11/2018)
Now that I understand, it seems easy.
Told ya. :)
You have now joined the secret club of UV Illuminati.
If the purple lines had a label with 'Front', 'Back' and 'Side' instead of a bunch of purple wavy lines, I would have probably figured it out on my own.
Unfortunately, that's not really possible, since this isn't a "picture" but it is the 3D mesh laid out flat for you. No text. That purple stuff is the "UV Map." If you change your iClone display for the cylinder to "wireframe" you will see all those purple triangles on the cylinder (in white, I think.) You do that in the "Scene" panel where the items in your scene are listed. Plus there is no way for the computer to know, generally speaking, if that is a front, top, finger, toe, or a door knob.
|
|
By Data Juggler - 7 Years Ago
|
When I went through my mid-life crises and couldn't afford a Porsche, I listened to a lot of audio books and one psychology type book talked about the far side of complexity; meaning after you have the 'Aha' moment is one of the great experiences as the difficulty on the other side is often way more daunting than it appears (I am sure he said it better than that).
|
|
By justaviking - 7 Years Ago
|
Oh yeah, there are a lot of details and nuances to learn, but you have the basic understanding. That alone puts you in a rare group. Look around your neighborhood; how many people would even know what you're talking about?
As you learn more and more, on one hand there is the "understanding." That is great for recognizing issues and what the source of a problem might be. And it really helps you appreciate the skill and talent of people who do it well. That leads to the other hand, which is "doing." That takes practice and experience (which includes failures).
But yeah, everything you touch in iClone leads to deep, deep rabbit hole. "Welcome to Wonderland, Alice."
|
|
By Data Juggler - 7 Years Ago
|
I have had an appreciation for animation ever since I was 13 and I would type in pages and pages of code from a magazine to draw a sprite of a pacman across my screen on a Vic 20 and then a Commodore 64.
The budgets for games and animated movies is mind boggling, and they specialists for every detail.
It is funny how long IClone existed and I didn't know anything about it. I even posted a craigslist ad requesting someone to give me the mouth poses for an image of a character and no one responded, so I didn't myself in Paint.Net and then I heard about Crazy Talk Animator.
Which now that I have IClone I kind of feel like I should have saved my money with Crazytalk Animator and Crazytalk 8 as I don't want to use either one of those now.
|
|
By illusionLAB - 7 Years Ago
|
Hey DJ, I noticed you are still 'wondering' about 3D Coat... here's a quick demo on how easy it is to get results (and not have to worry about UVs ;-)
https://forum.reallusion.com/379059/3D-Coat-model---texture-demo
|
|
By Filibusterous - 7 Years Ago
|
|
This is excellent stuff! I can cross off the term "UV map" on my long list of terms to both learn and understand! I was one of the idiots who thought "ultra-violet" when I first saw the term (insert Bert Stare).
|
|
By Data Juggler - 7 Years Ago
|
|
I thought UV also. Still don't know what it means.
|
|
By Data Juggler - 7 Years Ago
|
I tried 3D Coat, I didn't understand what to do.
I will just stick with the IClone way, good enough for what I need.
Thanks for the tip of 3D Coat, but I have bought enough software I don't know how to use for the year.
|
|
By Delerna - 7 Years Ago
|
Speaking very simple here
The UV map displays where the 3D models vertices, edges and faces apply to the 2D image that you use for Texturing the 3D model.
If you want something on the 2D image to show up on a very particular place on the model then you need to use the UV map to show you where you need to paint each part of the image.
The UV map shows you exactly where you must place things on the 2D image for it to show up on that part of the model. Put it on any position on the 2D image that does not match where the UV map shows you where it needs to be placed and it will not show up on the correct position on the 3D model.
Once you have the texturing completed you delete the layer that has the UV map and then save the image so you can load it onto the model.
That is its purpose (speaking simply). It is just used to show you where you need to paint things so they appear on the correct place on the model
|
|
By animagic - 7 Years Ago
|
I have used iClone for many years, and I just recently acquired 3DCoat. It's a great program, but not something you immediately need. Learning iClone and related programs is quite a task in itself.
That said, it is useful to have a basic understanding of how a texture maps to an object in order to make modifications.
|
|
By Delerna - 7 Years Ago
|
Here is another example. This time a snake I modeled in Blender and created the UV map as this image shows. I added text to show what each item in the UV map is for of the snakes modelling

I then use 3DExchange to load it into iClone.
From iClone I sent the UV map to my 2D editor. I then used the magic want to select all the black colors in the UV map and deleted them. This left only the UV mapping of the snakes 3D edges. Next I added a new layer and then painted each part a different color to try and demonstrate what the UV map is for.

Then I removed the UV map layer and saved the image I want to use as a texture on the snake.

And here is the result of that on the 3D snake in iClone. As you can see. The places on the 2D image that I colored in relation to where the UV map shows me where I need to color them Is now showing up on those parts of the snake. If I didn't paint where UV map showed me where to paint then the colors would not show up correctly. In fact, if I painted anywhere on the 2D image where there is no UV mapping then that wouldn't show up on the snake at all. Oh and the snake on the left is upside down so you can see the texturing on the bottom of the snake

|
|
By sonic7 - 7 Years Ago
|
Data >>> I tried 3D Coat, I didn't understand what to do. <<<
lol - me neither - yet .... (Don't even have it yet).
Data >>> I will just stick with the IClone way, good enough for what I need. <<<
Why not! ... If you're able to achieve the things you want inside of iClone - that's by far the neatest way to go!
This thread here is great. Really explains things nicely .....
|
|
By Delerna - 7 Years Ago
|
And now a bit more detail
Here is my 2D imaging of actual textures I used for my snake. The UV map layer and an extra layer for each color I wanted for different snakes.
.

And here are the results of adding those textures in iClone. Notice that I also used the green version of the texture in the Bump map of all the texture versions. May have been better to convert it to greyscale but I don't mind how the snake looks as it is so didn't worry about doing it. Not yet anyway. Also notice the metallic map is black. Make it whiter and the snake will look shinier. Also the roughness map will make the snake look more rough the darker it is. The thing is. All of these image maps relate to the UV map. If you want to control the shininess of the object so it is different on different parts then use the UV map so you know where to color the 2D tecture so it affects the part of the model that you want it to affect. That's the main point of UV maps. It identifies where you need to put your texturing on the 2D image so it shows up on the part of the model that you want it to show up on


|
|
By Delerna - 7 Years Ago
|
Oh. Might as well show my latest video of the snake. By the way. It shows each of the snakes spinning along the grass first and at the end it shows more of the animations.
Standing up, poking tong, opening mouth etc
Had some suggestions from Sonic7 that helped me improve it.
Although the software I used to produce the video from my iClone project outputs is not high detailed.
I'm dissapointed with that software.
|
|
By Delerna - 7 Years Ago
|
sorry, going on and on. But just wanted to highlight this a bit more.
If you want to create your own models then having a high understand of UV mapping is highly important because not UV mapping the model well can badly effect being able to texture the model well.
However, your talking about texturing models that have not been made by you. So really, the only thing you need to understand about it is that you use it to show where on the 2D image you need to paint things so they appear on the model in the correct place. Everything else about UV mapping is not needed if that's all your going to do. I guess its nice to understand as much as possible, you might be able to see why your texturing is not working right on a particular model if you understand what can cause bad effects by how the UV map was created. Can also help you to understand what you need to do to improve the texturing despite how it is UV mapped (to a degree anyway). But being necessary???? Not really, besides, I am sure you will start to notice and learn these things as you progress from this starting point. I know I did ... and am.
|
|
By sonic7 - 7 Years Ago
|
Hey Delerna! Wow - these animations of yours keep getting better!
Quite convincing indeed .... (and all the pics and explanations from you and others on this thread are a big help to us newer folk - thanks heaps!) :)
|
|
By Data Juggler - 7 Years Ago
|
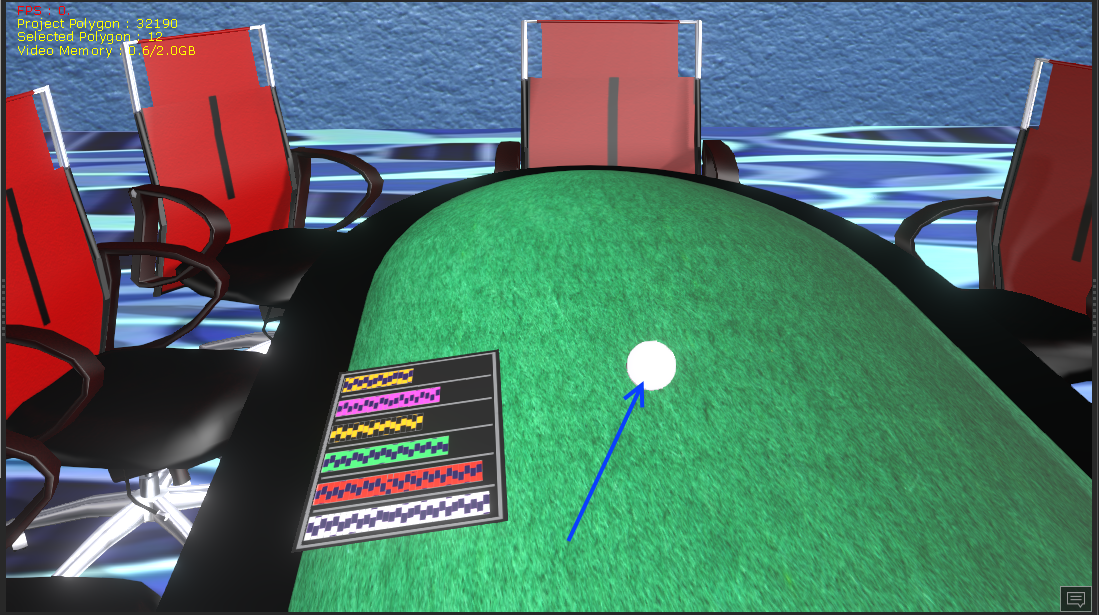
I wanted to post a preview of my poker chips now that I had a little time to create all the chips and colors.
It took a little trial and error to create the proper UV maps. What I did first to help line up the stripes on the side versus the top and bottom stripes was to verify which set of stripes in the top image matched a stripe in the side template by hiding one of the set of stripes.

Then when I applied the image onto a chip in IClone I could tell which stripe was missing a side. After that it was just guessing was I too far to the left or right until they finally matched up close enough for my needs.
I could work on chips forever, now I have to build a deck of cards. I wish there was a way to automate this. I have the card images from a card counter black jack program I started but never finished, but 52 cards is going to take a while.

Cards are flat so they should be much easier than chips.
Thanks for everyone's help explaining this.
|
|
By justaviking - 7 Years Ago
|
Very nice. Thanks for sharing. :)
|
|
By Delerna - 7 Years Ago
|
Good to see your work and well done.
Relating to your comment on determining where UV edges will appear on the prop.
You may already know about this? but you can adjust the prop so it shows you where its edges are (see the image if you don't know where it is).
Depending on the prop and how the UV map is made this can help you guess a bit easier where things need to be placed on the 2D image so it appears in the correct place
Still will be trial to find exactly where it needs to go but it can help you to guess where a bit easier. Not always, there is dependencies on where your looking to put it and how well the UV map identifies where that part is. But it is something that may help.

|
|
By Delerna - 7 Years Ago
|
Thought I might take this topic up a level.
At the bottom is a video demonstrating how I do texturing very often. It is a way that makes it quicker to check that each part you do to the texture is how you want it.
I have 2 screens on my computer but I showed what I do on a single screen so you can see how you can do it if you only have a single screen.
In this case I am using Krita to do the texturing because Paint Dot Net cant do this process (unfortunately)
I don't have photoshop but I guess it may do the same as Krita here. But I can't say it does.
Here are the steps I do
1) Send the props Base texture to the Krita
2) Send the props UV Map to the Krita
3) In Krita go to the UV map and select the black color and delete it
4) Then select all of the UV maps image and copy it. It must be the same size as the base texture. So resize it if needed.
5) In Krita go to the Base texture and paste the UV map into it. It gets added as a new layer above the Base texture.
6) Now I can select the Base textures layer and select colors and draw on the Base texture using the UVMap as a guide.
7) Now hide the UV Map and then save the image. It doesn't save it to the hard drive. Rather, it updates iClone directly.
That way I can see what I have done immediately.
Krita can have any number of layers and you can add new things to a new layer and save it. That way you see if it looks OK on the prop.
If not you can just delete that new layers texture without affecting what has already been done and approved and then re-draw the new bit again. Or use the eraser to remove the parts not needed.
Anyway the whole point I am showing is how to use the 2D editor to update the props image as you progress with your drawing.
Easier than having to save the image on your drive and then goto iClone and load the new version.
|
|
By Delerna - 7 Years Ago
|
Oh been meaning to say several times but kept forgetting.
None of what I am showing is to state that sending image maps and UV maps from iClone or CC to a 2D editor is the best way to do this. I was just showing how it can be done directly from reallusion's software without having to use anything more that a 2D editor...….and I don't find it all that difficult.
Other software's are definitely worth looking into if that's the way you want to go.
|
|
By justaviking - 7 Years Ago
|
Tagging on to what Delerna said...
Yes, you can do a lot with the tools already demonstrated in this thread.
However, you will run into more difficult problems. For example, many time you'll want a line or image to cross more difficult boundaries from one UV island to another, or across a seam.
If you try to paint something on an avatar head or body, it gets very difficult to get the lines to appear the way you want. So eventually you will want a "3D painting" application such as 3D Coat or Substance Painter (both mentioned previously).
It is fun, though, isn't it? It's fun when you learn how to control a piece of software and manage to make it do what you wanted it to do. Even if it's not perfect artistry, I know I have a lot of satisfaction from learning the basics of "How" (and why).
|