|
By 4u2ges - 8 Years Ago
|
I was working on a DAZ hair past weekend and figured I'd share my workflow routine. It might be the same, or different from yours. But I hope you find it useful.
You would most likely have a different hair to convert, which in turn might require slightly different approach at certain workflow steps.
So please share your experience in case you have some additional tips, or if you find a way to facilitate a certain routine in a workflow.
Sorry folks - no video - just a plain text and screenshots (I hate my voice and accent :) )
Prerequisites
1. You need to have a DAZ studio software with Decimator. Decimator is a little bit on the expensive side, but it is a great tool for reducing poly count.
You can do decimation in Blender (or other mesh editing software). But it is rather time consuming (specifically for the hair) and it is not covered in this workflow.
2. You have to be proficient with importing/exporting models in and out of CC 2.0. Export in advance a base female avatar from CC for the workflow steps in Blender.
3. Some knowledge / experience working with Blender would require (at least be familiar with mesh editing via basic transform tools).
Workflow
1. Bring a DAZ hair to the stage (there is no need to have an avatar on a stage in DAZ for that) and convert it to a Prop.
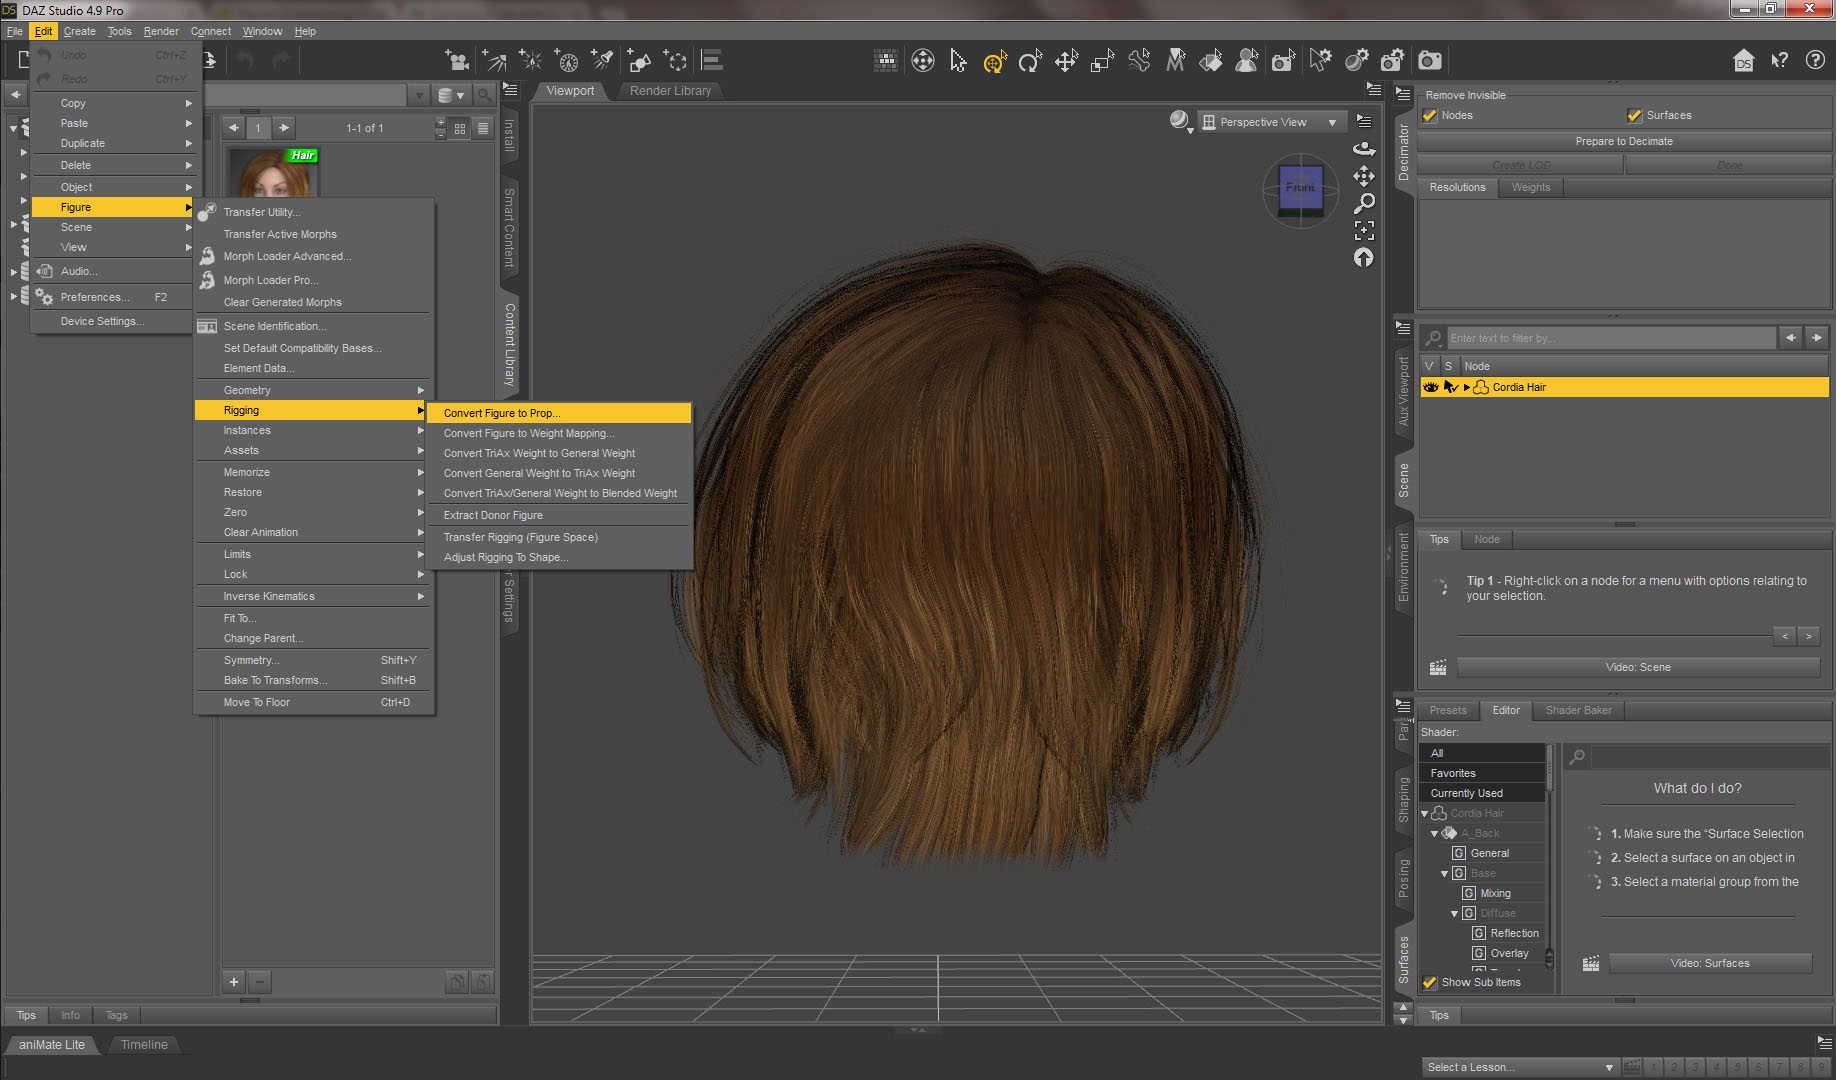
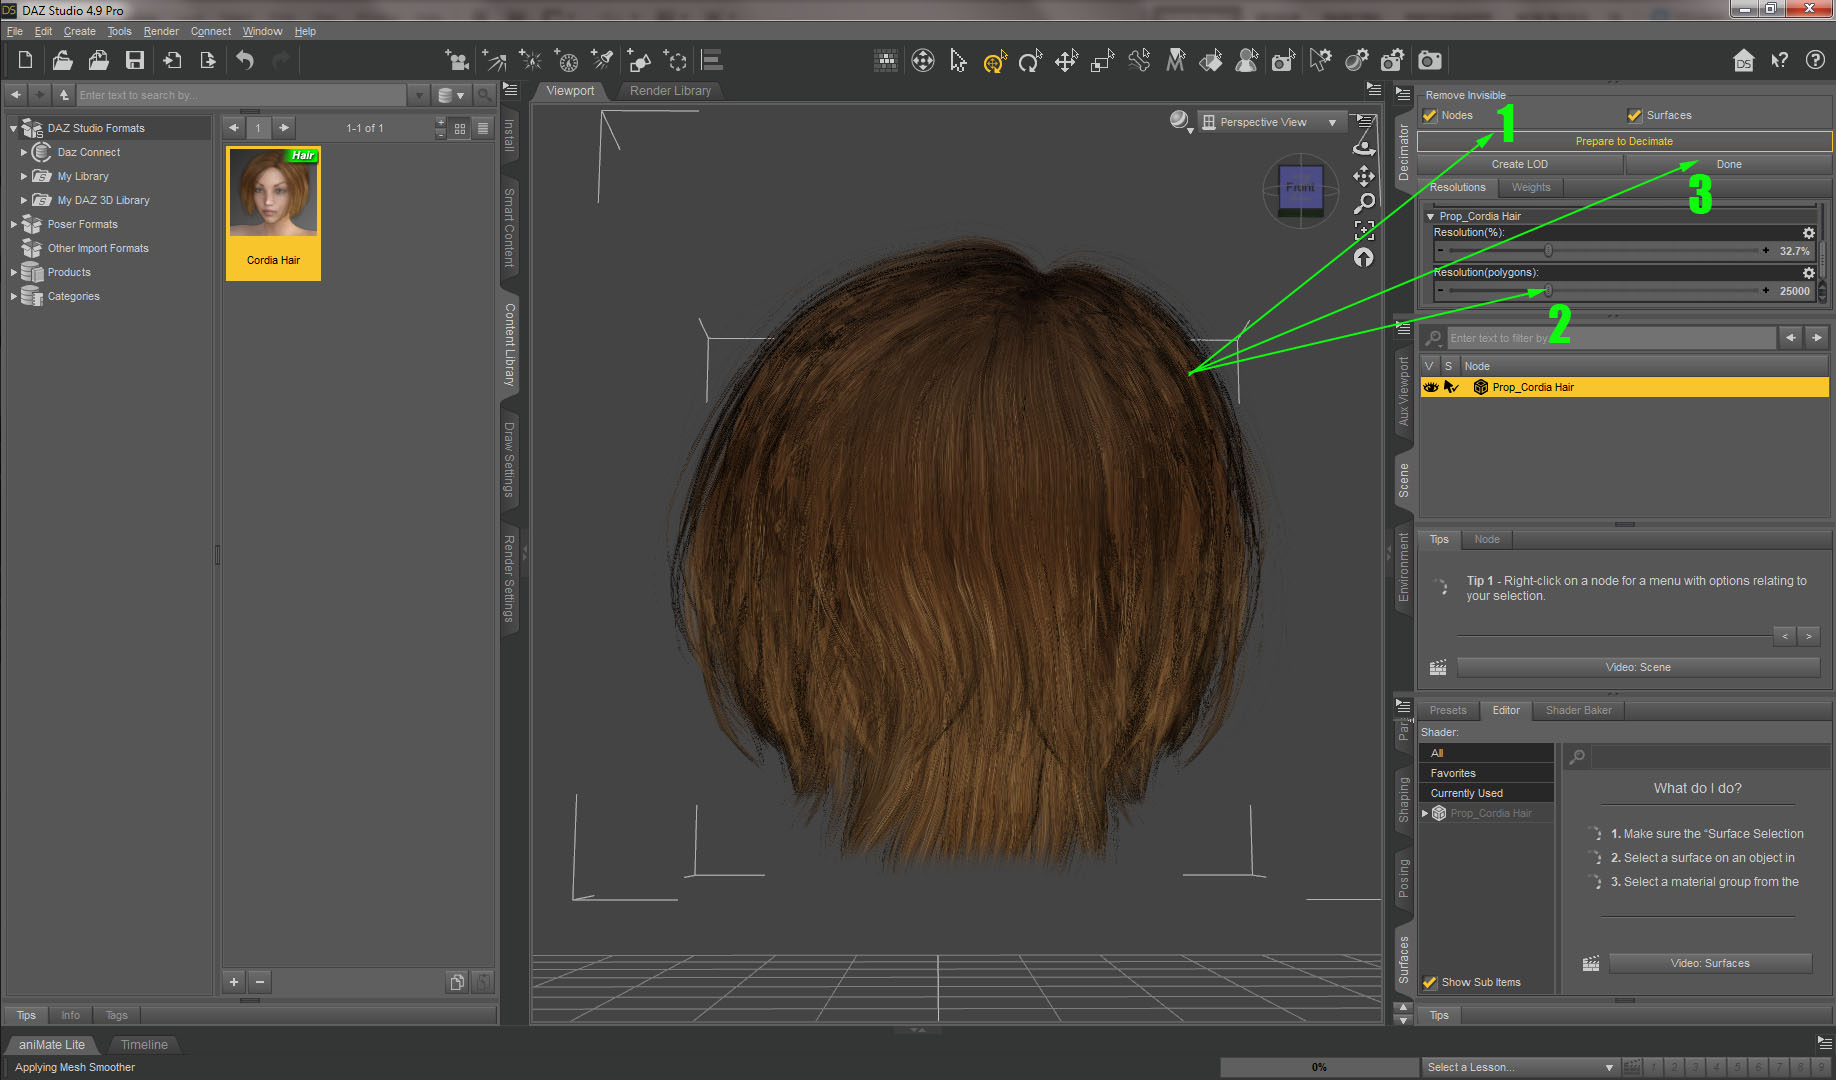
2. Decimate it. Click Prepare to Decimate, then use slider to set a poly count (or percentage), and click Done.
I have selected 25000 for Cordia Hair (you may go lower if you wish). But do not go too low. The hair would look bulky and ugly.
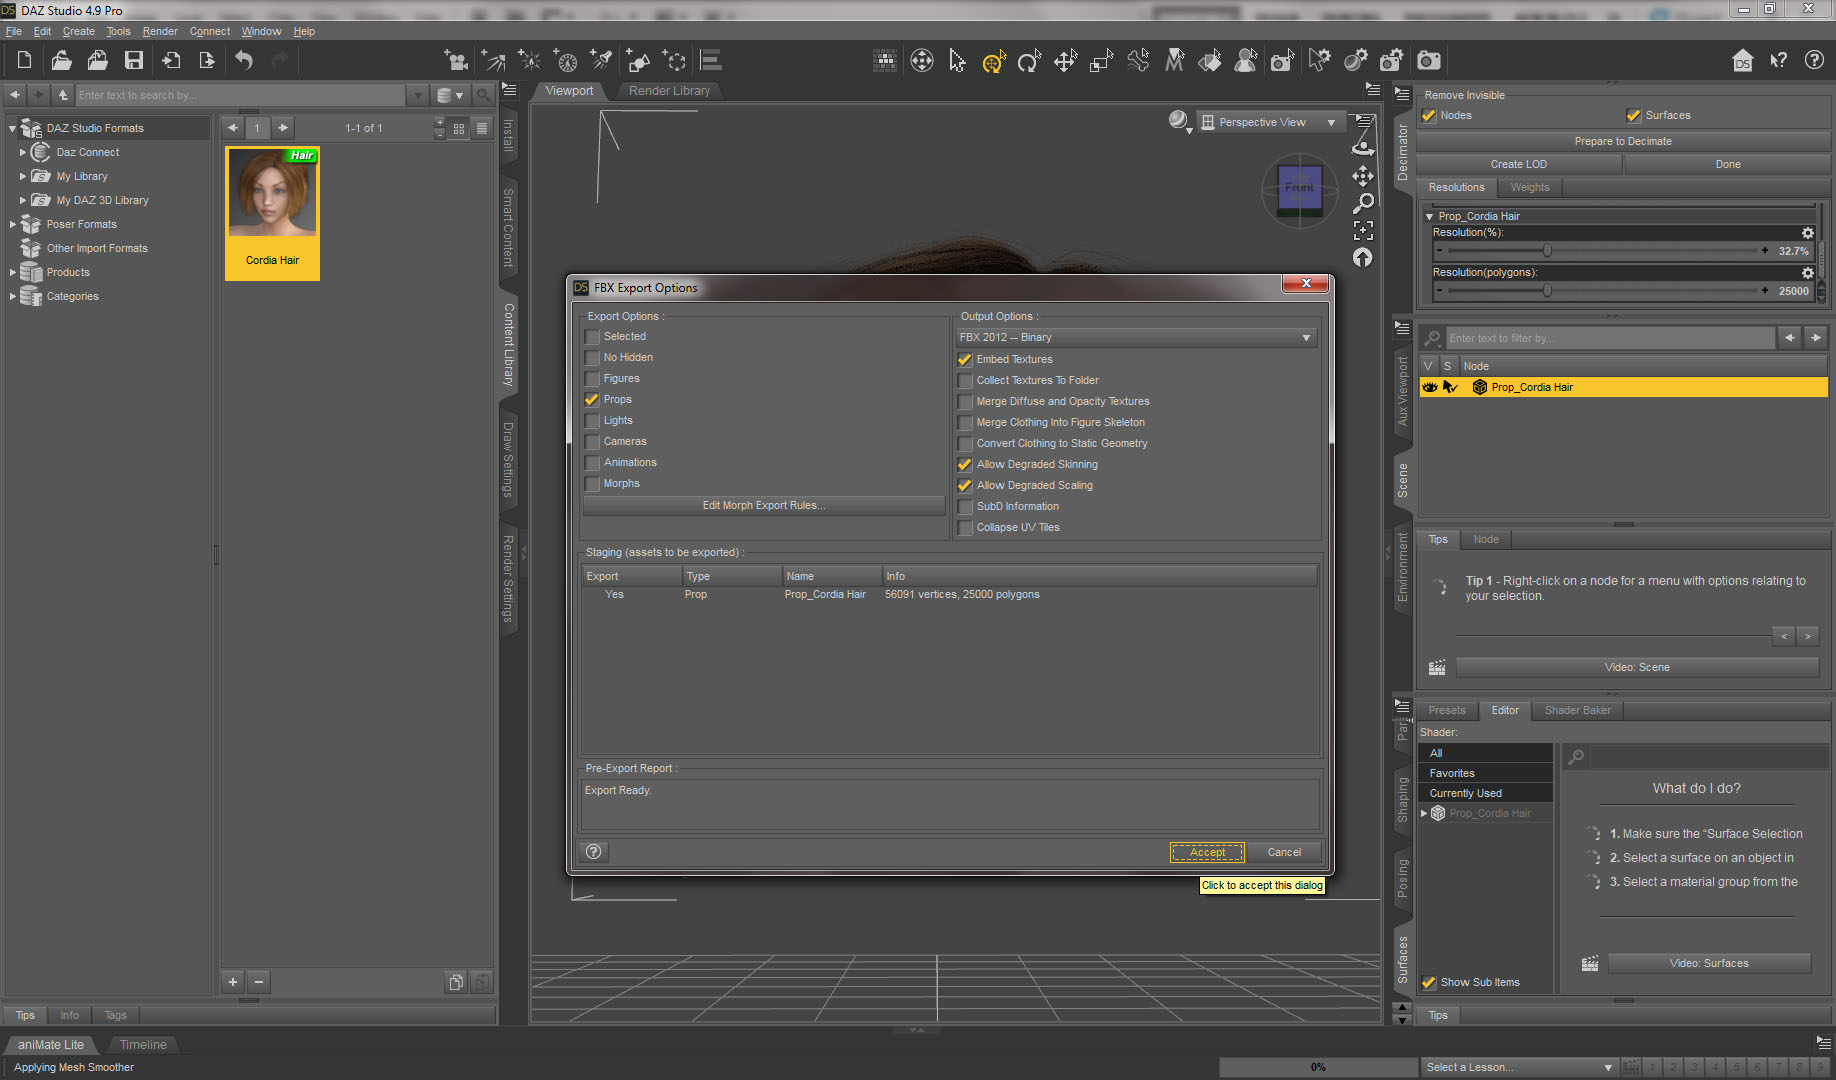
3. Export hair to FBX. From File menu select Export, choose .fbx and specify a name and location to save it to.
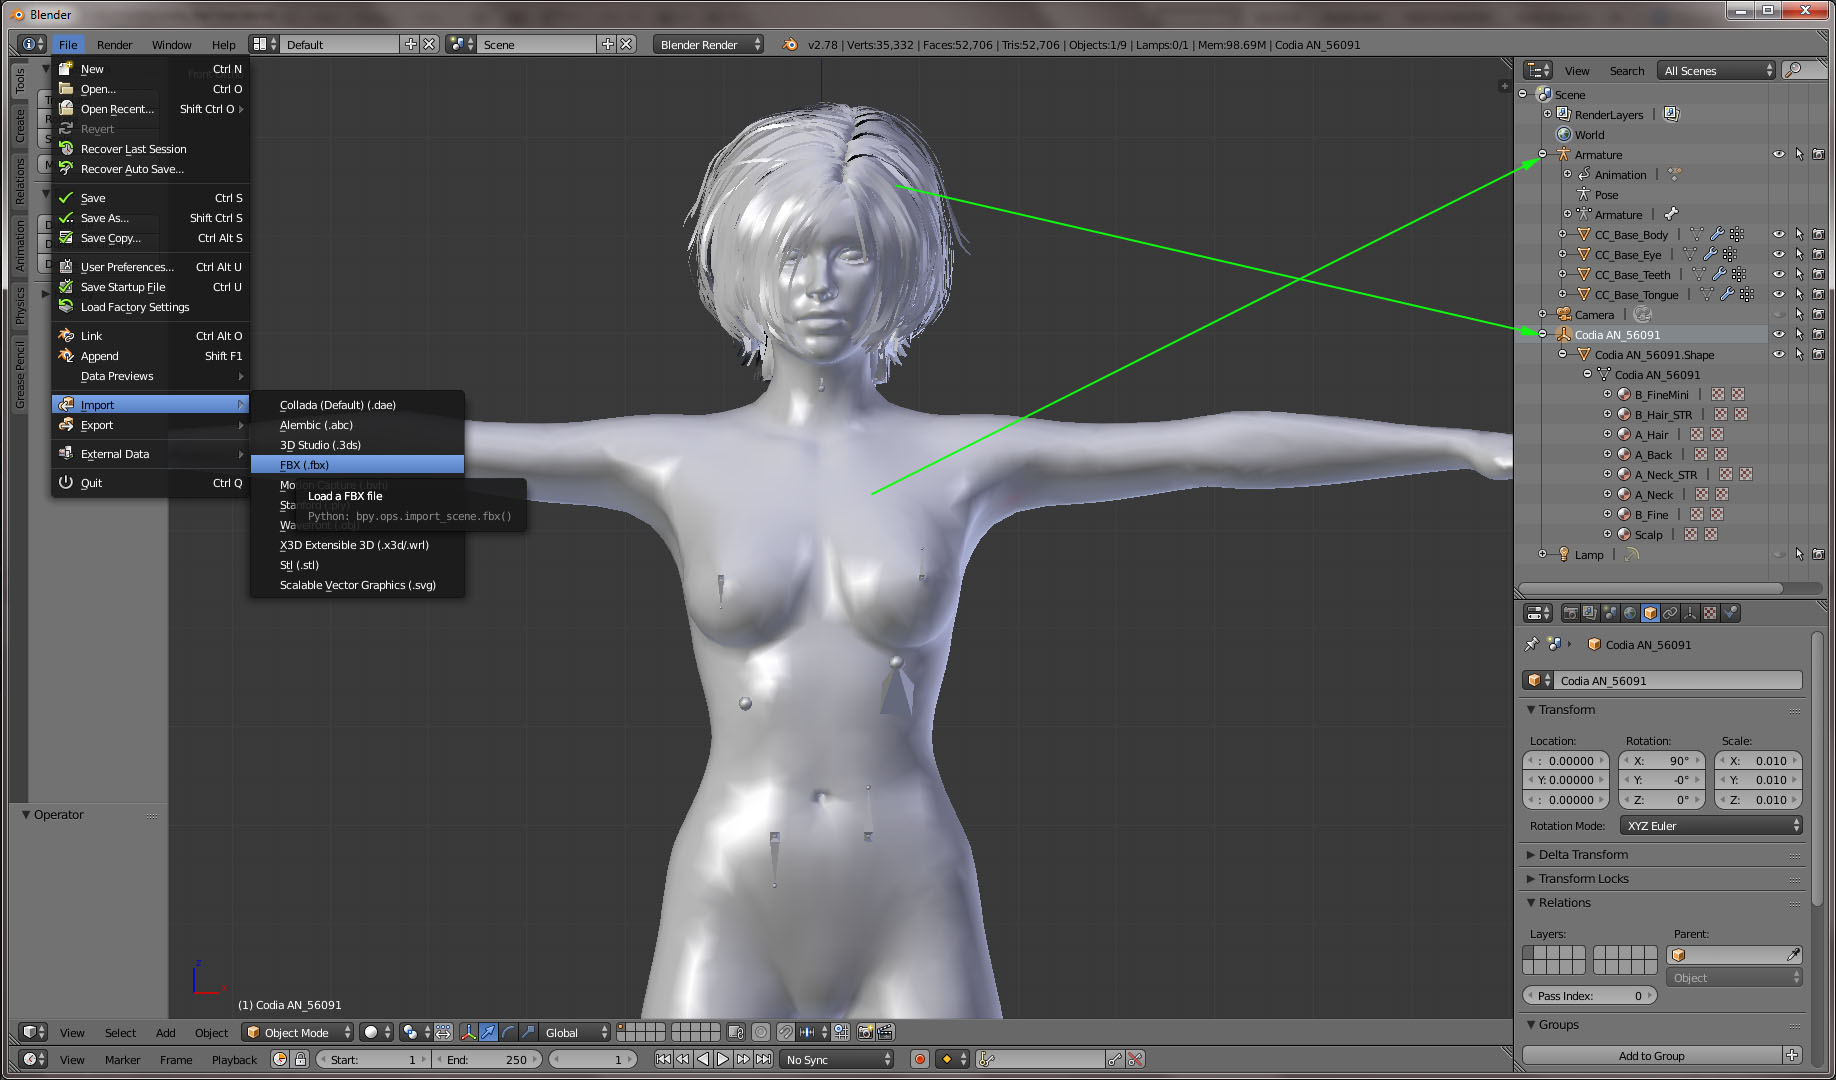
4. Open Blender fresh. Import a base CC 2.0 model and then hair you just exported from DAZ. Hair should match the model by X.
But it most likely be off by Y and Z. In my case Z was almost perfect but Y was way off.
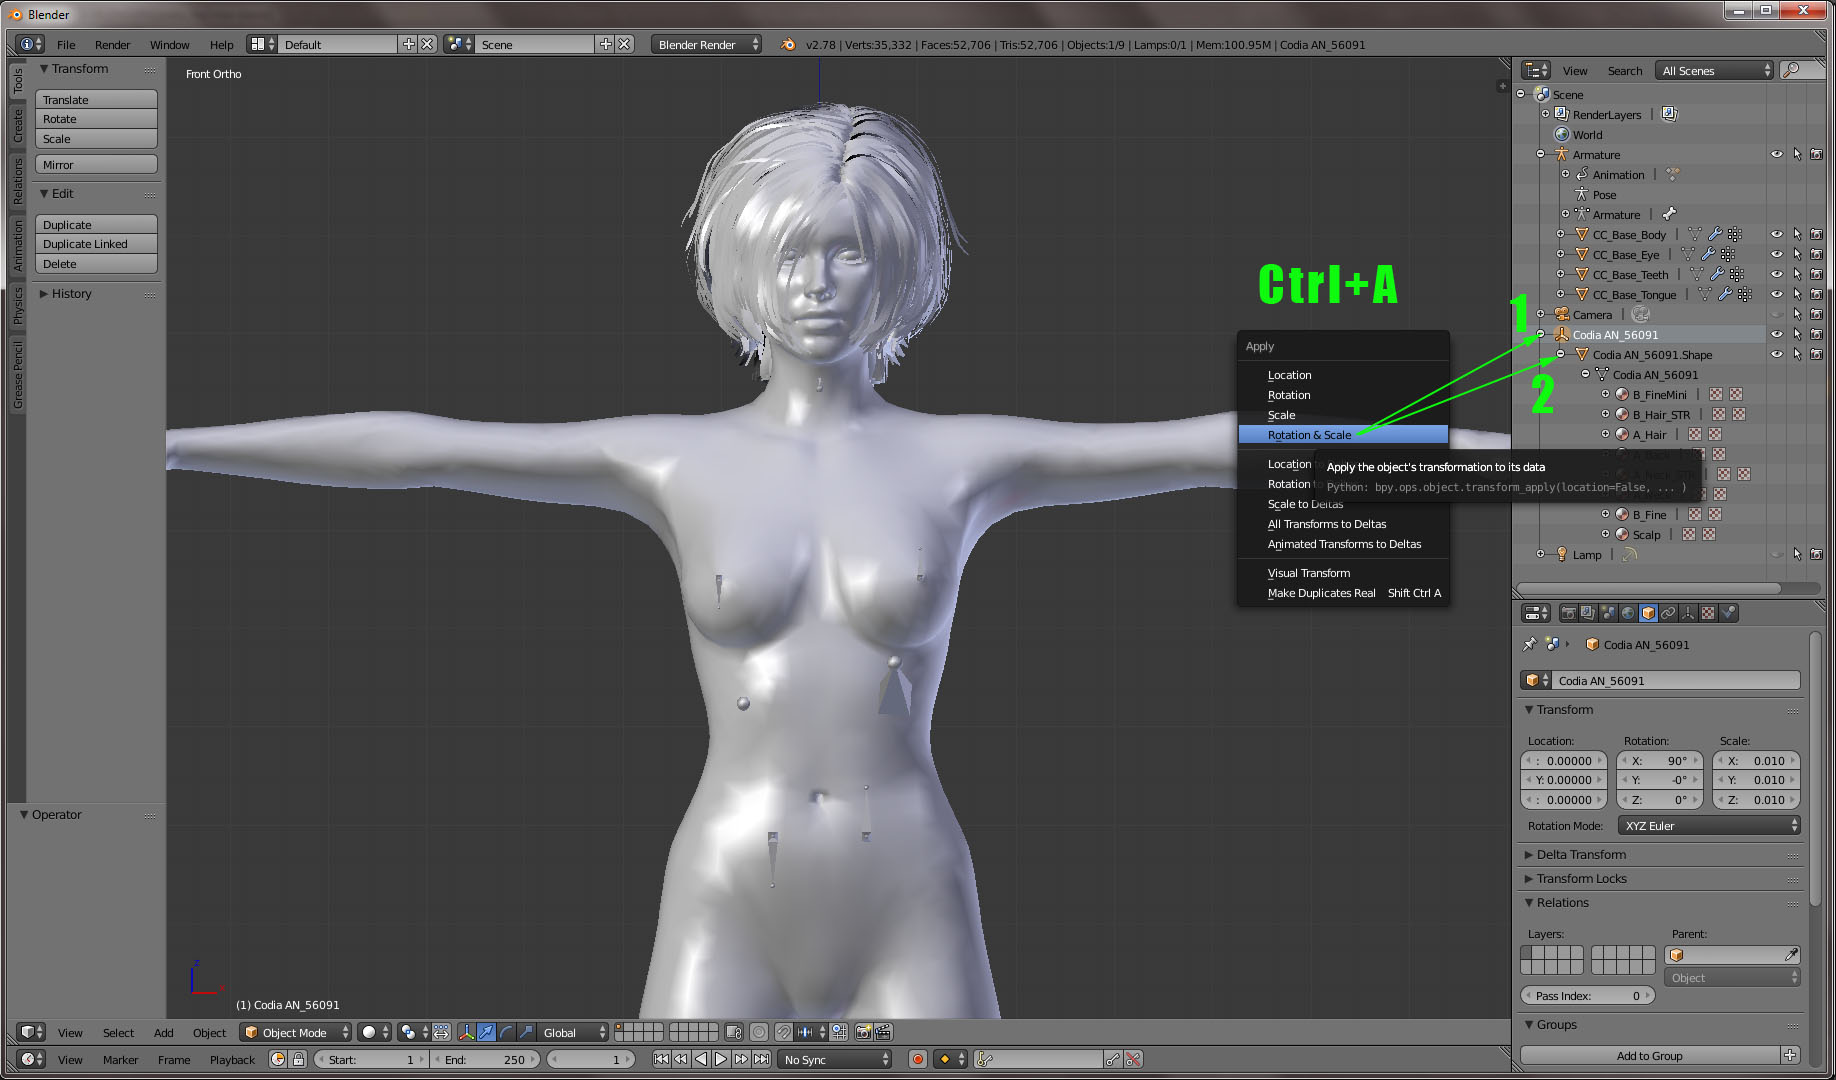
5. Get rid of a Hair Root (Empty) object. Before you do that, you need to reset Rotation and Scale in the correct order.
First select a Root object, hit Ctrl+A and choose Rotation and Scale. This would zero out rotation and scale data, but transfer initial values to the child node - which is a hair mesh.
Next select a hair mesh object and do the same - Ctrl+A and choose Rotation and Scale.
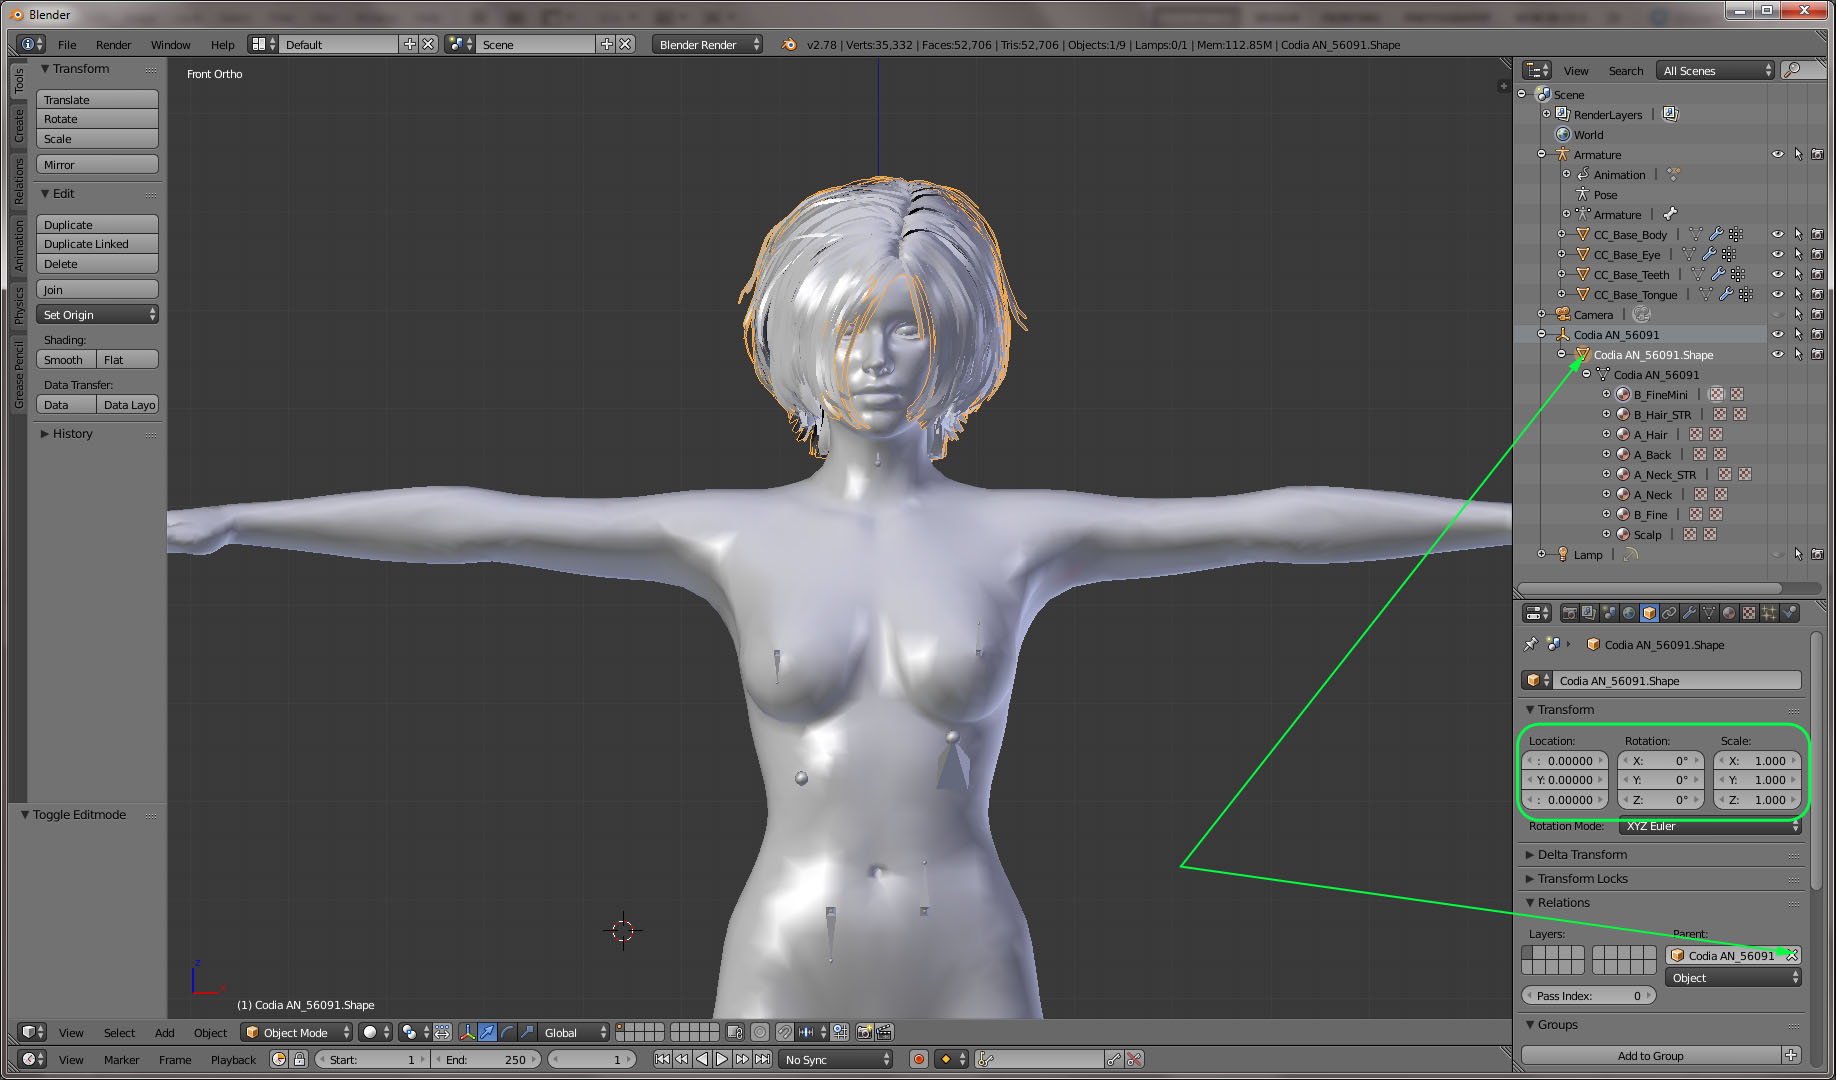
6. Now lets detach a hair from the parent.
Select a hair mesh object, make sure rotation and location values are 0 and scale is 1, and then detach from parent by clicking an X in the parent bound window.
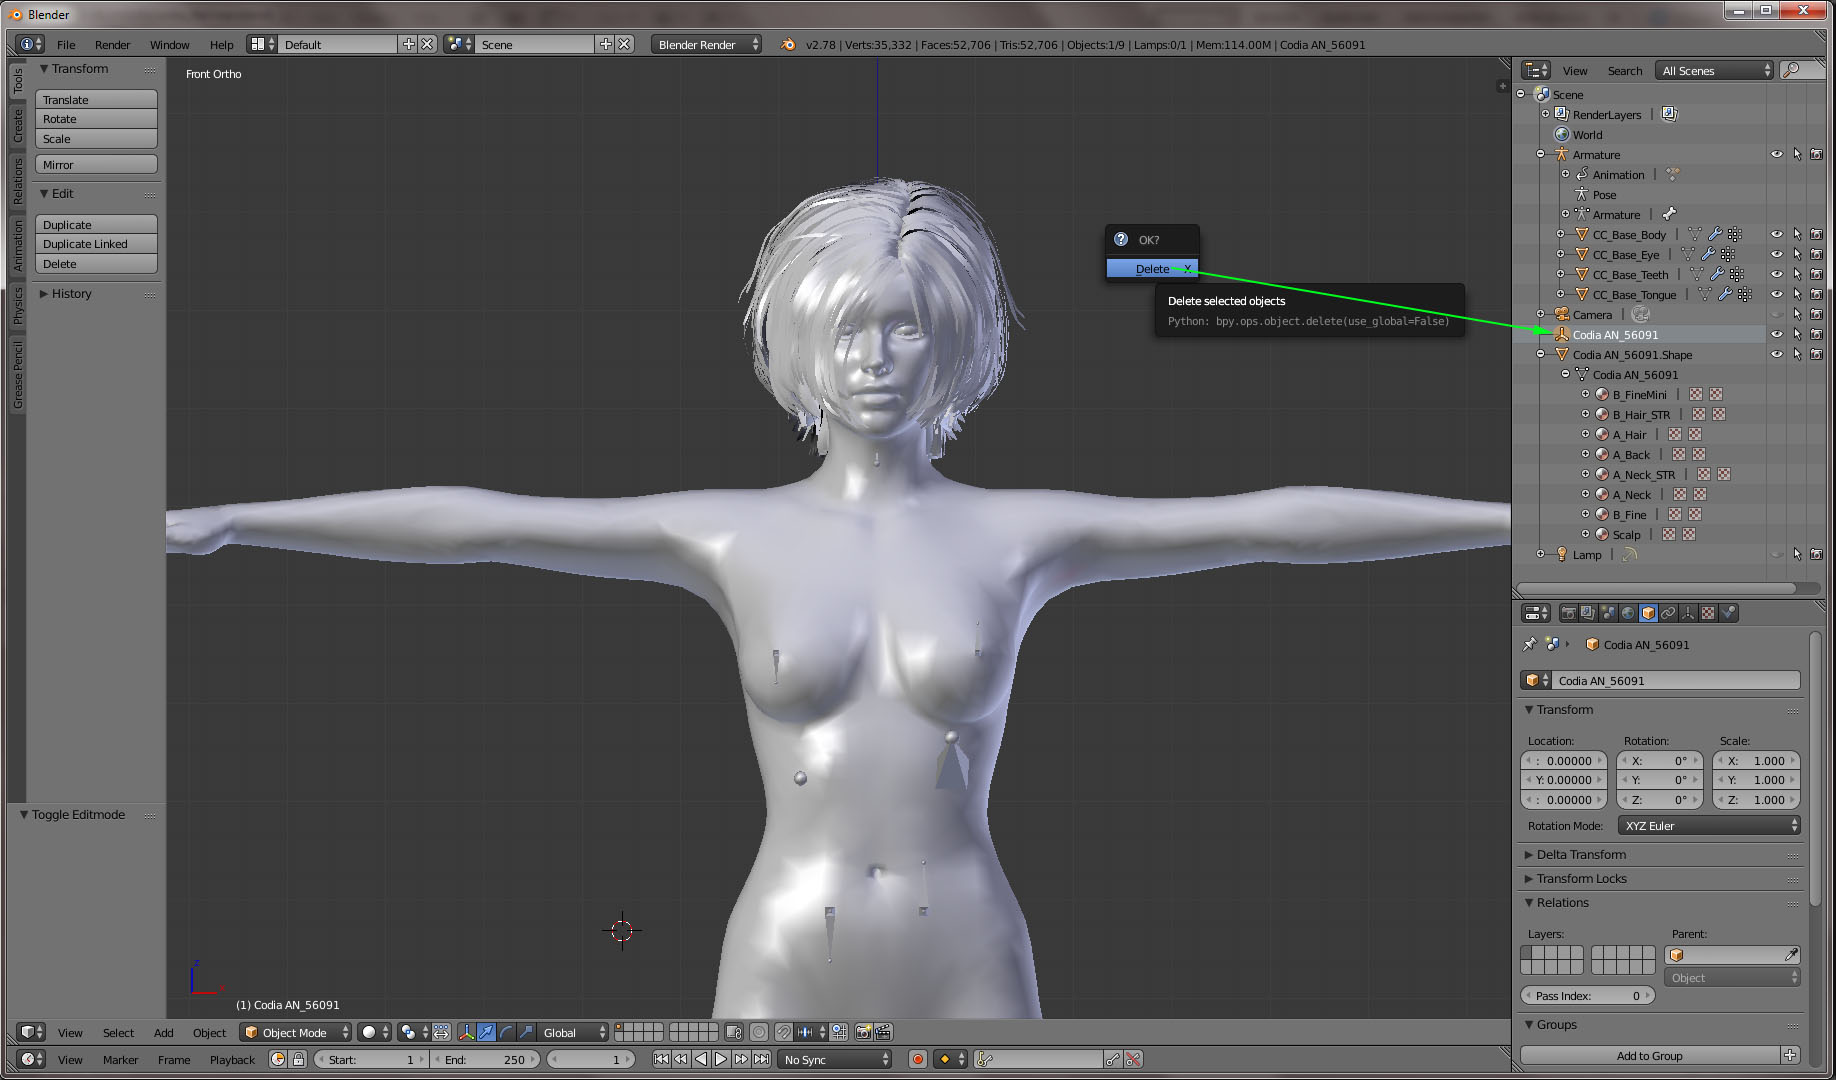
7. Finally delete orphan Empty object
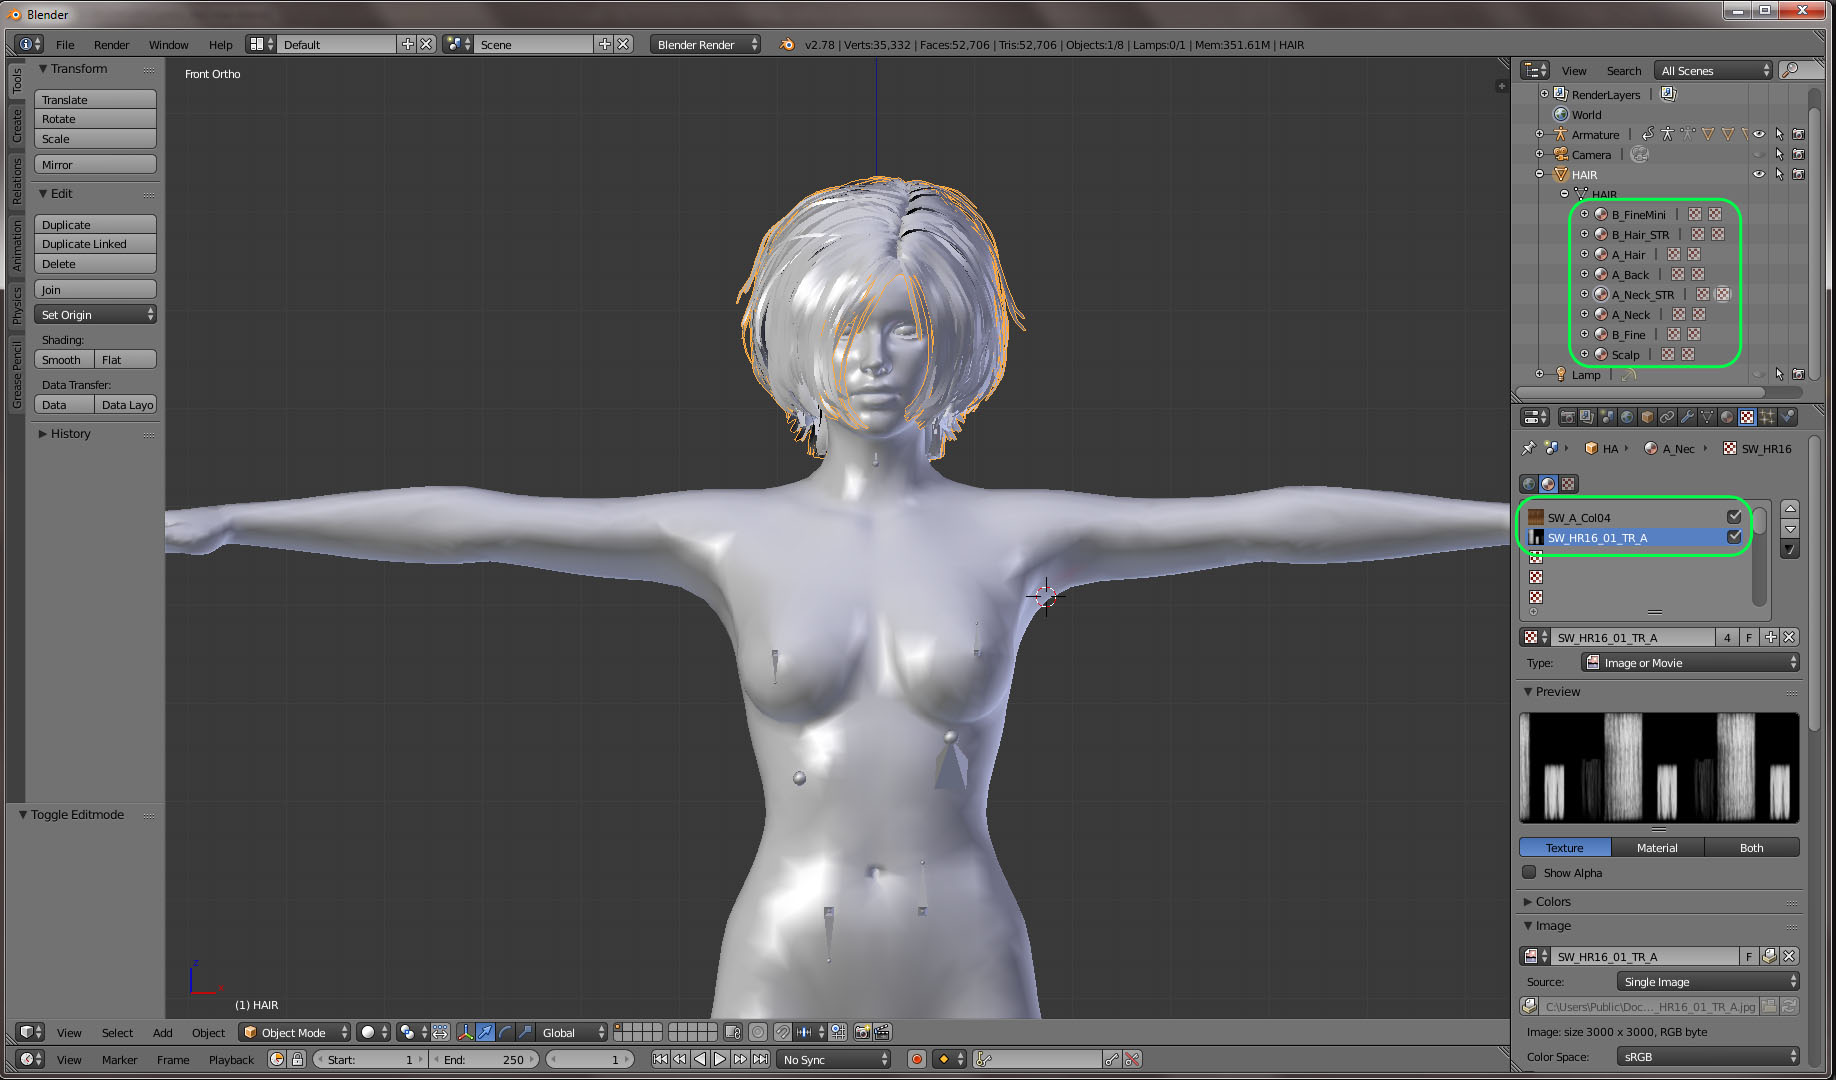
8. Now lets work with materials and textures. You might have more, or less count of materials assigned to different hair strands.
The goal is to reduce number of materials to possible minimum (unless you have an idea to shade different parts of the hair differently).
It is done by consolidating materials of the same type (those have the same texture maps). You need to visually analyze and compare materials and texture map assigned to them.
In my case I figured I can reduce number of materials from 8 to 3. By visual comparison, I noticed that materials, those names start with A and B respectively have the same texture maps assigned.
Plus a unique material for the Base/Scalp mesh.
It is also possible to have just one material, but in that case a UV map would need to be recreated, which might be time consuming.
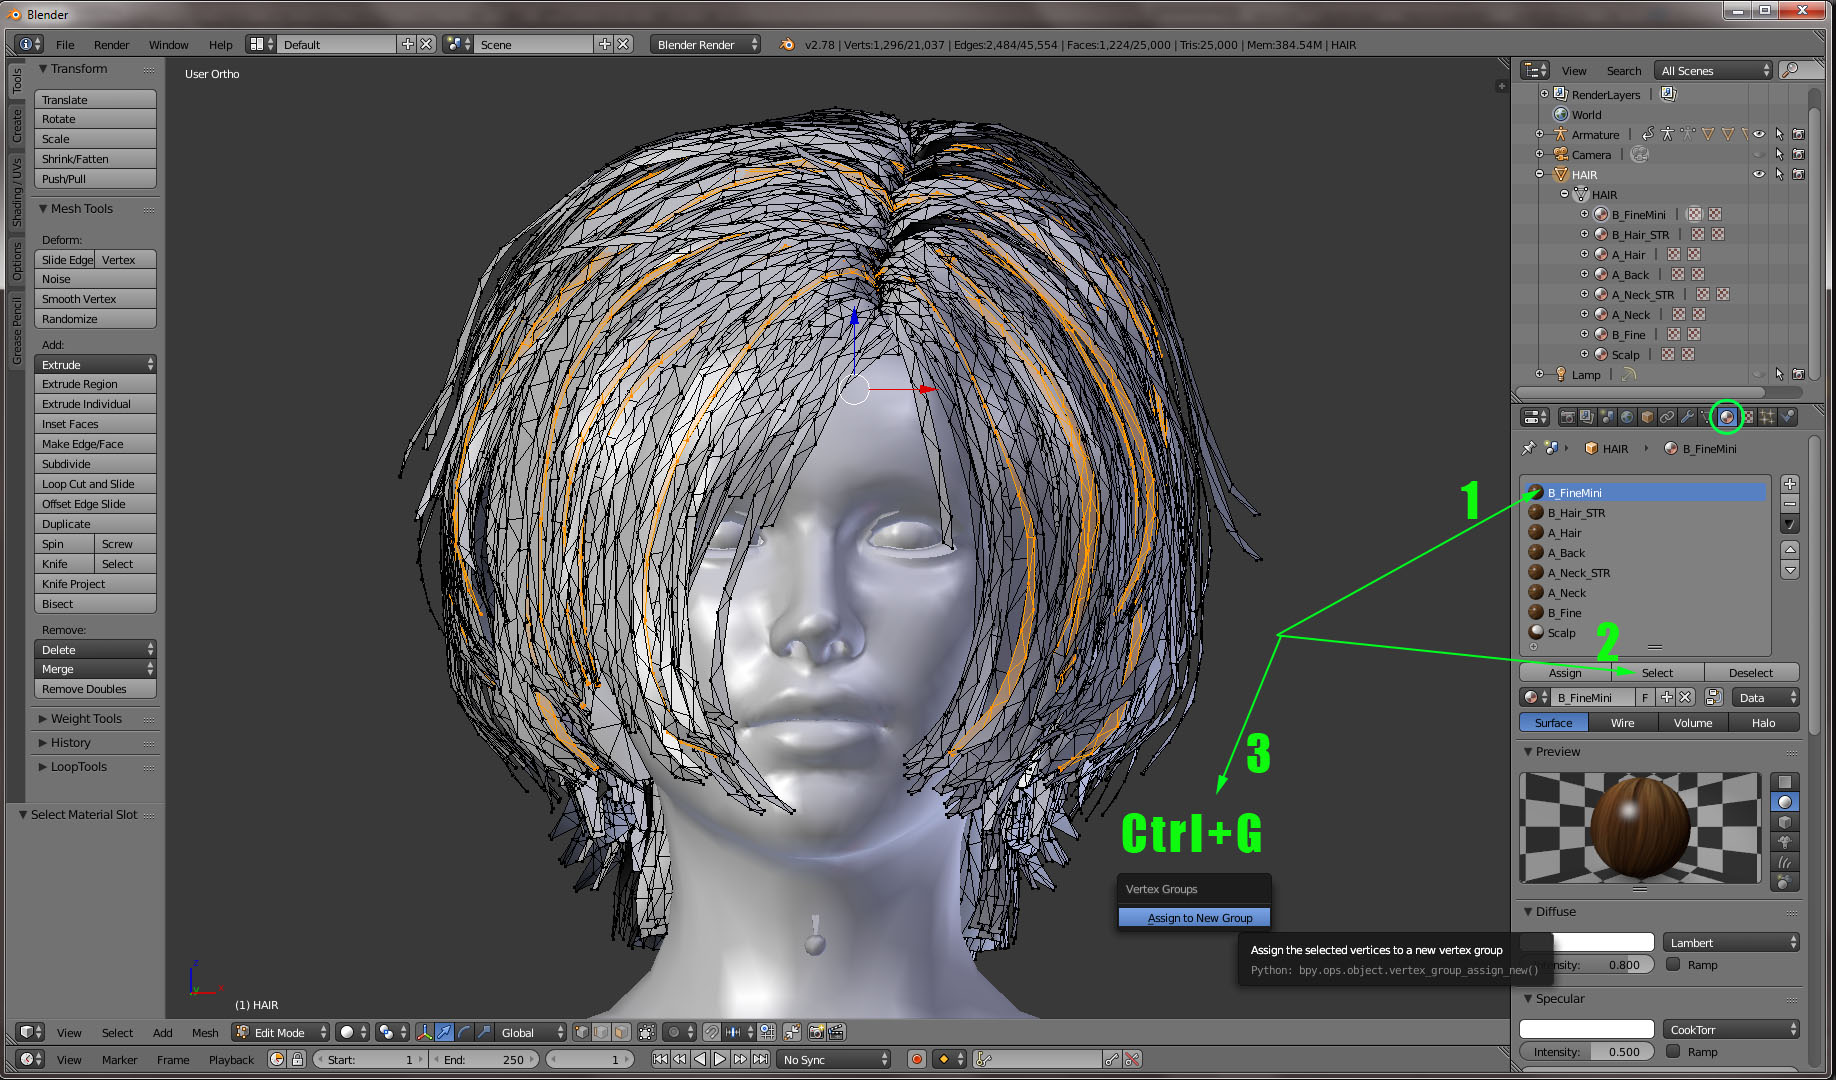
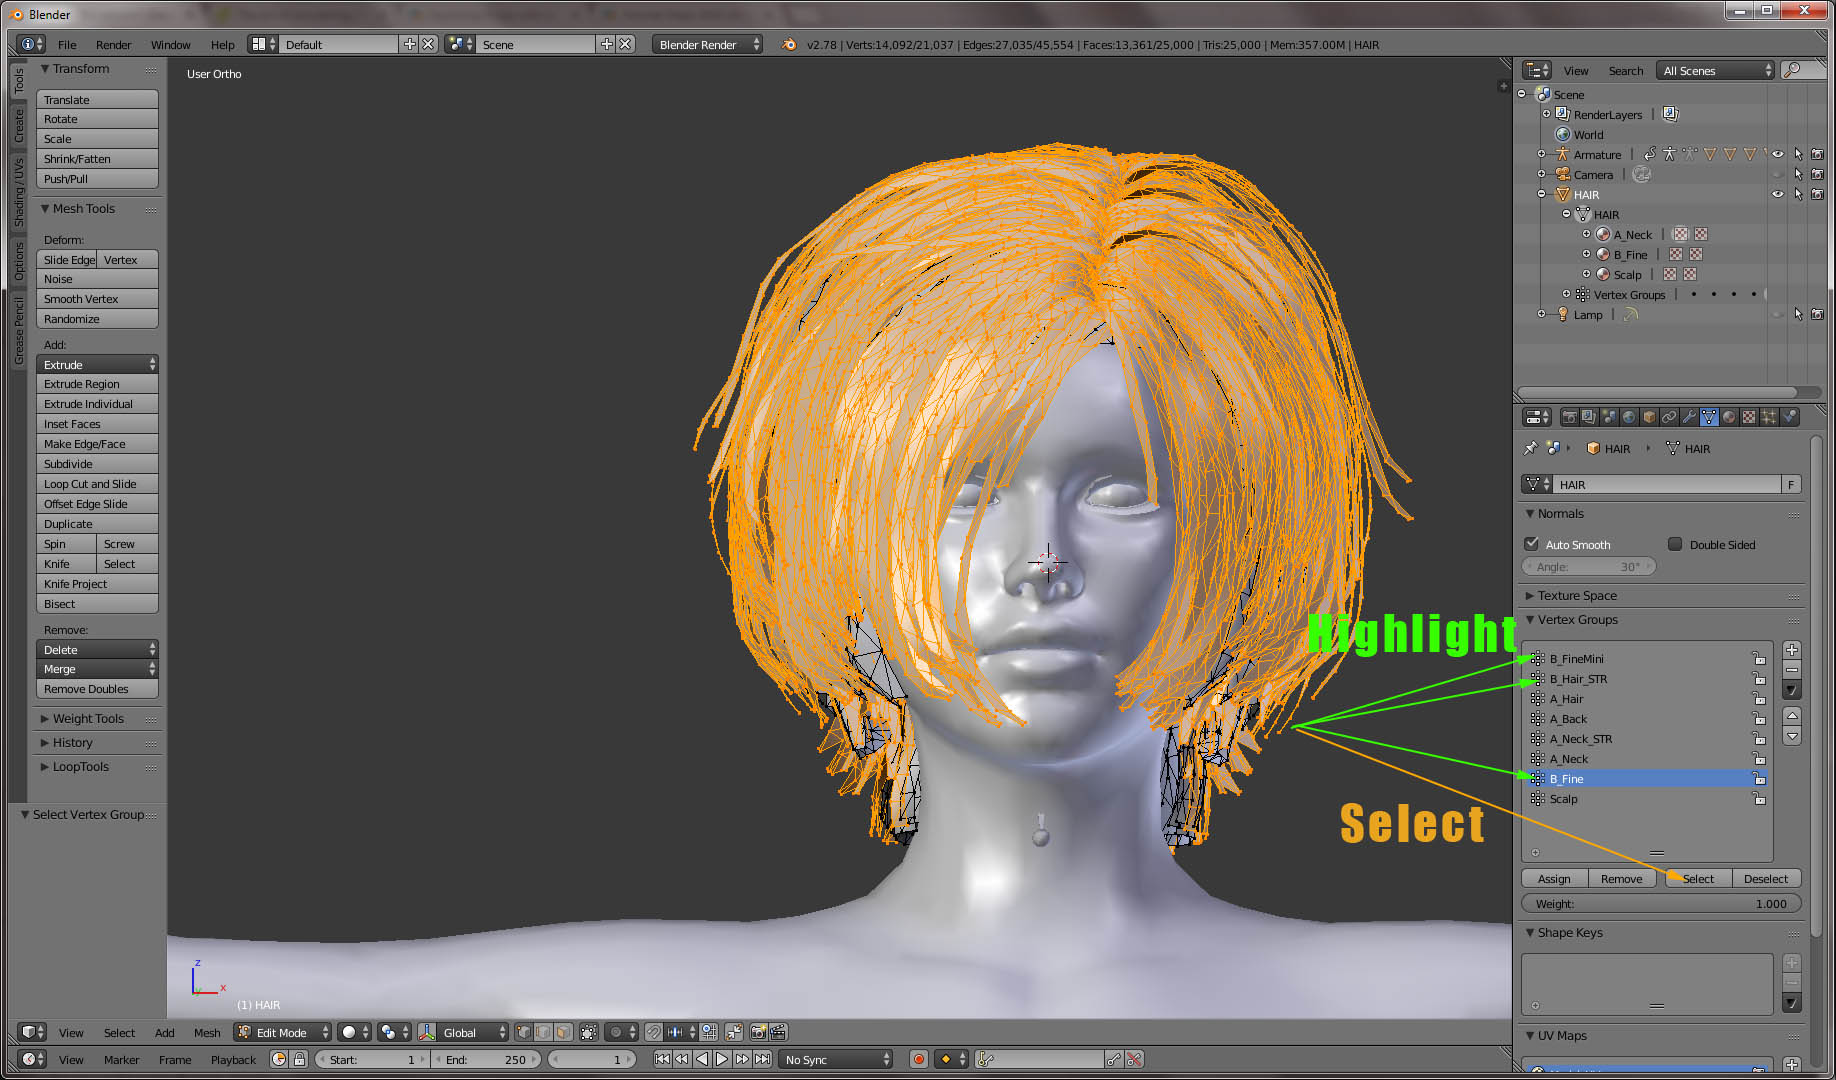
9. Before reducing number of materials, I prefer to save a current material-vertex reference as vertex groups.
This might be helpful in the future, when you need to identify a certain group of strands on a UV map.
So switch to Edit Mode. Make sure nothing is selected (hit A couple of times). Click on first material in the list, then click Select button.
All mesh strands associated with this material would be selected. Bring cursor to the stage, hit Ctrl+G and choose Assign to New Group.
Note: Save Blender project often. As any other software Blender crashes once in a while (though it has an excellent built-in last session and auto-save recovery tools)
|
|
By 4u2ges - 8 Years Ago
|
10. Now go to Data tab - the one that has an icon like a tris. You would see a newly created vertex group named... well... a "Group". Rename it to the originated material name.
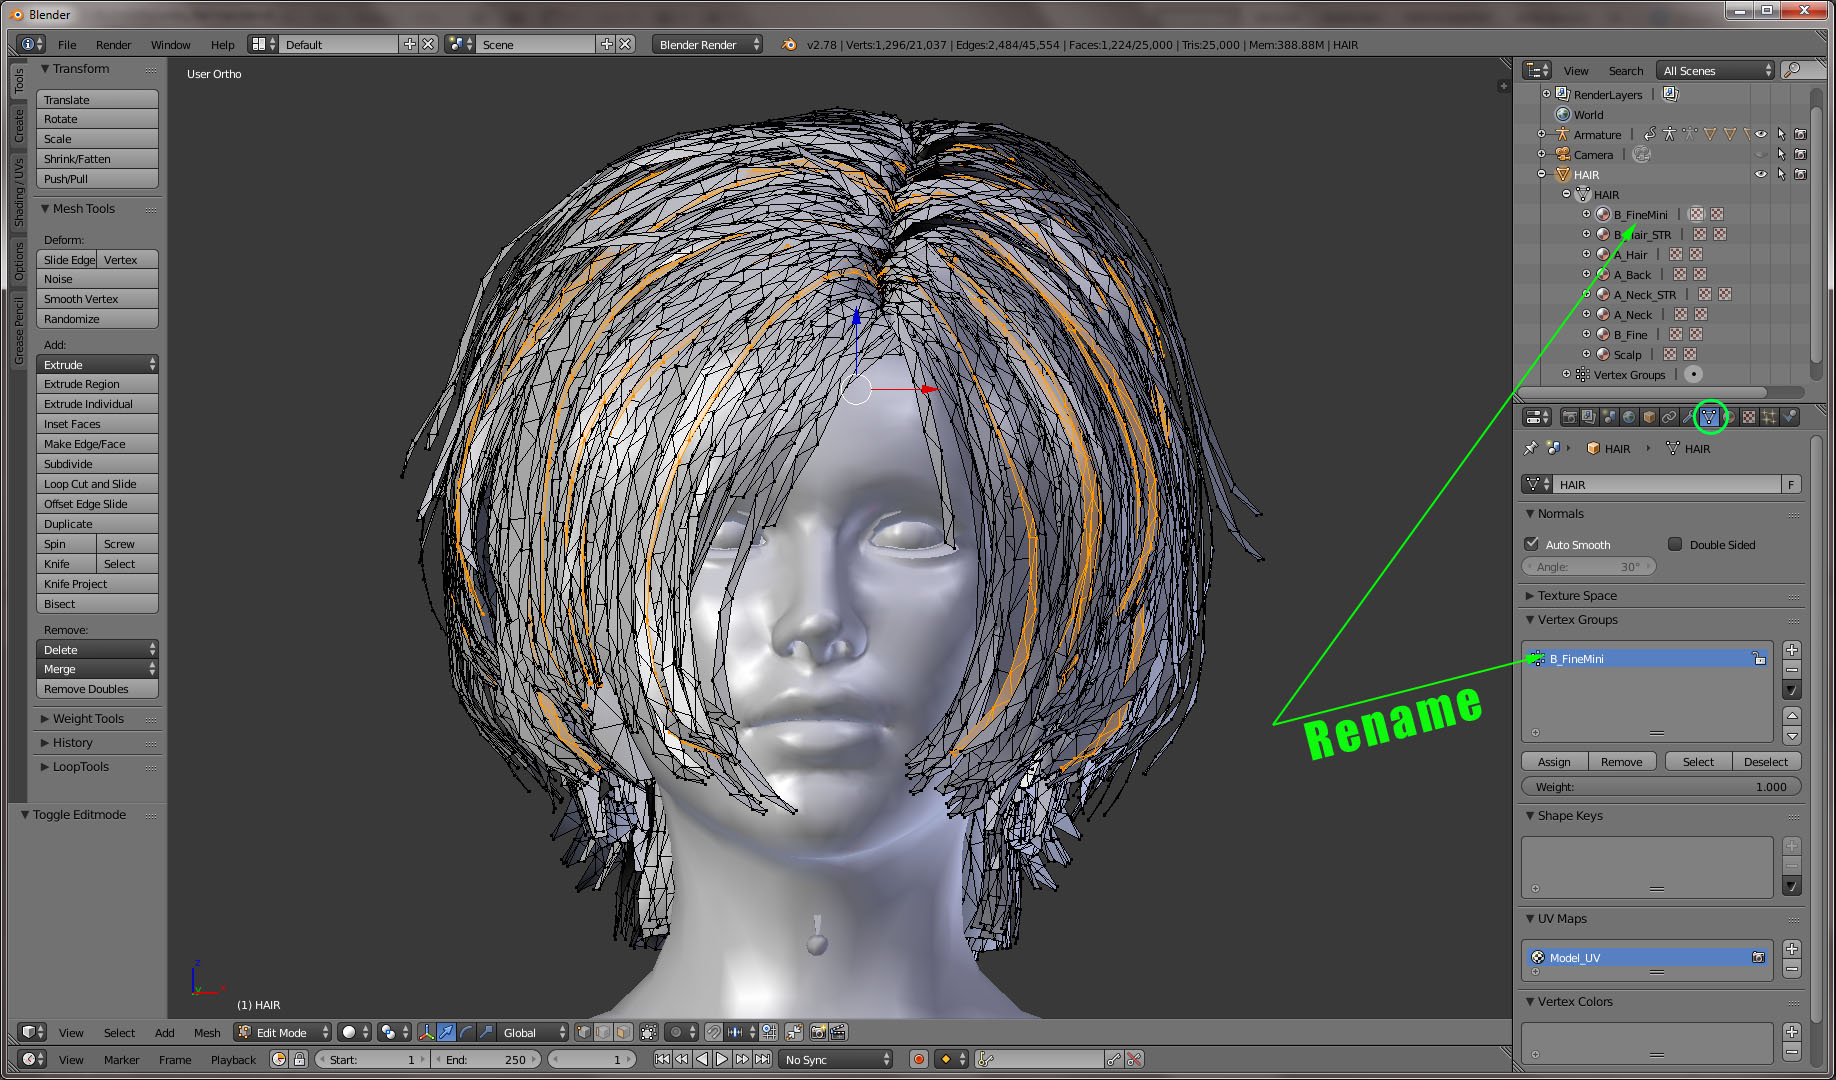
11. Do the same for the remaining materials - again, make sure nothing is selected, select next material, select corresponding vertices, assign to new group based on selection and rename the group.
At the end you should have something like pictured on a screenshot below (based on hair materials you had).
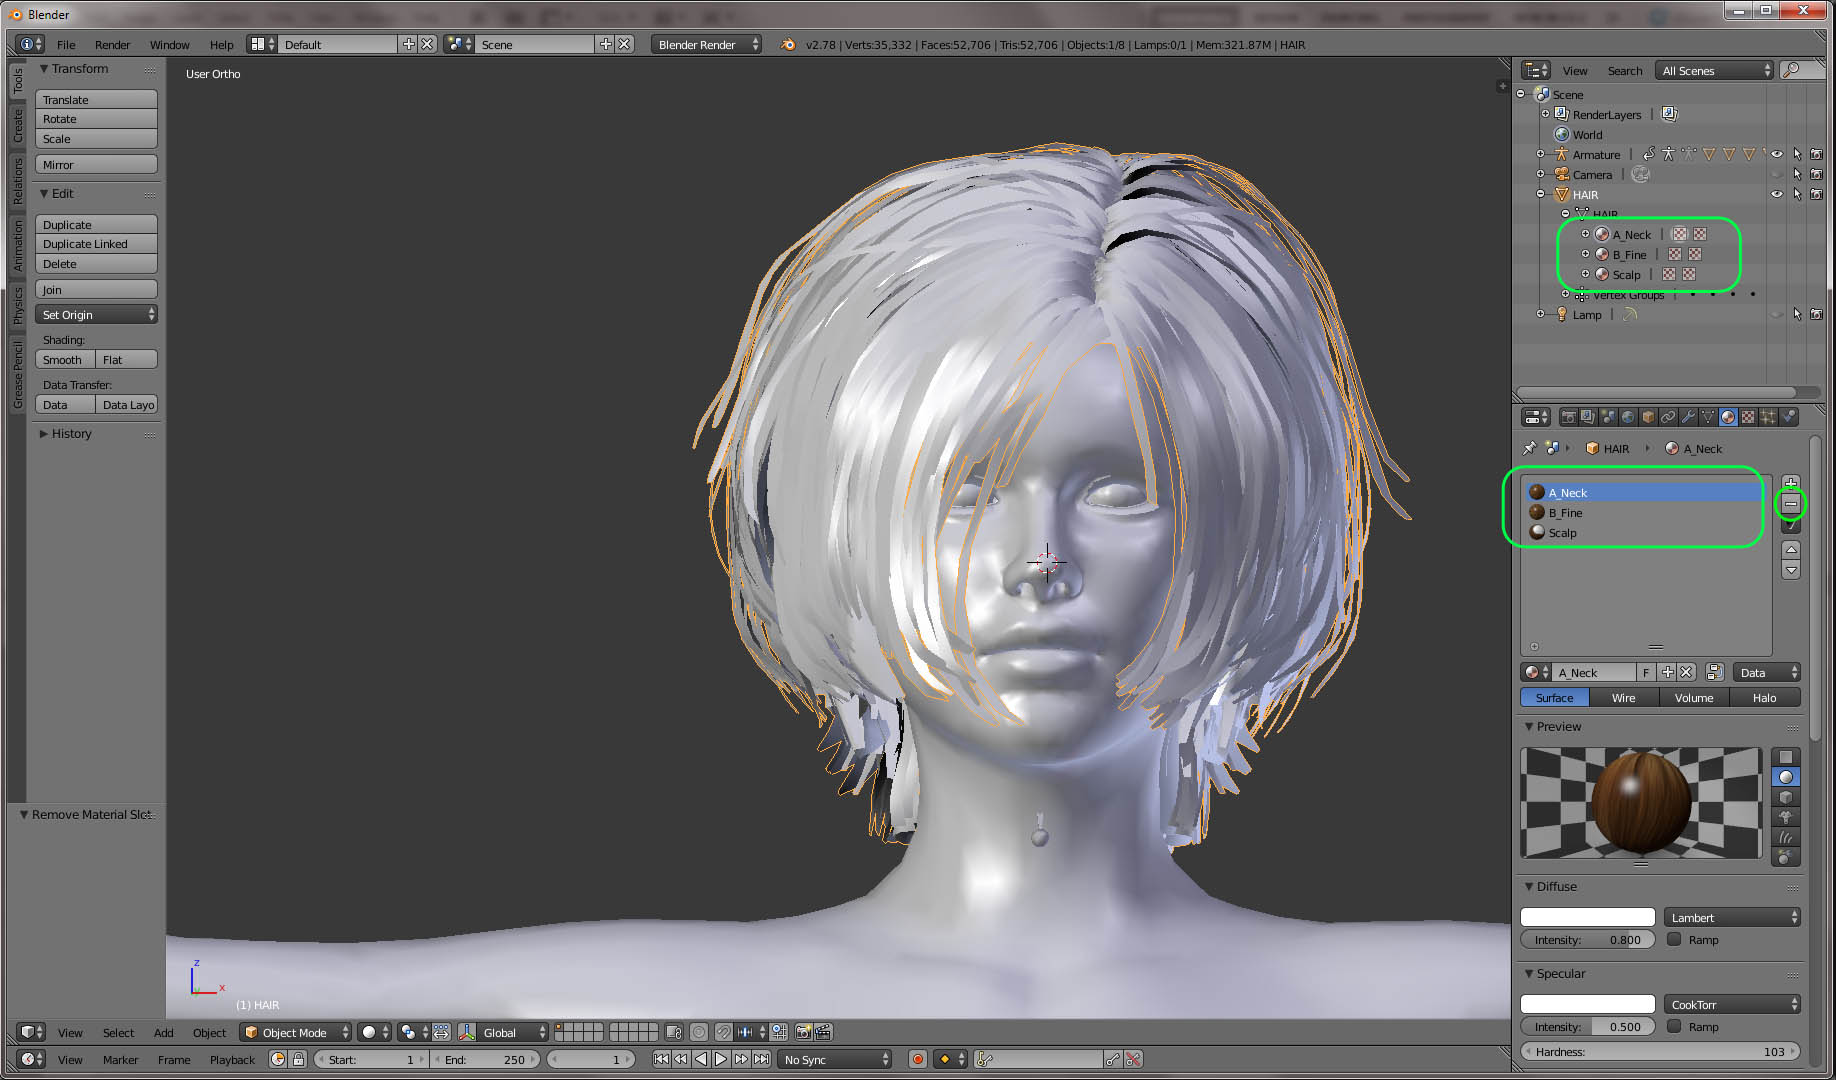
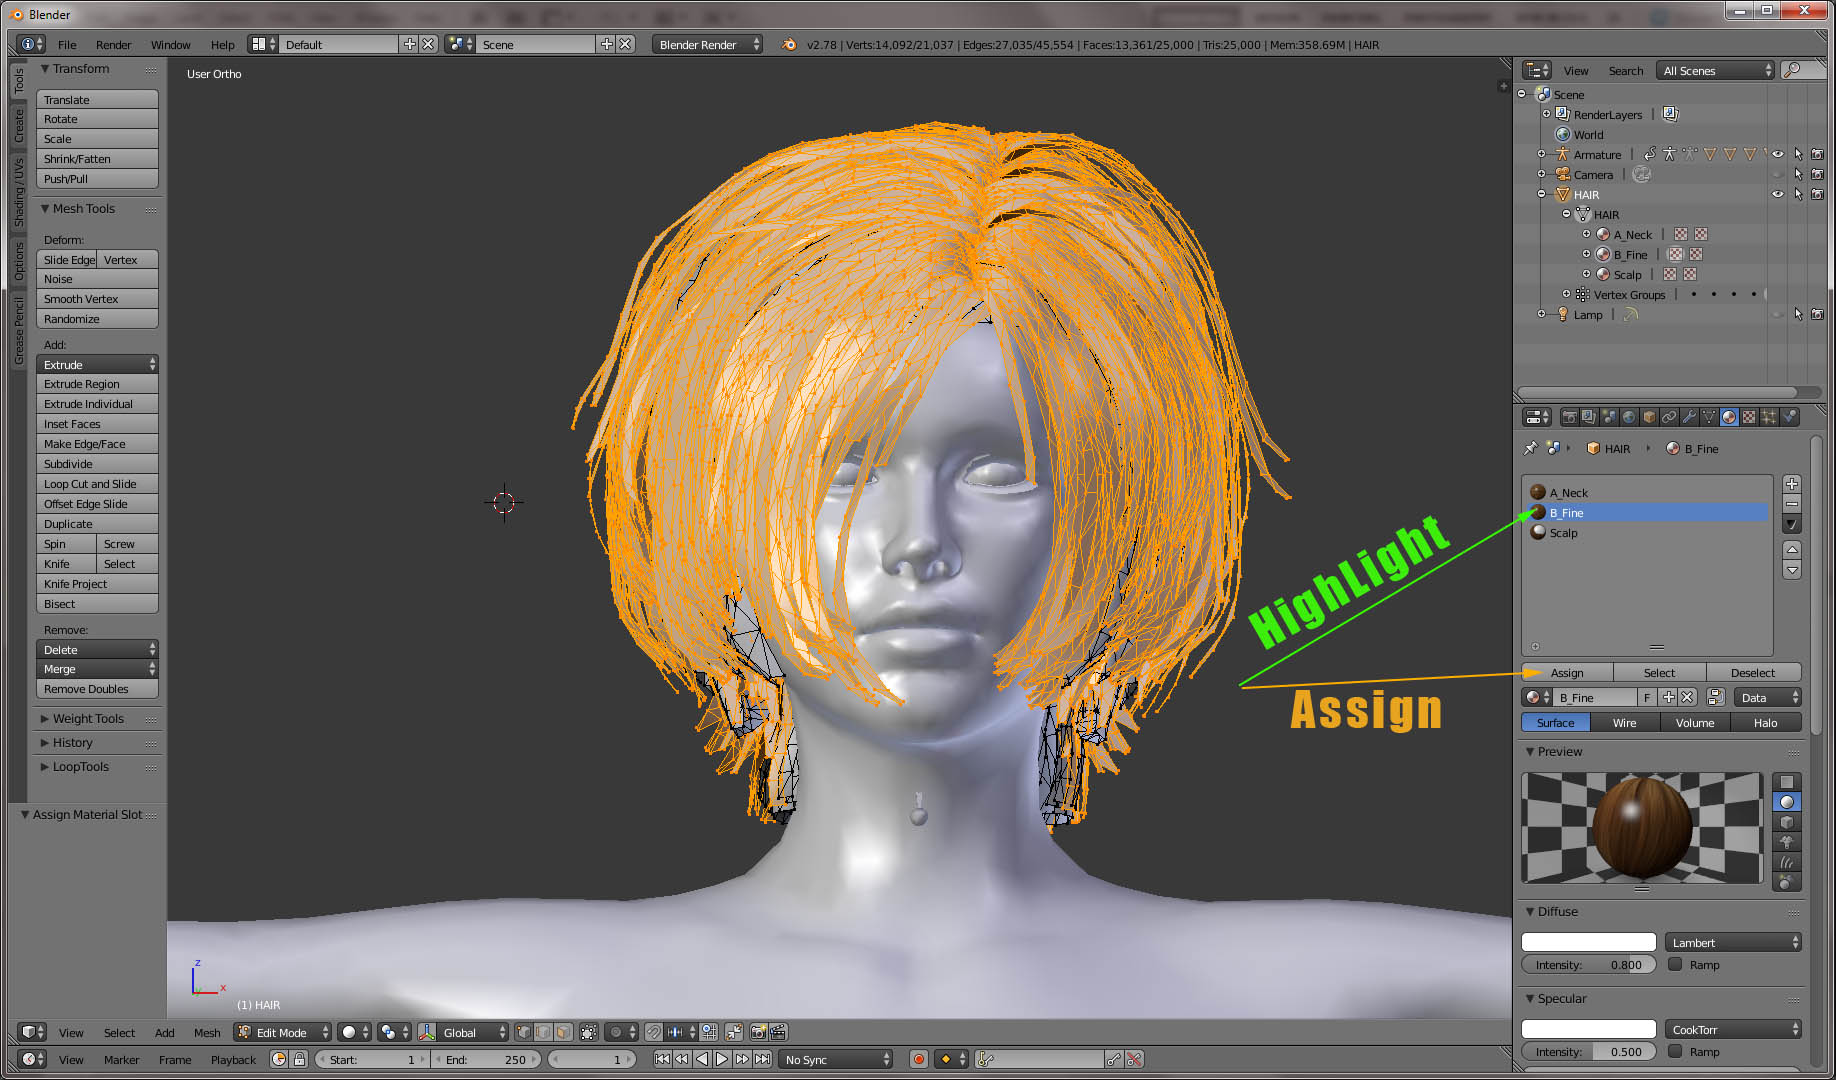
12. Delete materials and leave just one for each kind (you should have identified them in step 8).
In my case I left one material those name started with A, one with B and a Scalp (use minus on the right to remove a material.)
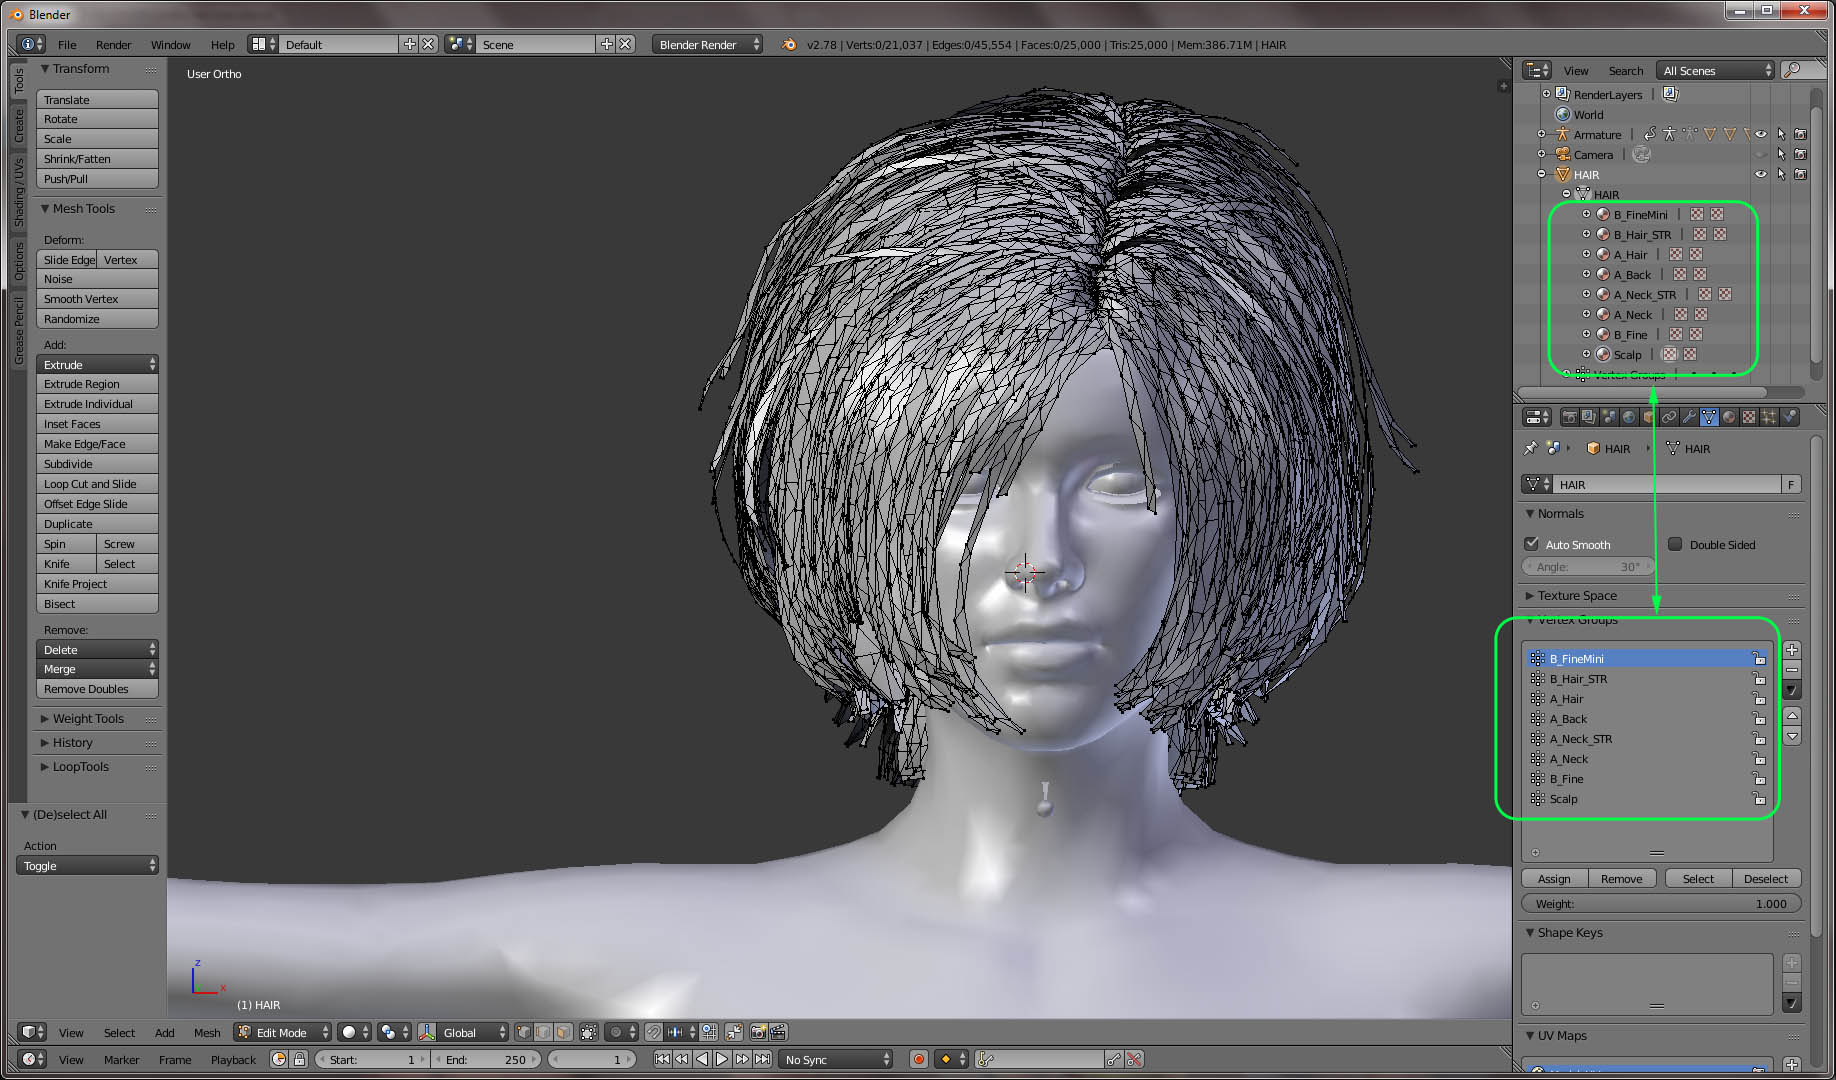
13. But we do not know what happened to the mesh that deleted materials were assigned to... and we do not want to know. We are going to reassign all!
Go back to Data tab. Make sure no vertices are selected. Select groups that had the same types of texture map assigned.
In my case I started with B type. Select each B type group and then click Select button. Unfortunately there is no way to select more than one group at a time.
So it has to be done one by one. At the end you should have selected all vertices assigned to all type B groups.
14. Back to Materials tab. Select corresponding B type material and click Assign button.... Done!
Now back to step 13 and do the same for the A type groups and assign A type material to selected A vertices.
Note: again this is just my case, where hair developer was smart enough to use a proper naming convention (A and B type).
You might have materials named totally different but they would have the same texture maps assigned. Just need to make notes identifying the same type.
Be careful, it is easy to mess thing up to the point where you would need to start over. Do not rely on Ctrl+Z (not related to forum user Ctrl+Z :) ).
Going back to object mode and hitting Ctrl+Z would wipe out all the work done while being in Edit Mode!
Once finished with materials, you may rename them. I did rename A type to HAIR_INNER and B to HAIR_OUTER (relative to mesh location). I left the SCALP mesh/material alone as it is unique.
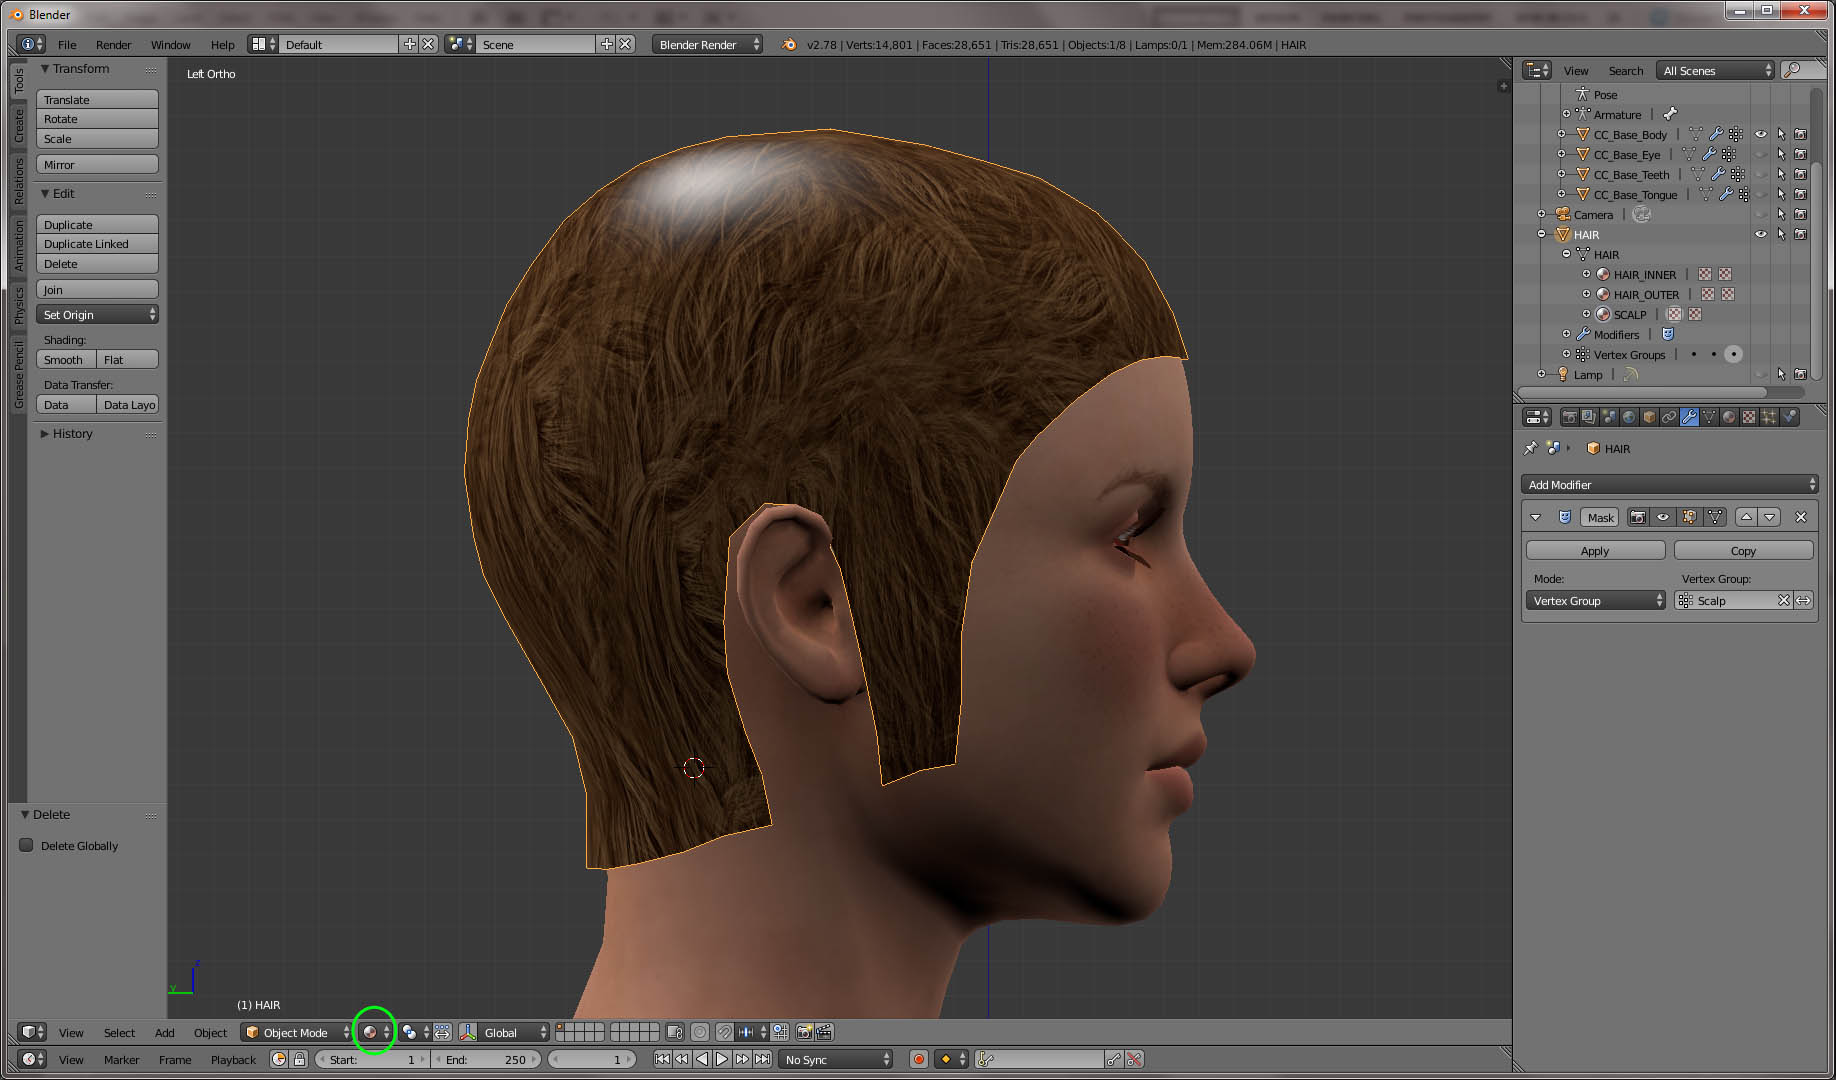
15. Lets work with the mesh now. Firstly, we need to properly align and shape the base/scalp mesh.
It is hard to do while the main hair strands are visible. We need to hide them.
I use a Mask modifier for that. Apply it to the hair.
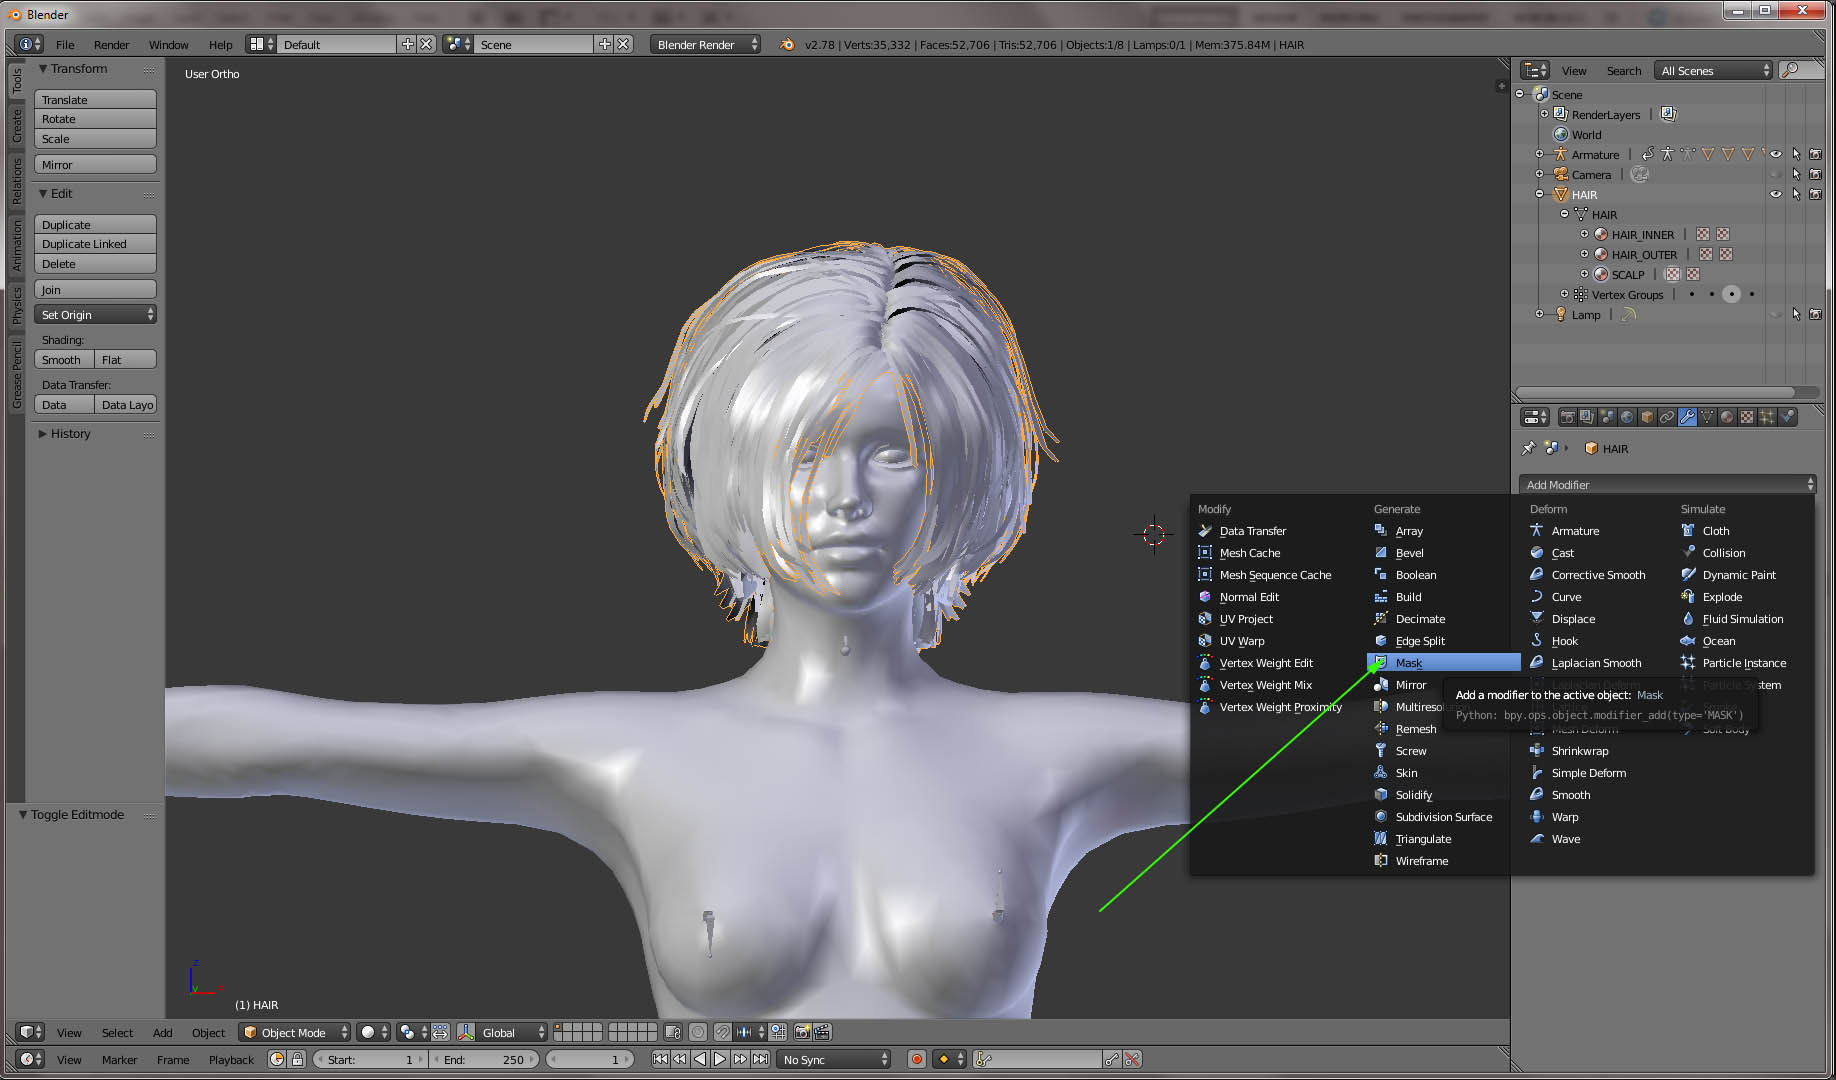
16. Within modifier, make sure to select all 3 indicated buttons (to ensure modifier is in effect in Object and Edit Modes).
Within Vertex group drop-down select Scalp/ Base group. So that only scalp mesh is visible.
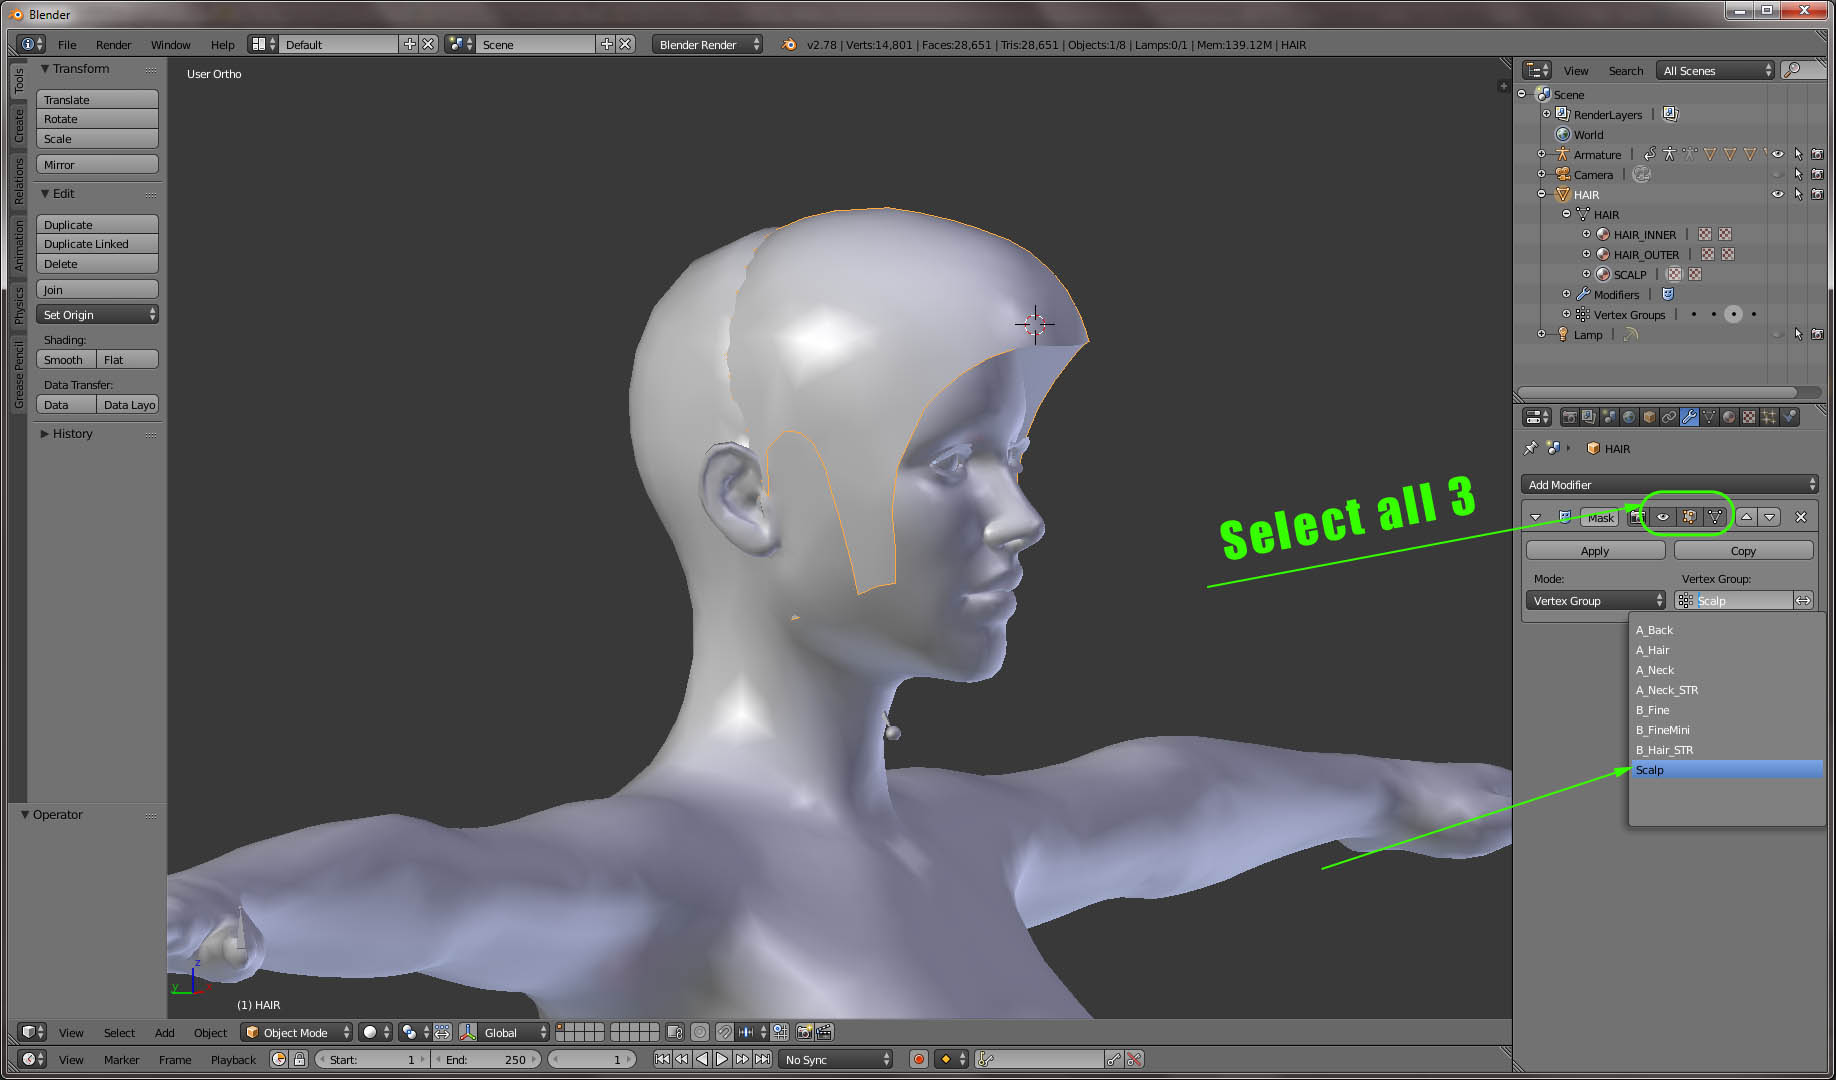
17. In Object mode transform scalp (although hair mesh is hidden, it would still follow) for the best possible fit (moving and scaling is usually enough). Use display switch for a better view. I selected a Material display here.
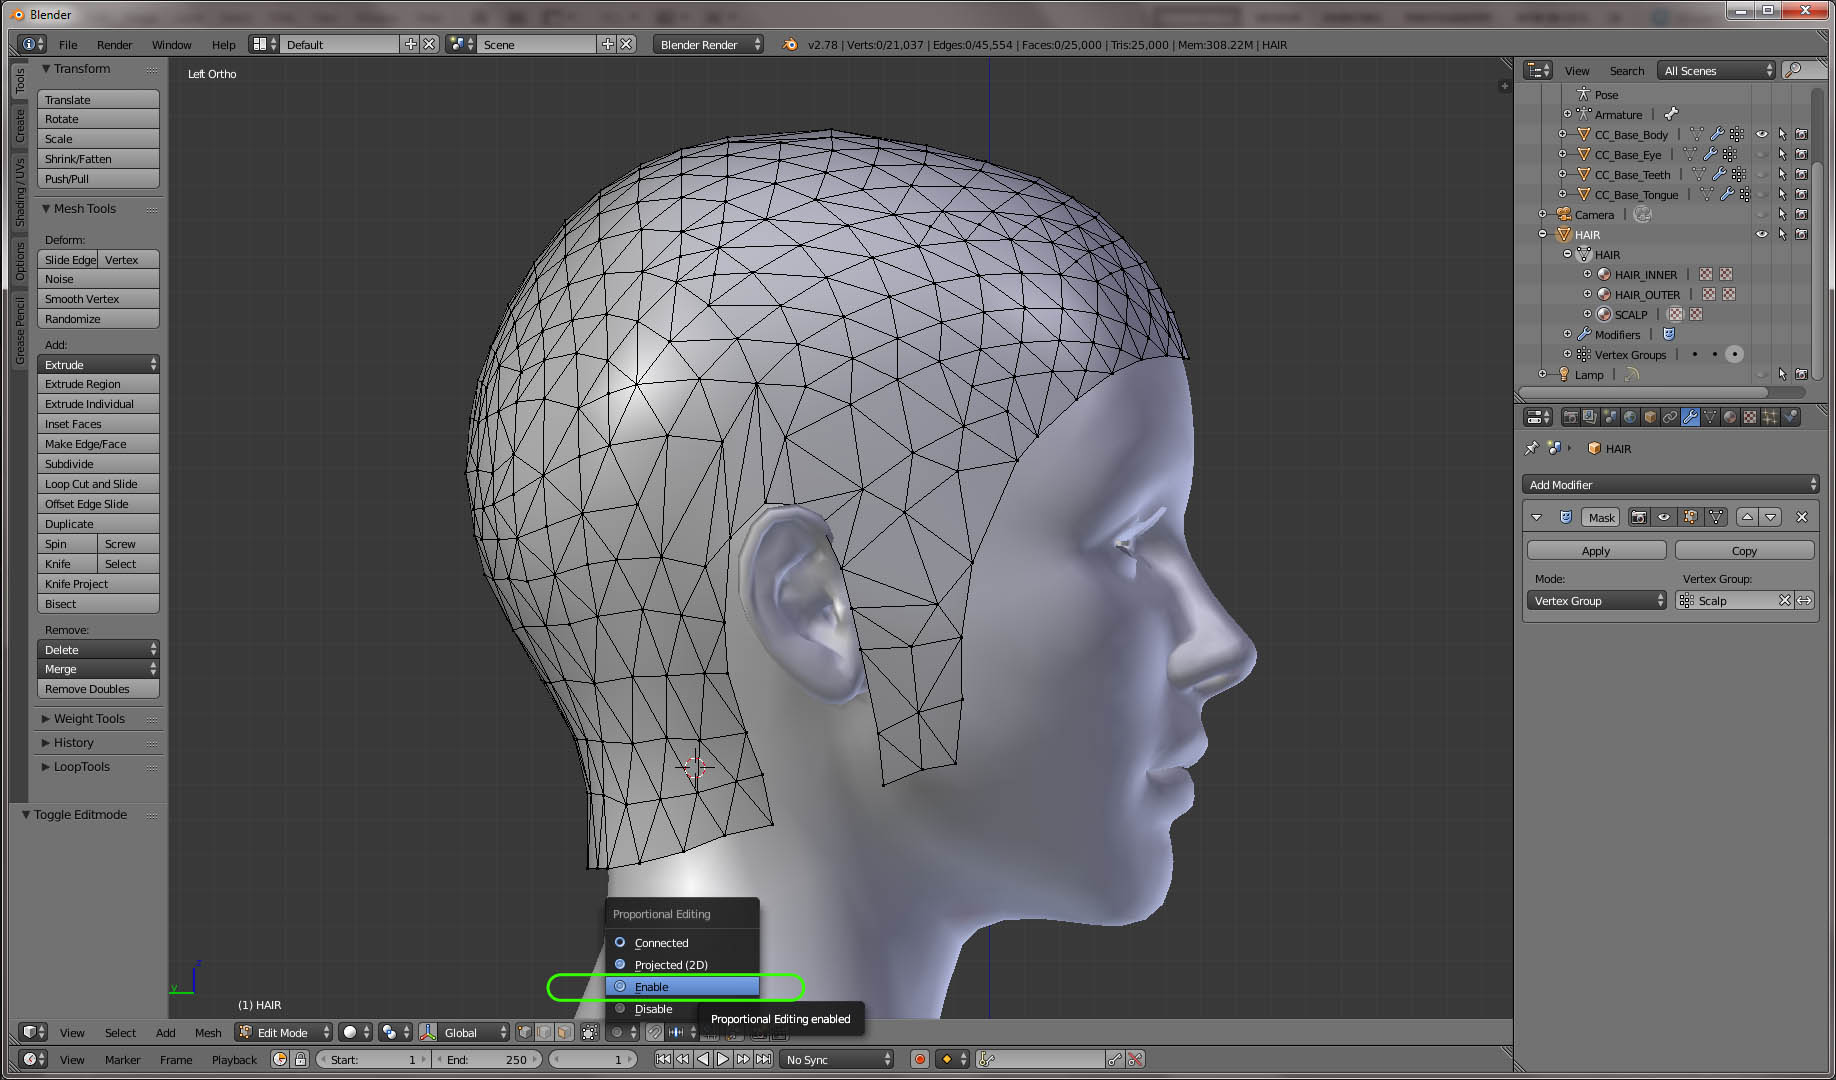
18. Back to Edit Mode. Make sure to enable Proportional Editing. Even if you manage to tweak the scalp mesh without Proportional Editing turned on,
the hidden hair mesh would not follow and would stuck way above the scalp mesh, or would go through the scalp mesh (depending which way you are working with the scalp mesh).
So basically you need to work a little further to bring a scalp mesh as close to the head as possible, without stretching it too much.
Thought it might not make a lot of difference since scalp mesh would be barely visible, in my case at least.
As I mentioned in Prerequisites, you would need some experience working with mesh in Edit mode.
To be continued in a few...
|
|
By 4u2ges - 8 Years Ago
|
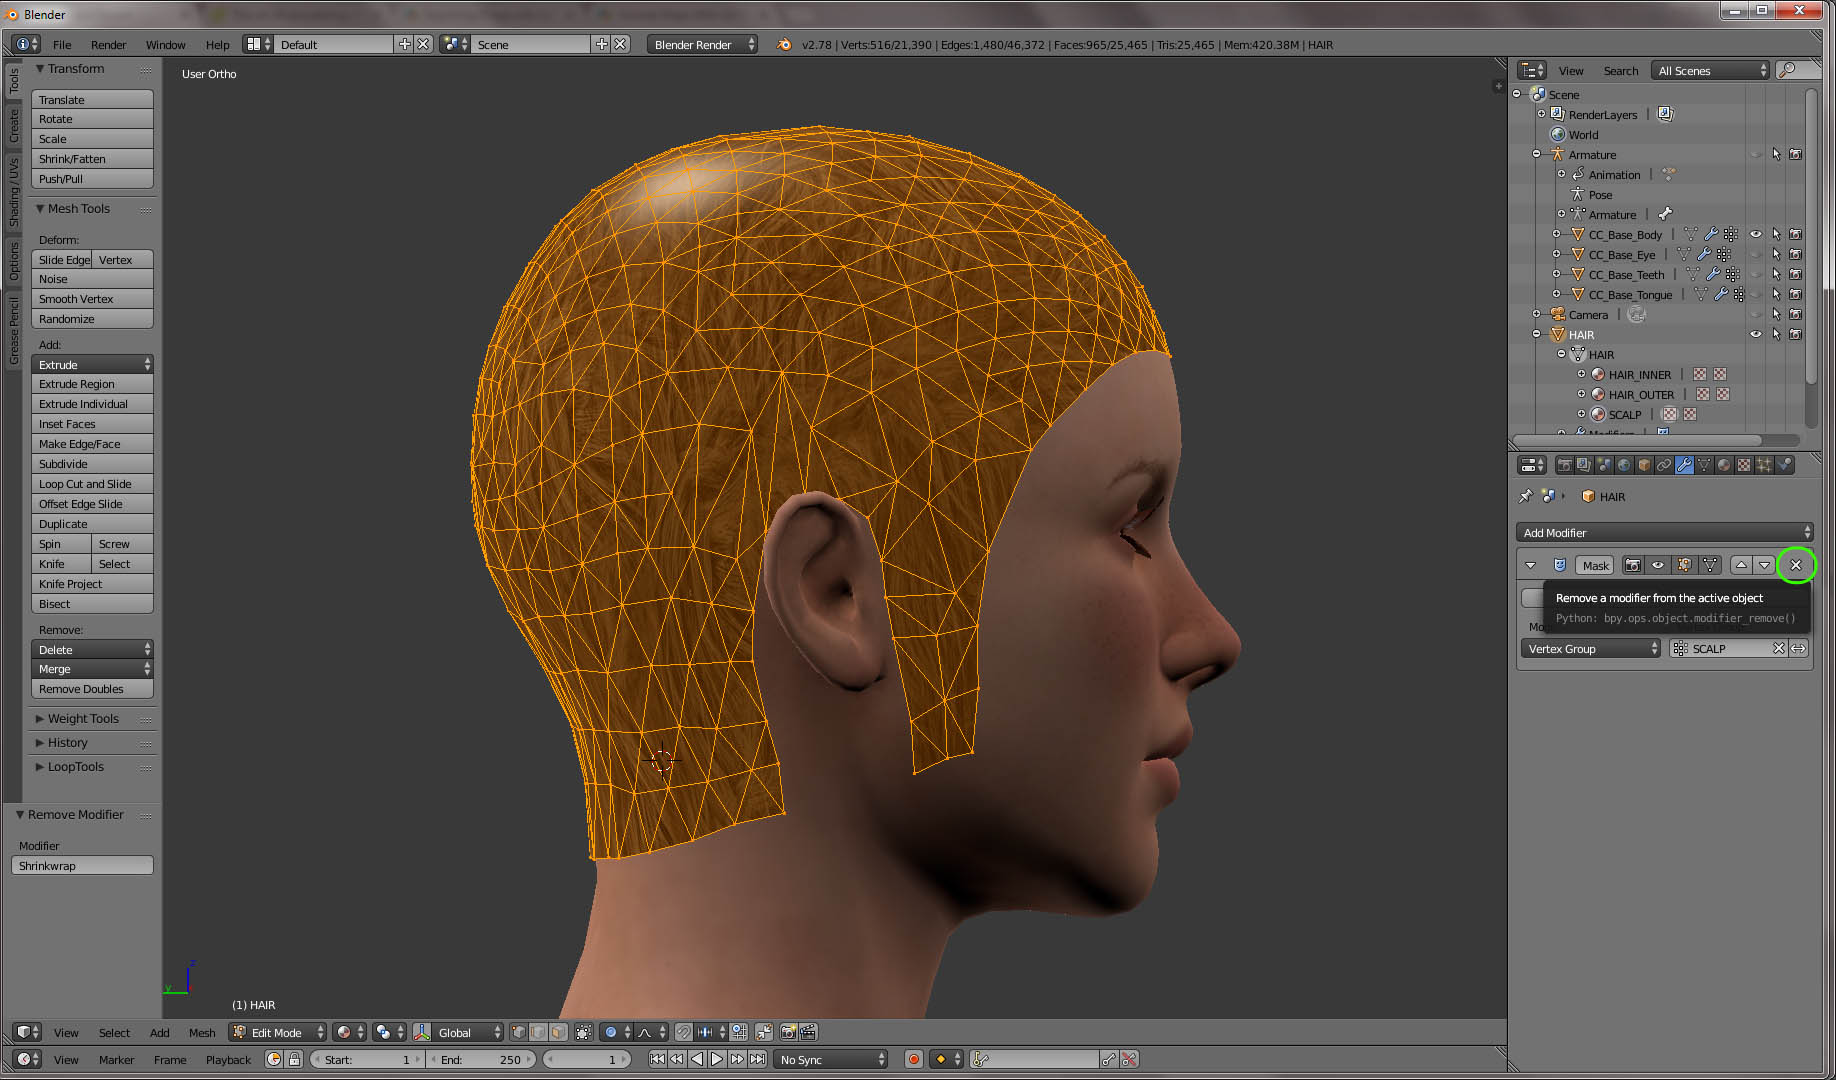
19. So here I am, done with the scalp mesh and can effectively remove Mask modifier.
Note: It would have been lot easier to tweak scalp mesh by using a Shrinkwrap modifier (selecting target as CC_Body ) applied after Mask modifier.
However, again the hair mesh would not follow and would need to be worked on after Mask modifier removed. So I prefer to tweak scalp mesh manually.
20. At this point you should have a perfectly aligned hair mesh. In some cases you might wish to work the hair mesh further - refining /reshaping it. Feel free to do so - a matter of preference.
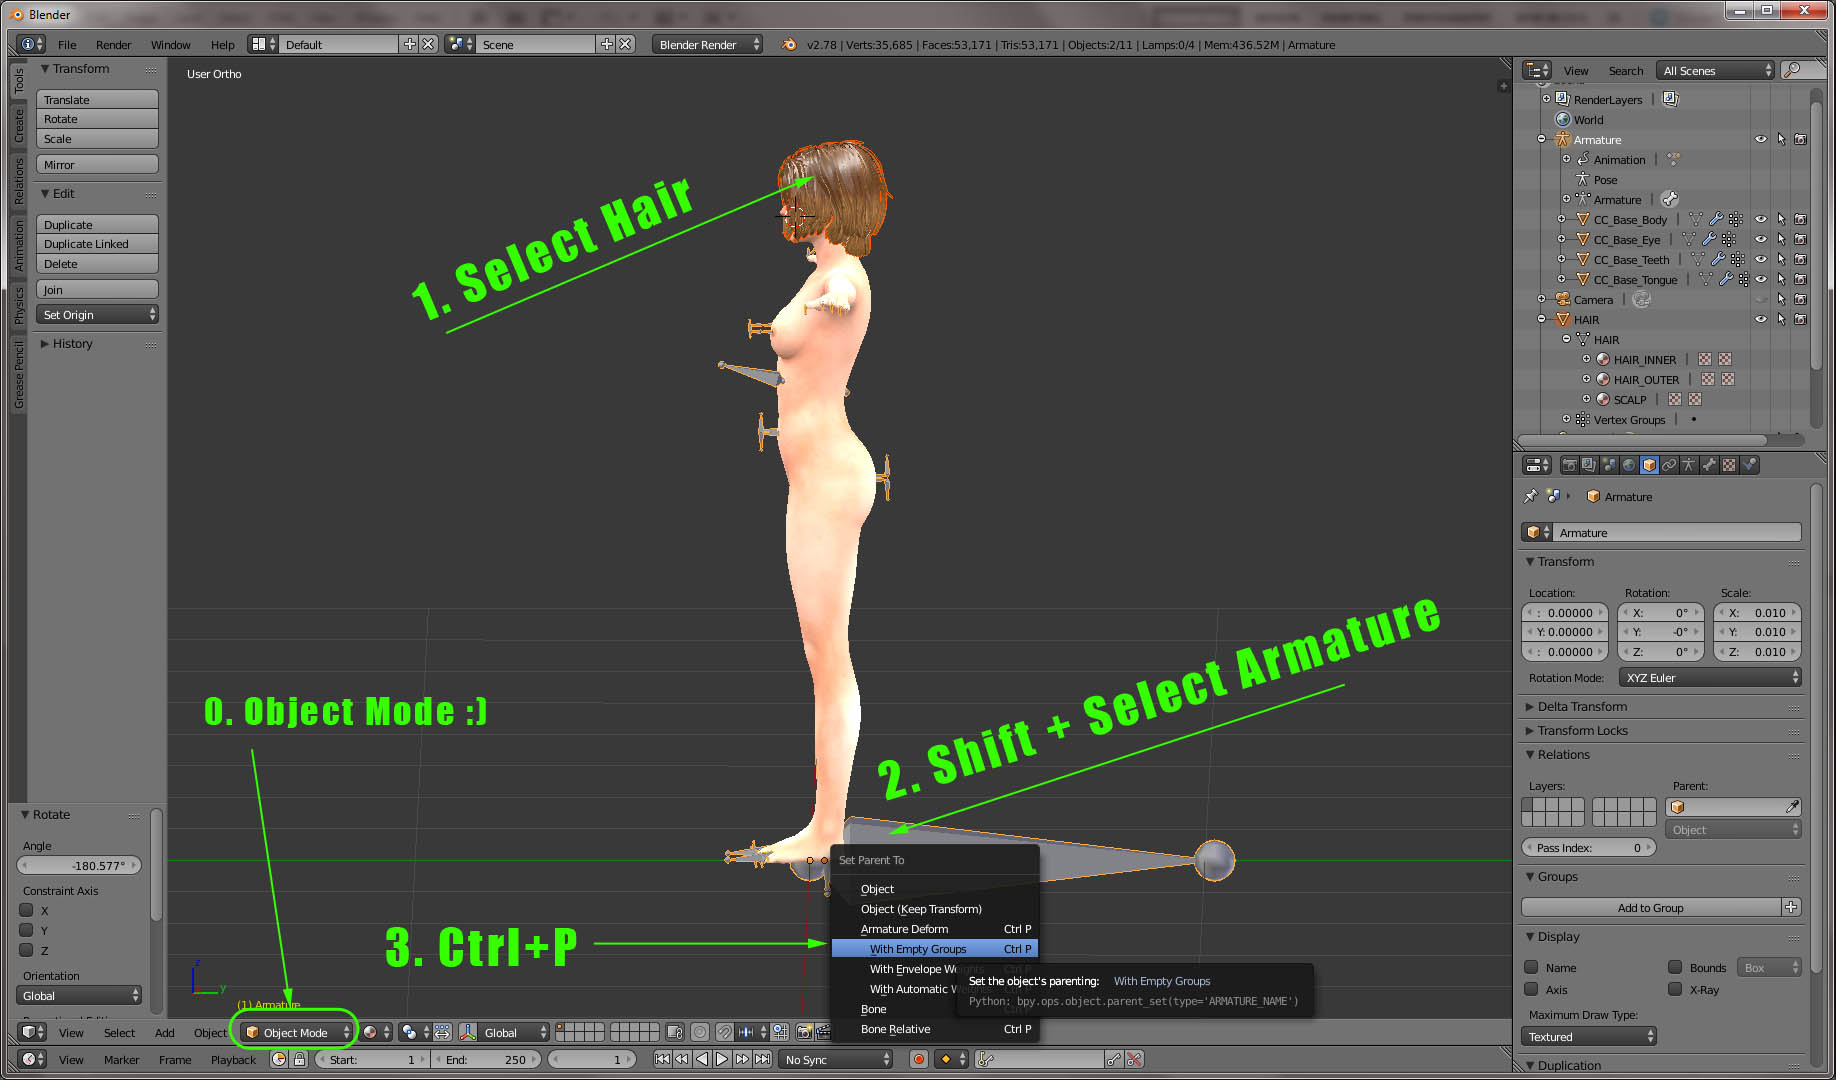
The remaining steps in Blender are well known and described in many tutorials. I'll just reiterate once more.
Attach a Hair to Armature.
In Object mode, Select Hair, Shift + Select Armature, Ctrl+P > With Empty Groups.
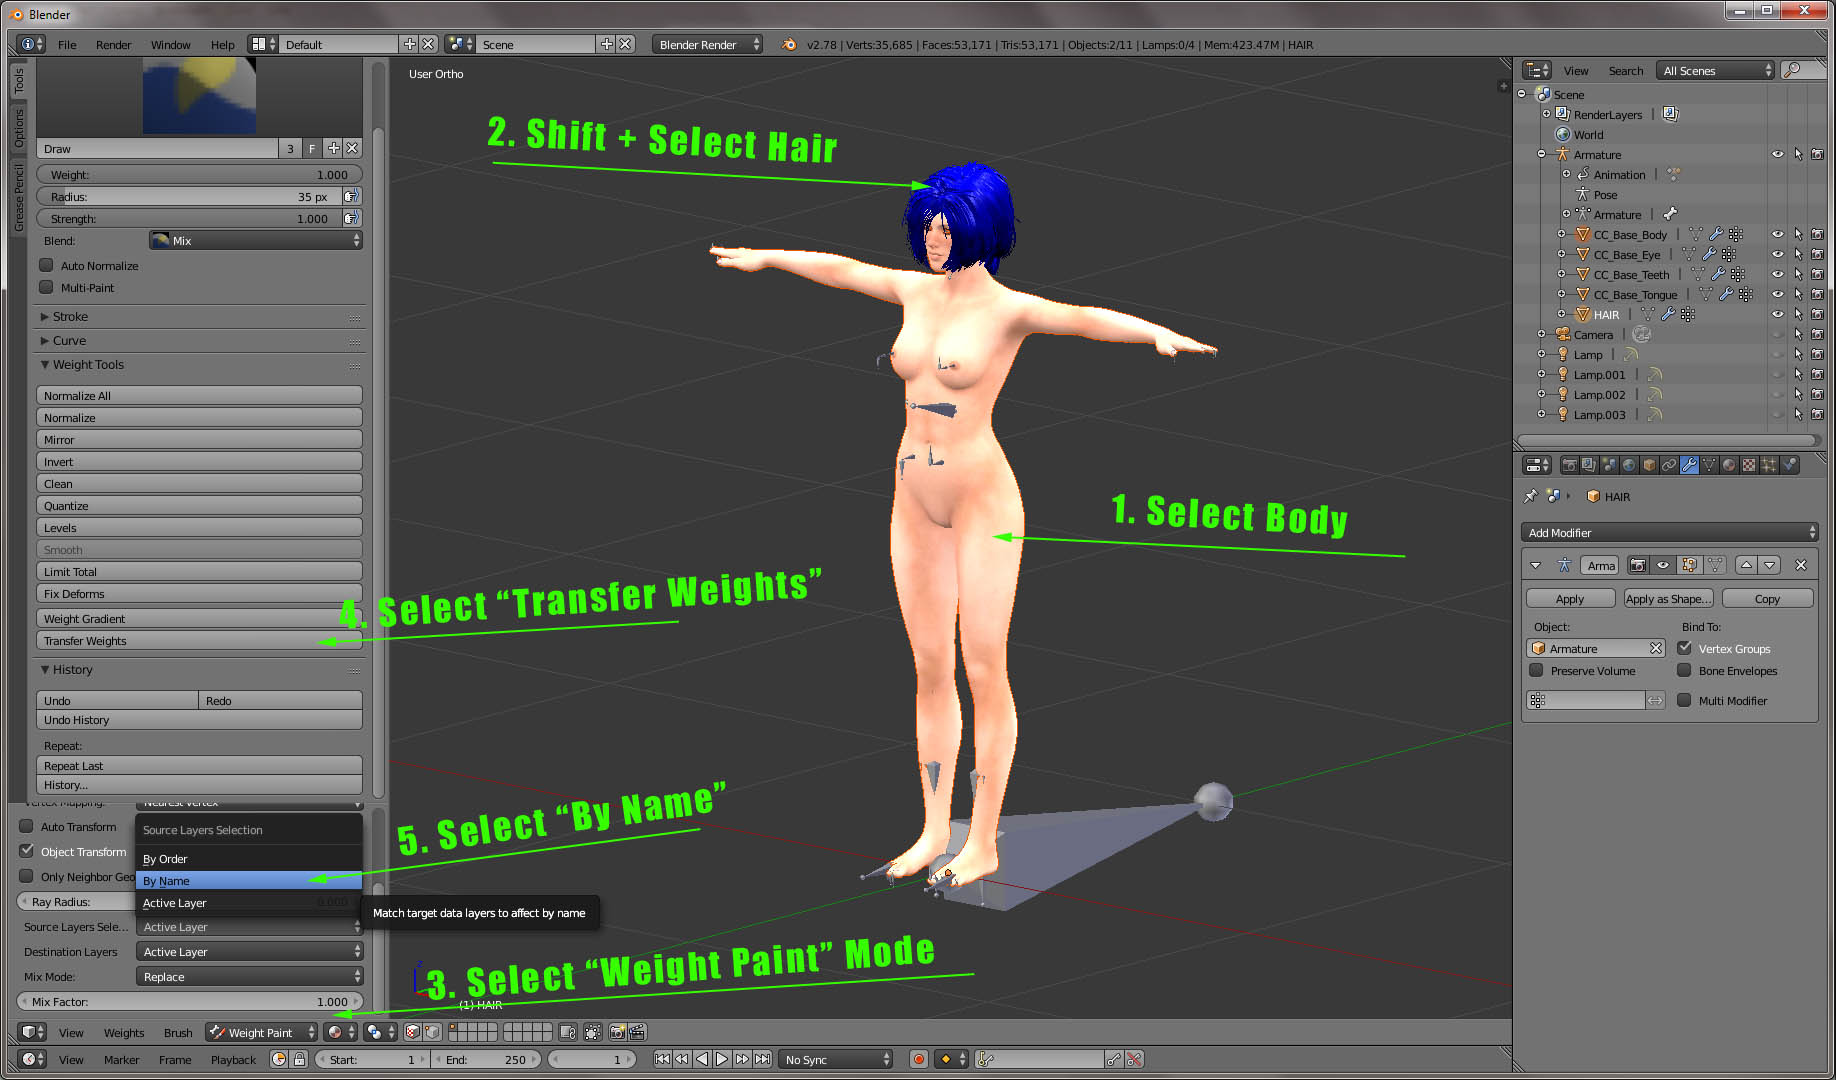
21. Transferring Weights
Select Body, Shift + Select Hair, Select Weight Paint Mode, click Transfer Weights button, in Source Layers... choose By Name.
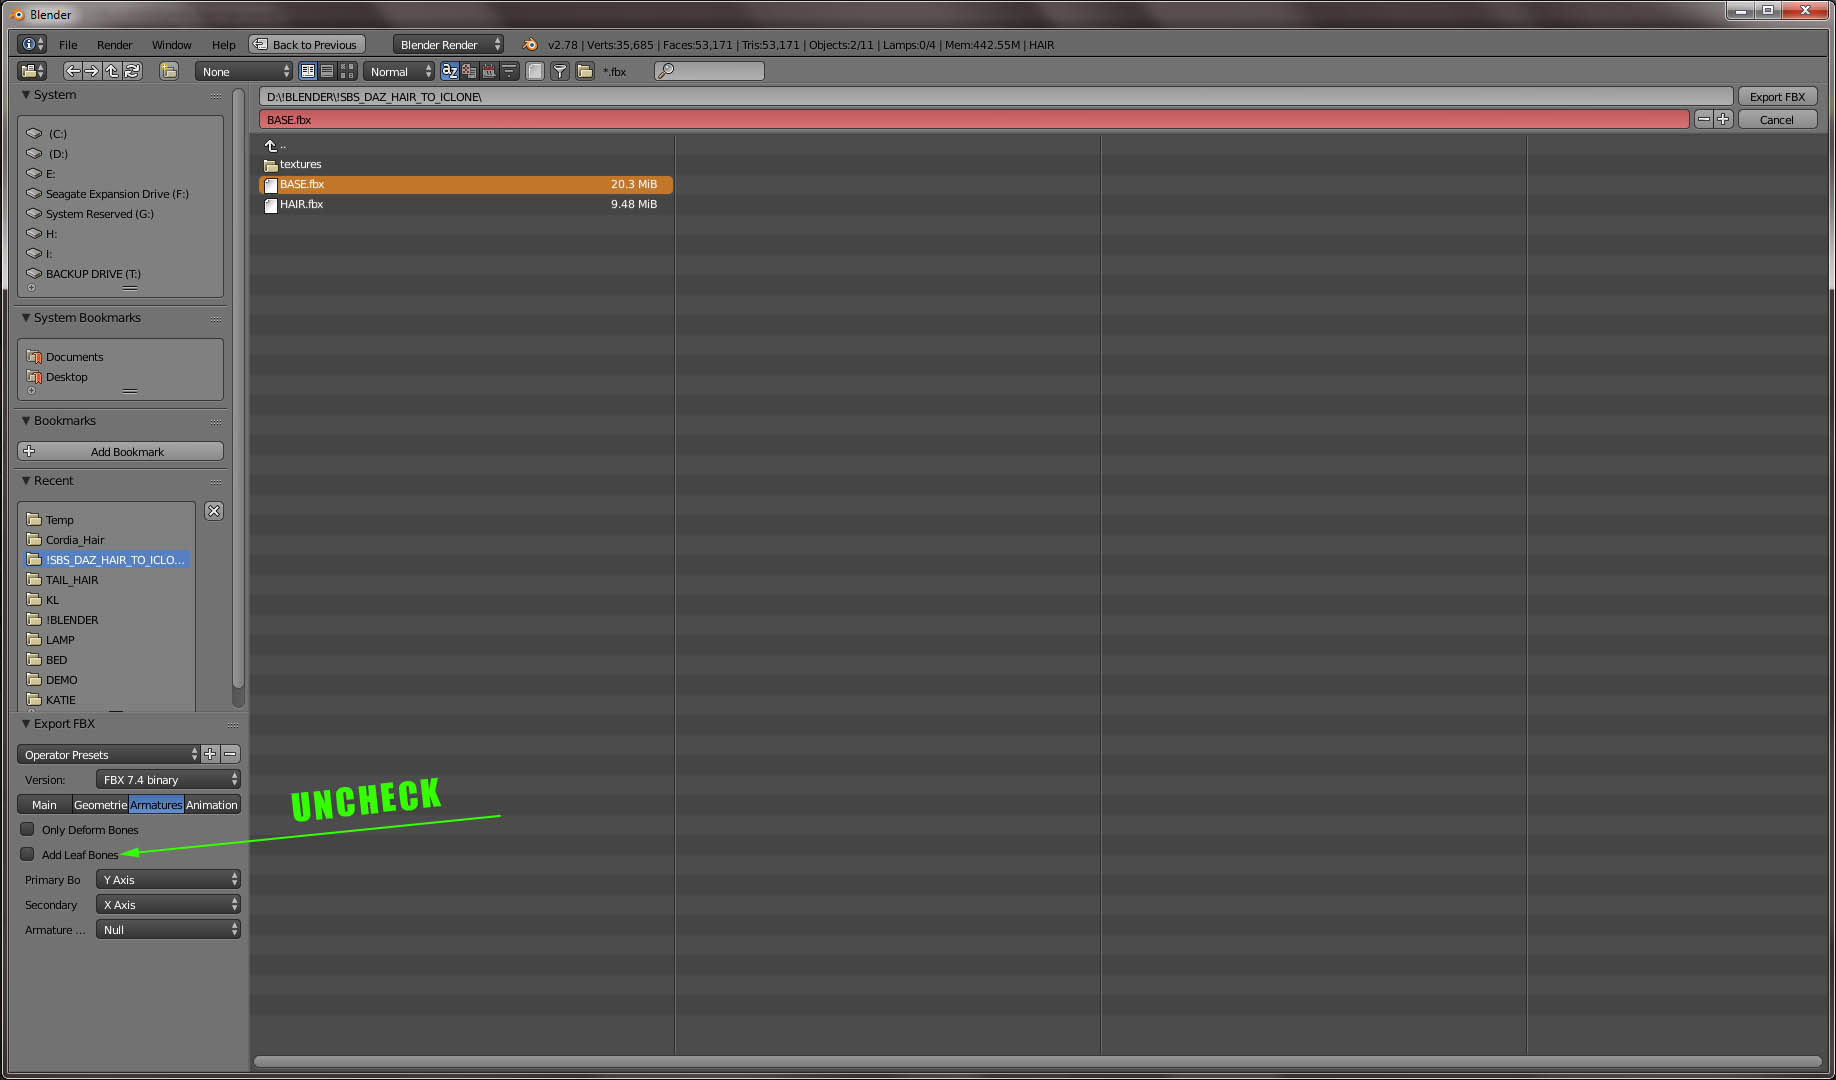
22. Export to FBX. If you are too lazy (as I am) for an extra step selecting an FBX key, override a base model initially exported from CC.
Oh yeah.. do not forget to uncheck Add Leaf Bones in Armature tab (there should be a way to make it default).
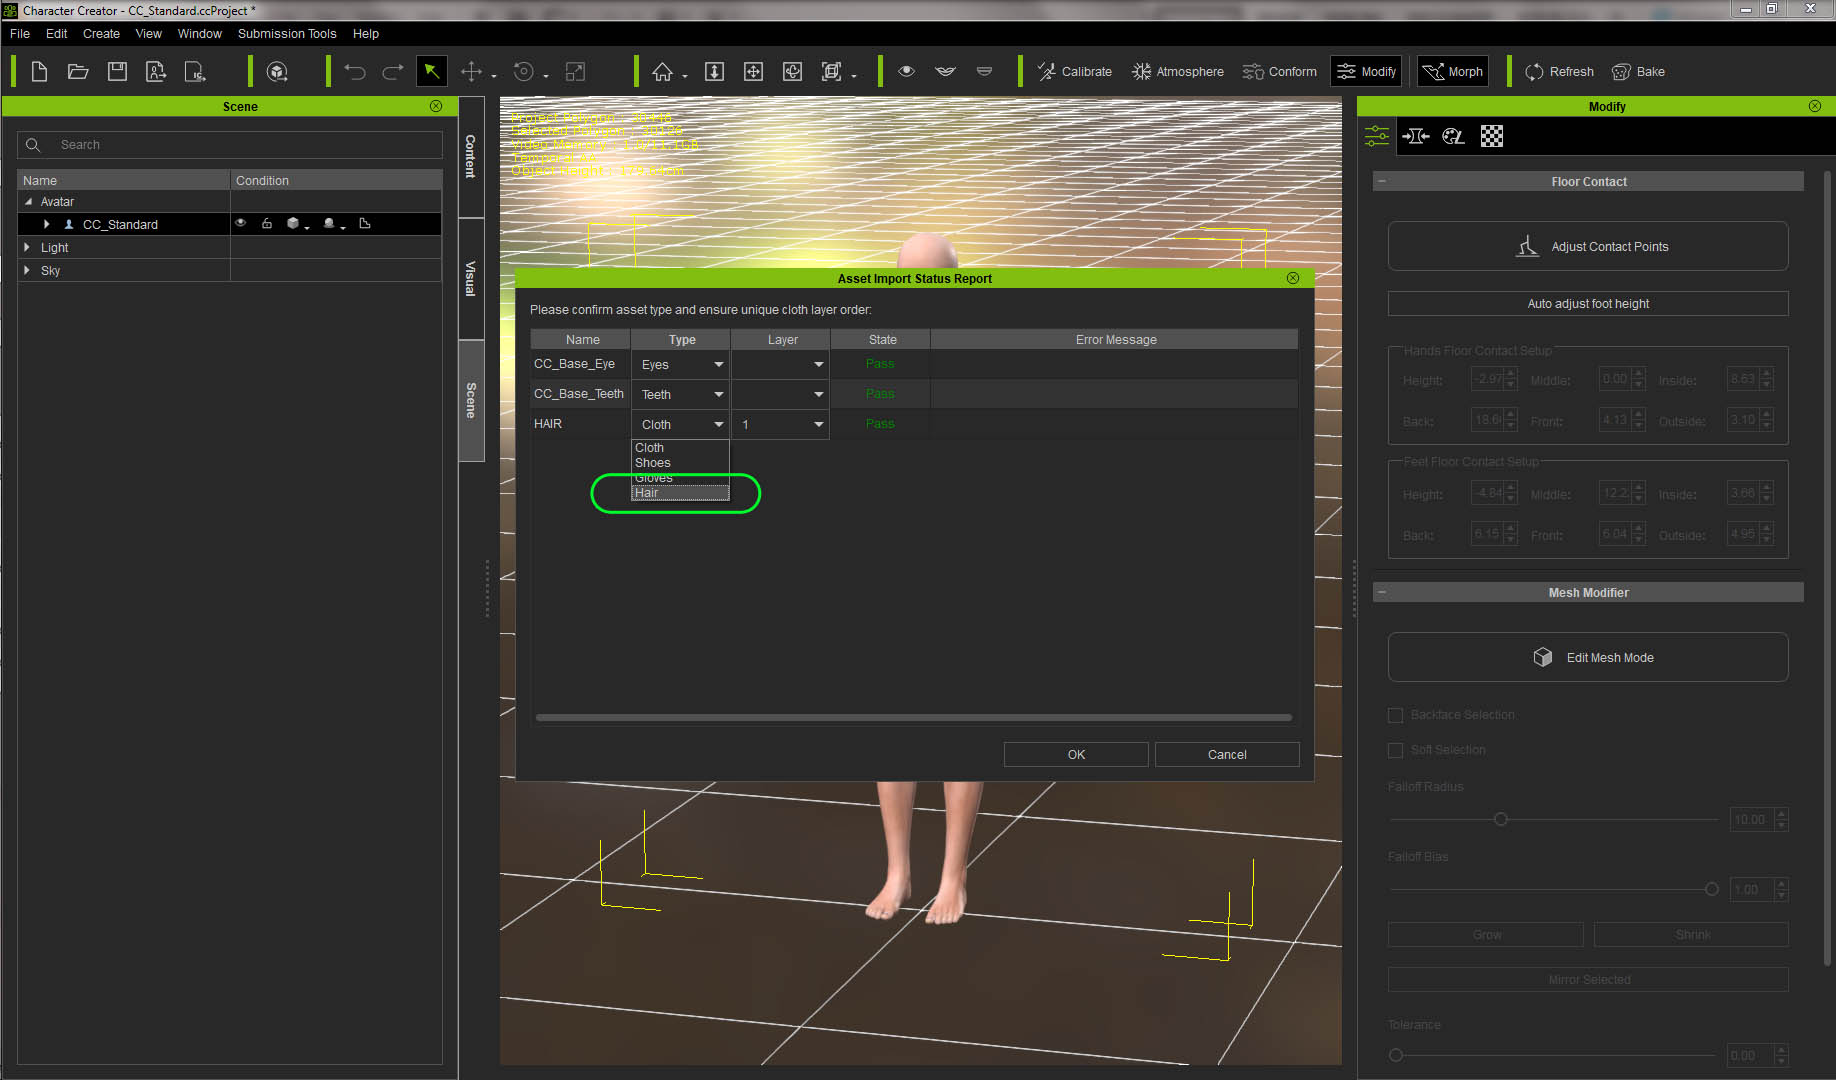
23. We are almost there. Back to the "comfort" of CC.
Import exported from Blender base model. If you did not play much with base model in Blender (like accidentally duplicated it and then deleted it), you should not have any ugly CC errors.
Select a "Hair" type for the HAIR.
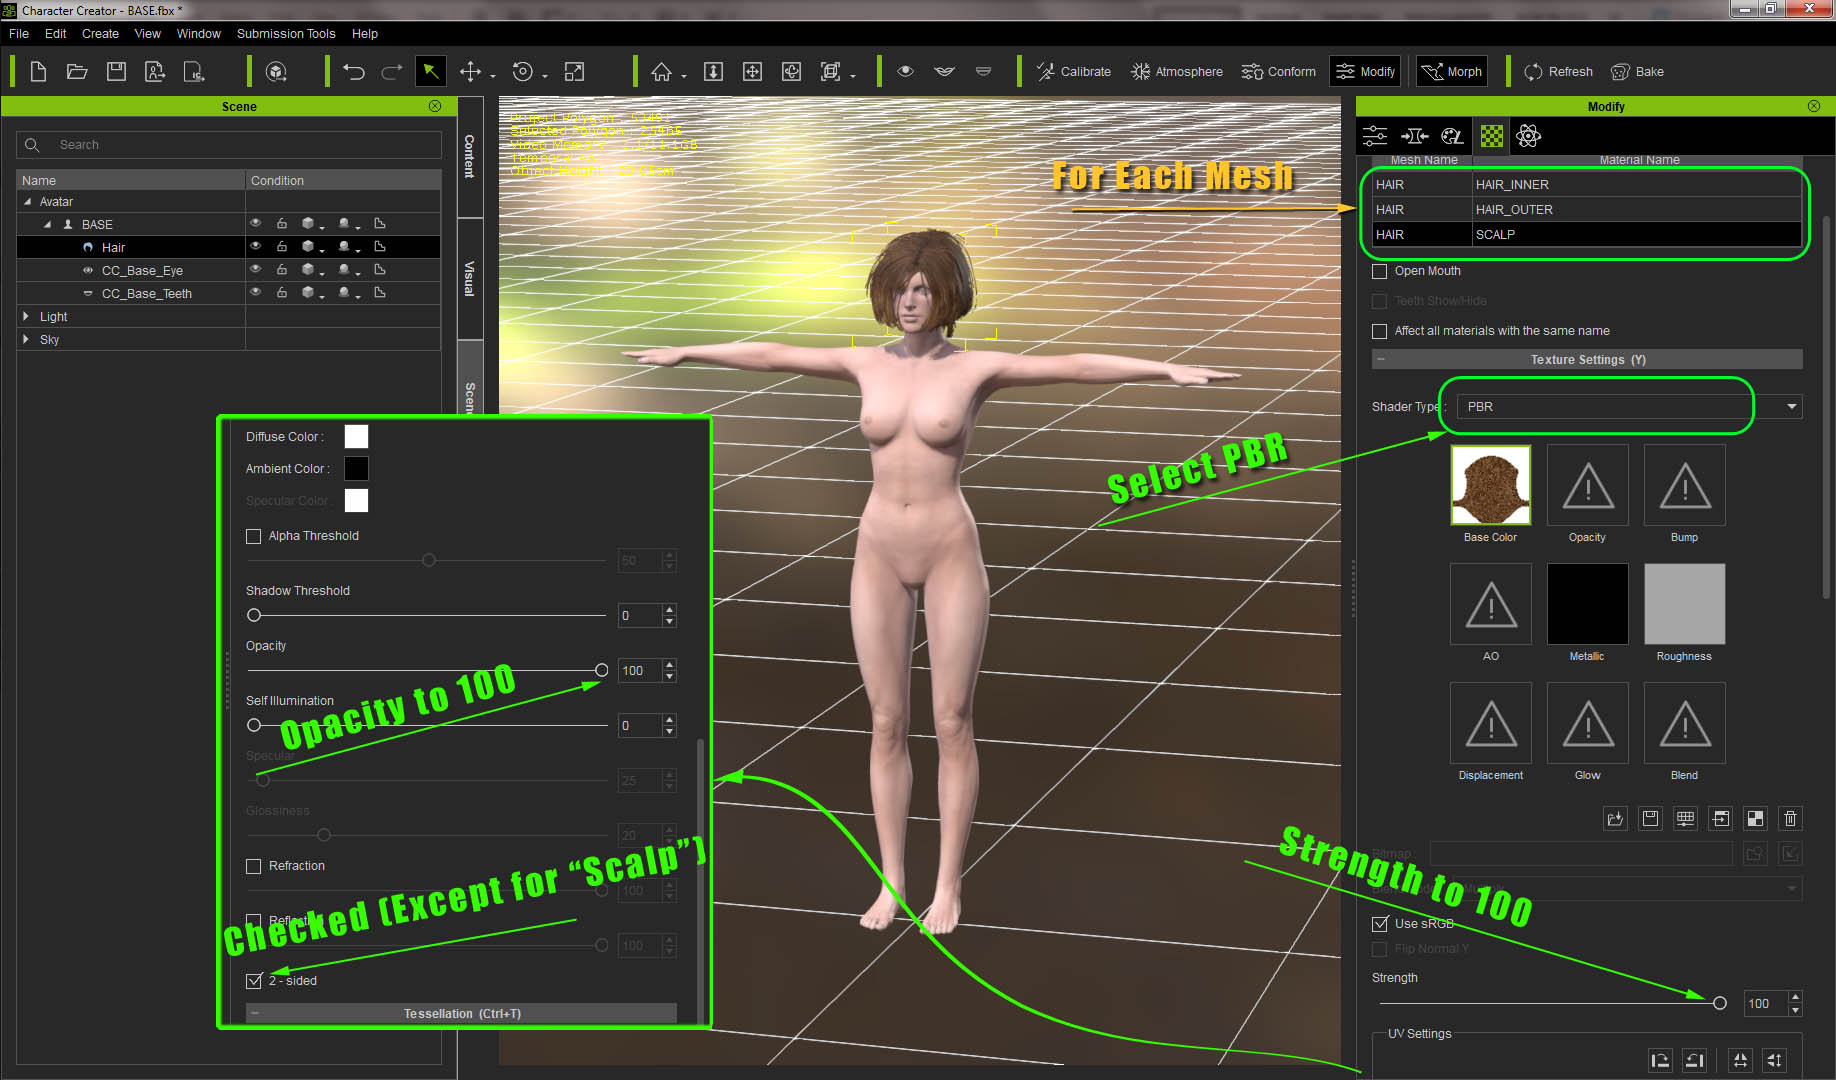
You would most likely not see the hair at this point. Opacity maps are not transferred, but the opacity control itself would most likely be down to 0. No worries, we'll fix it in a minute....
24. For each mesh/material in the list make sure to check/change if necessary the following:
Select PBR.
Crank Diffuse map (sorry, it is now called Base Color map) to 100 (Blender has an awful habit to set it to 80%).
Scroll down and set opacity to 100.
Check 2-sided. No need to check that for a base/scalp mesh.
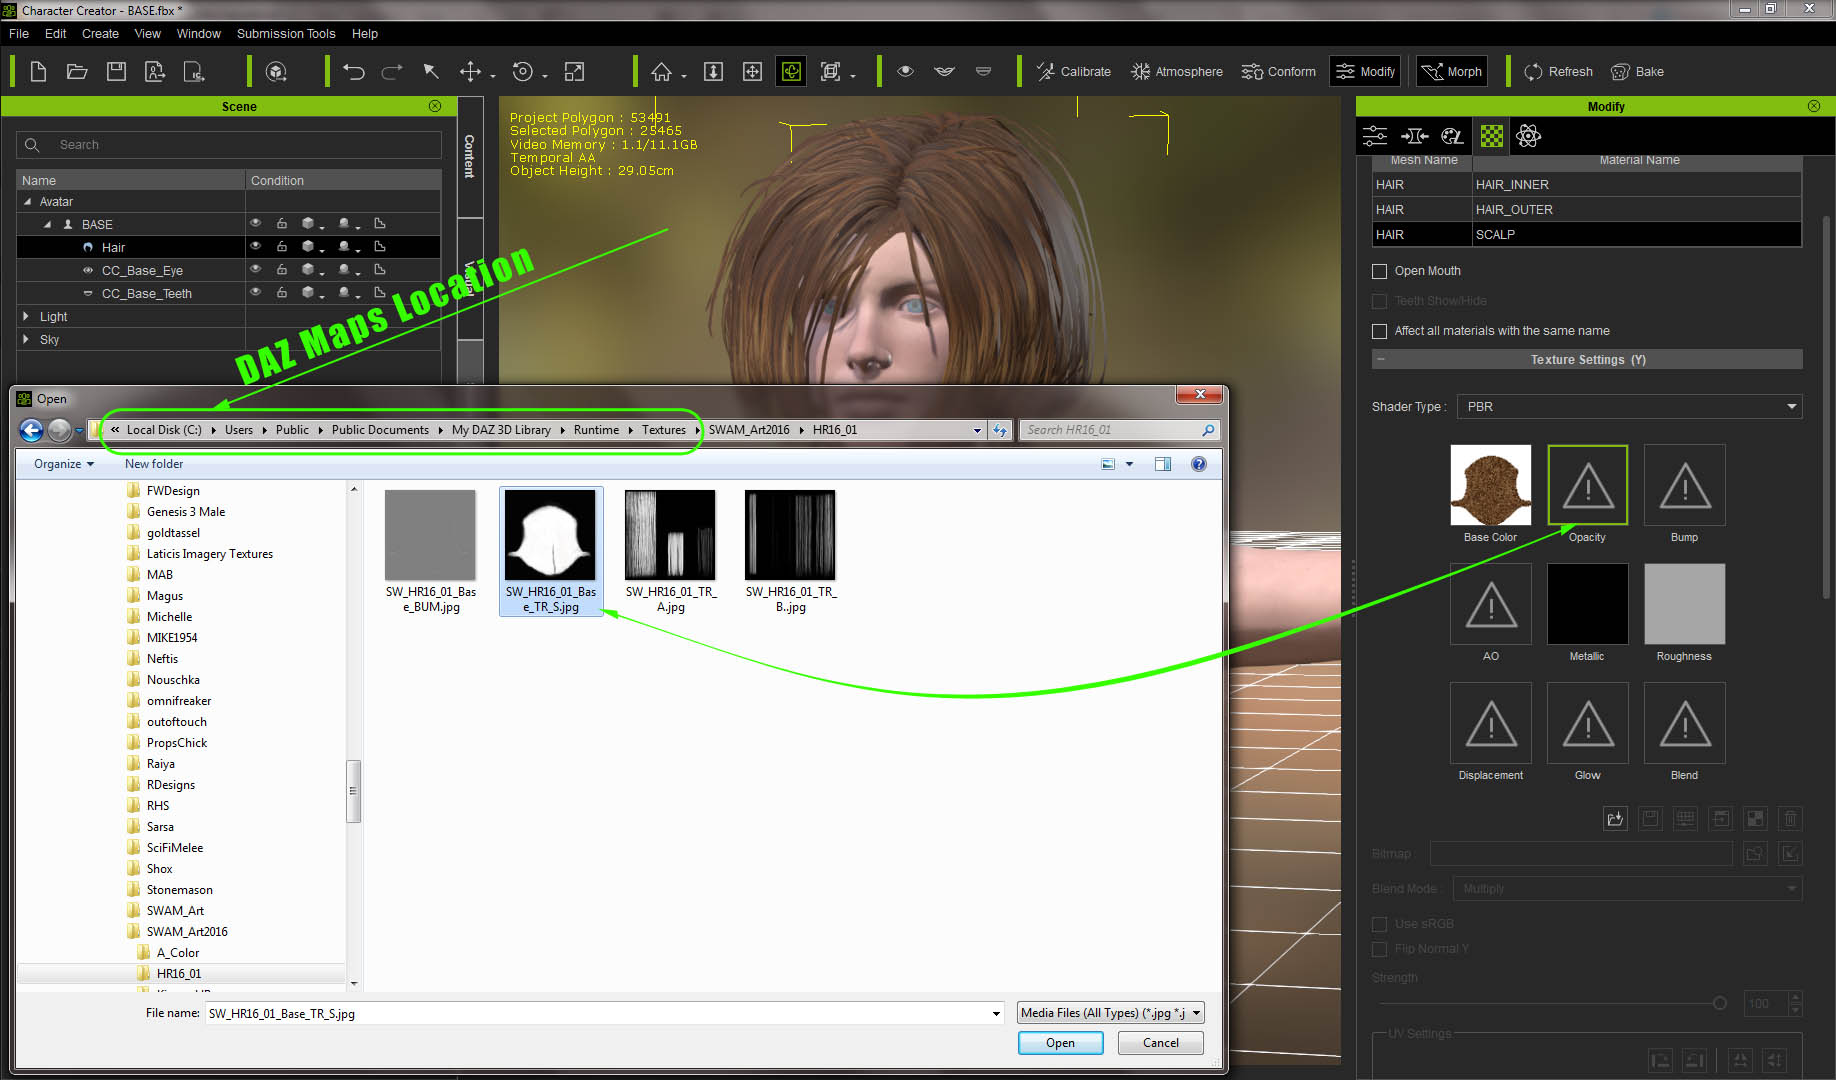
25. Lets finish it by bringing maps back. Default DAZ texture maps location is indicated on a screenshot below. Select correct Opacity Maps for respective materials, use Bump/Normal maps if available.
Note: I recommend to bring a contrast up a little on opacity maps. It might degrade the overall hair quality a little, but it would help to overcome some inconsistency with real-time rendering in relation to hair opacity.
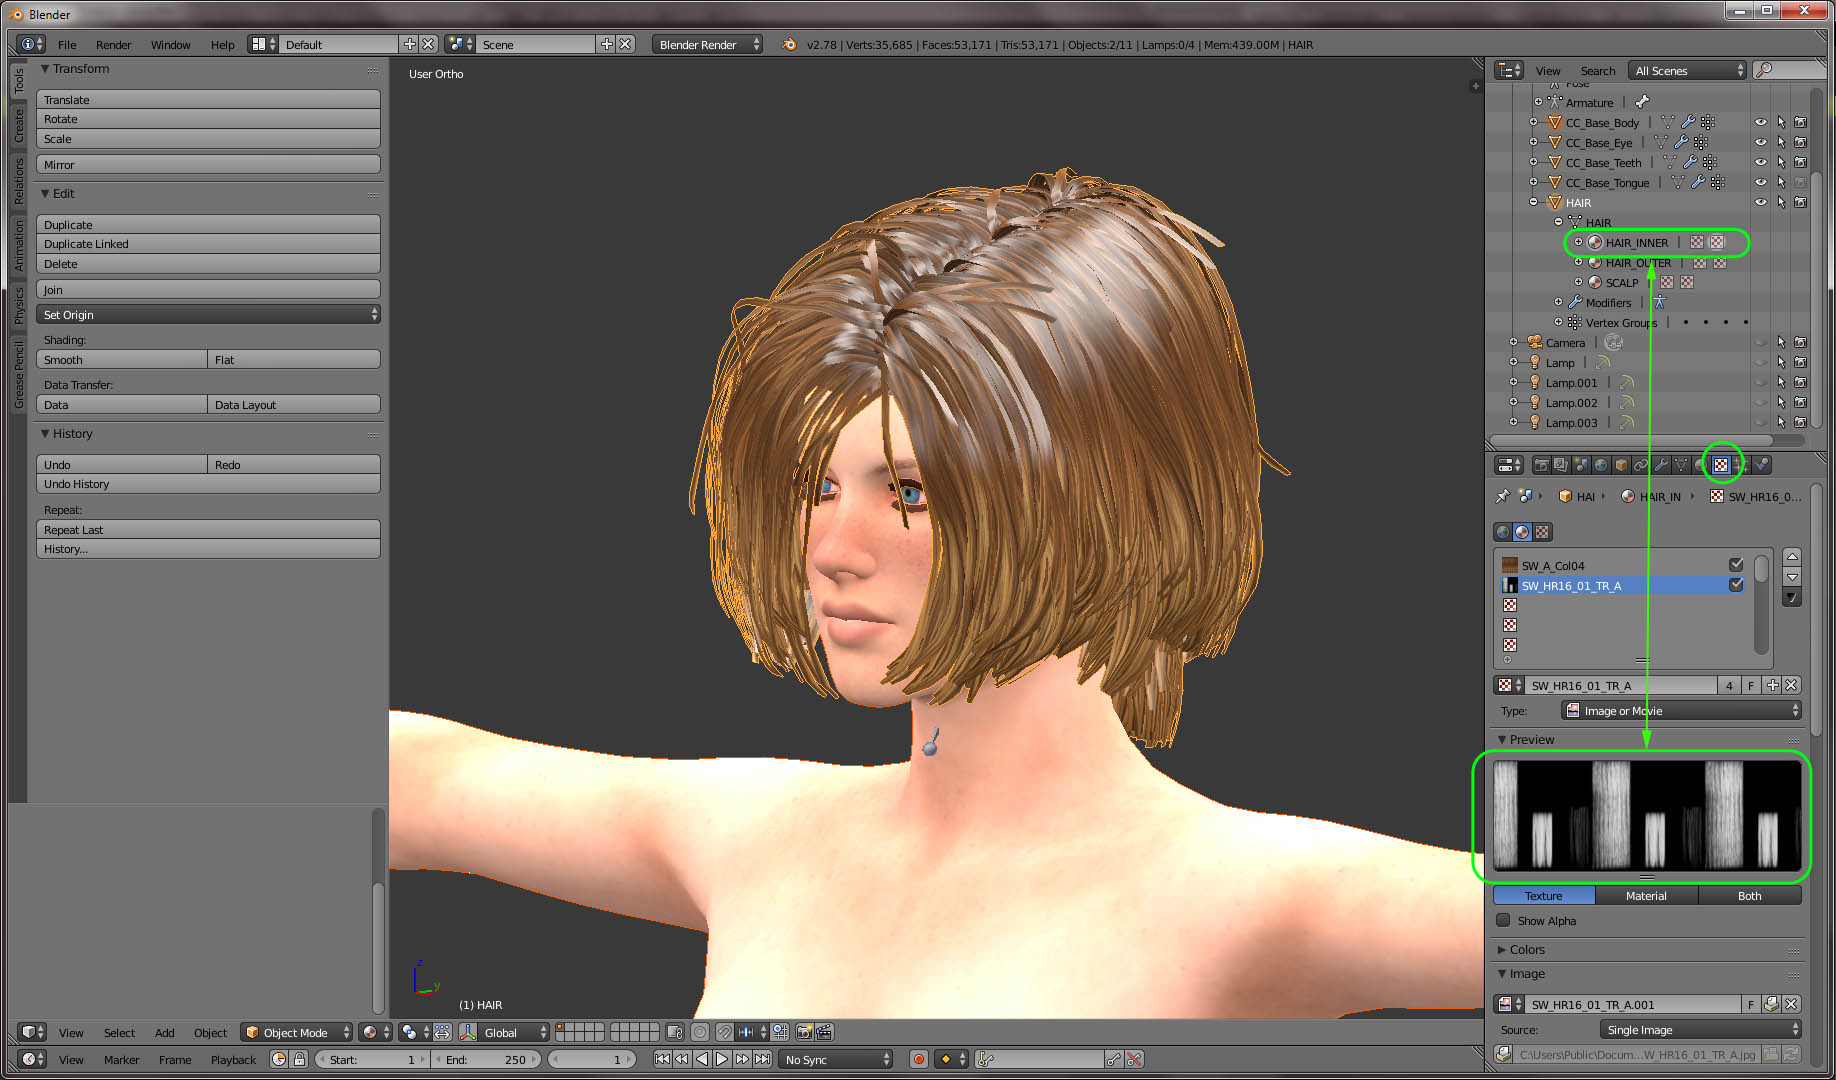
26. If you forgot which map was assigned to which material (like I did), go back to Blender and check it out.
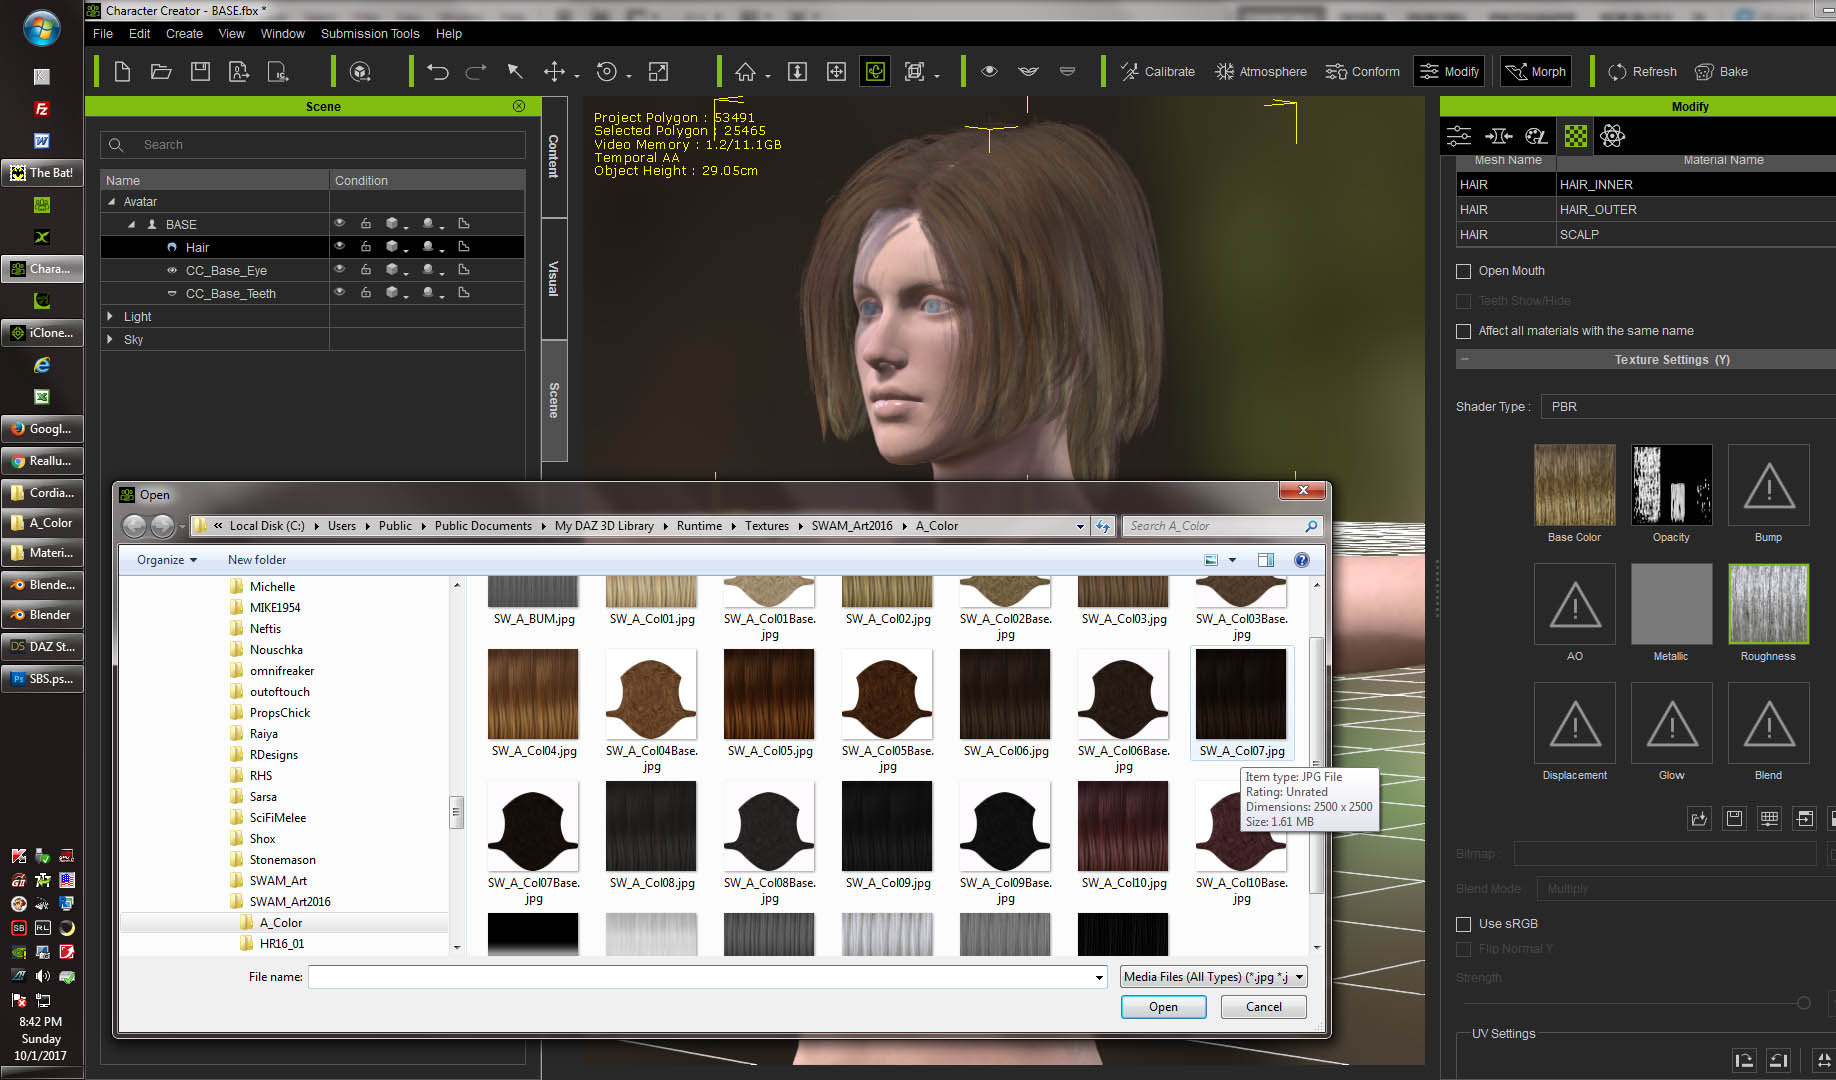
27. DAZ developers usually provide more than one shade for the hair. So it is a good time to play with those shades as well as with specular maps (if available).
If you end up with more than one material (excluding scalp), you may wish to mix shades, creating a nice dual/triple hair toning.
I recommend working with shades in iClone - under certain light conditions for a better outcome.
Though it is also possible with a single map with help of Photoshop or such. Remember those vertex groups created in steps 9/10? Now they would come handy.
By selecting them individually and then going to UV editing mode in Blender, you may effectively identify particular hair strands location on a UV map and shade them differently.
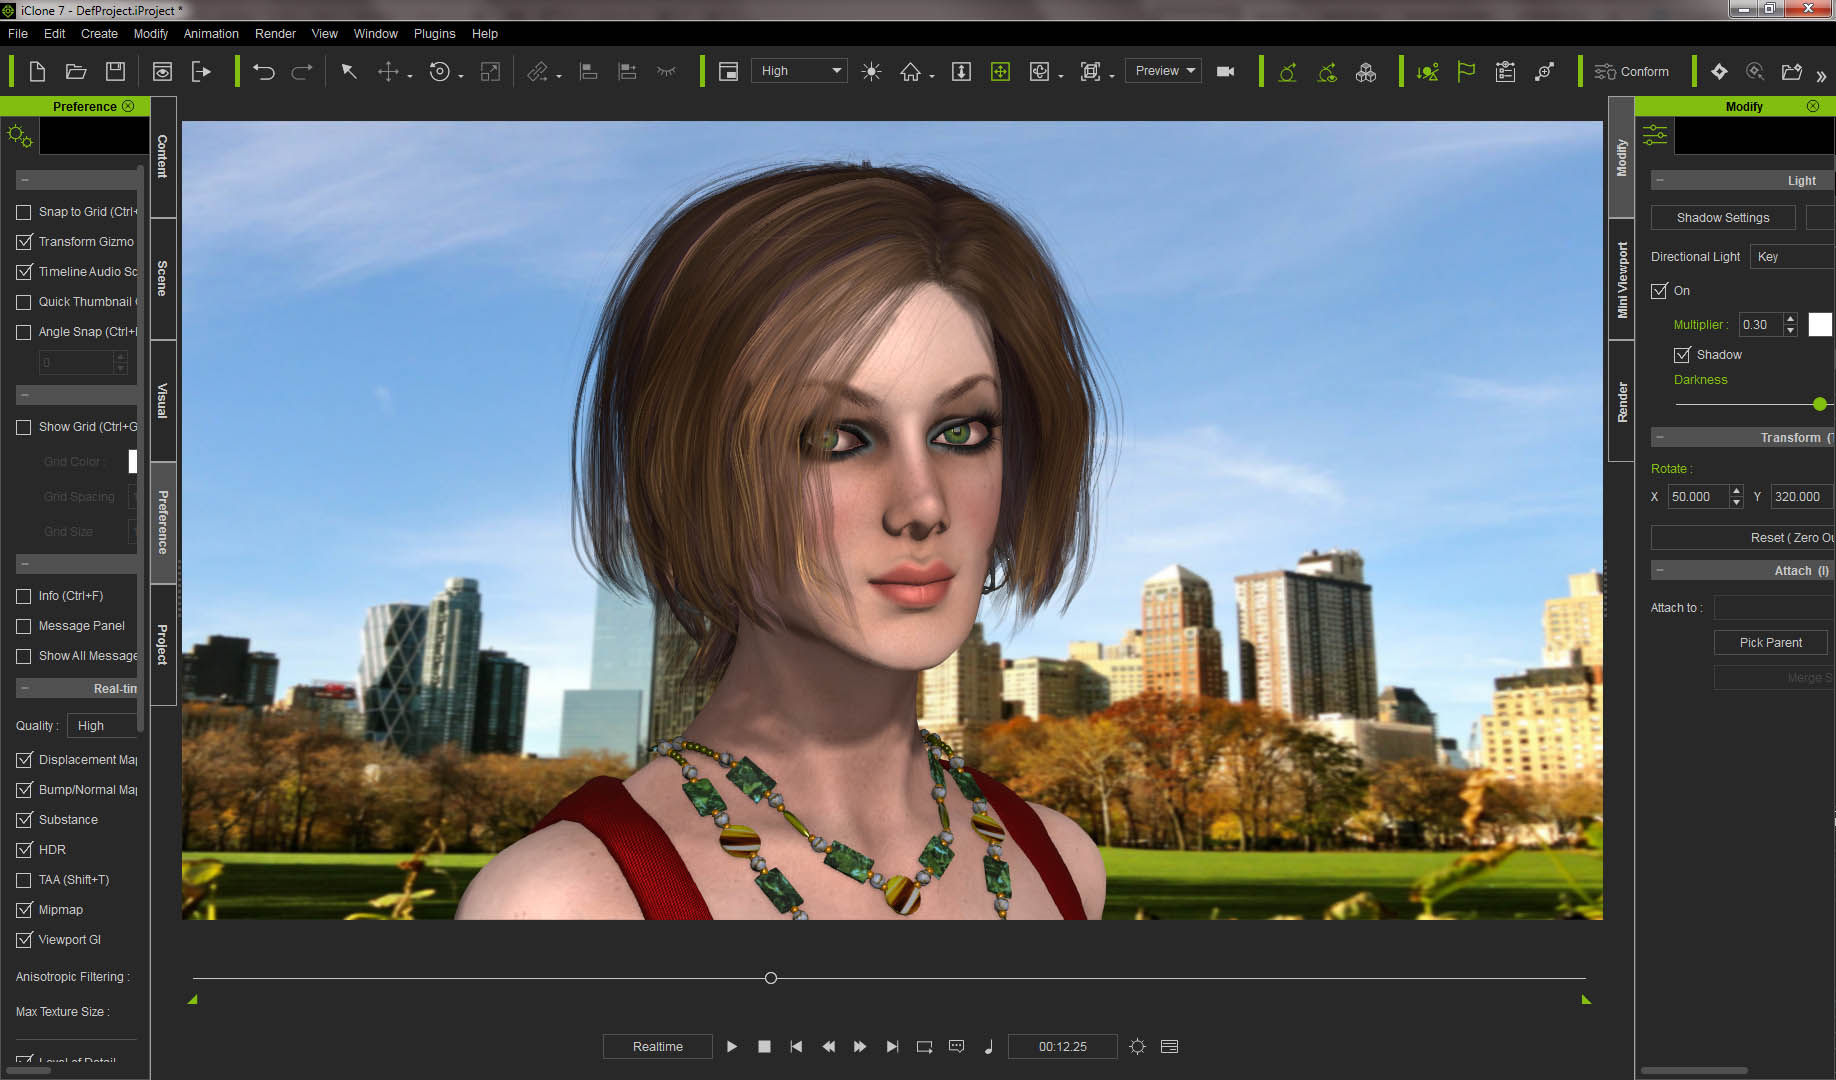
28. So here is Kara - 27 screenshots later - wearing a new DAZ wig... ooopps sorry Kara... a new hairstyle :)
Note: this hair does not have Physix applied. I am yet to create a weight map for it.
Thanks for looking... and maybe following! ;)
|
|
By Delerna - 8 Years Ago
|
Good to see.
I have Daz and several hairs but I have been too busy with other stuff to get around to converting my Daz contents for CC this is going to save me the time it wold take to learn this.
Subscribed and thanks for putting in the time, I know how time consuming showing your workflow can be.
|
|
By 4u2ges - 8 Years Ago
|
Thank you Delerna. Glad to help. I know you know how it is to put this together. :) You've done quite a few yourself. Keep up a good work as well!
|
|
By Kelleytoons - 8 Years Ago
|
You've put a great deal of work in, and thanks.
However, folks should be aware that not all hair is alike. You *seem* to be referring to what we would call in iClone polymapped hair. This is certainly one type of hair in Daz, but IMHO it's far from the most common. Particle hair is, but there is also dynamic and shader based (in particular the latter is impossible to export).
Particle hair is frustrating because if you try and decimate it you end up with male pattern baldness -- even on females. If you don't decimate it, it will bring iClone to its knees. Which is too bad, because there are some fantastic hair tools available in iClone for generating it.
But if you DO have polymapped hair this tutorial will work just fine (my own problem is that I'm always looking for men's hair, almost none of which is that).
|
|
By 4u2ges - 8 Years Ago
|
Hey Mike, thanks. I probably should have mentioned about particle hair. But quite frankly out of number of hair I have had, none of them were particle based. Maybe I was lucky (have not worked with men hair though). Well, I am lying.. there was a case with particle hair.. but it was a different type of hair :hehe:. Yes, decimator does not work on particle hair at all. Not only it leads to baldness but also creates an awfully looking mesh and since there is no opacity map - there is no control over it. I tried to work on it in Blender without much of the success.
So folks, stick with poly-mapped hair as Mike advised or skip this workflow altogether, get a render farm (and wait when iClone would support it). :)
|
|
By paulg625 - 8 Years Ago
|
|
Thanks 4u2ges, this will be very helpful as I have a ton of Daz hair which I can us this on.
|
|
By 4u2ges - 8 Years Ago
|
|
paulg625 (10/3/2017)
Thanks 4u2ges, this will be very helpful as I have a ton of Daz hair which I can us this on.
Glad to help Paul! :)
|
|
By CtrlZ - 8 Years Ago
|
|
Thank you!
|
|
By Kelleytoons - 8 Years Ago
|
4uegs (sorry if that's not the right name -- but it's *something* like that, right? <g>).
The first time I saw this all I could think of was "well, that won't work with the particle hair I've been running into" and didn't look much further. But since that time I've come across a workflow that will allow me to create mesh hair in Blender I'll be using in iClone and it reminded me of an experience I *did* have with Daz hair and I'd like to get your reaction to it.
It was (as is all the hair I'm concerned with) men's hair, which definitely is simpler hair but still has the same principles attached to it. All I did to convert was to export as an OBJ, bring it into XChange and then into iClone, and just adjust the scale in several directions. Finally I attached to the head, saved as a head accessory, and was able to convert and use it as an iHair in Character Creator. It's actually one of my go-to hair styles because it looks so good.
So what's wrong with my workflow? I understand part of your workflow was to simplify women's hair (which can be a lot more demanding) but I didn't do ANYTHING, didn't have to change materials, didn't worry about the underlying scalp piece (which I could size to just fit right on the skull of my men). It works great in CC (and thus iClone) even when I scale the head (the nice thing about hair, or any head accessory, is that it scales automagically to fit). But now I'm worried I may have just gotten lucky. What about my simple workflow would be an issue?
|
|
By 4u2ges - 8 Years Ago
|
That is fine. I am AKA Mr. G, if that makes it easier to type :)
Now to the point. There is nothing wrong with it, Mike. Moreover there is a thread nearby with workflow you just described: https://forum.reallusion.com/271742/PoserDaz-Hair-to-Character-Creator-tutorial
I am sure a lot of people would follow that path as it is whole lot easier to follow.
Except, that it does create a non-conformable head accessory. You can sure scale it each time you try it on a new character/avatar.
You can even go to CC, hide strands with opacity control (for hair with multiple materials), or create a temporary opacity map for hair with a single material and perfectly fit the cap/scalp mesh to the head by switching to "Edit Mesh Mode" (though I really hate working with this one after comfort of Blender).
You also mentioned converting to iHair. I suppose it was done outside of iCone suite after all.
But the point of my workflow is, not just to make an iHair, but make it fit perfectly, consolidate materials (shows a base routine, which could be used for any prop - a lot of 3D warehouse models require that).
Although all that mostly commented with user experience with Blender.
Take that men's hair I posted yesterday. It took me whole lot more time than any other hair to actually fix strands (the step I mentioned briefly in a workflow).
So we have to go case by case, consider complexity of the project, time we want to spend, accuracy and then take one path over another.
|
|
By Kelleytoons - 8 Years Ago
|
Okay, making a perfect fit I understand -- I'm (mostly) satisfied with "close enough" since I rarely do more than a closeup of a character's face in widescreen (which doesn't show off much imperfections). Getting REAL close would be a problem, I'm sure.
But IIRC (and I may not, although I'll find out more today because I want to try it with a few others I have from Daz) all I did to "convert" to iHair was just rename. After that it worked just fine, conforms even when head shape is changed (as I mentioned). I think the only real requirements of iHair is that it be attached to the head bone of the character -- I'm guessing (and it wouldn't take much experimentation to prove it) that ANY accessory so renamed would behave that way. I think that's how I got the helmets to work so perfectly, naming them as hair so they would reconform (but don't quote me on that -- that might just be that I put them in the Accessory/Head directory. I might have to experiment more with that as well, but I do think there is some kind of automagic going on otherwise fitting a hat each time would be a PITA).
I'm actually far more interested in creating my own hair in Blender and exporting because, again, men's hair (I know Daz is mostly fanboys but it's truly amazing how much female content there is compared to men's -- I would say it's something like 10 to 1, in terms of clothing, hair, bodies, etc. And yet in "films" it's almost exactly the opposite, with us needing far more men than women). But I wanted to be sure I wasn't missing something critical in what you're doing because many of the steps will be similar (from Blender mesh hair to iClone). The main difference is I can start with a "good" skull (so no real conforming issues).
|
|
By Kelleytoons - 8 Years Ago
|
Mr. G (and anyone else who might have seen what I wrote),
Maybe forget about what I said. For the life of me (or at least the old mind of me) I could have sworn I just brought hair over as I describe but I can't find an example of it and it doesn't seem to work when I try it now. I can bring it as an accessory (and it WILL scale with the head properly, as long as that is how you linked it) but not as iHair per se. So you would definitely end up with two different places for hair (which I don't like). At the very least the remaining steps you describe to link it within Blender and export it properly would have to be followed (why the iHair is so picky when ccAcc is not I'm not sure). Also, one *disadvantage* is you can't combine hairs (only one hair at a time) which I've actually found useful with my OBJ hairs (one overlaid on top of "normal" hair looks interesting).
In any case, I appreciate you summing up the steps I'll need to bring my Blender hair into iClone (not looking forward to all that work, but I guess that's the price we have to pay to get what we want. If ONLY we had more male hair... oh, wait, a few more ARE coming. Just not soon enough, and not as many as we need).
|
|
By 4u2ges - 8 Years Ago
|
Changing object file extension? I do not think it is quite possible in this case. Accessory and cloth/hair have different concept attaching to the armature.
It would have been way too much fun and spare us whole lot of time if possible.
It may look similar (specially men's hair where there is only a single bone to attach to - though by the neck it already goes to neck_twist),
but accessory would never conform regardless of file extension.
There was a discussion a while ago about having multiple hair objects possible. As of now the only way to have that, is to convert hair to cloth and assign some reserved ID (again I am talking about weight painted/conformable items).
As to 10:1 :) it is probably more than that. You can have one lady in the movie and 10 men. But she would probably beat them all by the variety of outfit, makeup, hairstyle change in 1.5h duration - it is natural.
|
|