|
Author
|
Message
|
|
Necka
|
|
|
Group: Forum Members
Last Active: Last Year
Posts: 62,
Visits: 407
|
Victor.Soupday (7/13/2021)
Necka (7/12/2021)
This looks amazing but I'm afraid that for games, having characters using those advanced shaders and all the default materials (around 10 and more depending on the characters) might not be good for crowded areas with NPCs where having merged materials/LOD is usually better as you don't go close-up or see their expressionsIt does work with Game Base and InstaLod characters, they are much simpler to setup as they are just the base PBR maps. The question on my mind is how to deal with the transparency. If there is any transparency, even just the eyelashes, it will render the whole character in the transparency queue which will be bad for performance, and as you have no doubt seen, Unity makes a god-awful mess of alpha blending. The alternative is to set the material to opaque with alpha clip, and that's what I'm going with for now. Will your tool offer a solution for LOD/Remesher characters with obviously less advanced materials?
Currently when importing with Auto-Setup a character that have Smart Hair / new brows and beard system it's a visual disaster That's what I'm going to look at next. Thanks a lot for your answers If you indeed manage to have remesher characters with new hair/beard system look "ok" once imported, that's quite awesome. Alpha clipping is clearly the way to go when it comes to this kind of characters. They are not meant to be shown with a camera zoomed in on to them, LOD exists for this reason and when those characters are close they can use the full blown materials with all the nice stuff you already show to us :) I'm really looking forward to use your tools. I use the current auto setup in Unity 2019 and then import the characters to my current project, but the results are nowhere close to what you posted. It's simply amazing. I'm still stunned by how great the character's eyes and hairs came out. The eyes without occlusion and tear line were lifeless to me.
|
|
|
|
|
Victor.Soupday
|
Victor.Soupday
Posted 4 Years Ago
|
|
Group: Forum Members
Last Active: Yesterday
Posts: 569,
Visits: 9.0K
|
It works with the merged materials output from InstaLod. The remesher, however, doesn't bake any opacity into the diffuse texture meaning it can never get the hair (or any transparency) right as it currently stands.
Not entirely sure what can be done about this.
|
|
|
|
|
kvergot
|
kvergot
Posted 4 Years Ago
|
|
Group: Forum Members
Last Active: 2 Years Ago
Posts: 9,
Visits: 126
|
Hi, Any possible date you can give for the HDRP Auto setup 2020,3 release? I am working on a time sensitive project and need this asap. Thank you.
|
|
|
|
|
Rowlan09
|
Rowlan09
Posted 4 Years Ago
|
|
Group: Forum Members
Last Active: 10 Months Ago
Posts: 15,
Visits: 84
|
Victor.Soupday (7/11/2021)
As shown in this thread, a WIP demo of the shaders: And a work in progress demo of the import and setup procedure: That's very impressive work, looking forward to the release. The less clicks the better.
|
|
|
|
|
deidrereaystudios
|
deidrereaystudios
Posted 4 Years Ago
|
|
Group: Forum Members
Last Active: 2 Years Ago
Posts: 43,
Visits: 346
|
That is some great work, and would truly be interested in seeing what in URP or Built in you could come up with. Have spent weeks myseld looking at CC3 characters into all of those pipelines, and HDRP (with some decent shaders and SSS) really can look amazing, yet even built in has some limitations etc. What also i ran into was the use of some other atmospheric assets from Unity Asset Store, and the render queue becoming a pain. Get the look you want, but not if in front or behind this etc.etc. Will keep my eyes peeled to see what you come up with, and if need for soem fresh eyes to test out some of your shaders etc dont hesitate to reach out.
|
|
|
|
|
chrisabranch_505463
|
chrisabranch_505463
Posted 4 Years Ago
|
|
Group: Forum Members
Last Active: 3 Years Ago
Posts: 1,
Visits: 55
|
looks good
|
|
|
|
|
Victor.Soupday
|
Victor.Soupday
Posted 4 Years Ago
|
|
Group: Forum Members
Last Active: Yesterday
Posts: 569,
Visits: 9.0K
|
Update: I've tested it with what I've got, and whilst I'm not 100% happy with it I think it's ready for an initial release, so here it is: Github package: https://github.com/soupday/cc3_unity_tools_HDRPDocumentation: https://soupday.github.io/cc3_unity_tools/This release is for Unity 2020.3 HDRP and above so it should (fingers crossed) work in all versions of 2021 too. Minimum requirements of the package: 2020.3.4f1, HDRP pipeline 10.5.0This is installed through the Package Manager, so it's slightly different than the usual drag the .unitypackage file into the project. It's installed into the Packages, not the Assets folders so it doesn't clutter up your project folders and maintains it's own C# assembly. Also being installed via the Package Manager, it can be installed directly from Github (with Git for windows installed). Full install instructions here: https://soupday.github.io/cc3_unity_tools/installation.html#The previous videos are a little out of date, I need to make some new ones... For now try it out and see what you think of it. Hopefully It should at least work.
|
|
|
|
|
Victor.Soupday
|
Victor.Soupday
Posted 4 Years Ago
|
|
Group: Forum Members
Last Active: Yesterday
Posts: 569,
Visits: 9.0K
|
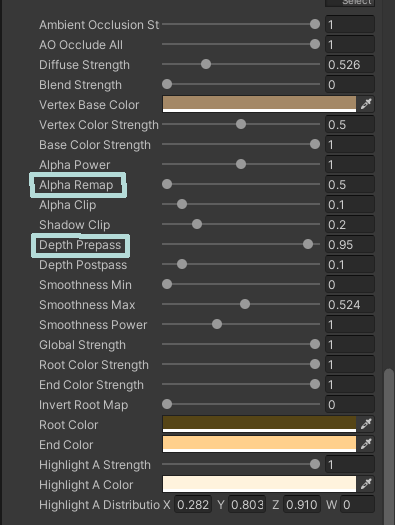
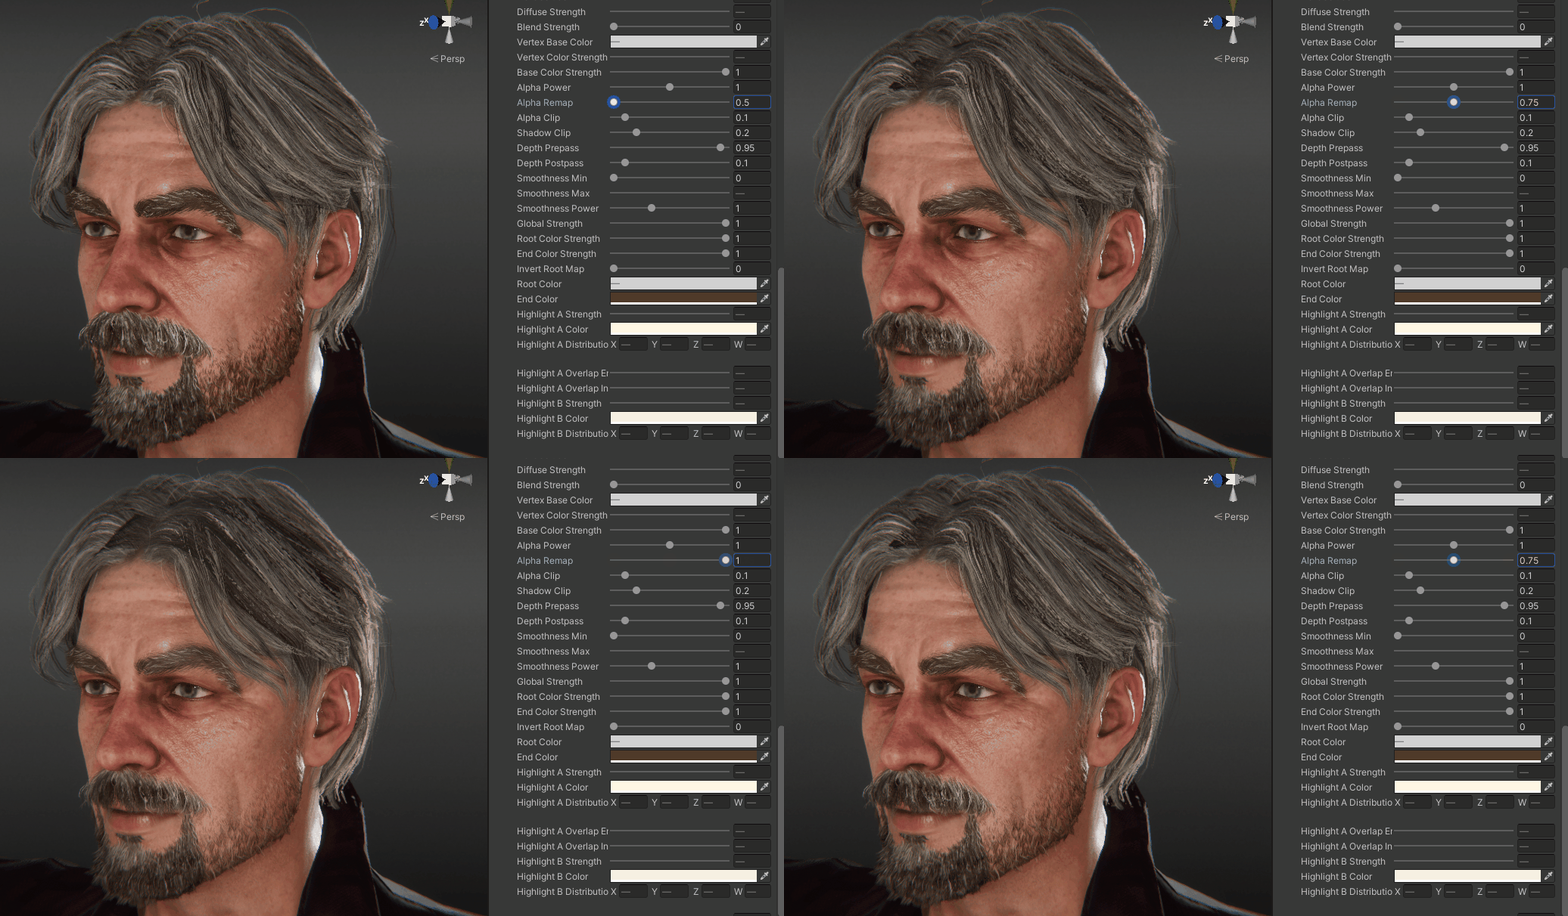
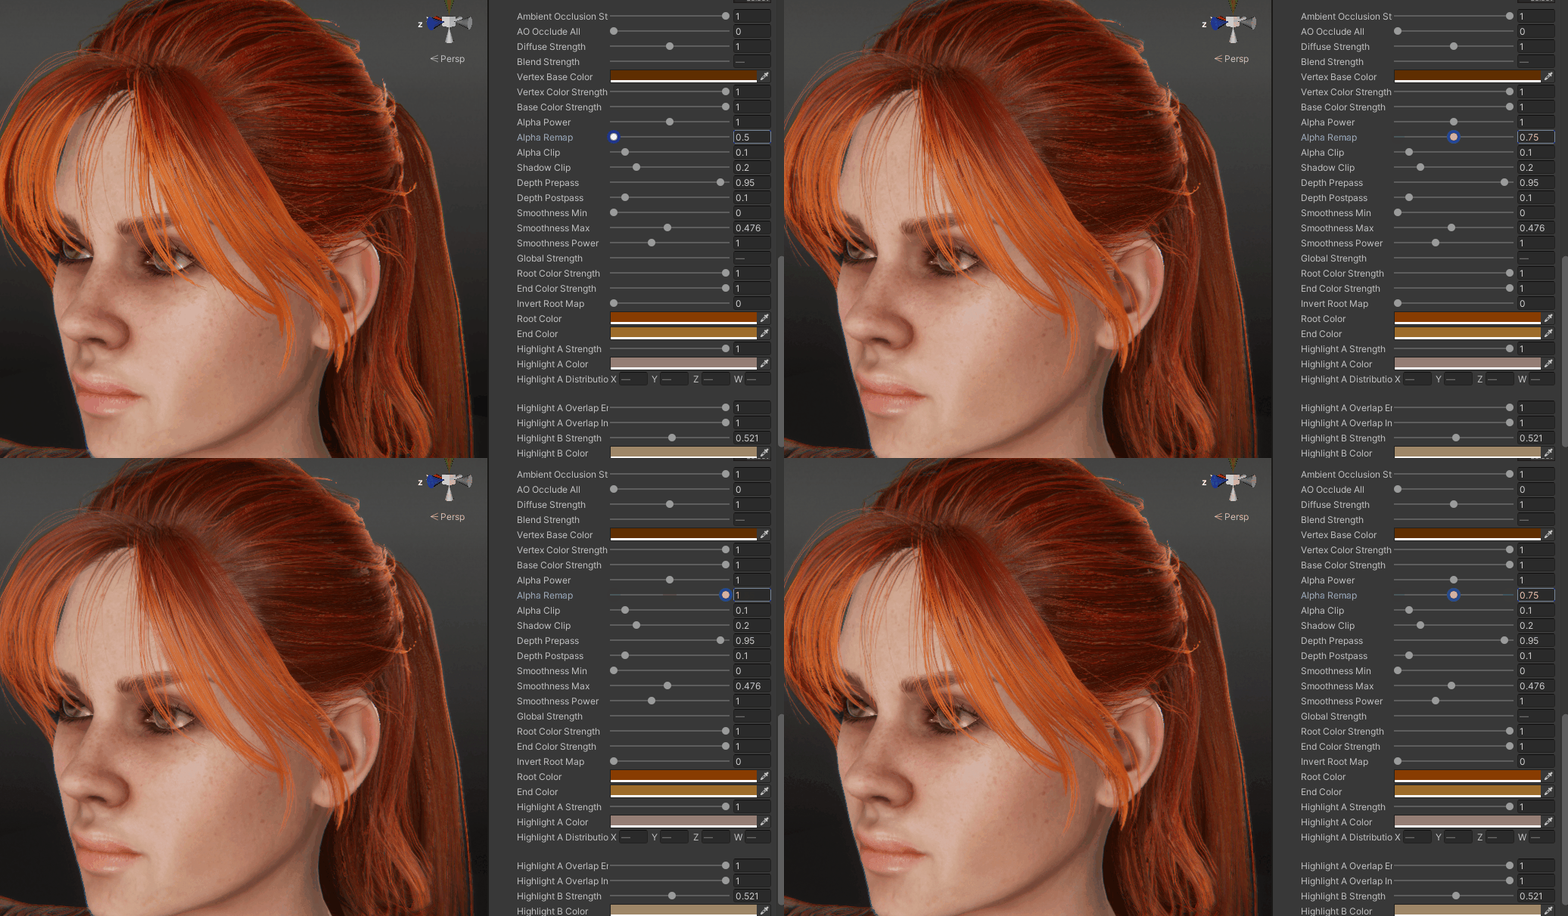
Notes: Hair shader: In order to resolve z-sorting issues with the hair shader, I've had to add an alpha remapping which compresses the alpha range which allows the depth prepass to work better. But, by default I've set this to quite a low value so that it works for just about everything, but it can make some hair/bow/beard meshes look too opaque. To resolve this raise the Alpha Remap parameter in the materials, Alpha Remap also works in tandem with Depth Prepass, the lower the Alpha Remap, the higher you can leave the Prepass.  In this example, the hair looks better at lower Alpha Remap values, but the brows and beard look too thick and opaque. At higher Alpha Remap range, the hair looks almost inside out, but the brows and beard look much better. In this case the hair is best left at the lower remap value and the brows and beard at higher values.  This next example has the opposite problem with the hair: At low remap values it looks too opaque and it looks much better at higher remap values.  So far there is no "one size fits all" solution for the hair.
|
|
|
|
|
e.l.thomas
|
e.l.thomas
Posted 4 Years Ago
|
|
Group: Forum Members
Last Active: 2 Years Ago
Posts: 5,
Visits: 91
|
Thank you so much for this, great work.
|
|
|
|
|
tantrum
|
tantrum
Posted 4 Years Ago
|
|
Group: Forum Members
Last Active: 6 Months Ago
Posts: 28,
Visits: 503
|
I was pretty excited to try this out today, even though I had to wait because I had a ton of "day job" work to get through first :D
Thank you again for making this, CC3 for me had been basically unusable / unfit, because I only need it for producing output to be consumed in Unity, and I was sold on the expectations of the kind of quality that output would be.
Now it's much better and usable again, even if there are the possibilities of further tweaks or improvements. I've yet to fathom or compare the cost associated with the shaders and textures necessary to achieve these results, I don't expect it to be free but I'm hoping its not too heavy for realtime use with multiple characters on screen, and a few other things I need to re-wrap my head around such as seeing how it works out with exported models having other features (lods, alternative game-base teeth or eyes, etc., some of which I saw you posted about will work), but at least now I can try without the other frustrations getting in the way.
I don't know if anything can be done at the shadergraph level about the softness of the hair rendering (the way it practically looks blurred in CC3 but like solid spaghetti strands in Unity), that would be something I'd like to see the gap narrowed on if feasible. The rest I need to do some further looking and playing around with, but at least it'll be fun ! I saw I could tweak the hair highlight colors and such at runtime too, so thanks also for adding/exposing those properties.
|
|
|
|