|
By Shaky - 15 Years Ago
|
Can someone point me to a tutorial that shows you how to make bump maps for clothing? I have tried to make my own, but I am doing something wrong.
Thanks
Shaky
|
|
By namunger - 15 Years Ago
|
It would be best to tell what you've tried, and what isn't working about it, but here's some general tips...
-If you're working with a diffuse image that has lots of textures, and you want to bring those out with the bump channel, start with the diffuse image, turn it to black and white, then modify the contrast/brightness till you get a good range of grey tones. Import this into the bump channel.
-If your diffuse layer doesn't have a good texture to work from, use an image of something with texture, like a swatch of fabric, and do the same process.
I've been wanting to do a quick "texturing tips" video that has some info about this, but I can't seem to get a minute free from my "real job." It's on the list, though!
|
|
By Shaky - 15 Years Ago
|
|
namunger (10/14/2011)
It would be best to tell what you've tried, and what isn't working about it, but here's some general tips...
-If you're working with a diffuse image that has lots of textures, and you want to bring those out with the bump channel, start with the diffuse image, turn it to black and white, then modify the contrast/brightness till you get a good range of grey tones. Import this into the bump channel.
-If your diffuse layer doesn't have a good texture to work from, use an image of something with texture, like a swatch of fabric, and do the same process.
I've been wanting to do a quick "texturing tips" video that has some info about this, but I can't seem to get a minute free from my "real job." It's on the list, though!
Ok, I'm trying to make a science fiction uniform. This suit would have all kinds of imbedded wires. I'm working on the diffuse image that is mostly gray, but I want the wires to look like they are inside the suit.
I am assuming that a bump map will do this. The thing that puzzled me was looking at other bump maps for clothing, and they are a blue color. What am I seeing?
Thank you for your time. :)
|
|
By WarLord - 15 Years Ago
|
You are probably looking at a normal map which is another, newer form of bump map. If you import a normal map into iClone you need to check the "Import as Normal Map" checkbox for them to function properly.
There is a quick way to make anything a normal map if you have Photoshop by using the free Nvidia plug-in that converts images to normals.
http://developer.nvidia.com/nvidia-texture-tools-adobe-photoshop
As to drawing out something like the wiring... then you are right the bump/normal channel should accent it. Maybe try a test by making it in color then converting to normal with the above plug-in.
Maybe one of the clothing experts will see this thread and give you a proper answer.
|
|
By namunger - 15 Years Ago
|
|
Yep, what he said! Here's a pic of a character i was working on a while back - Man-At-Arms from the old He-Man toys. I used a picture of a printed circuit board, turned it into a normal map, then applied to various primitives, which I embedded into the character to look like armor. Sounds like it may be along the lines you're going for.
|
|
By Shaky - 15 Years Ago
|
|
Thanks! I will put that advice to work :) and post my results.:D
|
|
By Alley - 15 Years Ago
|
|
So are the wires part of the diffuse image, and the idea is to make the bump map make them appear to be almost embedded into the suit? Another way to try and achieve this would be to place the wires on the character. Then cut a shape out rough around the wires where the chest would be open. (shot 1) Then on the shape behind, apply an inner bevel, play with the settings. Shot 2. Lastly, take your existing bump map, in this instance because Dylan come with one, and put the bevelled shape on top of the bump map. Then Select "Match Colour" and match the colour to the existing bump map. You can apply another inner bevel now to the coloured shape. This as your bump map will further help to give the look of being embedded. Of course lighting is also very helpful to further give the look. 


|
|
By WarLord - 15 Years Ago
|
|
You ROCK Alley!:cool:
|
|
By Shaky - 15 Years Ago
|
|
Thanks Everyone, I got it to work. 
This is my first uniform (anything) on iclone. As you can see by the shoes, I am not done. Again, thanks. :)
|
|
By Shaky - 15 Years Ago
|
|
Well, here is the results of learning how to use Bump maps. 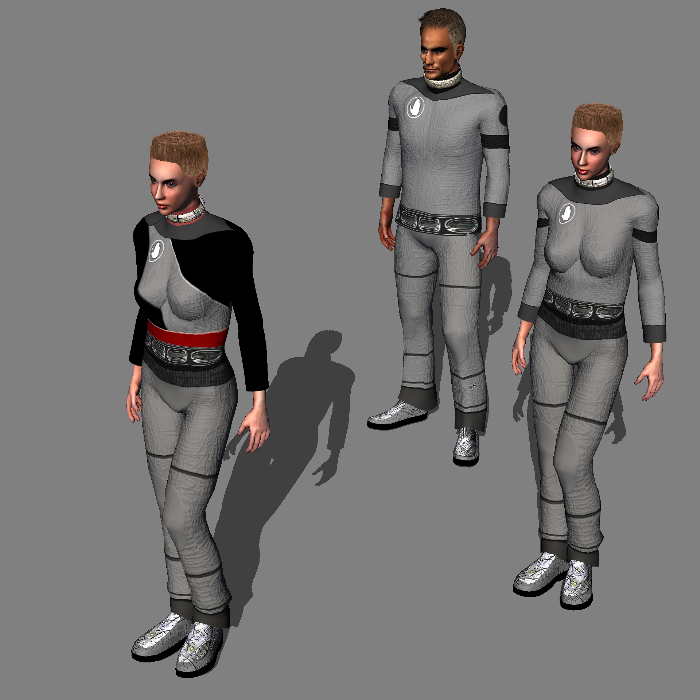
|
|
By Alley - 15 Years Ago
|
|
Nice work Shaky - now you might want to add a Blend to that, then use the slider to turn it down - it will just give a little more realism to the colour depths - play with overlay-multiply-addition and the sliders until it looks right. You can also use the tiling or flip them - just some experimentation. :)
|
|
By Shaky - 15 Years Ago
|
|
Wow! That was cool. The one on the left is with a blend and the other is without. 
How do you make a blend image? Thank you! Shaky
|
|
By Alley - 15 Years Ago
|
|
Reallusion supply 5 of them for you. They can be found in the folder called "Textures" and subfolder called "Blend". Try them all and experiment. c:/Users/Public/Public Documents/Reallusion/Template/Iclone 5 Template/Iclone Template/Textures/Blend or Iclone 4 if you are using 4.
|
|
By Shaky - 15 Years Ago
|
Alley (10/15/2011)
Reallusion supply 5 of them for you. They can be found in the folder called "Textures" and subfolder called "Blend". Try them all and experiment. c:/Users/Public/Public Documents/Reallusion/Template/Iclone 5 Template/Iclone Template/Textures/Blend or Iclone 4 if you are using 4. Yes, thank you. I looked at all of them. The image from my last post show the difference (although very subtle). Are there other blends to buy or make? Do you know how to make one?
|