|
By martok2112 - 13 Years Ago
|
Hi, folks,
It's your friendly neighborhood Martok2112 (call me Steve if you wish) with another tutorial for beginners, and for those looking to economize a bit in their animations.
Alright, class, ATTEND. (You, Jimmy, in the back...pay heed!) 
Ok, today, dear childroon, we discuss animating characters along a path. Today's lesson will be the first of a couple of different ways to deal with path character movement. So, let's turn in our textbooks to page one. (Joseph, put away that -- is THAT a porno mag?!...and you didn't bring enough to share?! We shall talk later, young sir. In the meantime, I'm sure you'll get your kicks out of this lesson.)
The purpose of this class is not only to give newcomers to iClone a nice little beginners' animation tutorial, but also to cover some problems that even some more advanced users have had with getting character path animations to work, as well as the problem some folks have with placing multiple animations together, and ending up with different character starting positions for each animation.
For the example I have today, I have decided to do a slight recreation of the (soon to be famous) car wash scene from the upcoming comedy "Bad Teacher" starring Cameron Diaz. I say slight because certain elements of this reproduction are not accurate.
Now, the first thing to think of when it comes to avatar/characters is to think of them as (Thomas, what are you doing?! Do not think of her THAT way. She is a willing participant in this very vital demonstration, not an object to be oogled. Well....ok...yes, she is very hot, but....ach, that is beside the point, now pay attention!)...ahem...think of them as "action figures" of a sort. (Yes, Gerald, like your little G.I. Joes or Star Wars figures.) In addition to creating clothing for them, you can also give them props to be a permanent part of their loadout. For the "Bad Teacher" avatar, we'll call her Elizabeth Halsey, since that is the character's name in the upcoming film, she has two sponges and a water hose. You can store the avatar with their accessories so they can be activated/deactivated as needed for your upcoming scenes. Elizabeth also has some "BLEND" overlays which will give her a wetlook appearance, but we're not worried about that right now.
Let's look at Fig. 001 
For this shot, Elizabeth will only need one sponge in her left hand, and the water hose in the right hand, so, let's activate them, and deactivate the right hand sponge. Now the next thing we wish to do is lay out a path around the truck for her to traverse. So, create the path, and edit as necessary. Done? Done.
Right, onto figure 002 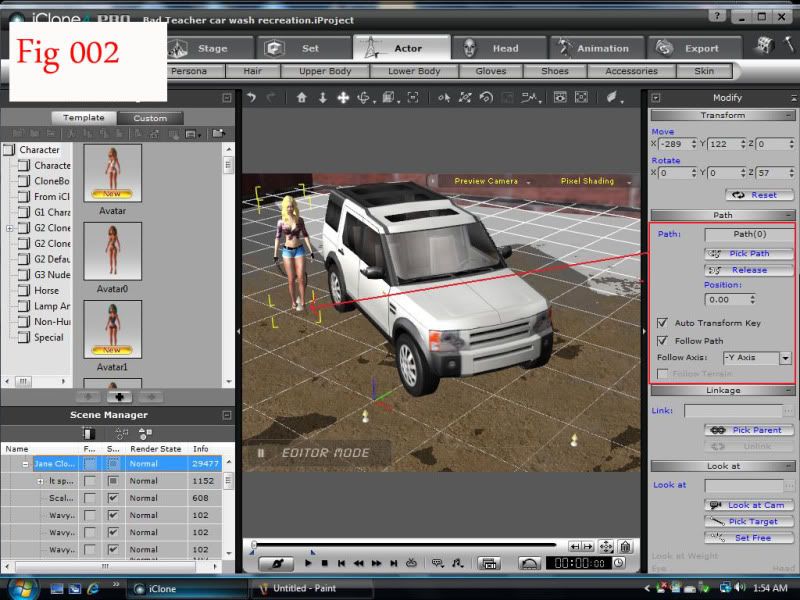
At the first frame of the soon to be made animation, place Elizabeth (make sure she is highlighted) at the start of the path, by clicking PICK PATH, and then moving the cursor to the first path point...the point of origin that you'd set down when creating your path. Since we are dealing with simple, flat terrain, you can set the "FOLLOW PATH" button in the PATH animation box. This will allow Elizabeth to track properly in her facing as she traverses the path.
|
|
By martok2112 - 13 Years Ago
|
In FIgure 003 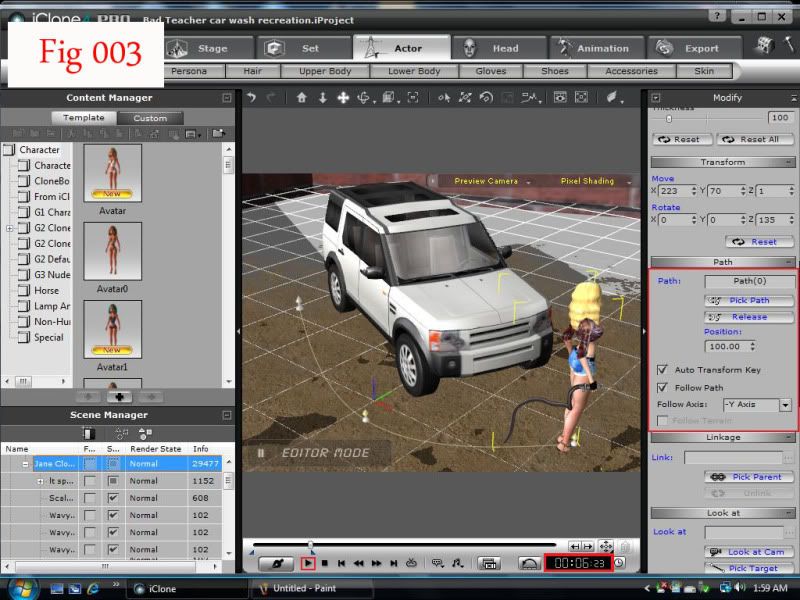
Set the length of time you wish the animation to carry on. For this, I've set the animation for about 4 seconds at first. Do this by moving the slider until you come up on about 4 seconds in the digital readout at the right of the playback bar. Now, set back to frame one and replay the animation to make sure that Elizabeth tracks properly along the path. If you are unhappy with the length of time it took for her to travel to the end point, you can always go into the TIMELINE and adjust the end path key frame and the end marker TRANSFORM keyframe. Move them to the right to increase the amount of time it takes for her to travel the path, move it to the left to decrease the amount of time. In this case, I thought she'd moved a bit too fast, so I moved the end PATH and TRANSFORM keyframes to the right until I got about six seconds worth of animation. Replay. Alright, I like this travel time, so we'll stick with that.
Right, onto Fig. 004 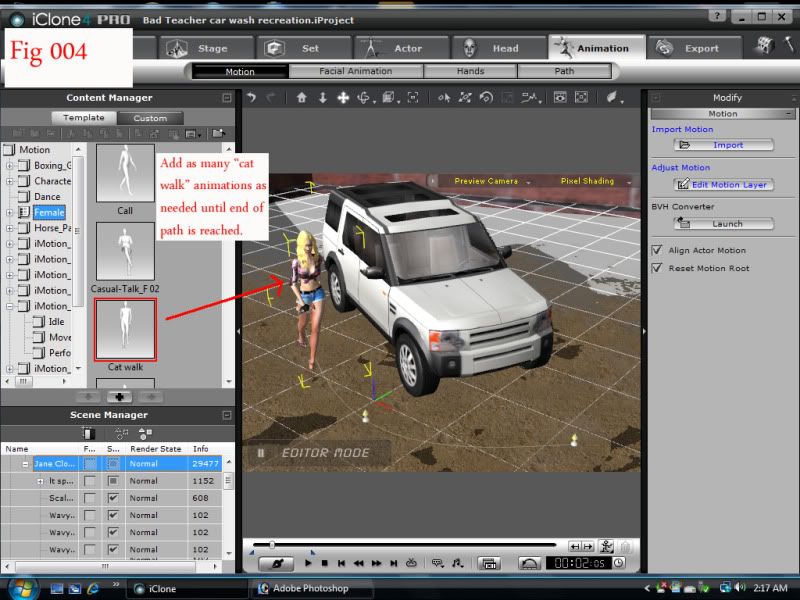
Ok, now that she's traversing the path properly, we can set about adding animations. So, select the following buttons: ANIMATION>MOTION>TEMPLATE>FEMALE and select "Cat Walk". Now, since we're back at frame one, double click on the "Cat Walk" animation loop, and it will apply to Elizabeth. As you can see, she's started her animation now with the cat walk. After the first loop has finished, the playback will pause. From here, you can either double click "Cat Walk" in the animation template, and lather, rinse, repeat (no pun intended) until you reach the end of the path. Or you can go into the TIMELINE, (see FIgure 004a) select JANE SEXY, MOTION, and then see the animation box for your first "Cat Walk". You can copy and paste this animation box until you reach the end of your path. Either method is acceptable.
Fig 004a 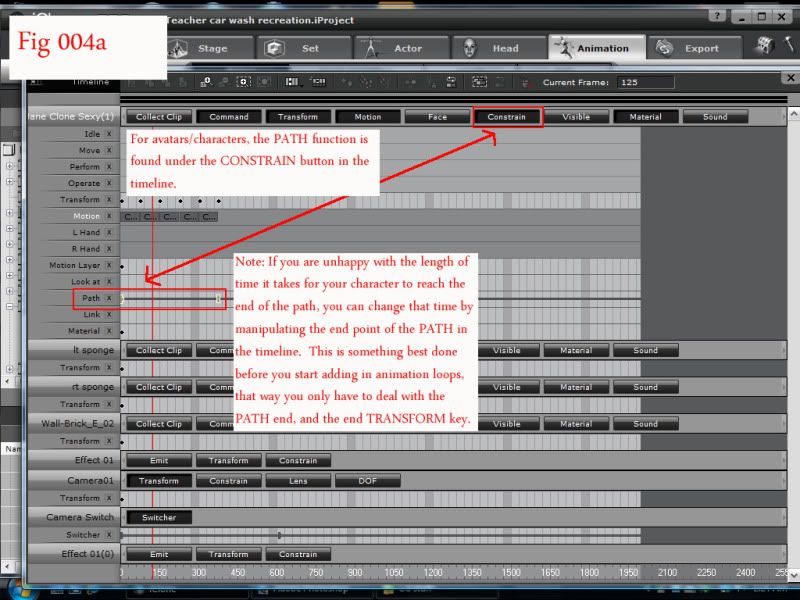
|
|
By martok2112 - 13 Years Ago
|
Now, playback the animation again with the "Cat Walks" in place. Now, as you can see, she is traversing the PATH, this time cat walking it, instead of just gliding along it. Well done.
Moving on...Fig 004b 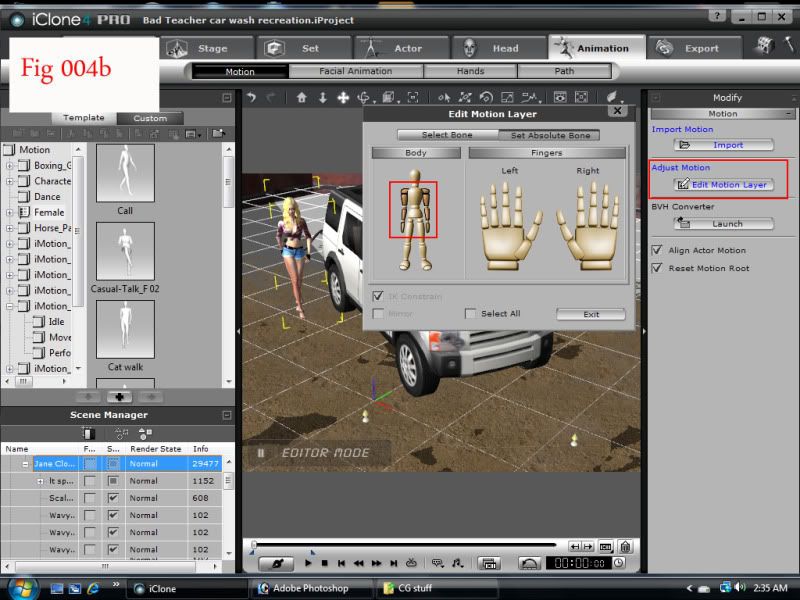
Alright, the animation and movement are in place, but now, we need to do a little tweaking. Go back to frame one, and while making sure that Elizabeth is still highlighted, click on ANIMATION, and EDIT MOTION LAYER under the ADJUST MOTION box on the right of the playback window. For our purposes, we're going to need Elizabeth to hose down the vehicle, while still executing her cat walk. With the EDIT MOTION LAYER activated, we now see the EDIT MOTION LAYER box being displayed. We want to select SET ABSOLUTE BONE. Now, as you'll notie in Fig 004b, I have highlighted (or browned out) her left and right arms, starting from the shoulder bones and down to her hands. This will effectively immobilize her arms during the catwalk animation. Go ahead and playback the scene, and now you will see that she is catwalking, but her arms are not moving. This now allows us to manipulate her arms to start hosing down/washing the vehicle.
Fig 005 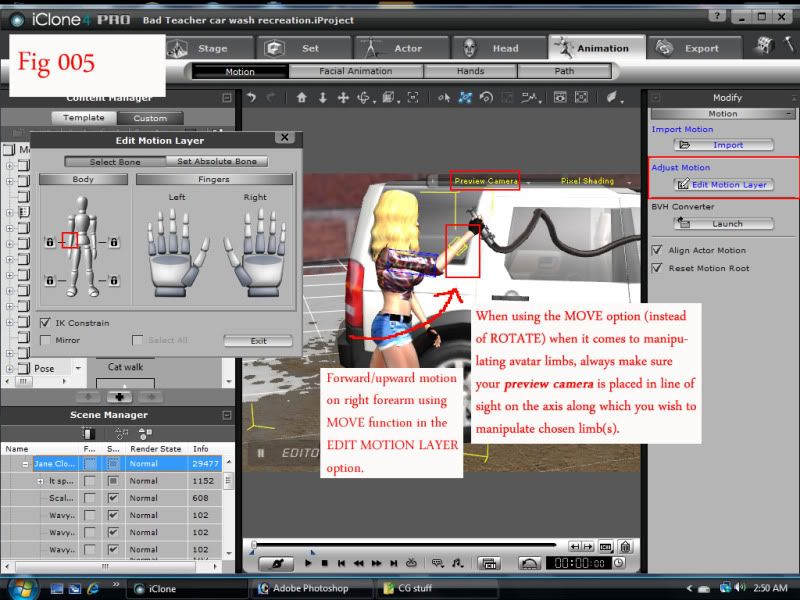
Now we begin to move her arms into the appropriate positions. (Michael, that'll be enough snarkery out of you, young man!....What do you mean is there such a word as "snarkery"?! Your impertinence will do you no credit in this class, sir!) As I was saying: Now we need to switch over to SELECT BONE in the EDIT MOTION LAYER window. Now, select her right forearm, and make sure you are in MOVE mode. Before moving her forearm, let us first adjust our PREVIEW camera, so that we are looking at Elizabeth from a profile (side) view. (Gerald, take that camera off her bum, and place it where I instructed you...this instant, lad!) Now, the reason we place the camera on this angle is so that when we move her forearm, we can move it forward. Now set your MOVE button, and then move her forearm so that it is ahead of her, and held slightly high...at about head level.
|
|
By martok2112 - 13 Years Ago
|
Fig 005a 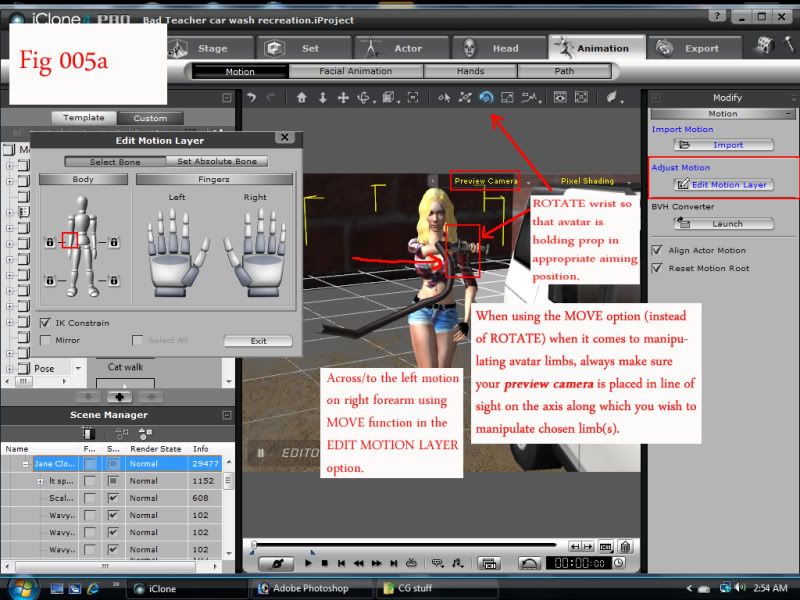
Now move the camera so that we are viewing Elizabeth from the front. (Zoom that camera out Stuart. I can see you oogling her cleavage from HERE!) Now, we can move her forearm a little bit so that it now starts to cross over to the left. (HER LEFT!) Switch to ROTATE mode so that we can ROTATE her wrist to properly aim the water hose. Click through the three rotation axes and adjust until you have the aim set.
Fig 005b 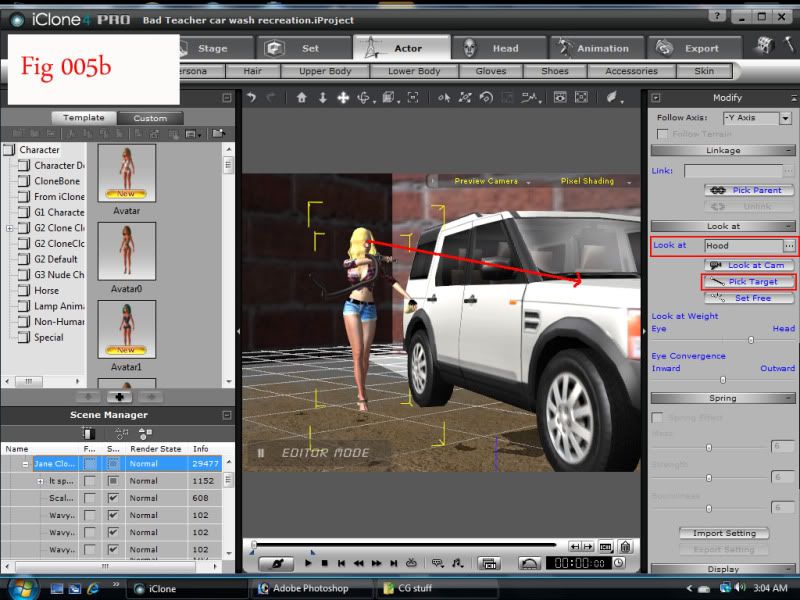
While still in frame one, now might be a good time to have Elizabeth actually looking at her target. So, with the ACTOR box highlighted, click on LOOK AT>PICK TARGET, and then with the cursor, select the hood of the vehicle. Now give her another test playback. You will now see that she is holding the hose properly, and moving along the vehicle, whilst looking at it.
Fig 005c 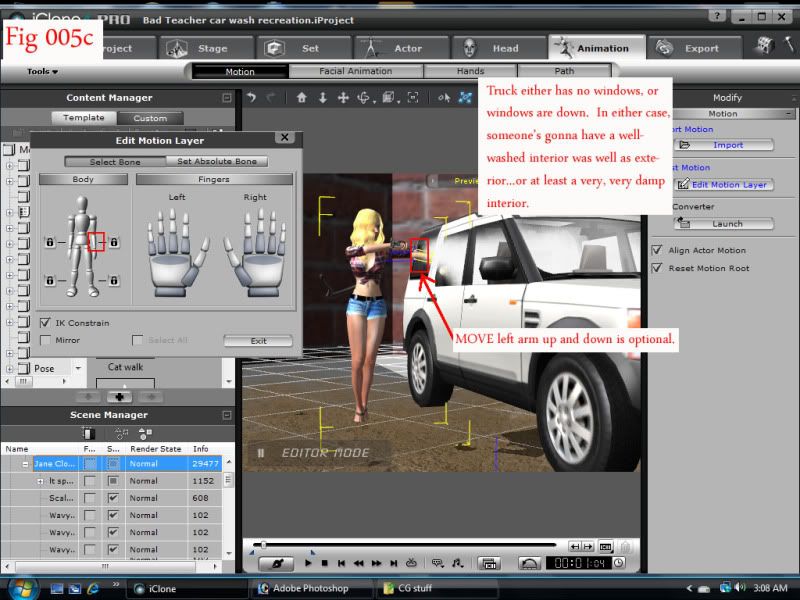
Alright, select the PICK DUMMY prop on Elizabeth in the SCENE MANAGER (lower left of the display) and expand it so that we can select its EFFECTS). TURN ON those effects so that the water hose is now actively spraying. Good. Now playback. Oh, dear. Umm....it looks like the owner might end up being a slight bit peeved at Elizabeth...although he should be peeved at himself for forgetting to roll his windows up. Anyhoo, nonsense aside, as you can now see, Elizabeth is walking around the vehicle, and actively hosing it down. We can also elect to move her left arm so that it appears she is rubbing down the vehicle while she walks up the path.
Watch the playback again. Well done, lads. You have successfully applied Elizabeth to the path, and then added in the animations and tweaks afterward.
You should now be able to create animations using characters along paths, and using whichever animations you desire. Remember the simple rule: PATH first, then ANIMATE. 
|
|
By mark - 13 Years Ago
|
Great job! Love it  Can we see the animation? Can we see the animation?
mp
|
|
By martok2112 - 13 Years Ago
|
Yeah, I'll get to that later tonight. (My sleep schedule's all askew.) 
I have another tutorial I'm planning, using the same motif. 
Glad you liked it. Many thanks.
|
|
By martok2112 - 13 Years Ago
|
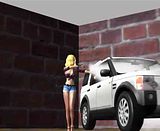
Mark, here's the resultant animation. 
|
|
By Keith_MPS - 13 Years Ago
|
Lord, whatever I done, just don't strike me blind for another two minutes.
Great stuff.
|
|
By martok2112 - 13 Years Ago
|
|
gnasche (6/13/2011)
Lord, whatever I done, just don't strike me blind for another two minutes.
Great stuff.
HA HA HA HA HA!!!
Thank you, gnasche.  I needed a good laugh, and thank you for the kind words. I needed a good laugh, and thank you for the kind words. 
|
|
By Paumanok West - 13 Years Ago
|
|
Wow, that's a great animation, and certainly a great way to publish a tutorial--in text, so we can read it at our pace, and broken up into forum posts. Tell us about the origins of the hose and the water effects.
|
|
By martok2112 - 13 Years Ago
|
Thanks, PW. I'm glad you enjoyed the animation, and found the tutorial easy to follow.  Since I don't have any kind of computer video capture software to make real-time video tutorials, this picture and text tutorial method is my preferred MO. I'm glad to see that it's palatable. Since I don't have any kind of computer video capture software to make real-time video tutorials, this picture and text tutorial method is my preferred MO. I'm glad to see that it's palatable.
As for the hose and the water effects, those came from the backstage content store (I got them before the backstage store turned into what it is now), and the hose already had spray effects tied to it. So it was just a matter of figuring out how to get the effects to kick on. The spray automatically follows the aim of the nozzle. So whomever created that prop....MAJOR PROPS to ya. It works really really well. 
In the video, yeah, they don't seem to have a point of origin now, do they? HA HA HA! It's a magic water hose lent to her by Hermione Granger. 
I know another poster in here created a tutorial for connecting the hose to another object so that the water and hose did indeed have a point of origin. I shall have to check that out some more.
In the meantime, just for the purposes of creating the animation to path tutorial, I had to use the magical hose lent by Hermione. 
|
|
By mark - 13 Years Ago
|
Hose me down as well....
|
|
By martok2112 - 13 Years Ago
|
HA HA HA HA HA HA!!! 
|
|
By colour - 13 Years Ago
|
Thanks for your time & effort All Copied to my HDD. All Copied to my HDD.IMO, These "Play-In-A-Day" Tuts that You, Mark, Cricky, Stuckon et al produce, are a vital part of learning iC, in that they don't concentrate on just one aspect & IMO, repetition is the only way to learn iC. Others may differ.
|
|
By martok2112 - 13 Years Ago
|
Most kind, Colour, thank you. I'm glad you find our tuts so useful and helpful. 
|
|
By mathahn - 13 Years Ago
|
I don't understand this part:
martok2112 (6/12/2011)
In FIgure 003  Set the length of time you wish the animation to carry on. For this, I've set the animation for about 4 seconds at first. Do this by moving the slider until you come up on about 4 seconds in the digital readout at the right of the playback bar. Now, set back to frame one and replay the animation to make sure that Elizabeth tracks properly along the path. If you are unhappy with the length of time it took for her to travel to the end point, you can always go into the TIMELINE and adjust the end path key frame and the end marker TRANSFORM keyframe. Move them to the right to increase the amount of time it takes for her to travel the path, move it to the left to decrease the amount of time. In this case, I thought she'd moved a bit too fast, so I moved the end PATH and TRANSFORM keyframes to the right until I got about six seconds worth of animation. Replay. Alright, I like this travel time, so we'll stick with that.
What slider?
How do I adjust the end path key frame and the end marker transform keyframe?
Thanks.
Also, sometimes I get the character to move along the path but then he goes back to the beginning. How do I stop this? Thanks.
|
|
By colour - 13 Years Ago
|
Post Deleted by me
|
|
By martok2112 - 13 Years Ago
|
Ok, Mathahn, this is just for you.
Now, do not feel insulted or slighted. I wrote this tutorial as best I could with the newb user in mind. According to your profile, you are a senior forum member, so I am going to presume that you have some knowledge of the user interface on iClone. This is written in case you don't.
I've broken this down about as simply as I can. I hope this helps.
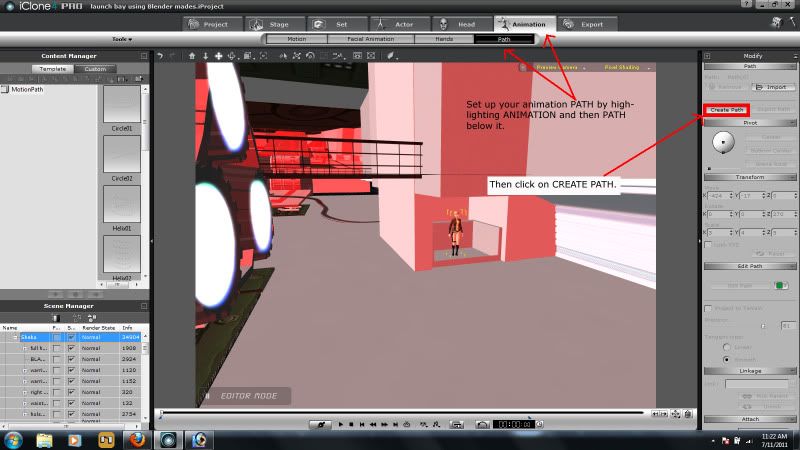
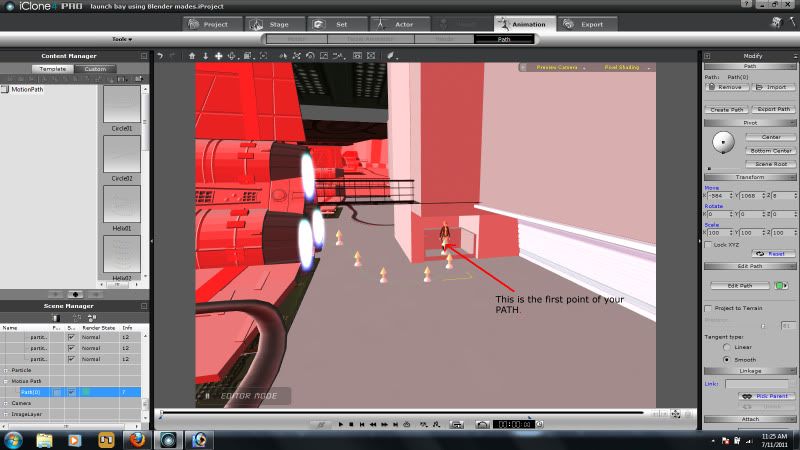
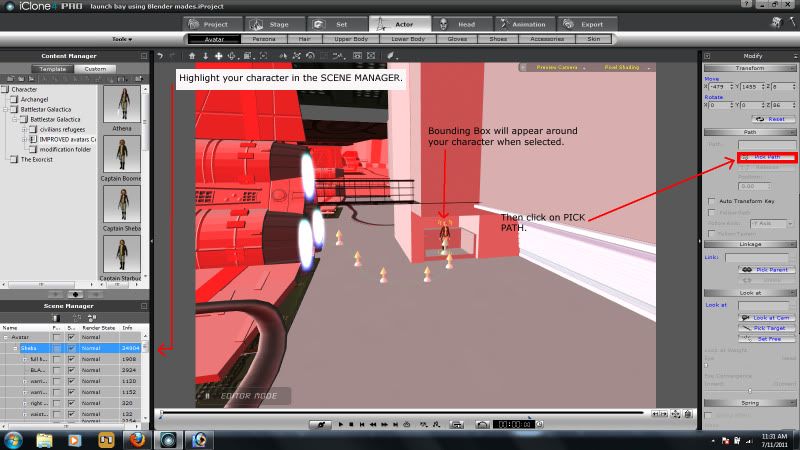
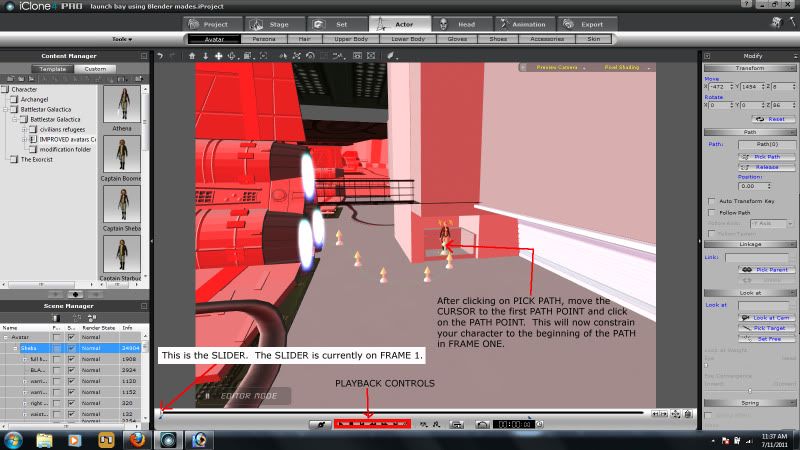
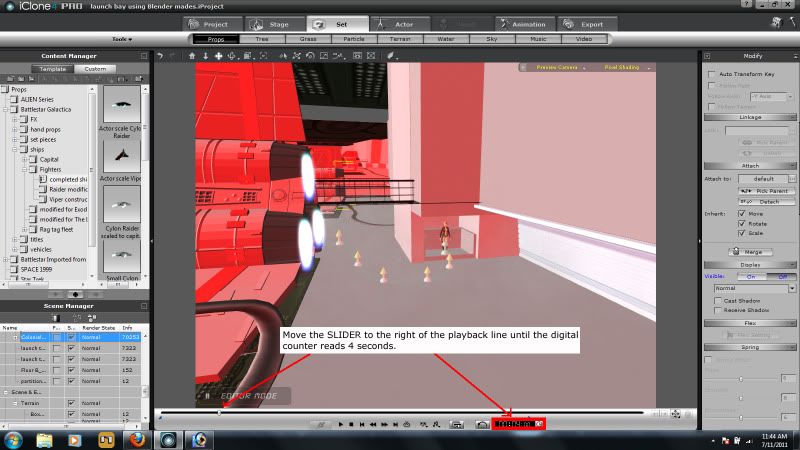
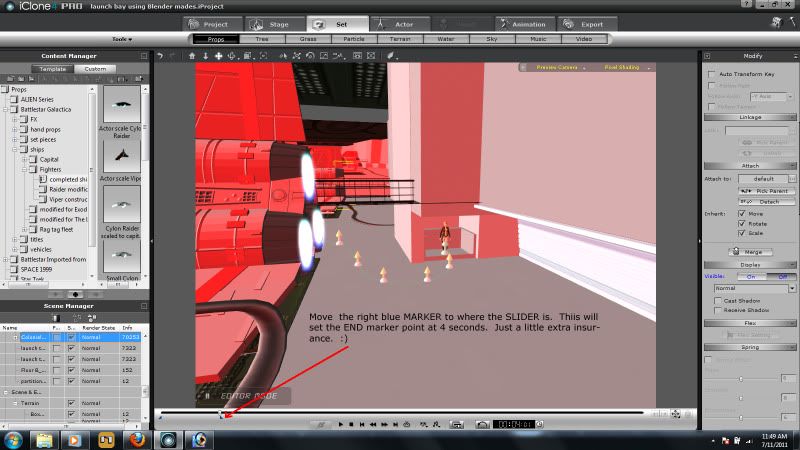
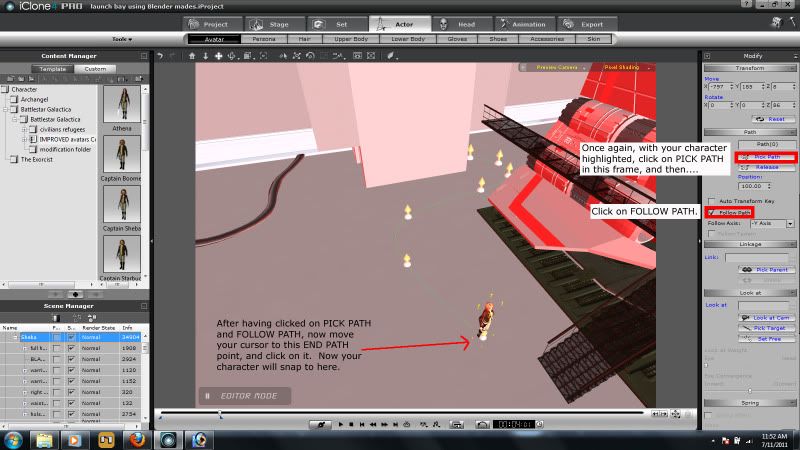
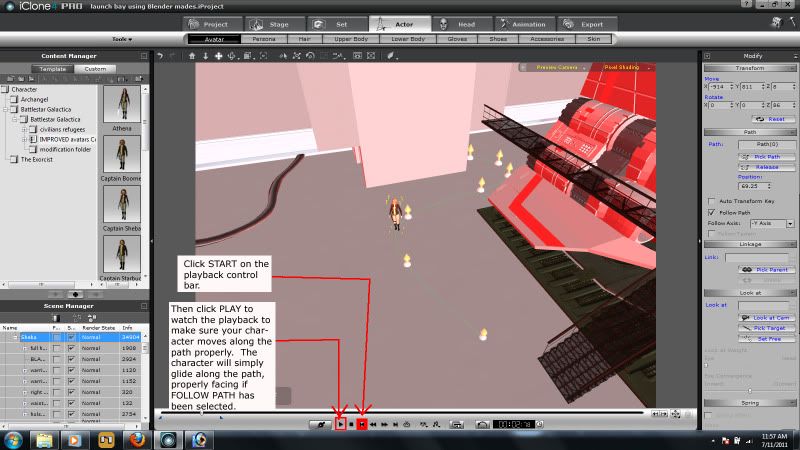
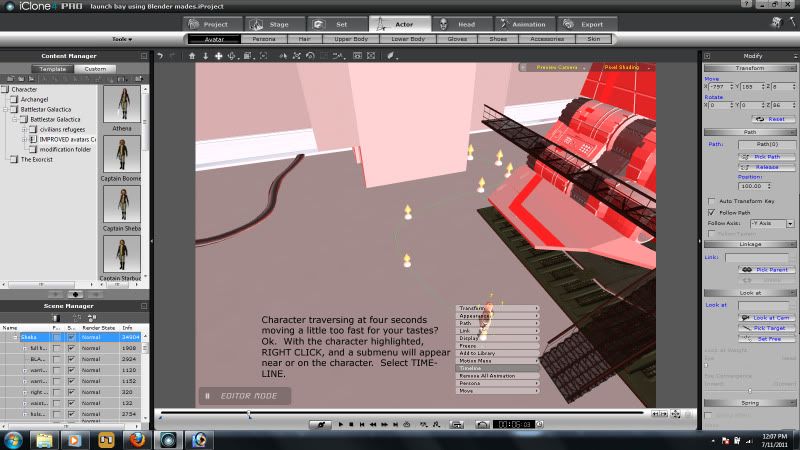
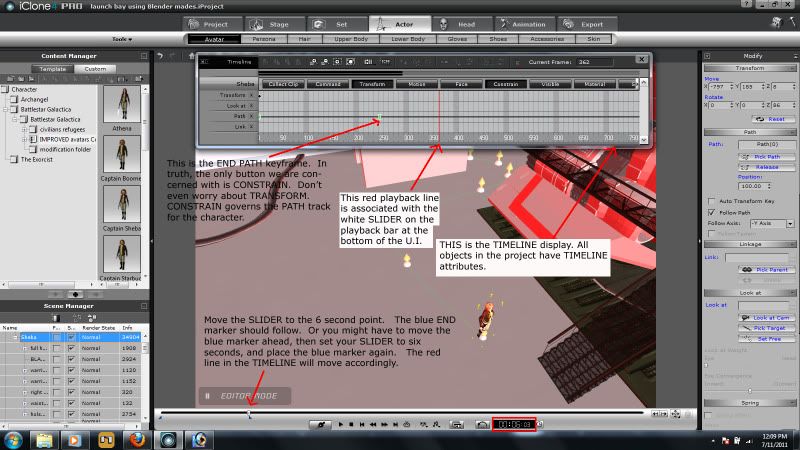
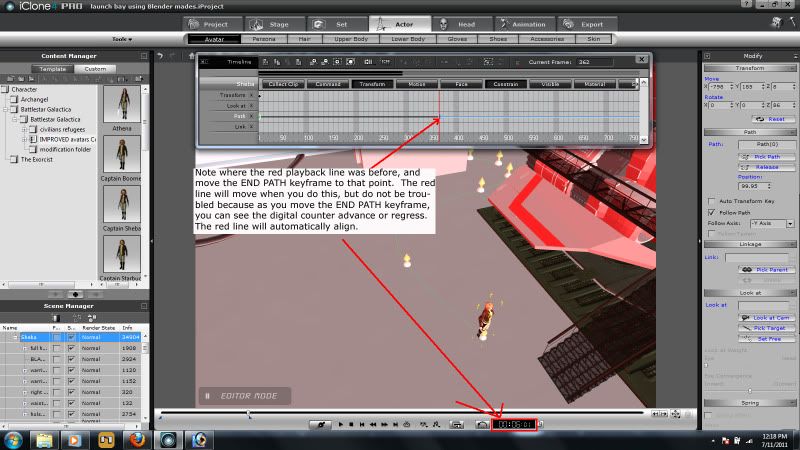
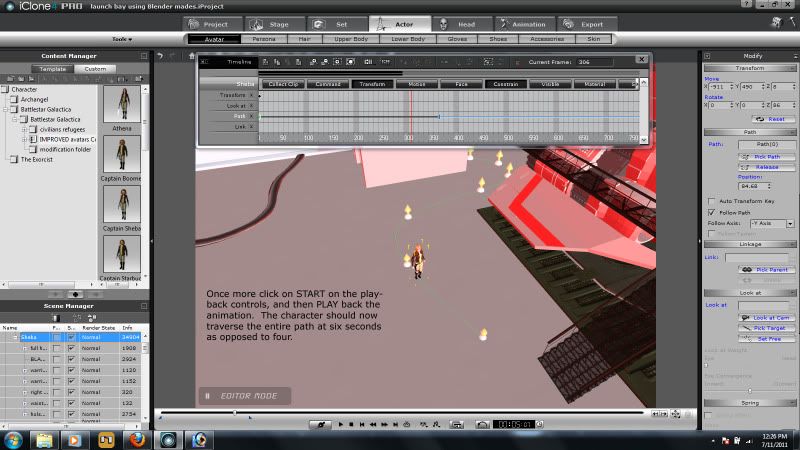
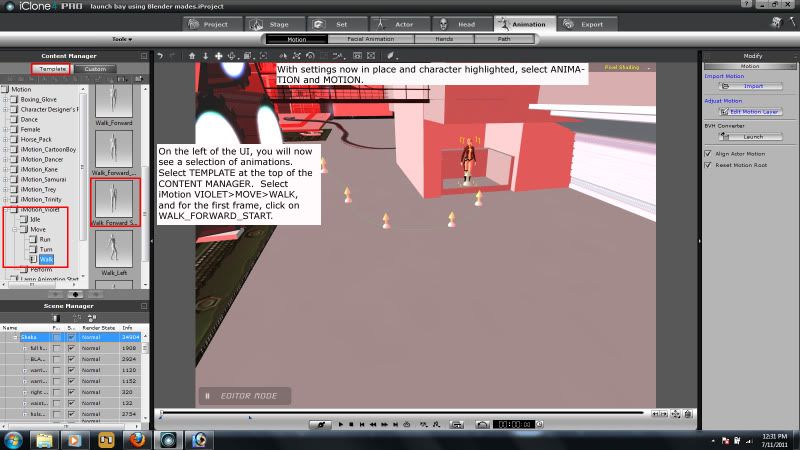
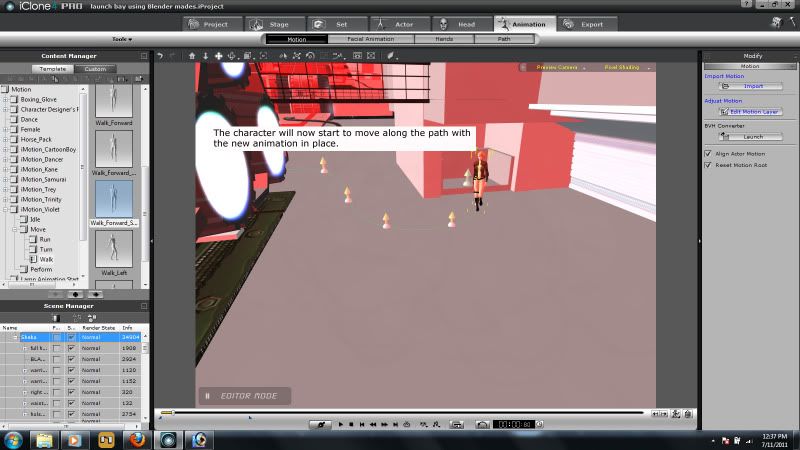
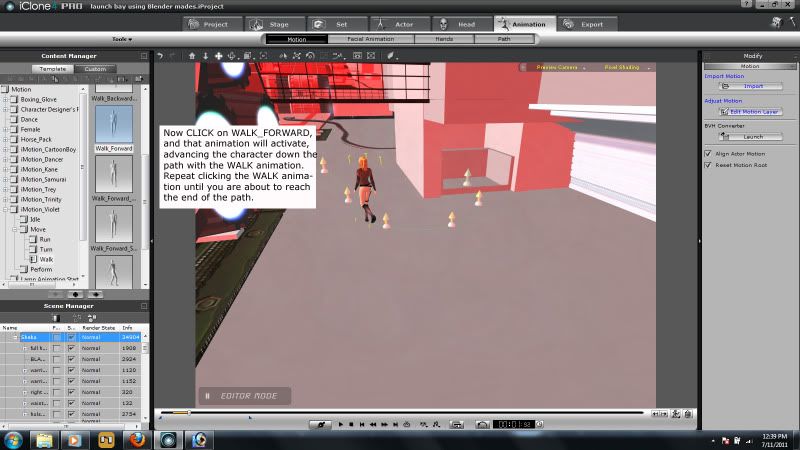
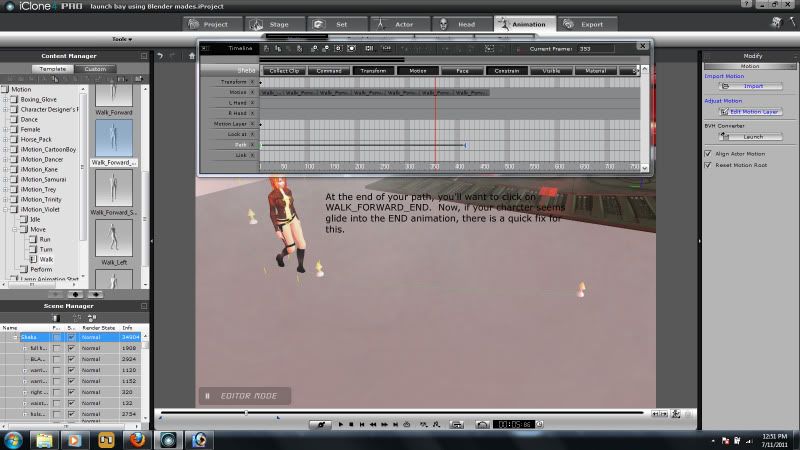
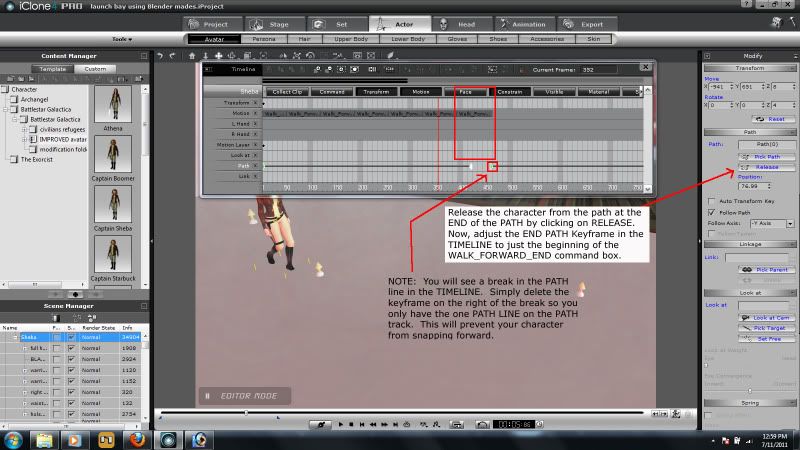
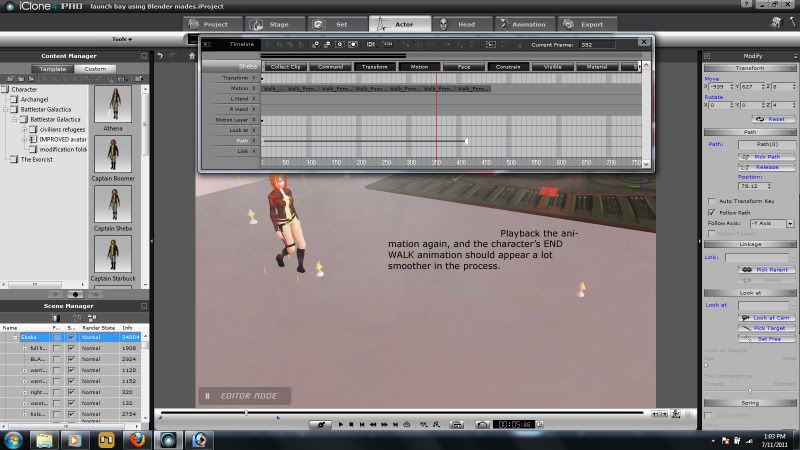
This is the last time I go this far. My tutorials, whilst trying to be as friendly as possible to newbies and novices (of course, I'm NO expert  ), are written under the presumption that the reader has a decent basic knowledge of the iClone UI. I put a lot of time into the tutorials to begin with...and although I don't claim to be able to cover every possible issue, I do try to cover as many as comes to mind. If you do not know where to find something even after I've pointed it out in the tutorial, my only recommendation is "read the frakkin' manual". ), are written under the presumption that the reader has a decent basic knowledge of the iClone UI. I put a lot of time into the tutorials to begin with...and although I don't claim to be able to cover every possible issue, I do try to cover as many as comes to mind. If you do not know where to find something even after I've pointed it out in the tutorial, my only recommendation is "read the frakkin' manual".
 Thank you, Thank you,
Steve
|
|
By mathahn - 13 Years Ago
|
|
Thanks. I am not at all insulted or slighted. I don't know why I'm considered a "senior member".
|
|
By martok2112 - 13 Years Ago
|
That's ok....as someone once pointed out to me, these "titles" are really just a posting rank system. Get enough posts in, and you get the title of tutor. 
I'm hopeful the above tutorial will help you out. 
|
|
By majorlance - 13 Years Ago
|
Champion! I used your tutorial to make paths for cars when it's just too much to operate several different cars at once and such, and it worked great! I want to set up a car chase scene. One question for anyone else out there would be how you might show the wheels turning when they hit a corner. I tried going back in to the director mode and pressing the a and d keys when the paths curved, but no luck there.
Thanks for the tutorial; it was a great help.
|
|
By martok2112 - 13 Years Ago
|
Thank you, majorlance. I am so glad the tutorial helped.  I look forward to seeing your car chase. I look forward to seeing your car chase. 
I've never really worked with cars before in iClone, but if the wheels can be turned as a result of keyframing, then you should be able to just keyframe them in Editor Mode when you have a car hit a corner. 
|
|
By Telek - 13 Years Ago
|
Just want to add my thanks, between this and Stuckon3D's videos my return to iClone has been a lot less difficult than It could have been.
Although a lot of head scratching has been and im sure will contuine to be involved (espically with the next version just around the corner  ) )
|
|
By martok2112 - 13 Years Ago
|
Most kind, Telek, Thank you.  I'm honored in helping smooth your transition back to iClone. I'm honored in helping smooth your transition back to iClone. 
|
|
By russellboyd90 - 13 Years Ago
|
|
Nice tutorial. I was working through but the options I have on the right hand motion menu for the actor are different. Is this because I have iClone 5?
|
|
By martok2112 - 13 Years Ago
|
Since I don't have iC5, and am unsure about it's interface, it is quite possible that you might have to adapt my tutorial to whatever UI the version 5 provides. 
|
|
By moviemachine - 13 Years Ago
|
Great tutorial martok2112,
On Fig 001 you have red Notes: the red text on grey background on my computer screen is unreadable. Not asking for a redo of that pic but could you tell us what that text is saying?
Much appreciated, and again this tutorial is super!
|
|
By martok2112 - 13 Years Ago
|
Thank you, Moviemachine. Apologies for the delayed reply. 
Lemme see here....fig 001 red text says:
In the upper left it says: NOTE: Set is not accurate to the actual production of "Bad Teacher" starring Cameron Diaz.
In the upper right, it says: Bad Teacher character stored with water hose and sponges as default props.
And on the bottom is says: FURTHER NOTE: Tonight I have to take a cold shower after completing this tutorial. 
So the only thing you might have missed was some humor. Ha ha ha. 
Again, I am glad you enjoyed the tut, and have found it useful. I will try to be more vigilant about how my text to backgrounds contrast. 
|
|
By MrStockboto - 13 Years Ago
|
Where might one find the character used in this tutorial? 
|
|
By moviemachine - 13 Years Ago
|
BristolDuncan (11/3/2011)
Where might one find the character used in this tutorial? 
It appears to be a modified Jane character (G2) 
|
|
By martok2112 - 13 Years Ago
|
|
Indeed it was the Jane character with another face placed on her.
|
|
By colour - 13 Years Ago
|
|
martok2112 (11/4/2011)
Indeed it was the Jane character with another face placed on her.Tasty!
|
|
By martok2112 - 13 Years Ago
|
Thank you. 
|
|
By maxieonline - 12 Years Ago
|
|
It is an older thread, but I have found it only now. And I would like to thank you for these 2 tutorials. They explain it very well and make it appear all so logical and easy that I wonder why I never got it before. Going back to iClone now and trying this ...
|
|
By martok2112 - 12 Years Ago
|
I just saw your reply, Maxie. Thank you for the kind words. I hope the tut helps you produce the result you seek. 
If I may, I have to say, if I had not found iClone, I would never have gotten into 3D animation like this. Between learning this, and learning how to build props and ships and sets in Blender, I feel like I can create almost anything I imagine...as long as it's something that falls within my interest.
I have seen many folks here create AWESOME fantasy pieces and animations. My hat is off to them.
I usually stick with sci-fi, or the occasional sexy thang like my Elizabeth in the tut. 
|
|