|
By Parallel World Labs - 3 Years Ago
|
I have lots of already recorded body and face mocap. The face mocap is animating CC4 Kevin's full face, including mouth.
I want to use 100% of the expressiveness of the facial performance BUT I want to blend 50% of the lips performance with 50% of the AccuLips viseme performance. If I just play with the Viseme / Expression strength sliders, they affect the WHOLE facial performance, resulting in me losing the eyes and eyebrow expressiveness.
I don't know how to either
1) EDIT the curves of the facial mocap so I can smooth / reduce keyframes on the LIPS/MOUTH ONLY
2) Mask out the Expressiveness setting so that I can have 100% expressiveness of the eyebrows but 50% on the lips.
I know I can replace/rerecord a facial mocap performance, but I used real actors and I need to preserve their performances.
Any thoughts?
|
|
By Kelleytoons - 3 Years Ago
|
Maybe my brain isn't working well, but my workflow is to always create the visemes with Acculips and then layer the ENTIRE facial performance on top of that (with Live Face). Doing it that way gives you exactly what it seems you are looking to do, namely - get the accuracy of Acculips with the facial performances of an actor.
I don't even do much on top of that other than I do not speak the lines - which is to say I will smile or frown (or whatever) and sometimes I even open my mouth a bit more of less but putting that layer on top of Acculips gives, to me, the perfect blend. No messing around with anything.
|
|
By Rampa - 3 Years Ago
|
Try this manual page for starters:
https://manual.reallusion.com/iClone-8/Content/ENU/8.0/50-Animation/Facial-Animation/Removing-Facial-Expressions.htm
|
|
By Parallel World Labs - 3 Years Ago
|
The technique described with the motion puppet gets me part of the way there but doesn't address my question in its entirety - that's a great technique for completely removing all mouth movements off your mocap so you can entirely replace with AccuLips.
That's not what I'm looking to do - I'm looking to BLEND the acculips and the mouth part of the facial performance, while KEEPING the rest of the facial performance at full strength.
So far I haven't seen a way to control the amount of the blend on masked-out parts. I know there's no feature to do this directly but I was hoping some clever user had come up with a way.
|
|
By Parallel World Labs - 3 Years Ago
|
I mean, that works for your own workflow - awesome. That's great when you are an indie creator and you're doing all the acting yourself.
In my case, I have professional actors who are delivering a full performance and I am coming along afterward and cleaning up their lip synch basically, trying to preserve the rest of their performance as accurately as possible, not the other way around.
|
|
By Parallel World Labs - 3 Years Ago
|
One obvious way to achieve what I want is to use Animation Layers and weights along with multiple passes of masked-out motion capture or face puppetting BUUUT so far I have not found a way to get facial animation into the Animation Layers.
I don't for the life of me understand why iClone makes this distinction between body part motion and facial motion - it's all animation, why not use the same system?
Similarly, what about curve editing for captured facial motion data? Why can I not unlock the base Layer, and edit facial animation curves just like you can with motion data?
|
|
By animagic - 3 Years Ago
|
One difference between body animation and facial animation is that one is bone-based and the other morph-based so obviously they are separate systems.
To make it one system would make things just more convoluted and unworkable in my opinion.
If you have specific requests, you can always add them to the Feedback Tracker. There's is little point in questioning why things are the way they are.
|
|
By Rampa - 3 Years Ago
|
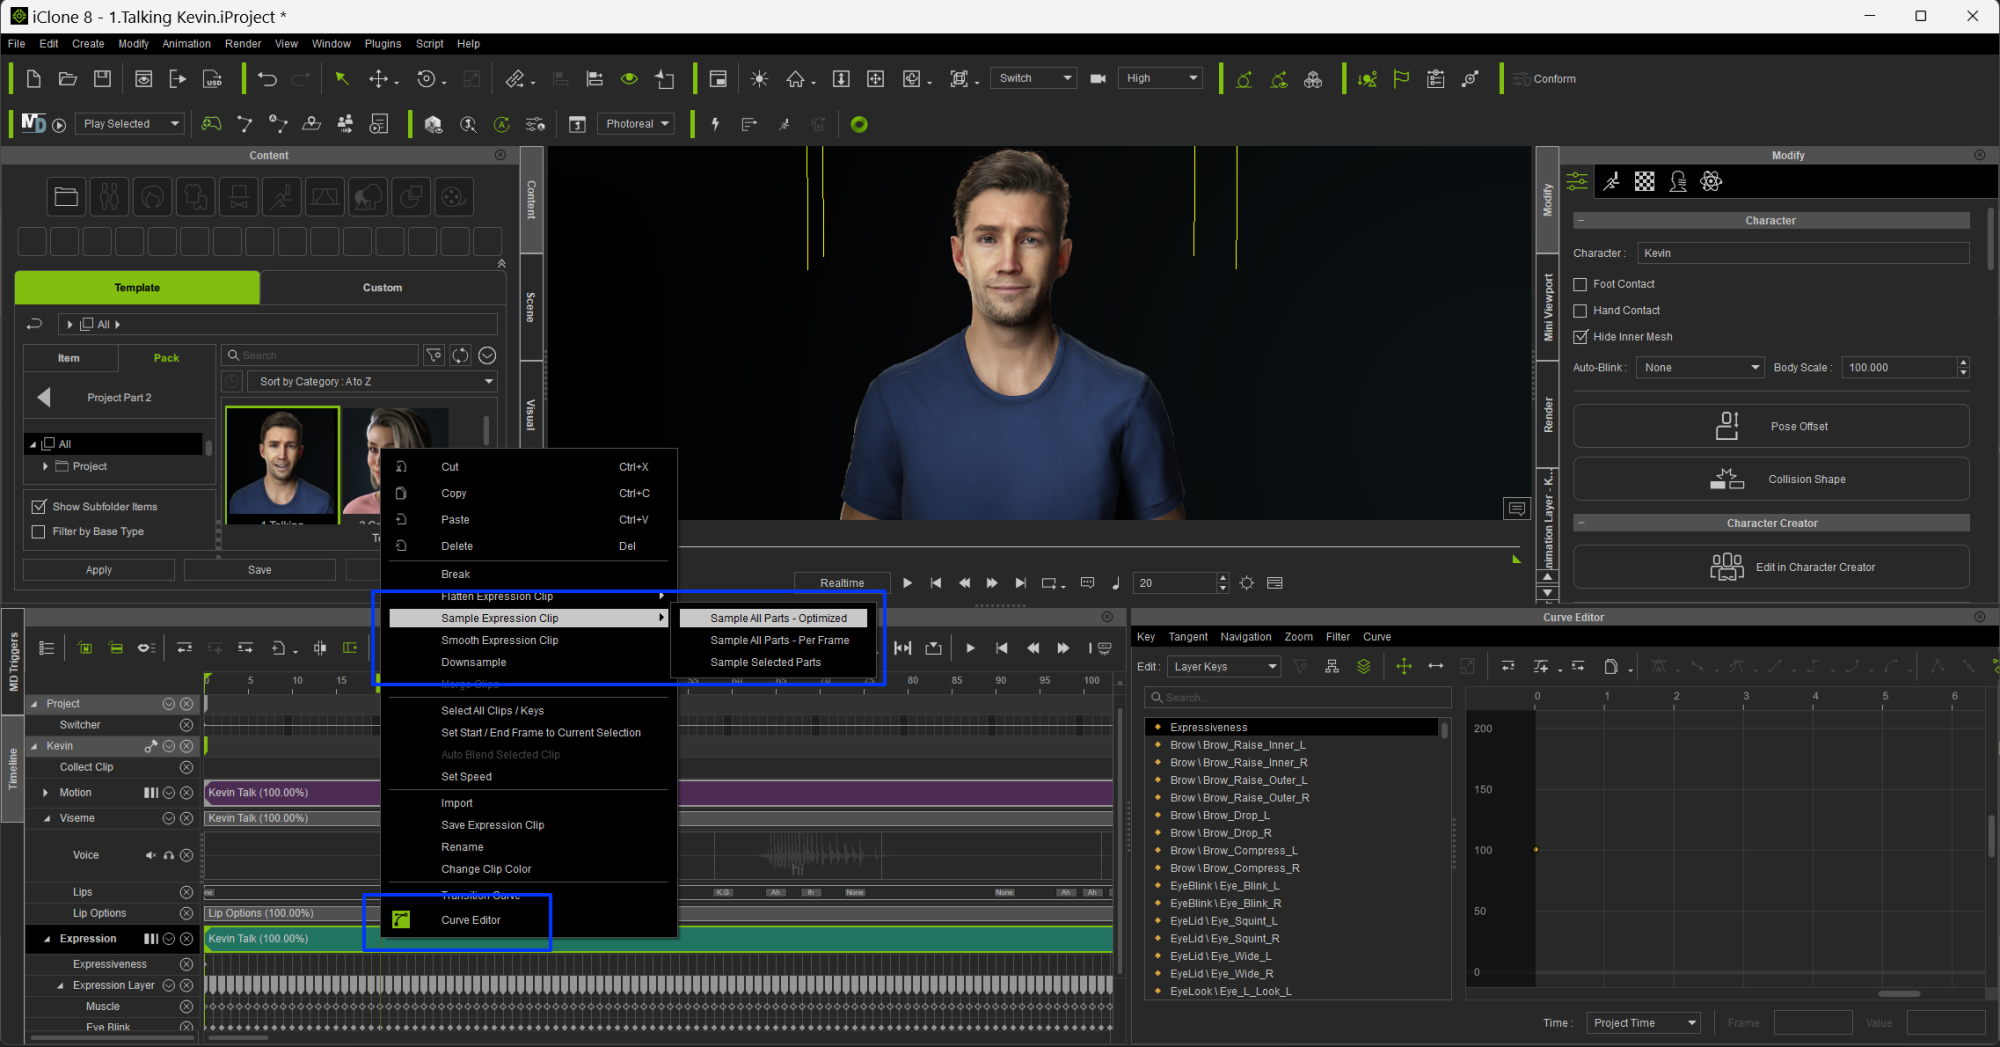
You can use the curve editor. Right-click on the track (expression in my picture) and sample. Right-click a second time and select "Curve Editor".

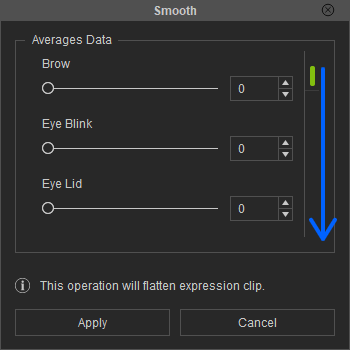
Note there is also a smoothing option in the right-click. Scroll down the list in its window. You can basically smooth elements of the expression to whatever percentage you want. Probably quicker than using the curve editor.

|
|
By Parallel World Labs - 3 Years Ago
|
@Rampa - oh wow! Okay, now we're talking. I'm going to try that as soon as I get back to my workstation. The key is to Sample the clip first, which I guess turns the data into keyframes which you can then edit in the curve editor. If that works, it's exactly what I need!
I've been trying all day to use either the face puppet or the LiveFace mocap to zero out just the lips using masking. The results have been inconsistent! In one clip I was able to completely remove all lip expressions using Replace. But in my most recent clip (captured exactly the same way) I can't get rid of the expressions completely - I can reduce them but they remain.
The problem really is that the AccuLips visemes are additive to the expression capture - not blended. So if you're talking in your face capture and your mouth is open, it opens twice as wide when the visemes are layered on top!
I wonder whether the sampling trick could also work for Viseme tracks - flattening the result so you can then edit with the curves. It would be very powerful if you could.
|
|
By Rampa - 3 Years Ago
|
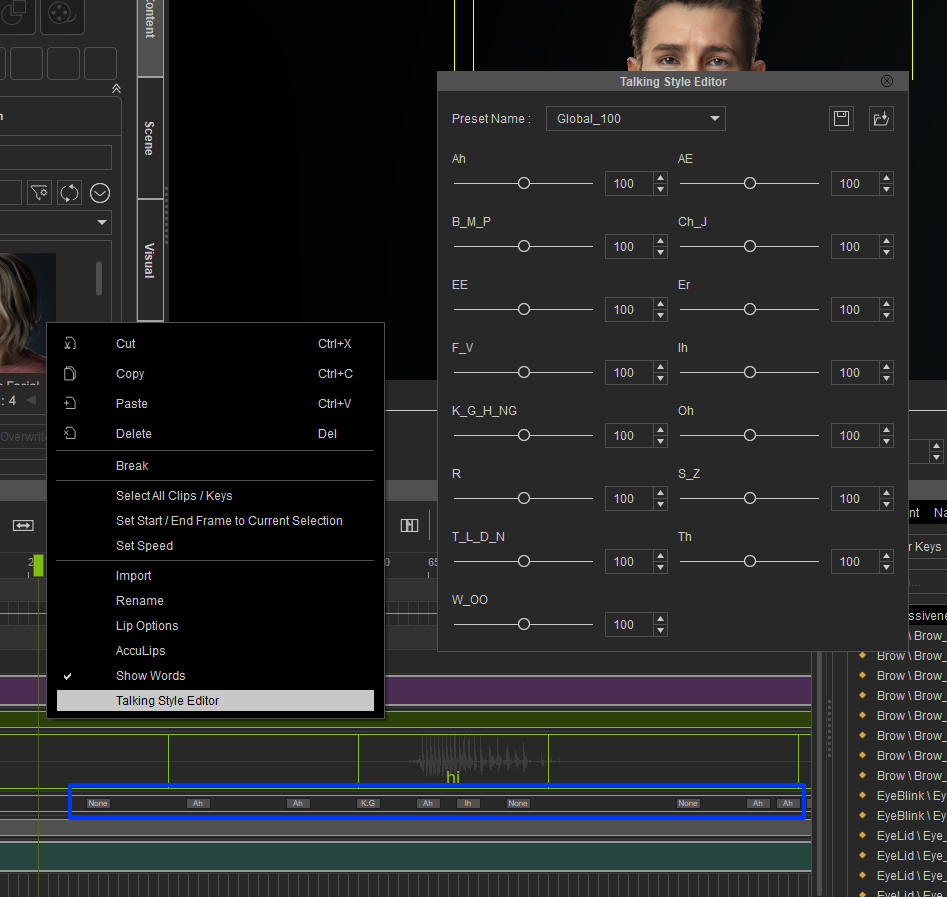
Visemes can be adjusted with the global strength slider in the animation tab of the modify panel, or by right-clicking the viseme track and selecting "Talking Style Editor" to adjust the different viseme strengths, or by double-clicking each viseme separately to edit them one by one.

|
|
By Parallel World Labs - 3 Years Ago
|
Yes, I have been playing with the Talking Style editor - primarily to pick the "Enunciating" profile.
Unfortunately it does the OPPOSITE of what I need - it allows you to exaggerate or reduce the blend of your various Viseme morph targets, instead of blending the mouth deformations of the motion capture data.
But can it be keyframed? I also couldn't figure out how to keyframe the "Lip Options" track.
|
|
By Rampa - 3 Years Ago
|
Changing the talking and smoothing settings is by clip, so go ahead right-click-break your viseme clip at the places you need it to change. Then set each clip.
For blending, use both the expression and viseme together. You will need to reduce the strength of both, because they are driving the same mesh. Otherwise you will see the the overdrive as you have before. So try setting both expression and viseme to 50%.
|
|
By Parallel World Labs - 3 Years Ago
|
Thanks for the continued tips and advice. The problem with setting viseme and expression to 50% is that while it does blend the lip animations, it also dampens the rest of the facial animations.
But your comment has made me wonder whether I can't exaggerate the morph targets that are not dealing with the lips and then globally tone everything down with the expression slider...
|
|
By mrtobycook - 3 Years Ago
|
|
This thread has three of the most knowledgeable people responding - Mike, Rampa and animagic I wish I could have all your knowledge somehow imprinted on my brain lol. (Plus Bassline’s!) :)
|
|
By Parallel World Labs - 3 Years Ago
|
I just thought I'd come back to this thread for posterity as I have found a solution that seems to really work in my use case, which I'll document below:
1. I capture all facial animation using the LiveMotion / LiveFace plugin. If I know I'll be blending viseme and facial expression, then I turn off facial mocap for just the JAW section prior to recording. This is done in the settings pane when you select the facial mocap and associate it with the character. By default all facial muscle groups are selected for capture, but you can click on different sections to deactivate capture for just those sections. This is not strictly necessary, but it saves a step later on.
2. After capture is complete, I perform the usual steps of adding an AccuLips animation layer to the character's animation, using the written script and captured audio track. I temporarily set the Expression value to 0 using the Modify panel, with Viseme set to 100 so I can fully concentrate on getting the generated lip synch as close as possible. This generates a highly accurate, if somewhat expressionless lip performance.
3. After that, I set expression to 100 and viseme to 100, and scrub through my animation looking for trouble spots. This usually involves areas where the lips pucker or stretch, because the captured facial mocap is added to the viseme morph targets, often resulting in > 100% morphing, which looks, well, horrendous in most cases.
4. Next, using the techniques helpfully provided by experts in the post above, I sample the expression layer, so that I have access to the curve editor. It's also a good idea to sample optimized here, to slightly speed up the next step.
5. The next step is to open the curve editor and determine which morph targets are causing the greatest issues, and reduce them dramatically. You can do this for the entire performance or for just a section, as needed and depending on the amount of time you want to spend. Typically I'll scrub to find the most offensive section and try to isolate which expression tracks are responsible for the issue by first examining the curves and trying to visually identify a curve that peaks at that exact frame. If that is inconclusive, I'll systematically delete curves until I find the tracks responsible.
6. Now that I have found the tracks that interfere the most with the viseme animation, I activate them, select all the points and first perform an Optimize to reduce the number of control points - this step is critical to speed up the processing, which can become unbearably slow.
7. With the offending curve tracks optimized, I then Simplify them as a preliminary step. I usually use a fairly high value here, as I will be discarding a lot of data anyway. Typically a value above 20.
8. As a last step then, and with the optimized and simplified control points selected, I use the Scale tool and scale everything down to about 25%. I find this allows me to still keep some of the subtleties of the performance, while eliminating the exaggerated effect caused by the additive animation layers.
I hope this helps others. If you have a workflow you think could be even more effective, by all means please share!
|