|
By MilesV - 5 Years Ago
|
There are some great threads for Unreal Engine 4 and 5 development, but I didn't see one for Unity Developers (Not a centralized thread anyway). So, I'm hoping this thread will serve as a place for Unity Devs to congregate and share tips and tricks, get help with issues they encounter, collaborate, etc.
|
|
By MilesV - 5 Years Ago
|
So to get things started:
The Unity Pipeline seems to be causing problems for a lot of people. Per the below thread, RL plans to provide auto-setup for Unity 2020.3 LTS (currently compatible with 2019.3). What is your current workflow for bringing CC3 characters into newer unsupported versions of Unity? How are you handling the new Smart Hair in Unity?
https://forum.reallusion.com/483154/Unity-Auto-Setup-Plans-for-2021?Keywords=unity%20auto
|
|
By MilesV - 5 Years Ago
|
I came across this article while looking into solutions for game hair. It's a really informative article that grounded my expectations.
Why Hair In Video Games Is So Hard To Do Well (kotaku.com.au)
|
|
By Victor.Soupday - 5 Years Ago
|
Hair is certainly a headache to get right in Unity. I'm getting some OK results with the HDRP/Hair shaders.
Remember to bake the diffuse and specular maps in the export settings...
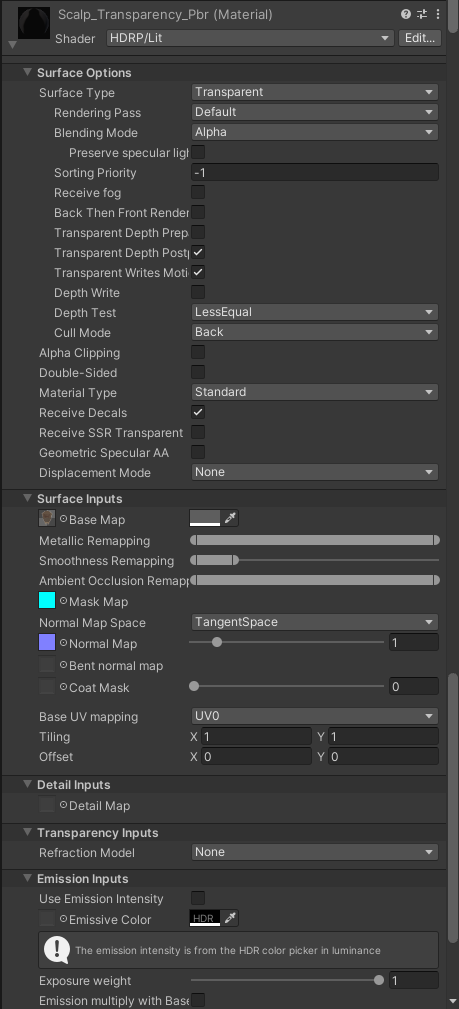
First thing to do is lower the smoothness of any scalp materials and give them a darker base map tint, so it doesn't show through so much and there are no specular reflections. Set it's Sorting Priority to lower than than the main hair material so it gets drawn first and is then overdrawn properly with the hair.
Main Hair Materials
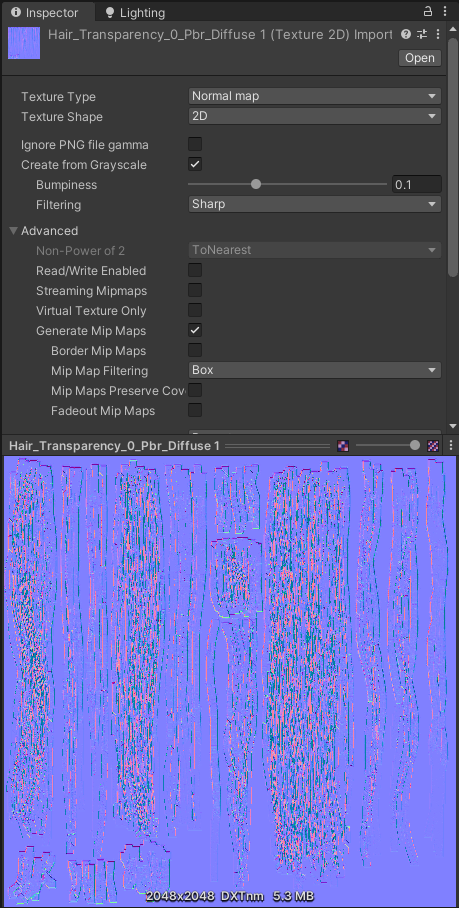
I'm using the HDRP/Hair shaders for these. Plug in the diffuse and AO Map. The smart hairs don't usually come with normals or bump maps, but here I'm faking it with a copy of the diffuse texture imported as a height map. It can improve the look a little bit.
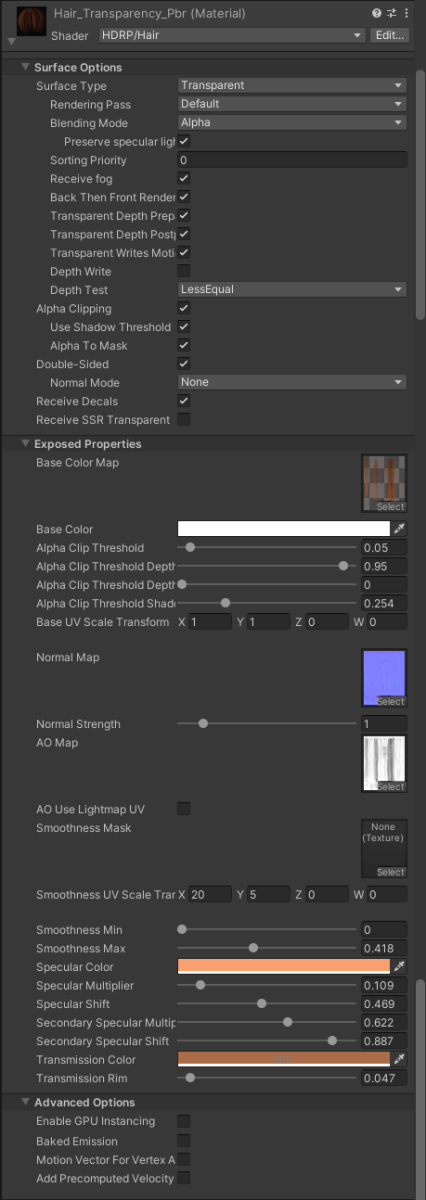 
Some settings
- Back then Front Render to draw the underside of the hair cards properly,
- Depth Pre-pass to help with any remaining Z-sorting problems.
- Depth Post-Pass and Write Motion Vectors is needed for some post processing effects, notably motion blur and depth of field.
- No Depth Write.
- Alpha Clipping and Shadow Clipping is needed to make the depth prepass work.
- Alpha to Mask for better anti-aliasing effect.
- Double Sided of course.
- Double Sided Normal Mode: set to whatever looks best, it varies with lighting conditions, usually 'None' is a safe bet.
- Alpha Clip should be fairly low ~ 0.1. Too high and it starts to eat up all the little strands.
- Alpha Clip Threshold Depth Prepass: this is quite an important setting, it pre-calculates which pixels (based on the clip threshold) are closest to the viewer so that it doesn't draw anything else underneath them. Some hair meshes with relatively few z-sorting issues (like this example) can get away with a high depth pre-pass. Less well sorted meshes will need a lower pre-pass threshold, but too low a setting will make the hair look thin and like there is nothing else underneath so this needs some experimentation.
- Alpha Clip Threshold Depth Postpass: Set to about the same as Alpha Clip.
- Shadow threshold, not too low as it can make the hair look too dark in strong lighting.
- The smoothness and specular settings control the anisotropic specular reflections. There's lots to play with here. Keep the Max Smoothness < 0.5 so the reflections aren't too strong and keep the Transmission Rim very low otherwise the hair looks too translucent.
|
|
By MilesV - 5 Years Ago
|
Thank you, Victor.Soupday! I didn't get to play with this much last night, but quickly got some decent results. You've saved me and I'm sure plenty of other people a ton of time. I really appreciate you taking the time to break things down for me and I love the Blender plugin you've been developing.
Almost all my experience with Unity has been with the built-in pipeline. I've recently been experimenting with Gaia Pro and GeNa Pro to create game environments using URP and HDRP, but they do all the heavy lifting for me. I was starting to dive into the documentation Unity has for Shader Graph and was getting a little overwhelmed. Its great to know I can switch to the hair and eye shaders from the inspector and not have to go down the rabbit hole of the node editor just yet.
Thanks again!
|
|
By cynsegura - 5 Years Ago
|
|
Hi guys thank you for creating this thread. I am wondering if to be able to make the character talk as a real human which is c3 plus from cc3.4 version. Do i need to create manual blendshapes for unity? Or is any better way with the recent updates. Please let me know. Kind regards
|
|
By Victor.Soupday - 5 Years Ago
|
All the facial blend shapes available in CC3 are exported with the characters (the full characters, not sure about the Gamebase or InstaLod'ed characters).
e.g. these are all the blend shapes on the main body mesh:
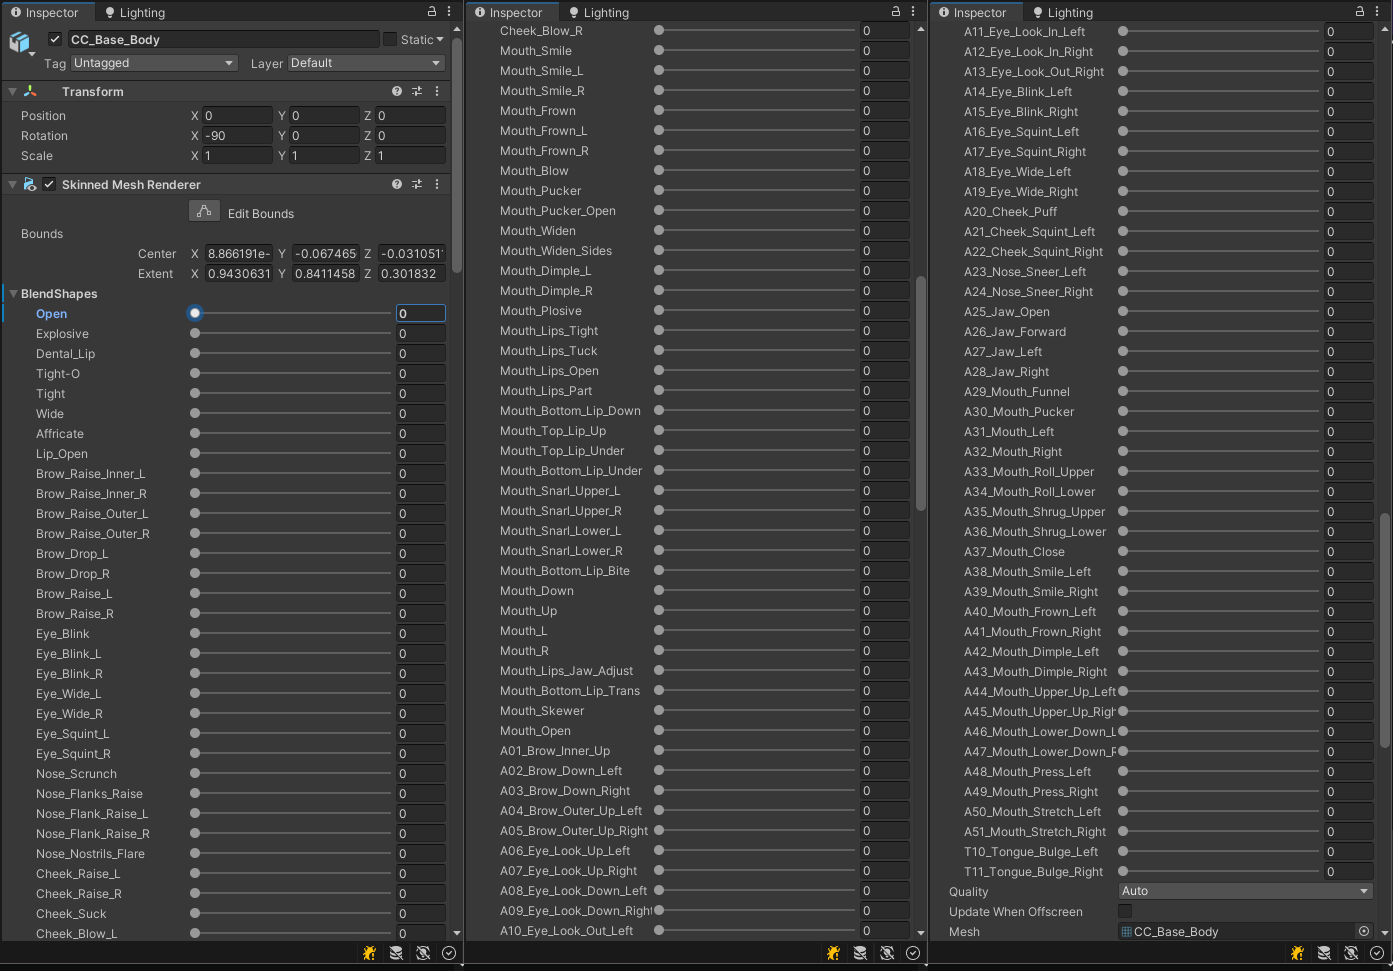
There are also blend shapes on the tongue, eye occlusion and tearline meshes, as well as on the smart hair: beard, moustache and eyebrow meshes too. Everything that takes part in the facial animation has the requisite blend shapes.
|
|
By michael.pickering - 5 Years Ago
|
Thanks for starting this thread! There's not been much joy for us Unity devs on this Forum, and it rather looks like we're being ignored by RL (after they deposited our money of course) but I'm keen to see if there are more of us.
Those hair suggestions look helpful, I'll have a look in more detail when I get back into Unity over the next few days. Thanks to those who contributed!!
|
|
By Victor.Soupday - 5 Years Ago
|
|
MilesV (6/10/2021)
I was starting to dive into the documentation Unity has for Shader Graph and was getting a little overwhelmed. Its great to know I can switch to the hair and eye shaders from the inspector and not have to go down the rabbit hole of the node editor just yet.
But down that Rabbit hole, you must go.
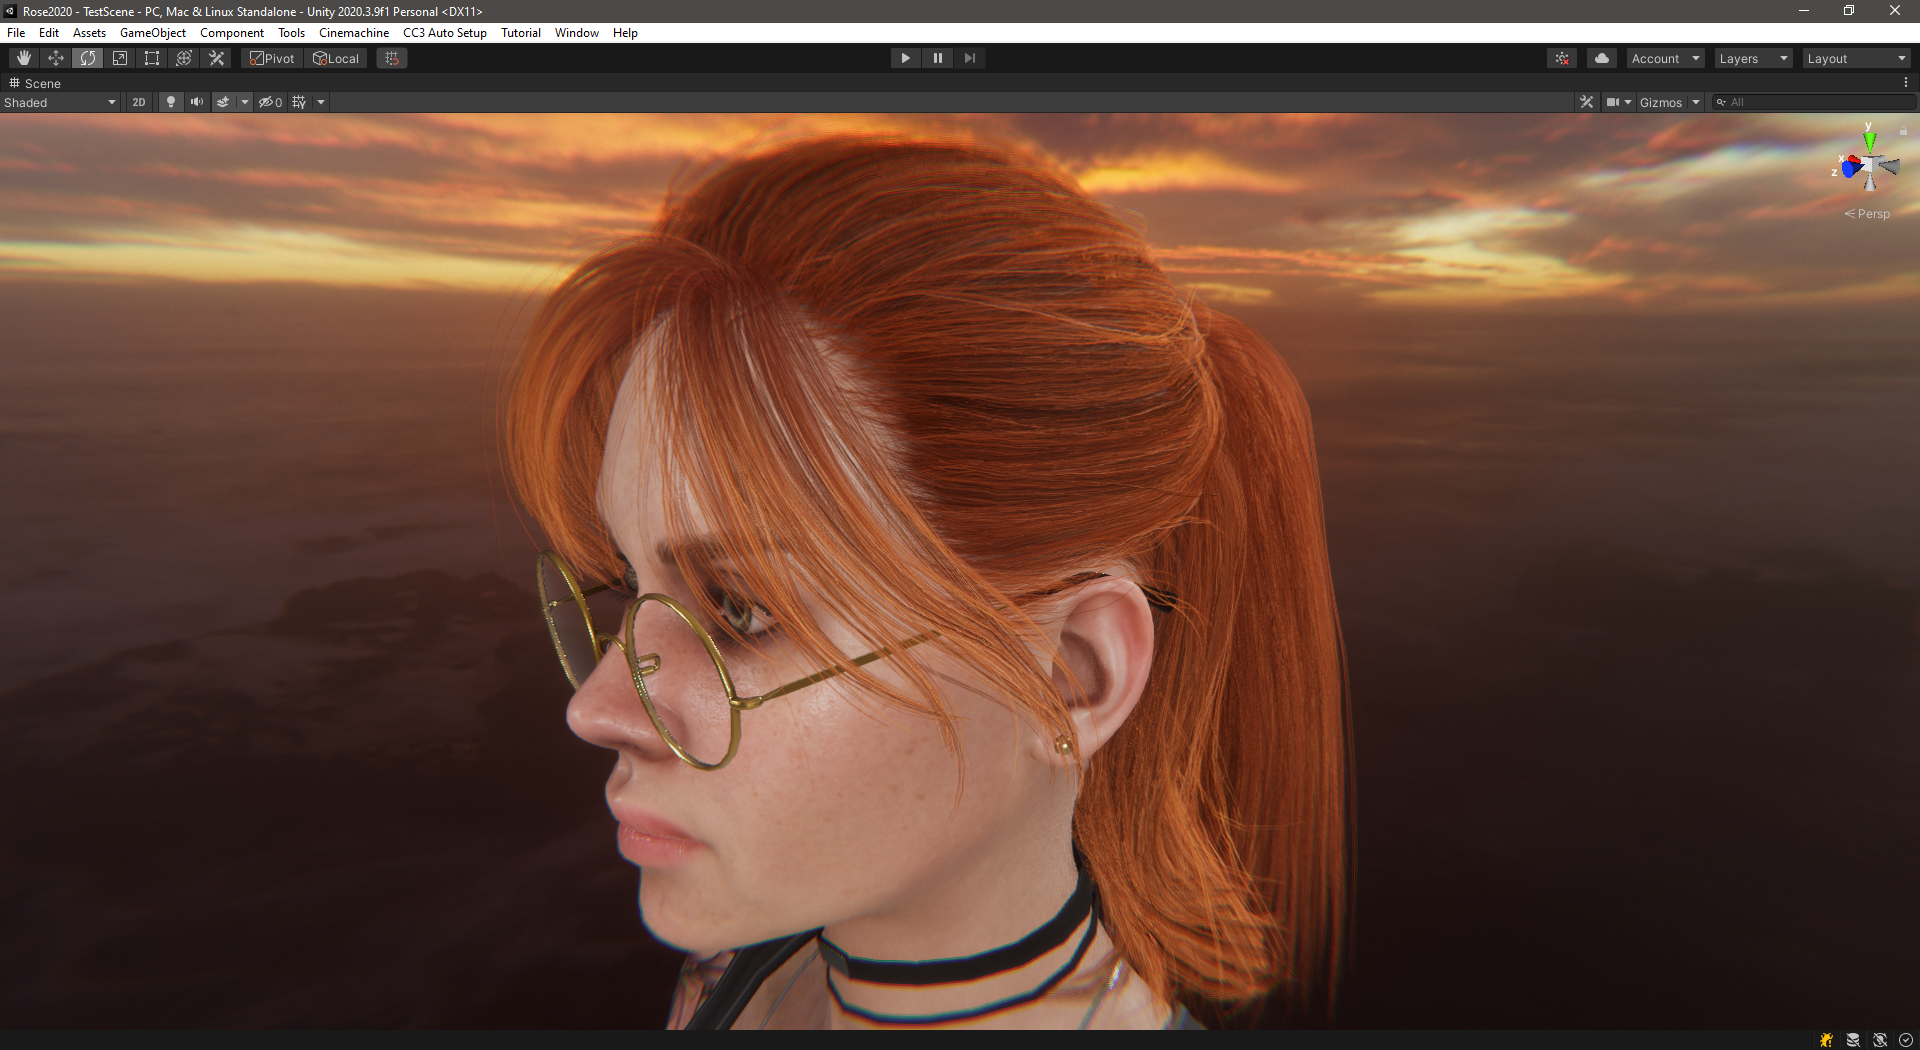
It has taken me a while to figure all this out but, consider this character in CC3:
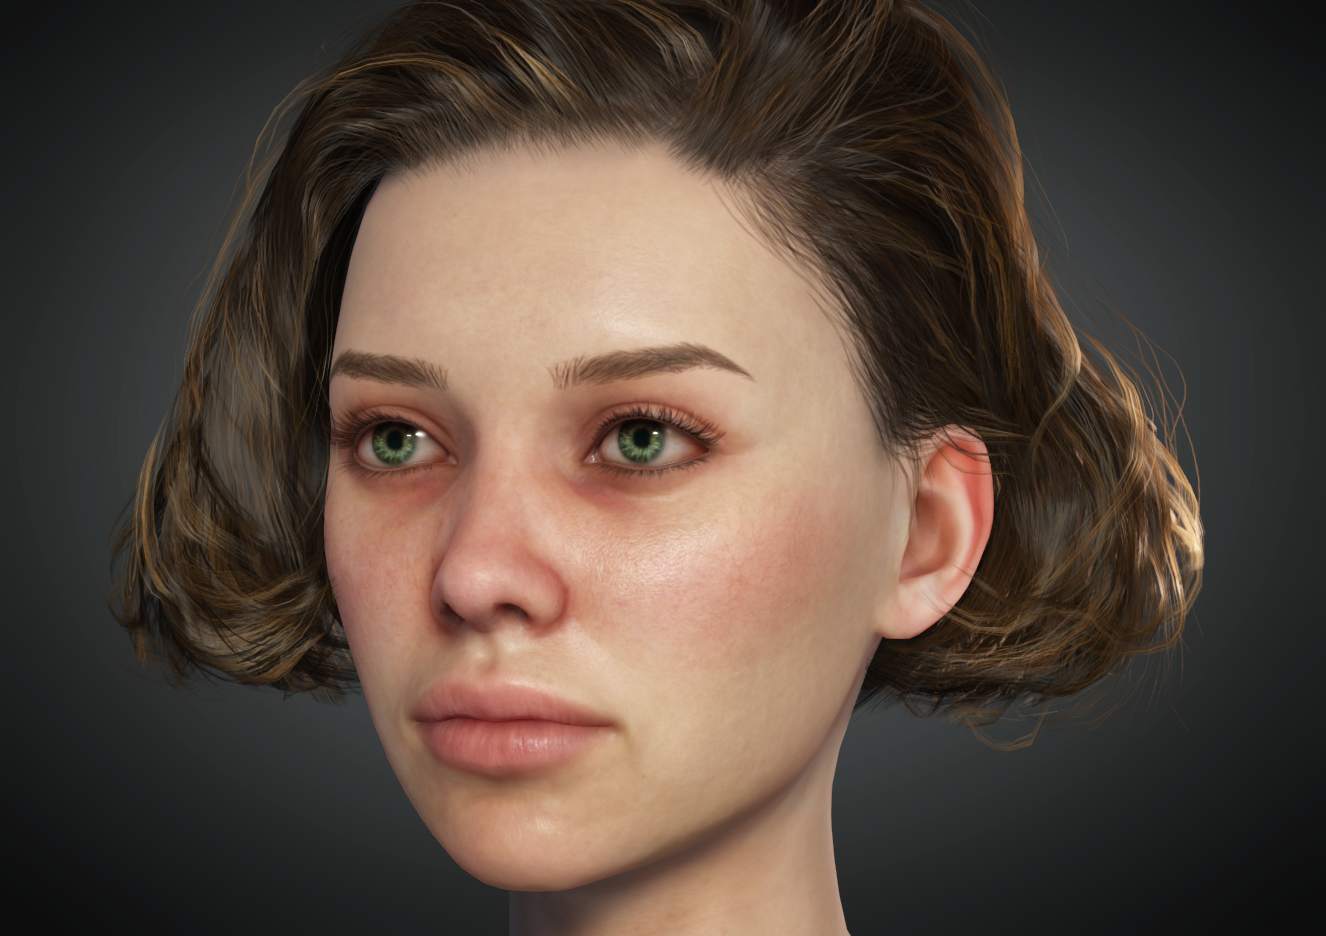
She is of the quality you would expect from Character Creator, but when you export into Unity (I'm using Unity 2020.3 / HDRP Pipeline here) you get this:
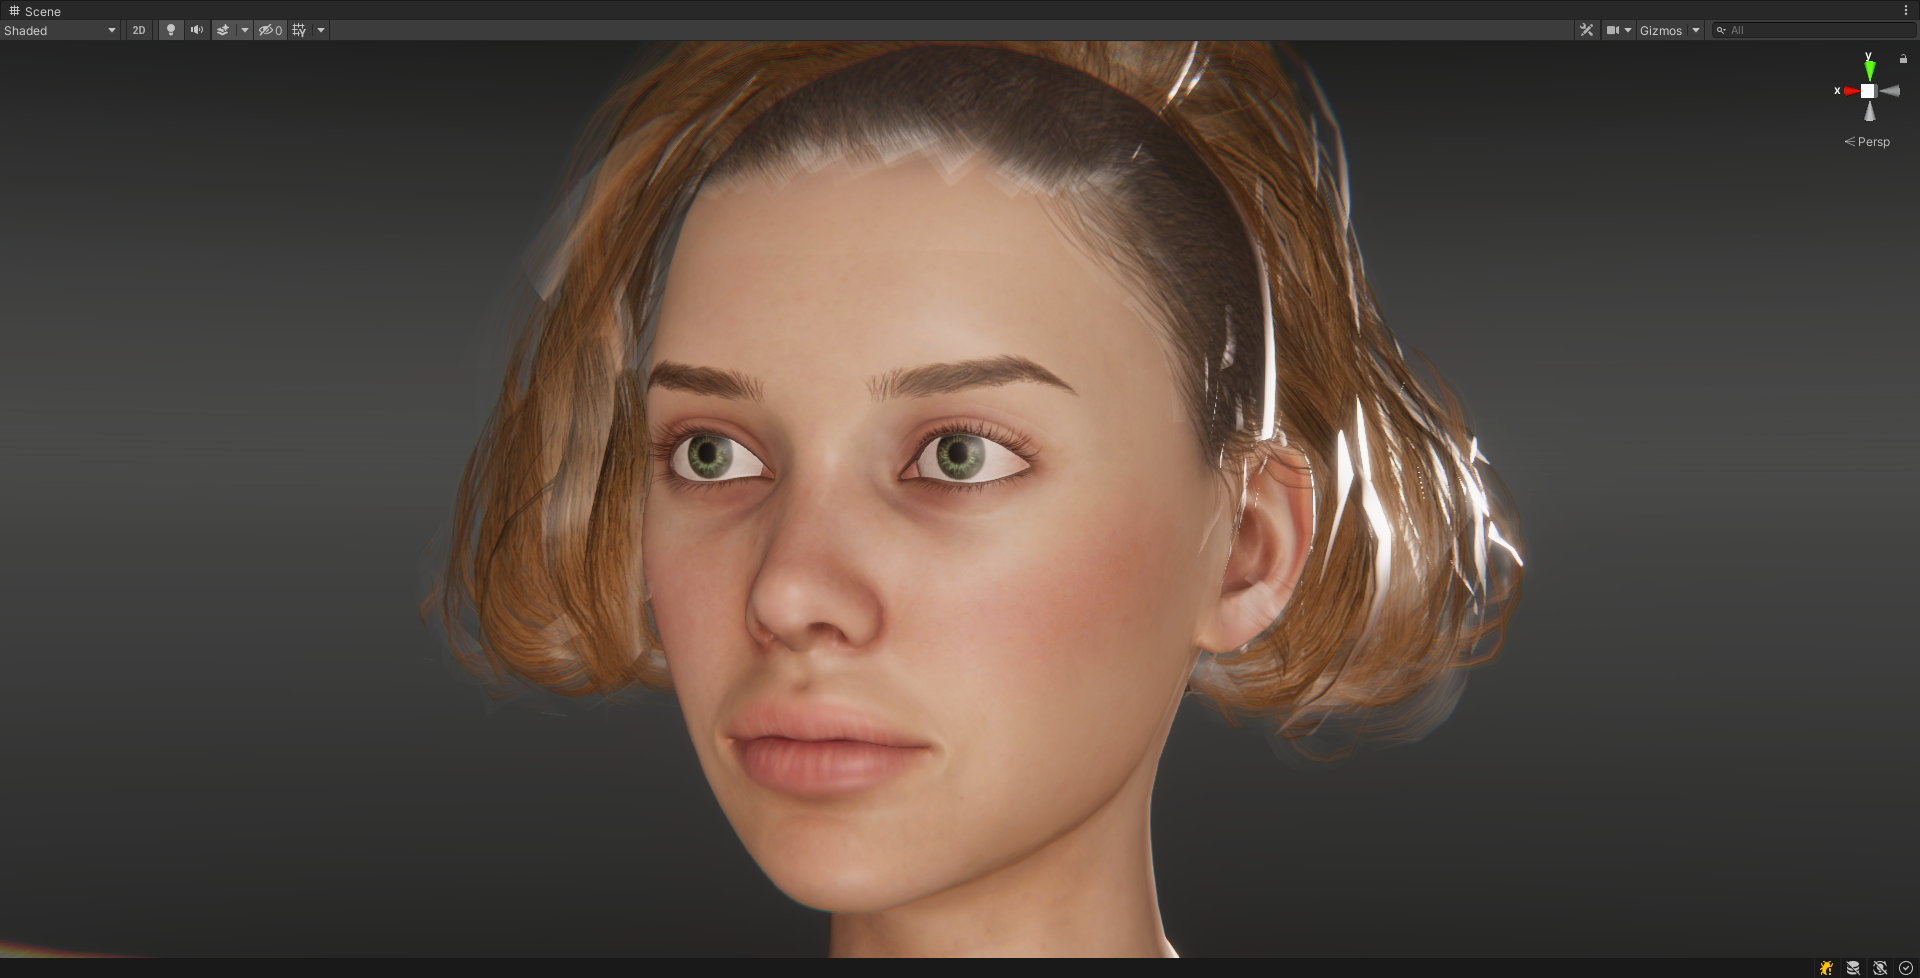
Which is obviously awful, Mainly due to the FBX format, which does not support the PBR texture set. (At least not the version of FBX that CC3 exports and Unity imports.). In fact, all it understands is the Diffuse texture, the Specular mask texture (which Unity doesn't actually support), the Opacity texture and the Normals. Which is why it looks terrible, because most of the textures are missing.
The next order of business is to populate the HDRP/Lit materials with the appropriate base textures, of which we have the Diffuse, Mask (named with the suffix '_HDRP' in the files.) and Normal maps.
Here I have plugged all these textures in, changed the hair material shader to HDRP/Hair, and given them some appropriate settings:
(I'm using the eye occlusion texture from the OBJ export to Blender as the alpha channel in an all black diffuse map, for some reason it doesn't come with the FBX export. The tearline material is 100% transparent, max smoothness material with no textures.)
And this is probably as good as it gets with the base textures and default HDRP material shaders, but it all looks flat and lifeless compared to the CC3 image above, particularly the eyes.
To truly recreate the character with all the details and layers and effects of the CC3 shaders, you have to dive into Shader Graph. Additionally we also have the problem that there is no 1:1 mapping of CC3 to Unity. They use different lighting, different shader models, different colour mapping and who knows what else. I had the same problem in Blender when I was making the Material setup add-on for that, the only real solution being to provide enough parameters and controls to the users so that they could make the characters in Blender look like the characters in CC3.
The same is true of Unity, so to achieve similar results to CC3 we need more control over the material shaders in Unity than the default HDRP/Lit and Hair shaders can provide.
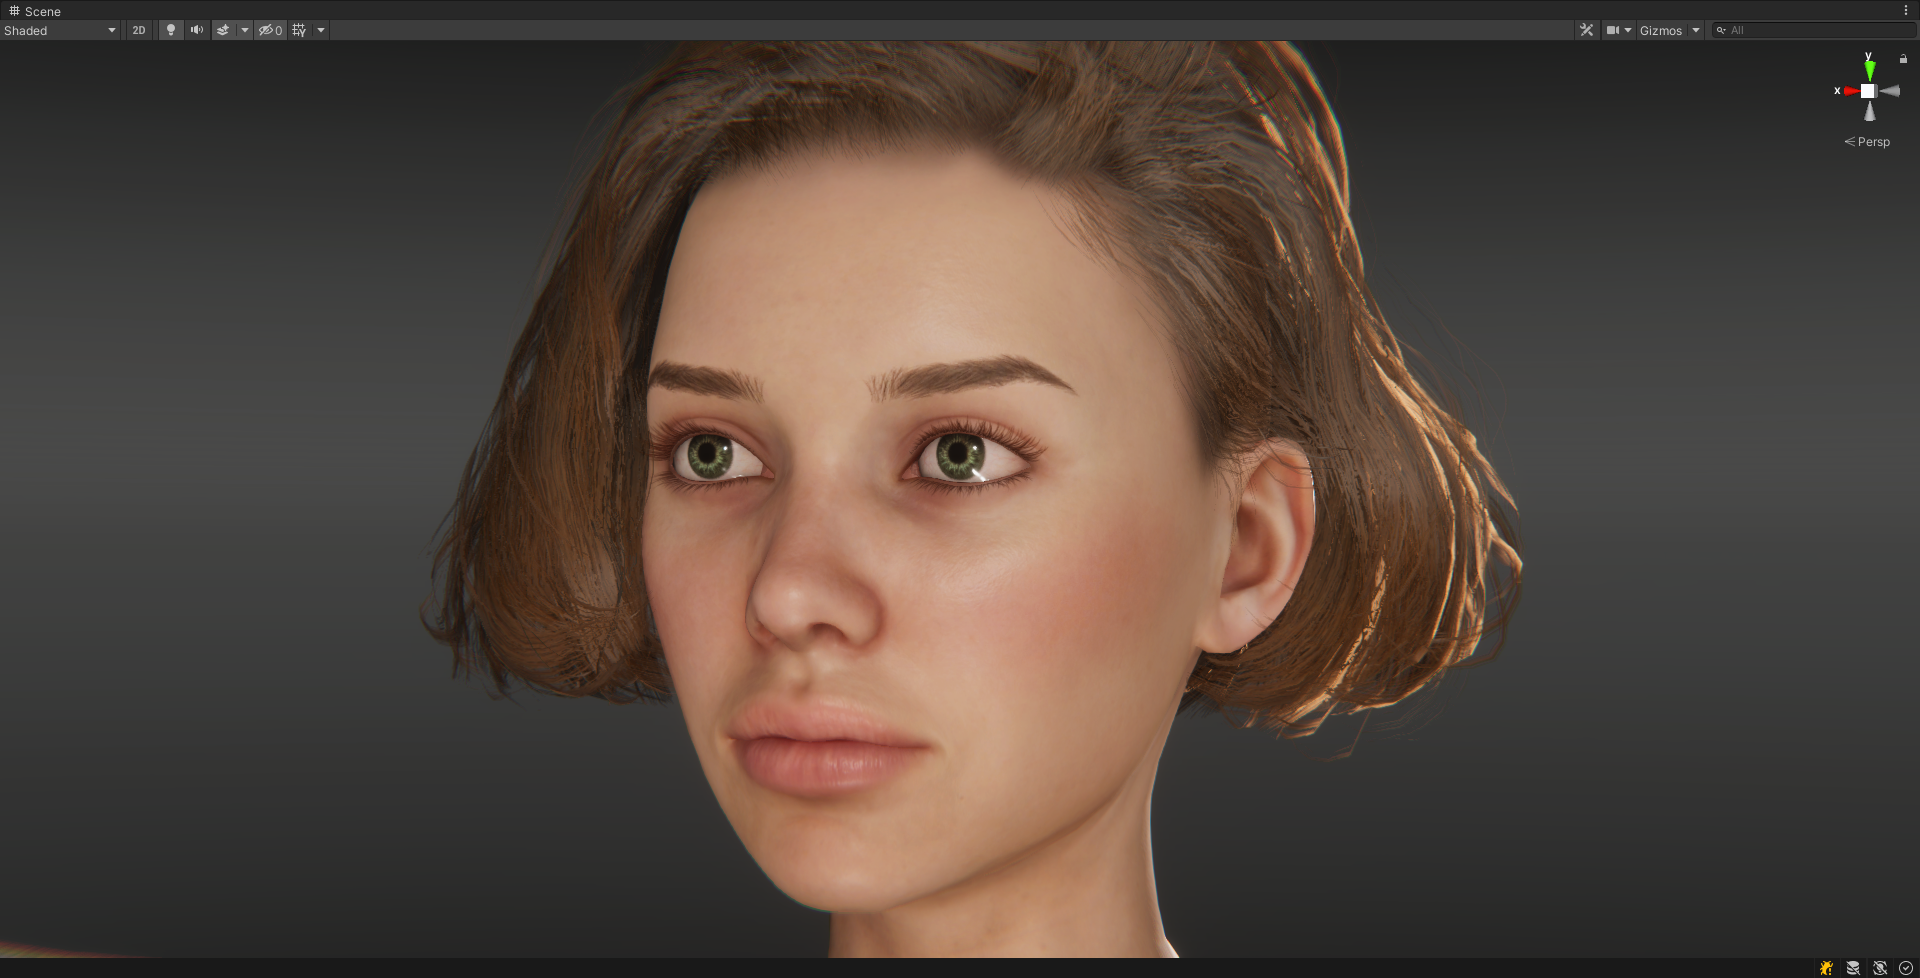
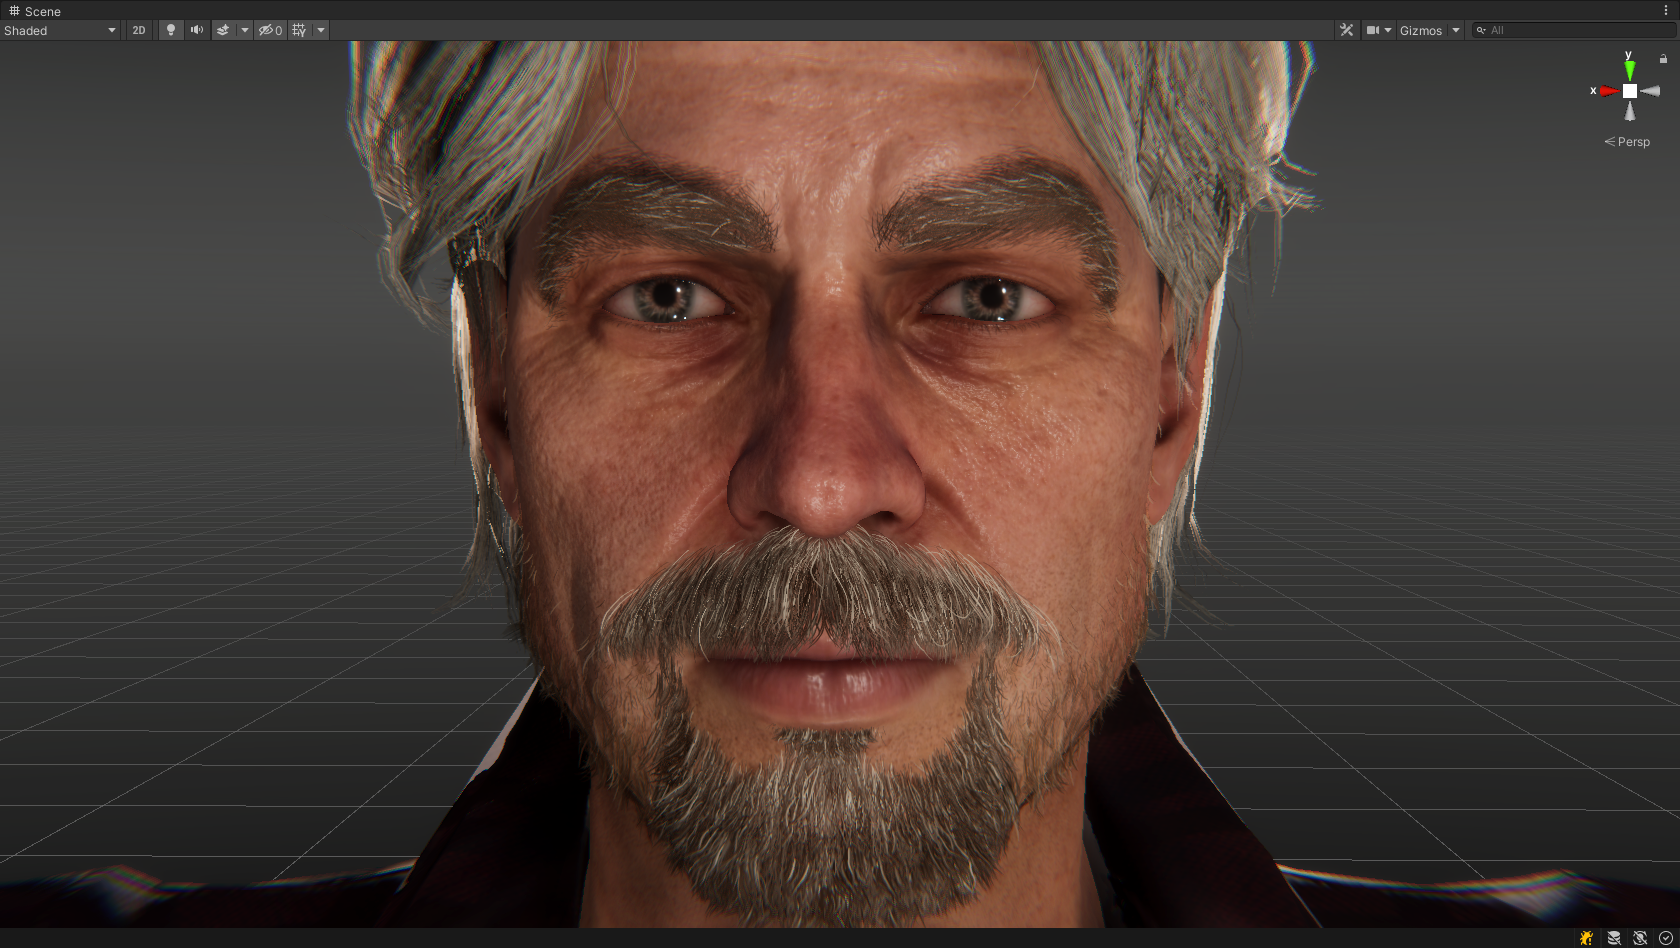
The shader nodes in Blender materials and Unity's Shader Graph are very similar. Similar enough that I could reproduce the same shaders in Unity that I made in Blender, even improve on them a bit. And they look something like this:
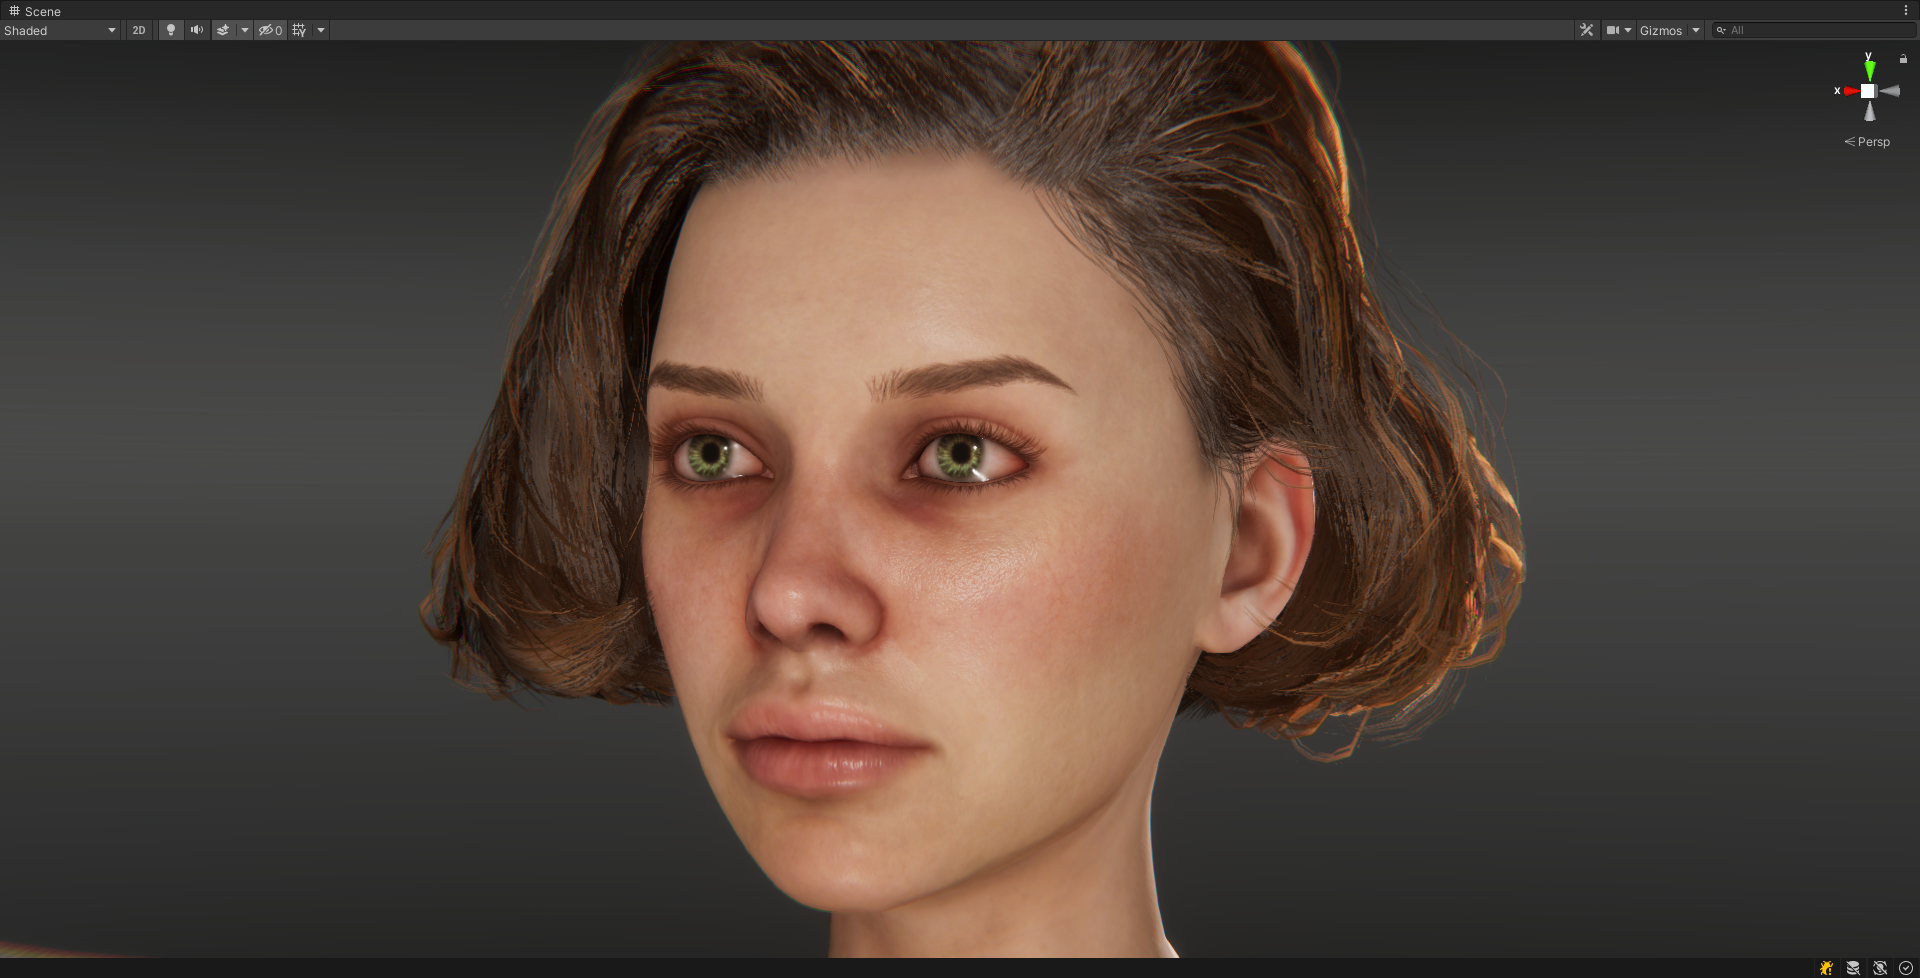
These shaders are using all the textures for the blend layers, micro normals, normal blending, shadow layers, hair root, id and flow maps, vertex deformation for the eyes and all the parameters to control how each texture is used and layered into the final results. The eyes are refactive with iris depth control and pupil size control. The skin, hair and eyes have min-max remapping and power curve mapping for the smoothness and alpha channels and it has all the controls of the smart hair shaders too.
There's still more work to do on the shaders and they are going to take a serious amount of explaining, but so far, I'm quite pleased with the results.
More to follow when I get the chance...
|
|
By Victor.Soupday - 5 Years Ago
|
There's too much to show with screen shots so I've put it in a video...
|
|
By MilesV - 5 Years Ago
|
|
But down that Rabbit hole, you must go.
hahaha yes, it's unavoidable in order to achieve what I want and a skill I really want to develop.
I appreciate you continuing to share and really value your expertise. Can't wait to really dig into what you've shown and experiment in my own sandbox. :D
|
|
By Necka - 5 Years Ago
|
Victor.Soupday (6/29/2021)
MilesV (6/10/2021)
I was starting to dive into the documentation Unity has for Shader Graph and was getting a little overwhelmed. Its great to know I can switch to the hair and eye shaders from the inspector and not have to go down the rabbit hole of the node editor just yet.
But down that Rabbit hole, you must go. It has taken me a while to figure all this out but, consider this character in CC3: She is of the quality you would expect from Character Creator, but when you export into Unity (I'm using Unity 2020.3 / HDRP Pipeline here) you get this: Which is obviously awful, Mainly due to the FBX format, which does not support the PBR texture set. (At least not the version of FBX that CC3 exports and Unity imports.). In fact, all it understands is the Diffuse texture, the Specular mask texture (which Unity doesn't actually support), the Opacity texture and the Normals. Which is why it looks terrible, because most of the textures are missing. The next order of business is to populate the HDRP/Lit materials with the appropriate base textures, of which we have the Diffuse, Mask (named with the suffix '_HDRP' in the files.) and Normal maps. Here I have plugged all these textures in, changed the hair material shader to HDRP/Hair, and given them some appropriate settings: (I'm using the eye occlusion texture from the OBJ export to Blender as the alpha channel in an all black diffuse map, for some reason it doesn't come with the FBX export. The tearline material is 100% transparent, max smoothness material with no textures.) And this is probably as good as it gets with the base textures and default HDRP material shaders, but it all looks flat and lifeless compared to the CC3 image above, particularly the eyes. To truly recreate the character with all the details and layers and effects of the CC3 shaders, you have to dive into Shader Graph. Additionally we also have the problem that there is no 1:1 mapping of CC3 to Unity. They use different lighting, different shader models, different colour mapping and who knows what else. I had the same problem in Blender when I was making the Material setup add-on for that, the only real solution being to provide enough parameters and controls to the users so that they could make the characters in Blender look like the characters in CC3. The same is true of Unity, so to achieve similar results to CC3 we need more control over the material shaders in Unity than the default HDRP/Lit and Hair shaders can provide. The shader nodes in Blender materials and Unity's Shader Graph are very similar. Similar enough that I could reproduce the same shaders in Unity that I made in Blender, even improve on them a bit. And they look something like this: These shaders are using all the textures for the blend layers, micro normals, normal blending, shadow layers, hair root, id and flow maps, vertex deformation for the eyes and all the parameters to control how each texture is used and layered into the final results. The eyes are refactive with iris depth control and pupil size control. The skin, hair and eyes have min-max remapping and power curve mapping for the smoothness and alpha channels and it has all the controls of the smart hair shaders too. There's still more work to do on the shaders and they are going to take a serious amount of explaining, but so far, I'm quite pleased with the results. More to follow when I get the chance...
This is absolutely fabulous.
I'm not a shader guy at all... even with shader graph I just don't get how things work and yet I can code almost anything...
I'm not sure you are that open, but would you consider sharing those shaders? I'm personally mostly interested into Eyes and Hair
Also if you have time, would you mind showing the process on how to get the eye occlusion working that good? I couldn't find a way at all on that front.
|
|
By Victor.Soupday - 5 Years Ago
|
Well, as to that... The shaders shown here are part of something I've been working on for a while:
It's not entirely finished and this is just for HDRP so far. It doesn't do anything with the Avatars and the bones so there's a ways to go before it's complete. Also it needs to map all the CC3 material parameters to the equivalent for the Shader Graph parameters, it only does a few of them so far. So much like my Blender setup add-on it just works on the materials and shaders for now, but it's coming along nicely I think.
URP and the built-in renderer are going to be a challenge as they have no native methods for subsurface scattering or depth prepass or refraction. It will be interesting to see how much of the quality and detail can be retained for those render pipelines.
Edit: I can go into more detail on how the shaders work, they could do with some explaining.
|
|
By Necka - 5 Years Ago
|
|
Victor.Soupday (7/1/2021)
Well, as to that... The shaders shown here are part of something I've been working on for a while:
It's not entirely finished and this is just for HDRP so far. It doesn't do anything with the Avatars and the bones so there's a ways to go before it's complete. Also it needs to map all the CC3 material parameters to the equivalent for the Shader Graph parameters, it only does a few of them so far. So much like my Blender setup add-on it just works on the materials and shaders for now, but it's coming along nicely I think.
URP and the built-in renderer are going to be a challenge as they have no native methods for subsurface scattering or depth prepass or refraction. It will be interesting to see how much of the quality and detail can be retained for those render pipelines.
Edit: I can go into more detail on how the shaders work, they could do with some explaining.
I moved to HDRP for a side project now and I'm quite happy with what I got. But now I saw your own results and I'm not happy anymore :D
I was upset to not be able to get the Eye occlusion and of course the Hair...
But I see that you are the official provider for the Blender Pipeline topic, I guess it's on the way for the Unity pipeline as well now :)
If you are looking for testers etc, count me in, it's amazing
|
|
By tantrum - 5 Years Ago
|
I saw/realized a while ago that shader graph would be the way to go, especially for the new "Smart Hair" system - even in Unity the shader graph shaders for things like HDRP/Hair are more capable than the old property-drawer shaders.
But then by the same token, you'd want to use the original textures and shader parameters (or some variant of them) that are already in CC3 for closely recreating them in Unity, instead of working off the baked textures provided (which would be better suited perhaps for generic / non-hero NPC models and/or lower LOD crowds)?
So at this point I'm wondering if it wouldn't be better to export (as a .json or something) the character meta data for that information and the paths to the textures used in CC3, so there would be some hope/chance of an automated workflow possible in Unity without having to manually match up the values.
|
|
By Necka - 5 Years Ago
|
|
tantrum (7/1/2021)
I saw/realized a while ago that shader graph would be the way to go, especially for the new "Smart Hair" system - even in Unity the shader graph shaders for things like HDRP/Hair are more capable than the old property-drawer shaders.
But then by the same token, you'd want to use the original textures and shader parameters (or some variant of them) that are already in CC3 for closely recreating them in Unity, instead of working off the baked textures provided (which would be better suited perhaps for generic / non-hero NPC models and/or lower LOD crowds)?
So at this point I'm wondering if it wouldn't be better to export (as a .json or something) the character meta data for that information and the paths to the textures used in CC3, so there would be some hope/chance of an automated workflow possible in Unity without having to manually match up the values.
That's a good point.
One way for this would be that Reallusion offers some kind of preset on export level when you chose Unity.
A preset that'd export the simpler textures as it is today or a more advanced preset which would change the json file accordingly so the auto setup script catches what to match in each materials
There is lots of potential but it also mean RL needs to work on this as well. Lots can be done on the Auto Setup side of things though.
|
|
By Victor.Soupday - 5 Years Ago
|
|
tantrum (7/1/2021)
But then by the same token, you'd want to use the original textures and shader parameters (or some variant of them) that are already in CC3 for closely recreating them in Unity, instead of working off the baked textures provided (which would be better suited perhaps for generic / non-hero NPC models and/or lower LOD crowds)?
So at this point I'm wondering if it wouldn't be better to export (as a .json or something) the character meta data for that information and the paths to the textures used in CC3, so there would be some hope/chance of an automated workflow possible in Unity without having to manually match up the values.
In fact the export from CC3 to Unity does actually include a .json file that details all the objects, materials & textures (and paths) and all the CC3 shader parameters for those materials and all the needed textures are included in the Unity export.
The old Auto-setup only used to connect the base texture maps which don't include any of the blend layers or details. It didn't actually bake any textures, other than packing the metallic, AO, detail mask and smoothness into the HDRP texture (Edit: CC3 does bake the smart hair diffuse textures, but you can turn that off in the export options). I'm using this .json information and the extra textures to recreate the character fully. (Actually, I haven't quite finished mapping all the CC3 shader parameters to my Unity Shader Graph parameters, but that is the intention.) So the result in Unity should be as close as possible to character you see in CC3.
But even then CC3 and Unity are completely different rendering engines, there's no real 1 to 1 mapping or one size fits all to recreating the characters in Unity, so there will be differences that need to be examined and fixed, or maybe something just doesn't look right in Unity's lighting and needs to be corrected.
That's the idea, anyway.
|
|
By tantrum - 5 Years Ago
|
Yes, the issues don't start with the auto-setup, they start with the export. That's where we get problems like these; none are to do with the import tool in Unity itself as the problem is already present prior. Or rather, these issues and export decisions ensure that the import isn't going to be successful at recreating what you see in CC3:
Smart Hair assignment of brow blend/morph shapes (name and quantity) - FeedBack Tracker (reallusion.com)
Smart hair merged materials base hair and scalp combined - FeedBack Tracker (reallusion.com)
Smart hair merged materials builds wrong diffuse map - FeedBack Tracker (reallusion.com)
Substance Painter Pipeline Export error with Prime Hair - FeedBack Tracker (reallusion.com)
This is also why I don't quite agree with the "everything works" position either. The product integrations just aren't tested satisfactorily prior to release and not supported adequately promptly post release, in my experience.
@Victor.Soupday thanks for mentioning the .json file, I'll have to look into it. I was just theorizing and not aware if something was already being produced, although I thought only the baked textures were exported (and would be referenced), not the source textures (e.g. ID map, flow map, etc.). I haven't looked though and certainly not to the level you apparently have. I will fundamentally disagree that "different rendering engines" preclude getting like for like results, the engines of Unity and Unreal are absolutely capable of reproducing the effects presented in CC3 100%. Changing the lighting etc. doesn't account for the differences we see. That's more to do with the resultant meshes and textures. Your own continued improvements in the results that look very interesting to pursue are a testament to this potential. Thank you.
|
|
By tantrum - 5 Years Ago
|
Victor.Soupday (6/13/2021)
All the facial blend shapes available in CC3 are exported with the characters (the full characters, not sure about the Gamebase or InstaLod'ed characters). e.g. these are all the blend shapes on the main body mesh: There are also blend shapes on the tongue, eye occlusion and tearline meshes, as well as on the smart hair: beard, moustache and eyebrow meshes too. Everything that takes part in the facial animation has the requisite blend shapes.
I noticed the blend shapes, but it also seems that a lot are just dumped inactive into the mix.
I would have liked the groups to be documented if some only come into play under certain conditions, or removed if they play no part in the piece at all. To that extent I created this issue a little while ago; I would be interested to hear your thoughts:
Smart Hair assignment of brow blend/morph shapes (name and quantity) - FeedBack Tracker (reallusion.com)
Personally, I don't like having to go through them one by one and guess or try to figure out if they are usable or not.
|
|
By Victor.Soupday - 5 Years Ago
|
tantrum (7/2/2021)
I noticed the blend shapes, but it also seems that a lot are just dumped inactive into the mix. I would have liked the groups to be documented if some only come into play under certain conditions, or removed if they play no part in the piece at all. To that extent I created this issue a little while ago; I would be interested to hear your thoughts: Smart Hair assignment of brow blend/morph shapes (name and quantity) - FeedBack Tracker (reallusion.com)Personally, I don't like having to go through them one by one and guess or try to figure out if they are usable or not.
I've noticed different characters have different sets of blend shapes and I did think at the time that it culled the inactive blend shapes.
But if it isn't culling them or they are such a small influence that they don't have any visible effect, it should be possible in a script to build replacement meshes that only keep the blend shapes whose vertex delta's pass a certain threshold. I've already written a function to copy blend shapes from a source mesh into a new mesh and replace it in the prefab, putting a threshold condition on them is almost trivial. I can put that in the tool menu. e.g. select the character then: Menu->Tools->"Prune Blend Shapes" (assuming it works)
|
|
By Victor.Soupday - 5 Years Ago
|
Well... that works.
|
|
By tantrum - 5 Years Ago
|
Looks like a good solution to it.
I'm sorry but I'm unfamiliar with the work you've been doing on this tool, is it some sort of asset that is or being made available somewhere? Or is this just a personal / proprietary tool?
|
|
By Victor.Soupday - 5 Years Ago
|
Like my Blender Setup add-on, it's a personal tool that I will make available, when it's ready.
My original intention was to make a pipeline for CC3 -> Blender -> Unity, I would bake the textures in Blender and set them up in Unity, but then I discovered baking the textures in Compute Shaders was 10x faster in Unity, so it's become a direct CC3 -> Unity setup.
|
|
By Necka - 5 Years Ago
|
|
Victor.Soupday (7/2/2021)
Well... that works.
Ok I definitely would like to know how you prune blenshapes :D
I created this "bug report" https://www.reallusion.com/FeedBackTracker/Issue/Blendshapes-inconsistent-between-Body-and-Beards-Tested-with-EXplus-facial-profile
Which is exactly about the inconsistency of Blendshapes between characters.
There is also the problem within CC that the "fix eye blink" feature doesn't fix it on the new EX+ blendshapes
I'm creating an expression manager in Unity, to easily animate CC3 character's expressions.
Basically animating all similar blendshape on the face from the different meshes (face, beard, mustache, brows)
But performance wise it's an issue to have on some meshes the blendshapes Smile Left at index 40 et on another mesh it's at index 41 as I have to lookup the blendshapes by name first and then by index
Would you be keen to share this Pruning script privately if I PM you? It could help me understand how I could maybe organize the blendshapes properly for a larger scope of use
|
|
By Victor.Soupday - 5 Years Ago
|
The tool menu functions are completely independant of the shader and material setup so I can show you that now:
https://soupday.github.io/code/MeshUtil.cs
(It's editor code so it needs to be placed in a folder named 'Editor')
But I pretty much have to do the same thing, look up the Blend shapes by name to get the index.
The only thing I can suggest is that you create a lookup table that lists all the blend shapes by name and that contains a dictionary of each Mesh object and the index of the blend shape. Something like:
public class BSLookup
{
string shapeName;
Dictionary<SkinnedMeshRenderer, int> indexCache;
public void SetWeight(float weight)
{
foreach (KeyValuePair<SkinnedMeshRenderer, int> pair in indexCache)
pair.Key.SetBlendShapeWeight(pair.Value, weight);
}
}
public List<BSLookup> lookupTable;
This way you only search for the blend shape name once, but you will need to scan the entire character first to fill in the lookup table.
|
|
By Necka - 5 Years Ago
|
Victor.Soupday (7/2/2021)
The tool menu functions are completely independant of the shader and material setup so I can show you that now: https://soupday.github.io/code/MeshUtil.cs(It's editor code so it needs to be placed in a folder named 'Editor') But I pretty much have to do the same thing, look up the Blend shapes by name to get the index. The only thing I can suggest is that you create a lookup table that lists all the blend shapes by name and that contains a dictionary of each Mesh object and the index of the blend shape. Something like: public class BSLookup
{
string shapeName;
Dictionary<SkinnedMeshRenderer, int> indexCache;
public void SetWeight(float weight)
{
foreach (KeyValuePair<SkinnedMeshRenderer, int> pair in indexCache)
pair.Key.SetBlendShapeWeight(pair.Value, weight);
}
}
public List<BSLookup> lookupTable;This way you only search for the blend shape name once, but you will need to scan the entire character first to fill in the lookup table.
Thanks a lot for sharing
Looking up by name in editor time (or at Start) is completely fine, I just didn't want that for blendshape manipulation at runtime. Your tool is going to help me quite a lot here, thank you
|
|
By gekido - 5 Years Ago
|
Amazing work on the HDRP shaders - looks awesome.
Are these something you are considering releasing (on the asset store or otherwise)? Would be a huge assistance for those of us that aren't very...shader-ey... to be able to replicate what Reallusion provides even remotely closely...
|
|
By Necka - 5 Years Ago
|
|
gekido (7/3/2021)
Amazing work on the HDRP shaders - looks awesome.
Are these something you are considering releasing (on the asset store or otherwise)? Would be a huge assistance for those of us that aren't very...shader-ey... to be able to replicate what Reallusion provides even remotely closely...
Seeing that his Blender auto-setup tool become the main choice for RL advertising it on their website + youtube... And seeing the quality of the work so far done in Unity, I'm assuming he's the chosen one to provide a performant auto-setup tool for Unity, at least for HDRP so far :)
|
|