|
By luis_paz1981 - 5 Years Ago
|
Hi guys,
I have recently exported my character to unreal, and unfortunately, I'm coming across an issue regarding the shaders/textures. When I place the character in my map, it looks like this:
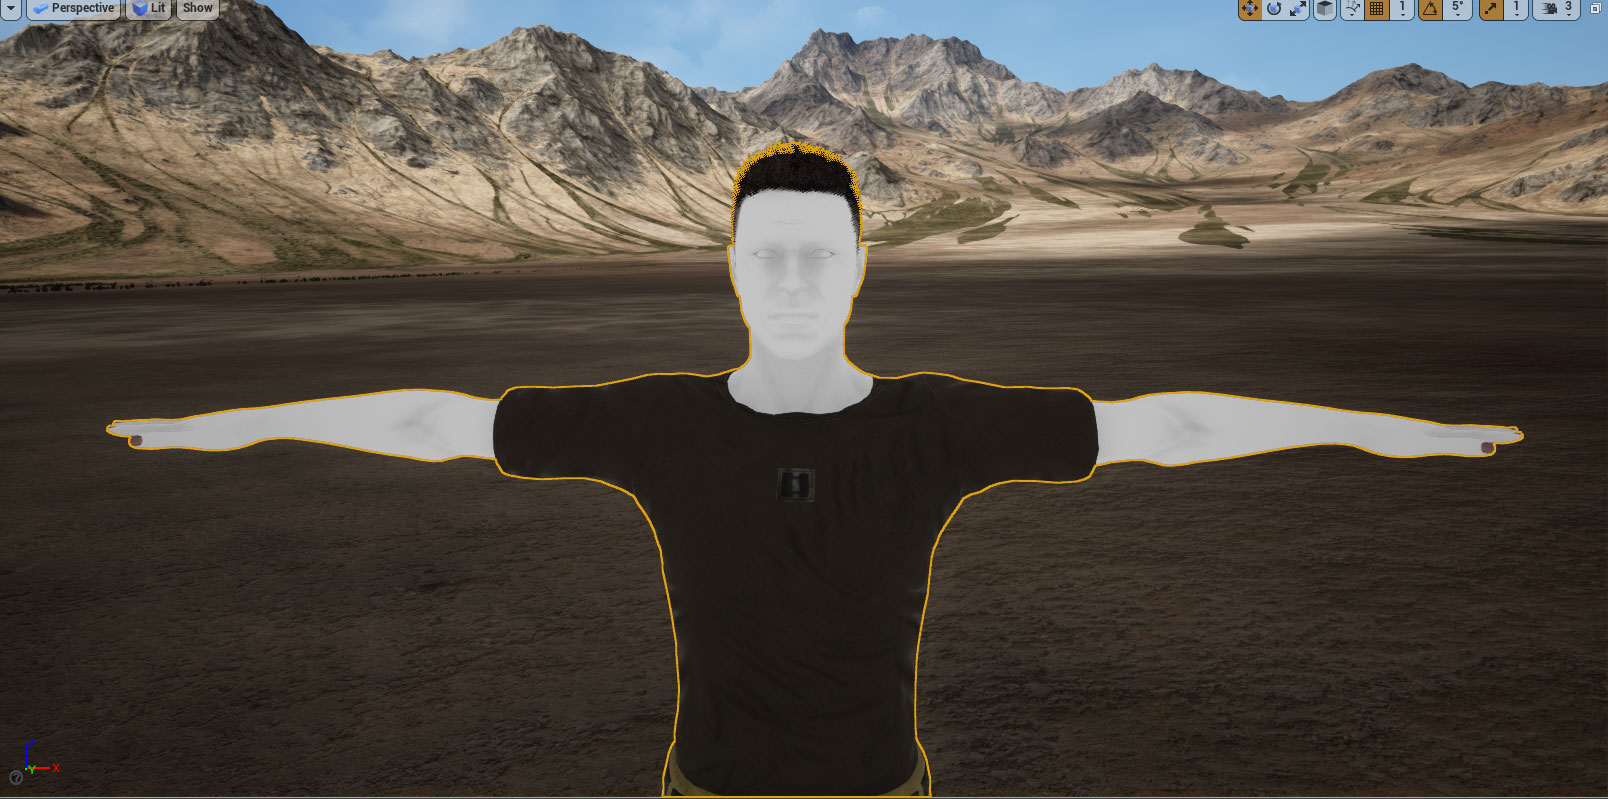
But inside Character Creator it looks fine:
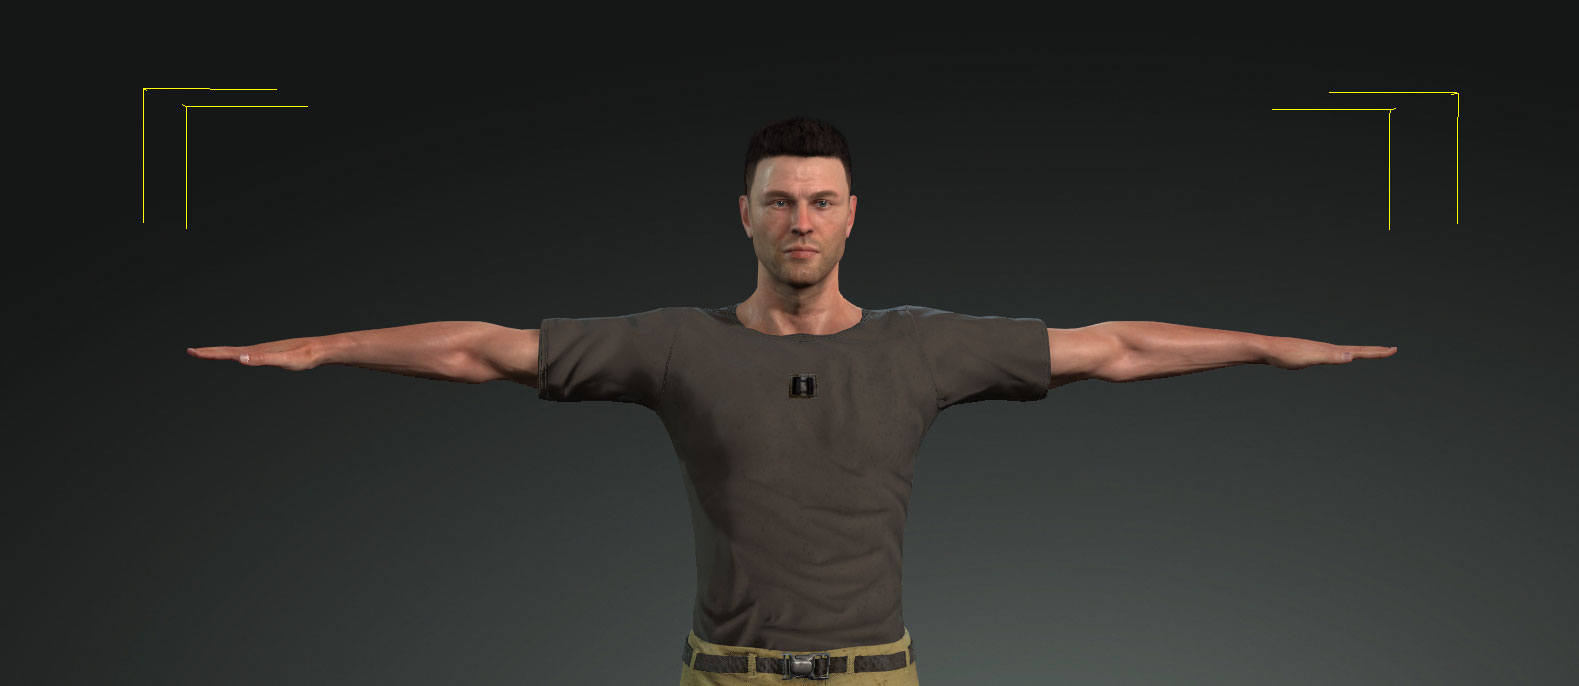
Any idea what could be wrong? I'm exporting using the pipeline Export FBX (Clothed Character), no LOD, export Mesh and embed textures. I'm also using the unreal plugin for auto setup and I have used the HQ shaders option.
Thanks for your help beforehand.
|
|
By unit23 - 5 Years Ago
|
|
luis_paz1981 (5/9/2020)
Thanks for your help beforehand.
Hello, perhaps the body related material broke? Can you post a screenshot of the effected material?
|
|
By luis_paz1981 - 5 Years Ago
|
|
Can you post a screenshot of the effected material?
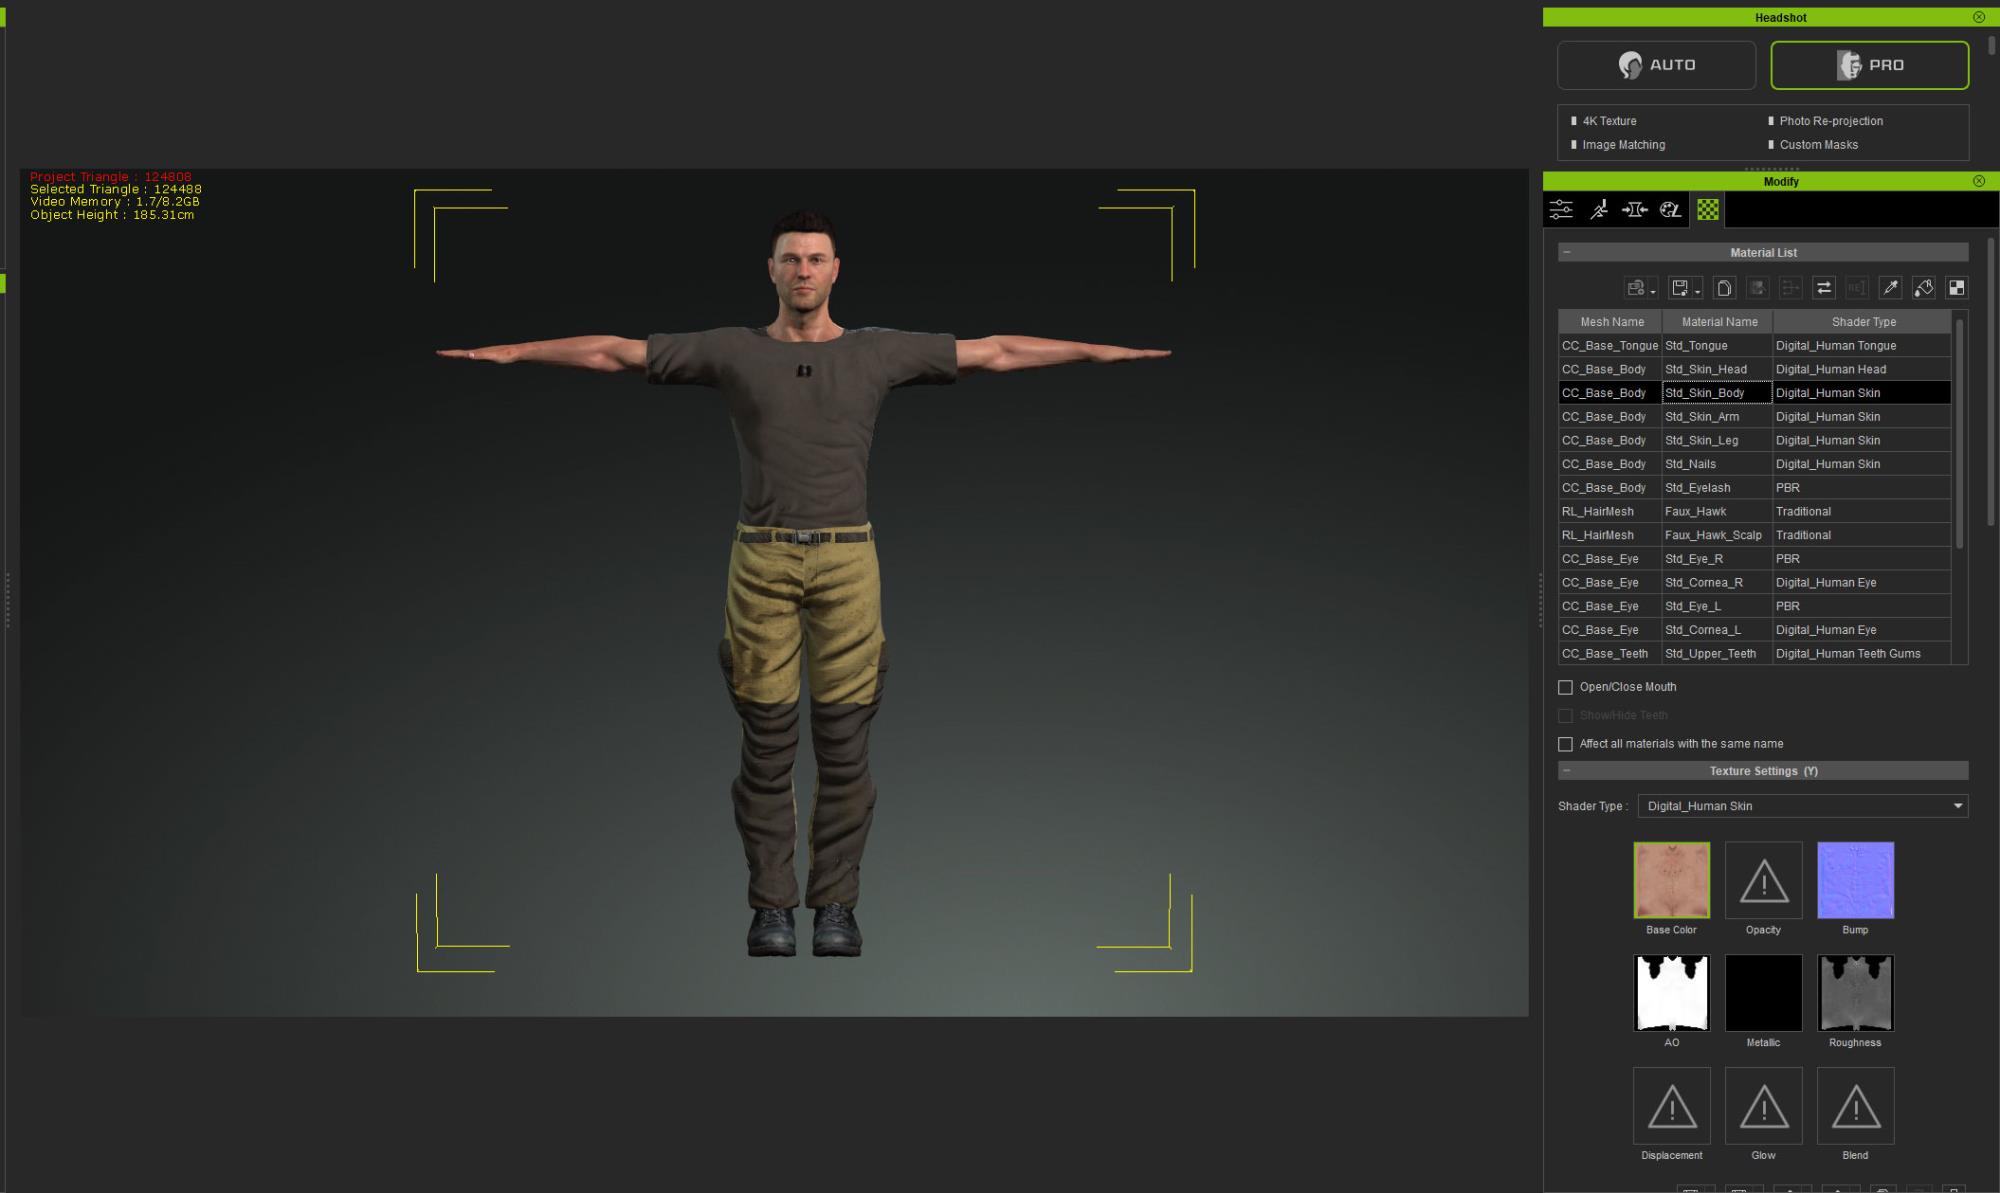
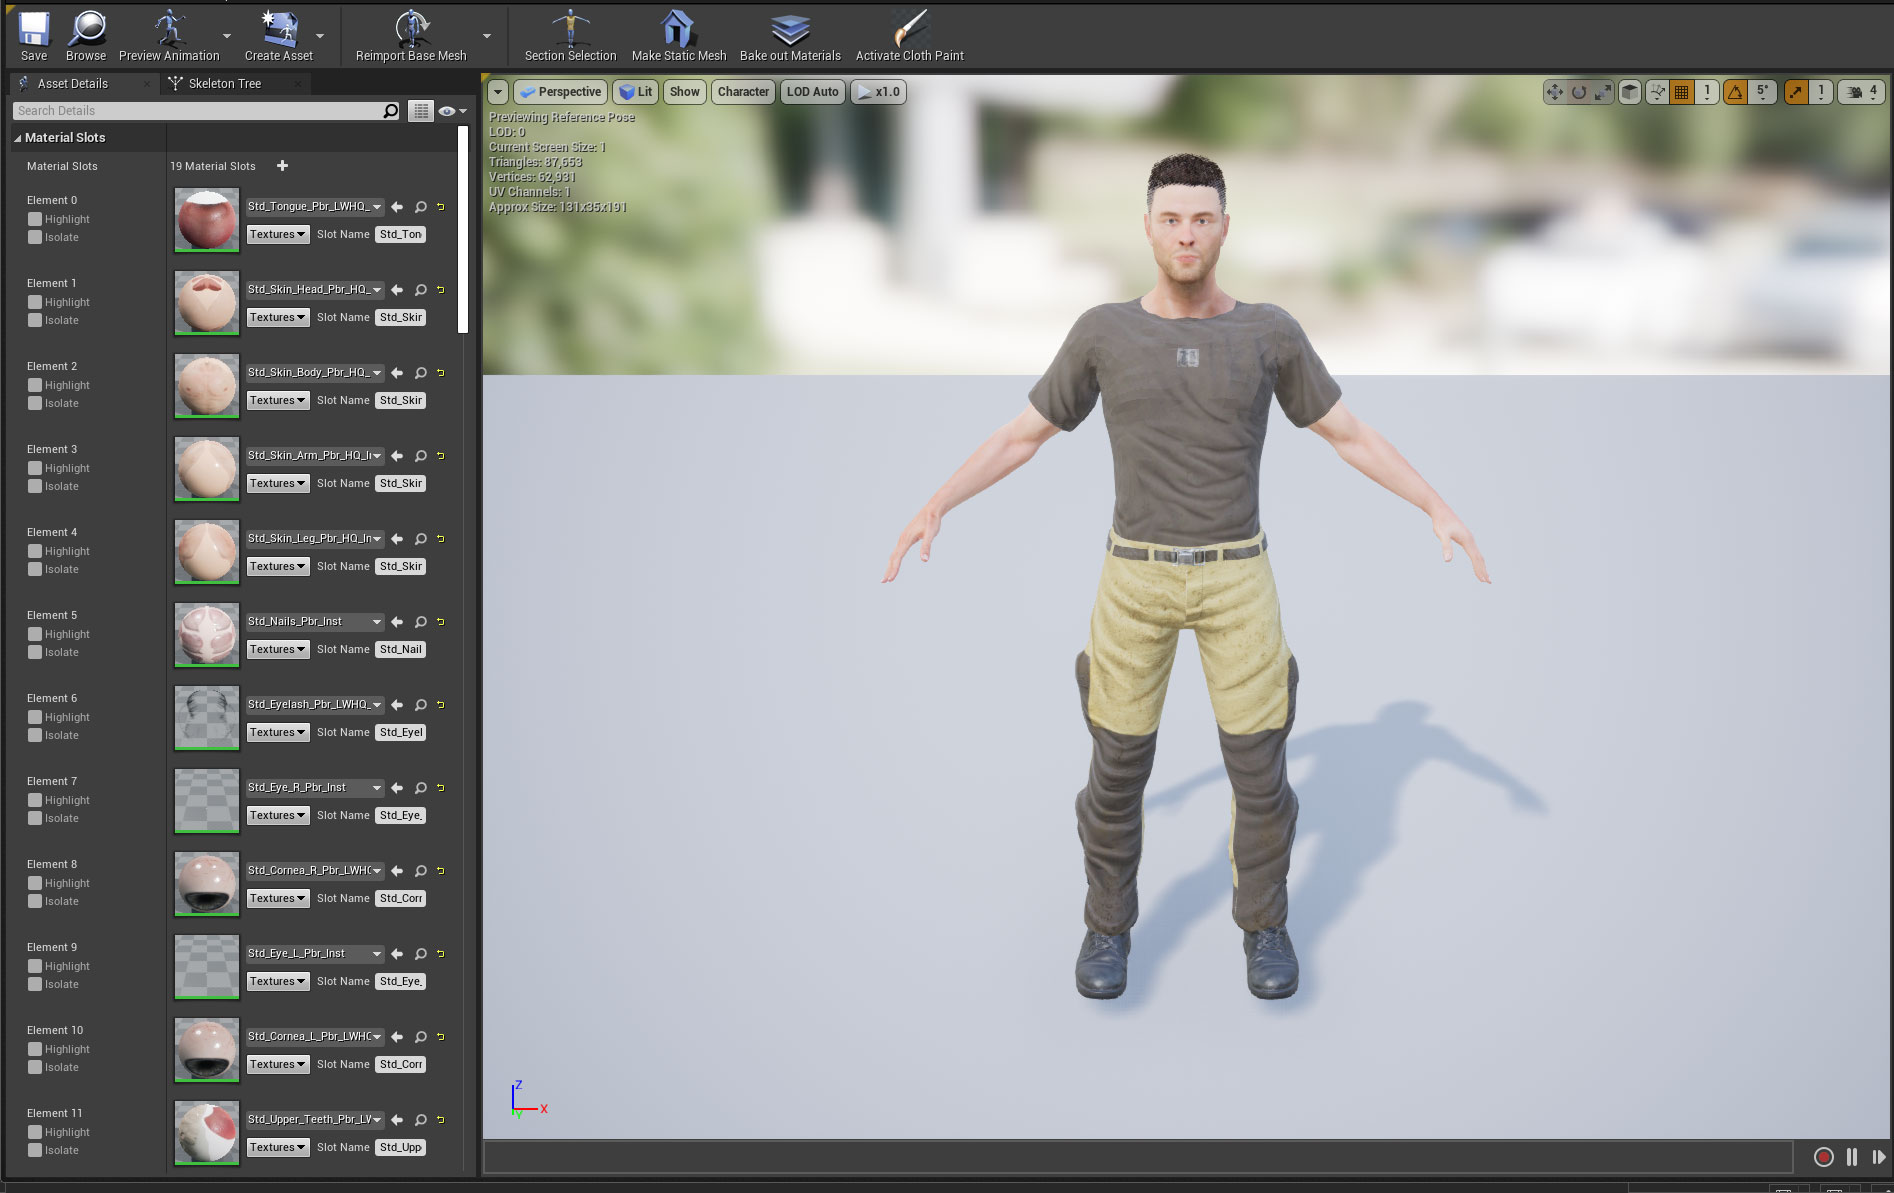
Hi unit23, I have taken screenshots of the material in UE4 and CC3 since I wasn't sure what you meant. Please let me know if these are what you need.
From inside CC3:
This is from the UE4 skeletal Mesh editor (ironically, it looks OK in here)
Also, the shader detail from UE4.
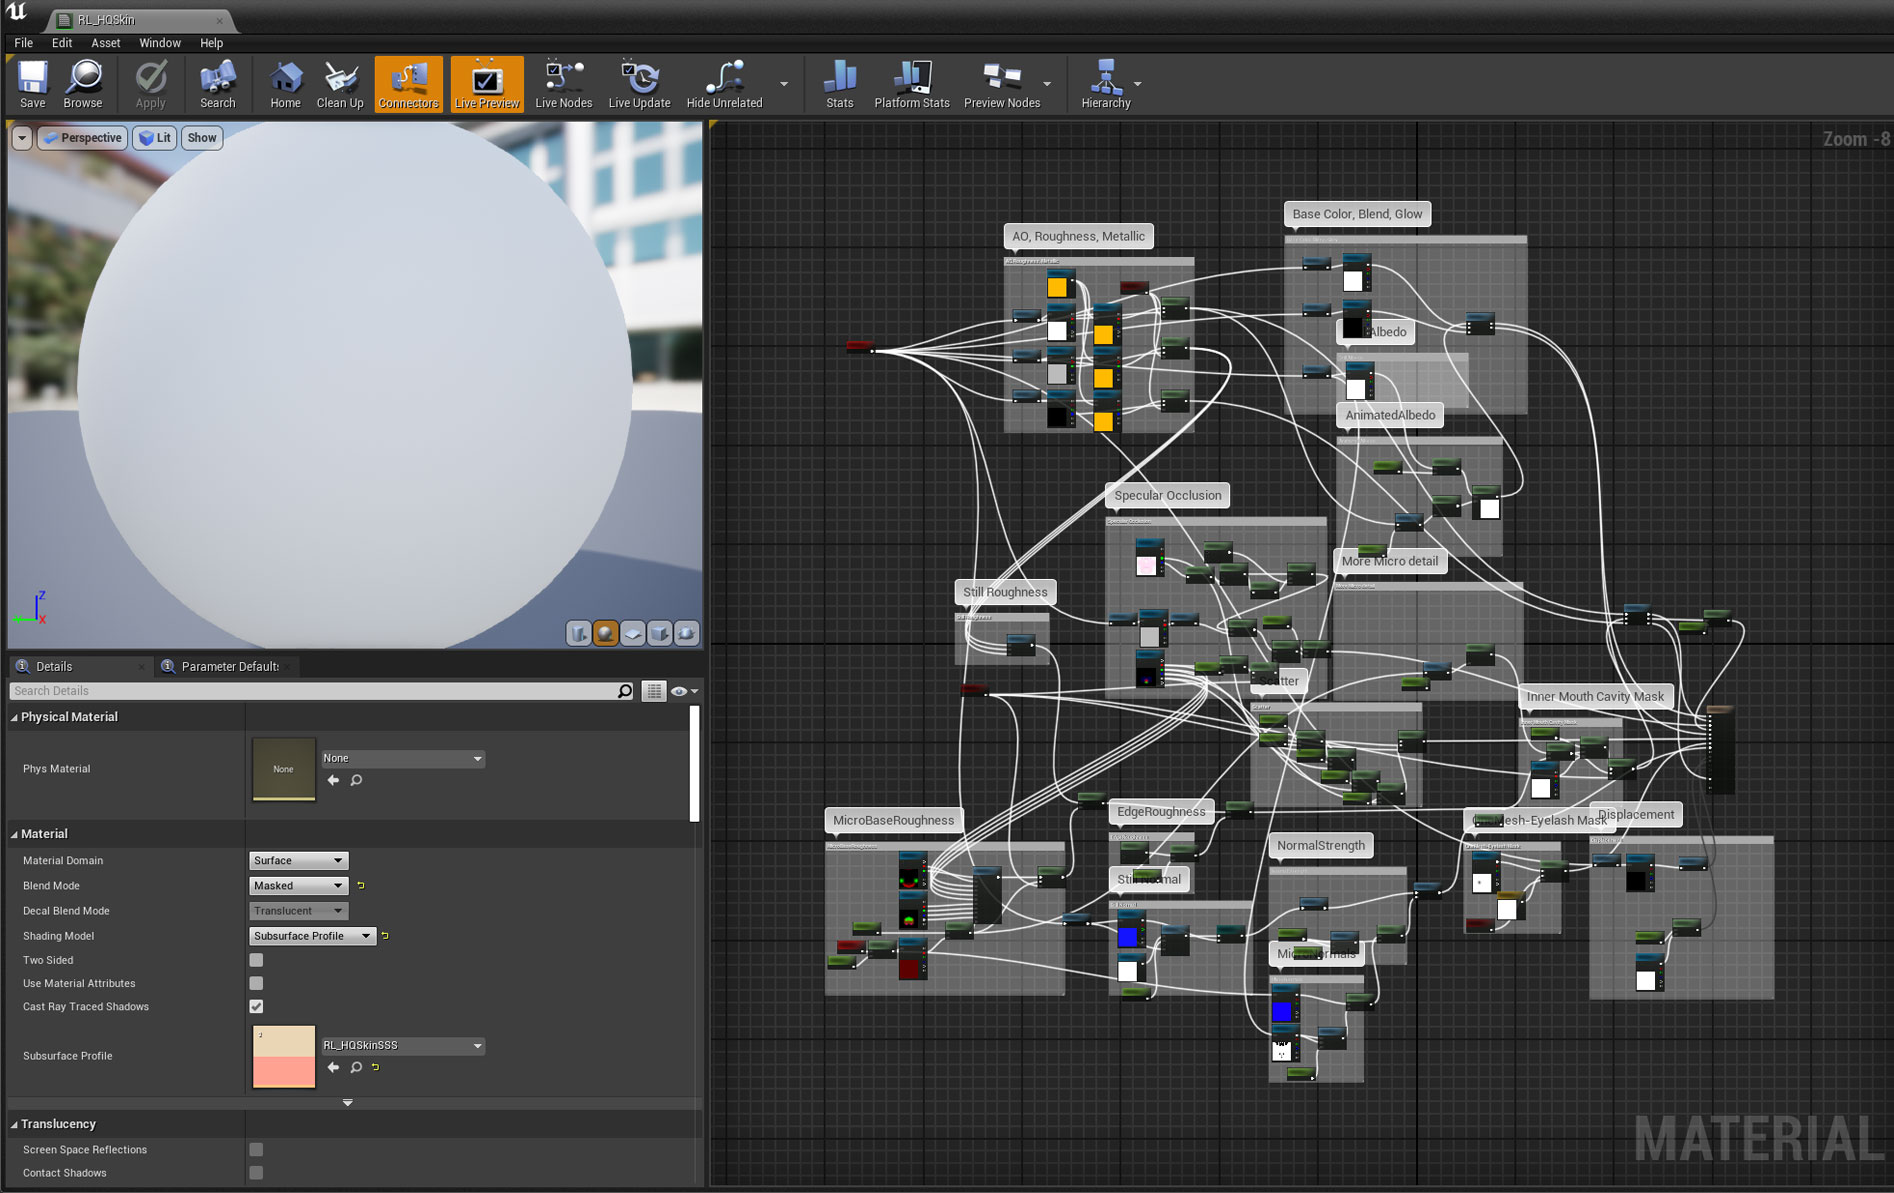
And the material instance (for the head as a sample) from the CC auto setup:

So I have also included some of the lighting settings of my map just in case, and a second character that actually looks OK in the map (besides the eyes) to use as a reference.

Thanks!
|
|
By unit23 - 5 Years Ago
|
luis_paz1981 (5/10/2020)
Can you post a screenshot of the effected material? Hi unit23, I have taken screenshots of the material in UE  Thanks!
Please go the Material Element for the Head, Arms or Body, visible in the details panel, then double click the material to open it, then post a screenshot for the detailed material view.
|
|
By luis_paz1981 - 5 Years Ago
|
Unit23,
You have replied as I was updating my post with that particular screenshot. Please see below.
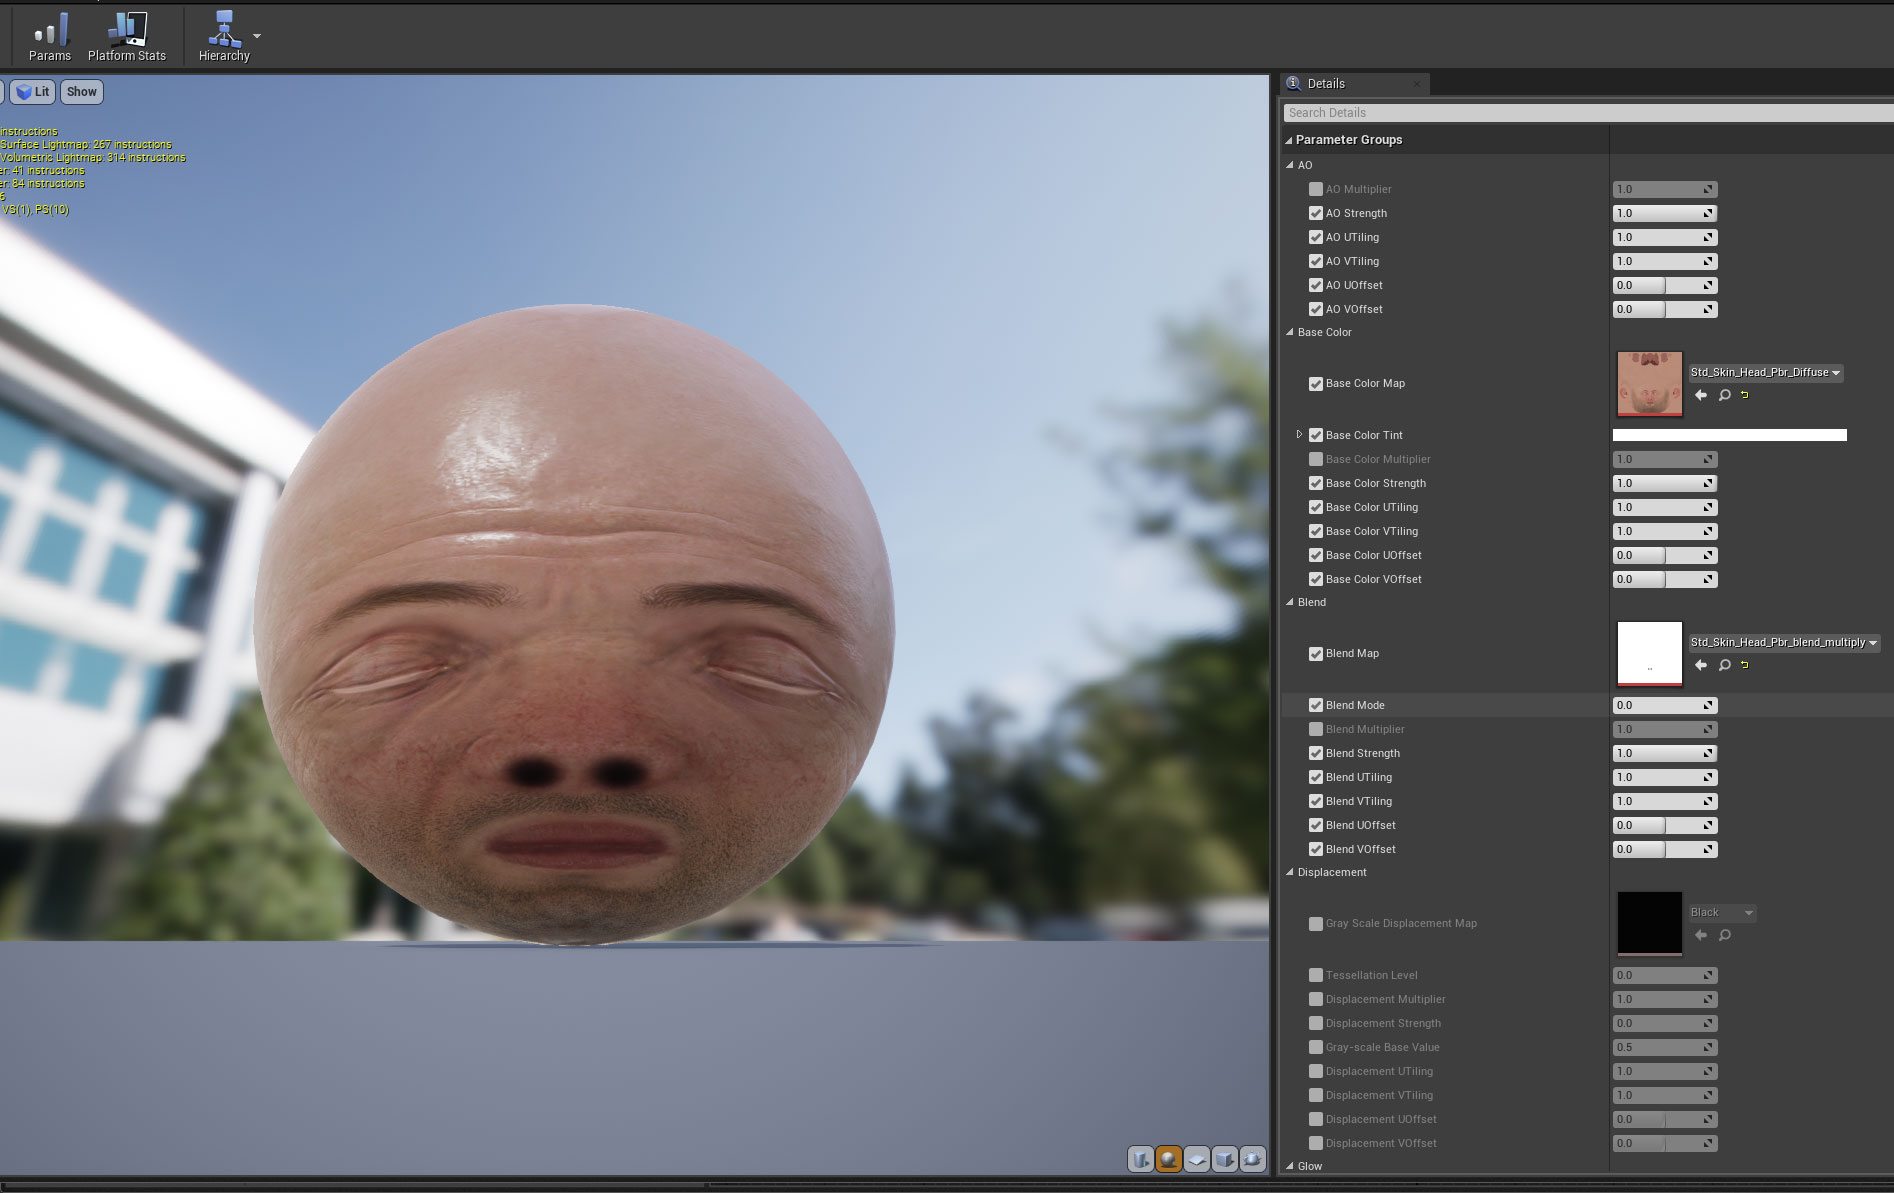
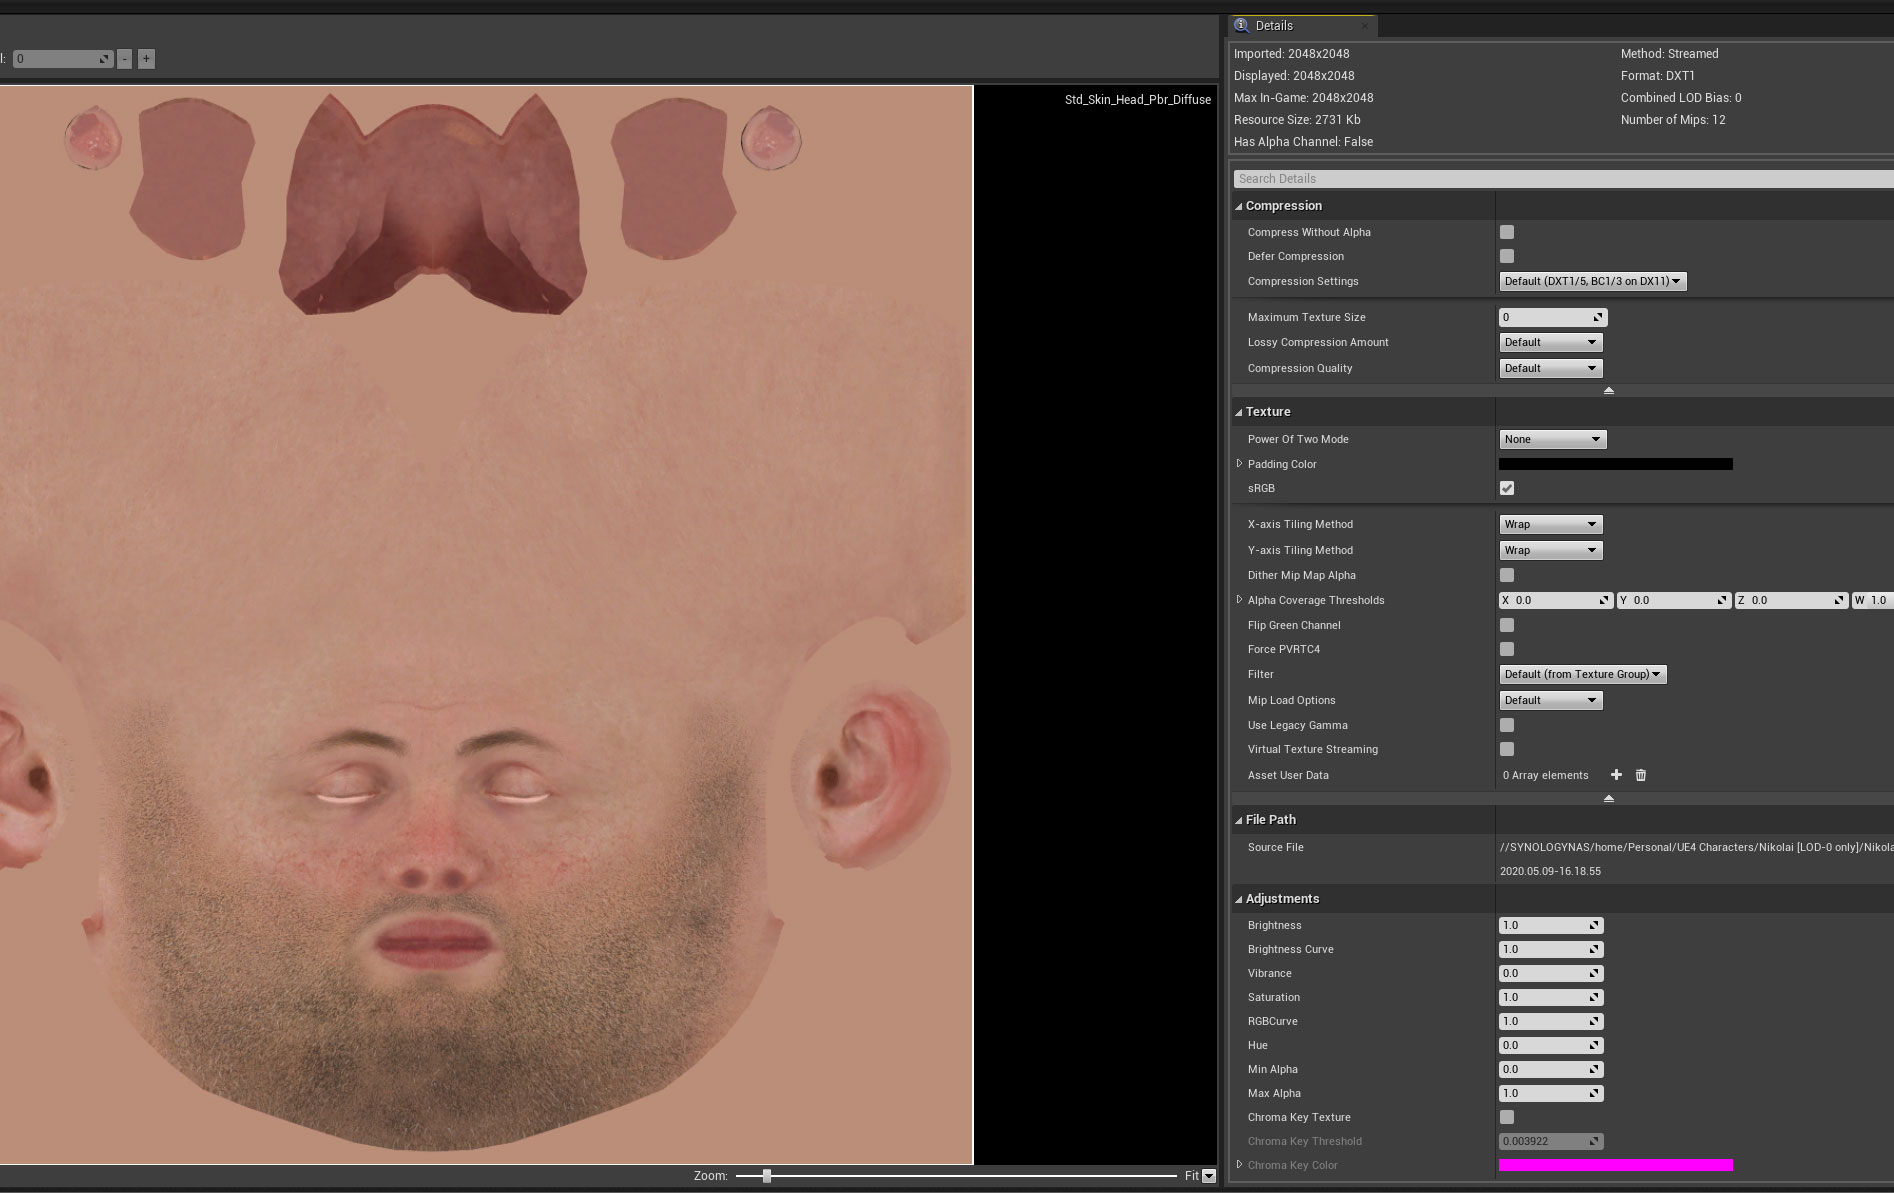
|
|
By unit23 - 5 Years Ago
|
|
luis_paz1981 (5/10/2020)
Unit23,
You have replied as I was updating my post with that particular screenshot.
Okay this is actually a Material Instance, the actual material, is the parent, linked at the bottom of it. However, it looks okay.
I have forwarded this issue to the staff.
|
|
By luis_paz1981 - 5 Years Ago
|
|
Okay this is actually a Material Instance, the actual material, is the parent, linked at the bottom of it. However, it looks okay.
I have forwarded this issue to the staff.
Thanks for your help, Unit23.
I'll wait for a reply.
|
|
By doubblesixx - 5 Years Ago
|
Depending on how many items and whatnot you have dragged into the scene baking light and calculating shaders can take a very long time even on decent computers so be patient :)
What caught my eye though is the Material type set in the picture above.. The "Translucent" type usually means the final output is dependent on something else to show the diffuse map ( if it's the diffuse map that intended to show here?).. I have been modifying some characters in Zbrush since i bought the Reallusion suite and have just now come to the step to make them game-ready for finalizing in Substance painter.. so i can't help you just yet in this case but are interrested to see possible pitfalls..
Cheers
|
|
By luis_paz1981 - 5 Years Ago
|
@unit23,
I have been trying different things while attempting to sort this issue. I have realised in the process that when I import the character into another level from a different project, the skin looks fine. Which possible level or project settings could make the materials look like that?
So far I have tried changing my lighting from static to dynamic and played with some global illumination settings without any luck.
Thanks!
|
|
By FAITH BASED GAMES - 5 Years Ago
|
Hey there luis_paz1981!
I have been following this thread since you posted it....I was trying to duplicate the problem, but NOT knowing what you are using for your "desert" background level it is kinda hard....but really NOT a problem. I have also read some similar posts here (a support ticket) that a person has/had the same type of problem.
What I did notice in your example photo of the 2 soldiers...there is ALSO a problem with the other solider (a UE4 Marketplace asset from the looks of it), his eyes are completely white (no iris or pupil).
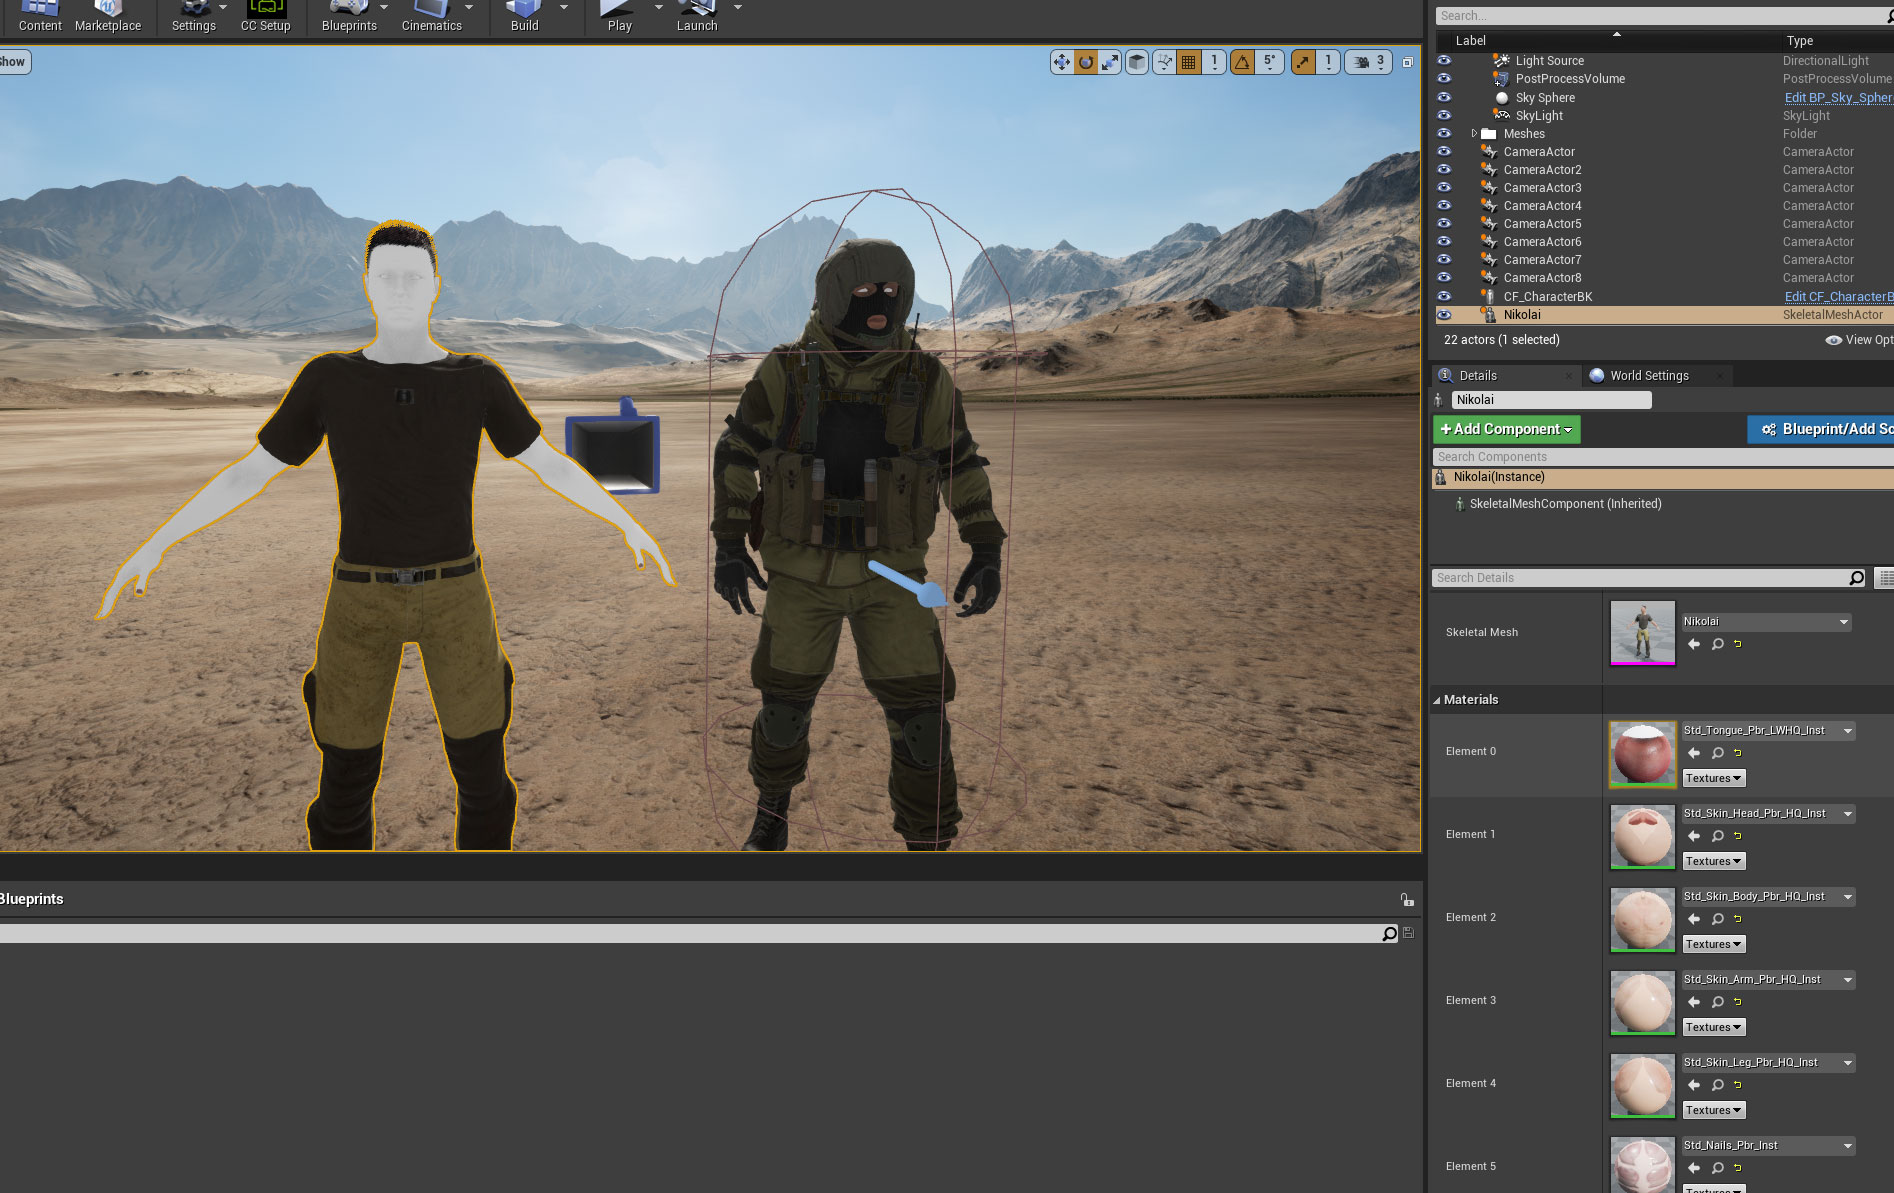
Is this your own level where you added lighting and things like that, or is it a "demo" level/map? If it is a demo map, then the creator probably is using some lighting source (trick) that makes the level look "nice" and not really made for "gameplay"....if that makes sense. With that being said about the demo map, then it is more than likely some type of problem with the lighting other than what you have already tried. So my suggestion would be to right click on the map in your content folder (wherever that map is located) duplicate it. Then "experiment" with that new map. What I would do first is start deleting things that might cause the problem with BOTH of those characters. First I would delete the the SphereReflection, then try the PostProcessVolume....the Light Source (Directional Lighting) and so on (even the Sky Sphere IF need be) until you only have the bear minimum (the level, the solider/s and ANY assets you have in the level...then you will have to bring in ALL new lighting (everything you may have deleted). Because we know that your model is right, it looks good elsewhere, but just NOT in that level, so it is just a process of elimination to find out what could be causing the problem and get your model looking right in that desert level.
I hope all of that makes sense and that you do find the solution soon!
Good luck!
Sam
:)
|
|
By luis_paz1981 - 5 Years Ago
|
|
I was trying to duplicate the problem, but NOT knowing what you are using for your "desert" background level it is kinda hard....but really NOT a problem.
@FAITH BASED GAMES,
Thanks for your reply. Indeed! I have completely missed mentioning the map I'm using for my level. The map I'm using is the Arid Mountains from the Pixel Perfect affordable landscapes pack.
Also sold on its own here: https://www.unrealengine.com/marketplace/en-US/product/arid-mountains
I will definitely begin testing using the steps you suggested and start making an elimination process.
Regards,
Luis
|
|
By luis_paz1981 - 5 Years Ago
|
|
What I would do first is start deleting things that might cause the problem with BOTH of those characters. First I would delete the the SphereReflection, then try the PostProcessVolume....the Light Source (Directional Lighting) and so on (even the Sky Sphere IF need be) until you only have the bear minimum (the level, the solider/s and ANY assets you have in the level...then you will have to bring in ALL new lighting (everything you may have deleted).
@FAITH BASED GAMES,
After a quick testing round, I can confirm the issue is the PostProcessVolume. What I don't know is WHAT is it inside the postProcessVolume that causes it. I'll try playing with the settings in it to see what happens. But please, if you have any ideas do not hesitate to share!
Thanks once again.
|
|
By FAITH BASED GAMES - 5 Years Ago
|
|
After a quick testing round, I can confirm the issue is the PostProcessVolume. What I don't know is WHAT is it inside the postProcessVolume that causes it. I'll try playing with the settings in it to see what happens. But please, if you have any ideas do not hesitate to share!
Thanks once again.
Hey there Luis!
GREAT...now at least we KNOW what the problem is/was. So if can just play around with that post processing volume (PPV) in the settings in the PPV details panel (from that level). Then post your findings here on what you did to get that one working properly (or even if you just start over with new to see what it does)....that WILL help out others here to know what to do in case they run into that problem as well!
Have fun creating!
Thanks!
Sam
:)
|
|
By luis_paz1981 - 5 Years Ago
|
|
GREAT...now at least we KNOW what the problem is/was.
Hey Sam,
Thanks again for your reply and your help. I have identified the culprit to be the EXPOSURE settings under the PostProcessVolume. The main problem is, I can adjust the settings to make the skin look good now, but that makes the level itself to be completely over-exposed (you know... cause happiness can never be complete... ever), so I will keep tweaking settings and trying to find a way to create balance within this lighting chaos cause, to be honest, the affordable landscape maps are amazing and I really want to be able to use them.
Thanks again for your help,
Luis
|
|
By unit23 - 5 Years Ago
|
|
luis_paz1981 (5/11/2020)
After a quick testing round, I can confirm the issue is the PostProcessVolume.
That is very strange. You can quickly disable the PP when ticking the option at the bottom of the Brush Settings panel, called 'hollow'. Then it only affects items inside of the volume.
|
|
By luis_paz1981 - 5 Years Ago
|
|
That is very strange. You can quickly disable the PP when ticking the option at the bottom of the Brush Settings panel, called 'hollow'. Then it only affects items inside of the volume.
Hi @unit23,
I have tried ticking the hollow box as suggested, but it has no effect at all in the scene, as shown here:
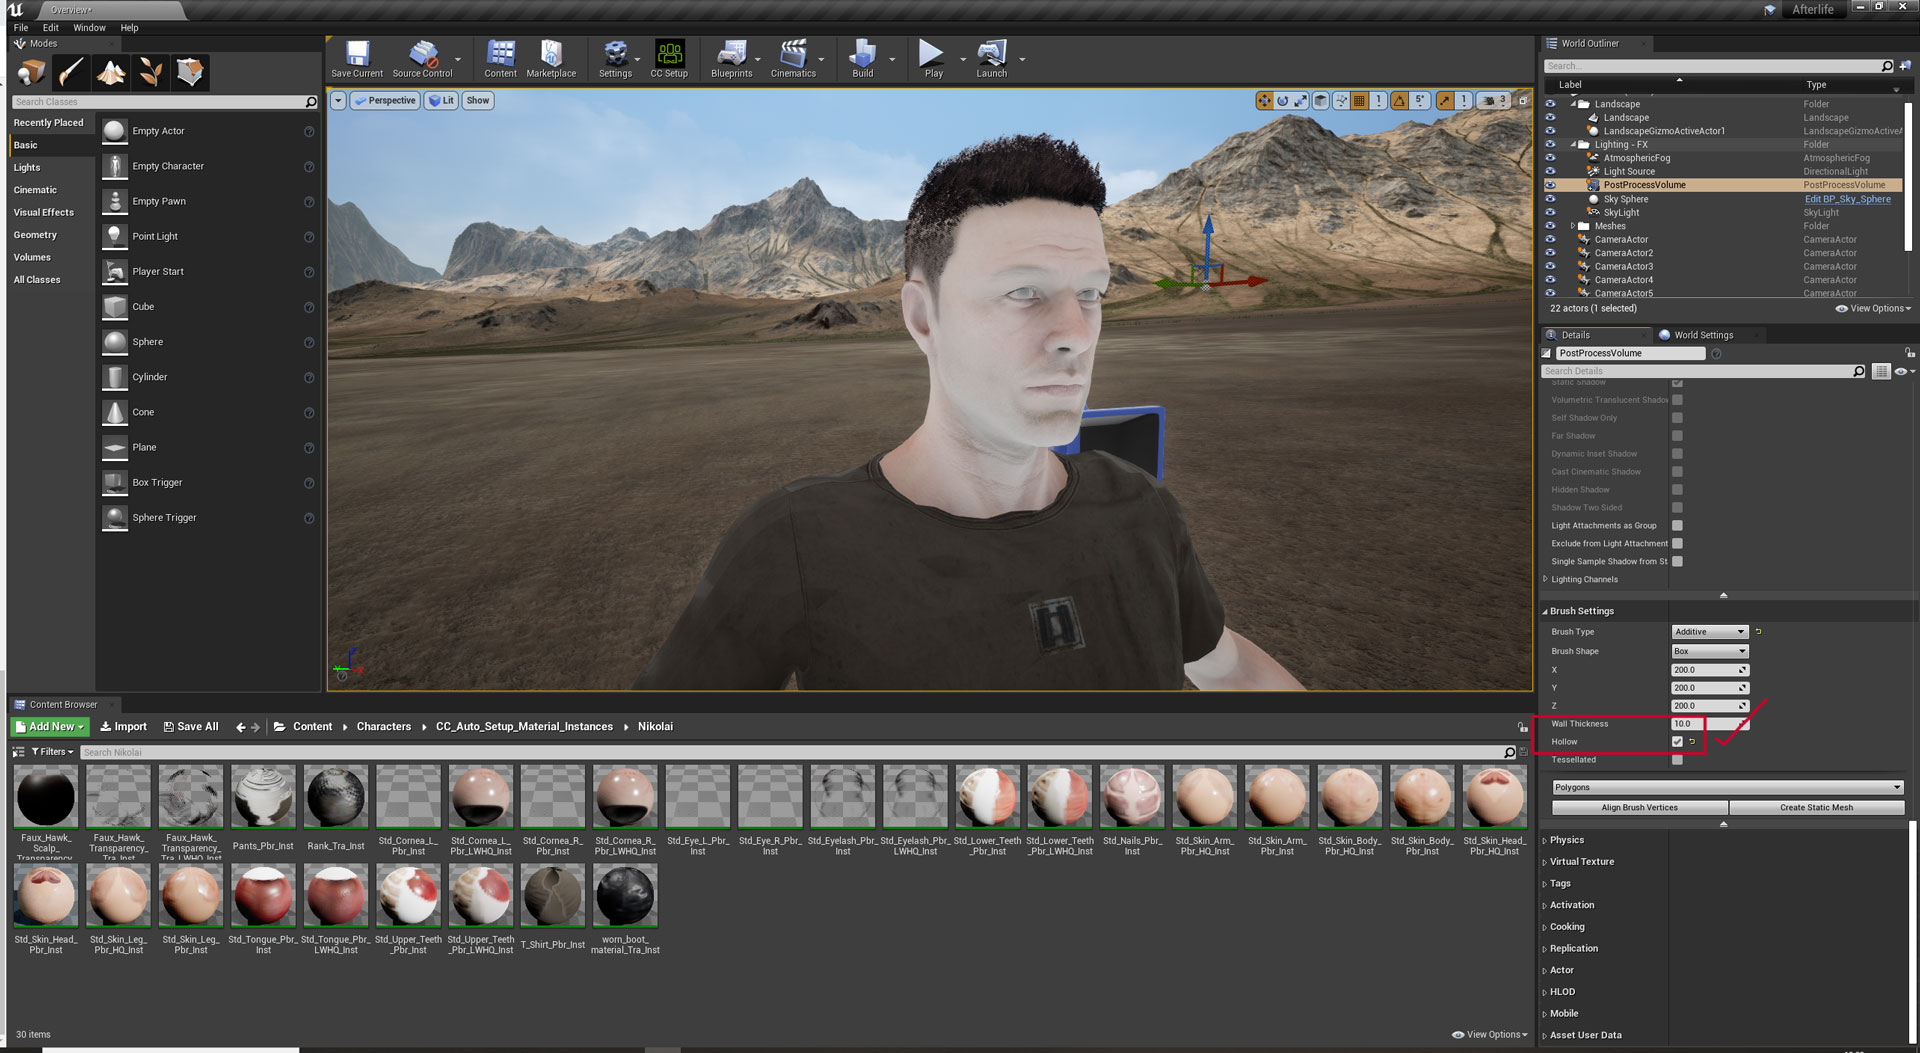
However, when I play with the exposure compensation a can see improvements in the skin shader as shown here:
WITH EXPOSURE COMP SET TO 1 IT STAYS THE SAME:
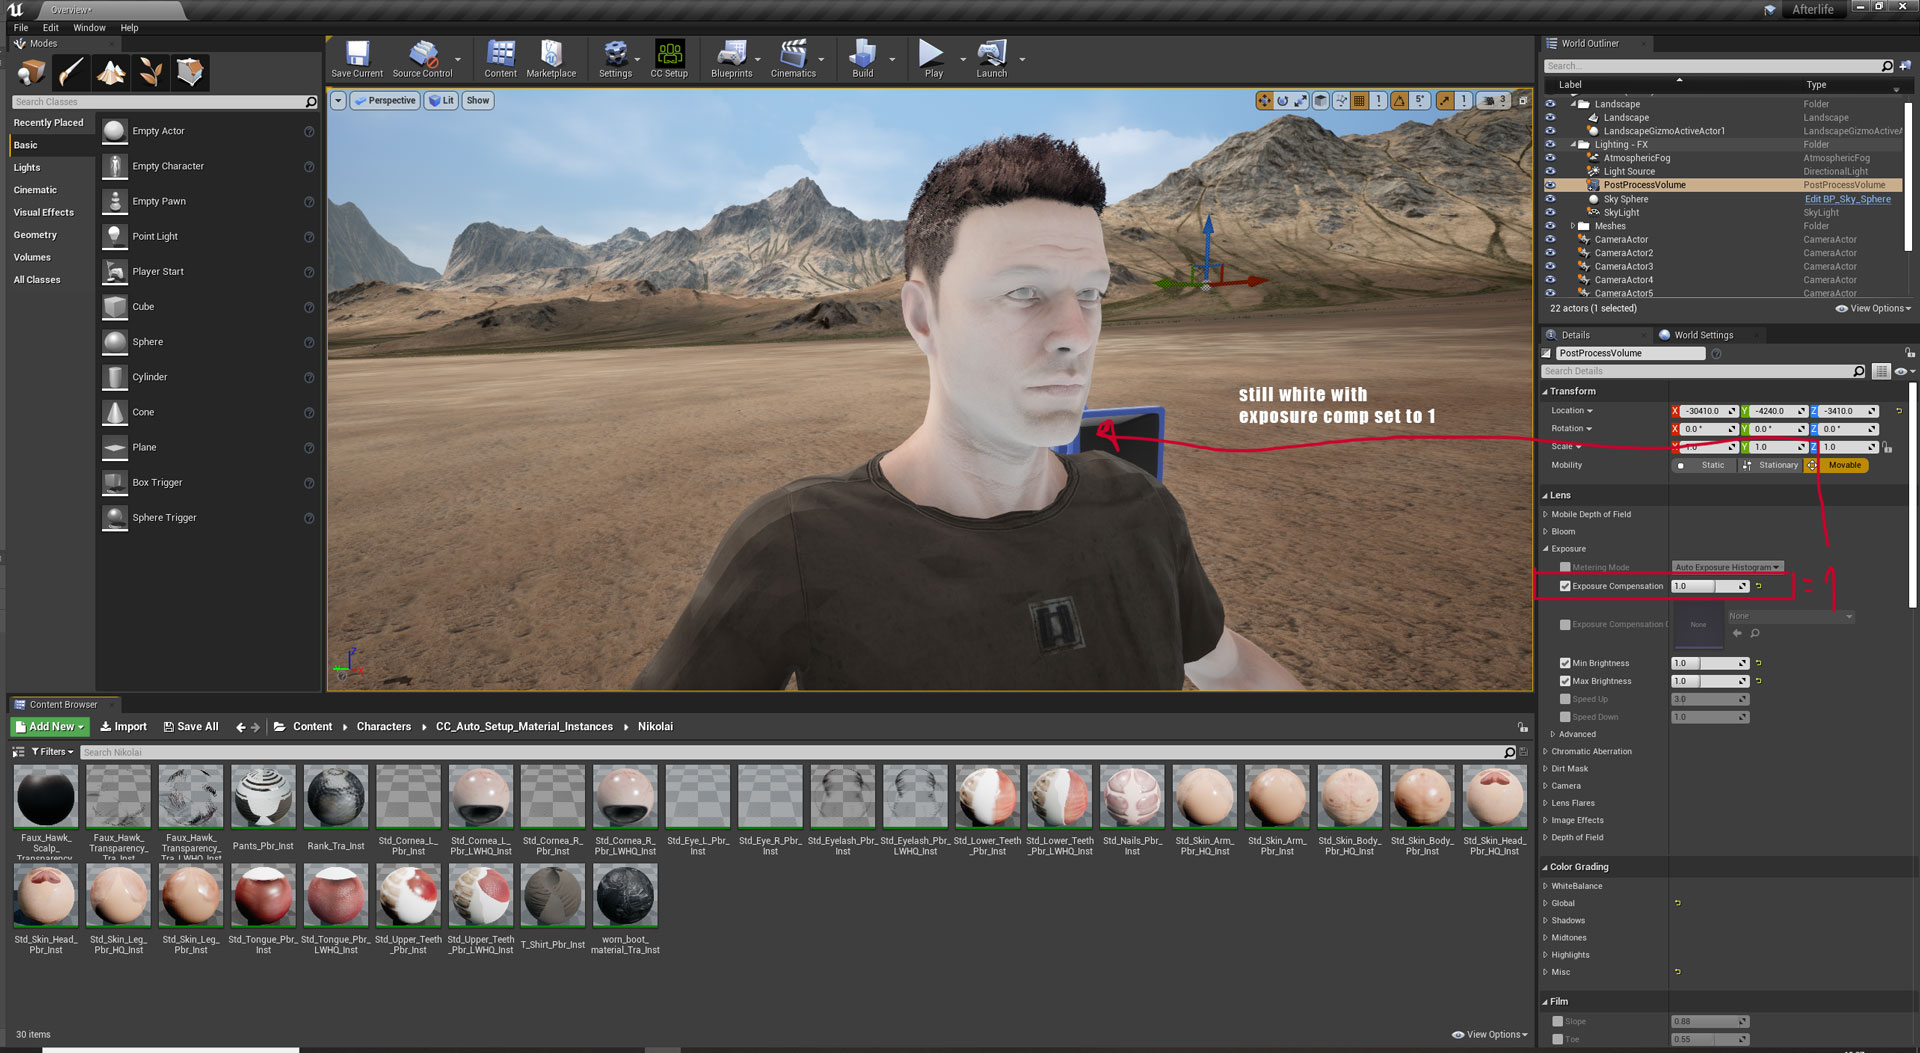
BUT WITH EXPOSURE COMP SET TO A HIGHER VALUE THE SKIN IMPROVES, BUT THE REST OF THE SCENE IT'S OVER-EXPOSED
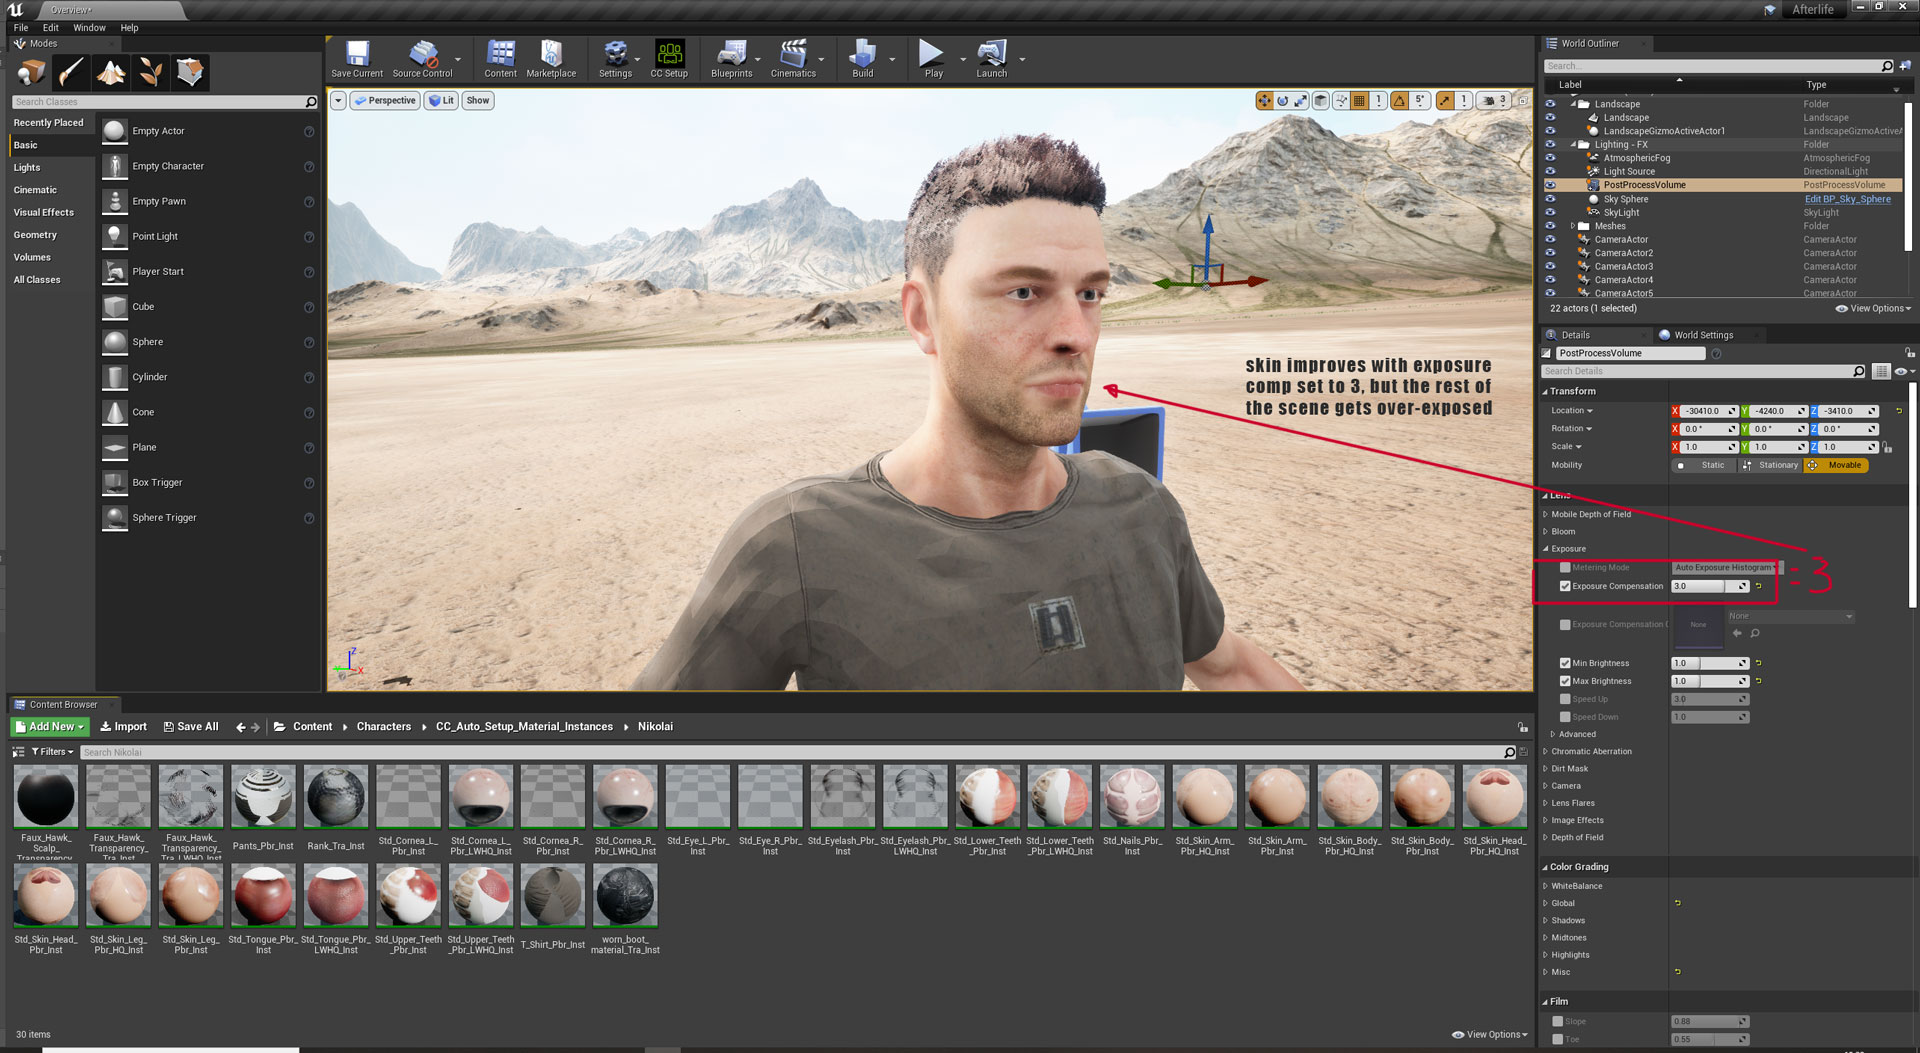
Any ideas?
Regards,
Luis
|
|
By Mikay² - 5 Years Ago
|
I have the same issue and posted it some time ago, but my ticket was simply closed with the comment that it was no bug - although it is obviously is a bug.
https://www.reallusion.com/FeedBackTracker/Issue/Live-Link-crashes-Unreal-and-auto-setup-doesnt-work
|
|
By unit23 - 5 Years Ago
|
luis_paz1981 (5/12/2020)
That is very strange. You can quickly disable the PP when ticking the option at the bottom of the Brush Settings panel, called 'hollow'. Then it only affects items inside of the volume. I have tried ticking the hollow box as suggested, but it has no effect at all in the scene
I meant, 'unticking' the hollow option.
|
|
By FAITH BASED GAMES - 5 Years Ago
|
luis_paz1981 (5/12/2020)
That is very strange. You can quickly disable the PP when ticking the option at the bottom of the Brush Settings panel, called 'hollow'. Then it only affects items inside of the volume. Hi @unit23, I have tried ticking the hollow box as suggested, but it has no effect at all in the scene, as shown here: However, when I play with the exposure compensation a can see improvements in the skin shader as shown here: WITH EXPOSURE COMP SET TO 1 IT STAYS THE SAME: BUT WITH EXPOSURE COMP SET TO A HIGHER VALUE THE SKIN IMPROVES, BUT THE REST OF THE SCENE IT'S OVER-EXPOSED Any ideas? Regards, Luis
Hey Luis,
I was thinking about this last night but I was too tired to reply...
Are you using the PP from that level? How about the "Fog"? If YES..both of those together may be your problem...try getting rid of both and starting with the default configurations...then you can adjust there. Having "somebody" else's setup may NOT work properly for what you are looking for.
The other thing, I think in most cases, you build your level, then add, PP, lighting FX, fog etc (that is why it is called POST processing). It will save time from having to adjust it every time you add something new....you just have to adjust a few times at the end to get "the look" you need for your project.
Can't hurt....so give it a shot.
Hope that helps as well!
Sam
:)
|
|
By FAITH BASED GAMES - 5 Years Ago
|
Hey there Mikay²,
I went to your "ticket", grabbed Gabi and tried her out...same resolute as you.
I did notice that, correct me if I am wrong, everything was imported from DAZ including Gabi. If that is in fact the case, that "could" be where the problem you are having lies. Those look GREAT in CC3, BUT not very good at all in UE4....especially the hair; it has about a 90% failure rate, for the hair you "should" use what you can purchase on the Reallusion Store/Marketplace without a LOT failures! You can try the DAZ hair but it could take a while to get what you would like (I have tried about 25 or so, only one or two came close to working correctly...they don't look bad just NOT great). Also getting the "skin" right will take some time for the shaders and lighting to export correctly into UE4.
IF you are wanting to bring Gabi into UE4 because you like her face (she's very pretty!) You can try the "Headshot" and Iray plugins if you purchased those here at Reallusion. You WILL have to adjust the lighting to get a good diffused lighting that you will need to get her face right then use Iray to get close to 4K, then use the Headshot plugin. I just did a REALLY quick try doing that and got Gabi looking like she needs into UE4....BUT I didn't have the lighting right in CC3, BUT she looked like how she is suppose to look going from CC3 to UE4. Just know that it will be a time consuming project, it's mainly getting the "lighting" right!
Perhaps this will help as well (I never had tried it out though). Character Creator 3 Tutorial - Auto-Load and Bake Daz Textures
One last thing....if you are using the iClone Unreal Live Link for ANYTHING or just have that plugin in your UE4 project you WILL get an error message EVERY TIME you close out UE4, they know about it, hopefully they can get that bug fixed soon!
Anyway I hope all of that makes sense and it will help you out with your project.
Have fun creating!
Sam
:)
|
|
By lancelotcq2 - 3 Years Ago
|
Thanks for this thread. I just had the exact same issue. Only I had been using my CC3 characters in my UE4 scene no problem, looked great, and then I powered up one day and all the sudden my characters looked like ghosts.
I spent two days trying to figure it out, and just deleted my post prccess volume and that seems to have fixed it.
|