|
By sonic7 - 7 Years Ago
|
Greetings to all - this thread is mainly for the "indie film makers" ....
As a result of the recent release of Iray for iClone, there's no doubt been a lot of "testing" going on...
I don't pretend to have the "perfect" answer here, but thought I'd share my findings anyway ....
I run a single Nvidia GTX-1070 card, (probably currently 'middle-ish' in the overall mix of graphics cards out-there).
OK. - so like everyone else, I wanted MAXIMUM quality for MINIMAL "hit" on my PC (laptop actually).
So here it is ... maybe give it a try ... it's designed for MAX speed ... (compromises of course!).
SETTINGS:
● De-Noise set to "39" ● Eliminate Shadow Artifact "ON" ● Anti-Alias Radius "1.5" ● Hardware Settings - Threads = "6" (depends on your particular PC) ● Render Mode "Interactive" ● GI Mode = "Diffuse" (problems can occur if using "Diffuse + Specular") ● Raytrace Quality = "High" ● Preview Auto Update = "ON" ● Preview Tessellations and Displacements = "OFF" ● Frame Size = "Custom" (I use 960 x 409). Under "Export Settings"
● Select a folder location and your output Format (I used PNG).
● Export Mode = Standalone Render (Save MI Scene) - which is the 'default' setting.
● Output Size = 1920 x 1080, OR, if needing widescreen, try 1920 x 818 (for a 2.35:1 aspect ratio) (or 1920 x 800 for a 21:9 aspect)
● Enter your 'Range' to be rendered.
● Frame Rate = 24 (or as you require).. ● Stop Criteria - Sample Iterations = "40" (that's right start at just "40" iterations! - you can always increase if needed) :)
PLUS, under iClone's 'Edit' > 'Preferences' > 'Iray Render Globals', you could reduce the 'Max Texture Size' to 1024 x1024
● Set your Viewing Quality to iClone's new "Minimal" setting (if you're running a bit low on VRam).
After hitting "render" It takes several minutes for the full 'loading' to occur, and then the frames will render sequentially after that.
You might be surprised how *fast* your render will be,. These 'lean' settings yielded me 3 frames per minute on my sample scene.
Also, given that these settings are for "Interactive Mode" (rather than "Photoreal Mode"), you might need to add some "Temporal Filtering" to smooth any slight 'flicker' or 'fluctuations' within the finished render sequence. - You could run your exported png sequence through a 'non linear editor' like Vegas (or similar), adding a 'temporal filter'. I used the 'Boris Temporal Blur' with it's 'default' setting. (Somebody might suggest something better though?). Edit: Just discovered that Boris 'BBC Noise Reduction' does a better job - it has a preset called 'Suppress More Y Noise' which seems to work well. (But dial the 'sharpness' to 0). Also maybe use 'BBC Gaussian Blur' with the preset 'slight blur.bsp' and dial the (linked) horizontal/vertical value to 0.5
The only other thing done in Vegas were the 'Levels'. For that I simply used 'Vegas Levels' to boost the overall gain and set the black levels. The 'order' of the filter chain was ● Levels > ● BCC Noise Reduction > ● BCC Gaussian Blur.
Edit: OK - here's an even better result:
* Vegas 'Levels' to set Gain, Gamma & Black level.
* 'BCC Flicker Fixer' using the preset 'Default Temporal Smooth YCC' and set 'smoothing' to '3' and 'Y Range' to '3'.
* Finally, 'BCC Gaussian Blur' if you want more of a 'film look'. Use 'Default.bsp' with 'Blur' set to 0.1 (or 0.2 or 0.3 for a 'softer' result).
So the above settings are simply a beginning. Those with older graphics cards may find these settings an advantage, while those with more powerful cards could 'up the ante' and increase the quality settings for sure ... Anyway - I hope this is useful to some as a "starting point".
And of course, if you can offer suggestions/improvements - please chime-in !!!!
|
|
By charly Rama - 7 Years Ago
|
thank you Sonic. I've tried your setting and indeed faster . Thank you.
BUT...I worked a lot with lut, GI and IBL on my project and...I liked the render more than Iray. I've posted it at my thread comparison and you see the potential of Iclone. I'll use your settings just for very short shoot for my project because the time needed for Iray is just too much
|
|
By sonic7 - 7 Years Ago
|
Thanks Charly ... yes I'm yet to venture into using LUTS, GI ans IBL really. I'm keeping it basic for now ... but maybe down the track I'll get into them. - I'll take a look at your thread - thanks !! :)
|
|
By AutoDidact - 7 Years Ago
|
|
Hi Steve while those are generally some good "optimization" tips the problem with them as that they can not account for the varibles that will come into play for each individual, for example Multiple humans or other organic life forms with skin and Subsurface scattering.
Or Sci-fi mechs&gear,Vehicles with reflective and emissive surfaces and thick transparent surfaces with caustics.
I am glad you specifically addressed this post to "indie filmmakers" because that is what I consider to be the target demographic of Iclone.
I have seen people post an iray render of a single portrait of one pretty girl in an empty universe, with render time of 18 minutes!!!
Ok thats fine if that is all you will ever do ( still portraits of pretty girls) However if you are not testing a render engine under the exact conditions of your expected usage (animated films) then what is the point?
|
|
By sonic7 - 7 Years Ago
|
Hi Auto ... I probably should have said 'basic' indie filmakers - more the 'entry level' (like me), who aren't including advanced visual features.
I did my test on only a couple of basic scenes and just tried to dial in the *fastest* iRay render time I could get, with 'acceptable' quality (to me anyway). It's just a starting point .....
Edit:
I'd said that I got around 3 frames per minute on my scene (using a GTX-1070 based laptop). Just now I ran the rather demanding "Loft Scene", which naturally dropped me back - (to just under 1.5 frames per minute). But that's not bad for the Loft scene (for 1080p). I guess this shows the ability of the iRay 'interactive mode' which is much faster than 'Photoreal mode'.
|
|
By 3dtester - 7 Years Ago
|
Thanks...even though i let alone the idea of iray animation for now, i found some your tips very helpful.
|
|
By animagic - 7 Years Ago
|
I have found LUT filters I can apply in Vegas, so that gives me some of the same benefits (which I like a lot) that I find in iClone. For testing purposes, I use a slightly longer iteration cycle (150) and then denoise at 149. But it is a good practice to denoise one frame before the final one.
I also render at 1280x720 and then use AI Gigapixel to scale up to 1920x1080.
I consider the iClone native renderer and the Iray renderer to be two different vehicles, so I adjust my scenes to work optimally for Iray. The result I get with Iray suits me. My current project has people in it (it is in fact quite "naturalistic"), but the look is not overly realistic and a certain griminess fits what I'm after.
EDIT: To optimize VRAM usage, I export the scene files first and then close iClone and use the Standalone renderer.
|
|
By sonic7 - 7 Years Ago
|
Thanks Job .... yes 40 iterations is extremely 'lean' (was pushing the boundaries), but 150 is surely a more respectable figure if you've got the hardware to achieve it in a reasonable time. I've noticed that 1080p rendered as 1080p is indeed on the 'sharp' side (as Mark has mentioned). I'm tempted, (when I get a chance) to do an upscale from 720p, but I might try it without Gigapixel, to see wthether I can get a more 'film' look (on the soft side). Mark spoke of using bicubic during the upscale to knock off the jaggies. I don't know atm (haven't looked), whether Vegas has a good filter for that. I've got that old 'VirtualDub' free program which has various bicubic settings for when resizing. If anyone has a time tested best approach for ordinary upscaling, I'm keen to know.
I get what you're saying about Iray and iClone being two different vehicles. I've now got to re-light my shots using the Iray preview window for 'reference'. Some of my lights are 'spilling' over (too much 'reach'), resulting in areas being washed out, so are too 'flat' looking. But at the same time, other camera angles show excessive contrast and need to be better balanced with lighting levels ....
|
|
By TonyDPrime - 7 Years Ago
|
|
Imagine this as an episode of "In Search Of" with Leonard Nimoy.
|
|
By sonic7 - 7 Years Ago
|
.... lol Tony ....
|
|
By 4u2ges - 7 Years Ago
|
Although number of required samples would highly depend on the scene (lights, camera angles, amount of *open space* in the frame),
Interactive mode would always call for less samples than Photoreal (for pixel convergence). For some scenes even 100 might be an overkill.
But before even going for post production NLE filters, there are some more options to explore inside Iray Export.
There is a built in firefly filter in Iray, which in iClone implementation is not practically functioning, because it is missing an important control.
That control could be added manually into the export scene files (hopefully in the next patch RL would push it into GUI).
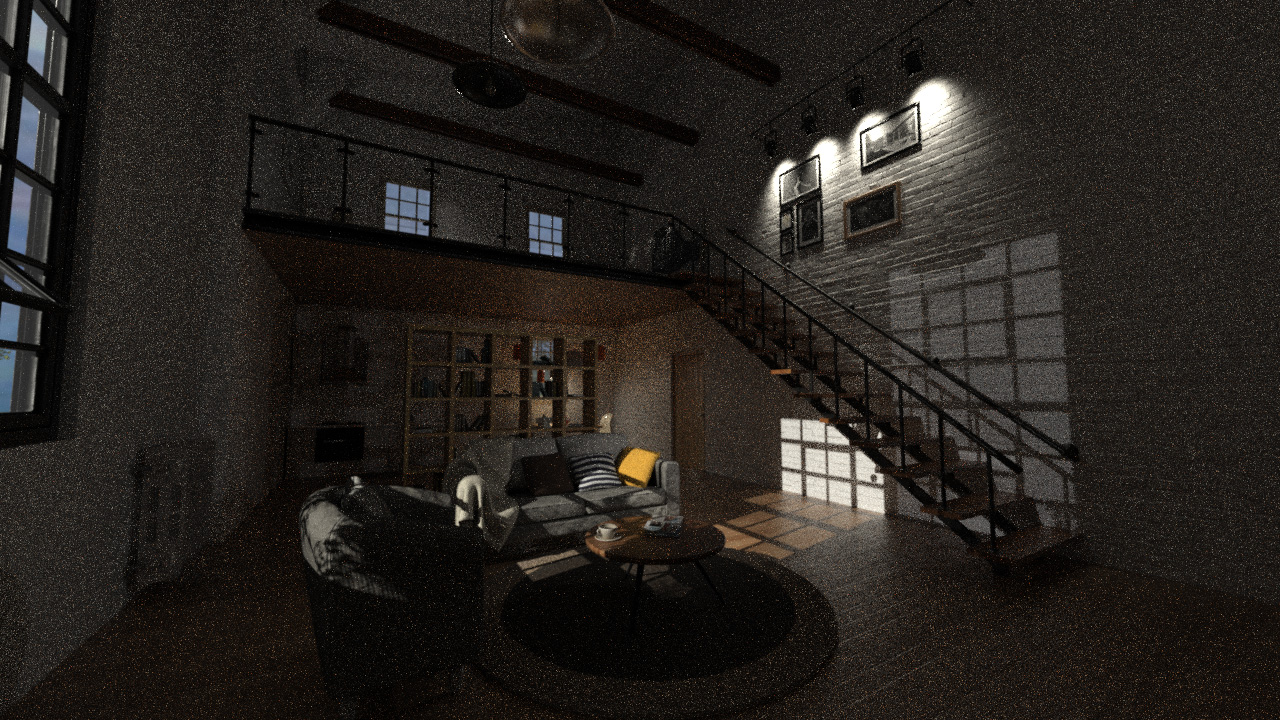
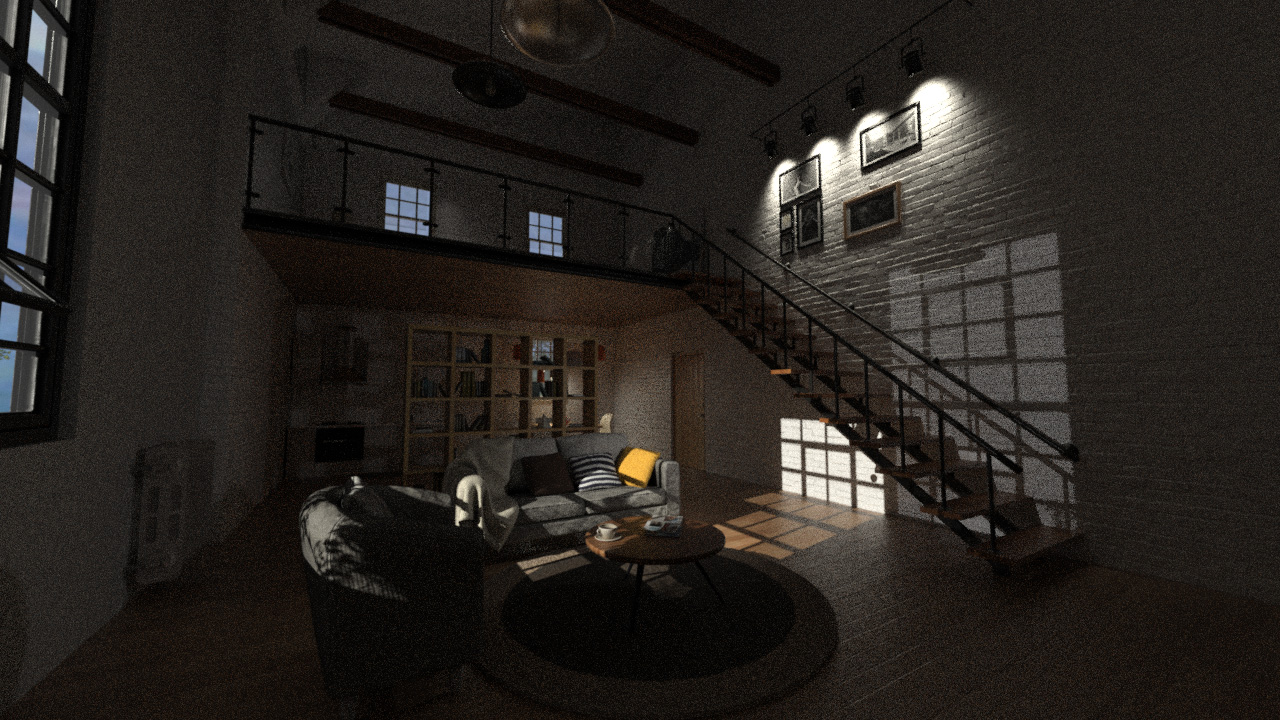
Here are 2 screenshots of the loft scene frame rendered with identical parameters.
But for the second render I have added a missing control manually.


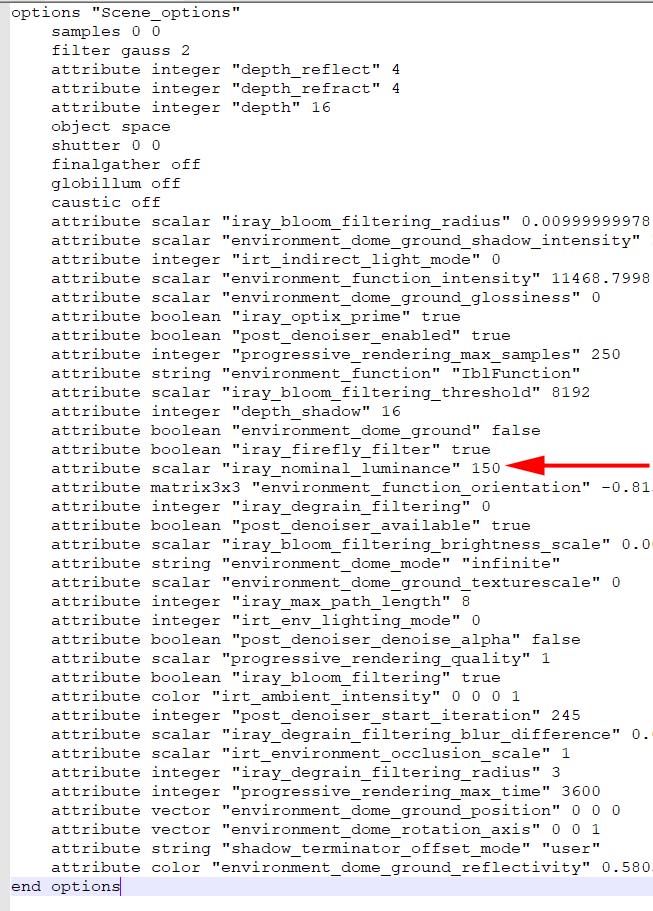
This missing parameter should be added however, for each frame into *.scene.mi file.
After opening the file, scroll all the way to the bottom and find a scene options block.
options "Scene_options"
----------------------------
end options
Add the following parameter anywhere within the block
attribute scalar "iray_nominal_luminance" 150
Parameter 150 is a variable. For darker scene you may want to increase the value. For brighter take it down.
It basically does "fine tune" a firefly filter and estimate errors. Higher value provides more aggressive approach.

This parameter is best suited in combination with tonemapper control as it might darken the scene slightly and you need a tonemapper to compensate.
Since you cannot use it in Preview (until RL integrates it), you might face a hassle going back and forth between Preview > Export > Standalone Render
(or leave it for post work).
Nominal Luminance parameter has to be added to each frame (again thus far, I hope RL would eventually make scene options common for the entire export),
you might need to use some tools (such as Notepad++) to add the parameter globally in one shot.
Note: I have not tested it in Interactive mode, as I do not particularly like this mode much.
|
|
By animagic - 7 Years Ago
|
4u2ges, thanks for the Firefly Filter tip.
I was looking for a way to make changes in all scene files for a particular scene and found that you can do this with Notepad++.
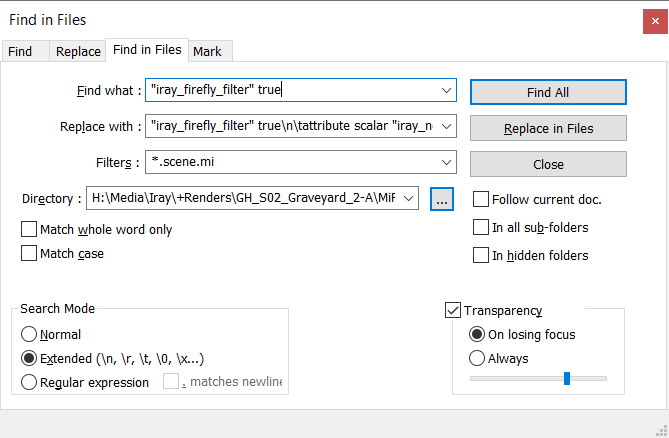
Open Notepad++ and select Search > Find in Files... This will open a dialog box:

Make sure the "Extended" option is checked.
In "Find what" enter: "iray_firefly_filter" true
In "Replace with" enter: "iray_firefly_filter" true\n\tattribute scalar "iray_nominal_luminance" 150
\n gives a new line and \t is a tab to indent the line with the rest.
In Filters: enter: *.scene.mi
In Directory you enter the path to the MiResources folder where the scene files are located.
Click "Replace in Files" and all scene files will be updated.
|
|
By 4u2ges - 7 Years Ago
|
Thanks Ani for additional tip with Notepad++. I was too lazy to add that one. :)
|
|
By sonic7 - 7 Years Ago
|
@4u2ges ... Looking forward to viewing your pics full screen this evening when back at a PC & internet source. Plus I can try some actual tests tonight. :)
|
|
By Snarp Farkle - 7 Years Ago
|
Thanks Steve for posting this!
I've been playing around with Iray settings too but don't really know what I'm doing yet, just playing around to get a look that I want. Most of my work has been in still images, for the magazine articles that I've written, and your settings should help with that, but then again all that is about to change.
I've given notice to the Voice magazine that I am retiring from writing my articles, after 10 years I just don't see the views or feedback I used to get, instead of thousands of views I'm lucky to see 100! They have asked me if I would be interested in doing a comic strip for the magazine, and I may play around with that idea, as each one of those I do would be from scenes that could eventually turn into a movie! This will free me up to devote more of my time into learning all the parts of animation and film making that I've had to put on the back burner for so long.
I'm excited about Reallusion's Iray finally coming into play and am impressed with the quality of the speed settings, compared to DAZ render times of a 3840 x 2160 at over one hour, I can get the same or better render quality in just a couple of minutes! The difference though is that in DAZ I have a plethora of pre-render scripts that I can use and they come with camera's, shaders, backgrounds, sky domes, etc., etc.. When I get into iClone I'm kinda lost as how to put all this things into play and just play around sometimes for a whole day to get what I think looks good, and so I'm hoping more people will share they're settings too on this thread to help with the learning curve!
|
|
By sonic7 - 7 Years Ago
|
Thanks Snarpe for your thoughts here .... and yes - I too find myself mostly 'playing around' in iClone (I've got a long, long way to go - heaps to learn yet). I'm not at all familiar with 'scripting' or 'programming' of any sort; I'm just a visual guy that wants to get the 'look' I like with the *minimum* amount of fuss. The way I see it, the 'less' that comes between 'idea' and 'end product' - the better. I don't know how those with all the programming skills can come from 'that place' (technical), and yet be 'creative' as well. - It honestly does my head in. Well, of course, *if* you can do both that's terriffic! - It's just that I personally can't. I'm a 'what you see is what you get' sort of guy (the way I work) ....
Interesting what you say about DAZ, (which I've had very little experience with, so I can't compare the two), but I do think Reallusion have done a good job with the Iray adoption. I'll possibly always be a grass roots, basic creator sort of guy (or even more of a 'tester') - but I do 'aspire' to great things. If they're ever going to happen, it'll probably be with iClone .....
Well I do wish you well with your endeavours Snarpe! :)
|
|
By sonic7 - 7 Years Ago
|
Well here's a test I knocked up for the Loft Scene ...
It was done at just 40 iterations per frame. This helped immensely with the render 'time', but to be honest I'm still not happy with the 'quality' due to the persistent *flicker* even after filtering (seen mainly on the walls).
If that could be eliminated, it would make for incredibly efficient Iray renders. So the settings used for the render below were exactly as mentioned at the beginning of this thread.
Update Post
|
|
By charly Rama - 7 Years Ago
|
|
Good Steeve, good. And the render time was...?
|
|
By 4u2ges - 7 Years Ago
|
|
If that could be eliminated, it would make for incredibly efficient Iray renders.
Unfortunately it cannot be. It could be 40 or 400. The result in Loft Scene case would be the same.
That is a nature of Interactive mode rendering. Fast but inaccurate, or rather inconsistent in dynamics.
|
|
By sonic7 - 7 Years Ago
|
@4u2ges .... I get what you're saying: it will never be perfect, but the question is how close can you get?
This is the exact same file as above, run though VirtualDub's internal temporal smoother and the result is decidedly better.
@Charly .... these took around 43 seconds per frame (1920 x 818 pixels) done on a single GTX-1070 (Laptop), so this 17 seconds (400 frames) took around 4.8 hours. (repeated on this video).
|
|
By illusionLAB - 7 Years Ago
|
Flickering that looks like a 'lighting' problem is usually caused by GI. From what I've seen in the RL video about 'optimizing' for animation it looks as if iClone is still generating a batch file of individual frames to the Iray renderer - the MI file (a slightly more sophisticated version of our beloved Indigo pipeline!). So, in short, if the GI is recalculating for every frame you will get flickering... if there's a way to 'disable' GI it may be worth trying to see if it rectifies the problem (although what's the point of raytrace renders without GI?).
|
|
By sonic7 - 7 Years Ago
|
Yes Mark - well these are the sorts of things that only the more technically minded would understand. I certainly don't, which is why I always resort to 'visual tricks' to get a certain result. From what you and 4u2ges are saying, the 'flickering' is due to the way 'interactive' goes about things. I understand that. But surely (apart from disabling Global Illumination), there *could* be some sort of 'frame averaging' ie: temporal filtering put in place to yield a better result (not perfect, but better). Anyway - for me, using 'Photorealistic' is probably not an option simply due to the time it takes to render. So at the moment if I want to use Iray, then 'Interactive' with temporal smoothing seems the way to go. I'll do some more tests over the next few days on different scenes. I'm *thinking* that static shots may behave better, (no camera movement), and that shots without large flat surfaces (walls) may also behave better ...
Thanks Mark, 4u2ges, Job, (and others) for helping to clarify what's happening with this - I really do appreciate your expertise ! .... :)
|
|
By illusionLAB - 7 Years Ago
|
|
I'm *thinking* that static shots may behave better
This is usually true - and yes, the more complex the scene the less you'll probably notice flickering. As for the GI flickering, imagine your camera is a ball cannon and it shoots out 300 balls covering your scene... when the camera moves a little and you shoot the balls again they are not going to bounce in the same way - so, each "cannon shot" is as good as the other just not the same. Raytrace rendering is fickle, and you will soon discover that there are many factors that influence the final results - even at the Hollywood level you seldom get away with "one render" - it's always an iterative process.
|
|
By sonic7 - 7 Years Ago
|
edited (corrected)...
@Mark ... Good analogy - even I can understand that. Well, here's Version 3 of this 'Temporal Smothing' attempt. Don't know if it's much different to Ver 2, but it takes less steps (no need for VirtualDub now). This uses a different Vegas Plugin - 'Boris BCC Flicker Fixer'....
I mean sure, it has issues - it's by no means perfect - but for a meager 40 iterations it's not bad ... Using 'Photorealistic' mode would probably require at least ×5 the number of iterations - possibly a lot more .... I suppose I should test out some avatars - but in any case others might want to do their own testing and someone else could probably improve on this ...
Edit: Upon further testing, it became evident that bright objects on a dark or black background don't respond well to this approach. In such a situation, the 'ghost-like' frames included in the 'averaging' - become very noticeable. So getting 'acceptable' results depends largely on the particular scene used.
|
|
By TonyDPrime - 7 Years Ago
|
@Sonic - that looks really good!
|
|
By jarretttowe - 7 Years Ago
|
Yep, great work at 40.
|
|
By jason.delatorre - 7 Years Ago
|
|
Sorry if this is a noob question. What is the MI format? I usually do my post production in After Effects or Premiere. I typically work with MOV or MP4. I don't think I've ever heard of an MI file. Does it work like an image sequence?
|
|
By sonic7 - 7 Years Ago
|
Good question Jason. I'm not really up to speed on them myself, other than they're used to enable rendering of your scene at a later date without having to re-open your project. If my understanding is correct, it contains all the necessary components for a later re-render - hence it's large size ...
|
|
By justaviking - 7 Years Ago
|
"What is an MI file?"
Short answer = It is an Iray data file
iClone has .iProject and .iProp and .iAvatar files, which are how iClone reads and writes mesh, texture, lighting, and animation data, etc. In theory a lot of that could be written in OJB (for mesh) and JPG or PNG (for textures), but they stuff all that data into their own file structure for various reasons.
Similarly, Iray has it's own "language" and formatting for mesh data. The .mi files include mesh data, camera data, render control information, and links to texture files.
|
|
By animagic - 7 Years Ago
|
It took some digging to find out what "mi" actually stands for and it apparently originates from Mental Ray, which was bought by Nvidia at some point.
So "mi" stands for mental images scene format. There is also "mib", which is the mental images binary scene format.
More here: https://www.migenius.com/doc/realityserver/4.4/resources/general/iray/manual/index.html#/concept/scene_file_formats.html?zoom_highlight=.mi.
The format is used by a variety of software packages. A short overview of the mi format can be found here: http://paulbourke.net/dataformats/mi/.
|
|
By vfxsampath - 6 Years Ago
|
|
i bought iclone iray with lots of expectations for a high quality animation rendering. But still its not yet even close to arnold renderer in 3dsmax and maya. They are very fast and give a very good result. Iray in iclone has higher noise profile. Denoise is not a good solution as it blurs all the details. for instance fabric and skin pores etc.
|