|
By Delerna - 7 Years Ago
|
This is some examples of how I use my my modular architecture objects to create scenes
|
|
By Delerna - 7 Years Ago
|
ADDING THE ORIEL WINDOWS TO A BUILDING SO YOU CAN SEE INTO THE BUILDING
ONE WAY OF MAKING A BUILDING
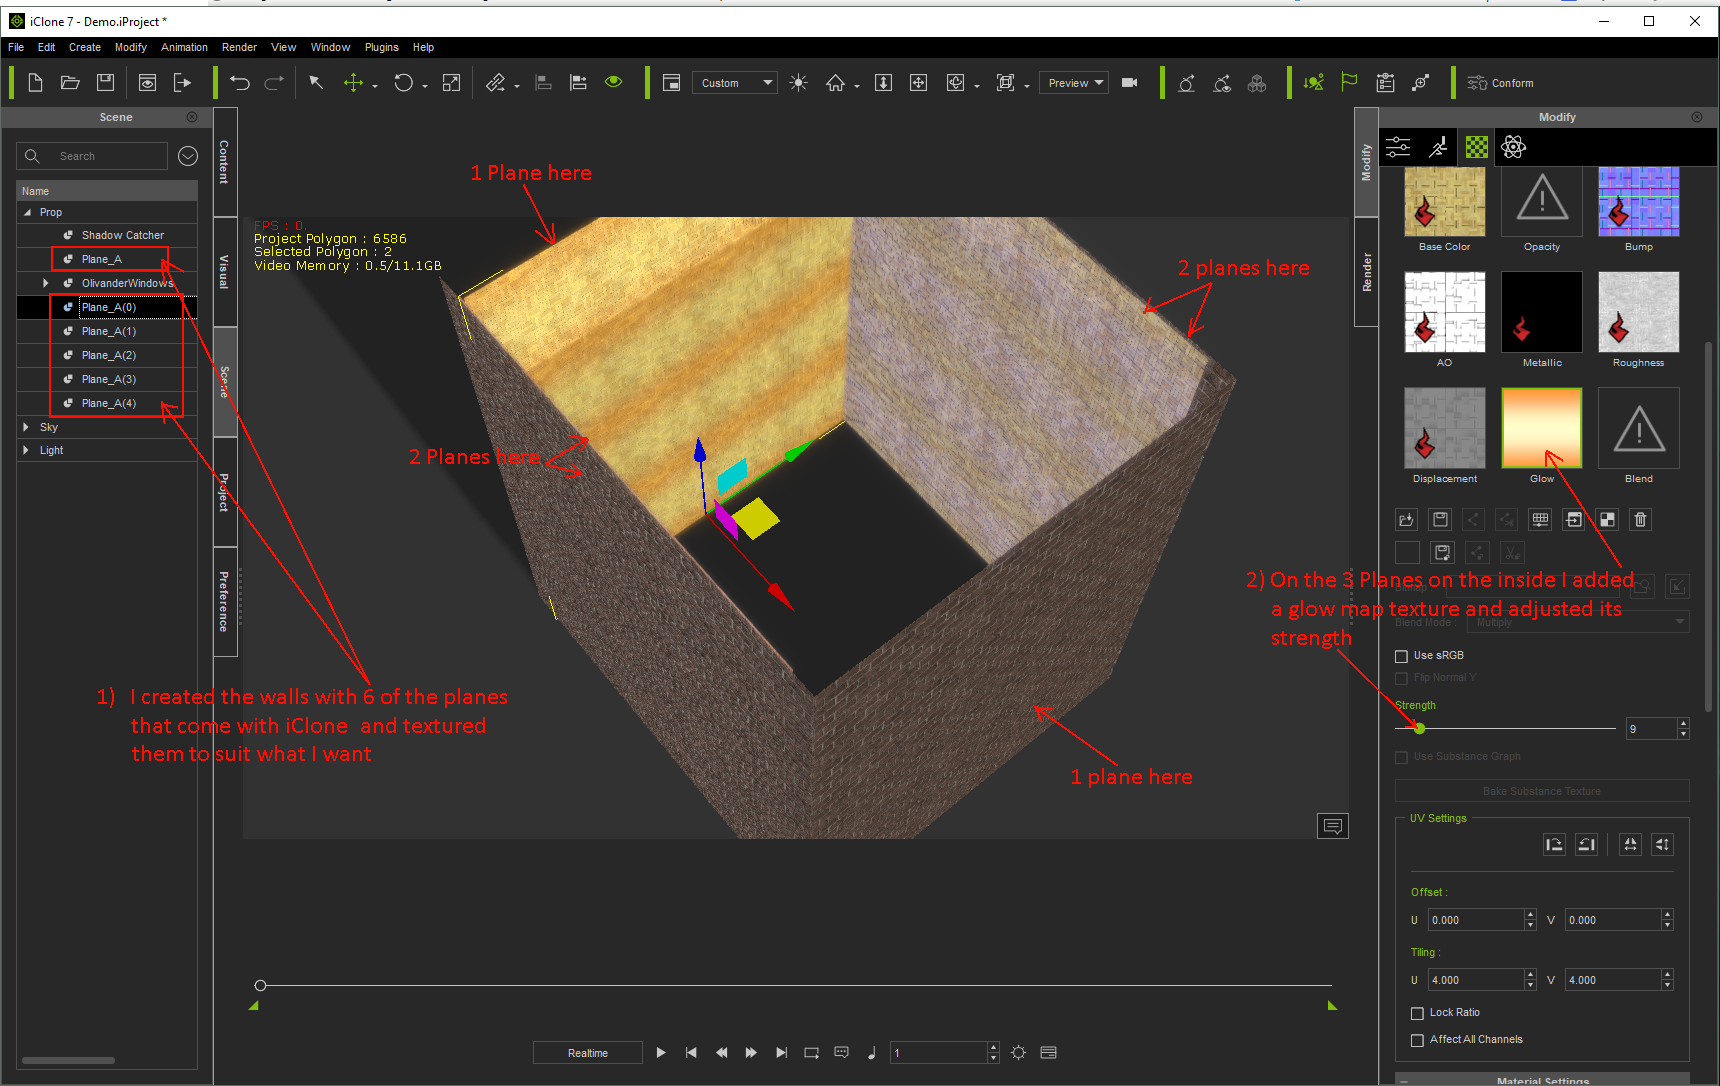
Here is one way of starting to make a building
ADDING THE WINDOWS SHOWS UP THE WALL
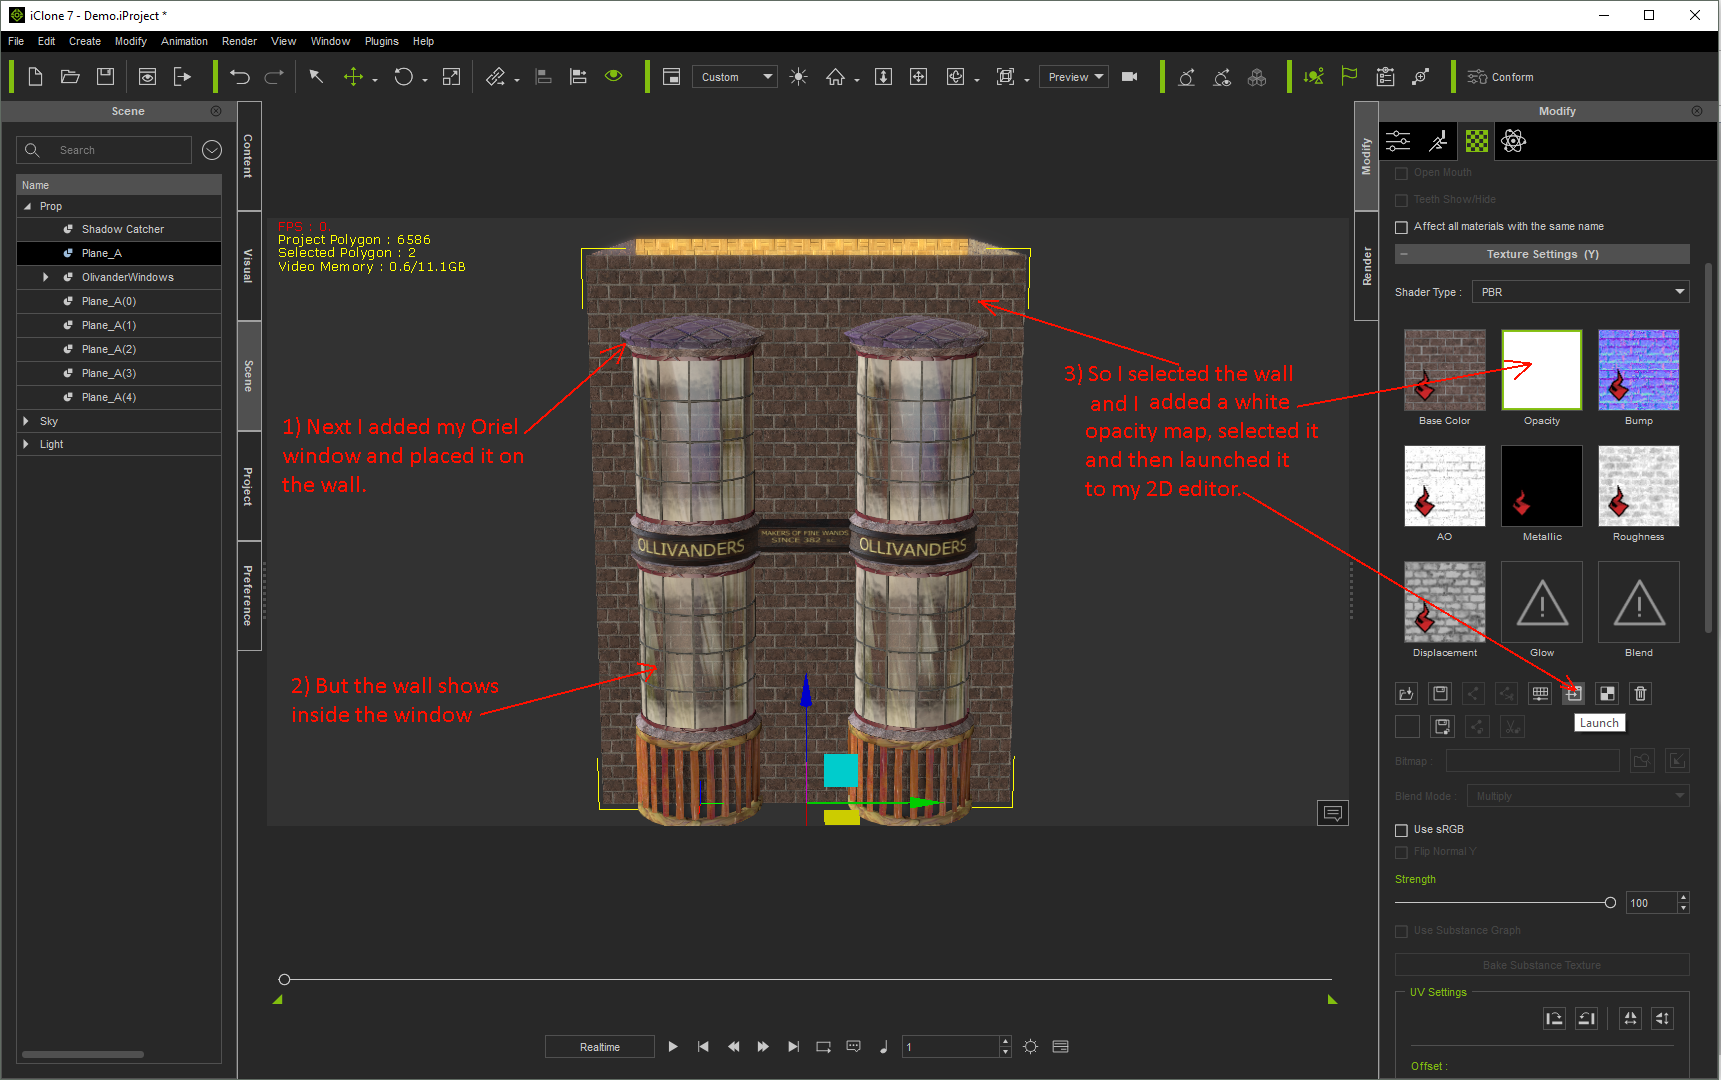
OOPS, The walls are showing up through the windows. That's not how it should be :crazy:
USING OPACITY MAPS TO MAKE HOLES IN THE WALL
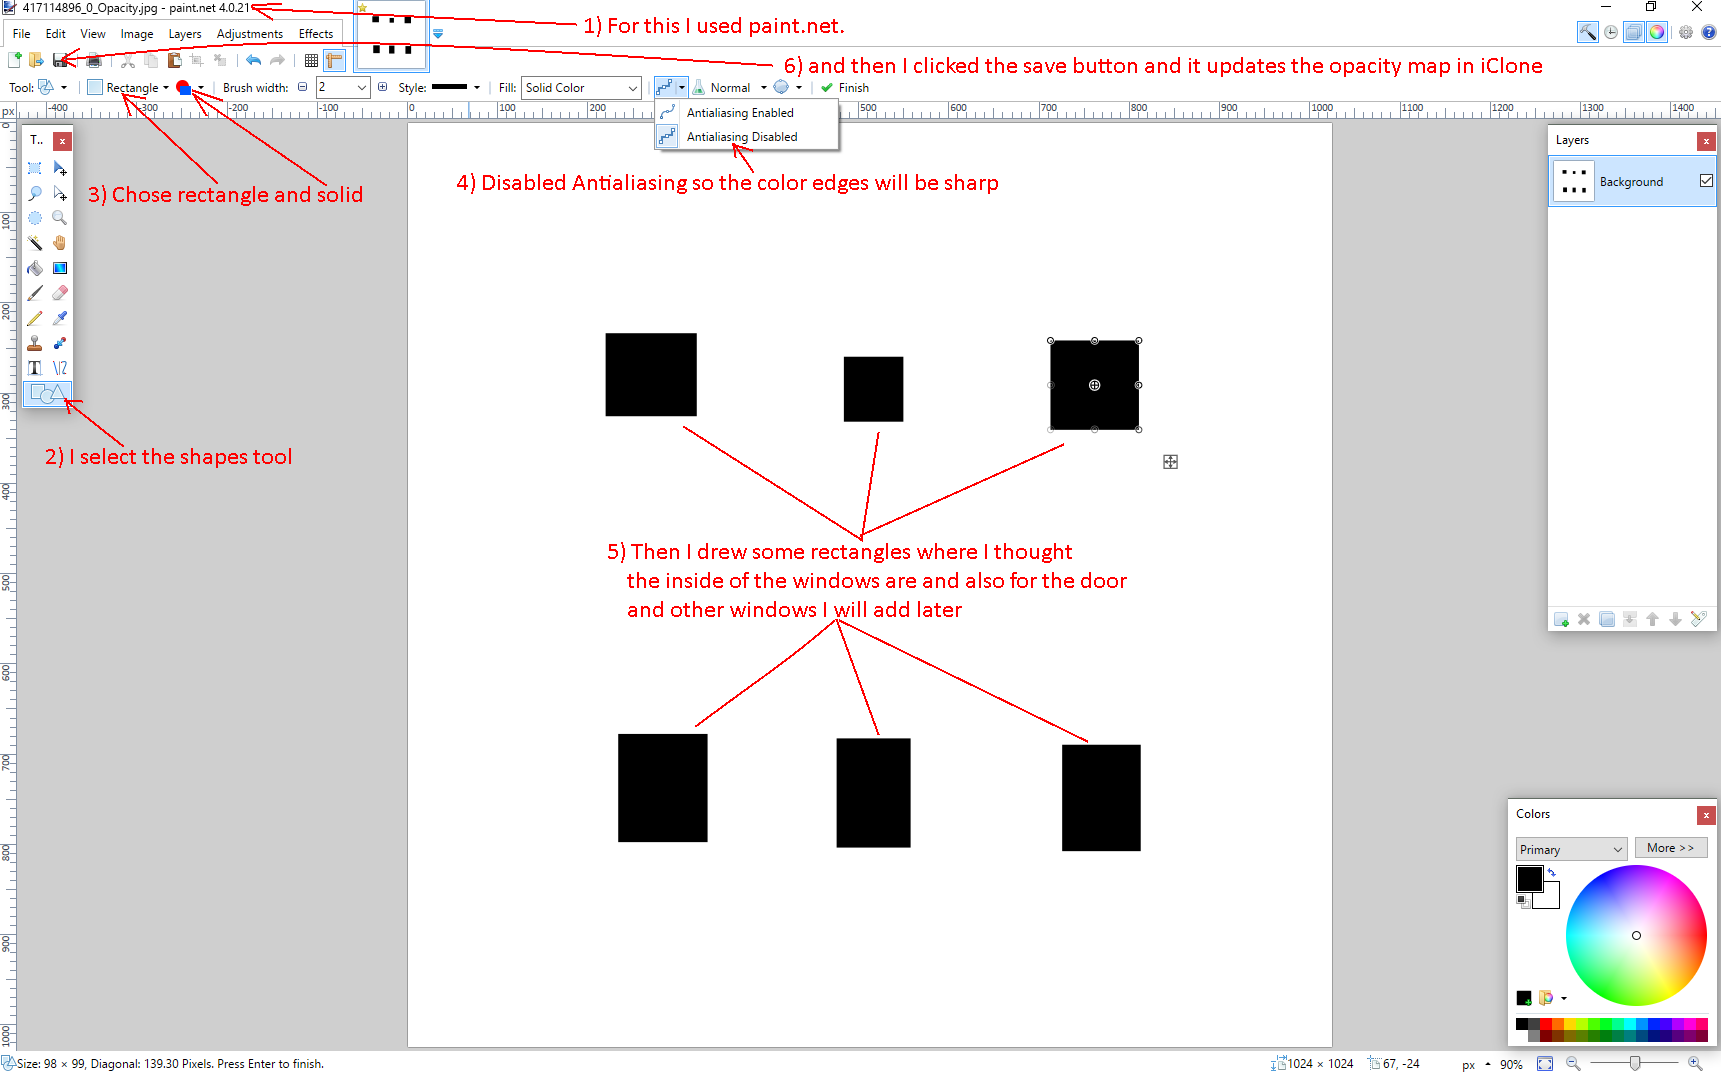
I try not to make them the right size yet. Just try to start them in the right places
THE INITIAL RESULT
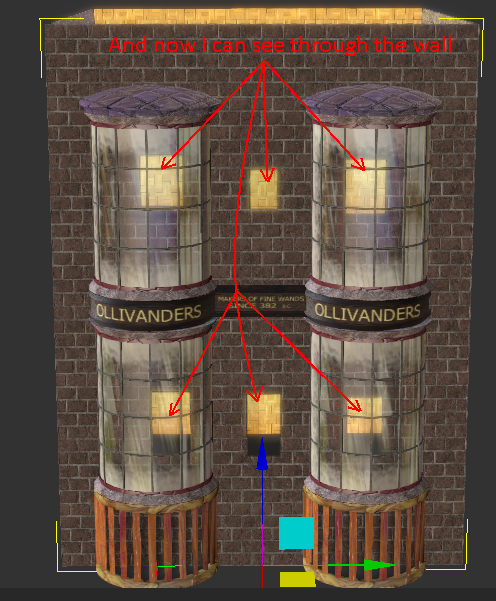
Yep, now I can see through the walls into the building. Just need to adjust its sizes now.
INCREASING THE HOLE SIZES
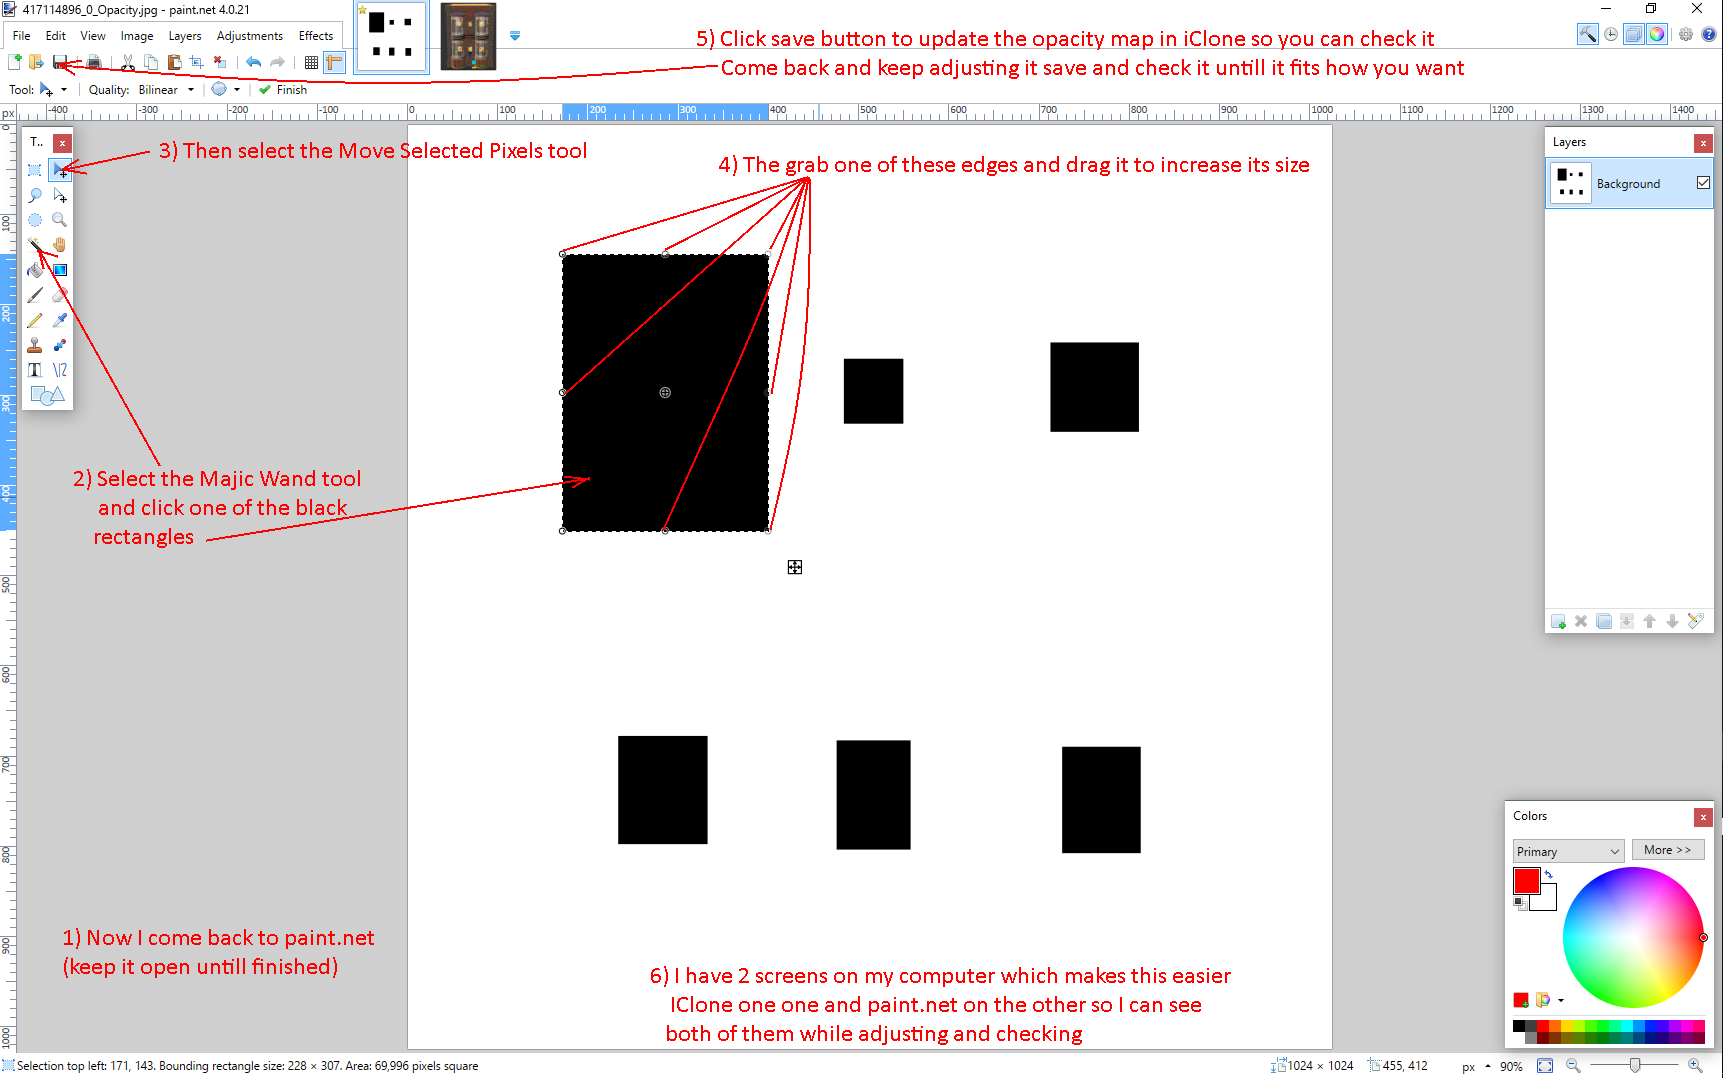
My process is to make a small change, save it, check it in iClone, if not far enough make another small change, save it and check iClone again.
I have 2 screens on my computer so doing that is very easy. Its almost like making the change within iClone itself. Not quite but almost.
DECREASING THE HOLES SIZES
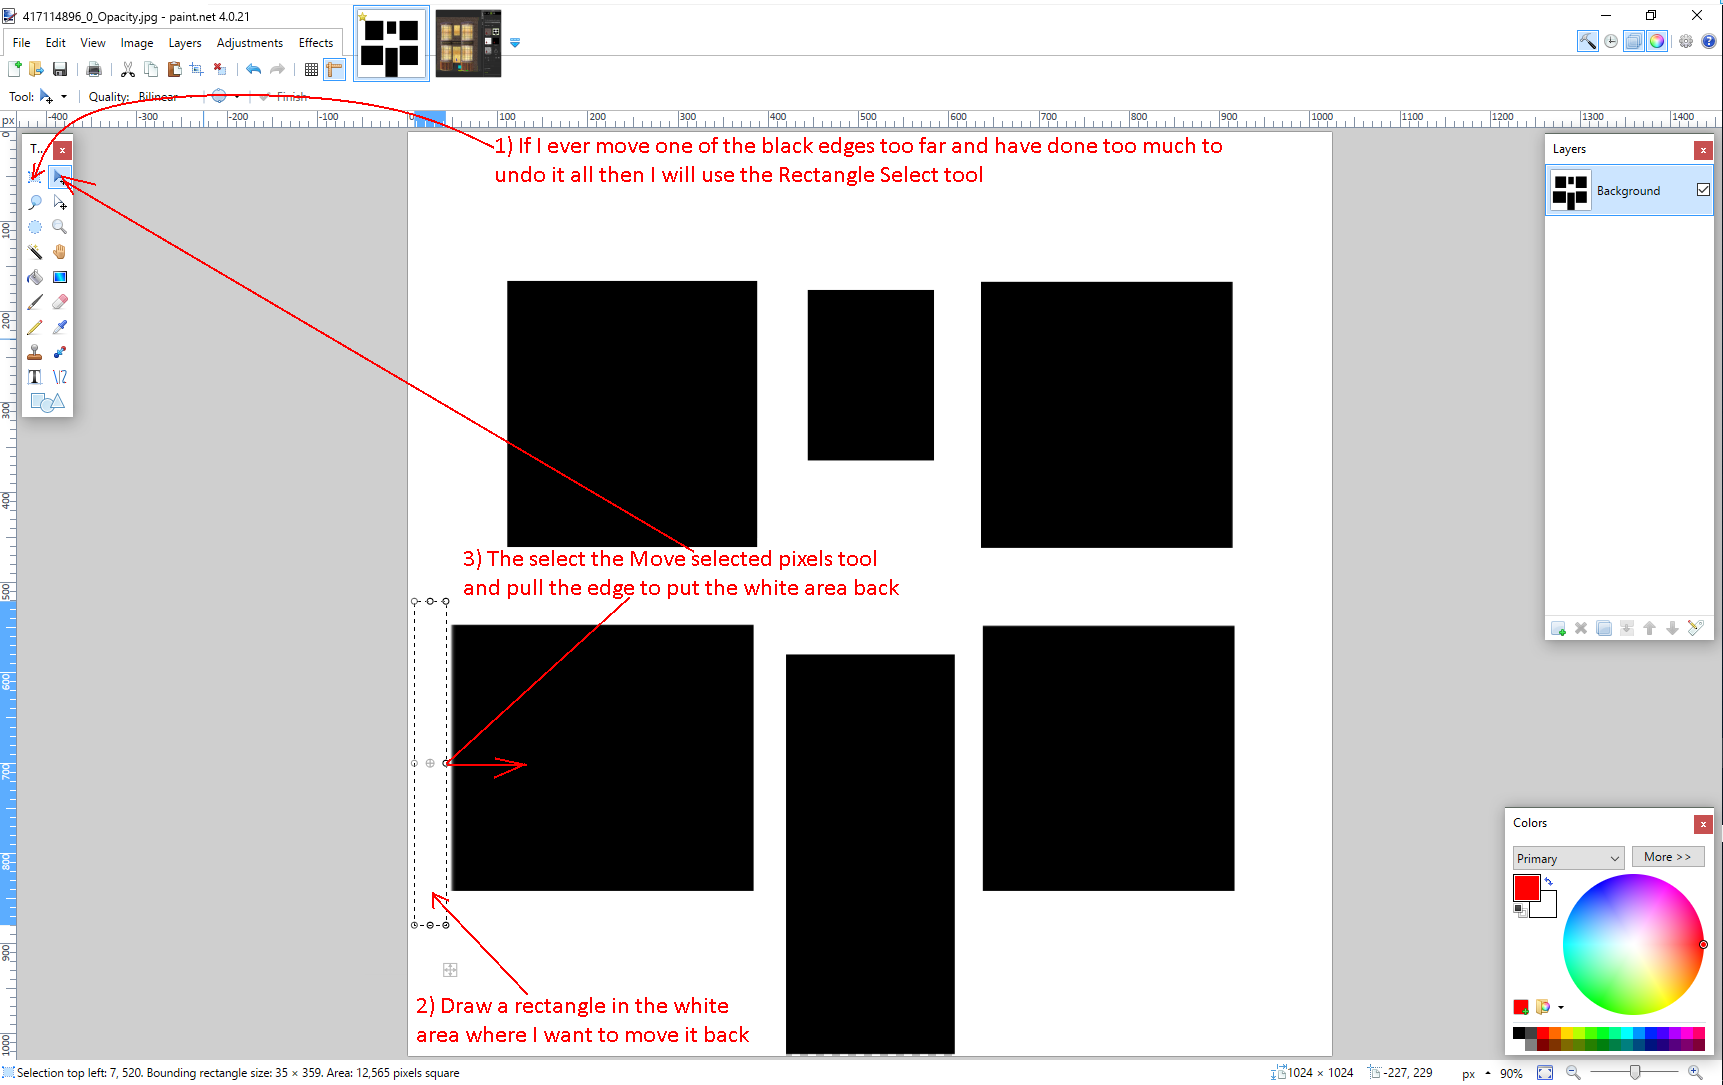
Usually I adjust just one side of the black rectangle and save it so I can check it in iClone. If I have moved it too far then I will just go back to paint.net, undo it and move it again a little less. Save and check.
But sometimes I do several and undoing will also undo all the things that are correct. That is when I do this.
THE FINAL RESULT
When I say the final result I only mean for adding the windows to the wall.
Still need to add a door and a standard window at the top. Also need to add a floor and a roof and furnishings etc inside the building.
For the wall I did consider making walls with the holes modelled but I figure that it would need tons of walls made to suit all the variations of buildings.
That's why I decided to use reallusion's Plane prop and opacity maps for the window and door holes. Now I can scale and move them on the building however I want and I just need to generate an opacity may to suit the design
|
|
By Delerna - 7 Years Ago
|
Here is an image of a scene I am going to make with my Modular props as well as others that came with iClone by default
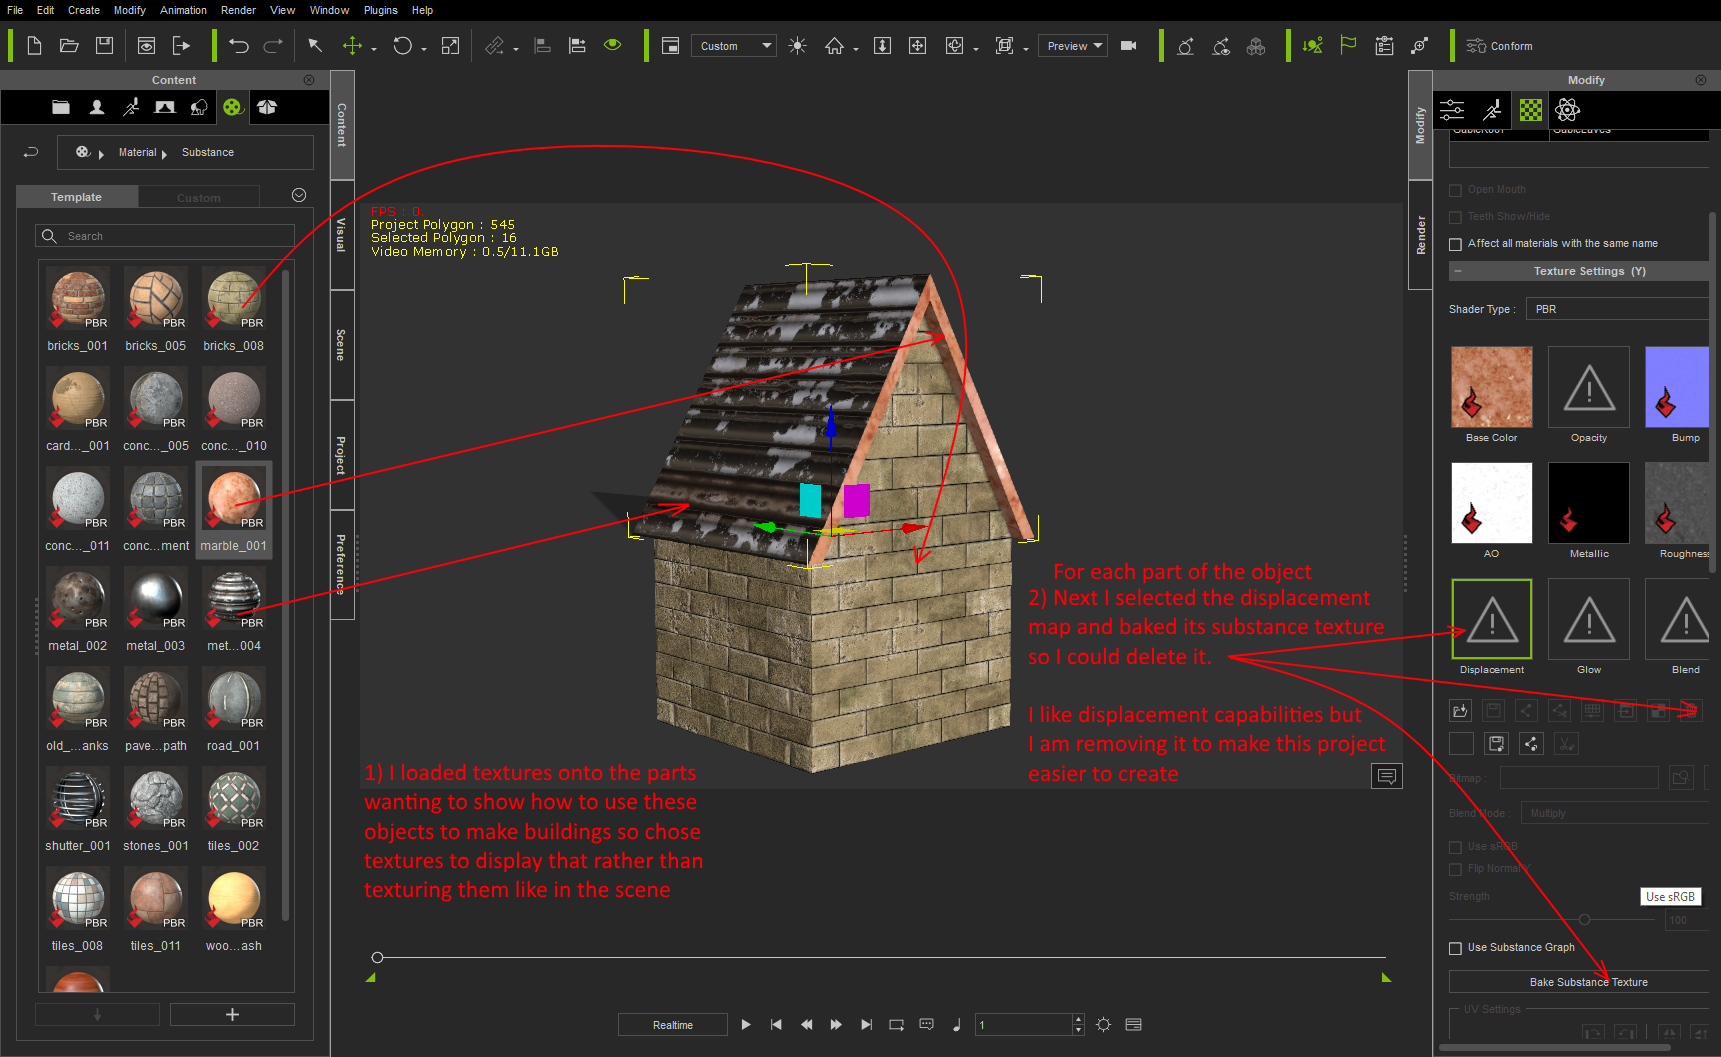
I am not going to worry about the texturing very much for this because I am doing this to demonstrate how I use my Modular props to make things

First up I load one of the Gable roof modules that suits the scene I want to make. The one I'm using here doesn't have any faces on the back of the object. Using that because I wont be showing the back of the scene so It will save some resources on my computer. Especially as I star adding more and more of them.
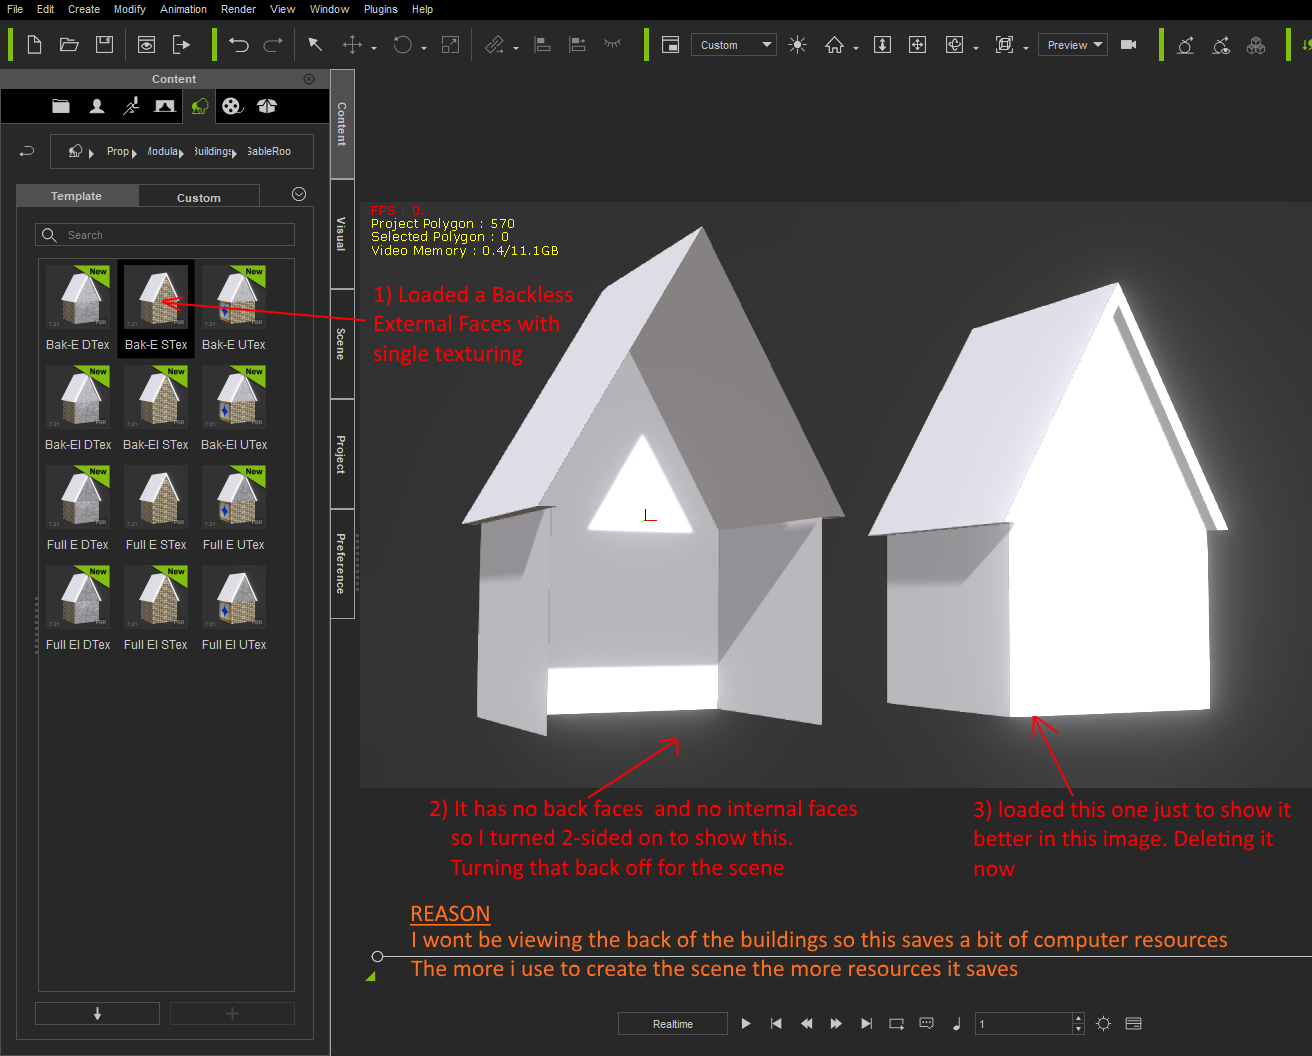
Next up I texture the object. All the buildings in the scene have pretty much the same texture in all of them. So texturing this one and then duplicating it will save me some time. Also, because I will be duplicating this a lot it means the texture should only be needed in memory once which saves resources again. You can also copy/past textures from one prop to another which does the same thing. Dragging the same texture from the content panel onto many props will waste your resources.
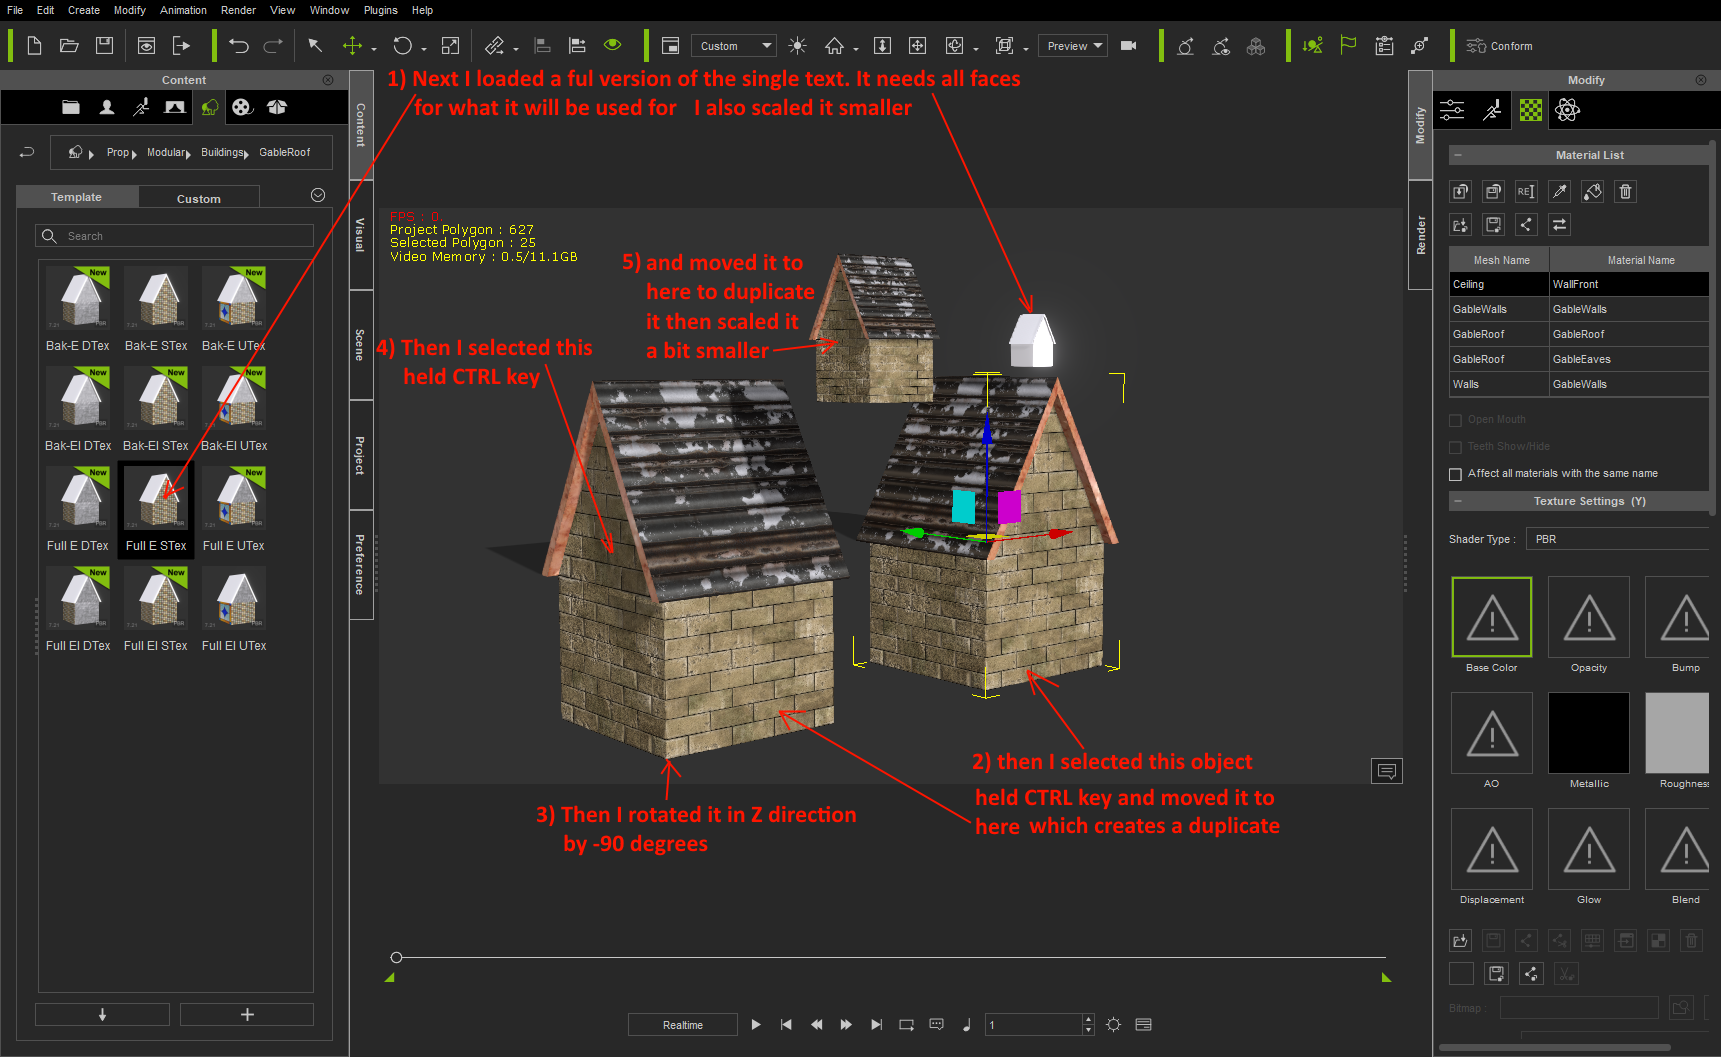
I have put these Gable Roof Building props to try and make it so I can scale its parts differently. Here is a video that demonstrates how it works. I think the video makes it easier to see how it works that showing it in images.
All parts are attached to a plane that can be used as a floor in the top half
Selecting that means you can scale everything and I recommend that you can scale them in X,Y and Z directions
Inside the main prop there is a roof and a walls prop.
Selecting the roof means you can scale the roof and the walls inside the roof without scaling the bottom set of walls
Selecting the Walls means you can scale the bottom set of walls without scaling the roof and its inner walls
For both of these I recommend that you only scale them in the Z direction
Inside the roof prop is the Gable Roof which also includes the Gables Eaves.
If you scale the length of the building the eaves might become too long. Selecting the Gable roof enables you to scale it so the length of the eaves fits the building better
I recommend that you only scale this in the Y direction.
This video demonstrates all those scaling recommendations.
Next Up I start duplicating and loading other different Gable roof buildings that will be needed to make the scene
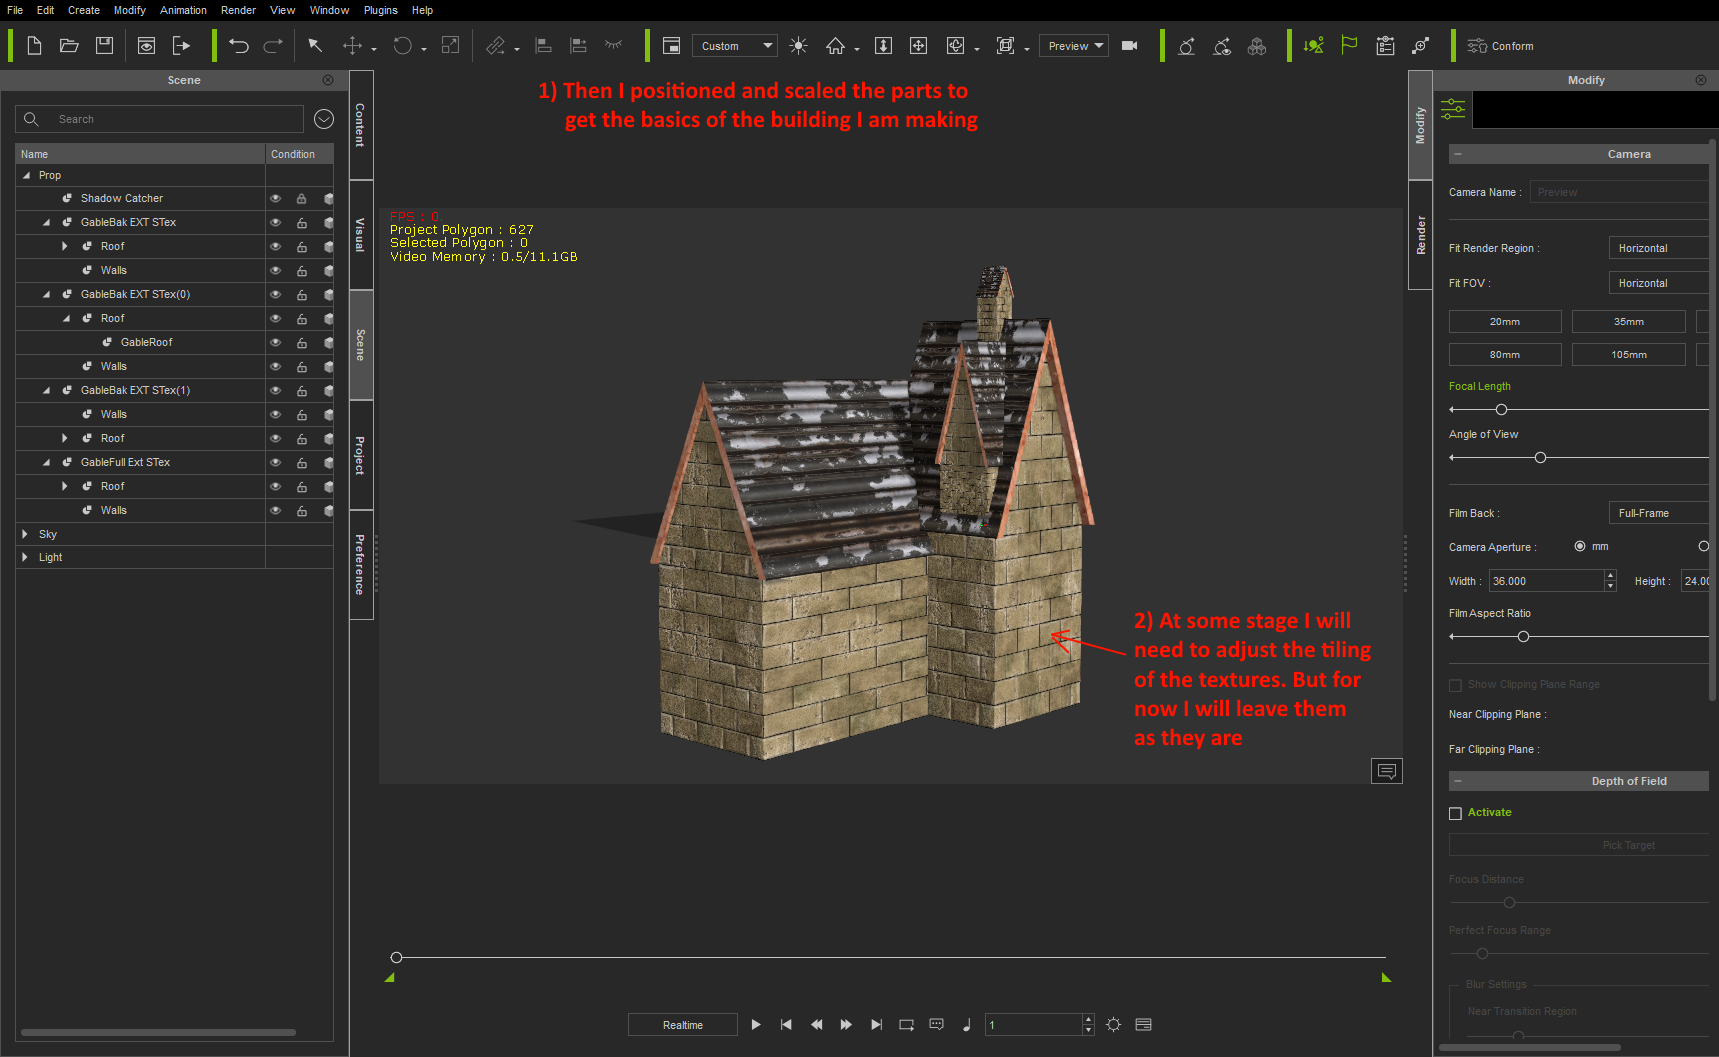
And then I start positioning them and scaling them to make the building
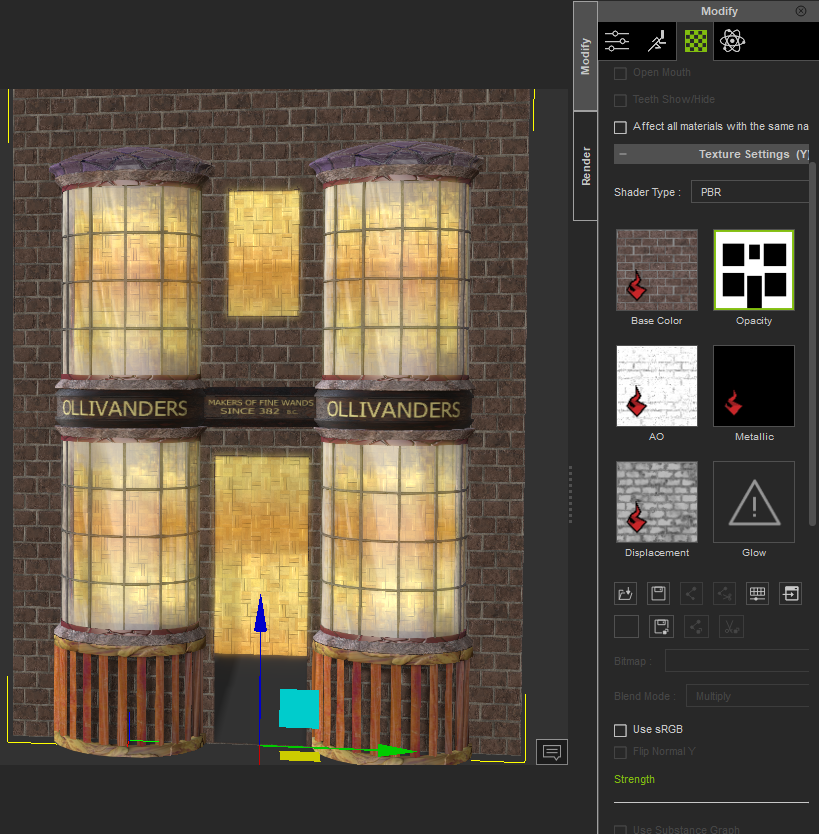
Now I start adding the other modular items to construct the building. In this case I am adding an Oriel window.
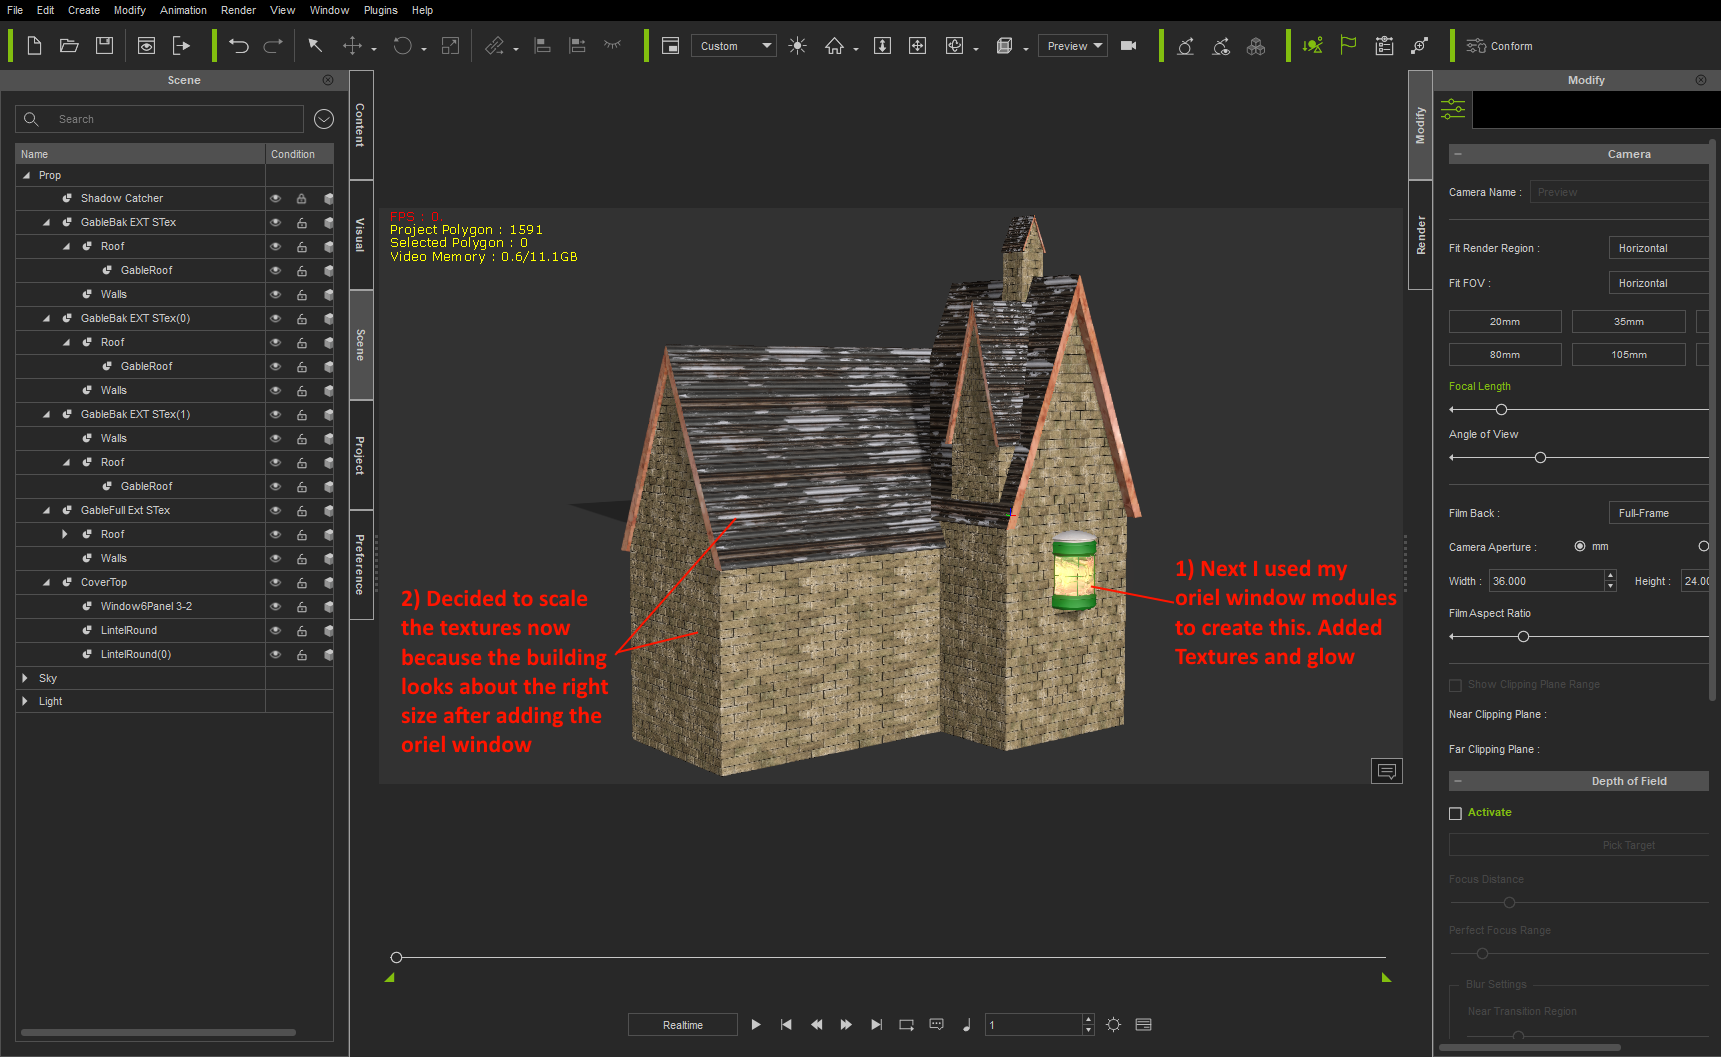
Here is what I have so far
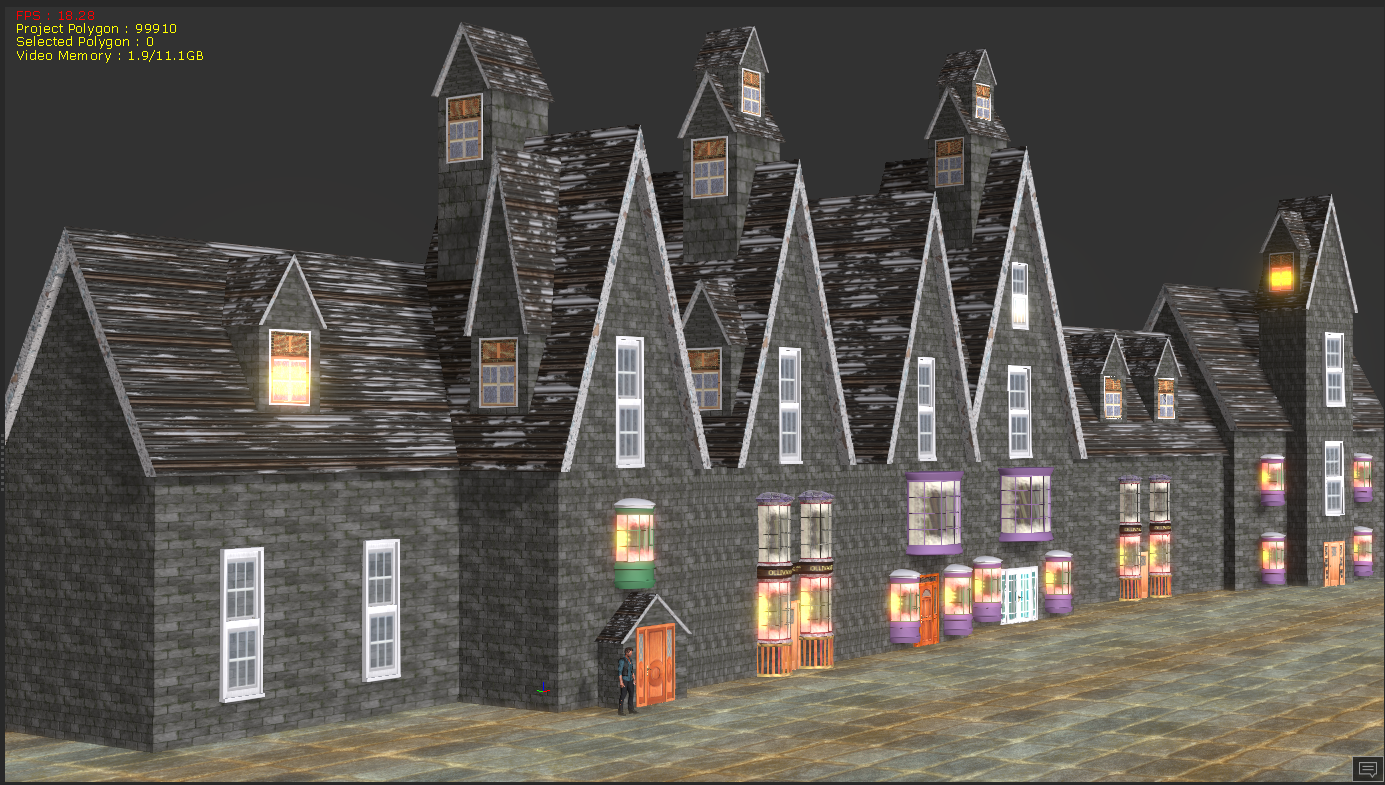
I realised I needed to use opacity maps for windows and doors and doing that with single texture versions puts the holes on all walls. So I restarted with the Unique texturing versions I only takes up 1.9 GB and there is a character included.
I have used iClones texturing abilities with texturing props I have bought from Reallusion. Except for the windows and doors which I am happy that I bought from GrannyJ quite some time ago. They work well in the sceen I think. The rest of the content is just my Gable buildings and Oriel windows. Oh, and the road and the wall bits between some of the buildings are just iClones PlaneA and PlaneB props.
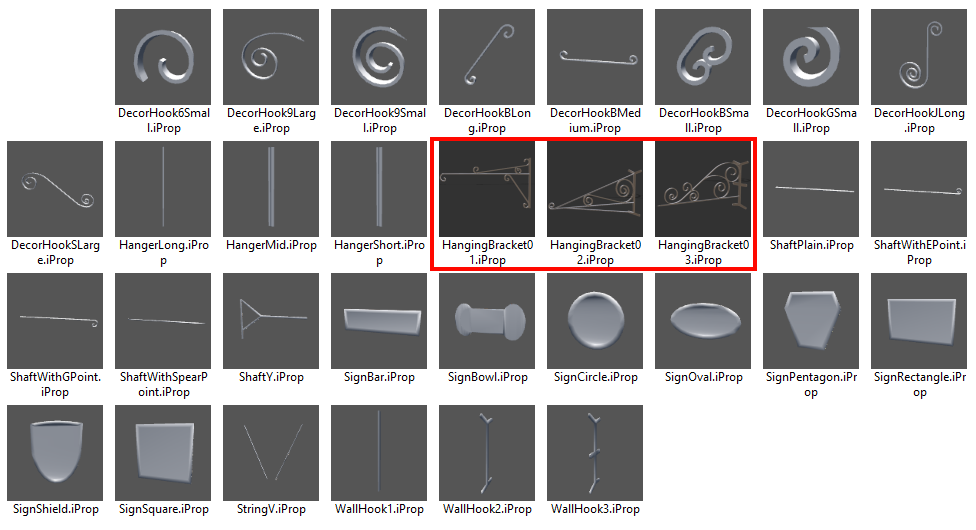
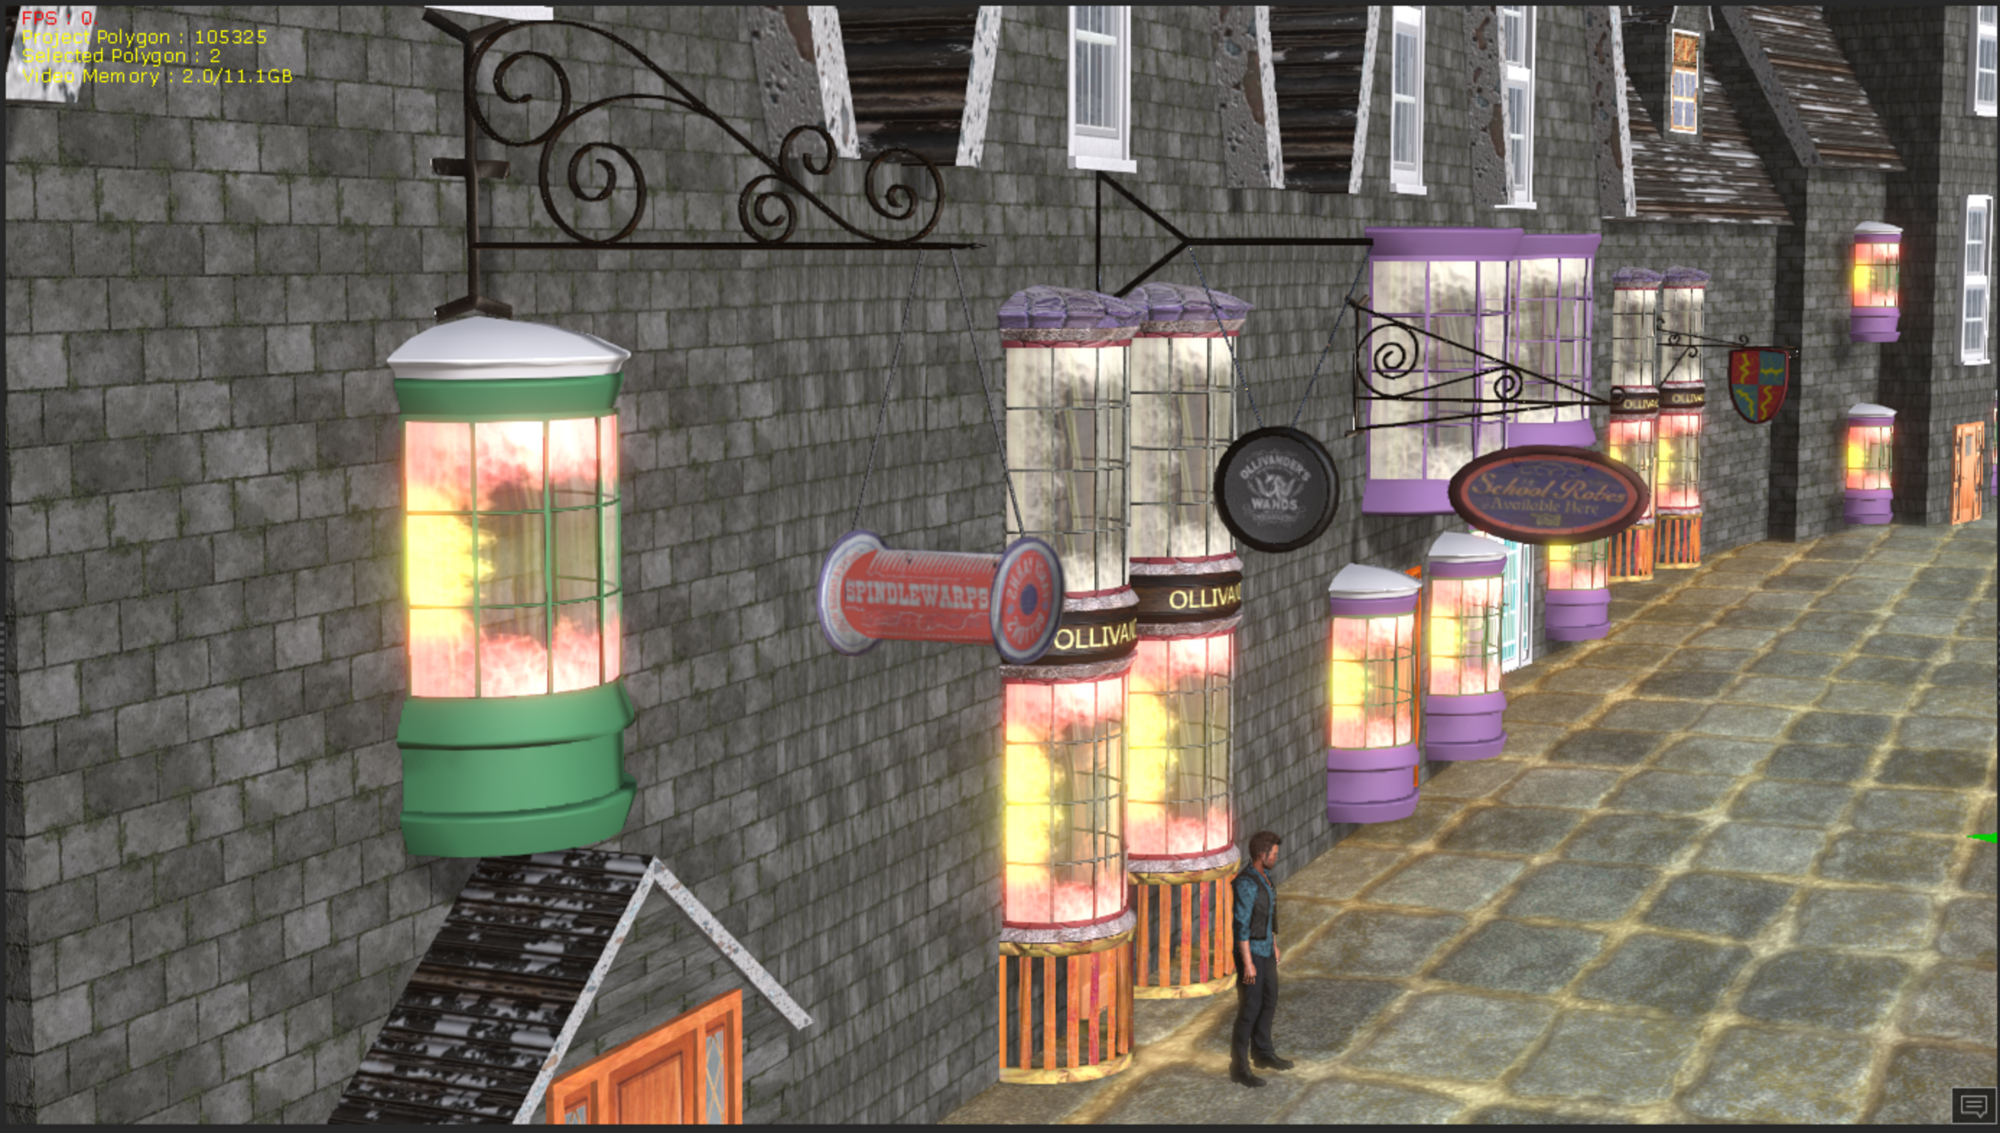
So now I am working on publishing my next set of contents tomorrow which I will be using to expand this scene. They are hanging bracked pieces that can be used to create many styles of signs for the buildings.
In this image the 3 in the red square are 3 I have put together by combining the parts that suit what I wanted to make for this scene. There are also several bar sign shapes for hanging off the Hanging brackets I make. I think I will need to add a couple more styles of strings than just the 1 in this image.
|
|
By Delerna - 7 Years Ago
|
HANGING BRACKET SIGNS
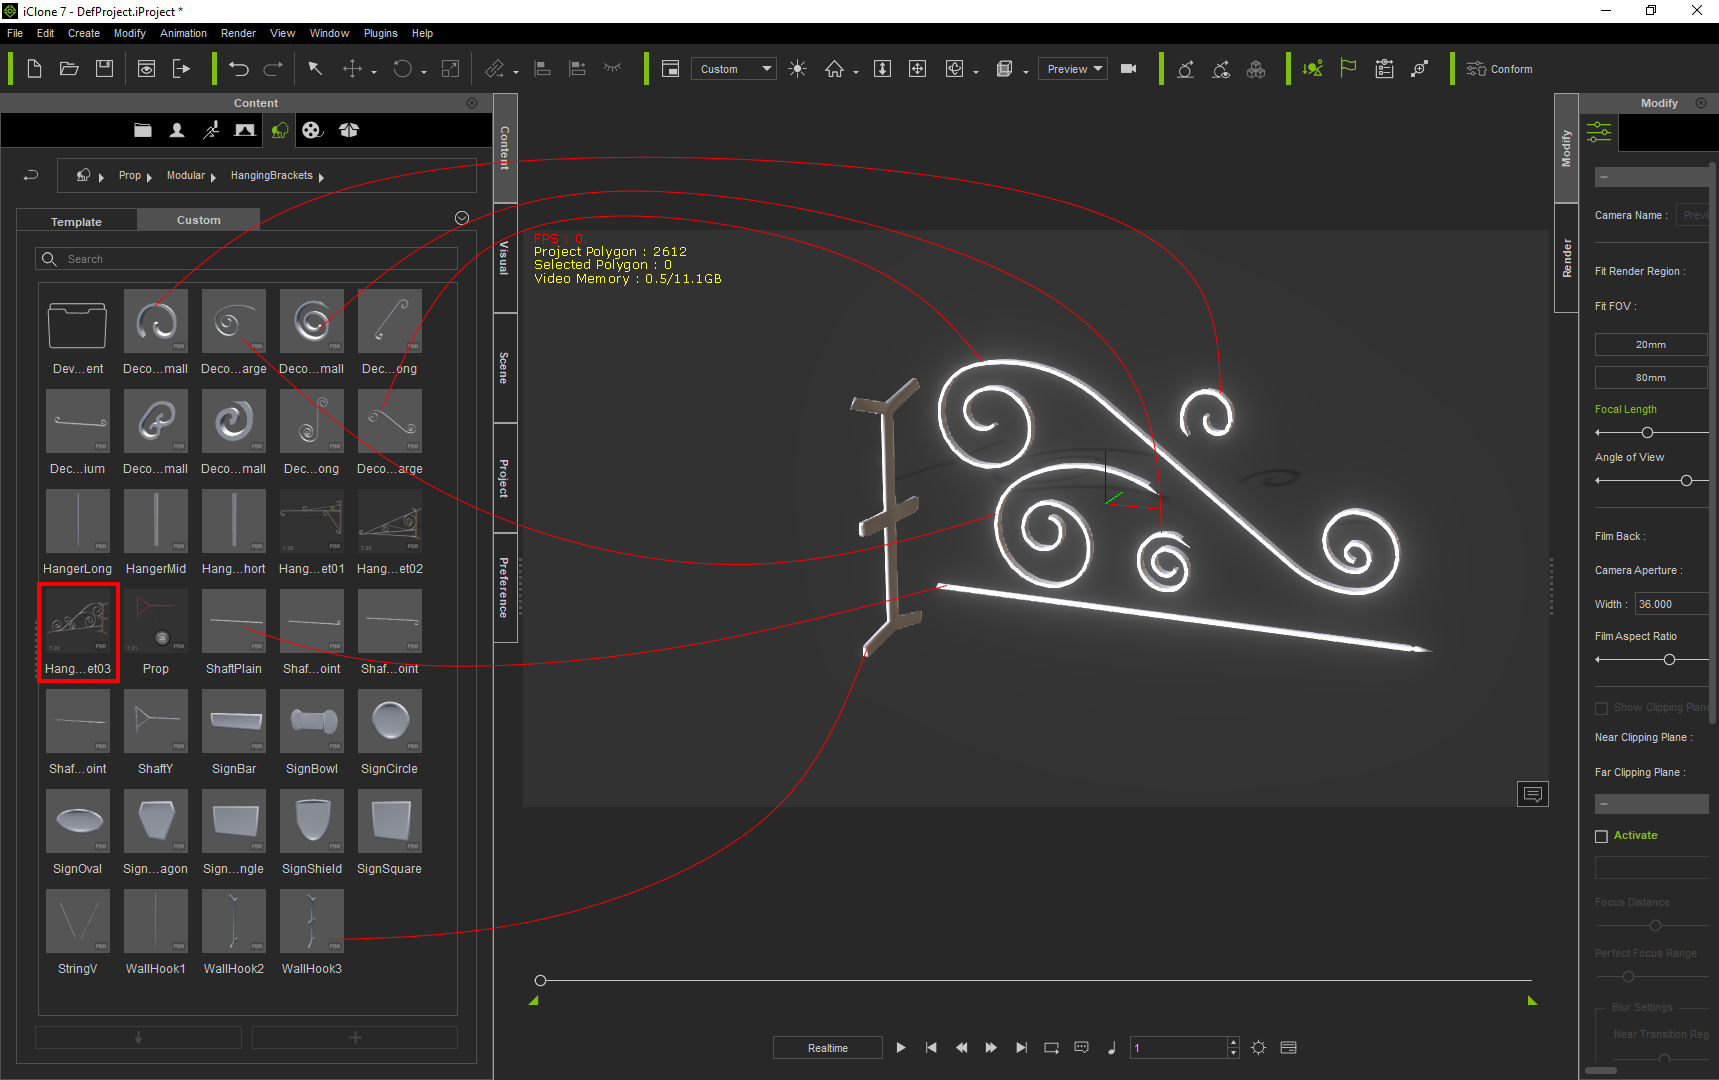
CREATE A HANGING BRACKET
Load the parts needed to create the a bracket style to suit what I need
Then I scale, rotate and position them to make the bracket I want and then I save it. This one I saved is surrounded by a red rectangle
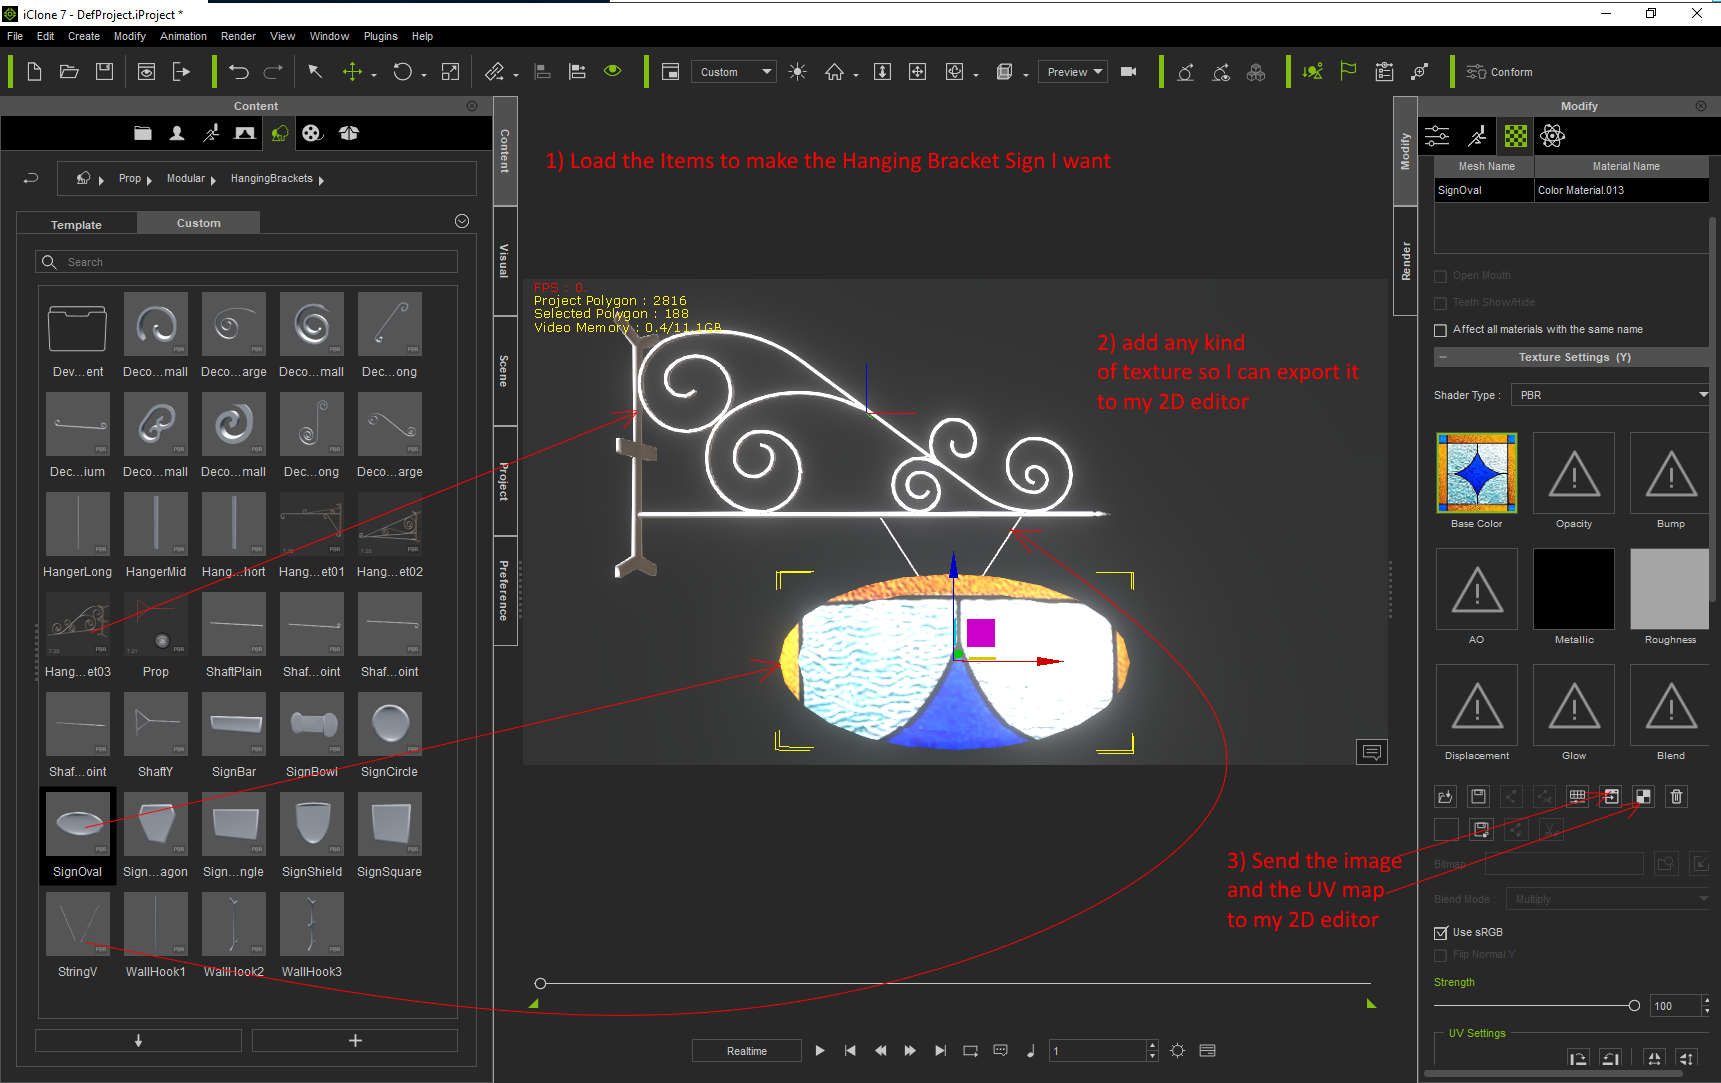
CREATE A HANGING BRACKET SIGN
Load the hanging bracket, sign shape and string I want to use to make a sign.
To texture the sign I sent the diffuse and UV map to my 2D editor. Need an image on the prop to do that so I just load anything onto it.
TEXTURING THE HANGING BRACKET SIGN
I just used one of realusions metal substance textures for the hanging bracket.
The project I am working on in this workflow is for a harry potter video I am working on for my own personal pleasure.
So I don't mind using a photo I got from the internet to texture the sign.
Here is the image I am using and I selected and copied the sign image I want to use
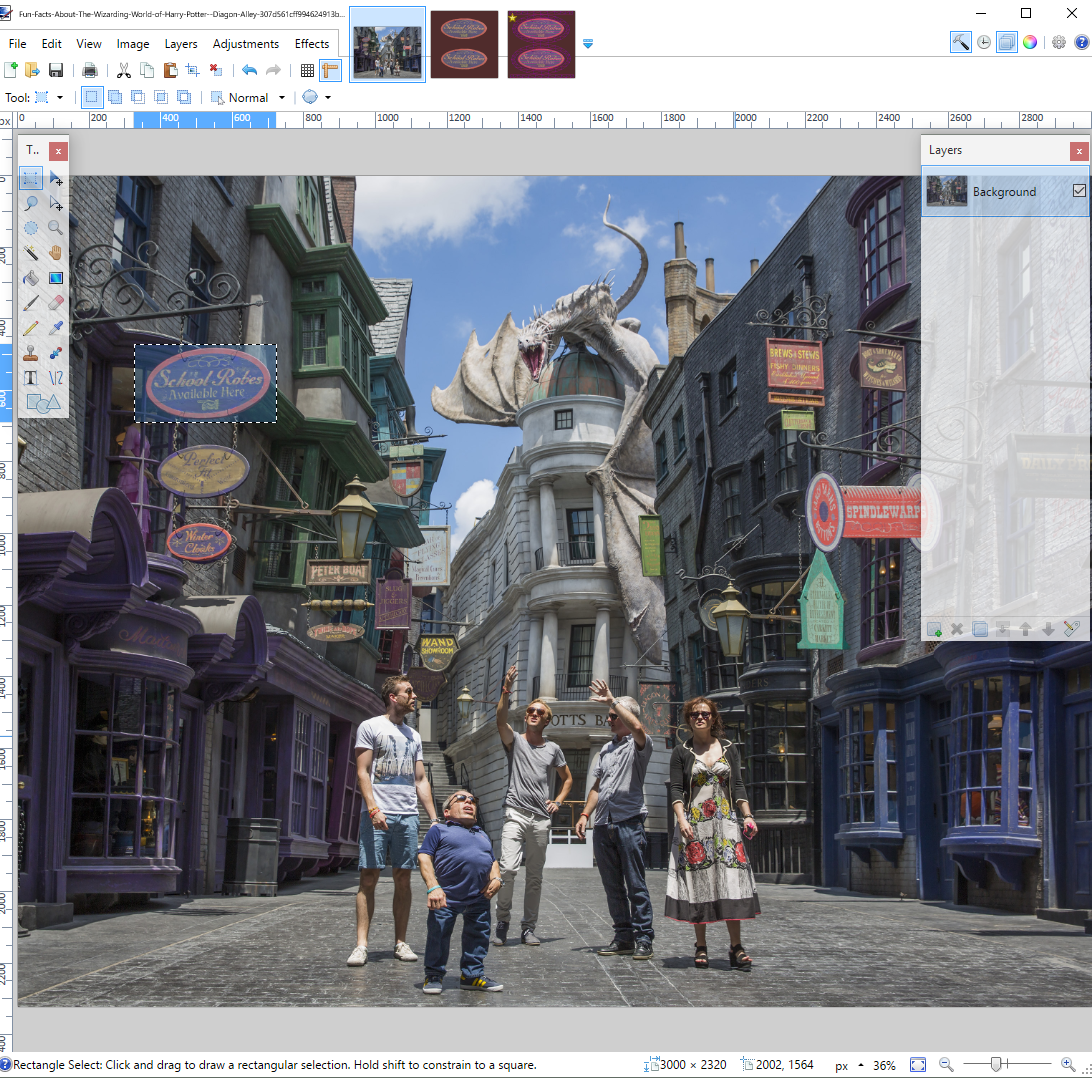
In the UV map image I held CTRL key and used the majic wand to select and delete the background color. Oh and turned the hardness down to 10% so it wouldn't select everything
Next I added a new layer to the UVMap image and moved it below the UVMap layer. Then I pasted the copied sign into the new layer and adjusted it to fit the prop using the UV map as a guide
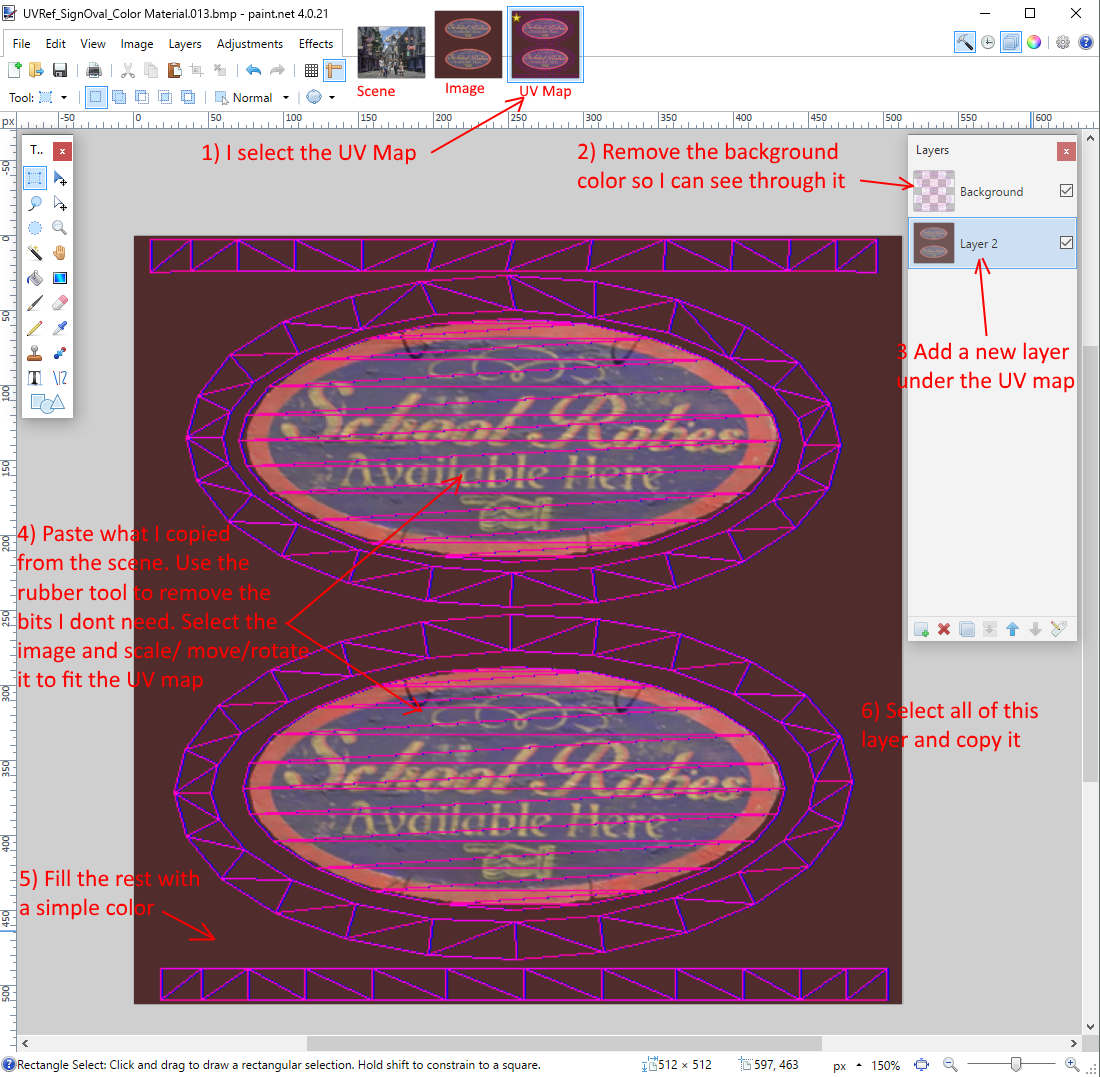
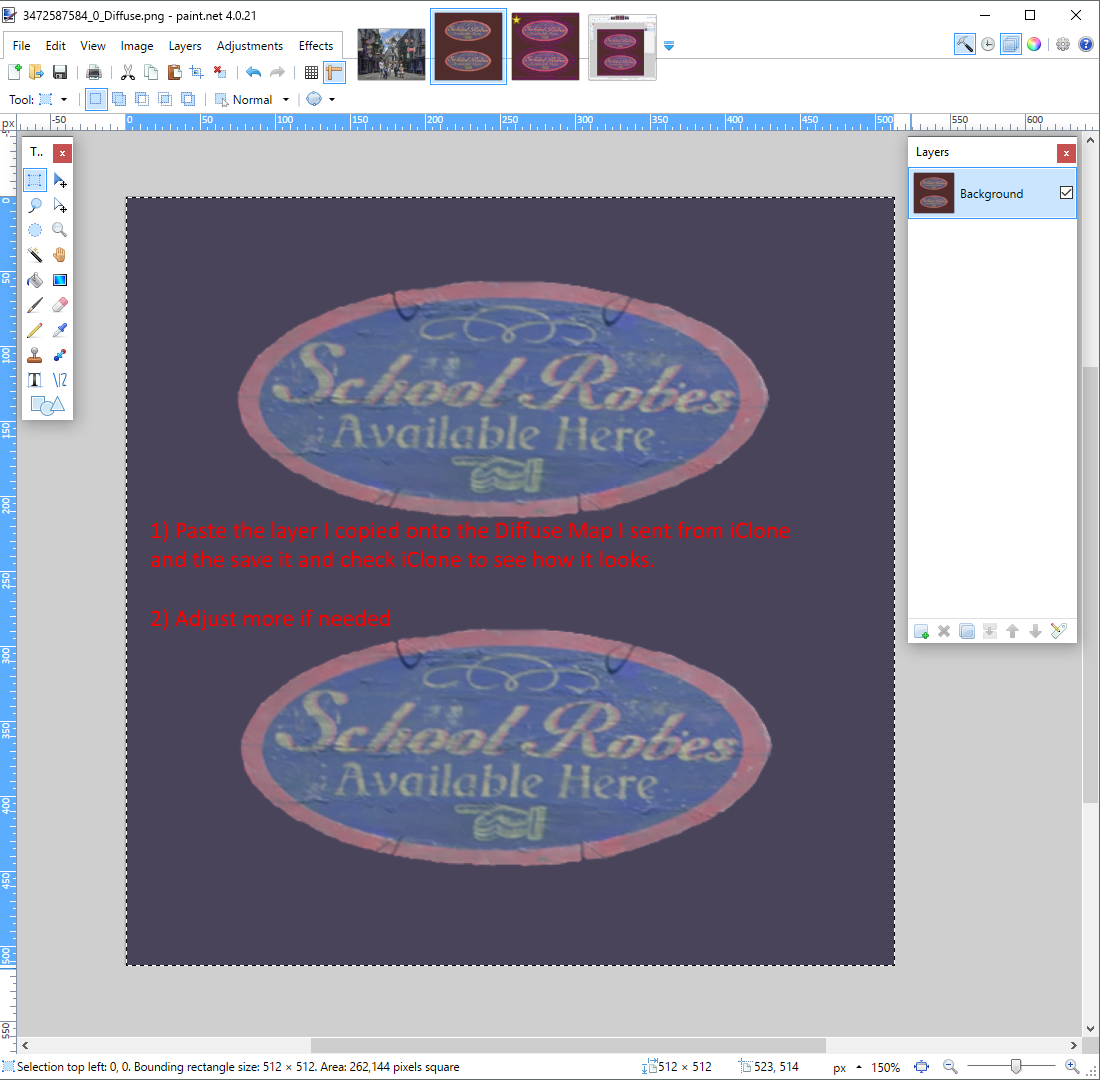
When I think I have it I copy the layer of the image and paste it into the Diffuse image I sent from iClone and then save it. It updates iClone so I can check it looks OK.
Come back and adjust the UV map version copy and past it back into the Diffuse image and save it again and check iClone. Repeat until satisfied.
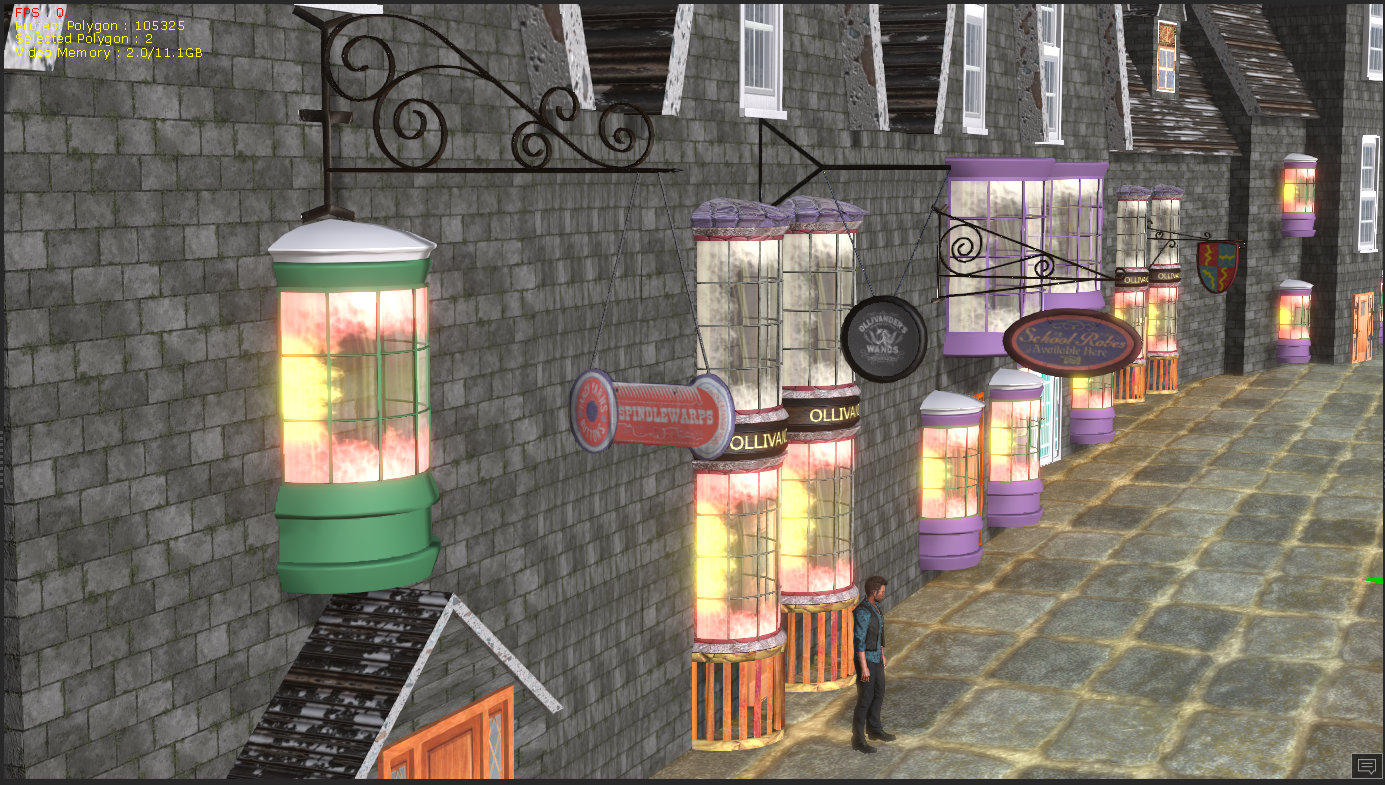
And now here is my scene with a few hanging bracket signs added
|
|
By Delerna - 7 Years Ago
|
|
workflow
|
|
By Delerna - 7 Years Ago
|
|
workflow
|
|
By Delerna - 7 Years Ago
|
|
workflow
|
|
By Delerna - 7 Years Ago
|
|
workflow
|
|
By Delerna - 7 Years Ago
|
|
workflow
|
|
By Delerna - 7 Years Ago
|
|
Workflow
|
|
By sonic7 - 7 Years Ago
|
Delerna! ..... Modular Props! That sounds wonderful!
I see you like to 'reserve' your post 'spots' in advance!! lol :P
Hey - does that mean I won't have to use 'Sketchup' anymore?
That would really be terrific if construction of models became possible inside iClone to a 'similar' degree to sketchup ...
But not sure if that's what you mean here? ......
(btw - it's good to hear from you! - it's been a while ....)
Steve ...
|
|
By Delerna - 7 Years Ago
|
Yep, You have it right.
At least, that is what I am attempting to do.
We shall see if it works as I progress
Posted my first worklow
|
|
By sonic7 - 7 Years Ago
|
|
Nice !!!! :)
|
|
By Delerna - 7 Years Ago
|
Also want to say that my only goal is for creating things for use within iClone for creating videos.
The content should be useable within game engines I think but nothing I am showing here will be for that purpose.
Game creators will need to decide for themselves if any of these are useful for them?
|
|
By sonic7 - 7 Years Ago
|
Delerna! .... This is sooo helpful! ..... I love the way you explain everything in detail, with clear, 'easy to follow' steps!
This is terrific! (Alas I only have 1 monitor screen, but I'm wondering, if I took an 'image snap' of my wall and windows, - whether I couldn't somehow use it as a 'reference' inside of paint.net.? (I've never used it - so I'm not sure) .....
Steve.
|
|
By Delerna - 7 Years Ago
|
Even with one screen you should still be able to do what I do easy enough.
Its just by having 2 screens I can click the save button in Paint.Net while I am watching the scene in iClone and I instantly see the change as it happens.
With only one screen you can click the save button in Paint.net and then click the link in windows to iClone so you can then check how it looks.
Just means you will need to remember what you changed and how it used to look in iClone before the change so you can compare how it is now.
Or even scale the 2 applications so they both fit on the single screen
Just a bit easier when you have 2 screens LOL
|
|
By sonic7 - 7 Years Ago
|
|
Gotcha ! Yes - it's great when 'changes' are immediately 'reflected' in your main program - makes things a whole lot more 'efficient' - not to mention 'more enjoyable' .... :)
|
|
By Delerna - 7 Years Ago
|
I have now added some demonstrations for the next set of Modular Props
Modular Props according to my preferences anyway
|
|
By Delerna - 7 Years Ago
|
|
added the scene I have made so far. Working on publishing the sign hanging brackets now
|
|
By sonic7 - 7 Years Ago
|
|
Nice, Delerna! .... I really like how each of your posts are an 'instalment' adding to the previous ones .... Very creative and logical ... :)
|
|
By Delerna - 7 Years Ago
|
Thanks for your comments Steve, it is encouraging. My name is Graham by the way.
I have now added the HANGING BRACKET SIGN
Haven't published them yet. Going to take a break and play a game in my PS4 for a couple of hours.
Publishing the new props by tonight
|
|
By sonic7 - 7 Years Ago
|
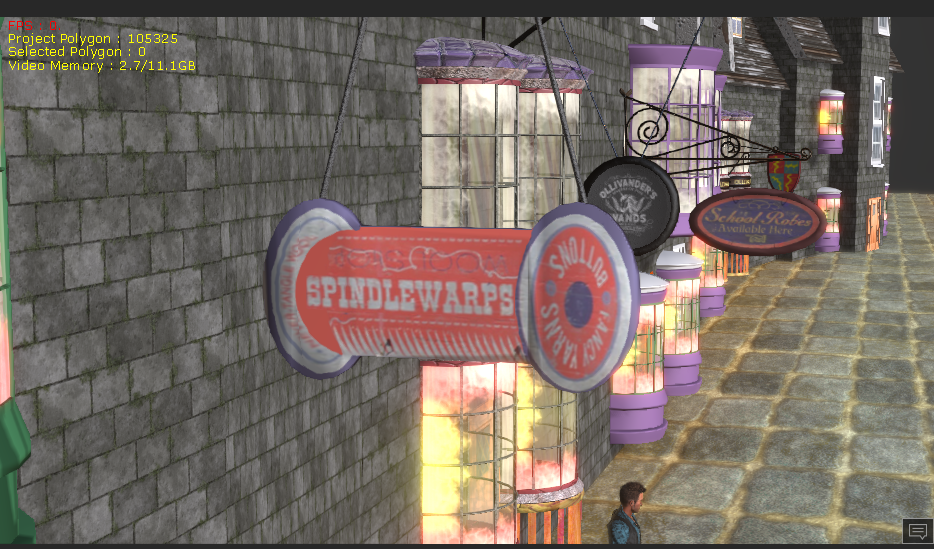
Graham ....Pardon me for tinkering with your work, but was wondering about the 'perspective' on that very front 'Spindlewarps' sign.
Something looked a tad 'un-real' to me - I couldn't quite figure out which way the sign was meant to *face* - EITHER 'across the street' like the others, OR 'in the direction of the street'.
Anyway, I did a quick 'flip' of the sign (see pic below) to see whether it's perhaps more believable? (Also had to reverse the lettering, because the 'flip' made them backwards of course - I didn't bother with the lettering on the 'end' part, so that's still backwards).
Don't know what you think?
Steve.
|
|
By Delerna - 7 Years Ago
|
|
you are probably right. texturing isn't something I spent much time on. im more focused on showing how the contents work. another point is the texturing on the doors and flat windows as well as the poles under the oriel windows all need better texturing. its something I will spend more time on after I have finished making the scene. Also texturing is one of my weaknesses. its something I do that satisfies me but not high level like I see with many other peoples efforts. Alley for example has textured many of the clothes I have made and she improves them incredibly. I do wish I was better at texturing. its one of the reasons I really appreciate reallusions texturing tools for CC and now in iclone. makes it easier for me to do better texturing but I still have plenty to improve myself on in that area
|
|
By Delerna - 7 Years Ago
|
|
actually I just loaded yours and mine to compare them. yes you have improved it considerably. thanks for pointing it out. I will be doing that on mine
|
|
By sonic7 - 7 Years Ago
|
Glad to help Graham :)
Actually, all I did was 'cut the entire sign', then 'pasted a mirror version' of it. (working with your 2d image).
Once mirrored, the lettering was naturally 'reversed', so I pasted 'just the lettering' again 'over the top' of the reversed letters - done ....
So it was all simply 'cut & paste' - nothing to do with 'maps' or anything like that - which is 'way over my head' since I've never done texturing ....
So yeah .... I'm just a 'visual' sort of guy .... :)
|
|
By Delerna - 7 Years Ago
|
Ha Ha Ha I have a terrible memory. Now I know what I did.
My texturing of that needs more work because it is very rough. When I textured that one it was the correct way around but the texture on the other side of the sign looked a bit better. So I turned it around 180 degrees as a temporary way of making it look better because I wanted to get more of the contents completed. Here it is the right way around. At some point I will be reworking on the texturing in certain places
for use in my video. I will say, and this is why I have desire to improve my texturing abilities because the one thing that makes scenes look good or not is the texturing and not the modelling. Models need to be done well enough to enable good texturing.
|
|
By Delerna - 7 Years Ago
|
I might as well add another point about changes I will make in the future for when I make video's.
This scene is totally 3D objects and I still have the buildings on the other side of the road to make.
In my videos I am not likely to use this fully 3D scene for the videos. Exactly what I will do all depends on what parts of the scene will be primary for the video part I am making.
Also, this is my own thinking so I don't know if anyone else does it. My method for this is to use 3D items where the actors are acting and to save computer resources for the actors and other things I will use 2D images instead of 3D content for things in the distance. So this project I am working on for this post is going to be a template for creating my scenes for videos.
I will load it into iClone, position the camera where I want to make some action for my video. Then I will hide certain parts to keep just one of the building and export a 2D image of the building from where My camera is. Then I can put a plane where the building is, delete the props for that building and load its 2D image onto the plane. Especially for things like the hanging bracket sign's. Create and texture them with the 3D props. Make a 2D image of it and then use that image on a plane in my video project, especially as it goes into the distance. I might even create a 2D image of the entire set of buildings on one side of the road for use for a scene where the actors are inside a building. I might even take videos of characters walking, running, skipping, talking etc etc along the road. Hide every content except the characters and export the video with the camera in the position inside the building where my characters will be. Actually I will pull the camera back a bit further so the video will be wide enough.
Then I create the scene inside one of the buildings. Add 2 Planes outside. 1 for the 2D image of the buildings and 1 for the video of the people walking, skipping etc etc so they can be scene through the window and door from inside the building. That's how I like to do it. Don't know if anyone else finds it useful
Here is a video of me experimenting a long time ago with this idea to see how it works. I think it works well and enables me to have more resources for 3D stuff up close, where it really matter in my book.
I did use 2D stuff to close to the primary part of the scene but it doesn't look too bad to me and it was just a test to see how well 2D and 3D works together
|
|
By sonic7 - 7 Years Ago
|
Graham ......
I've been looking into the same approach myself; ie: substituting 2d planes for the 3d geometry.
Here's my rambling thoughts:
● I think it can work, but it's far more 'believable' when used with 'static' camera shots.
● With *some* moving shots - you can get a realistic result, but it tends to be shots that move 'in' or 'out' rather than tracking sideways or craning high/low. 'True' 3D objects reveal different parts of themselves as the angle of view changes. As a shot cranes up, we expect to view more of the 'top' geometry of the object and a reducing 'front face'. 2D image planes can't display those changes, the bigger such moves are, the more unrealistic the result is.
● With camera moves that travel towards or away from the subject, planes work fine. The only thing here though, is to use enough planes to create a believable 'perspective change' of the elements. If it's only a very distant landscape, then a single image plane works fine. But if it's a more 'intimate' environment, with the distant landscape, trees a lot closer, and say bushes and plants even closer again - then things change. A single image plane of 'all' of this is fine if your camera shot is 'static'. But if say it's 'tracking in' towards a foreground subject, then you'd need 3 planes (landscape, trees, bushes - the front 2 being 'alpha' for transparency - so they don't obscure what's behind). With 3 planes, as the camera does it's move, a reasonably 'convincing' interaction of the layers will happen. It's the changing 'perspective' that needs to occur to look 'believable'.
● It gets trickier when your background isn't made up of 'flat' layers (the above example is with 'flat' layers). Imagine now a scene looking down the length of a street with the buildings on both sides of the road gradually narrowing down in scale and becoming closer together. Here's the problem ... This sort of perspective is gradual and continuous, yet if we were to substitute 2D planes - how many would we use? Again, for a 'static' shot - only one. But if we were moving forward or backward with the camera, then a decision has to be made about 'where' to place separate image planes ... one for every building?, one for every street block?. The more you use, the more 'believable' the perspective change - but it can become rather cumbersome.
● Then there's the correct 'positioning' that's required when using multiple image planes. Each needs to be 'placed' at a distance from the camera that matches the distance of the original 3D geometry it's replacing. This can be 'tricky'. Obviously, the further away the image plane needs to be, the larger it needs to be 'scaled' to neatly fill the camera frame, but trickier still is to get it 'perpendicular' to the camera. If it's not, then 'key-stoning' results.
● On my *limited* power laptop, I've found there's no real overall advantage using 2D planes - 'performance-wise'. This could be totally different on higher powered PC's though ....
● The other 'downside' to image planes is the reduced 'freedom' to make quick changes to your camera positions. Minor changes - fine, but a significant relocation of the camera would mean re-rendering your 2D image plane (or multiple 'planes').
● Overall, I've personally decided that staying 3D 'all the way' is not only more 'flexible', but produces results that are more 'believable'. That's not to say that image planes don't have their place. In the case of substituting only one 'very distant' geometry of a substantially resource hungry set - a single image plane makes good sense. And it's the most forgiving way to use it, since any 'perspective changes' in very 'distant objects' are virtually non existent anyway. Plus - last minute camera angle changes might not require rendering a new plane - it may only need shifting slightly to 'cheat' the shot, or better still, if it's used as 'background texture' rather than a 'plane', it will auto-fit to the entire camera frame as the 'most distant' element. (but will become the same background on ALL camera views).
If it was me, and I had a reasonably beefy PC, I'd stay 3D all the way. But I guess it depends on the sets you'd be using. If they were 'massive' in geometry you might have to use image planes. I can only speak from my perspective on this, and your situation may be different Graham .... :)
EDIT: Plus - 'making invisible' the parts of your set that aren't in view - saves a lot of resoucres - as you know. And then there's the 'compositing' approach of exporting different 'layers' of your shots and combining them in something like 'Vegas' or 'Fusion'. This works even for moving camera shots, because you can just render out the exact same camera time-line motion *several times* - each time with different 'layers' (set components) 'switched-on' to 'view'. (Using 'PNG' sequences for transparent 'alpha' channel).
Advantages:
● Each 'pass' is greatly reduced in system resources.
● An excellent 'Depth Of Field' look can be obtained by using 'Fusion' (free version) to properly 'de-focus' appropriate layers.
● Independent layer control for color grading, plus the ability to add subtleties like dust, haze, fog, film grain etc.
Disadvantages:
● More time consuming
● As with 'Image planes', late changes to camera angles or moves require some re-working.
Sorry for my long 'ramble' .... your modular workflow is coming along really well ! .... :)
|
|
By Delerna - 7 Years Ago
|
I am not arguing against your points because they are valid. That's why I said exactly what I do all depends on what parts of the scene will be primary for the part of the video I am making.
And how people do things depends on their own preferences. For me using 2D images where possible saves resources which gives more room for extra characters or props and keeping them 3D
. I never use a single project for the video I am working on. I will have lots and lots of projects each one covering a minute or 2 of the video. For me, exactly how long depends a lot on camera changes. I find at the point of changing to another camera is a good place to switch to a new project. I did say "I am not likely to use this fully 3D scene" but I meant "I am not likely to always use this fully 3D scene"
In some cases I would load my buildings template and keep it completely 3D. But when I need my resources so I can add enough characters/props etc and keep them 3D then I will use the 3D template scene to create 2D images for use for backgrounds of the scene. My main example was using 2D image of the buildings for viewing through the window from inside the building. Gives me plenty of resources for making the primary scene, inside the building. Eventually the character or characters will walk out of the building and the camera will change from inside the building to outside. That is where I would have a new project to continue my video, starting from where the camera has moved outside and now the buildings in that project will be 3D. Or maybe some of the distant ones will be 2D depending on whether I need to save some resources for extra characters/props etc or not.
Exactly what I convert to 2D images totally depends on what my single 1 to 2 minute project for my video is doing. In another single 1 to 2 minute project for my video the parts I turn to 2D images will be completely different. But I will only do that if I need the resources for the primary point of the project I am working on. Anyway its really a matter of personal preferences for our workflows. Whichever way you prefer to do it is your choice.
In regards to your point about only being able to move cameras in and out of 2D images I will say I disagree with that, not 100% disagree but I find there are ways to make 2D images still look 3D.
Here is an experiment I did a long time ago. The front mountain is an image I put on a plane that I converted to V shaped vertically and horrizontally (I still think of it as a plain, not totally correct but that's how I see it) It is definitely not perfect but for one thing I built that video in about 5 minutes, it was only a test to see how it looks. Spend a bit more time making the other mountains better and the edges at the water correct. More importantly, adding the primary contents for the scene, 2 or 3 pirate ships sailing around each other shooting cannons at each other with heaps of pirates jumping/swinging from 1 ship to another and it will look ???????. Personal choice but it looks fine to me
EDIT
Oh, I think it can be seen but everything in that, except the water, is just 2D images placed on simply adjusted planes
|
|
By sonic7 - 7 Years Ago
|
Graham - sorry! .... I didn't realize how much you were already 'invested' in this approach. What I said was probably the last thing you'd want to hear ! ...
Well, I think that video example of yours 'does work'. I think it looks believable enough up to about the last 5 seconds. Besides, once the other elements have been added in, no-one will be watching the mountain island anyway - so it would 'easily' work. :)
Edit: I had another *think* about that statement I'd made; the one you mentioned - about the 'in & out' camera moves VS tracking or craning. I think there's *some* tracking and craning shots that yield realistic results, but I think the 'in and out' moves are somewhat less likely to fall apart. The 'distance' of the subject also has a lot to do with how well it works. If the 2D planes are 'more distant', the results tend to work better.
|
|
By Delerna - 7 Years Ago
|
|
There was nothing wrong with you making those comments.We are just expressing our workflows.
|
|