|
By sonic7 - 8 Years Ago
|
This is for those who're accustomed to using a Non Linear Editor for combining or compositing 'layers' to obtain their final video result....
Which would be your *preferred* Format (and Codec) to work with?
The only criteria is that the 'alpha videos' rendered in iClone, can be imported into the NLE and 'layered' (+ adding FX) - to produce the final scene.
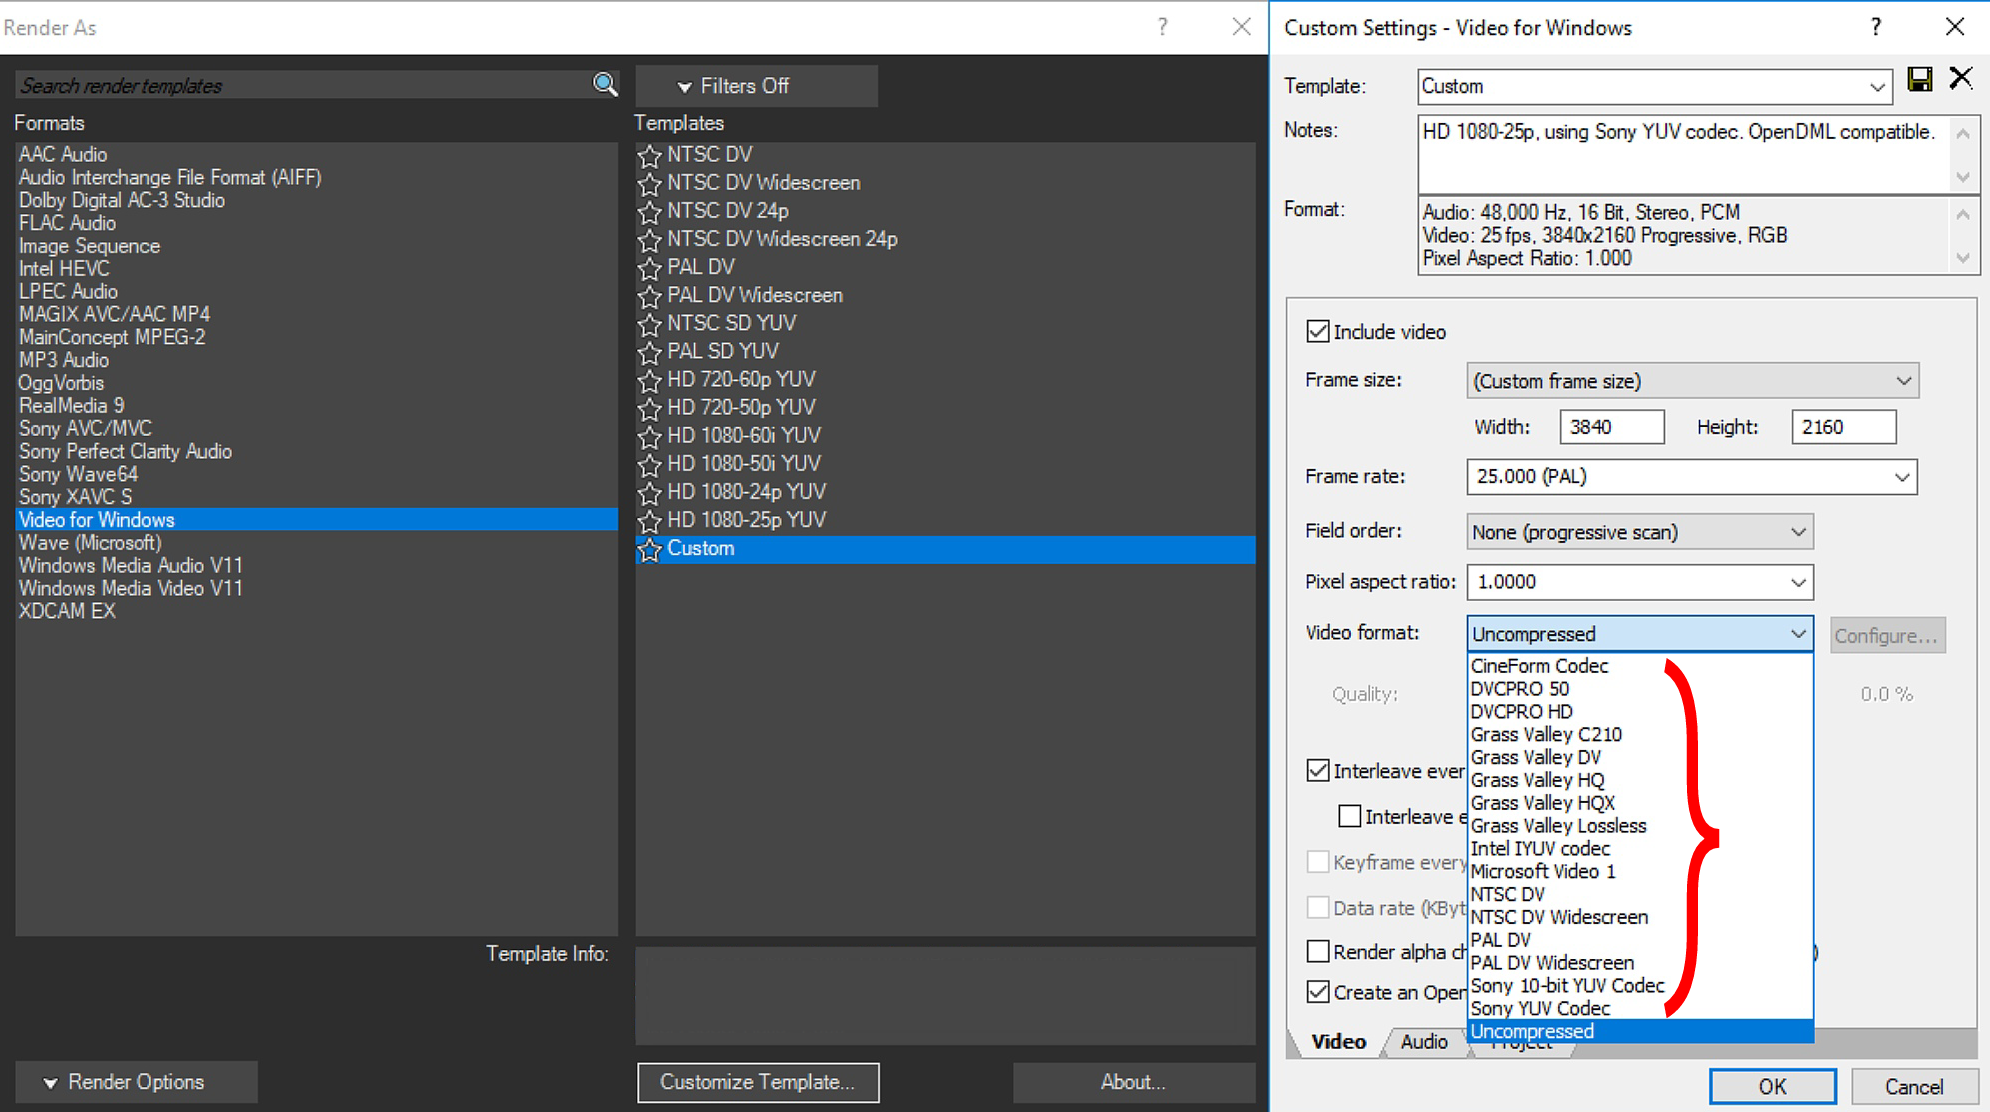
I'm interested to hear 'different views & experiences' from anyone doing this... Btw, my NLE is Vegas Movie Studio 15 by MAGIX - the little brother to Sony Vegas - (the currently available formats and codecs are shown in the pic). Any suggestions?... thnx ... ;)
|
|
By Kelleytoons - 8 Years Ago
|
No real debate -- everyone I know who does animation (and that includes a lot of Pros) just renders to still frames. So no file "format" to worry about.
For any video they bring in, of course, it's lossless AVI for the most part. But for iClone projects just render to PNG (which contains alpha) and you're home free.
|
|
By Kelleytoons - 8 Years Ago
|
|
And let me clarify that last -- you don't EVER use a codec until you're ready for final output. You do not want to be compressing or decompressing your footage until the very end (which is why you work with stills for animation and other rendered stuff, and uncompressed video for the rest). Only when you are finished do you bring up your final codec (and, of course, you save your project so you can render in different codecs depending on your delivery needs).
|
|
By sonic7 - 8 Years Ago
|
G'day Mike! ... Yes - I well remember your advice on this in the past re .PNGs (I hadn't forgotten).
I guess it's more a question of 'once it's in there' (the NLE) .... Do I keep it that way (my PC struggles playing PNG sequences) - or is there a recommended format to transcode into, and if I do, to keep in mind:
● Minimal or no loss to be incurred
● something 'other than' uncompressed, (huge file sizes - just as sluggish)
● keeping the alpha channel as well
???
|
|
By Kelleytoons - 8 Years Ago
|
No -- you do NOT transcode. You can temporarily render so it plays faster but, again, you hold off any compression until the output.
Nearly all NLEs will "render" a sequence so it plays faster on the timeline, you just need to find how to do it in yours.
|
|
By sonic7 - 8 Years Ago
|
Ahhhh !!! ..... Yes .... I thought I'd read something about 'proxy' files - smaller versions of the originals ....
I get it - yes make the proxy files in Media Studio, Edit and add FX, then when all is complete let it render the *final* using the original PNG sequence .....
OK. Now, the only thought on that is 'will the proxy files' give me accurate enough detail/definition for dialing in my FX?
Hopefully that's a 'yes' - so that the final render hasn't 'changed' compared to my 'off line edit'....
|
|
By sonic7 - 8 Years Ago
|
I'll do some testing on this Mike - and report back with my findings (in-case useful to others) .... thnx :)
Mark won't understand me (I can see him shaking his head) - "why is Sonic mucking about with 8 bits" ....
|
|
By mark - 8 Years Ago
|
As they say .png is the way to go for sure. One beauty is you can render at very high resolution and then render the size you need when you're done in your NLE.
Now if you have an audio track you need to match or reference in you NLE I would also render a .wmv or .mp4 file out of iClone for that. The .png image sequence won't have audio as you know. You can then line everything up in your NLE and lay back in your original audio and of course add to your audio tracks mix and sweeten.
|
|
By illusionLAB - 8 Years Ago
|
:w00t: 8 bit files the norm for editing. Using PNG or TGA sequences are the way to go right up till your 'final output'. Proxies are a must... I think Vegas calls it "Smart Render". The industry standard for "offline" editing is AVID's quicktime codec. Even the "lowest quality" will look almost as good as your original PNG renders, so you're not going to miss anything. The codecs are free and once installed should just "show up" in your list of options. As you're in a world of discovery right now... you may want to look at BMD's DaVinci Resolve 15 - I've been using Premiere for eons, but find Resolve much more powerful (now that Fairlight Audio and Fusion in the same software). Also free.
|
|
By sonic7 - 8 Years Ago
|
@Mark .... Yes - what you say makes sense. I've got to get "Video" (and 'codecs') out of my brain when it comes to this work in NLEs.
Seems that the good old 'individual' frames (like in Cine film) or 'flip book' animation, is the way to think.
Yes - well the audio's done and dusted - but I guess it might be an idea to place it inside iClone as a reference for timing.
The clown that 'sings' (mimes) to the finished audio will be *a real actor for the C/Us* and *an avatar for the distant shots*.
I haven't the experience for gaining 'realistic' C/U performances with an avatar.
So - yeah - still a good idea to have a reference audio and do like you say - bring it over to the NLE.... thnx :)
|
|
By sonic7 - 8 Years Ago
|
Mark (illusionLAB) ... what did you say was free? ... not DaVinci Resolve 15 ?
|
|
By sonic7 - 8 Years Ago
|
What does 'free public beta' mean?
https://www.creativebloq.com/news/davinci-resolve-15-software-released-as-a-free-beta
|
|
By wires - 8 Years Ago
|
Mark mentioned 2 things in his post. Use the Avid codecs and the free Resolve 15 - be aware that this is still in public beta testing and may/is a little buggy in some areas. I do all of my editing using image sequences where possible, the rest is mostly camera footage. The Avid DNxHD and above codecs are very, very good, but can only be played back on a system having them installed on it - they are also almost finished doing the transition away fromm QuickTime on the PC side due to the lack of Apple support for the software. On the Mac side it's different as QT is still supported, and even there they use mostly ProRes for encoding, it can be played back on a PC, but there are no really good 3rd party encoders available that a "Pro" would/could use.
As already mentioned image sequences are the best way to render out of iClone. you could use mpg4 files as proxies for external effects creation and then use the image sequence with the effect tracks in a final comp.
|
|
By wires - 8 Years Ago
|
It is a public beta testing phase that some companies use to get their product tested on a very wide selection of work environments, and there are no sign up charges, or costs for the software. Most, if not all, public betas have a "can not be used after" date stamp meaning that either the tester purchases a full version - or in the case of Resolve downloads and uses the latest free final release version.
|
|
By wires - 8 Years Ago
|
|
You can download the free Resolve here. The public beta forum is here, if you wish to see what testers are reporting.
|
|
By sonic7 - 8 Years Ago
|
Thanks Gerry. Yes, well I'm Gob-smacked! I've never been involved with beta testing and the like. Don't know what to make of all this.
24 hours ago I'd decided to take the 'layered' approach rather than have to learn Fusion. I'm comfortable with the NLE way.
So I saw a 'Special' for MAGIX Vegas Movie Studio Suite - dropped to $120 AUD. I decided to download the 'trial'.
Then I got another email offering an "upgrade" (I hadn't even 'bought' it yet), and it was for $79.99 USD PLUS they were throwing in 'proDAD ReSpeedr 1.0' for free.... WOW I thought! ... So I bought it !!!
Now I'm not so sure I did the right thing ....
@Gerry .... thanks for the link ....
|
|
By wires - 8 Years Ago
|
Steve,
Don't get confused with all of this, you can never have enough tools for your work. :cool:
I use Avid Media Composer, and still consider it to be the best out there. But this isn't about best or whatever, it's about what gets the job done that I have in front of me and for that reason I also have the free Resolve installed and use it mainly for the Colour Correction abilities - which are about the best in the field. I also use the paid Fusion version simply because it interacts directly with Media Composer through Fusion Connect. On top of that I have a bunch of stuff from New Blue and Boris that work inside MC quite nicely and a great motion stabiliser from ProDad.
There is no way that anyone can be proficient in using all of the above, but at least I can get a lot of work done with out having to go outside. A friend of mine uses Pro Tools, among other items, for audio work and does a lot of mixes for me - there is no way that I am even going to think of learning a full fledged DAW. Same thing goes for Colour Correction, I can do some stuff myself but the final grade is done by a guy who lives in a dark grey hole and uses a DaVinci control panel. :smooooth:
The main thing is that there are many ways to be unkind to a cat, and we just have to take advantage of those available - and free is almost always a great way to get the skin off. :P
|
|
By sonic7 - 8 Years Ago
|
Gerry .... yes I admit I'd naively hoped to get almost everything under one hood.
But aside from the programs I use for creating music, I see:
● iClone - as a 'studio set' environment and for animating actors
● Fusion9 - as an 'authentic' DOF creator as well as for creating other FX
● Vegas Movie Studio - as a layers compositor, perhaps a Grader, additional FX compositing, adding transitions, and rendering out.
This isn't "commercial" stuff - but I think (hope) I can achieve good results all the same .... thanks Gerry :)
|
|
By justaviking - 8 Years Ago
|
|
sonic7 (6/4/2018)
...the audio's done and dusted - but I guess it might be an idea to place it inside iClone as a reference for timing.
That's what I've done on my last few projects. I add whatever audio seems necessary to my iClone project, but then replace it all in my NLE.
In-project audio includes voice-over for viseme generation, some music for timing purposes, and maybe a bit more music to set the mood and "major" sound effects to make it more enjoyable while animating. For all non-character audio, I attach the audio to appropriately named dummy props to make it easy to find. But in the end, whether I export to a sequence of PNG or (gasp!) a WMV file, I still replace ALL the audio in my NLE.
To me, the best thing about doing the audio in my NLE is I can vary the volume over time, rather than have each track be a fixed volume for the entire scene. There are numerous other benefits (easier to work with, etc.), but the variable volume is the major benefit to me.
|
|
By animagic - 8 Years Ago
|
|
mark (6/4/2018)
As they say .png is the way to go for sure. One beauty is you can render at very high resolution and then render the size you need when you're done in your NLE.
Now if you have an audio track you need to match or reference in you NLE I would also render a .wmv or .mp4 file out of iClone for that. The .png image sequence won't have audio as you know. You can then line everything up in your NLE and lay back in your original audio and of course add to your audio tracks mix and sweeten.
Since version 6, iClone can render audio only (.WAV option under Video), so that's what I would use as external reference. Other than that, I concur with the use of image sequences.
I use Vegas Pro, and in the past I have had problems with images sequences in large projects, but currently that works fine. What I'm currently doing as sort of an experiment is to have a separate Vegas project for each self-contained scene. These projects can be referenced in a master Vegas project and the combined scenes can be rendered out from there. You could see if that helps with any problems with a large number of image sequences.
|
|
By Rockoloco666 - 8 Years Ago
|
|
Just to add something to this discussion, the advice given by kt about not compressing until the end is very true for audio, when editing you should use wav or aiff ( the uncompressed avi for audio) or flac which is lossless and half the size of a wav or aiff, for audio that will only be used as a reference you can use mp3 with any quality since they will never be used for final output. And a very very usefull tip for audio mixing: If you are struggling with audio levels, instead of raising the volume for lets say dialogue, try reducing the volume of other tracks instead, this, as stupid as it sounds is one of the top ten audio mistakes everyone does ( even pro engineers)
|
|
By mark - 8 Years Ago
|
Thanks Job, forgot about that...but sometimes nice to have a visual reference if needed ;)
|
|
By sonic7 - 8 Years Ago
|
Great tips ... thanks all .... just 'recappjng' since last post:
@Dennis:
● use "reference audio' track in iClone, then replace that with the 'Master Audio' in your NLE.
● export as PNG sequence or WMV file■■. (Interesting, - more on this below■■) ... thnx :)
@animagic:
● It's possible to render 'audio only' as .WAV format straight out of iClone 6 or later (it's an option available under 'Video').
● Can try using separate Vegas 'projects' for each scene. Reference these and 'combine' them in a 'Master' project for final render... thnx :)
@raxel67:
● For master audio use wav, aiff, or FLAC (to retain quality). Using mp3 is OK for iClone's 'reference' audio.
● To achieve a better audio mix - don't necessarily just 'add' gain to weaker tracks, - you can 'reduce' gain on stronger tracks... thnx :)
@mark:
● iClone's WAV output is a good idea but if you need a 'Visual reference' then render out both 'audio & video' together... thnx :)
■■ Rendering as 'other than' a PNG sequence. If I'm reading you correctly on this Dennis - you would possibly export as WMV?
It looks like 'Vegas Movie Studio 15' can only create 'proxy' files from *video formats* - not from *Image Sequences*. :( I don't know whether there's a work around for this - but if not, I may be forced to export from iClone in something 'other than' a PNG sequence OR, alternatively, change the PNG into some 'intermediate codec' first. - But I'd have to retain the 'alpha' channel whatever I do :w00t:
|
|
By Rockoloco666 - 8 Years Ago
|
|
Avi is another good choice, and it allows alpha and has the same quality as png
|
|
By sonic7 - 8 Years Ago
|
Would I be correct in saying that the 'AVI' output is 'fixed' to a default setting?
There doesn't appear to be any drop down menu to select an AVI codec ....
Or does 'AVI' mean 'uncompressed'?
EDIT: Looks like it must be 'uncompressed' (the 'Quality' slider goes 'gray' when choosing AVI)
So we're talking 8.3GB per minute for 1080p at 24 fps (8 bit)....
another 'source' says 5.7GB /minute..... oh well - 'a lot' anyway :ermm:
.... so 'Export' as uncompressed, then I'd use the 'proxy' generated by Vegas Movie Studio to edit with .... OK! - Let's try that !
(I'll be back!)
|
|
By Rampa - 8 Years Ago
|
|
When exporting as AVI, the settings box pops up after you save your file. It gives you uncompressed, DV, and MJPEG options.
|
|
By sonic7 - 8 Years Ago
|
Thanks Rampa :) - yes I just did a 'test' (exporting out an 'uncompressed' file) - and noticed exactly what you're talking about - the extra options ...
I saw:
● DV Video Encoder
● Full Frames (Uncompressed)
● Grass Valley HQ Encoder (this is one I'd installed on my PC for a past video project that was edited in a different NLE)
● MJPEG Compressor
OK, so upon importing the 'uncompressed' AVI into Vegas MS, it became evident that it doesn't 'include' the alpha component.
Meaning that when attempting to 'overlay' it (using the next video track 'above'), it totally excludes the video track 'below'.
So now I'm wondering whether uncompressed can even hold 'alpha' information at all.
And if it can't - I'm thinking that's where this 'masking' business I've heard of - might come into play ....
|
|
By wires - 8 Years Ago
|
Steve,
There is an option in the render panel to just render an Alpha video.
Just select "Export alpha video only"
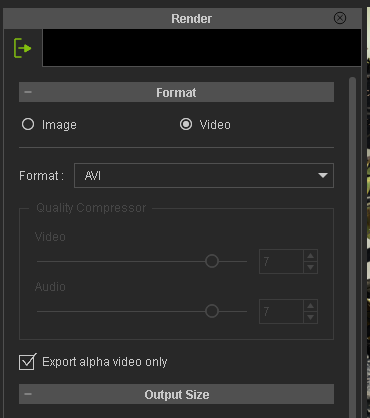
This does require 2 renders, one with and one without Alpha.
|
|
By justaviking - 8 Years Ago
|
@Steve
Yes, I am speaking heresy. I sometimes render to WMV (Windows Media) format. I cannot really defend it.
I have found the WMV files send to be surprisingly compact and, to my eyes, visually acceptable.
I probably do that more when rendering in my NLE (as the final step) than for intermediate files. I originally assumed .mp4 file formats would be better, but it doesn't seem that way to me; the WMV files are noticeably smaller, and seem to look at least as good*. I don't know, maybe I'm stuck with some wonky CODECs on my computer.
It depends on what I'm working on, of course, but let's be honest, any "compression" of my video is the least of my problems. :ermm: If I'm doing "serious" work, then I will be sure to avoid "lossy" intermediate file format.
SUMMARY:
1) I will usually render iClone to AVI if I'm going to do additional editing in my NLE
2) Will render to sequence of PNG if I'm doing "serious" work
3) Typically use WMV for work-in-progress checks, and often use it as my final output
*Hmm... I might be thinking about "mpeg" format that was always significantly bigger than wmv. The .mp4 is probably not like that. I need to double-check a couple of files when I get home. Sorry for the confusion.
|
|
By sonic7 - 8 Years Ago
|
Thanks very much Gerry .... I exported an 'Alpha video' via that setting, and played around a bit with it in Movie Studio.
It seemed like a lot of jigging around - I mean I couldn't even get it to work - so sort of gave up ....
I can see there's lots of possible 'methods' of getting your action/foreground composited 'over' the top of your background (in a NLE).
Am I understanding correctly?
Seems to me they are:
1. The Ideal >>>> ● Export alpha PNG - done! IF your PC is powerful enough to manipulate them. if not;
2. Next best >>>> ● Export alpha PNG - turn them into 'Proxy Files' IF your NLE 'ALLOWS' proxy creation from PNG. if not;
3. Next best >>>> ● Export alpha PNG - and transcode into another 'lossless format' that will work 'as is' or if still sluggish, use proxy NOW.
4. Otherwise >>>> ● Export an 'uncompressed' video AS WELL AS an alpha video - and use 'masking' in the NLE. (still might have to use a 'proxy' if sluggish).
ALTERNATIVELY:
5. Another way >>>> ● Export as 'uncompressed' video against a color (but not a color that's in the scene) then 'chroma key' - done! IF your PC is powerful enough to manipulate them. IF NOT;
6. Next best >>>>>> ● Export as 'uncompressed' video against a color (but not a color that's in the scene) - use your NLE to create a proxy file then 'chroma key'.
In my case, BOTH 1 and 2 are simply not possible ... and 4. seems too involved and protracted ....
And if I'm not mistaken it's BOTH Movie Studio AND Hitfilm Express that won't allow Proxy creation from PNG's
|
|
By Kelleytoons - 8 Years Ago
|
Sometimes we have to work with what we can work with -- back in the day, when our PCs weren't powerful enough for true NLE, we used workarounds that might serve you well with your underpowered setup.
What I think I'd do, if I were you, is not render to my final output size. Clearly your editor can't handle that, and it's no good if you can't get it setup the way you want. So render to, say, 320x240 PNG (or as large as your PC *can* handle). The nice thing about this is your video editor shouldn't care when you finally DO render to the final output -- it will update the sequence automagically the next time it loads. But in the meantime you can work with all the layers, get them working the way you want, and THEN re-render to your final size (overriding exactly the same files, with the same names), load up your editor for JUST the output, and output it.
It's called working with proxies, although in this case it's not *strictly* the case (I'm not sure what you'd call it, exactly) and what we used to do all the time, back in the day. Should be plenty workable enough for you without jumping through hoops.
|
|
By sonic7 - 8 Years Ago
|
@Mike .... Interesting .... all the references I've been making to 'proxy' files were those that are created in the NLE 'automatically' when selected. What you're suggesting is a 'manual' proxy approach...
|
|
By illusionLAB - 8 Years Ago
|
|
Most NLEs rely on converting "image sequence" files into proxies by creating highly compressed MP4 or even WMV - neither of which support an alpha. There are a few AVI and QT codecs that allow an alpha, but in my experience they tend to be optimized for the "Pro" market so they are either uncompressed or use less compression - and therefore they are more about convenience than performance.
|
|
By sonic7 - 8 Years Ago
|
Mark >>>>> ....Most NLEs rely on converting "image sequence" files into proxies by creating highly compressed MP4 or even WMV - neither of which support an alpha.<<<<
that's good to know ..... so I won't go down that rabbit hole then .... thnx :)
|
|
By sonic7 - 8 Years Ago
|
OK - So from where I stand (at the moment at least), numbers 1, 2 and (possibly) 4 are OUT. Then with 5 and 6 - because they rely on keying with 'color' I have certain reservations about the cleaness of the key.
That leaves me with number 3, which, given what Mike has 'suggested', AND what Mark has 'warned about', then a 'manual' proxy creation would involve a similar amount of work/steps to #3.
Yeah --- I'd say #3 but with 'manual' proxy creation in place of a 'lossless' format creation ...... need to do some tests ....
|
|
By Kelleytoons - 8 Years Ago
|
No, I was suggesting doing #1, but just do it with a much lower-res PNG. Your machine ought to be able to handle that, and when you are finished with your edit just go ahead and re-render at the higher res you want, reload the editor (with the project) and then output it (you can even output it at the lower res just to make sure first).
If your machine can't handle that lower res there's something wrong, somewhere (even my old laptop could do that, and it's REALLY old, like 7 or 8 years, which in computer terms is a dinosaur).
|
|
By sonic7 - 8 Years Ago
|
After much deliberation as well as testing I've come to the following conclusions:
● Regarding 'proxy' generation in Vegas Movie Studio 15 ●
(assuming a low performing system and/or large 4K video files).
This software has a confusing 'dual' approach to proxy creation - well it fooled me, (not helped by '0 results returned' when searching 'proxy' in the manual).
But here's how it works...
☆ The 'manual' mode. By right clicking a file in the preview bin you can select 'Create Video Proxy' from the drop down menu. A short time later you'll be automatically editing with the proxies - seamlessly 'beneath the surface'. When you finally do your render, the original files will be automatically 'referenced' by the software for a full spec output file.
☆ The 'auto' mode. However, if you choose to bring in UHD video, a proxy file WILL BE created by default during import - and you won't really know you're using it. It's in this situation you can end up scratching your head because if you go to create your proxy (thinking you need to do it), your drop down list now has this feature 'grayed out'. Makes sense IF you know why. You can however disable this 'Auto Create Proxy for HD' under 'Preferences>Video'.
Now it gets a bit tricky. 'Vegas Movie Studio15' has 4 preview window 'modes' ..... if you select 'Draft' or 'Preview' then any *proxy files* on your timeline will be used in the preview window, - wheras, if you select 'Good' or 'Best' only the *original files* will be previewed (and you lose replay performance).
In either case - whether using manual or auto - all Proxy files will NOT contain an alpha channel - even if your imported file did.
Obviously not having alpha is potentially a huge drawback (depending on the work being edited of course).
You *can* switch your preview window back and forward between the 'modes' to give you *either* better replay speed with NO alpha OR sluggish replay WITH alpha.
To get the 'best of both worlds' ie: fast replay AND alpha channel - you're forced to look 'outside' the program for a solution.
This is where the idea mentioned by Mike Kelley - earlier in this thread - is the one 'sure fire way' of obtaining it.
Namely, create your own 'low resolution' frame for frame PNG duplicates from your hi res files.
Suggestion: Use a separate folder for each. The first folder (the 'hi-res' originals) could be called 'Project bla bla ORIG' and the second folder 'Project bla bla PROXY'. All the (eg: 960x540 pxl) files in the PROXY folder must have precisely identical names to the (eg: 3840x2160 pxl) files in the ORIG folder.
Start a project and work with the low res files to make all the editing decisions, FX, transitions and even the alpha layering (since they're alpha PNG). When complete, *save your project* and shut down the editor, Now 're-name' the folder containing all the low re-res files to 'Project bla bla PROXY done' - that way the NLE won't 'find' their location. Also re-name the folder containing the hi-res 'originals' to 'Project bla bla PROXY' - so now, upon re-opening your project, the NLE will reference the (identically named) hi-res ones for rendering out.
But do a small test first to make certain it works.
Big thanks to Mike for this suggestion! :)
|
|
By animagic - 8 Years Ago
|
Sonic, that's an interesting approach. I'm currently working on a project where I renamed a folder containing an image sequence to something more logical, so Vegas Pro couldn't find it. Then, as with Movie Studio, Vegas prompts you and let you specify a new location.
Another option, which may or may not be available in Movie Studio, is to do a Replace within the editor. In the Project Media panel right-click the image sequence and select Replace, which will then allow you select the hi-res alternative.
|
|
By sonic7 - 8 Years Ago
|
@animagic ....
>>> Sonic, that's an interesting approach. I'm currently working on a project where I renamed a folder containing an image sequence to something more logical, so Vegas Pro couldn't find it. Then, as with Movie Studio, Vegas prompts you and let you specify a new location. <<<
Yes, about that 'message' ... "The following file could not be found in the specified location" (in Vegas MS there's 4 options):
● Search for the missing file
● Specify a new location or replacement file
● Ignore missing file and leave it offline
● Ignore all missing files and leave them offline
With option ●2 - I'm confused as to whether it's referring to two possible fixes: #A "Specify a new location" #B "Specify a replacement file"
If that's what it means then only #B works for me (specify file).
I was hoping that the #A would mean simply 'pointing to a folder' and it would take care of the rest (finding the right files inside). - But it doesn't seem to work for me.
>>>Another option, which may or may not be available in Movie Studio, is to do a Replace within the editor. In the Project Media panel right-click the image sequence and select Replace, which will then allow you select the hi-res alternative. <<<
Brilliant! .... I wasn't aware of that one! Yes that could come in very handy! .... thanks animagic! :)
I just watched a video about daVinci Resolve - it's an absolutely incredible piece of software ....
|
|
By animagic - 8 Years Ago
|
|
"Specify a new location or replacement file" opens a file browser and gives you indeed the two possibilities you mention, with #B the one that is suitable for your purposes: specify a replacement file.
|
|
By sonic7 - 8 Years Ago
|
Earlier in this post I'd mentioned this:
..... upon importing the 'uncompressed' AVI into Vegas MS, it became evident that it doesn't 'include' the alpha component.
Meaning that when attempting to 'overlay' it (using the next video track 'above'), it totally excludes the video track 'below'.
So now I'm wondering whether uncompressed can even hold 'alpha' information at all.......
Well that was incorrect, because the 'uncompressed' video from iClone does contain an alpha component.
I had failed to 'select' the file's 'properties option' for making it's alpha 'active' - as in 'straight' or 'premultiplied', (whatever they mean); but once I did that (in the NLE), - all was well and it showed it's transparency.
|
|
By bexley - 8 Years Ago
|
Just my 2 cents worth:
By coincidence I've been forced to deal with this issue myself recently. I'm out-putting lip-synced toon-shaded animation at 24fps to be posted in After Effects and Premiere Pro CS5 (I bought CS5 in 2010 for a project and it still works great!).
Because of I-clones eccentricities, I'm forced to output audio as an mp4 at 30fps, and the picture is a PNG sequence at 24fps. The picture might comprise of three passes per character ( 1-with lines, 2-without lines, 3-matte pass) and then some motion tracking data if necessary (another pass or more) -- so I have to keep notes. I block the scene, set up the cameras and lights, use the switcher to figure out the coverage, then render each angle based on the switcher cut -- but with a few seconds either side of the cut to maximise my editing opportunities. That last part is a lifesaver. All four files (three PNG picture at 24 fps, and one MP4 sound at 30fps) are pulled into After Effects and synced up into a single composition (very fast). This is then rendered into a Quicktime JPG sequence for editing. Any additional work (adding backgrounds, etc.) is done in AE and then re-rendered as necessary. These re-renders update automatically in Premiere.
If I could make it simpler I would. However it guarantees me optimum control of post without sacrificing the ability to edit properly. Once you get used to it, it becomes automatic. The Iclone switcher is a great idea (and very handy) but it's just a switcher. Editing usually involves disrupting the time-line with overlaps, and jump cuts.
Just my 2 cent worth.
--Bex
|
|
By sonic7 - 8 Years Ago
|
@bexley ..... Your approach sounds good to me .... I'm personally not an 'After Effects' person - only because of doing things 'on the cheap', but I was wondering with your use of JPEG image sequences whether you lose your 'alpha' ability at that point? - or doesn't it matter for your purposes?. Your file sizes would certainly be reduced though - compared with PNG sequences .... :)
Steve.
|
|
By bexley - 8 Years Ago
|
By the time I'm at the QT Jpeg stage I don't need the alpha channel. I went with QT Jpeg because it was recommend to me some years ago by someone who knows what he's doing :-), but I'm sure there are better codecs out there now. The real advantage to my system is that I get to make precise edits (in Premiere Pro because I'm in QT Jpeg), and still have the option of fixing background and picture detail in After Effects (because I'm in PNG sequence). After making my changes, I just re-render over the old file and the update is automatic. This is a system that could work in any NLE with any post-prod software.
Other advantages with AE are things like re-framing and re-timing. I'm working in a 2D-like environment (fake anime), which helps. I haven't tried it, but WAX might be useful for this stuff. http://www.debugmode.com/wax/
All these tests were made using the system I described
|
|
By sonic7 - 8 Years Ago
|
@bexley .... thanks for sharing your thoughts on work flow .... :)
Thought your animation was good! A lot of expression in these 2d cartoons! (helped along by a great sound track) ....
Yeah, I'd heard of 'WAX' a few years back ... might take a fresh look and see what it can do!
Thanks for sharing!
|