|
By Famekrafts - 7 Years Ago
|
I followed Rampa's tutorial on Quick Blender Bodysuit for cc.
I created my own character and not use the base character and exported that as obj. because I cannot export as fbx without the pipeline.
Now every time I try to import the character body suit it is saying I need fbx key. So How do i get this key without pipeline?
|
|
By Rampa - 7 Years Ago
|
You can get the CC templates for building your clothing here:
https://www.reallusion.com/character-creator/custom-outfit.html
For Blender, import the CC FBX, build your clothing on it, and then export it as FBX following the tutorial.
There are templates for male, female, and neutral. There are also FBXKey files included.
|
|
By Famekrafts - 7 Years Ago
|
Rampa (5/9/2018)
You can get the CC templates for building your clothing here: https://www.reallusion.com/character-creator/custom-outfit.html
For Blender, import the CC FBX, build your clothing on it, and then export it as FBX following the tutorial.
There are templates for male, female, and neutral. There are also FBXKey files included.
Thanks, Man, that really helps.
|
|
By Famekrafts - 7 Years Ago
|
Rampa (5/9/2018)
You can get the CC templates for building your clothing here: https://www.reallusion.com/character-creator/custom-outfit.html
For Blender, import the CC FBX, build your clothing on it, and then export it as FBX following the tutorial.
There are templates for male, female, and neutral. There are also FBXKey files included.
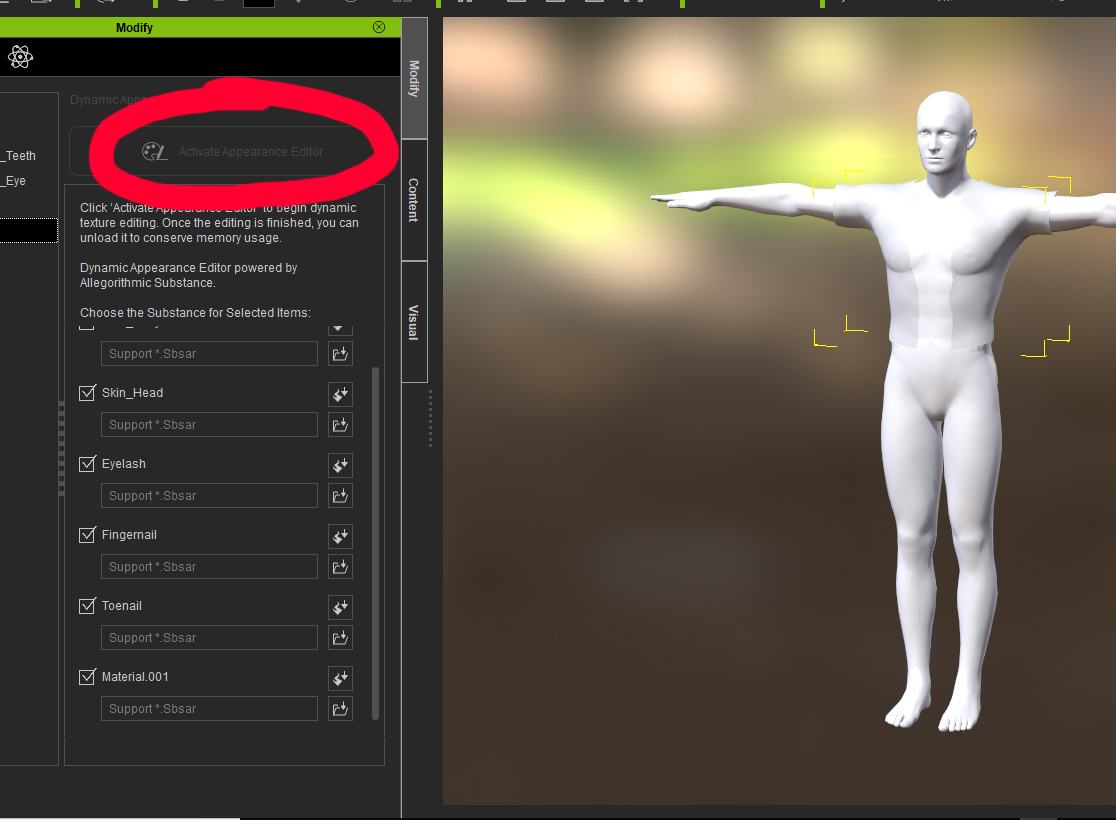
I am getting stuck on this step of the tutorial, once I import it inside CC the Appearance editor is not clickable.
How do I solve this?
|
|
By Famekrafts - 7 Years Ago
|
|
Ok got it, had to add PBR or traditional materials to all items.
|
|
By Rampa - 7 Years Ago
|
Excellent! :)
Glad to see you got it working.
|
|
By R Ham - 7 Years Ago
|
Rampa (5/9/2018)
You can get the CC templates for building your clothing here: https://www.reallusion.com/character-creator/custom-outfit.html
For Blender, import the CC FBX, build your clothing on it, and then export it as FBX following the tutorial.
There are templates for male, female, and neutral. There are also FBXKey files included.
Thanks for posting this link. I stumbled across this page some time back but didn't appreciate what it said at the time. This time I've bookmarked it. The templates are valuable of course, I'll be experimenting with them. But I could have used that Edit Mesh Mode tool when I was dealing with lower body poke through on Old Gramma. The thing is, I learned about smoothing in DAZ, but took for granted that iClone didn't have it. I went through a whole lot of agonizing with PhysX cloth for nothing. :pinch:
|
|
By Famekrafts - 7 Years Ago
|
|
Rampa (5/9/2018)
Excellent! :)
Glad to see you got it working.
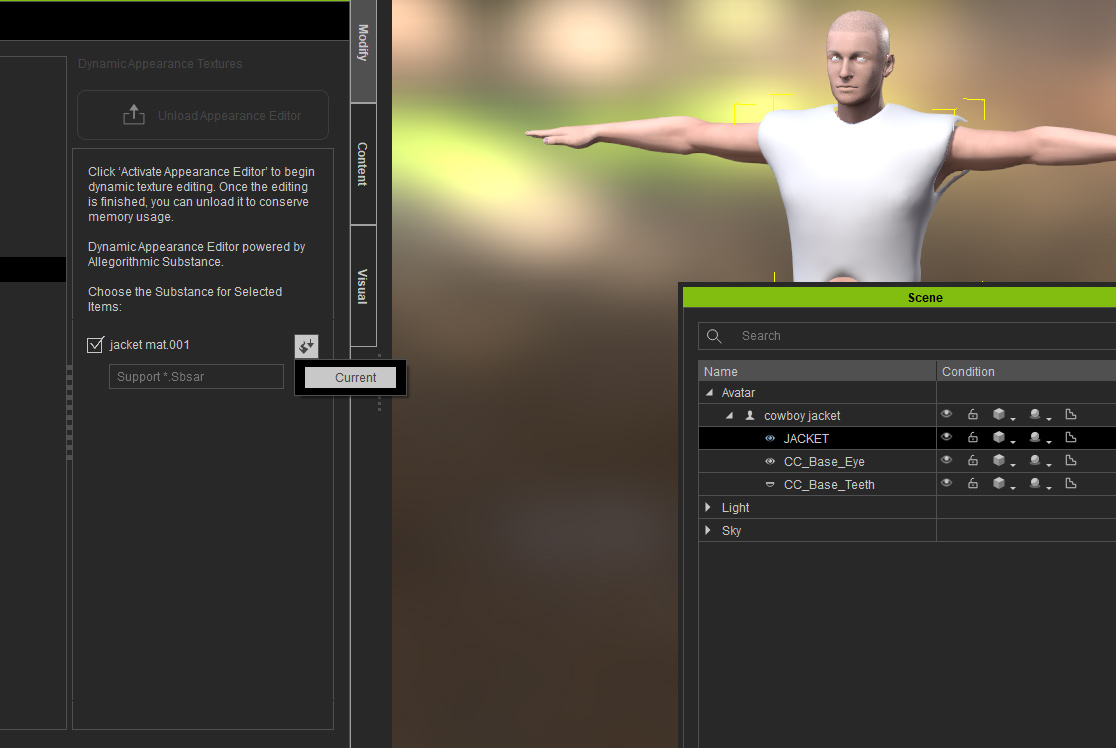
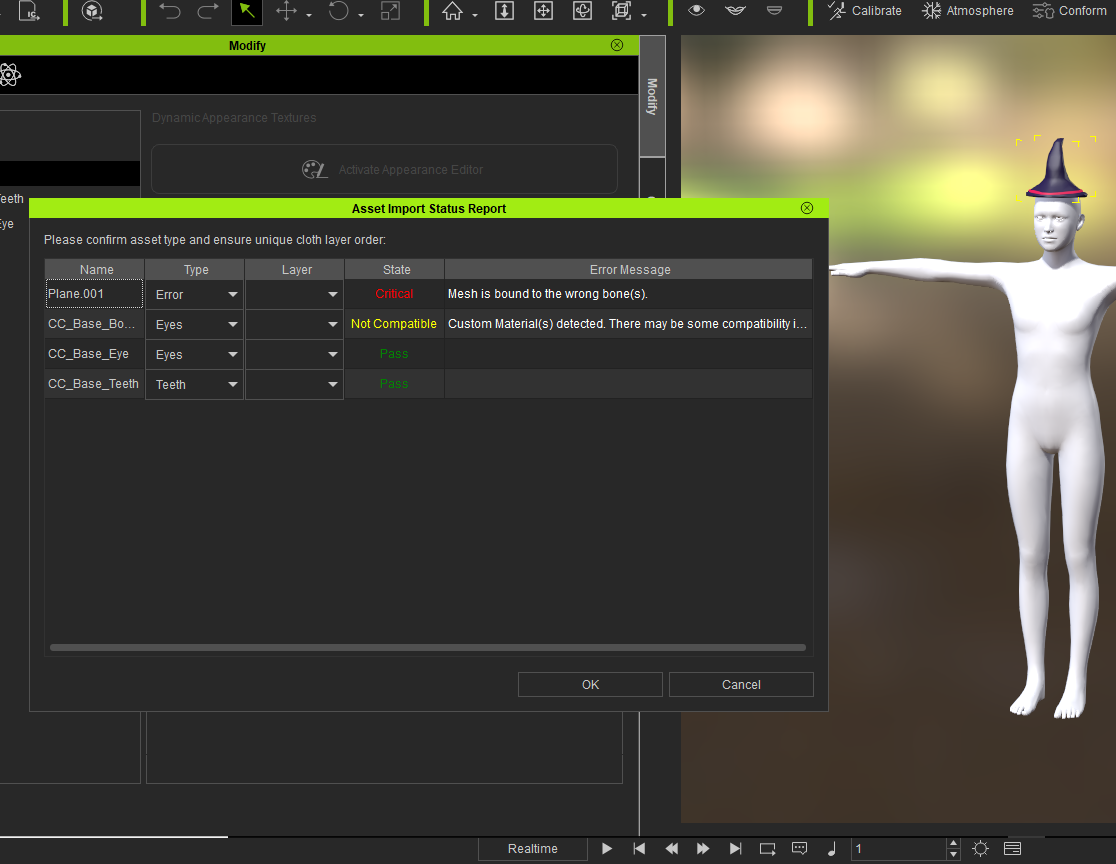
Rampa I am again stuck with this. Now the new cloth is being selected as either skin or it will not give an option to select traditional or pbr material for the jacket
check screenshot. I am getting this error while the character loads.

|
|
By Famekrafts - 7 Years Ago
|
|
I was using the wrong fbx key I think. now it worked when I used the calibration key.
|
|
By Famekrafts - 7 Years Ago
|
Famekrafts (5/11/2018)
Rampa (5/9/2018)
Excellent! :)
Glad to see you got it working.Rampa I am again stuck with this. Now the new cloth is being selected as either skin or it will not give an option to select traditional or pbr material for the jacket check screenshot. I am getting this error while the character loads.
Ok Rampa I am literally stuck with this problem every time I create a cloth.
It shows incompatible material added and it reads mesh as eyes instead of cloth.
How do I fix this?
|
|
By Kelleytoons - 7 Years Ago
|
That's usually because you haven't done the steps properly in Blender.
In Blender make sure you attach the clothing to the base bone. When you do this press Ctrl-P and select "With Empty Groups". Now select the Base_Body (with Object Select) and, holding down the shift key, select the clothing item. Switch to Weight Paint mode and do Transfer Weights, and change the advanced options "Source Layer" to "By Name". Then export with Armature bones turned off and all should be well.
|
|
By Famekrafts - 7 Years Ago
|
If anyone else gets stuck at this step make sure you weight map your cloth and use a name as source for weight map inside blender.
Follow this tut and it will work -
|
|
By Famekrafts - 7 Years Ago
|
Kelleytoons (5/21/2018)
That's usually because you haven't done the steps properly in Blender.
In Blender make sure you attach the clothing to the base bone. When you do this press Ctrl-P and select "With Empty Groups". Now select the Base_Body (with Object Select) and, holding down the shift key, select the clothing item. Switch to Weight Paint mode and do Transfer Weights, and change the advanced options "Source Layer" to "By Name". Then export with Armature bones turned off and all should be well.
Yes, I followed the above tut and got it done. Rampa's tut was missing the weight map point.

|
|
By Kelleytoons - 7 Years Ago
|
There's one more sort of critical step -- the clothing will work, but not as well. You need to also smooth out the vertex group weights on the clothing, or it won't deform well.
I showed this in one of my tutorials (where I also wrote a Python routine that does this): however, I've since learned a MUCH easier (well, faster) way of doing this. Just use the Smooth tool in the Weight tools options, and all will be well (I'll be creating a video tutorial about this either tonight or tomorrow).
|
|
By Famekrafts - 7 Years Ago
|
|
Kelleytoons (5/21/2018)
There's one more sort of critical step -- the clothing will work, but not as well. You need to also smooth out the vertex group weights on the clothing, or it won't deform well.
I showed this in one of my tutorials (where I also wrote a Python routine that does this): however, I've since learned a MUCH easier (well, faster) way of doing this. Just use the Smooth tool in the Weight tools options, and all will be well (I'll be creating a video tutorial about this either tonight or tomorrow).
Because there are two materials on my hat iclone is requesting a weight map for enabling physics.
How to export weight maps for two materials separately?
|
|
By Kelleytoons - 7 Years Ago
|
This can range from stupidly simple to impossible, depending on how the hat is mapped.
For example, if you have a coat with buttons (so that the buttons are mapped separately) you can't do this -- there's no way you can apply cloth physics to both the coat and the buttons properly (so the answer is to remap it). If, though, you just need the edges of the hat (which is normally the case) to have physics you don't even need to worry about the rest of the hat.
So I guess I'd have to see the hat and the mapping to know for sure. Easiest way to play around, though, is to use a program like 3D Coat and create your map interactively (see my tutorials).
|
|
By Famekrafts - 7 Years Ago
|
|
Kelleytoons (5/22/2018)
This can range from stupidly simple to impossible, depending on how the hat is mapped.
For example, if you have a coat with buttons (so that the buttons are mapped separately) you can't do this -- there's no way you can apply cloth physics to both the coat and the buttons properly (so the answer is to remap it). If, though, you just need the edges of the hat (which is normally the case) to have physics you don't even need to worry about the rest of the hat.
So I guess I'd have to see the hat and the mapping to know for sure. Easiest way to play around, though, is to use a program like 3D Coat and create your map interactively (see my tutorials).
Well Iclone is showing me this error. What kind of greyscale map does It require? 3D coat is way expensive, I will prefer to buy substance painter rather than 3D coat for texturing.

|
|
By Famekrafts - 7 Years Ago
|
|
Kelleytoons (5/22/2018)
This can range from stupidly simple to impossible, depending on how the hat is mapped.
For example, if you have a coat with buttons (so that the buttons are mapped separately) you can't do this -- there's no way you can apply cloth physics to both the coat and the buttons properly (so the answer is to remap it). If, though, you just need the edges of the hat (which is normally the case) to have physics you don't even need to worry about the rest of the hat.
So I guess I'd have to see the hat and the mapping to know for sure. Easiest way to play around, though, is to use a program like 3D Coat and create your map interactively (see my tutorials).
Here is the UV mapping in blender

|
|
By Kelleytoons - 7 Years Ago
|
3D Coat expensive? You can buy the student version (all you need) for less than $100. And it's WAY better than SP (for one thing it will create UV maps easily, and very, very good ones, much better than you can get anywhere. SP can't create UV maps at all).
And that may very well be what you need to do here. Without having the hat myself I can't really say.
|
|
By Kelleytoons - 7 Years Ago
|
Based on what you are showing me, it appears that you did a no-no -- you applied two separate materials using the same UV map on the same object.
This won't allow physics to work (at least that I know of -- perhaps a physics wizard will chime in here). It's also not a very good practice in general.
|
|
By Famekrafts - 7 Years Ago
|
|
Kelleytoons (5/22/2018)
Based on what you are showing me, it appears that you did a no-no -- you applied two separate materials using the same UV map on the same object.
This won't allow physics to work (at least that I know of -- perhaps a physics wizard will chime in here). It's also not a very good practice in general.
So basically I need to keep the mesh separate so they can be different objects combined together? with different UV maps.
The educational version of 3D coat is not going to help because it is not for commercial purpose and I am moving towards commercial work. Currently whatever I am doing is to create a demo real for tv and web commercials.
|
|
By 4u2ges - 7 Years Ago
|
|
You would really need to take that ribbon out. For many practical reasons, not just because of physix is not going to work (and it will not in this case).
It is flat painted strip (as far as I can see), but you have it occupied the most outer space on your UV map, white nicely textured main blue hat mesh (which needs mush higher resolution, than the ribbon) is pushed to the center and is a lot smaller.
So delete the ribbon mesh, scale the rest of the islands to occupy the entire map all the way to edges.
Then simply draw the curvy ribbon over the blue texture in your favorite paint program (I use photoshop). But you can use whatever you have at your disposal.
Finally if you need a “volume” for the ribbon, use normal/bump map to push it out (again in your favorite application capable of creating texture maps).
And for physics weight map a nice BW gradient sector.
I would have shown it graphically, but I am not at my computer at the moment.
|
|
By Kelleytoons - 7 Years Ago
|
Usually what happens (at least in terms of resources used for things like iClone or any other Real time systems) is you just do not use multi-materials. That's the beauty of the PBR approach -- you can simulate different types of materials (wood, plastic, metal) all on the same object, using the same material, just by adjusting the maps applied.
So the answer is, no, you don't want to separate the mesh, but rather understand how PBR actually works. There are some really good tutorials out there on this (RL has a great one, IIRC, that takes a gun that has a wood handle and manipulates the metallic and roughness maps to get the looks of different materials) but it's pretty easy to understand.
(And you should talk with 3D Coat's author -- he's very willing to work with folks. He sold me the full version of 3D Coat for the educational price, for example. He's particularly willing around the Christmas holidays, but I suspect if you explained your case he might be accommodating. In any case, you need to at least have the ability to create your own UV maps, but if you can do that you might not need Coat).
|
|
By wires - 7 Years Ago
|
|
Character Creator 3 Pipeline may just make this whole discussion obsolete. :):cool::smooooth:
|
|
By Famekrafts - 7 Years Ago
|
4u2ges (5/22/2018)
You would really need to take that ribbon out. For many practical reasons, not just because of physix is not going to work (and it will not in this case).
It is flat painted strip (as far as I can see), but you have it occupied the most outer space on your UV map, white nicely textured main blue hat mesh (which needs mush higher resolution, than the ribbon) is pushed to the center and is a lot smaller.
So delete the ribbon mesh, scale the rest of the islands to occupy the entire map all the way to edges.
Then simply draw the curvy ribbon over the blue texture in your favorite paint program (I use photoshop). But you can use whatever you have at your disposal.
Finally if you need a “volume” for the ribbon, use normal/bump map to push it out (again in your favorite application capable of creating texture maps).
And for physics weight map a nice BW gradient sector.
I would have shown it graphically, but I am not at my computer at the moment.
Thanks got it. I will not need that weight map greyscale if there is only one material.
|
|
By Kelleytoons - 7 Years Ago
|
It looks impressive, but I wouldn't necessarily throw out the baby with the bathwater.
They don't talk at all about physics there, so I'm guessing we may still need to understand how to create our own physics maps (and thus our own UVs and managing materials). While there's no doubt things will get easier, they won't get to the "make art" button (so the more you understand about the back basics, the better).
|
|
By Famekrafts - 7 Years Ago
|
Lol. I am waiting btw, do we need to upgrade to cc 3 or it will be free upgrade like when I bought iclone?
|
|
By wires - 7 Years Ago
|
|
In the thread that I linked to it states that CC 3 will be free for iClone 7 users, however the Pipeline version will cost $199.00.
|
|
By urbanlamb - 7 Years Ago
|
Famekrafts (5/22/2018)
Kelleytoons (5/22/2018)
This can range from stupidly simple to impossible, depending on how the hat is mapped.
For example, if you have a coat with buttons (so that the buttons are mapped separately) you can't do this -- there's no way you can apply cloth physics to both the coat and the buttons properly (so the answer is to remap it). If, though, you just need the edges of the hat (which is normally the case) to have physics you don't even need to worry about the rest of the hat.
So I guess I'd have to see the hat and the mapping to know for sure. Easiest way to play around, though, is to use a program like 3D Coat and create your map interactively (see my tutorials).Here is the UV mapping in blender
For this its not build very well for this type of thing.
1) the uvmap for the ribbon is out of scale with the rest so textures will apply at wierd resolutions
2) for this particular example there is no need for two materials you simply use normal mapping to create a height difference for the ribbon to differentiate it from the rest of the hat.
3) two materials is a bit overkill for something so simple in fact its overkill for most things. you should use 1 material and put it all together and use textures to create the effects you want
4) edit - forgot that to use substances directly in iclone which can be done you can create an idcolour map and use the substance mixer thingy they added this removes the need for more than one material in most situations.
- as an aside actually the mathematical algorithms for mapping are actually superior in blender and they are integrating a new one from some research done in 2016 for mapping things like heads with superior results that to my knowledge is not added to any other software at the moment. So for mapping I would stick with blender, but if you want to apply effects or physics to things one continuous mesh and one material is usually the best way and keep all the mapping to scale the ribbon part is way too large for the rest of the hat so make sure its proportional.
|
|
By 4u2ges - 7 Years Ago
|
|
CC3 is certainly going to help a lot, but it is not going to magically create us cloth. We still need to fully understand the process and work hard to create something decent.
>>> Thanks got it. I will not need that weight map greyscale if there is only one material.
I think you are a bit confused there as to what the physix weight map is there for. Soft cloth physix does not need to apply to every cloth items. Only those items you wish to respond to gravity and interact with the wind.
Don’t think this hat really needs any physix… well, if you want to have the hat edges to spring a little, then you need to enable soft cloth physix and B/W gradient weight map respectively, as gradient map tells which part of the mesh should be static (completely black on the map) and which interact (grey to white)
And as it seems the ribbon is a totally separate mesh, it has to go.
|
|
By Famekrafts - 7 Years Ago
|
4u2ges (5/22/2018)
CC3 is certainly going to help a lot, but it is not going to magically create us cloth. We still need to fully understand the process and work hard to create something decent.
>>> Thanks got it. I will not need that weight map greyscale if there is only one material.
I think you are a bit confused there as to what the physix weight map is there for. Soft cloth physix does not need to apply to every cloth items. Only those items you wish to respond to gravity and interact with the wind.
Don’t think this hat really needs any physix… well, if you want to have the hat edges to spring a little, then you need to enable soft cloth physix and B/W gradient weight map respectively, as gradient map tells which part of the mesh should be static (completely black on the map) and which interact (grey to white)
And as it seems the ribbon is a totally separate mesh, it has to go.
Thanks still learning the ropes.
|
|
By Famekrafts - 7 Years Ago
|
urbanlamb (5/22/2018)
Famekrafts (5/22/2018)
Kelleytoons (5/22/2018)
This can range from stupidly simple to impossible, depending on how the hat is mapped.
For example, if you have a coat with buttons (so that the buttons are mapped separately) you can't do this -- there's no way you can apply cloth physics to both the coat and the buttons properly (so the answer is to remap it). If, though, you just need the edges of the hat (which is normally the case) to have physics you don't even need to worry about the rest of the hat.
So I guess I'd have to see the hat and the mapping to know for sure. Easiest way to play around, though, is to use a program like 3D Coat and create your map interactively (see my tutorials).Here is the UV mapping in blender For this its not build very well for this type of thing. 1) the uvmap for the ribbon is out of scale with the rest so textures will apply at wierd resolutions 2) for this particular example there is no need for two materials you simply use normal mapping to create a height difference for the ribbon to differentiate it from the rest of the hat. 3) two materials is a bit overkill for something so simple in fact its overkill for most things. you should use 1 material and put it all together and use textures to create the effects you want 4) edit - forgot that to use substances directly in iclone which can be done you can create an idcolour map and use the substance mixer thingy they added this removes the need for more than one material in most situations. - as an aside actually the mathematical algorithms for mapping are actually superior in blender and they are integrating a new one from some research done in 2016 for mapping things like heads with superior results that to my knowledge is not added to any other software at the moment. So for mapping I would stick with blender, but if you want to apply effects or physics to things one continuous mesh and one material is usually the best way and keep all the mapping to scale the ribbon part is way too large for the rest of the hat so make sure its proportional.
I understand this is overkill but this is just a test mesh. I am planning to create a lot of accessories so I can use them for my future characters or sell them on content store. This was a just a test to get the pipeline ready for blender to cc - iclone export.
|
|
By Famekrafts - 7 Years Ago
|
Finally managed to get the hat textured inside cc
Leather Wizard hat

|
|
By Famekrafts - 7 Years Ago
|

Now getting a hang of it.
|
|
By Famekrafts - 7 Years Ago
|

This one textured in the blender.
|