|
By Atonnis - 7 Years Ago
|
I have been through tutorials and searched and searched but I find myself at a loss.
In order to produce full-blown animations that don't produce files that are multiple-GB in size for every alembic, I decided to try creating the character with no hair, exporting the animations, and then hiding the character and only exporting the hair with animations - this was done from DAZ and through 3DXchange.
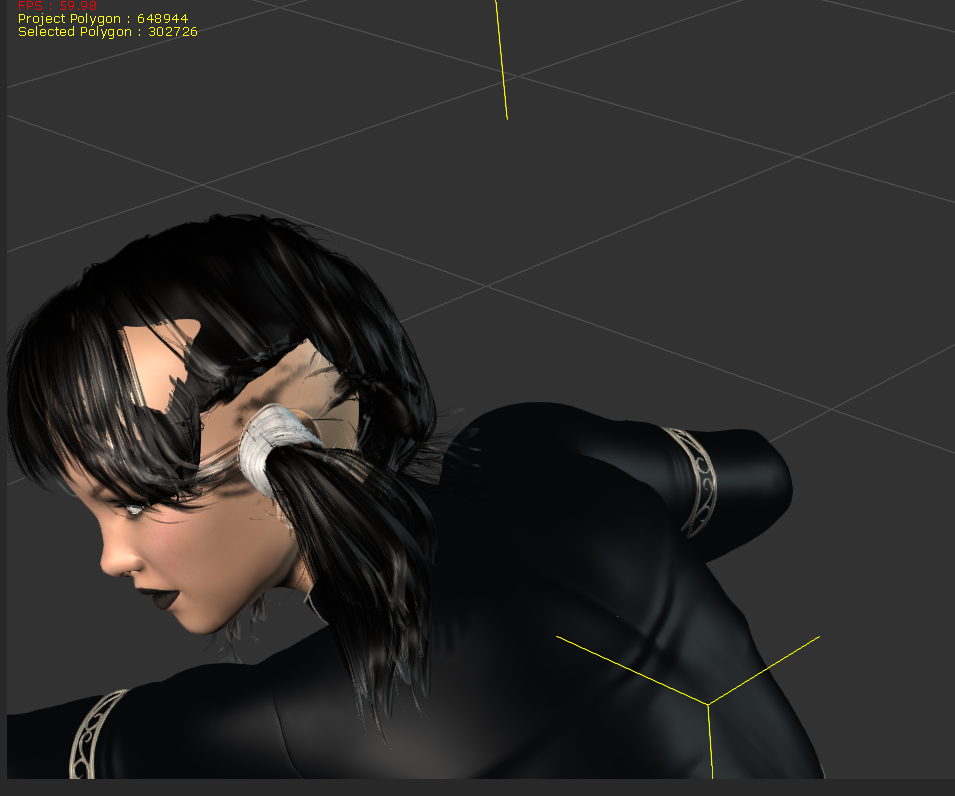
Now, I have managed to link the two to fight in sync, however I cannot stop the hair from sometimes falling right through the skin of the head of the character.
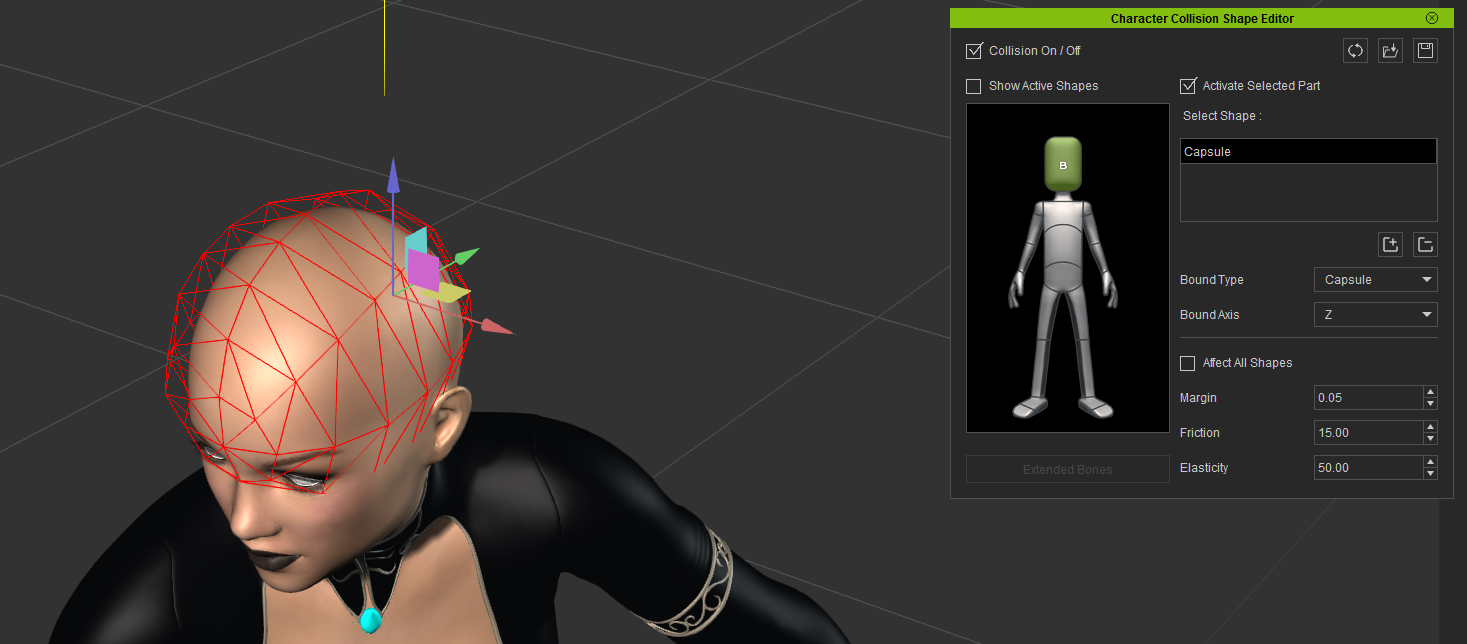
The two pictures attached will show what I mean. One shows my collision setup for the head, the other shows the result upon playing in Frame mode.


I've never managed to successfully export from DAZ into 3Dxchange into iClone and then export an alembic file that wasn't multiple GB in size - we're talking HUGE. I thought just having the hair as alembic might make the difference, but it's no good if it won't work in the scene due to collision. I'm getting desperate for a way to get animated hair into Unreal Engine, since APEX confuses the heck out of me, and I'm absolutely useless with the hair tools in 3DSMax and Maya.
Can anyone share any tips, without just dumping a load of links to the standard iClone tutorials - unless there's something I missed, of course? I would be most grateful.
Thank you for at the very least reading!
Atonnis
|
|
By Pixtim - 7 Years Ago
|
If I understand correctly, your goal is to have animated hair in a real-time animation in Unreal.
I do not know Unreal but I use Unity 3D, and I think the principles must be almost the same ...
When you send an animated character to real time, it's the bones that are animated and not the mesh. That's why it's light.
If you send a mesh animation ... it is very heavy and not adapted to real time ...
For me your process is simply not the right one.
Instead, you should try to transfer the map of influences to Unreal so that the animation of the hair is created automatically in Unreal with its physical tools.
|
|
By vidi - 7 Years Ago
|
|
The collision shape are only for softbody physic . It not so complicated like you think In your case make some Bones in the braids, give it in 3D xchange spring bone effect and attach the Hair to the character The springbones will move the braids automatically and also it is all in one exportable to a another Engine .
|
|
By Atonnis - 7 Years Ago
|
|
Pixtim(2/15/2017)
If I understand correctly, your goal is to have animated hair in a real-time animation in Unreal.
I do not know Unreal but I use Unity 3D, and I think the principles must be almost the same ...
When you send an animated character to real time, it's the bones that are animated and not the mesh. That's why it's light.
If you send a mesh animation ... it is very heavy and not adapted to real time ...
For me your process is simply not the right one.
Instead, you should try to transfer the map of influences to Unreal so that the animation of the hair is created automatically in Unreal with its physical tools.
Thank you for your reply.
I find myself completely at a loss. I transfer a map of influences of what? How do I import the skeletal mesh of the hair (it does have a skeleton) yet manage to make it move within limits with motion? I can't for the life of me figure out the nvidia implementations? In my answer to the next post have a look at the video, it's all within iClone and the hair is softcloth, so should it not be keeping off of the bald head with the collision shape I have set up?
|
|
By Atonnis - 7 Years Ago
|
vidi (2/15/2017)
The collision shape are only for softbody physic . It not so complicated like you think In your case make some Bones in the braids, give it in 3D xchange spring bone effect and attach the Hair to the character The springbones will move the braids automatically and also it is all in one exportable to a another Engine .
Thanks for the info. But how does this work when you have at least 6 sections to the hair, on top, sides, bangs, back, etc? I've never seen any tutorials or anything say add a whole rack of bones to your hair mesh?
|
|
By Snarp Farkle - 7 Years Ago
|
|
Thanks for the info. But how does this work when you have at least 6 sections to the hair, on top, sides, bangs, back, etc? I've never seen any tutorials or anything say add a whole rack of bones to your hair mesh?
Try this tutorial [HERE]
|
|
By Atonnis - 7 Years Ago
|
SnarpFarkle (2/17/2017)
Thanks for the info. But how does this work when you have at least 6 sections to the hair, on top, sides, bangs, back, etc? I've never seen any tutorials or anything say add a whole rack of bones to your hair mesh?
Try this tutorial [HERE]
Thanks, but I've been through that tutorial. I don't know if it was intentional but he manages to pick hair that has plenty of distance between the hair and the scalp, so the collision volume is easy.
My issue is that the hair appears to be ignoring the collision shape I set up around the head and letting the hair through anyway.
Are there any tips/tricks to the numbers I should use. I admit I don't full understand their use in this context?
|
|
By dogged2003 - 7 Years Ago
|
|
Do you know about this limitation: https://reallusion.com/FeedBackTracker/Issue/Avatar-Collision-Shape-does-not-work-If-there-are-more-than-17-20
|
|
By Atonnis - 7 Years Ago
|
Yes. I only have one collision shape, as shown in the picture above. Good thought though.
|
|
By Atonnis - 7 Years Ago
|
|
Sorry to bump this up, but I would really love some information on how I'm supposed to get hair to work if it doesn't collide to collision shapes.
Is there anyone who can suggest to me how I can get hair to react within its weight map limitations with any animation, not just the example I show above. Hair drives me absolutely nuts since so much of the work I'm trying to do at the moment involves characters both in direct conversation with the viewer and in combat situations, including cutscenes where quality is paramount.
Thank you in advance!
|
|
By Atonnis - 7 Years Ago
|
Me sad 
|
|
By Atonnis - 7 Years Ago
|
Well, iClone 7 is out and I've been using it already for a while, but I still don't have a £*"($&"£ solution as to how to get hair, in particular, to work in any other software. In particular UE4. All I want is hair that reacts to movement within limitations, and I've played with those WITHIN Reallusion products until the cows come home, then go out again for a hearty breakfast.
Can anyone please direct me to a way I can get, for example, a ponytail to react when a character turns its head? I can't alembic it as that only essentially records and plays back animation, not taking into account physics in the movement. Is it possible with any of these products or should I just have gone elsewhere and stop bothering to work so hard to learn it all?
|
|
By Rampa - 7 Years Ago
|
Paint your physics weight map in ue4. The new version has new cloth tools. There is no way to send the weight map from one program to the other. Neither program is set up to handle such a transfer.
They are also using different PhysX cloth.
EDIT
I found this tutorial for the new NVcloth. https://www.youtube.com/watch?v=OO8v-yzeuBo
|
|
By Atonnis - 7 Years Ago
|
Edit: I should note that this is with an entirely iClone created character now.
Thankyou. I had been following a similar video tutorial but I always end up with the same issue.
Upon trying to create the physical material I always get the same error:
Failed to generate clothing sim mesh due to degenerate triangle, found coincident vertices in triangle A=X=0.742 Y=22.883 Z-148.878 B=X=0.962 Y=-23.335 Z=150.640 C=X=0.962 Y=233.335 Z-150.640
Now, I accept that I'm trying to do it to the hair mesh, but should it really make that much of a difference?
Otherwise, can you suggest any way I can get the hair to flow/move as described?
Thank you very much for any assistance. I tried in the Unreal forums but so far 72 views and no-one yet to respond.... 
|
|
By Rampa - 7 Years Ago
|
Atonnis (6/28/2017)
Edit: I should note that this is with an entirely iClone created character now. Thankyou. I had been following a similar video tutorial but I always end up with the same issue. Upon trying to create the physical material I always get the same error: Failed to generate clothing sim mesh due to degenerate triangle, found coincident vertices in triangle A=X=0.742 Y=22.883 Z-148.878 B=X=0.962 Y=-23.335 Z=150.640 C=X=0.962 Y=233.335 Z-150.640 Now, I accept that I'm trying to do it to the hair mesh, but should it really make that much of a difference? Otherwise, can you suggest any way I can get the hair to flow/move as described? Thank you very much for any assistance. I tried in the Unreal forums but so far 72 views and no-one yet to respond.... 
I have an idea. Maybe it'll even be a good one. 
It says there are degenerate triangles. That means that there are tri-polys that have 2 or all their vertices in the same location. It cannot have a normal if this is the case, and so fails.
A lot of modeling programs (like Blender) have tools to remove overlapping, or very close, vertices.
|
|