|
By blackhawk - 10 Years Ago
|
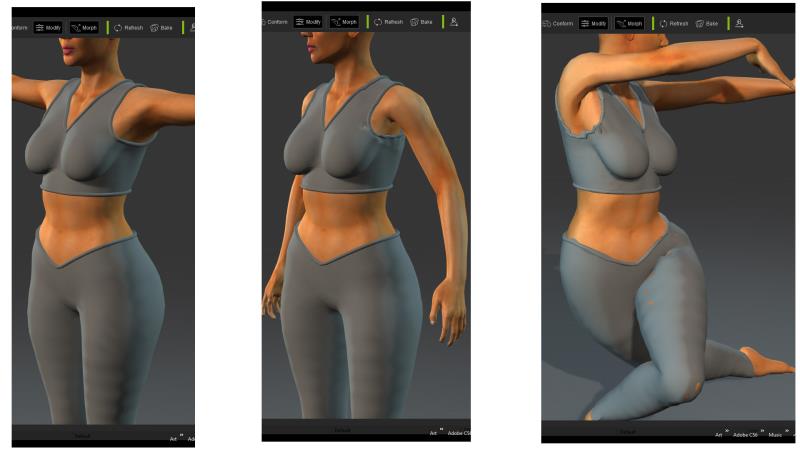
I recently made this clothing illustrated in the attached image using zBrush 4R7 and Blender 2.77a. I am having a problem trying to weight paint the clothing to get the proper movement with the armature after I transfer weights, Notice the arms and the waist on the the image. I understand the weight painting method or so I think but I am not getting the desired results. Does anyone have any suggestions?
Thanks
Al
|
|
By Delerna - 10 Years Ago
|
Its tuff to say without seeing everything.
When I get issues like that I go here to what the first image is showing to try and determine what is causing it.
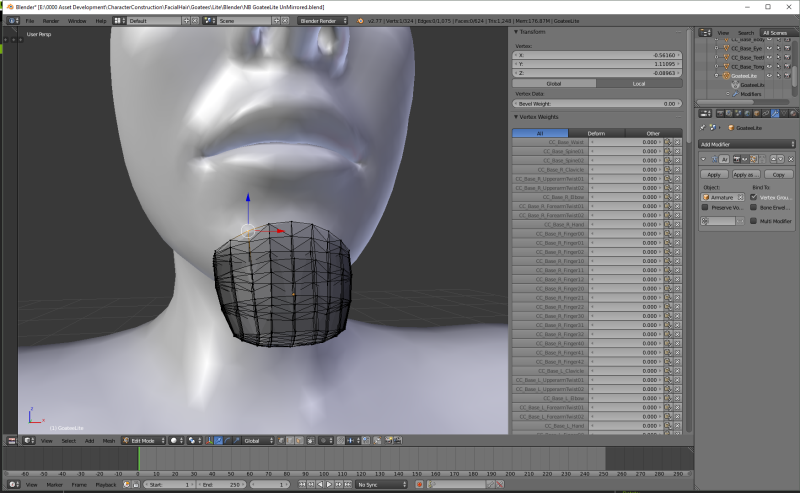
In Edit mode select one of the vertices that is having the problem and you can see the weight values for each of the bones for that vertice.
Generally I find that some unexpected bones have weight values not equal to 0. Generally animations look ok in Blender but when you bring it into iClone you get issues similar to yours
How that happens I am not 100% sure but the second image shows my suspicion. I will test it out proper one day just so I can be sure
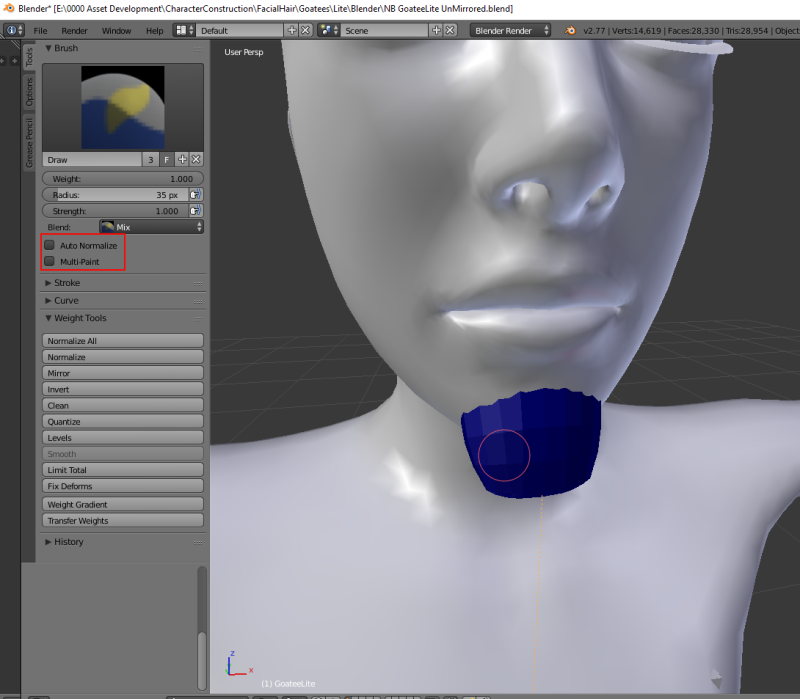
OK In the next image I have found (I think) that during manual weight painting having the multi paint check box ticked causes weight values to be added to some totally unrelated bones.
I always have it unticked now and haven't had the kind of problem your having happen since.
I also find Auto Normalise can cause issues too (I think) Usually it is OK to have it checked but sometimes I have problems Untick it redo the rigging and problem is gone.
I think it might have something to do with what it is your modelling.
Just a note, In blender both of these checkboxes work without any problem. Its just when you bring it into iclone and sometimes CC the problem appears.
|
|
By JIX - 10 Years Ago
|
|
Made the same experience. In one thread some were already longing for tutorials concerning this issue and also some weighting tools inside CC in the long run.
|
|
By eternityblue - 10 Years Ago
|
|
I have a weight paint issue too. When I use a mesh imported from Poser etc. any 3d modeller I guess, I can transfer the weights just fine, but when I try creating my own mesh, say just add a square primitive as an example, and then go to weight paint, when I transfer the weights, all the setting for the weights are greyed out, so I can't choose 'by name' and it doesn't import into CC correctly. Any ideas? The mesh is parented to the body fine.
|
|
By Delerna - 10 Years Ago
|
Here is my process
1) create my cloth mesh fitted to the cc character I imported
2) in object mode select the mesh i made then shift select one of the characters bones
3) press control/p and select armature deform/with empty groups
4) select the characters body then shift select the mesh i made
5) goto weight pait mode select transfer weights and then set source = by name
6) click the transfer weights button again just to be sure the weights transfer
Hope that helps, always works for me
I have kept this simple by just listing the steps and not explaining what they do.
|
|
By eternityblue - 10 Years Ago
|
|
I think I traced it to not having a UV map. I was just able to get draw mesh imported into CC, so that's great :)
|
|
By eternityblue - 10 Years Ago
|
Scratch that, it was Global Undo somehow was getting enabled/disabled, not sure why but that is what caused the operator redo panel to get greyed out. AT least now I know, until I forget...
|
|
By eternityblue - 10 Years Ago
|
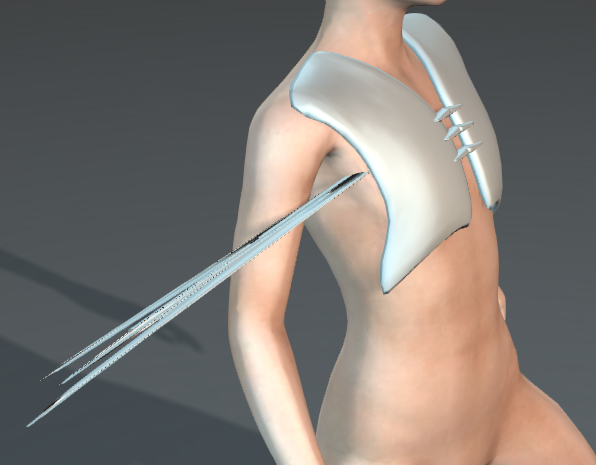
How about this issue? I would think it is the weight map, but it seems to all be blue. Would anything else cause this? It looks fine in t-pose, but as you go though the calibration it is obviously broken somewhere.
(EDIT: I think it is something with the mesh and not the weight map at this point)
|
|
By eternityblue - 10 Years Ago
|
And it wasn't the mesh but something about the weight map. I deleted all of the vertex weights entries and redid the weight transfer and it is fine. I keep doing something occasionally that messes up the transfer, but at least I have a work around until I figure that out.
I'm really confused about how to weight map for CC using Blender. Is there a clear set of steps I could follow?
|
|
By Delerna - 10 Years Ago
|
I have had that vertice spike happen to me. In my previous post with the images . I found in the vertex weight list for the vertex that was spiking had a -1 value on some or one of the bones, cant remember now. How it got -1 i am unsure. Cant enter -1 manually. However i suspect that manually adjusting the weight painting with the auto normalize option ticked may have had something to do with it. Once you have some understanding of the basic steps of the weight the painting process then the way you do it depends on what it is your weight painting. In my opinion, and it is only my opinion. After you learn the basics there is really only one way to learn how to weight paint what you make....trial and error, map and test to see what it does. But if you mention what you find confusing i am sure someone will try and help if they can
|
|
By mrmdesign - 10 Years Ago
|
I got strange spiking if I made any changes to the UV map or geometry of the clothing after it was parented to the mesh. I could not fix that particular item even after clearing everything and starting again. If I re-unwrapped the UVs, I was able to sort it out but it was not an option as I needed the UVs to match a certain texture. Everything worked perfectly in Blender and the problem only surfaced in CC.
This makes me think that the UVs are integral to correct weighting in CC.
|
|
By mrmdesign - 10 Years Ago
|
I know how to properly skin, thanks sw00000p. Just sharing my experiences.
It took ages to get it all working in the way that cc wanted it to but I know how to work the cogs now. The sheer amount of morph targets means you have to be extremely precise if you want to create a universally compatible outfit. I am always learning (and I never give up) but it was really bugging me how everything worked perfectly in Blender and Unity but not in cc. I have figured it out now though (I think) ;-)
|