|
By Lamias - 9 Years Ago
|
It's the first time i am experimenting with CC Characters, and today this problem occured.
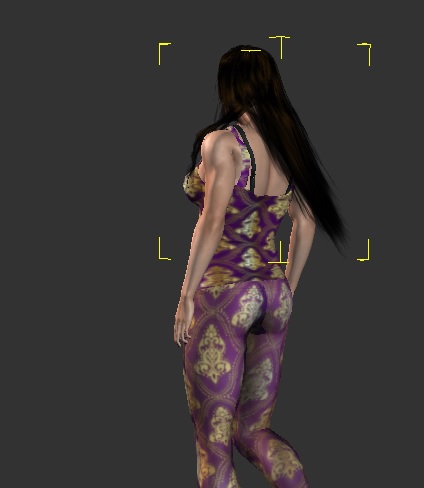
I applied a walking animation in a CCC, and in some instances, the hair appears to fall through the blouse.
Screenshot:

What is the solution here? I tried modifying the collision shapes, but no matter where i put them, this is still happening...
This is the final render and it looks weird... :(
Thanks!!
|
|
By justaviking - 9 Years Ago
|
50% guesswork here... I'm not at my iClone computer at the moment...
I think there is a "cloth-to-cloth" collision setting in the Project Settings. Off by default.
Turn it on, and see if that helps. I'd love to know the answer.
|
|
By Lamias - 9 Years Ago
|
@Justaviking,
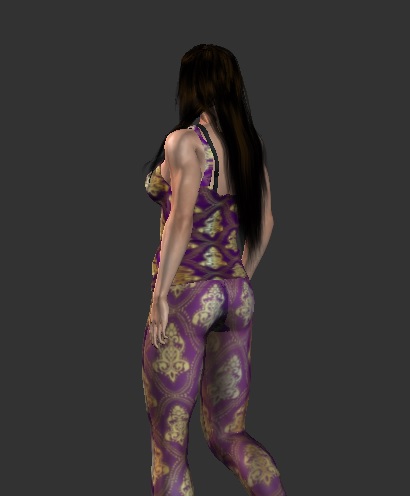
I tried it and it helps a bit, but it's still not good. After i played around with the physics, the best result looked like this.
Hair still looks weird because of the collisions. It stays like this in the entire walking motion. (And this result is with damping in 0,01 and high elasticity. Before i tweaked those values the hair was practically immovable) :P
@Sw0000000p,
I found the tutorial, and i had actually seen it before, but i don't understand if it helps my situation.
My problem seems to be visual and not technical, because when the character walks the hair flows normally, and only in some instances (4-5 frames in each walk motion), the hair disappears inside the blouse.
Any ideas..? :(
Thanks for replies!!
|
|
By justaviking - 9 Years Ago
|
@Lamias,
I keep looking at the last picture, I find myself wondering... I the hair actually "under" the blouse, or is it more of a "display" issue where iClone is drawing the wrong object for some reason.
That must be very frustrating. If you've been reading the other threads, you'll see that I can sympathize with you.
|
|
By Rampa - 9 Years Ago
|
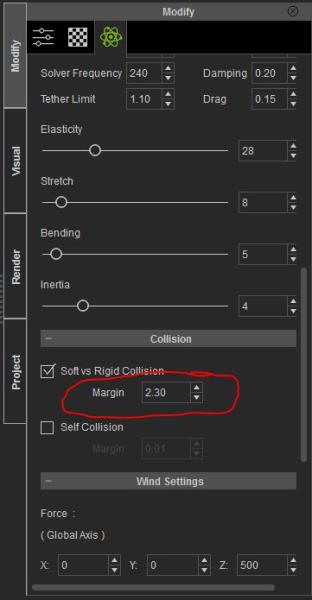
I would give the hair a greater margin then the dress has. I checked the default dress, and it has a collision margin of 2, while the default hair has a margin of 2.3.
If you crank up soft physics collision, your likely to end up with "Medusa hair", where the two layers are colliding so much that it cannot settle.
|
|
By Lamias - 9 Years Ago
|
@justaviking
That's what i think too. It's a display issue because in some frames the hair is displayed under the blouse, and in other frames it is displayed normally.
Thank you for your sympathy. Does this mean that it can't be fixed? Is it a hardware issue?
@Rampa
You are talking about changing the margin in Iclone or in CC? I didn't quite understand what you propose
Thanks for replies!! :)
|
|
By Rampa - 9 Years Ago
|
The margin is the distance that PhysX tries to keep the soft cloth from going under. The larger the margin, the further away the physics part of the hair will be from the surface (avatar's collision shapes). It is in the physics settings panel in iClone.
Here you go. :)
|
|
By justaviking - 9 Years Ago
|
|
Lamias (4/28/2016)
@justaviking
Thank you for your sympathy. Does this mean that it can't be fixed? Is it a hardware issue?
I was working with some soft cloth lately, so I know what a struggle it can be. I didn't mean to imply it can't be fixed or worked around.
It's interesting that your observation also lead you to suspect more of a "visual" issue than a "physics" issue. It's hard to tell from a static photo or two.
Anyway, pay much more attention to Rampa. He is providing potentially useful information.
|
|
By animagic - 9 Years Ago
|
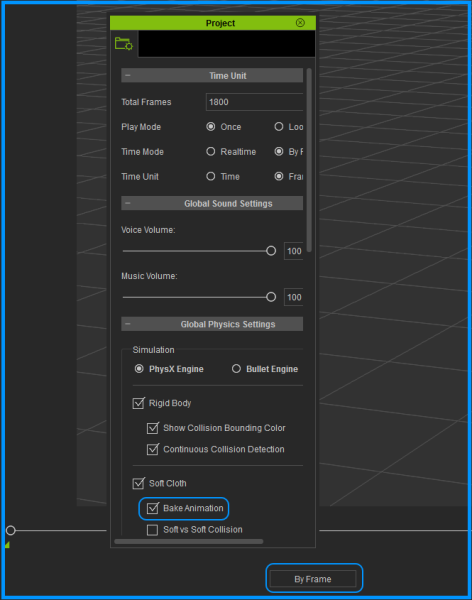
@Lamias: Just in case you didn't consider this yet: it is best to run any soft cloth simulation (clothes, hair) in By Frame mode first while baking the animation and then turning off soft cloth physics altogether.
The Time Mode switch is under the timeline slider (settings: Realtime and By Frame).
The option to bake soft cloth animation is under Project Settings (Edit => Project Settings).
|
|
By Lamias - 9 Years Ago
|
Firstly, thank you all for replying!!
@Justaviking
I now understand how difficult it is to work with soft cloth. Maybe RL could improve some things on their part... :(
@Animagic
I only use "By frame" mode when using physics, i know it gives more time for correct calculations. When i am pleased with the result, i bake the animation and turn off physics!! All this testing here is in frame mode :)
@Rampa
I tweaked what u said and the result is good enough. :D The problem is most likely visual, because only from this certain camera angle does the hair appear wrong.
I also noticed that the pants with the blouse exhibit the same problem. I am giving u a gif with the problem, notice the place where the blouse and the pants intersect, and you will see a flickering... :(

I tried conforming both clothes, the top in the highest values and the bottom in the lowest, but the problem remains. Any solutions there? Or just change the camera angle..? :(
Thanks for the help!! :D
|
|
By Lamias - 9 Years Ago
|
Hey Sw000000p,
I thought about the solution to change the camera angle too... :P
But i don't want to "cover up the problem"...
I paid much money for Iclone and all the content, so i would expect from such a program not to have issues like this.
If the issue i am experiencing is something that occures to everyone and it's the program's fault, then i would like to know it, in order to adapt my thinking.
But if it's only on my pc, the ultimate solution of course would be to change the angle and be done with it. But first, i would like to deplete all the other options... :)
|
|
By Lamias - 9 Years Ago
|
Hahahahha, you are talking about blender right? :D
I have listened to your advice, and started learning Maya. I used it to rig characters and create facial morphs!! :)
In regards to my problem, u think that inserting the character in a 3rd party program and fixing the meshes would be helpful?
Thanks :)
|
|
By pumeco - 9 Years Ago
|
|
sw00000p (4/28/2016)
Note:
The only reason you here me advise other to use Blender is because most ic users can't afford Autodesk and Blender is Free.
"I'm a 3ds Max, MotionBuilder, Endorphin, AE... user...
NOT a Blender user.

|
|
By pumeco - 9 Years Ago
|
sw00000p (4/28/2016)
...trolling and disrupting the forum, again. 
Not really, I just thought the best way to represent the notion that most people only use Blender cause they can't affort Max, deserves a facepalm.
People use Blender cause they're wise and because it's a powerful, professional tool that will eventually be the industry standard.
That's why an ever increasing number of "Max" users are switching to it.
Stop talking misleading bullshit, then people wouldn't need to correct you :)
|
|
By pumeco - 9 Years Ago
|
I suppose you could always change your name out of embarrassment when Max and Maya become nothing more than plugins for Blender :D
|
|
By animagic - 9 Years Ago
|
@Lamias: I think it would be helpful for others to try out what you want to accomplish and see if the same problem comes up. I will try when I have some time. The hair should stay off the body I would think. Clothing is a hit and a miss sometimes. RL has promised a better solution for the collision shapes (if I can find the post...:unsure: ), maybe we need to remind them.
Even though there are many fine third-party tools that could be used, you're right to want to accomplish this in iClone, as do I.
|
|
By justaviking - 9 Years Ago
|
Coincidentally, I had this happen last night...
It used to work fine, but I played with the hair physics settings, and used on of the "built-in options" for hair settings. I don't remember which one, exactly. I adjusted the wind some, and after rendering, now her hair impacts into the body and goes under the strap of her dress.

|
|
By pumeco - 9 Years Ago
|
YAAAAAAAAAY :D
|
|
By justaviking - 9 Years Ago
|
Knowing the tools will get better provides comfort.
Knowing what to do with the tools until then gives results. (Even if that includes Blender, Maya, or whatever, right? ;) )
So... hair that goes under clothing or into the avatar's skin...
I have two pictures showing the physics settings for the hair.
One set gives the bad behavior shown in the picture in my previous post.
The other set results in well-behaved hair.

I am NOT claiming these settings result in universally great hair. I am only saying one set goes into the collar bone area, the other does not.
I have played with some individual values, but have not yet figured out which one is the most magical one. It's very likely some combination. I was really hopeful the Solver Frequency would do it, but that setting alone does not fix the "bad" hair.
I also played with the avatar's collision shapes, but that did not help the bad hair stay on the outside of her chest.
For now, I have to get back to the project using the "good" settings. If I figure out the secret sauce, I'll certainly share it here.
|
|
By Rampa - 9 Years Ago
|
|
It's that margin of ".01" that was the main culprit, methinks. But the inertia can play a pretty big roll as well. It's best to keep it low for hair, as you discovered in column 2. I discovered that with my pseudo-strand hair, the more inertia, the more the strands could widen out flat. It makes it more "flingy" (scientific notation ;) ).
|
|
By justaviking - 9 Years Ago
|
|
rampa (4/29/2016)
It's that margin of ".01" that was the main culprit, methinks. But the inertia can play a pretty big roll as well.
I could swear that was one of the first things I tried. Really. I swear I tried that right away. That, and the Solver Frequency.
But before typing this response, I went back to the "bad" settings and changed ONLY the margin. Well what do you know? It did seem to be the silver bullet this time. I must have had some other value out of whack, or maybe I hadn't changed it enough, or changed another value at the same time. I know that was one of my top two or three suspect values.
What's really frustrating about it, is the hair was behaving fairly well, until I clicked on the on the long hair presets. You'd think that the presets in iClone would give good results, but a couple of them are absolutely horrendous (at least for this hair, even though I was trying the long hair buttons).
Well, thanks for making me take one more look at it. There is no doubt, though, that the values interact in ways that aren't always intuitively obvious. Sometimes plain stubbornness to keep at it until you get a good result is a valuable trait.
|
|
By pumeco - 9 Years Ago
|
The classic problem of having a bunch of paramaters and not knowing the exact outcome of each (the problem Dennis speaks of) is something that could be fixed by 'Paramater Modulation'. I believe that would be the right term for it, meaning the adjustment of one paramater automatically modulates (changes) others. With the cloth simulator, paramater modulation could be used to prevent these problems you're having by having the ability to adjust other paramaters for you, based on the paramater settings you already have, and the parameter you're currently changing. It's something that should always have an override, but such things can help in preventing things from going completely crazy and out of control.
|
|
By justaviking - 9 Years Ago
|
This just a tease (like a movie trailer)...
I made a big improvement today. I'll write up the details a bit later. ;)
justaviking (4/28/2016)
Coincidentally, I had this happen last night... It used to work fine, but I played with the hair physics settings, and used on of the "built-in options" for hair settings. I don't remember which one, exactly. I adjusted the wind some, and after rendering, now her hair impacts into the body and goes under the strap of her dress.
|
|
By justaviking - 9 Years Ago
|
I know this was briefly mentioned earlier in this thread, but I want to draw attention to the "custom" collision shapes you can make.
In the picture below, I selected the upper chest area (shaded in green) and then clicked the "Add Shape" button.
You can double-click on the name and type in your own name.
"Capsule" makes a nice Bound Type for bodies.
Press W, E, or R to activate the Move, Rotate, or Scale gizmo.
Then you position the shape and move it where it's needed.
To fix my avatar, I did three things:
1) I moved and rotated a couple existing shaped into better positions. The original ones (from Reallusion) protruded down into the body, which is why you see hair going into the chest in my previous picture.
2) I added a couple small capsules to align with the dress straps.
3) I added one long capsule (stretched using the "scale" gizmo) to go across the back from shoulder-to-shoulder. I could also have used sphered on the shoulder joints, but this worked well.
After doing this work on the collision shapes, I was able to greatly decrease the "Margin" for the collisions again, from 2.8 down to 0.5 and even less without the hair going under the skin or beneath the strap of the dress.
I encourage the OP to go back and study this some more. I know he said he moved a collision shape, but maybe adding a new on in the small of the back would also work very well.

Also note that on a NEW PROJECT...
a) Added CC avatar Natalie
b) Added "long hair"
The project has a default Soft-Vs-Rigid margin of 2.0 which results in a large gap between the collision shapes and the hair.
That can be dialed down a lot... if your collision shapes are properly positioned.

Lastly, notice that selecting a Hair "Preset" might result in totally HORRIBLE results.
In this case, I picked "3_Wavy".
That set the Soft-Vs-Rigid Collision Margin to 5.00. Gaagh!
That was one place I went wrong the other day. I tried a built-in hair preset, assuming that would help me, but it only made things worse. Now I'm learning why.

Have fun. :)
|
|
By Lamias - 9 Years Ago
|
Wow, this is all extremely helpful!!!
I will get down with it today, and i will post the results!!
Thank you so much Justaviking, and thank all of u guys for the advice and the willingness to help!! :)
|