|
By aknzrdude - 17 Years Ago
|
Some background: I am in the process of creating a new movie which is tentatively titled - Voyages of the Sojourner - a steampunk themed movie set in 1880's with some of today's technology. With this thread, i wanted to start a diary on how i put together the movie. Note i'll assume you are familiar with the user interface. WARNING I expect this thread will be graphics intensive so be warned.
How i approach movie making in iclone
Obviously everyone approaches movie making differently. I have always focused more on visuals first, story second (sacrilege!) but i typically would fart around and design a set or character and suddenly a story idea emerges. This is true with this Steampunk movie. I first designed some characters and the idea emerged. But hey whatever works for you

IDEA # 1 : A Movie is a bunch of scenes connected by the plot
The sentence above pretty much sums up how i approach the movie. i break the story down into a bunch of scenes. One key point is the visual style, costumes etc.. must sort of be the same through out. One of the scenes for my movie involve a captain sitting in his cabin contemplating the journey - so we will use this diary to describe how i approach this
IDEA # 2: Each scene might involved many different projects, or might require rendering many different footage, requiring an external video editor to assemble them all later
First Steps -collecting the elements
1) i determine i need an ocean scene where i can show the ship bobbing in the water, this establishes that our character is a captain of a ship
2) I need an interior scene where the captain is in his cabin. I go over to images.google.com and search for images that help guide me. I go to 3D Warehouse to see if one is already created to my satisfaction. If i can't find anything my options are to create my own using 3D blocks or buy one already made. Head over to RL's store or coolcreators.com or clones2go
in this case i found a galleon cabin at clones2go
I also needed a ship for external shots so found one at 3D warehouse
I also needed some crew members and to save time creating my own, went to coolcreators and got Alley's Medieval pack that can double as crew members
3) i need to decorate the cabin - to personalize it for the captain - so back to 3D warehouse i go and download some props which i convert using 3D exchange. I could not find a photo frame i liked so will make my own using 3D blocks
so now we have almost all we need but do need to make a few ourselves
Here's a list of various elements that I'll be making for this scene
1) make the ocean scene - sky, waves, water, ship and set up the camera
2) decorate the cabin, create photo prop
3) set up lighting for the cabin
4) set up the camera angles i will be using to film
6) edit the captain's motions
7) design the captain's costume
|
|
By aknzrdude - 17 Years Ago
|
Creating a Basic Ocean
see the end result video here
here's how we got there - CREATING THE OCEAN
1) basically use iClone's built in WATER - drag it into the workspace. The WATER prop has built in animated bump maps which simulates water moving

2) now for the sky, we can use one of the 3D SPACE props - these are props that goes over your scene as skys, ceiling, even caves. Basically put a sky prop to your workstage, apply texture to it, then animate it
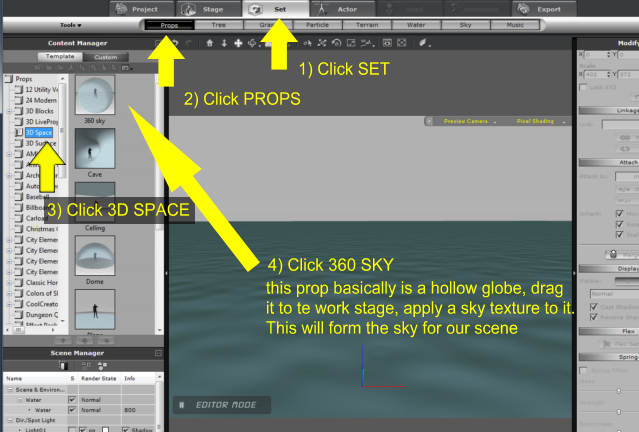
3) Here's how you apply texture. I use google to look for sky pictures i can use as texture maps
|
|
By aknzrdude - 17 Years Ago
|
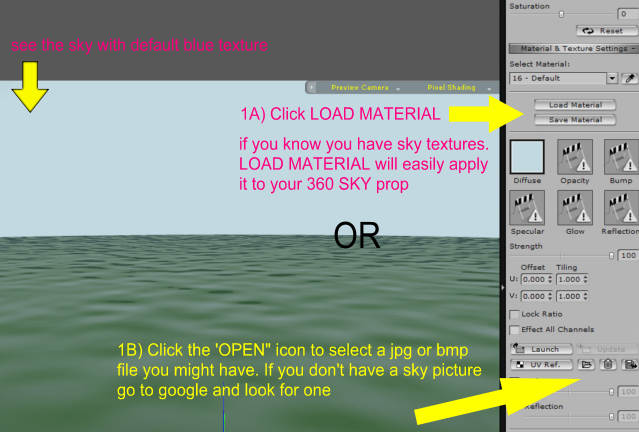
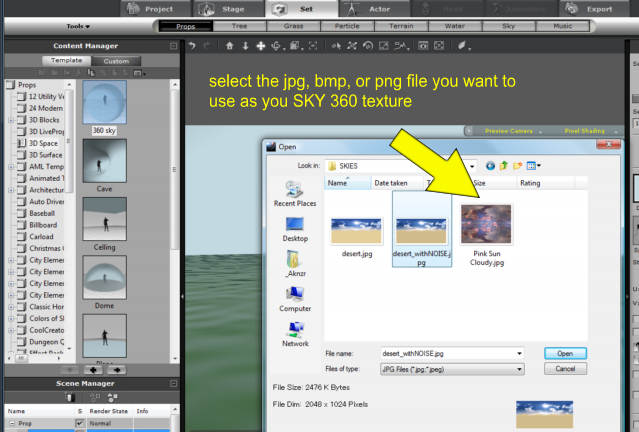
4) Click on DIFFUSE, then the OPEN icon and select the image you want to use for your sky
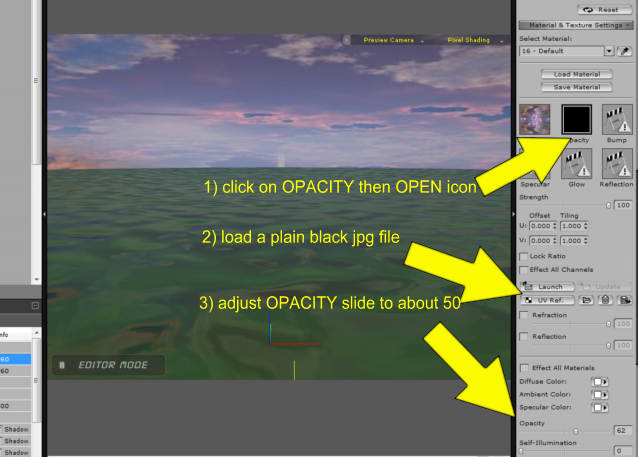
5) Now Click the OPEN icon again and this time click on OPACITY we'll add a plain black jpg. Adjust OPACITY strength slider to ~50 Why? because i want to create a SKY that is somewhat transparent. Why? becuase i will add another SKY prop, make it a bit bigger than the first one to become an outer sky - the transparency will help the camera see the outer sky prop. This way when i animate the sky prop it will look like i have layers of clouds
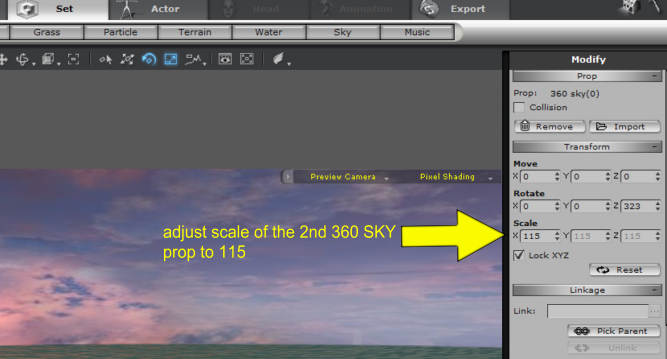
6) Now save the prop by clicking the "+" on the left panel. Now add this same prop to the scene. You should now have 2 360 SKY props on your content manager

7) Go to the transform section (top right section of the MODIFY section) and adjust the XYZ size of one of the SKY props to 115 - this becomes our outer sky layer
|
|
By aknzrdude - 17 Years Ago
|
ANIMATING THE SCENE
8) now we prepare to animate the scene. First off i can adjust the direction the water is flowing. To check, click on PLAY on the timeline just below the workstage

Use the WATER MODIFY panel, select DIRECTION and change the number to change the direction of water flow -try different numbers to get a sense of direction. You can also change the color
ANIMATING THE CLOUDS
9) for this scene, i want the clouds moving in one direction. with 2 SKY props I have 2 layers of skies sop what I'll do is make each sky prop rotate slowly but at different speeds to simulate layered cloud moving

10) Adjust the motion of the first SKY, by using the TIMELINE and the ROTATE control. Then repeat the same procedure for the second SKY but this time set the ROTATE to a lower number than the first SKY. As an alternative you can leave this one alone not have it move

now you see how the video shown above (or linked here) was created. Next well talk about lighting and camera. But first i gotta sleep
|
|
By gizmo - 17 Years Ago
|
|
I like the idea of two sky props aknzrdude. Had not thought of that one. Good thread.
|
|
By AverageJoe - 17 Years Ago
|
|
Definetly a good thread, and I look forward to continued postings...
|
|
By sumthinwong - 17 Years Ago
|
|
Finally a real "how to", thank you Aknzrdude for your time in this endeavor. Maybe some help from the others of us who could contribute from time to time or jump in with additional info. Thanks again for starting this I look forward to its continuation.
|
|
By sisch - 17 Years Ago
|
|
Thank you - for one thing it is great to see how others are working, and for me this is especially great - I'm learning a lot! :)
|
|
By aknzrdude - 17 Years Ago
|
ANIMATECHNICA's Heart Ache prevention tip - always save the project after you're done or better yet while you are doing it! when I'm working on a movie before i render out or add a new camera i save the project. Create a directory in your custom folder, label it TEMP WIP - and save any work in process projects there - in case you screw up or iClone crashes. For out little project here, i will be converting the scene into a night scene so i will save what i have so far
LIGHTING BASICS
Ok we just finished our first movie set, now let's think about how we want to light it. I'm no expert in lighting but i basically do everything by trial and error and through this have developed my own flavor on how i light things. More on that later. First let's talk about iClone basics
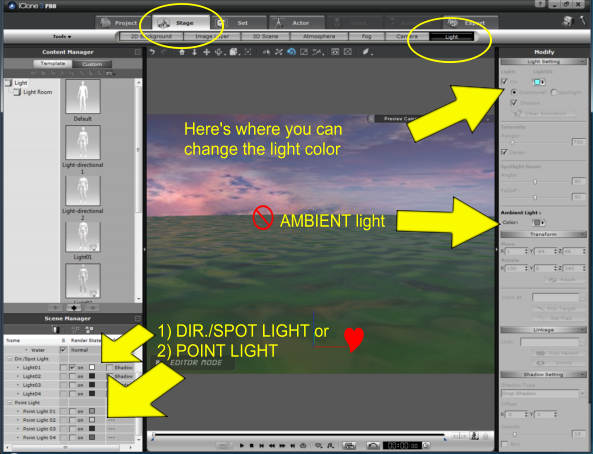
We have 3 light types in iClone
1) DIR./SPOTLIGHT - DIR refers to directional light - this lets you shine the light along a specific direction. Great for showing sunrise and sunsets for example. SPOTLIGHT - well i think it's self explanatory. Both of these lights you can animate and cast shadows
2) POINT LIGHT - looks at these as local lights, they only affect the immediate vicinity. Great for simulating light coming from lamps, torches. I use this primarily in my movies. These lights you also animate (move, change color,intensity n rotate) and link to objects
3) AMBIENT light - this light can be viewed as your global light or sunlight - it lights up in all directions. It also gives some iClone movies that 'flat' cartoony look. I seldom use this light. It is defaulted to GRAY color but i usually turn it to BLACK
now we will use a combination of texture adjustments and lighting to make our scene look like it is night time
|
|
By aknzrdude - 17 Years Ago
|
TURNING DAYTIME INTO NIGHT
see sample of this section's output video
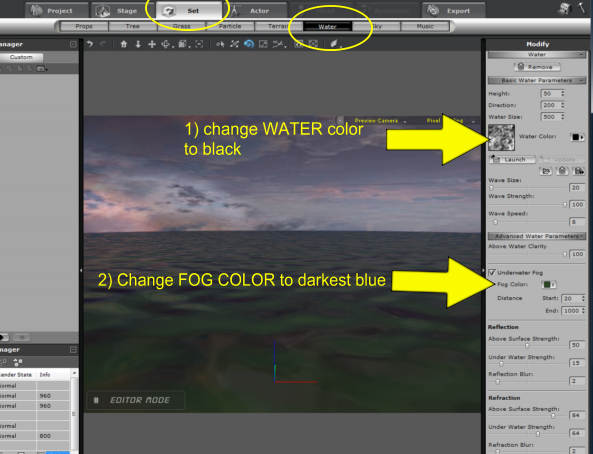
1) Back to our original project, to make it look like its night time,my first step is to adjust the color of the WATER
 [/img] [/img]
2) Now let's work on the SKY 360 prop - 2 ways to do this - a) change the texture (as described in STEP4 of my previous post) and load a night time sky picture OR in my lazy method case i just turn down the SATURATION of the material - this effectively removes the color from texture so i am left with a greyscale picture as my texture map.

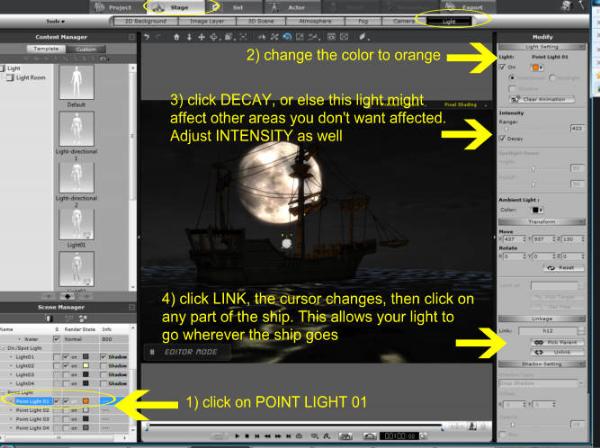
3) now we almost have a night time scene. Let's tackle lighting - go to STAGE-LIGHT and follow the image below.
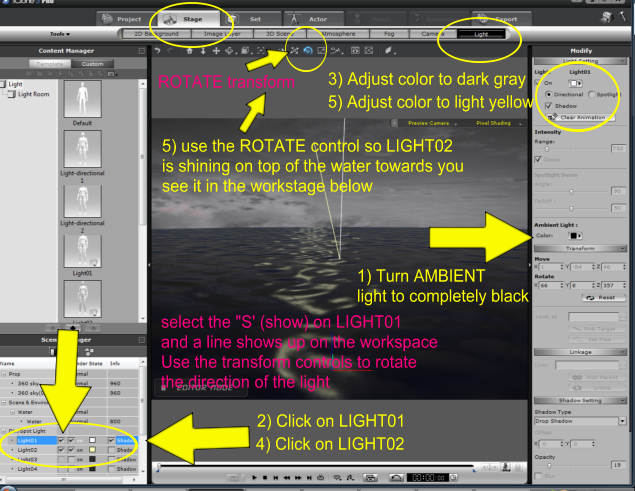
4) ok got my night scene - you can adjust the lighting, or lower the BRIGHTNESS of the SKY texture map to make the scene even darker, i purposedly left it somewhat lighter for this tutorial. Now i realize it could benefit from having a moon. To add a moon, i go to images.google.com and look for a nice moon picture

5) Now i need to convert that pictureinto a prop so i load a BILLBOARDprop
6) Now go to PROPS - MODIFY - MATERIAL and we'll work with the material maps

there we now have a usable night time ocean scene - don't forget to save the project- in fact everytime you create a new prop, save that prop in your custom folder
|
|
By aknzrdude - 17 Years Ago
|
7) my scene is not yet done, i need to add a ship and have that ship move across the water
so off to coolcreators, clones2go and 3D warehouse i go to look for a ship - got one from clones2go and used it below

8) now let's apply some lighting on the ship to bring out some of the details of the ship - but if you are ok with a silhouette you can leave it alone - me, i like details so we'll us a a point light and have it linked to the ship so it allows us to see some details of the ship
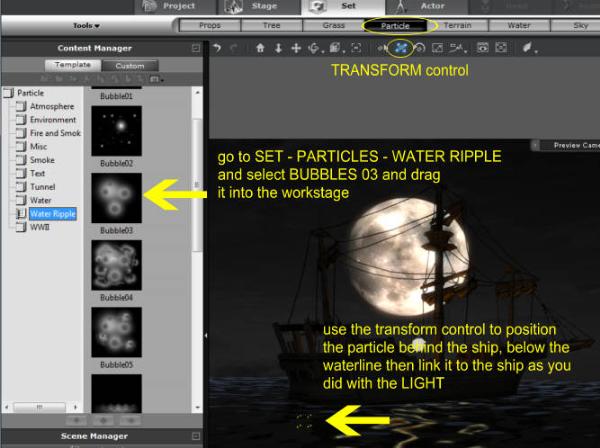
9) Thinking ahead, now when my ship moves i want it to have some sort of water wake - so some trial and error with particles led me to choose one and use it to simulate the water wake
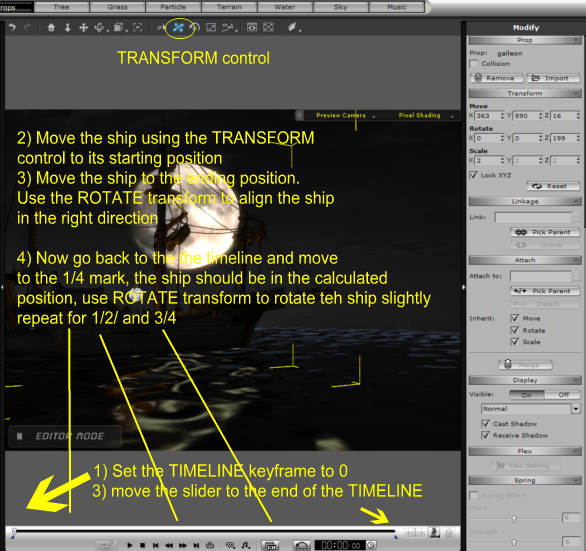
10) Now lets animate it - review how we did it above when we had the SKY rotate. Same thing here. The idea here is we tell iClone where the ship starts and where it ends, iClone calculates where the ship might be in between these two points. After we do this we jump into around the 1/4 mark of the timeline, the 1/2 and the 3/4 mark and ever so slightly adjust the ship's rotation in each of these points. This simulates the ship moving/bobbing with the waves
Okay so we now complete the first scene - at my discretion, i can tweak the entire scene more to improve the look, the motions, add rain and fog etc..
11) Now notice we did not touch the camera, everything is captured from the point of view of the PREVIEW camera. we'll work on the other cameras later.
RENDERING
12) now i am ready to render the scene - if you go to EXPORT you will see the various formats you can export (image, video, image sequence, widget) select VIDEO. Under FORMAT i always export uncompressed AVI for my movies. I use an external video editor to assemble the movies and from there export to the format i want to use for uploading to YouTube. This way i always have the uncompressed MASTER in case i need it in the future.
WATCH VIDEO HERE
since we put all that work in, here's a rendering of the image
|
|
By Alley - 17 Years Ago
|
|
This is so incredibly awesome of you to share all this help. I have long admired your lighting and other techniques and hadn't a clue how to achieve the things that you manage to achieve. Thanks. :kiss:
|
|
By afterThought - 17 Years Ago
|
This is an awesome guide to adding those nuances that can take a film from good to great. Thank you for sharing your process with us! It's greatly appreciated.
aT
|
|
By aknzrdude - 17 Years Ago
|
next up well work on the captain's cabin scene. This section will be hefty - it will include building the cabin using 3D Blocks, lighting, motion layers, motion timeline editing, camera animation and the camera switch.
Stay tuned
here's the completed scene we will go through step by step to build

|
|
By Capemedia - 17 Years Ago
|
|
Gabe you a gentlemen in every sense of the word and sharing this with other iClone users only adds to that. Doing this not only give us a glimpse of a master iClone craftsman at work, but helps so many other people in understanding how to get the best out of iClone. Thank you so much for having the idea for this and then implementing it. I take my hat off to you sir :) Cape!
|
|
By jleao - 17 Years Ago
|
|
Just amazing. I just bought iclone and we newsbys have so many things to learn that it can get difficult. So, it great we can follow the best and learn with them with projects like this. Many, many thanks for sharing your knowledge.
|
|
By Illustrator Cathy - 17 Years Ago
|
Wow Gabe - This is totally amazing! I am going to ad a link to this on the Wiki. Thank you so much for sharing your expertise with us!
Cathy :hehe:
|
|
By Paumanok West - 17 Years Ago
|
|
Gabe, I really love your ship's cabin. The chart table is pretty modernistic, though.
|
|
By aknzrdude - 17 Years Ago
|
|
LOL paumanok yes still in the process of either getting one from 3D warehouse or building it out of 3D blocks - - for now it is a palceholder - came from an office set
|
|
By rgrove - 17 Years Ago
|
|
thanks so much for sharing this tutorial/approach to production in iClone. This is a much needed practical write-up. Hat's off to you, sir. :)
|
|
By aknzrdude - 17 Years Ago
|
Thanks for the supportive comments folks - i was going to write a lot more today but a heat wave hit the bay area (northern california) and it was just too hot in my room/office to do any work - so i only have a short section today
We are going to create the cabin scene along with some character animation. I did find a ship cabin that i will use for the movie but for the sake of this tutorial, i'll walk through making one
USING 3D BLOCKS
well i am not a proficient modeller, and am too lazy to learn other software, Sketchup for example, so i decided that I'll make use of the 3D BLOCKS that come standard with iCLONE. Think of it as LEGO blocks - position it, combine it with other objects and soon you'll have a set
Using 3D BLOCKs is most effective when paired with the right texture and lighting. So we'll talk a bit about textures and a couple of good habits to adopt
AnimaTechnica Good Habit #1: Texture harvesting - everytime you run into a texture, save it. At times when i see a nice floor pattern in the mall, or nice clouds in the sky, i take a picture for future use as textures
AnimaTechnica Good Habit #2: Create a folder of textures you've harvested - label them appropriately - tiles, floors, windows, doors, fabrics, metals etc..
Let's talk about iClone material controls - let's just focus on 3 things most commonly used in this scene

for our cabin we will use primarily the DIFFUSE map and the BUMP map
Think of the DIFFUSE map as essentially a decal or sticker you would apply to an object - the higher the resolution of this map, the better looking the texture but the bigger the file size.
The BUMP map simulates a 3D effect on your object - for example even if your object is flat, with a bump map it will look like it has bumps, dips etc..IMPORTANT - bump maps are most visible with the right lighting - too bright a light washes them out and you won't see the effect
OPACITY - simple concept anything black will become transparent, greay semi-transparent and white -opaque - you can use this to etch out shapes, holes in an object but note this is only good for medium shots, for close ups, it does not look good
one thing to note, if you load a gray scale image into the bump map, the lighter colors become bumps and darker colors are the dips
TILING - this refers to how many times you want the DIFFUSE map to be repeated. You can repeat the DIFFUSE map Horizontally or vertically
OK we've enough of the basics to do some damage
|
|
By aknzrdude - 17 Years Ago
|
BUILDING THE CABIN
to build the cabin, we will use the 3D BLOCKS and most specifically the WALL and the FLOOR props.
1) Go to SET - PROPS - 3D BLOCKS - WALL AND FLOOR and drag the FLOOR into the workstage
Use the TRANSFORM controls to position it appropriately.

As before, i would go to images.google.com to look for wood textures - load this texture as DIFFUSE and also BUMP. Now CLICK on BUMP and adjust the SATURATION slider down to zero to make the BUMP picture gray
Once you have both DIFFUSE and BUMP maps loaded, click on SAVE MATERIAL to save both of these maps into one file. This way when you want to apply the same look to another object, you can then just reload this material file instead of going through and loading diffuse and bump separately
2) Load an AVATAR into the scene this will help us determine the right size cabin to build- use the XZY TRANSFORM controls on the MODIFY panel to resize the FLOOR to the appropriate size

|
|
By aknzrdude - 17 Years Ago
|
3) Go back to the PROP section and this time, drag a WALL prop to the scene. go to MODIFY panel and click on LOAD MATERIAL and load the material we just saved in the previous step
Now go to UV SETTINGS and click on BOX - this applies the texture to all 4 sides

4) Repeat STEP 3 to bring in WALL PROPS to form the LEFT and RIGHT side of the cabin. Use the TRANSFORM controls to position them appropriately. You can use the Texture controls to change the orientation of the DIFFUSE map -

5) Repeat again and bring in WALL props,angle them slightly to form the roof of the cabin

6) Now go to PROP - 3D BLOCKS and select BOX_001. Resize this so it goes from floor
to ceiling. LOAD MATERIALS and apply it to the prop. At your discretion you can select a different texture. Do it again to form another column.

At this point the cabin looks pretty crappy but not to worry since we will be filming inside the cabin and not the outside. so now we'll zoom in to the interior and start decorating it.
|
|
By aknzrdude - 17 Years Ago
|
DECORATING THE CABIN
Now that we have the basic cabin structure, we will now decorate it - we will build a table using 3D BLOCKS, build some windows, and also import some props from 3D Warehouse
7) Let's drag a WALL prop again, adjust position and rotation as needed - click DIFFUSE and load a new material for our table top. Now use 3D BLOCKS COLUMNs for the table's legs. Once you have assembled the parts, make sure you attach the prop parts to each other so the table becomes one prop rather than a collection of props

nice little table eh?
8) Let's add some windows, use the same WALL prop as before, resize to fit and change the DIFFUSE map. Go to images.google.com and search for a window image and use that

9) Now we can build more stuff or raid 3D warehouse and leech off other people's work

10) i want to add a touch of family for the captain so we will build a little picture frame

11) really straight forward, we will add a another...you guessed it WALL prop..resize and position it using the TRANSFORM controls. Now back to google to look for a picture frame i like.
i found one, added the photo of the captain's aunt and uncle. This will be your DIFFUSE map

12) Now load the frame photo into your photo editing software and turn it into a mask - basically make all parts of the frame white and holes black. This will be your OPACITY map.
Go back to iClone, and apply the DIFFUSE and OPACITY maps to the prop

don't expect to use this prop for closeups, should be good for medium to long shots only.

13) I'll build another prop- drag a 3D BLOCK - 3D SURFACE - PAPER_B prop to the workstage
and apply a DIFFUSE map using an old map of the world. Also add another 3D Warehouse prop in the form of a book
so now we are done with the set design, lets look at lighting. As you can see below, the image
is washed out, not too appealing. We 'll have to adjust the lighting.. as i said before I always turn AMBIENT lighting to BLACK (if i want to have that dark contrasty look)

|
|
By aknzrdude - 17 Years Ago
|
14) Ok now i like using orange lights and pink lights - i usually position them at 45 degree angle from the character, orange on the left, pink on the right- this is what it looks like below - so as you can see, the previously drab looking cabin can be made to look decent


|
|
By gizmo - 17 Years Ago
|
|
Sorry about the heat wave akn. Me . . . I'm sitting here in my balaclava and drinking Bovril. Your doing a great job. There seems no doubt there is a need for step by step tutorials which is proven by the amount of hits you have already received on this thread.
|
|
By Dulci - 17 Years Ago
|
|
Thank you so much for this - the information you're providing is incredibly helpful and instructive.
|
|
By Peter (RL) - 17 Years Ago
|
|
Outstanding work Gabe. Thanks for taking the time to write this extensive production diary. It really is essential reading for everyone to see how a iClone pro like yourself goes about creating a project from scratch. I'll pin this so it always readily available. :)
|
|
By sumthinwong - 17 Years Ago
|
|
Thanks Peter, I was hoping that this good piece of work would be pinned. Please ask RL to contract to produce more.
|
|
By aknzrdude - 17 Years Ago
|
ok ma-ladies and germs, we not got the scene we sorta like now we will work on animating the character. as you can see, i still have a default character in there - you can change this now to the desired character you want to use
SOME BASICs on EDITING MOTIONS
First we need to get a basic understanding of how iClone's timeline works
but first just so we are clear, let's make sure we are talking about the same things
the timeline below the workstage is what i call the playback timeline. You can use it for easy keyframing like we did with the ships motion. Works with props but not so great with character motion For that you need the MOTION TIMELINE which you can get by clicking on the SHOW TIMELINE icon (see below)

ANIMATECHNICA Tid Bit #1: FRAMES in iCLONE - the frame counter is displayed in the animation timeline, you can toggle this display to show the TIME by clicking on the clock face looking icon. You can also use this icon to set the maximum number of frames. For me i use the FRAME display. One thing to remember:
Time in seconds * 60 = # of clone frames
Number of Frames / 60 = time in seconds
so if you have a 3 minute song, you can set your total number of FRAMES to 180*60 = 10800 frames
Conversely if you had 2000 frames, you will render = 2000/60 = 33.3 seconds
ANIMATECHNICA Tid Bit #2 : Adging a keyframe means you are telling iClone to remember and lock down the character's position and pose at this point in time
iClone calculates what happens between keyframes
so if you set a keyframe at frame 0 and another one at frame 100, iClone calculates what happens between 0 and 100. Why is this important? well so if you apply a motion, the start of the motion becomes a keyframe and the pose of the character at preceding keyframe and this new one will be calculated by iClone. example if at key frame 0 my character is sitting down and at keyframe 100 my character is standing up, iclone calculates what happens in between so you see the character transition from one pose to another.

|
|
By omanuel - 17 Years Ago
|
Dear Diary,
Gabe is freakin' awesome. That is all.
Seriously man, this is great thread...very informative with every thing explained to great detail. The screengrabs help tremondously, ...I can see this helping out beginners as well as seasoned iCloners...I haven't used the ocean in any of my iClone animations, so nice to know there is user-written info about it as well as the rest you catologed. Keep it up...if you have the time to do all that :w00t:!
|
|
By Alley - 17 Years Ago
|
|
Hand UP!!! Question from the dummy at the back. Time in seconds * 60 = # of clone frames
Number of Frames / 60 = time in seconds
so if you have a 3 minute song, you can set your total number of FRAMES to 180*60 = 10800 frames
Conversely if you had 2000 frames, you will render = 2000/60 = 33.3 seconds If you are rendering at 30 fps, wouldn't your frames have to be 5,400?? for a 3 minute song, i.e. 180 seconds in three minutes x 30 = 5,400?? I know you are going to set me straight here, so I'l get my dunce cap ready.:w00t:
|
|
By aknzrdude - 17 Years Ago
|
|
yes good question Alley - that was my first impression as well but if you look closely, iClone renders double the frames - perhaps for interlacing purposes? - but never theless it is there a simple test confirms this - render the default 2000 frames and you get 33 seconds of video
|
|
By aknzrdude - 17 Years Ago
|
|
thanksfor the supportive comments O gabe
|
|
By Alley - 17 Years Ago
|
|
Okay, I get it. :) 
|
|
By aknzrdude - 17 Years Ago
|
ok before we go on to animating the character and finishing up our scene, i was asked a question - how do you turn the cabin scene into daytime when AMBIENT light is black?
here's how i do it - keep AMBIENT light black...follow the instructions below and you get a daylight scene with contrasty shadows
also as you noticed in this picture, i populated the scenewith additional props from 3D xchange - carpet, map, flintlock pistol, desk lamp- my theory is a lot of details in a scene can drown out the imperfections as the eye gets distracted. I also positioned the orange point light under the lampshade as you can see

|
|
By aknzrdude - 17 Years Ago
|
MOTION EDITING
now we will go into animation- here's our starting point - avatar standing in the cabin -
the way i envision the scene, the captain is sitting on his chair reading or writing on his journal.
He hears a knock on the door and stands up
some action items we need to do
1) captain look like he's breathing while sitting down
2) cabin is moving as if the ship was moving on the ocean
3) When the captain stand up, his chair gets pushed back a little
- here a video of what it looks like

FASTEN THE PROPS DOWN
1) looking at item 2 above, this means everything in the room should move along with the cabin - so to do this, click on each prop and link them to the floor of the cabin (easy way). Don't forget to link the avatar to the floor
2) After linking, go to the TIMELINE below the workstage and go to FRAME 0, click on the FLOOR prop, then ROTATE the floor slightly, repeat at about 1/4 the lenght of the timeline but rotate in different or opporiste direction as key frame 0, repeat for timeline positions around the 1/2, 3/4 and end of timeline
3) click PLAY in the animation controls and your cabin should be swaying to and fro

EDITING MOTION
First some basics- for editing motions, i typically use the EDIT MOTION LAYER which you can get by selecting AVATAR - ANIMATION - then clicking on the MOTION LAYER button on he left MODIFY section. I also use the ANIMATION TIMELINE as described previously

1) Making sure the avatar is breathing - first things first, the DEFAULT idle motion of iClone is the AVATAR standing up, arms to the side and breathing. It is much easier to modify this than animate a character breathing. So what we'll so is use this motion as our starting point, add a motion layer to position him sitting down, then animate the transition from sitting down to standing up
Start at KeyFrame 0 and follow the instructions below

Remember what i said about keyframes? It locks your avatar's position down in that specific time. So in the above procedure we added a keyframe at around the 400 mark. Why? Because we want iClone to remember the Avatar's pose at this point which is basically the character in a standing position. The idea is we will also set a keyframe where the avatar's sitting down pose ends and he starts to slowly stand up. But more on that later
2) Now we have a breathing avatar, now we need to make him sit -Go to the ANIMATION TIMELINE by clicking on the SHOW TIMELINE button below the workstage - click on FRAME 0
Follow the instructions in the picture

|
|
By aknzrdude - 17 Years Ago
|
you just rotated the thighs as shown below, next step is rotate the lower legs. Make sure MIRROR is checked - this moves both the left and right limbs at the same time so it is much easier to position. Don't worry about the avatar body position at this point, we'll fix that later

3) After positioning the thighs, repeat the same procedure to position the lower legs and the arms

4) now we have a rough position, next we'll fine tune, exit motion layer for now, use the camera positioning controls to position the camera straight on, use the TRANSFORM controls to move the character into the right position on the chair near the desk. After positioning him, you can relaunch EDIT MOTION LAYER to fine tune the arm position

now that we are done, we have an avatar sitting and breathing - now we make him stand up. go to the ANIMATION TIMELINE. Notice the GRAY bar on the PERFORM row? This is the default motion we applied earlier. If you click on this bar it turns blue. Also notice the KEYFRAME we added earlier on the MOTION LAYER row. What we are going to do now is add a keyframe to lock in the avatar's SIT pose at around keyframe 360 - this is so that from frame 0 to frame 260, we want the character sitting down. then it start to stand up until it reaches its full upright pose at Frame 400

5) now that we cut the Default motion in half, let's move the right half so it starts around the keyframe 400. Notice a solid blue bar and a short outlined bar to its left. this blue outline represents the transition time so basically iClone will use keyframe 360 (sitting down) and then start to stand up when the blue outline starts - so the longer the blue outline (you can drag it), the longer the transition time, the smoother the motion. So what i do is move the fully standing blur bar motion to the right and stretch the blue outline

6) Ok we are done with this motion editing. Now to add a little more detail. When the avatar stands up, i want his chair to get pushed back a little so back to the TIMELINE we go - note i ended up tweaking the above so instead of the keyframes at 360 and 400 we were using earlier, i moved them to 410 and 450 - but same principle. Now see below for how to position the chair

ok now we are done with motion editing - next session we'll tackle camera
but [size=4]here's a video of what we've done so far[/size]
|
|
By Bigboss - 17 Years Ago
|
|
Fantastic Thread ! This is a great tutorial akznrdBerg...:D P.S. Ak, I don't comment all your stuff because it is simply fantastic all the time so I fell into the routine...:) Great Tutorial, keep it up !!!
|
|
By aknzrdude - 17 Years Ago
|
thanks Guy - appreciate the comments
which reminds me of a story :
- Steven Spielberg was sitting in a bar in the late hours of one friday night. In one corner of the bar is this really old gentleman kept glaring at him, Spielberg tried to ignore the stare.
then suddenly the old guy walks up to Spielberg and punches him on the face.
Spielberg looked surprised "Why the hell did you do that?"
Old man glares at him "that's for sinking the Titanic"
Spielberg " wait a minute, i didn't sink the Titanic, an iceberg did"
Old man "iceberg, Spielberg - you're all the same to me"
|
|
By safegaard - 17 Years Ago
|
|
:) Thank you so wery mush. It´s the best made tuturial stof for a newbee i could get. I am your fan for ewer.
|
|
By news.newz - 17 Years Ago
|
|
thank you for doing this - very helpful and insightful
|
|
By Illustrator Cathy - 17 Years Ago
|
Dude - I'm still laughing over the Spielberg joke... :w00t:
:D
This tutorial is really fantastic! Thank you so much for sharing it with us.
Cathy :hehe:
|
|
By aknzrdude - 17 Years Ago
|
thanks for the comments! been consumed these past few hours trying to resurrect my pc after i got a black screen of death - blank screen with nothing but the mouse cursor - turns out this si a common problem with Vista
mine happened after a windows update - after a ton of hours trying to troubleshoot and using my lappy to look for solutions, it ended up being the video driver (ati) - i uninstalled the driver, booted up ok- then re installed the driver
|
|
By moviechick - 17 Years Ago
|
|
Gabe You are just the greatest!!! I have stumbled around for so long never very happy with what I have made. This tut will really help me prepare scenes in the future. I am so grateful for your teaching skills! movichick
|
|
By aknzrdude - 17 Years Ago
|
|
thanks moviechick - working on the camera tutorial now - was hoping to get it up last friday but vista problems set me back
|
|
By moviechick - 17 Years Ago
|
|
Yipeeee! My cameras at present will give viewers vertigo :) Thanks some more Gabe. moviechick
|
|
By Sophia - 17 Years Ago
|
|
Thank you SO much! I love you! Oh wait I'm married :D Seriously, this is awesome stuff, thank you so much for sharing. I have just glanced over this quickly, but I can see where this is REALLY going to help everybody... thanks again!
|
|
By aknzrdude - 17 Years Ago
|
Working with Cameras
ok so we have our cabin scene, added a couple of characters (more of character texturing down the road) and now we want to film a dialog
The shot as i imagined it: camera flies into the room, we see the captain near his desk, camera slowly pans to the side, shows that there is another guy in the room. Camera cuts the the captain who starts talking. Camera cuts to the other person who responds - so in total i will have 3 cameras in the scene that i can use to render the scene. Of course i can render out each camera separately and use a video editor to make my camera switches, but iclone provides a neat tool called CAMERA SWITCHER that makes it easy so you can render in one session -more on this later
i consider iclone having 2 basic cameras - the preview and the shooting camera - i also call this the numbered camera
AnimaTechnica's iClone Camera Workflow Basics
the PREVIEW camera is the default camera - i primarily use this to experiment, locate the shot i want to capture, my workflow is as follows:
a) position the PREVIEW camera to the starting shot of let's say camera 1, note the position numbers
b) position the PREVIEW camera to the ending shot of camera 1 - note the position numbers
c) Add camera and use the position numbers to position Camera 01
d) check playback, fine tune as needed
e) to add another camera to shoot from a different angle, repeat steps above
of course once you get used to it you can discover shorts cuts but for beginning try the above
The Preview Camera
The TRANSFORM controls moves the camera using the selected object as it's axis
So if for example you imported a prop but it got placed somewhere you can't see, clicking the 'CAMERA VIEW" icon as shown below moves your camera to the prop
The reason i play with the PREVIEW camera is that is is not animatable, if you work with the numbered cameras you might inadvertently insert a keyframe which screws up your shot. You can practice the positioning, angles, even depth of field with the PREVIEW camera

Here's a couple of areas in the workstage you need to remember

HERE WE GO
1) First since the focal point of the scene is the captain avatar, click on him. Start at Frame 0 and use the TRANSFORM controls to position on the shot we want...

The reason you want to note down those numbers is that when you add the numbered camera (for rendering) you can position them exactly as how you setup your preview camera. Once you get proficient, you can eyeball it or just bypass the preview camera altogether
By the way if you are rendering a shot where the camera does not move, then you can just use the PREVIEW camera
2) now let's move the preview camera to where we want to end the camera 01 movement. In this case i wanted the camera to fly into the room then slowly turn so it captures both characters in its viewport. Note in the example below my end point was at frame 900 - the more frames in between, the smoother the movement.

ADDING CAMERAS
3) We have established our camera 01 shot, now let's add CAMERA 01 to the scene
you can add a lot of cameras in a scene - the most i've had was 6 but you can have more

position Camera 01 to the ending position using the numbers we noted above - again you can eyeball it if you want

you can now click PLAY on the timeline below the workstage to check the camera movement. iClone calculates the position of the camera between frame 0 and frame 900. At this point you can jump into any point between Frame 0 and Frame 900 to fine tune the camera rotation etc..
4) Time to add another camera - this shot we want to be pointing at the captain as he will be speaking his lines. for this process, well bypass the PREVIEW camera to show how to do it directly with the numbered cameras. This camera will not be moving

5) Repeat the same process above for CAMERA 03
|
|
By aknzrdude - 17 Years Ago
|
THE CAMERA SWITCHER
to me this is one of the most useful tools in iclone. It allows you to setup many different cameras at different angles and use the switcher to jump from one camera to another- this is particularly useful for fight scenes where i use the same motion but film it from the different angles to make it look like a fight is longer (for example checkout the the fight scene here starting at time 04:32)
How it works
you use the timeline to tell iclone at what frame to use a certain camera, start at 0 with camera 1, then at frame 100, switch to camera 02 - and so on
1) open the animation timeline

2) on the ANIMATION TIMELINE use the drop down menu and select CAMERA SWITCH. Now lets start at frame 0 - click there, so the red timeline marker is at frame 0, then RIGHT CLICK - and select CAMERA 01 as shown below. now let's say we want the camera to switch to camera 2 at frame 800, we just right click on frame 800 and select camera 2. Repeat for camera 3 let's say at frame 1500

3) so now we have setup the camera switch - to check it, go to the workstage and use the camera drop down menu to select CAMERA SWITCH. now press play in the animation playback control to check how the switching works.
now when you export the movie it will now export using the switch

|
|
By moviechick - 17 Years Ago
|
Gabe!! You are so wonderful to do all this. Clean and simple to understand, I have been playing around with what you've posted and had some pretty decent results in a short amount of time.
You deserve the giant chocolate chip cookie award!!
moviechick
|
|
By aknzrdude - 17 Years Ago
|
|
thanks moviechick - and please make that with macadamia nuts :)
|
|
By Sophia - 17 Years Ago
|
Well, I followed the first part of the tutorial and would like to share my first effort on iClone, based on the first scene and some of the techniques you explained in the cabin scene tutorials. If I can do it, anybody can :D
Watch my very first movie
|
|
By aknzrdude - 17 Years Ago
|
|
Sophia that is a beautiful scene - coupled with the sounds effects really brings the nice atmosphere to it
|
|
By Sophia - 17 Years Ago
|
|
Thanks :) It's fun following your tutorial, right now I'm trying the cabin scene. I have a question though about the actor: I followed all the steps to make him sit down, then stand up, but my problem is when he stands up his waist never moves, he just stretches his legs so his feet stick through the floor. So I thought I'd just go to frame 400 a position him a bit northward, but now he starts hovering up right from frame 1, which looks ridiculous of course. What am I doing wrong?
|
|
By aknzrdude - 17 Years Ago
|
ahh sophia you've discovered the curse of the missing keyframe :) what happens here is that iclone remembers your last key frame - most likely frame 1 when you added the first post motion so when you add the new motion at frame 400 it thinks it needs to transition the character from frame 1 to 400 so the character looks like it is drifting
here's what you need to do
let's say you have the character sitting up until frame 300 and you want him standing up at frame 400 -here at the steps
1) before adding the the standing up pose, motion, go to the animation timeline, click on the motion layer and add a key frame at 300. This tells i clone to start what ever motion, position you will add will start from this keyframe
2) now go to frame 400 and add the standing up motion - also at this time you can correct the position so his feet are touching the ground - click play to see what happens. most likely you will see the character sitting down then abruptly get up. To smooth out this transition, go to animation timeline, click on perform and you should see a blue bar that represents the standing up pose/motion. you will also see a blue outline to the left of the blue bar - this is the transition length , make it longer and extend it to the left to frame 300 so it smoothly transitions
3) now you can go back and jump into some frames between 300 and 400 to fine tune the character position so his feet stays on the ground. When I'm lazy (as is often the case) i move my camera angle so i don't see the feet but rather just the waist up but it still conveys the motion of getting up
|
|
By Sophia - 17 Years Ago
|
|
Hehe thanks, I got it. I added another quick&dirty (I think) which was on frame 300 I shifted him z+1, so that at least he remains seated before he starts moving up :)
|
|
By colour - 17 Years Ago
|
|
This is excellent! So many Programmes' Manuals just list "How to's", in random order. Although iclone 3's Manual's, On-line & Downloaded Tutorials "How To's" are very detailed, IMO, they fall into that bracket. Time & time again the beginner will say ".........Yes, but where do I start?". I, like several other Video Editors & 2D Animators in the Pinnacle Studio & Video Friends Forums, have been encouraged to embrace 3D Animating with iClone, having seen the amazingly life-like Pinhead Project Productions, produced by iCloners. Since I now have iClone PRO 3.2, I have the answer to my question & will be following your Tutorial (Which I've only chaced-upon today), adapting it to the Content I already have. Thankyou very much for taking the time & trouble to Post.:)
|
|
By aknzrdude - 17 Years Ago
|
thanks for the comments folks
so my next scene involves the deck of the ship - the captain barking out orders. I want the deck to look like its populated with a lot of people - but the problem is if you have too many characters in one scene, iClone (more likely your PC) starts slowing down, gets sluggish and non responsive - so how do we solve this problem?
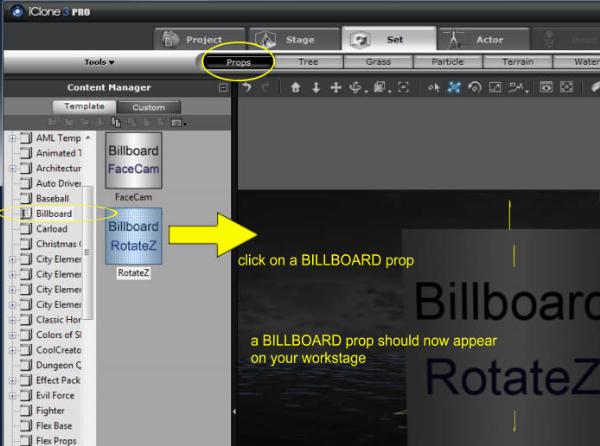
The BILLBOARD PROP
if you look at SET - PROPS you will see the BILLBOARD prop. The BILLBOARD prop is basically a plane that always faces the camera so no matter what angle you look at it, it ways faces you
The PREPARING BILLBOARD AVATAR
Notice the BILLBOARD prop has 0 polys so it is ideal to use as a proxy for a real avatar
1) to create the BILLBOARD prop, follow the steps below

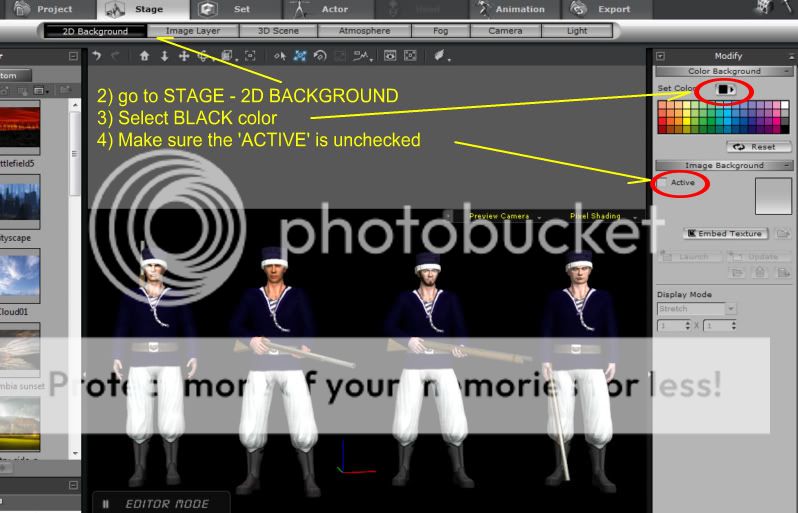
in step 7 above, why did we change the background color to BLACK? well because it blends better to the background, you can leave it white but the edges will stick out in a dark setting so i always opt for black. So we have two pictures we've exported - one with black background and another with white background - the white one will be used to create the opacity map - it is much easier to do this if the background is pure white
Additional tip - you can change the face, or the pose and export 2 files for each change (1 black, 1 white background)
2) Open up your photo editing software and convert the picture with the white background to an OPACITY map (i.e. the avatar white and the background black)

3) you should now have an opacity map that looks like this one

ASSEMBLING the BILLBOARD AVATAR
4) now lets go back to the scene - we will import the set (in my case the Galleon) and one avatar so we can judge the sizing of the billboard prop
Follow the instructions below

5) Use the Modify controls and import the DIIFFUSE map (picture with black background) and OPACITY map (the map we created at step 2 above)


6) use the MODIFY - TRANSFORM controls to position the prop near the real avatar and resize the prop to match the real one

7) once resized, save the prop under the CUSTOM _ BILLBOARD tab and name it CREW1
8) Now import the prop as many times as you want and position them appropriately in the scene. As mentioned before, if you prepare props of different faces, poses, it works more effectively. In the scene below we are only using tow real avatars others are BILLBOARD props
Adjust the set lighting as needed. Note these props do cast shadows as well
Additional Hint - if you want to save time, you can merge the Billboard props so you can import a bunch at a time next time you want a crowd scene

Here's an example of how i used merged billboard prop to create this 'army'

|
|
By aknzrdude - 17 Years Ago
|
|
just a little update here - for my movie, i needed to create some costumes for the character - so we will cover clone cloth and texture editing next session..stay tuned
|
|
By moviechick - 17 Years Ago
|
Right on Gabe! Im so excited. Your textures always look so amazing I have my copy/paste file all ready.
Thanks. Jo
|
|
By Paumanok West - 17 Years Ago
|
This is all cutting-edge work, but I still like the ship interiors the best.
Question about the captain's peacoat. This is a must-have fashion. Do you have any plans to sell it?
|
|
By aknzrdude - 17 Years Ago
|
Paumanok you must have read my mind :)
the captain's peacoat is exactly what we will make in the tutorial - at the end of which i will have it available for download
this will be followed by a tutorial using G2 clone cloth
|
|
By Paumanok West - 17 Years Ago
|
|
gabe, thrilled to hear this. When you're tut-ing, would you please go over again the deal about G2 versus G3. I recall Reallusion saying that they didn't want people to think less of G2 just because G3 came out. I know G3 has fewer polygons and in some ways some improved shapes. Can you refresh us in your discussion?
|
|
By colour - 17 Years Ago
|
|
Gabe - Tried to Reply to your PM re: Tut but can't, 'cos :
|
|
By aknzrdude - 17 Years Ago
|
ok folks we will start working on costumes using clone cloth. But first we'll cover some basics so we are on the same page. For my movie one of the key characters is a naval officer circa 1880's so i go over to google and get a rough idea what the costume might look like
G2 vs. G3
Now choosing between G2 and G3 - either one works great - in fact i have a lot of G2 characters already created but we will use G3 because it has lower polys - that means you can have a similar looking character as in G2 but with a smaller file size - so theoretically you can get more characters/props in a scene. The other thing is the UV mapping on G3 is much better so it is easier to place buttons and lines and not have them as distorted. For either G2 or G3 you typically work with a separate upper and lower texture maps
Now i've also worked with a 3rd party clonecloth system - specifically BigBoss - which makes texturing even easier because you can do both uppers and lowers on one map - that is one picture file
What We Need:
- For this tutorial we will use G3 Trey CloneCloth specifically the Trey Overcoat
- you will need a drawing or paint program that supports layers
- the ever useful google search engine for texture images and inspiration
What is a Texture Map?
For the purpose of this tutorial let's clarify this by saying it is a picture that we will apply to the clone cloth to color it, design it. iClone works with 6 texture maps - but for this basic tutorial we'll cover just diffuse and opacity - i'll do a more advanced tutorial later
Texture Template - G3 and G2 come with texture template - this is basically a jpg file with lines drawn corresponding to areas of the body. The lines help guide us on how to position our texture map
Diffuse Map - this is the actual texture/color/design that is going to be applied to the clonecloth
Opacity Map - this is a mask - basically iclone will use it as follows : all areas in white will be shown, all areas in black will be transparent
Texture map resolution
you need to have high resolution pictures as texture maps to make them look crisp in the character - go to PREFERENCES (the hammer icon on the top right of iclone) and under "MAX REAL_TIME MAP SIZE" - select 8192x8192
File Size
One of the things that causes iClone to slow down and sometimes crash is a heavily textured character - some times looking at the poly count does not give you the full story - it might look like its low poly but the file size is 50-60MB for just 1 character -
so how does the file size get too big? well if you have a high res diffuse map , bump map, opacity map etc.. that adds up to the file size
Animatechnica's solution - i use a hi res (I use the default texture map template size but save at 100% quality), high quality diffuse map but typically use a lower res, lower quality for the opacity, bump, specular glow and reflection maps - we'll cover this in a more advanced texturing session
this applies to props as well - so watch out for that
Types of Texturing
i consider three types of texturing
- the first one is what i call texture dumping - basically taking a picture of some fabric, and pasting it over the texture map template - this is the easiest way to customize your character but the results is less than savory
- the second method involves using a picture of clothing and stretching it, tweaking it to fit the texture map template - it works ok at times
- the third method is hand drawing the texture onto the template
AnimaTechnica's method is a hybrid of drawing and using pictures of materials/fabrics and applying those pictures to the shape i hand draw - this tutorial will cover this technique
My Drawing tool
The most important part of clonecloth texturing is our drawing or paint tool - many people use adobe photoshop, paint shop pro - i use RealDraw ($59 from MediaChance.com)
i like Real Draw because of these features
1 uses layers -lets you build the costume layer by layer
2 uses vector graphics - you can export what you draw in high res without losing quality
3 let's you apply a picture to a shape you just drew
4 let's you apply lighting to your drawing
5 easy to use drawing tools - basically connect the dots
so if your paint application supports the above, you should be ok - to me only feature #4 is optional - i must have the others
|
|
By aknzrdude - 17 Years Ago
|
Now to Create the Captain
A) Click on AVATAR then to G3 CLONE CLOTH V1 and load the overcoat character

B) First thing we'll work on is the upper body. But first we need to load the Texture Map template to help guide us

c) In the Material library, look for the template map - HINT -i use View thumbnails on explorer to make it easier to identify

D) now you can see what the template looks like

E) by clicking LAUNCH your draw/paint program launches and opens the texture map template
at the same time it creates a file in your iClone Temp directory called UPPER_0_DIFFUSE.jpg

notice how the coat is laid out, the front and back of the coat, the collar separated and sleeves separate - the picture you see is RealDraw - the tools should be similar to your paint program
Notice also that the front has different colored lines on the edges (purple on the left side, green on the right, the same colors are seen on the back map - these colors tell you where the front and back maps meet
AnimaTechnica's Texturing process is summed up as : Draw shape, adjust position, apply texture
F) The first thing i do is draw some colored boxes on the template, export it to the iClone Temp directory and overwrite the UPPER_0_Diffuse file. Go back to iClone and click on UPDATE.
you should see the colored boxes applied to your avatar - Why did i do this? This helps help determine how the cloth mapping works whether a line going from front to back stays in a straight line or curves. In this case i use the red box to help me place a belt if i need it, the blue box to help guide me where i should put the coat flap - since this is a double breasted coat, the flap is not in the center

G) Now back in the Draw - i start using the line tool to create a shape, pick a color that differentiates it from the others - move the layers (using your draw program) front and back as needed so the guide shapes are still visible. I use the BLUE box to position the purple shape appropriately. At this point we are just using plain colors, we'll add textures later

|
|
By aknzrdude - 17 Years Ago
|
H) Now go back to the draw program and draw the shape of the left side of the coat - just follow the contour of the template map- Add an outline as well - export again overwriting the UPPER_0_Diffuse file and click update in iclone

Now our coat is taking shape- at this point i want to see how this might look with the right texture - so off to images.google.com, do a search for wool fabric - picked a picture of a fabric i liked and saved it and imported it to my draw program
I) Now real draw allows me to take that picture and apply it to the shape i just drew -for the pocket, i adjusted the colors so it is a little darker

J) Apply the same texture to the left side of the coat

K) Now to decorate to coat further, we'll add buttons - this is where it gets a little tricky - because certain areas of the body is not flat, the texture map does not always follow a straight lin - so in this case even if we drew a perfectly round circle, iclone does not show it as such - so this part requires trial and error to reshape resize the circle so it looks somewhat round in the avatar

L) now that e are somewhat done with the front, time to work on the back - follow the process i outlined : Draw SHAPE, Position, Apply Texture

After UPDATING iclone, inspect the side seams where the front and back textures are supposed to connect, make sure they are lined up -if not adjust the back texture length and update iclone to check - repeat as necessary.
|
|
By aknzrdude - 17 Years Ago
|
M) Now we'll work on the right arm sleeve - same process -Draw shape, adjust position as needed, apply the texture - i also added three gold lines - notice how the gold lines look metallic - that's the real draw lighting feature in action

Repeat what you just did for the left arm sleeve
N) Don't forget to click update in iclone to see what it looks like

O) at this point you can decorate the front coat a little bit - a little tip i use dingbat fonts, use real draw to give them a bevel and make them look metallic and add to the texture map we are creating

P) now lets work on the inner clothing - i draw a rectangle box again just to see where i will put my shirt collar

Q) again for the shirt material, do a search in google - i found this lacy one a while back - draw the shape, using the red box to guide you (or modify the red box to the shape of the collar) and then apply material

R) Do the same for the rest of the shirt and the inner sleeve - add buttons if you want, adjust color if you want

S) Now let's add some effects on the back - completely optional but can help enhance the texture

|
|
By aknzrdude - 17 Years Ago
|
T) now we've finshed the diffuse mapping, we need to work on opacity to remove areas of the coat we dont want - in this case the bottom of overcoat -optional we can trim the inner sleeves

U) so Opacity map is basically a black and white picture where the black areas are transparent and the white areas shows the diffuse map

V) use your draw or paint program to select the shapes we've just created, turn them all white, and make the background black - in my case what i do is add a layer of pure white, move it just above the original layer (which should contain the texture map template) so in essence you have your texture map with a white background - export this as a jpg, and use your paint program to convert to black and white mask

W) Apply the opacity map as described

|
|
By aknzrdude - 17 Years Ago
|
X) after loading the opacity maps and checking it in iclone, now we will work on the lower

..to be continued - gotta go to bed now
|
|
By sisch - 17 Years Ago
|
|
This tutorial is just the awesomeness of awesomeness! Thank you! :)
|
|
By moviechick - 17 Years Ago
|
Oly Moley!! I knew, Gabe, when you said you where gonna do this that it was gonna be terrific. It is just the best!!
Thank you ... Jo
|
|
By jleao - 17 Years Ago
|
|
YES, YES, YES. I love these project tutorials. Thanks a lot for your time and for being willing to share your knolewdge. I´l be refreshing all the time for the next tut.
|
|
By afterThought - 17 Years Ago
|
|
Gabe, you're a prince among men! Thank you so much for sharing this with us.
|
|
By nlprod1 - 17 Years Ago
|
|
Making clothing for my characters has definitely been my weakness up to now. I can't thank you enough for your generosity, your expertise, and your precious time. :cool:
|
|
By Paumanok West - 17 Years Ago
|
|
Gabe, the modeling is great and the tutorial is great. Quite an example for how to present a good tutorial. Thanks from the whole community!
|
|
By aknzrdude - 17 Years Ago
|
thanks for the comments everyone - I'll continue the tutorial tonight to cover the lower and putting final touches to the costume. Come back later as well as i will provide a link to the finished material files for your use
After this, I'll change plans a bit - for those of you that don't have the full G3 clone cloth yet, we'll work on G3 casual clone cloth which came free with iClone 3 -if you don't have it, go to backstage and download it. Then we'll tackle G2 clone cloth
if you want to see how wide the possibilities are with creating custom characters with clone cloth, check out my gallery
|
|
By omanuel - 17 Years Ago
|
|
Awesome gallery, Gabe...it was cool to see all those images together. The Steampunk and the Faery lines you did were one of my favorites...very ethereal! Look forward to seeing more
|
|
By jleao - 17 Years Ago
|
Just amazing.
But can i ask you to give us some tips on creating textures? How should we go about getting something with this quality, how should photograph or build them from scratch. how to make them more real... I´m really interested in this. Thanks so much, once again.
|
|
By sumthinwong - 17 Years Ago
|
|
Ditto to the compliments, your instruction has enhanced my enjoyment of Iclone, and will result in me buying more product. The community thanks you and I hope RL appreciates what you are doing for them also. Thanks Aknzrdude.
|
|
By aknzrdude - 17 Years Ago
|
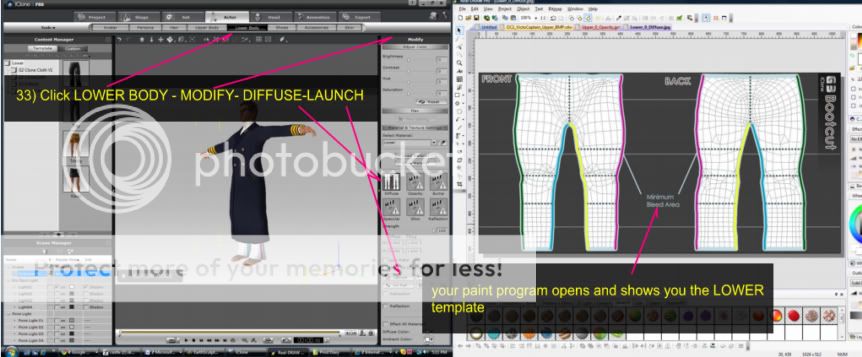
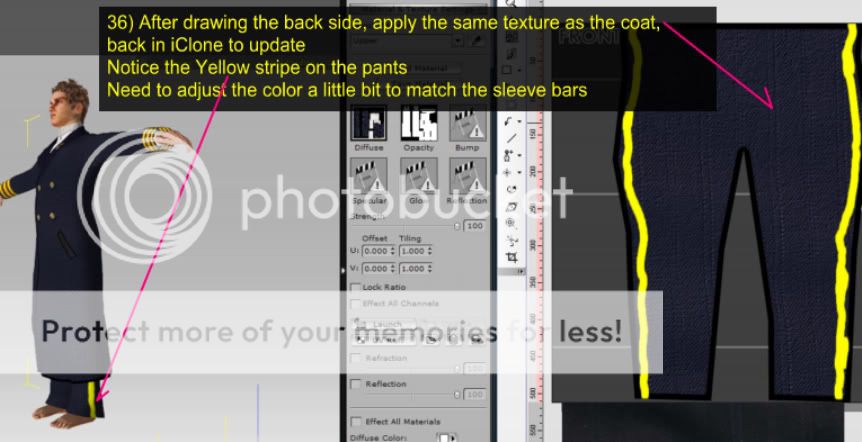
Continuing the tutorial - we've just completed texturing the overcoat part, now we want to texture the pants - this should be easier sine only a little bit of the pants is showing
my goal is to have the pants have the same texture as the overcoat but also have yellow piping/stripes on the side
If you haven't done it yet, as described previously, click on LOWER -MODIFY - LOAD MATERIAL to load the bootcut lower template
Y) Now we'll launch the drawing program to start working in this
Z) Use your drawing tool to draw lines on the seam lines of the map - this would be the green, purple lines on the front template and back template
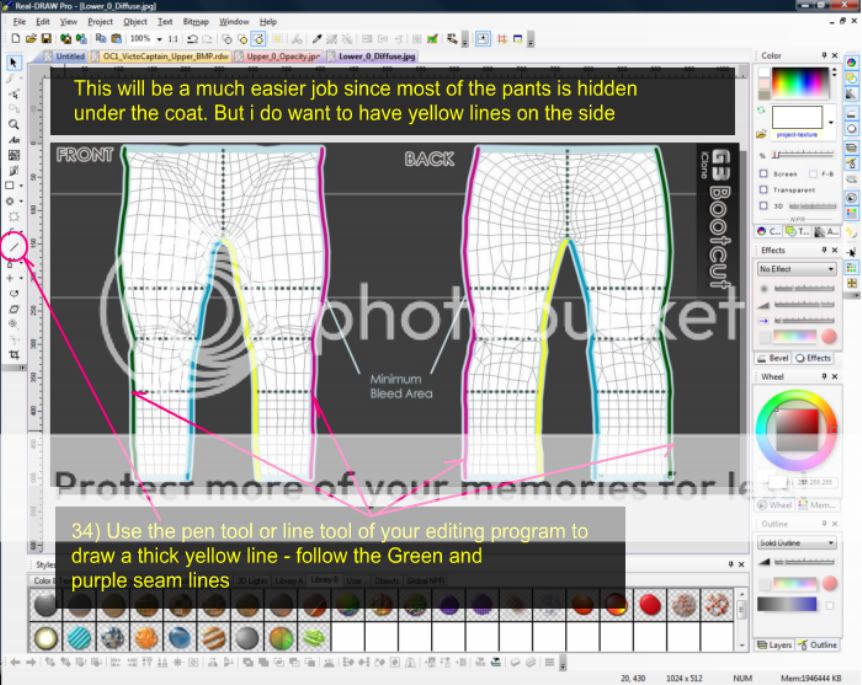
AA) as you can see below, i drew thick yellow lines on the outline
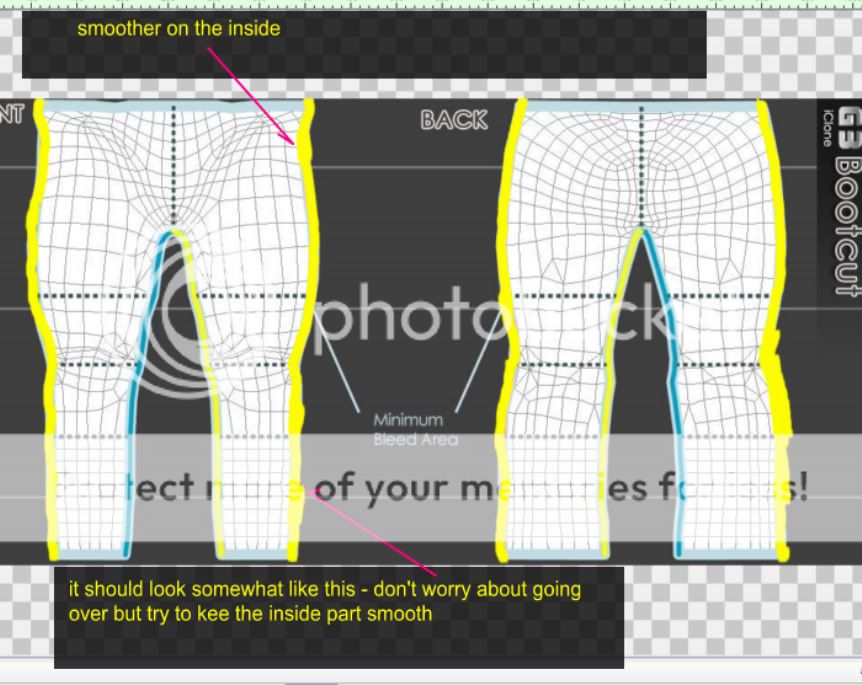
AB) now as before we draw shape, position it - move teh previous line that we drew into an upper layer so the lines sit above the red shape as shown below
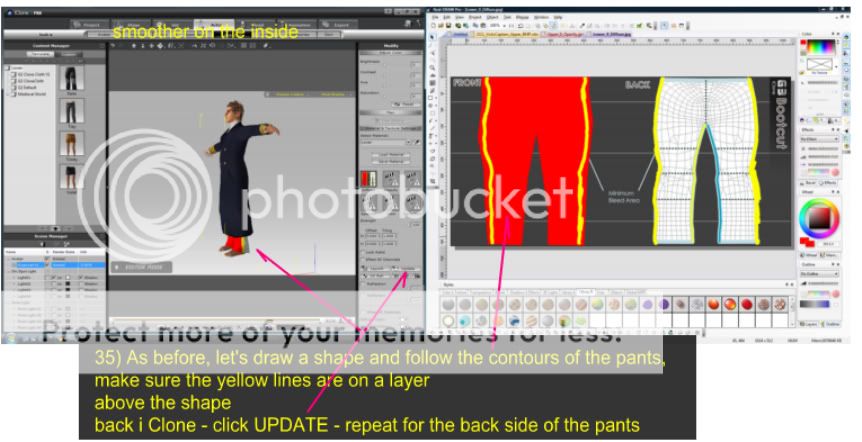
AC) as before, we now apply the texture to the shape. Repeat for the back side - click update and see the result in iclone - tweak the texture map as needed
|
|
By aknzrdude - 17 Years Ago
|
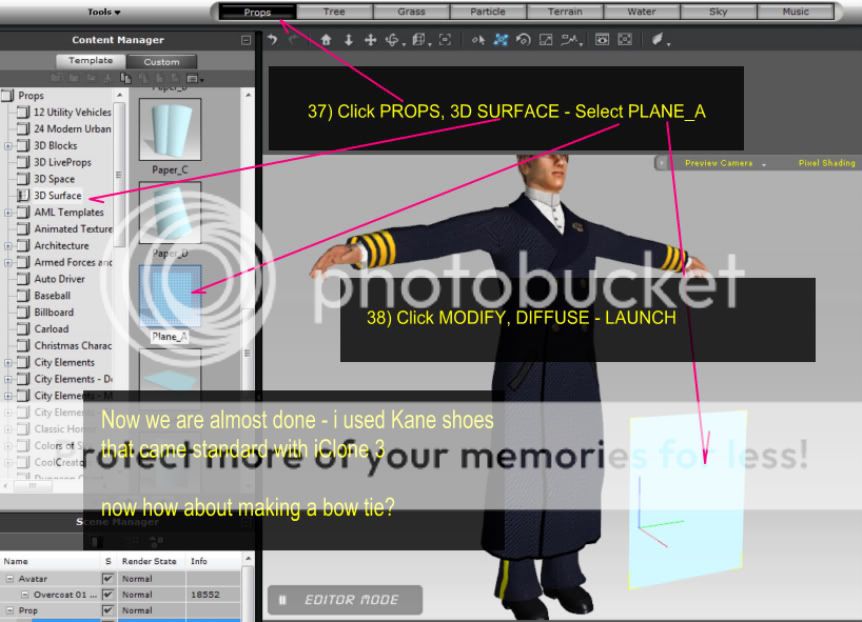
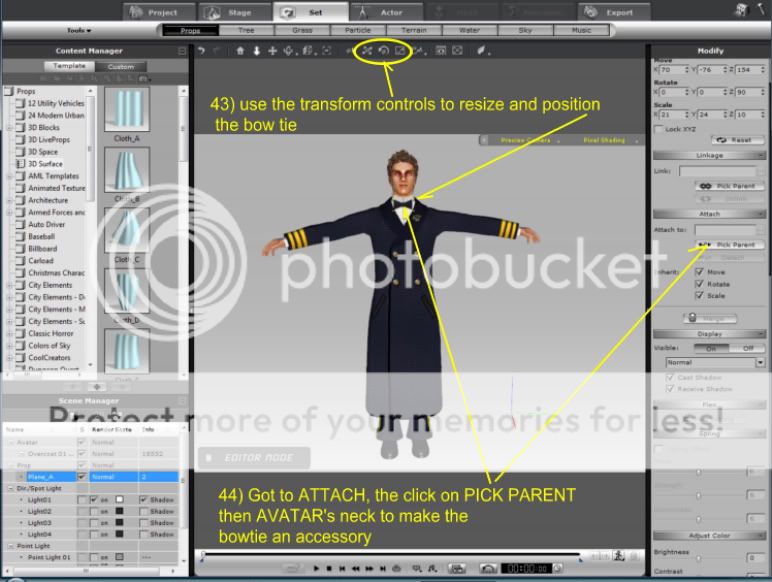
AD) ok now we are actually done but if you want to enhance it a little bit, we'll add a bow tie - you could go to 3D warehouse and look for one but for the sake of learning about accessory creation, we'll make one - a simple one -
AE) in your paint program, just have a white background (black is preferred) and draw the shape of the bow tie - add the texture we used in the coat, darken it a little bit
next we'll use an opacity map to remove the areas outside the bow tie drawing -note i used a white background in this example because it makes it easier to create an opacity map, but your diffuse map should be against a black background because if you use white, you can sometimes see the white edges, black blends in with the background better
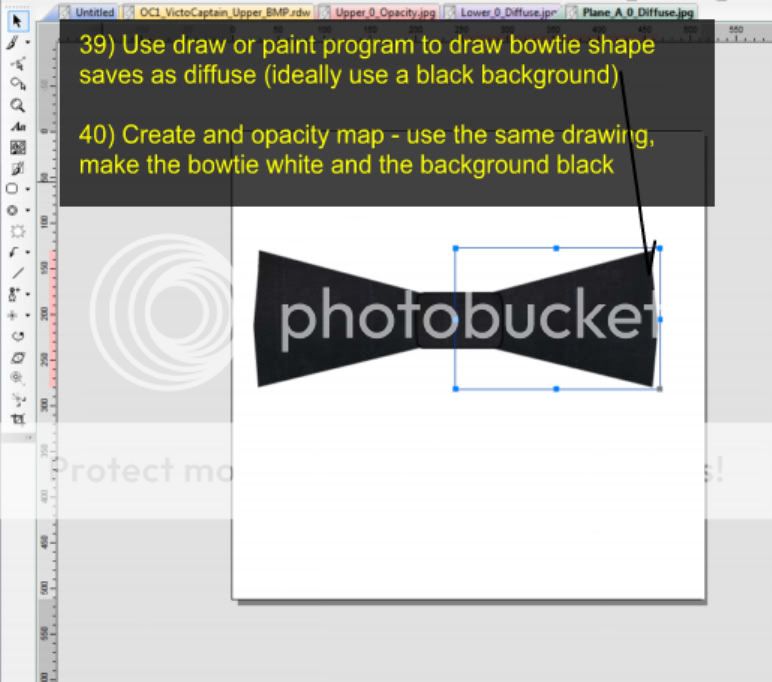
AF) after you create the opacity map (remember black is transparent, white is visible) we apply it to the plane
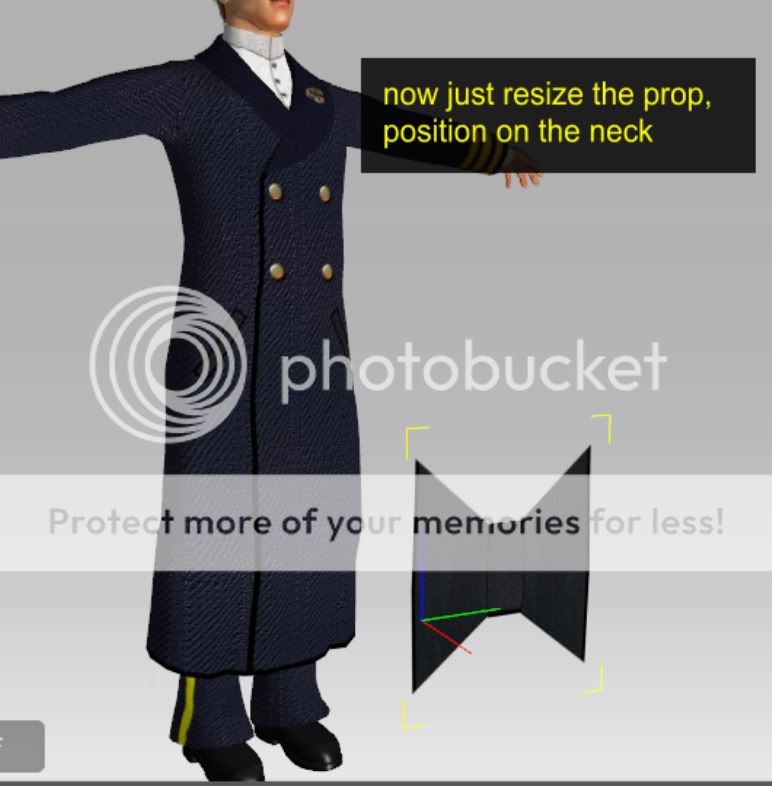
AG) just resize the prop, position it on the neck go to ATTACH and click PICK PARENT and click on the neck - you've just created a new accessory - remember to save this in your custom directory. Now next time all you do is click on this accessory and iclone will place it on the neck
we're done!!!
here's the character in full costume in the victorian room
remember to come back later for the link to the material files

|
|
By aknzrdude - 17 Years Ago
|
ok as promised you can download the naval overcoat textures here
you can download the nighttime ocean project here
|
|
By aknzrdude - 17 Years Ago
|
sorry haven't updated this with the G3 clone cloth (free from reallusion) tutorial but that's coming soon - had to go and finish up my trailer for the movie
here's a teaser poster

|
|
By Paumanok West - 17 Years Ago
|
I hope it's okay to clutter your tute with the results we are getting back home!
I wanted to say thanks so much for the Captain template. I could have done it myself, but your work provides such a kickstart.
Here's a costume change for my model, based upon a concept I've has for a few years now.
This design could also be used to clothe Robert E Lee, Abraham Lincoln, or maybe even Captain Nemo.
PS The wingtips on the collar, and the bowtie are made from podium primitives.

|
|
By aknzrdude - 17 Years Ago
|
|
paumanok that looks very cool - good point about the robert e lee style, it can be repurposed for that
|
|
By aknzrdude - 17 Years Ago
|
well since this thread was involved in the creation of my still in process movie, thought i'd post here about the premier of the trailer for it
Sunday October 4th at 4 pm pacific, 7pm EST...midnight in London
watch it at the TMU Theater - http://www.tmutheater.com
|
|
By wires - 17 Years Ago
|
|
This is the most amazing tutorial that I have ever seen - better than any handbook. Thank you very much Gabe for giving up so much of your time preparing all of this and sharing your knowledge with others.
|
|
By aknzrdude - 17 Years Ago
|
Uploaded the trailer for Voyages of the Sojourner
watch it in HD
|
|
By warlord720 - 17 Years Ago
|
|
Top notch as always Gabe! Excellent trailer and the diary is more than anyone could ask for. Thanks for the hard work!:cool:
|
|
By aknzrdude - 17 Years Ago
|
a little bit of a tangent here - but i just installed iClone 4 and the default Custom folder is in my C drive - however i have all my previous custom elements in a different drive and folder so the challenge is how do i point iClone to my old custom folder so i don't have to drag and drop everything?
Solution (thanks to zuijlen) - assuming Vista 64
1) as a precaution create a system restore
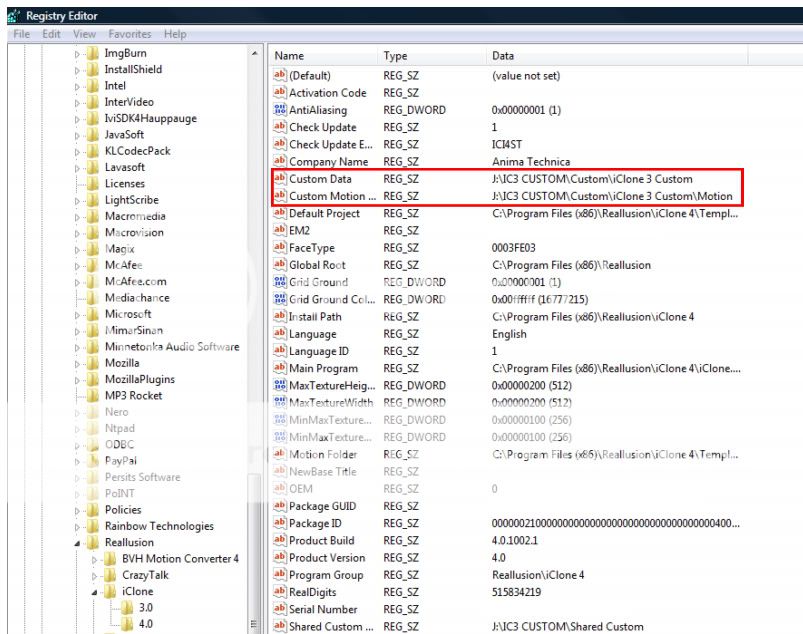
2) Click START and on the "Start Search' box type REGEDIT
3) the registry editor opens up, navigate to
HKEY_LOCAL_MACHINE\SOFTWARE\Wow6432Node\Reallusion\iClone\4.0
on the right panel you should see the image below:
4) right click on the Custom Data, select Modify and enter the path to your custom folder
5) Repeat for Custom Motion
close the registry, restart iclone and your old custom folders with your previous stuff should be there
|
|
By aknzrdude - 17 Years Ago
|
a little update - been hard at work trying to get all my scenes done, the clone cloth G3 creation tutorial will be done this week
but first here's another screen shot of the city of Narbonne - rebuilt it from the ic3 version to take advantage of iC4

here's my cast of 30 using the video import capability to create large crowd scenes - we'll do a tutorial on that soon

|
|
By surajit - 17 Years Ago
|
|
Took some time to find it, but this thread has straight gone into my favorites tab. Thank you Gabe, you are a true artist, in work and in heart. Regards Surajit
|
|
By rfacko - 17 Years Ago
|
|
I can find my IC3 custom folders but I can't find IC4 custom folders anywhere. I have Vista but not 64 bit. Where did IC4 create that folder? I have everything on a non-C drive but on C there is no trace of the custom folder. Reallusion marker contains only Crazy Talk info. Any suggestions? Florida Bob
|
|
By gizmo - 17 Years Ago
|
|
"here's my cast of 30 using the video import capability to create large crowd scenes - we'll do a tutorial on that soon" Now, I'm looking forward to that one. Great stills as usual akn.
|
|
By afterThought - 17 Years Ago
|
|
Very nice screenies, Gabe!
|
|
By aknzrdude - 17 Years Ago
|
ok my iclone 4 problems keeping me from rendering some of my projects - so i decided to start re creating some - and in the process create this tutorial
CREATING VIDEO PROPS with iCLONE 4
Background - i want to have a large cast but sadly can only manage up to 12 with a large set before iClone becomes unwieldy - using standard billboard props (as shown earlier in this thread) is ok but the characters do not move. The solution? iC4's new video prop
to get this done here's what you will need
- iC4 of course
- video editing program that supports invert (usually found in video effects section)
ok here's our starting scene - given the size of this set, i need to use video props to populate areas with crowds- in this example we'll look at the ship and its crew
i only have 1 avatar here, the rest will be from video props

Step 1A) open up iclone, LOAD your AVATARs and apply motions you want. I setup my animation to last 1000 frames coz that's all i need for my shot - but it is always a good idea to create it longer to maximise its use
1B) set up your camera so all the movements that AVATAR undertake will be captured within the camera view
2) once we've setup the animation and the camera, it is important that the camera does not get moved - now we need to change the background color to BLACK..WHY? because once you apply the opacity map there is usually a border around the avatars- having a white background makes this stand out and a darker color helps hide it so it blends in better with your scene
|
|
By aknzrdude - 17 Years Ago
|
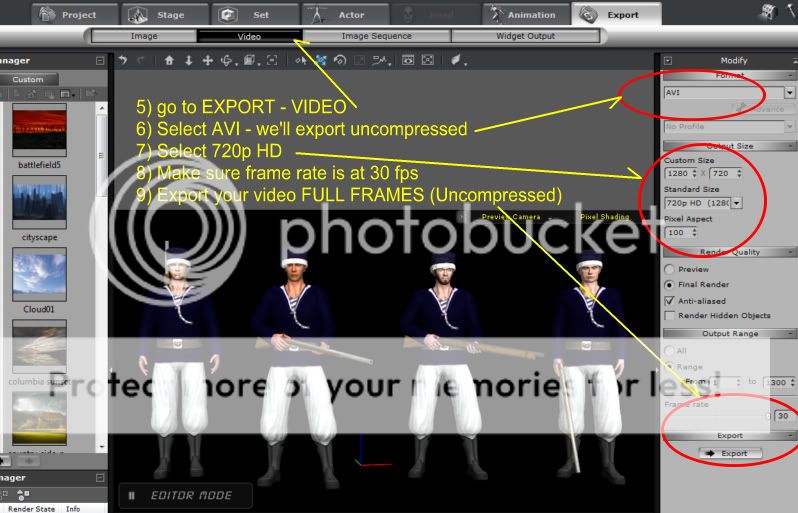
Steps 5 -9) Now export your video - in my case i'll export at 720p HD - you can export smaller resolution especially if the video will be used in background at a far distance
I export it UNCOMPRESSED - why? because i consider this my master and want it to be the highest quality possible - plus it gives me flexibility if i want to use it closer to the camera
Important to make sure the frame rate will equal the frame rate of your movie
We'll call this exported video your DIFFUSE MAP video
Steps 10-13) now we need to create the alpha or opacity map. Go back to iC4, make sure the camera or any of the avatars have not been moved - we'll change the background color to WHITE, turn off the shadow of the DIR/SPOT LIGHT

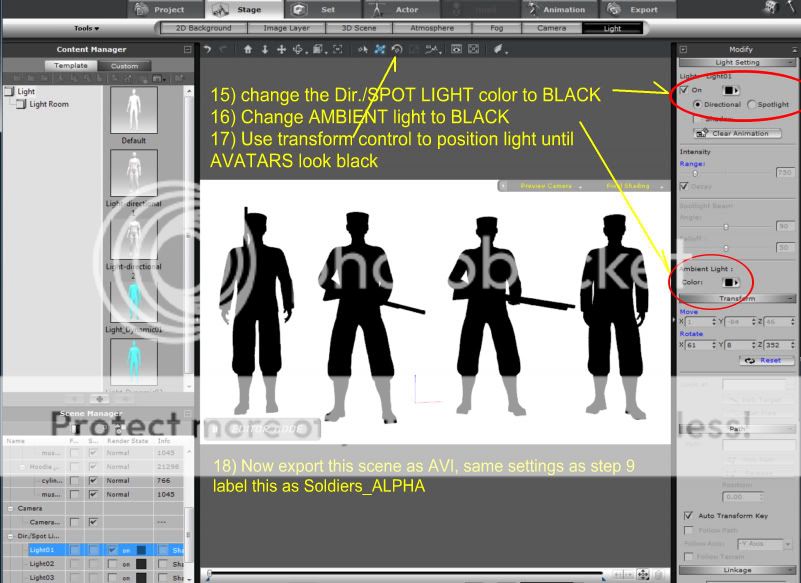
Step 14) make sire all other lights are turned off - only DIR/ SPOT LIGHT left on
Steps 15-18) Change the DIR/SPOTLIGHT to BLACK. Change AMBIENT light to BLACK and use the transform controls to position the DIR/SPOTLIGHT so your avatars turn BLACK. After that export the movie as above and label this as ALPHA
|
|
By aknzrdude - 17 Years Ago
|
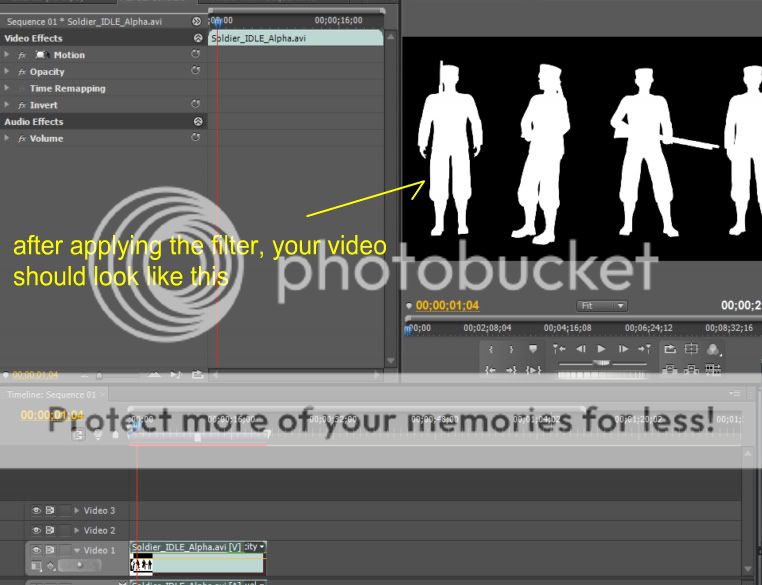
Steps 19-21) after you've exported/rendered the video, open up your video editing program -what we'll do first is convert the ALPHA video so the white background color turn black and the black avatars are colored white. Most video editing programs have a video effect called INVERT that takes care of this for you.
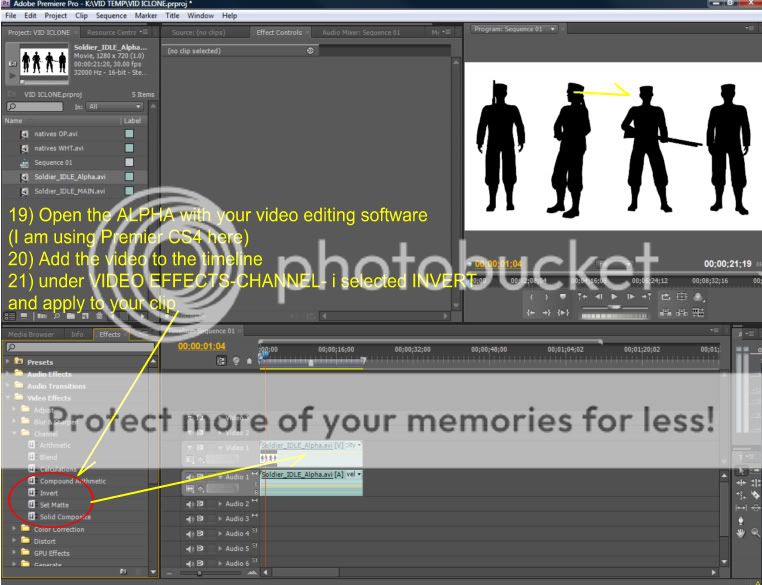
My photo above shows Adobe Premier CS4 -where the effect is found under VIDEO EFFECTS - CHANNEL - INVERT -just apply that effect to your video - after which it should like below
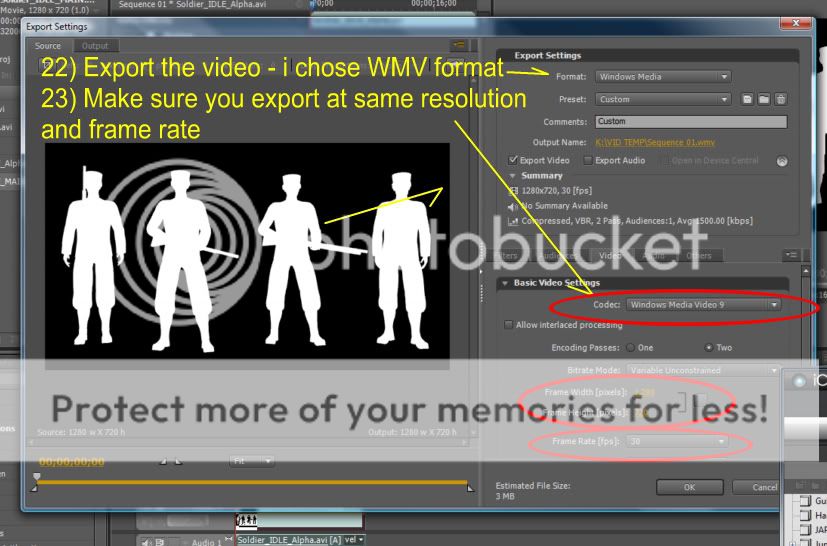
Steps 22-23) Now export this video - i use WMV format to get a smaller file - again make sure it is the same frame rate and resolution as your original - name this file ALPHA. Now load your DIFFUSE video into the timeline, turn off the invert effect and export that video - same format, resolution and frame rate as the ALPHA we just did and label it diffuse
|
|
By aknzrdude - 17 Years Ago
|
At this point we can maximize the use of the diffuse and alpha originals - i can for example change the speed of video, re-export the diffuse and alpha pair, if your video editing app supports reverse, apply it as exports the diffuse and alpha pair - we've just managed to have a total of 3 possible iterations from the original video
this is helpful if you want to re-use the same video in the scene - that way it does not look like everyone is moving in sync - more on this later
Steps 24-25) now we go back to iClone - start with a fresh project, import an AVATAR, import a billboard prop - this billboard prop is where we'll apply the video
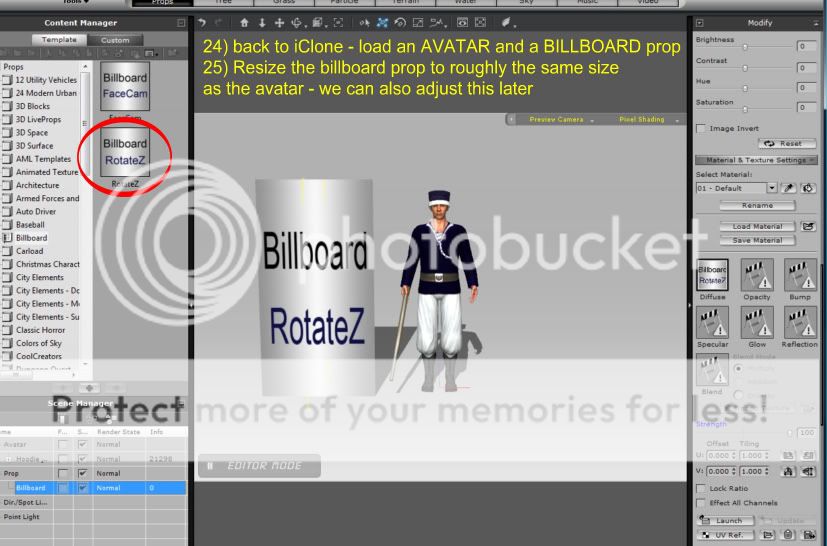
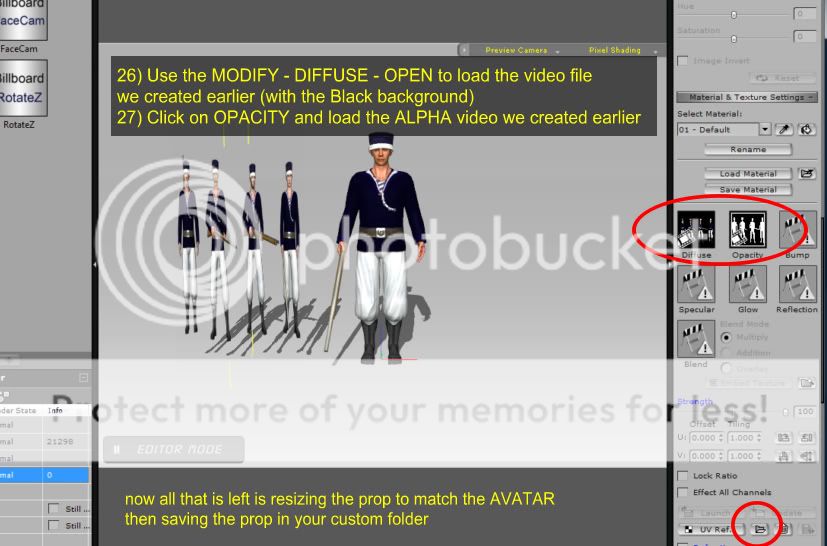
Steps 26-27) with the billboard prop selected, load the diffuse video into the DIFFUSE material channel and the alpha video into the OPACITY channel. Readjust the size of the billboard to match your AVATAR - once done save this prop
now do the same for the other iterations - the videos where you adjusted the time lenght, or reversed the action - save into your custom folder
|
|
By aknzrdude - 17 Years Ago
|
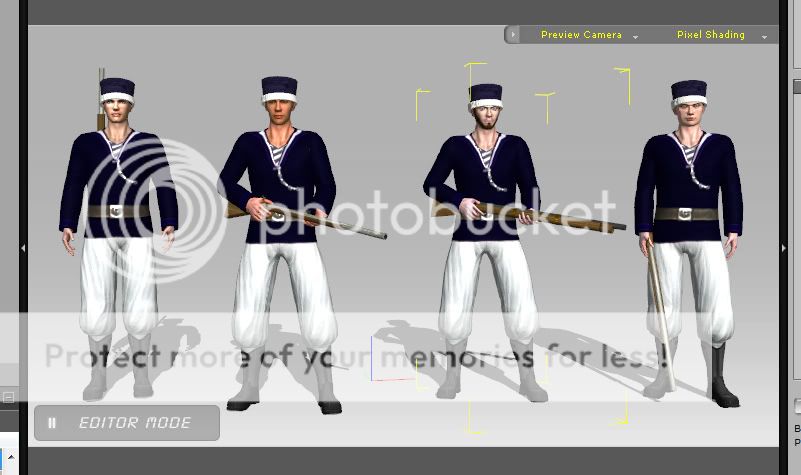
ok now that we've created the props, open up your scene and add the video props - mix and match with the other video props so it does not look they synchronized swimming
UPDATE - posted the wrong link to the video
watch the video clip here
here's a screen shot

|
|
By afterThought - 17 Years Ago
|
|
Wonderful tip, Gabe! Thank you! :)
|
|
By Illustrator Cathy - 17 Years Ago
|
Dude - phenomenal work you are doing here. Great tutorial!
Cathy :hehe:
|
|
By sumthinwong - 17 Years Ago
|
|
I love the work you're doing, would like to say keep em coming but I know the work involved in presenting this excellent work to us. Whatever you're able to do in the future its very much appreciated.
|
|
By Dulci - 17 Years Ago
|
|
Thank you so much for the CloneCloth walk-through!
|
|
By safegaard - 17 Years Ago
|
|
Thank you. Great tuturial.:)
|
|
By Illustrator Cathy - 17 Years Ago
|
Gabe, I love you so much! Thank you for having my baby ...
... ooops ... wrong forum... sorry.
Cathy :hehe:
|
|
By gizmo - 17 Years Ago
|
|
Anim8torCathy (10/19/2009)
Gabe, I love you so much! Thank you for having my baby ...
... ooops ... wrong forum... sorry.
Cathy :hehe:Thats never stopped him . . .
|
|
By aknzrdude - 17 Years Ago
|
just playing around with more costume design - so made a bunch of costumes for my movie's explorer fleet...may perhaps use them in some space/sci-fi movie down the road

|
|
By Paumanok West - 17 Years Ago
|
Excellent, really excellent. :D
And I hope you sell some of the heads!
|
|
By aknzrdude - 17 Years Ago
|
well the Voyages of the Sojourner movie is now in its final stages, all rendering completed, all 4 chapters edited and now in sound editing - so in the process of auditioning musical scores. the Movie will have a 40 minute run time. Watch the Trailer here
But in i neglected to present the cast so will take the opportunity to do so now
Presenting the cast of the Voyages of the Sojourner in order of appearance:

|
|
By gizmo - 17 Years Ago
|
|
Looks great. Can't wait for this one! Love the sets.
|
|
By aknzrdude - 17 Years Ago
|
thanks gizmo - oh and a tutorial coming soon for some low scale morphing in iclone
see sample video - turning a man into a woman
|
|
By Capemedia - 17 Years Ago
|
|
Gabe you continue to pioneer iClone, amazing stuff :)
|
|
By Christy0 - 17 Years Ago
|
|
Great cast, and great avatars. I will certainly keep my out for this one. Explorer Fleet is going to be a huge hit by all the hard work that's going into it.
|
|
By CRAIGSLIST-04 - 17 Years Ago
|
|
IC4 is Amazing ... Now I don't have to use Nuke or Flame to do my compositing ... This diary is truely informative ... :cool:
|
|
By aknzrdude - 17 Years Ago
|
here's another demo on using 'morphing' within iclone - i am putting together the tutorial for this - should be up late tonight
This demo shows a beautiful young lady age right in front of your eyes - all done within iclone
watch the aging clip
|
|
By safegaard - 17 Years Ago
|
|
As says above, you are an artist. I love this thread. :)
|
|
By aknzrdude - 17 Years Ago
|
pk folks tutorial time again - this time i was working a scene where life was being drained on my character and i wanted that character to age - but i did not want to cut the camera but capture the change in one take so what do i do?
First of all check out the video to see the final effect
now how do we do this
1) Start off with our beautiful character below - the red circles show the controls we will be working with
so go to SKIN, select FACE from the drop down menu
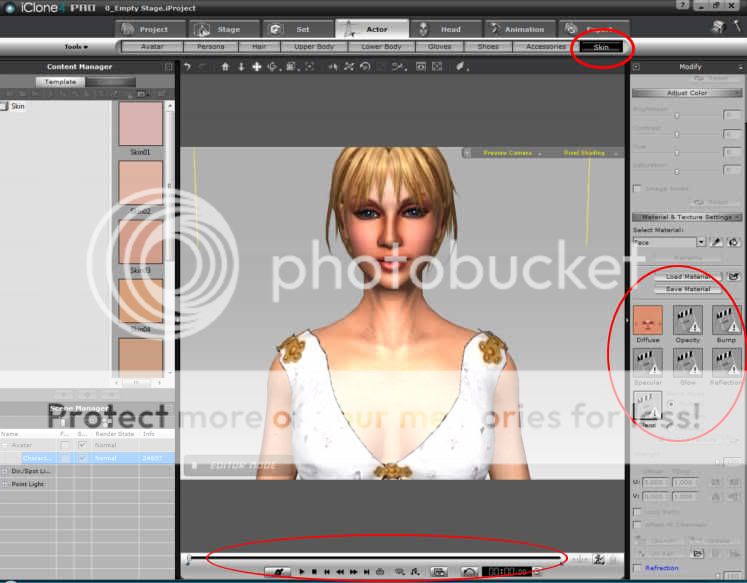
2) to age the face you can do one of 2 things - load a blend map or load a bump map. I will show you the blend map later for another type of effect but for this tutorial, we'll use the BUMP map. Click on the 'OPEN' icon for the BUMP map
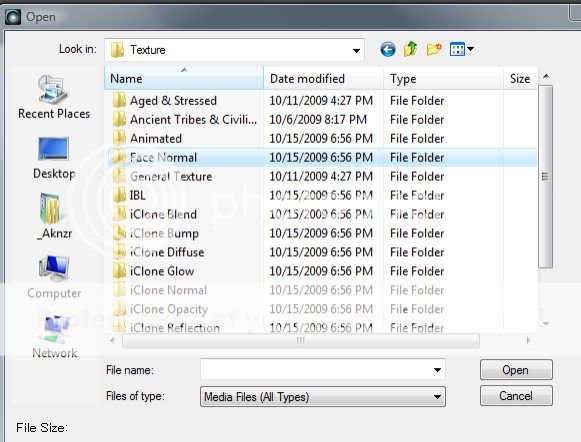
3) Navigate to your iClone 4 directory then go to Template\iClone Template\Texture\Face Normal - here you will see a collection of purple images - these are normal maps you can apply to your character's face to add scars, wrinkles etc. For this exercise i chose the "Old man' normal file
4) Once the Normal is loaded, go to your timeline, go to key frame zero, then adjust the STRENGTH of the BUMP map to '0' then move the timeline slider all the way to the end and adjust the STRENGTH of the BUMP map to 100 - so this let's the BUMP map show up gradually
5) Now for the body - still in SKIN, select UPPER
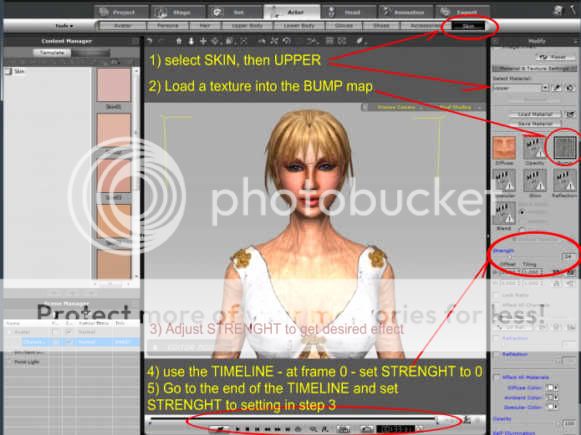
note for the upper bump map i chose a tree bark texture - it seemed to have the desired albeit exaggerated effect
so there you go - a simple way to morph
|
|
By aknzrdude - 17 Years Ago
|
this next tutorial makes use of the BLEND material channel
my scene is a couple of guys fighting, one guy grabs a spear and hits the other guy with it - i wanted to show that both combatants start off with clean costumes, and the guy that get's hit with the spear shows a bloody costume - but i wanted in one continous take - so here's how i did it
first watch the video of the effect here - notice the relatively clean armor, he turns away and a spear hits him in the back, blood is splattered all over his armor
to do this is fairly simple - we will use the BLEND material channel and the TIMELINE
1) go to UPPER - MODIFY - click on the OPEN icon for the BLEND material channel
load a bloody texture - the way this channel works is anything white becomes transparent and the colored items get's applied (using Multiply blend mode)
2) once loaded, set the material STRENGTH to 0
here's the guy as he turns to run away - clean armor

make sure the blend material strength is set to zero up until the point where the spear hits him, then adjust the material strength to 100 - use the timeline for more accuracy of placement
so for example, of the spear hits him at frame 150, make sure frame 0 is at zero strenght and frame 149 is at zero strenght, then a frame 150, adjust the strenght to 100
so here's our character with a spear stuck on his back, blend material strength set to 100 at the appropriate keyframe

so there you are - a simple way to show injury using the blend channel - you can use this effect for houses. show them clean then as fire ravages them, slowly turn dark
|
|
By gizmo - 17 Years Ago
|
|
Thanks once again aknzrdude. Great knowledge. Thats two more things to try out. I also agree about your wishfull feature of paired fight (sword and others), motions. That would be a tremendous boon. I'm working on one now and it 'aint easy'.
|
|
By nlprod1 - 17 Years Ago
|
|
Thanks again for sharing these great tips. very cool ! :cool:
|
|
By Paumanok West - 17 Years Ago
|
|
gizmo (11/25/2009)
I also agree about your wishfull feature of paired fight (sword and others), motions. That would be a tremendous boon. I'm working on one now and it 'aint easy'.
Absolutely.
RL's paired sequences can currently be found in The Wedding Planner series, the horse-human interactions in the Horse and Tack collection, and a few nice conversation pairings in the Perform motions supplied with iClone 4.
Can I also assume that some of the fighting sequences available in BackStage are paired?
More paired motions are essential, but especially for common(everyday) dramatic situations.
|
|
By shalako42 - 17 Years Ago
|
|
I am finding this very useful Gabe. Is there any way you could have it all in a oner as a downloadable PDF so I can have it to refer to on my desktop. Thanks again for posting this as it does help duffers like me a fair bit.
|
|
By aknzrdude - 17 Years Ago
|
thanks Tom, will check out the best way to put it together
in the meantime - here's a shot from my next project The Bard

|
|
By shalako42 - 17 Years Ago
|
Cheers Gabe
Your still shot looks good . Apologies for the time I took to reply I was FSXing over Russia and got carried away.
|
|
By thebiz.movies - 17 Years Ago
|
|
Hey Gabe, Great stuff here. Particularly liked the clonecloth and video idea for characters. I am curious as to how computer workload intensive it would be to use 20 different videos of characters instead of say 2 or 3 mixed up on 20 different instances. Thoughts?
|
|
By aknzrdude - 17 Years Ago
|
|
sorry i missed this earlier thebiz- yep having 20 videos can be resource hungry depending on the video you use - if you are going to use them a distance away from the camera, low res video is ok as long as the resolution matches your project
|
|
By aknzrdude - 17 Years Ago
|
since we used this thread to work on this movie, i'll use it to announce that the Voyages of the Sojourner (now a trilogy) will premier this week. Part 1 in HD will be available at Vimeo later this evening with Parts 2 and 3 coming in the next few weeks
A special screening of the draft of the trilogy will be aired tonight only at www.TMUTHEATER.com
at 8 pm PST/11 pm EST/4 am UK
|
|
By aknzrdude - 17 Years Ago
|
The Voyages of the Sojourner trilogy is a sci-fi adventure movie in a Steampunk theme. It follows the adventures and explorations of the HMS Sojourner under the command of Captain Phineas Aknussen.
The Voyages of the Sojourner trilogy kicks off as the HMS Wayfarer gets caught in a storm while exploring the uncharted lands.
The Cast in Order of Appearance
Capt Steubing - Shalako
Phineas Aknussen - Killian
Silas - Peter Martin
Eidwynn - Jakechief
Arianna - Dulci
Duchess - Duchess110
Phelonious - JohnnyEx
Ondarag - Anim8r Cathy
First Officer Rodrigo - Macwemyss
Singing Rodrigo - Norrie
Lord Azael - Ricky Grove
Lady Azael - Alley
Johann De Martini - played by special guest John Martin II
Story and Animation
AnimaTechnica
Special Thanks to Ricky Grove for his tireless efforts in sound engineering
Credits
Costume Design - AnimaTechnica
Custom Meshes - BigBoss
Duchess costume - by Alley
Wayfarer airship, props - Popeye, coolclones, clones2go
Musical Score
Antonin Dvorak - Symphony no.9
Cherry Ann Fulton -"Marsh of Ruddha'
Pro Scores 'Sky Elves'
magnatune.com
|
|
By Teviniii - 17 Years Ago
|
I was blown away by the logistics and the visuals!
It's refreshing to see the application of the new features in an actual film.
Very well done!
|
|
By shygirl - 17 Years Ago
|
|
Your best ever IMO. Amazing job Gabe, it had so much in it. Tremendous amount of work displayed with great attention to detail. Loved the part played by Eidwynn. Thoroughly enjoyed every minute.....once I got over the Mal de Mer :sick: Excellent job! Shy :):
|
|
By Popeye - 17 Years Ago
|
|
Excellent Gabe. Everyone who helped you needs to be applaudid. The voice characters were very good. Liked your camera work and lighting. Take a bow!!;) Great job!
|
|
By jimmygee - 17 Years Ago
|
|
Brilliant! An inspiration for everyone, well done and Merry Xmas:) Jimmy
|
|
By Flybynight - 17 Years Ago
|
|
Very good. Really enjoyed that :)
|
|
By Bigboss - 17 Years Ago
|
|
Brilliant work ! Spielbdude...
|
|
By Raven2angel - 17 Years Ago
|
Excellent work on all aspects and the cast did a fantastic job too :)
Great work, looking forward to the next episode :D
|
|
By gizmo - 17 Years Ago
|
|
akn, you've done it again. Excellent content and visuals. (Its easy to forget how much went into every aspect of this as we now expect so much from you as a norm). For me, the very best was the storm scene. Unique. Fantastic. I also really like the end teaser - your man with the sword - top notch.
|
|
By DesertWalker - 17 Years Ago
|
|
Stunning! Talent + tons of sweat.
|
|
By aknzrdude - 17 Years Ago
|
thanks for all the supportive comments!
even though the movie looked like it took a lot of work, it is actually just a collection of scenes similar to what we outlined in this thread -you can see a lot of the scenes we've covered - but having the voice actors is critical to bringing some of the scenes to life
so use TMunderground.com - lots of really good voice actors willing to help out
also gotta thank ricky grove for all his help in engineering the sound, and popeye for helping jump start the first scene with the ship and the ship interior prop
|
|
By safegaard - 17 Years Ago
|
|
Very impressing masterpiece. Its so god for us Newbees to se how you "oldies" works and so inspiring. It give me courage to go on with all the struggle. Thanks for sharing your time and your work with us. It means a great difference. :)
|
|
By shalako42 - 17 Years Ago
|
Excellent work Gabe and thoroughly enjoyable. A good old fashioned ripping yarn...
|
|
By timepassages - 17 Years Ago
|
I just purchased iclone 4 and am having trouble importing video into a scene. Any suggestions?
thanks
|
|
By ThreeDimensionalThings - 17 Years Ago
|
|
Select the object you want to add video too, double click on the diffuse picture and navigate to the folder your video is in, select it and it should display on your object when you press play.
|
|
By aknzrdude - 16 Years Ago
|
on a whim i entered a Steampunk Art competition last October and was pleasantly surprised to find out i won in the 3D category
you might recognize these costumes from
Voyages of the Sojourner - Watch Part 1

|
|
By gizmo - 16 Years Ago
|
|
Congratulations akn. Well deserved. Superb costuming too.
|
|
By shygirl - 16 Years Ago
|
|
Congratulations Gabe, well deserved. Shy :)
|
|
By Popeye - 16 Years Ago
|
|
Good on ya Gabe. Well done. Congratulations ;)
|
|
By ThreeDimensionalThings - 16 Years Ago
|
|
Congratulations Gabe, those were amazing costumes, well deserved.
|
|
By Flybynight - 16 Years Ago
|
|
Congratulations!!!:) Darren
|
|
By sjonesdc - 16 Years Ago
|
|
aknzrdude, Congrates!!!! sjonesdc :hehe: STILL LEARNING!!!
|
|
By Alley - 16 Years Ago
|
|
Congratulations Gabe, your costumes were quite striking and professionally done. And they looked really terrific in your movie. So glad you got this recognition. :)
|
|
By Teviniii - 16 Years Ago
|
I can't say I'm surprised you won.
Congratulations.
|
|
By jwm2002 - 16 Years Ago
|
aknzrdude (10/17/2009)
Steps 10-13) ...make sure the camera or any of the avatars have not been moved...
The easiest thing to do is to check the FREEZE box for the camera that you intend to export the scene with under SCENE MANAGER panel on the left or to click the LOCK CAMERA VIEW under the MODIFY panel when the Camera is selected, which prevents users from modifying the camera movements. The user can then select back to the preview camera to move through the scene.
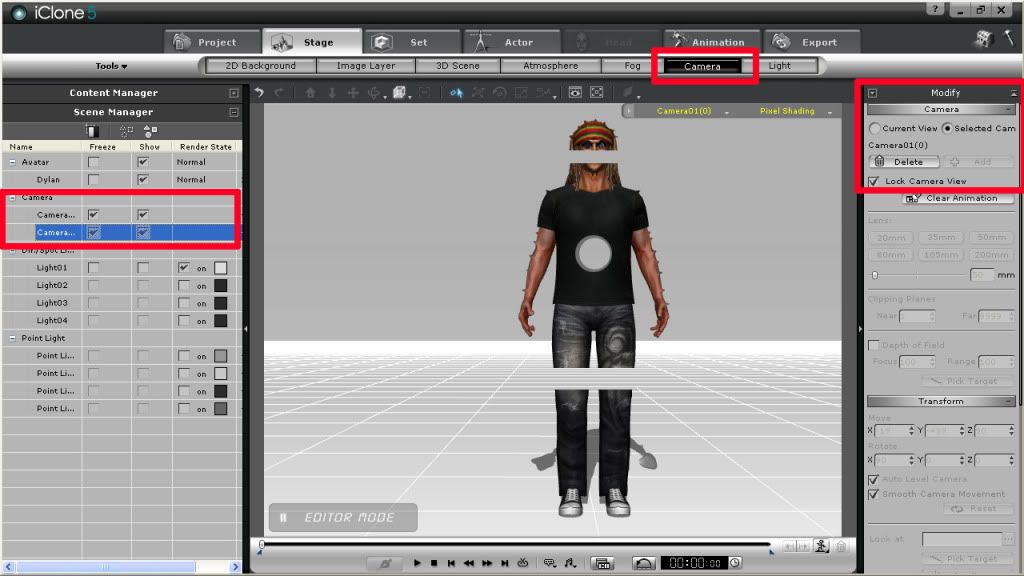
|
|
By animagic - 16 Years Ago
|
 Wow, iClone 5... :w00t:
|
|
By gizmo - 16 Years Ago
|
|
Well spotted that man.
|
|
By sjonesdc - 16 Years Ago
|
|
I'm just getting use to all of the "stuff" of iClone4Pro and looking forward to 3dXchange 3 and now it looks like I may be behind? The same thing happened when I got into Adobe Flash CS3. As soon as I became familiar with it, CS4 was being offered. At this rate I'll never be able to keep up.
|
|
By jwm2002 - 16 Years Ago
|
|
sjonesdc (1/10/2010)
I'm just getting use to all of the "stuff" of iClone4Pro and looking forward to 3dXchange 3 and now it looks like I may be behind? The same thing happened when I got into Adobe Flash CS3. As soon as I became familiar with it, CS4 was being offered.
At this rate I'll never be able to keep up.
...which is why it's great to have forums like this!
|
|
By DesertWalker - 16 Years Ago
|
|
Congratulations! Well-deserved. ps. This is referring to AKN's win.
|
|
By sjonesdc - 16 Years Ago
|
Test01 (1/10/2010)
sjonesdc (1/10/2010)
I'm just getting use to all of the "stuff" of iClone4Pro and looking forward to 3dXchange 3 and now it looks like I may be behind? The same thing happened when I got into Adobe Flash CS3. As soon as I became familiar with it, CS4 was being offered.
At this rate I'll never be able to keep up....which is why it's great to have forums like this! Test01, You're right.....but I'll still be behind, reading all of the responses!!! :w00t:
|
|
By aknzrdude - 16 Years Ago
|
hey sjonesdc i wouldn't worry about learning everything - in my case i learn as i go along - usually it is the movie i am working on that dictates what i try to learn - in the process i get things done but may not use iclone to its full potential or capabilities or most efficient
case in point is the camera - i've been freaking out trying not to mess up my camera setting when there right under my nose is the freeze - thanks test01 for pointing it out
sjonesdc (1/11/2010)
Test01 (1/10/2010)
sjonesdc (1/10/2010)
I'm just getting use to all of the "stuff" of iClone4Pro and looking forward to 3dXchange 3 and now it looks like I may be behind? The same thing happened when I got into Adobe Flash CS3. As soon as I became familiar with it, CS4 was being offered.
At this rate I'll never be able to keep up....which is why it's great to have forums like this! Test01, You're right.....but I'll still be behind, reading all of the responses!!! :w00t:
|
|
By jwm2002 - 16 Years Ago
|
|
I pretty much only focus on character motion creation and camera movement. I don't mind posting pics and video of what I find.
|
|
By sjonesdc - 16 Years Ago
|
|
Test01 and aknzrdude, Thanks for your input. At the moment, I concentrating on one aspect of iClone and that creating clothing that looks real and hopefully soon my muse will return. Thanks again!
|
|
By aknzrdude - 16 Years Ago
|
The HD version of the Voyages of the Sojourner Part 2 is now up at YouTube
special thanks to Ricky Grove for his sound engineering work
The Voyages of the Sojourner trilogy is a sci-fi adventure movie in a Steampunk theme. It follows the adventures and explorations of the HMS Sojourner under the command of Captain Phineas Aknussen. In part 3, a landing party from the Sojourner meet the diabolical Lord Azael
The Cast in Order of Appearance
Capt Steubing - Shalako
Phineas Aknussen - Killian
Silas - Peter Martin
Eidwynn - Jakechief
Arianna - Dulci
Duchess - Duchess110
Phelonious - JohnnyEx
Ondarag - Anim8r Cathy
First Officer Rodrigo - Macwemyss
Singing Rodrigo - Norrie
Lord Azael - Ricky Grove
Lady Azael - Alley
Johann De Martini - played by special guest John Martin II
Story and Animation
AnimaTechnica
Special Thanks to Ricky Grove for his tireless efforts in sound engineering
Credits
Costume Design - AnimaTechnica
Custom Meshes - BigBoss
Duchess costume - by Alley
Wayfarer airship, props - Popeye, coolclones, clones2go
Musical Score
Antonin Dvorak - Symphony no.9
Cherry Ann Fulton -"Marsh of Ruddlan'
Pro Scores 'Sky Elves'
magnatune.com[/quote]
|
|
By thebiz.movies - 16 Years Ago
|
|
Finally had a use for learning the video prop portion of this tutorial. Good stuff gabe. Well laid out and nicely explained. Easy peasy. Thanks.
|
|
By aknzrdude - 16 Years Ago
|
The Nobbit Production Thread
As in the creation of the Sojourner, i will try to update this with various tips and hints as i make this movie
Well i got word that my "The Hobbit" pitch in the FanFilmsFollies Script Pitch Contest was one of the 3 winners - so i guess i gotta make the movie - the only thing was i pitched it before i made The Nobbit so i might work on possibly completing two movies here - most of the scenes/renders will be the same (except for some let's just say risque scenes, and dialog) so i will start proceeding on set and costume work and writing the Nobbit script first - I've completed writing the first 20 minutes of the movie which i estimate to be about 90 minutes long
Casting call out to you folks who might be interested. short list of parts below but other roles might be added as the script gets more fleshed out. If you have a mind to audition, just send me a file -get creative on what you want to say (see descriptions below) and just adlib (yeah i'm lazy). Only gollum's role is filled in everything else is up for grabs
here are the potential roles:
main characters
Gonedeaf - the wizard (Gandalf) - foul mouthed, cantankerous
Dildo Bigguns - the Nobbit (The hobbit) - will have this role and gollum's role the straight man in the movie
El-Rondo - the Elf lord (Elrond) - stoner type character
Gollum - CathyAmn8r
Thore-End - leader of the dwarves(Thorin) - prissy, speaks with a lisp
~5-10 lines
Ballin - (Balin) whiny dwarf
Groin - (Gloin) high pitched voice, nuts crushed in an accident earlier in his youth
Oys - Orc leader - tries to sound aristocratic but mangles his grammar
Be-O - the shapeshifter (Beorn) - deep, gravely, rorscach like voice
Bard -Lake-town archer (Bard) - duke nukem personality/voice
Smug- the dragon (Smaug) - think HAL from 2001 space oddysey
Warg leader - a wolf like creature -
Galadriel - lady of the elves - narrator, cate blanchett impression would be good
one or two lines
Goober the Goblin - gomer pyle sounding voice
Thorondor - lord of the eagles - hillbilly sounding
other opportunities to help
script writing
set design
animation/motion/action scenes choreography
musical scoring (would like a combo of various genres of music covered depending on the scene - rap, hiphop, georgian chant, country, pop etc..)
if interested in any of the roles or help just email me
animatechnica@gmail.com
in the subject title put Nobbit: role
attach a file or download link to your audition lines
My goal is to finish this before the end of 2010, my personal goal is September, barring any other conflicts
well that's it for now, production stills/character photos will be updated as they get done
|
|
By aknzrdude - 16 Years Ago
|
the Dwarves

|
|
By aknzrdude - 16 Years Ago
|
Test render of the scene when the party first arrive at Rivendell - three diferent 'reveal' options i tried out here
|
|
By Sen - 16 Years Ago
|
Always beautiful Gabe ;)

|
|
By gizmo - 16 Years Ago
|
|
Looking good akn. I like option 2 best.
|
|
By Darren01 - 16 Years Ago
|
I've never had the chance to sit down and go through this diary or tutorial until now. To be totally honest, I haven't really done much with IC for a while, I was doing ok with the avatar creation & animation but couldn't get my head around how to set up a static scene, letalone an animated scene. And using different cameras was something I hadn't even started to understand. Your tutorial wasn't presumptuous and was explained in a very simple manner. You've given me inspiration to get back into it! A heartfelt thanks aknzrdude/Gabe.
your work is nothing short of professional, and for you to share your trade secrets with our community, is extremely generous. Good luck with your future movies, I look forward to watching them
|
|
By aknzrdude - 16 Years Ago
|
i am glad to say that the Voyages of the Sojourner has been given a 'best screenplay' award through the iClone Sci-fi competition
The judges say
"The Best Screenplay Award goes to AnimaTechnica with the Voyages of the Sojourner. This masterpiece brings an innovative and creative storyline that captivates deep and appealing plots all while delivering great costume and scene production. Congratulations to AnimaTechnica MyCinema Productions who have once again raised the bar for all iClone Movie Makers. "
formerly released in 3 separate chapters, the voyages trilogy is now compiled into one 35 minute movie. Watch it Here in HD
|
|
By Paumanok West - 16 Years Ago
|
aknzrdude (8/4/2010)
i am glad to say that the Voyages of the Sojourner has been given a 'best screenplay' award through the iClone Sci-fi competition
Great news--but hardly surprising! Congratulations! :P
|
|
By mellormedia - 16 Years Ago
|
|
Well done Gabe, I'm glad your works are getting the recognition they deserve, keep leading the way and pushing them boundaries! Best of regards, mAD mELLOR mAN:D
|
|
By Alley - 16 Years Ago
|
|
Congratulations Gabe - the movie was spectacular and it's a well deserved win. :)
|
|
By Bigboss - 16 Years Ago
|
|
Bravo Gabe! ... Well deserved and a very impressive artwork !
|
|
By Seeker769 - 16 Years Ago
|
|
A very fitting category, although I could easily see it winning for stunning visuals too :) CONGRATULATIONS! Chris
|
|
By Illustrator Cathy - 16 Years Ago
|
|
:w00t: !!!! CONGRATS GABE !!!! :w00t:
|
|
By afterThought - 16 Years Ago
|
|
Congratulations, Gabe! :)
|
|
By rollynumber1 - 15 Years Ago
|
|
Great tutorial you are full of talents well done keep it up,also i wonder if you have this tutorial in video ,thanks for your hard work.
|
|
By aknzrdude - 15 Years Ago
|
well i guess its time to sorta resurrect this thread as i embark on a new project - looking to do an iclone version of the musical Jesus Christ Superstar - so will use this thread to keep a productio diary/tutorial of sorts as i create the various scenes/sets/costumes

|
|
By Capemedia - 15 Years Ago
|
|
aknzrdude (2/22/2011)
well i guess its time to sorta resurrect this thread as i embark on a new project - looking to do an iclone version of the musical Jesus Christ Superstar - so will use this thread to keep a productio diary/tutorial of sorts as i create the various scenes/sets/costumesHolly sh!t Gabe, Talk about taking on a massive task! Do you ever stop? I've been wanting to write a musical for decades and even when I'm so close to getting somewhere, life puts me back. This is one of my favorite Andrew Lloyd Webbers musicals but it's huge. Hat's off to you, I know I could never make it and I watch with interest to how this unfolds. All the best with it. Cape :)
|
|
By aknzrdude - 15 Years Ago
|
Thanks Colin - i am hoping some of the learnings from the Nobbit will help in pulling this off - as there are no speaking scenes, this should help ease some of the scene creation - but a lot of pre production work required for set design, costuming and face texturing - probably most of my March will be spent on this (aside from finishing up The Nobbit)
I am giving myself the entire 2011 to pull it off - in comparison, the Nobbit (90 minutes long) is closing on 9 months so far)
the other thing going for it is now there are a lot of new developers - should help ease the pain of creating sets/costumes
so a shout out to you developers - if you have a costume,character, set design that might fit, ping me
|
|
By aknzrdude - 15 Years Ago
|
test render of JC

|
|
By kurzal - 15 Years Ago
|
|
aknzrdude (2/22/2011)
there are a lot of new developers - should help ease the pain of creating sets/costumes
I can help in set creating. PM me :) I would be pleased if I could somehow help you.
|
|
By kurzal - 15 Years Ago
|
PM-engine :) says: "The recipient has already exceeded their permitted number of private messages." :D and I can't send PM so I just ask you here:
I am a bad historian :D so what kind of interiors would you - as director - prefer as a reference for Caiaphas hall first, second or third?
And don't forget to clear some private messages ;)
|
|
By aknzrdude - 15 Years Ago
|
Thanks igor - i finally cleared my inbox :) - the third one would be great
gabe
|
|
By aknzrdude - 15 Years Ago
|
Pre production going very well - and I am very grateful for the many talented members of the community lending a hand - just a few of the pre production work that is happening right now
awesome Roman fort designed by Samulis
Kurzal designing Pilate's Hall and bedroom
JCS body performance motion captured by Keith (gnasche)
great vocal performance by an artist in Italy who has found the project and stepped in to help
great vocal performance by Keith who takes on the role of Annas
here's a sample shot of Kaiafas' hall (designed by Kurzal)

a shot taken from Keith's motion captured performance

crucifixion

|
|
By Capemedia - 15 Years Ago
|
|
Amazing stuff Gabe. Hope you'll let me know about my daughter :)
|