|
By rcsinger29 - 13 Years Ago
|
I am growing exponentially frustrated when trying to change heads on avatars.
When crossing generations, the skin tone NEVER matches. I have several very nice custom heads that when applied to for instance, the PR 5 female, causes the body to change to an unrealistic deep tan color.
Case by case, the fix is simple, change the grey ambient to white, load into PS and lighten by 1, then load the face, use color picker on a dark tone of the upper, add a solid fill layer to the face, noise, blur, multiply, and opacity = 45!!!
The problem is, if you change the clothing, you have to go through the WHOLE PROCESS AGAIN.
If you change the head... You have to go through the WHOLE PROCESS AGAIN.
The same thing happens with G3 - G5 and vice versa.
Does anyone have a quick tip for saving a base material that will correctly adjust the skin tone across generations?
|
|
By rcsinger29 - 13 Years Ago
|
Swoop, I have a tremendous amount of respect for your knowledge and wish I could learn more from you. I simply can't understand your method of instruction.
Can you provide a little more detail?
Once this method is applied, can you simply switch the head and the color adjust correctly, just as it does with same-gen?
|
|
By Cricky - 13 Years Ago
|
|
rcsinger29 (12/14/2013)
I am growing exponentially frustrated when trying to change heads on avatars.
When crossing generations, the skin tone NEVER matches. I have several very nice custom heads that when applied to for instance, the PR 5 female, causes the body to change to an unrealistic deep tan color.
Case by case, the fix is simple, change the grey ambient to white, load into PS and lighten by 1, then load the face, use color picker on a dark tone of the upper, add a solid fill layer to the face, noise, blur, multiply, and opacity = 45!!!
The problem is, if you change the clothing, you have to go through the WHOLE PROCESS AGAIN.
If you change the head... You have to go through the WHOLE PROCESS AGAIN.
The same thing happens with G3 - G5 and vice versa.
Does anyone have a quick tip for saving a base material that will correctly adjust the skin tone across generations?
Just choose the Face(Skin) and when you change it, make sure you select/choose the "Affect All Materials" option to have the remaining skin change with your edits.
If the "Affect All Materials" is already checked when you apply the new head, turn it off and back on.
|
|
By rcsinger29 - 13 Years Ago
|
@Cricky
It effects all the skin when you edit the "adjust color" attributes. Even with "affect all materials" unchecked, it still adjusts every map.
The problem is actually the opposite. When applying a G5 head to a PR5 body (or any other cross gen head) the skin color will not match the rest of the body. I want to try to create a "base" that will adjust properly when a different gen head is applied.
|
|
By animagic - 13 Years Ago
|
|
I have noticed too that there is a problem with skin matching in the current version of iClone. It used to be that as long as a 10x10 square in the upper left corner of the Face skin texture was used as the reference color (so basically you would have the top portion of the face texture with the reference color), this same color would be used at the seams of other skin textures to get seamless transitions. Well, the color does still get picked up and has the same value as the reference color, but somehow the head and the neck don't match. To complicate matters, the newer textures have a specularity map, which the face texture may not have. But even when I get rid of the specularity maps and make sure that all further settings are the same for all textures, the match is still off. I think this is a recent issue, because in the past I never noticed it. As to the problem with clothing changing the skin as well, what I have done once everything matches is save all skin textures and then reload them after the new clothes are applied.
|
|
By rcsinger29 - 13 Years Ago
|
@Animagic,
Yeah, that's what I do as well. The problem is that I have to edit and save an iMtl file for each head I want to apply. I can fix the texture on the face fairly quickly, it's just irritating to have to do it for EVERY head, change the outfit, and have to reload the iMtl file for all other body parts again, rinse and repeat.
|
|
By animagic - 13 Years Ago
|
|
I looked at this a bit more with a grid and the problem is that the textures are larger than what is actually visible, so it's tricky to find the exact spot where the edges need to match. If you use the same monochrome texture for both head and upper, then you get a seamless transistion. It looks then that this need some work on RL's part.
|
|
By rcsinger29 - 13 Years Ago
|
It works ok with same gen head/body combos.
My work around may be lengthy and might not match perfect, but its close enough that only someone looking for the problem would see it.
@Swooop, I am pretty fluent in PS. I don't know it all but I'm versed. I have used that method (increasing the canvass to 1024/1024) on bodysuit cloth to get a proper alignment and color.
I was hoping that a hue/sat/brightness/tone combination could be saved to the body, that could then be used as a base, that would match correctly when a new head was applied.
For instance:
Multiple adjustments to PR5 female to match G3 violet.
Save the character, save the upper/lower/hands/shoes skin iMtl.
New project - load the saved character, load G3 trinity head - Boom skin matches.
-or- load upper/lower/ hand/feet/ Boom, skin matches.
-without having to edit the texture EVERY TIME.
@Animagic,
The area around the neck (G5 characters at least) almost looks like road rash. It's not smooth at all.i thought that correcting the rough texture around the neck would help but it actually makes the line more defined and visible.
My fix for a G5 head -> PR5 body is
Remove grey ambient from the skin of the body.
Load each skin file into PS. Adjust color/lighten * 1
Load the G5 face texture
Use color picker on a dark tone of the upper skin
Add a solid color fill layer to the face (the one you picked)
Change the fill layer to multiply, use 45 opacity
Then add a significant noise filter and blur the solid layer.
I did notice that the "affect all materials" button would ever so slightly adjust the other textures. But it still doesn't match. When I use my method of matching the tone, if I use "affect all mats", the upper skin will match, but there will be a defined line where the upper and lower meet.
|
|
By mark - 13 Years Ago
|
This has been an annoyance for some time.
As has been stated... I usually pick a common color from one of the maps that I bring into Photoshop, then use a soft "airbrush" to blend the edges of the maps so when they are butted together in iClone the edges are, in effect, the same color....even then it's not perfect, as far as I'm concerned... but it's closer to a seemless blend.. Of course you lose any nice textures that were on the original texture map...that's where your bump and blend (maybe seamless) maps come into play ;)
|
|
By animagic - 13 Years Ago
|
|
Thanks for all your tips, guys! I don't have Photoshop, only Paintshop Pro (poor man's PS), but I'm sure I will be able to devise a comparable process. No EZ button...:crying:
|
|
By justaviking - 13 Years Ago
|
animagic (12/16/2013)
Thanks for all your tips, guys! I don't have Photoshop, only Paintshop Pro (poor man's PS), but I'm sure I will be able to devise a comparable process. No EZ button...:crying: Have you ever tried GIMP? It's a "really poor man's" Photoshop. (It's free.) I was never very good at Photoshop, nor am I very good at GIMP, but it seems to be quite functional.
|
|
By rcsinger29 - 13 Years Ago
|
Photoshop Elements:
100 - 200 bucks, most Office Depot, office max, staples, carries.
I have yet to encounter a primary function in PS that is not also included in Elements. The layout is slightly different and many of the PS plugins and utilities do not work properly (Daz 3d bridge comes to mind) but it works great with iclone.
|
|
By animagic - 13 Years Ago
|
|
Thanks, rcsinger, I didn't know Elements was that functional. That would be good to get as there are many tips written for Photoshop. Viking, I've tried Gimp in the past, but couldn't get used to the UI. That was years ago, though. I don't mind paying some money, but not the full price of the "big" Photoshop, which would be overkill in my case. I just see Elements is for sale for 70 bucks...Hmm...:w00t:
|
|
By rcsinger29 - 13 Years Ago
|
|
I absolutely love Elements. The interface is almost identical to the full version so most video and slide tutorials are easily understood. Some of the functions are located in different places, for instance, the warp tool is located in -filter-distort-liquefy button - 1 and the offset function is located in -filter-other, but as far as functionality and features, I have yet to encounter a tutorial on creating textures that I couldn't follow and find the functions.
|
|
By rcsinger29 - 13 Years Ago
|
In tooling around with things, I noticed that when you cross generations between Body and head, the alignment is significantly off between the head and neck area. Iclone automatically adjusts this to make a seam. This gap is not present with same gen head/body combos. I wonder if this has something to do with why the tone matching is broken??
Does Texture Resolution effect it at all?
More to do..
|
|
By rcsinger29 - 13 Years Ago
|
I spent quite a bit of time last night lining the G5 neck up with the G3 head. That ugly fat line is easily fixed, not hard at all. The texture tone "seemed" to change ever so slightly after the edit (used undo/redo several times to try to confirm) but if it did, it's so subtle it's almost non existent.
The characters are much more realistic although the neck is bent slightly forward.
|
|
By rcsinger29 - 13 Years Ago
|
|
Patience swooop, I've been hanging wire along the side of a major highway, just got finished.
|
|
By rcsinger29 - 13 Years Ago
|
Ok, now that I have a little time.
First off, I am not an IC Dev. I downloaded some stuff from the Dev site for personal growth. In learning more and more, I started tackling bigger challenges. I Made a couple outfits and a few props that I uploaded and a few people spent some points on but I am far from a developer.
In the beginning, I was trying to move WAY TOO FAST, getting overwhelmed and becoming more confused. I finally learned to slow down and "tinker" With things a little at a time. This has produced great results for me.
To the point. Yes, I aligned the verticies ;sort of.
To the actuality: When I start "tinkering" I make small changes, then check the result with a far from finished product. I then continue along this path; small edits, export/import, check the results, rinse and repeat. I then determine the usefulness to me/others, any potential profit, etc.
I did not completely align the verticies. I edited them to eliminate that thick fat overlap of the meshes of the upper (neck) and head. I noticed the skin tone change ever so slightly when replacing the same avatar. This prompted me to ask the question. The skin tone seemed to change ever so slightly with an edited, but not perfectly aligned, mesh. I also intend to edit the uppers for smaller heads for the purpose of getting rid of the "CONE NECK" that results from a small head. If this "helps" the skin matching, its worth noting.
I hope that my skills eventually evolve into being worthy of being called a IC Dev, but for now, I am a hobbyist who is learning, distributing a thing or two, and getting a few free items from the marketplace as a result.
|
|
By animagic - 13 Years Ago
|
|
A long time ago, when we had IC 2, and then IC 3 came along, Peter (RL) published a procedure to match a G3 head on a G2 body. Nothing fancy, just a matter of resizing the G3 head in iClone with the Avatar proportion tool. There may have been a little more you needed to do, I don't remember. You can do something similar with G5 heads and G3 bodies. I found the instructions with my G5 head in the MarketPlace: If you want to use this head with a G3 character you 'll need to scale down the head to 92%. I know this is a simple approach, but then again I an a simple person...:unsure:
|
|
By rcsinger29 - 13 Years Ago
|
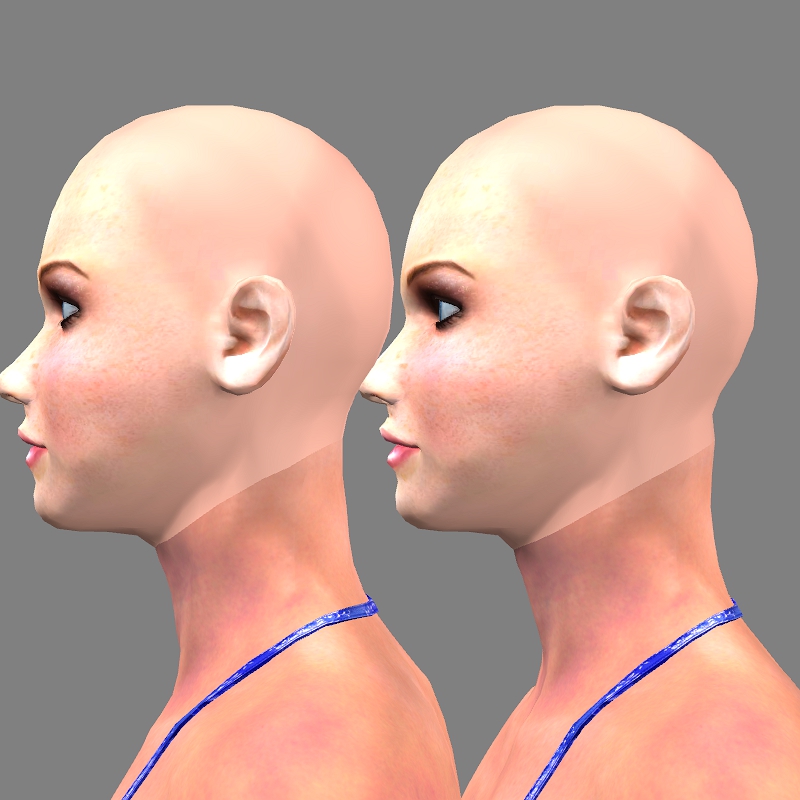
Using the Avatar proportions tool leaves a "Cone" shape around the neck area. Reshaping the mesh makes a smooth transition.
Left Side - Reshaped.......Right Side - Origonal

|
|
By rcsinger29 - 13 Years Ago
|
|
You do HELP ME. Sometimes I wish I had a decoder ring to understand what you say, but after I dig into it a little, I generally find out the point you are trying to convey.
|
|
By animagic - 13 Years Ago
|
|
@rcsinger: I understand it is not a perfect solution, but since in my case the hair covered up the neck mostly it didn't matter so much. And time is precious... But I'm always interested in a better way, and you're doing a good job in decoding sw00000p...
|
|
By rcsinger29 - 13 Years Ago
|
I first noticed that "cone" on male avatars. I put a G3 head onto a chuck avatar (short hair) and it bugged the fidduttles out of me. I never worried about it with female avatars until I made a bunch of custom faces and started trying to match the skin tone.
In messing around with this problem, the bulge started bugging me more and more. Lining one body to another head (verticies) takes about 5 minutes. The benefit is that when this upper is saved, any G5 head will fit the new body correctly. For this reason (and the fact that I am OCD when I know there is a flaw of some sort) I am going to reshape each gerneration body to fit each generation head, save the upper as I.e. PR5 to G5, and hang on to the OBJ to export/replace with each CC model.
EDIT: I remember where it bugged me. I was working on a lake/romantic scene using PR5 tony on a G5 body (casual outfit) and Gwynn on a G3 body - bikini. The bulge stuck out like a sore --- neck. Messes with your camera angles quite a bit.
|