|
Author
|
Message
|
|
martok2112
|
martok2112
Posted 13 Years Ago
|
|
Group: Forum Members
Last Active: 2 Weeks Ago
Posts: 1.6K,
Visits: 2.4K
|
Hi, folks, It's your friendly neighborhood Martok2112 (call me Steve if you wish) with another tutorial for beginners, and for those looking to economize a bit in their animations. Alright, class, ATTEND. (You, Jimmy, in the back...pay heed!)  Ok, today, dear childroon, we discuss animating characters along a path. Today's lesson will be the first of a couple of different ways to deal with path character movement. So, let's turn in our textbooks to page one. (Joseph, put away that -- is THAT a porno mag?!...and you didn't bring enough to share?! We shall talk later, young sir. In the meantime, I'm sure you'll get your kicks out of this lesson.) The purpose of this class is not only to give newcomers to iClone a nice little beginners' animation tutorial, but also to cover some problems that even some more advanced users have had with getting character path animations to work, as well as the problem some folks have with placing multiple animations together, and ending up with different character starting positions for each animation. For the example I have today, I have decided to do a slight recreation of the (soon to be famous) car wash scene from the upcoming comedy "Bad Teacher" starring Cameron Diaz. I say slight because certain elements of this reproduction are not accurate. Now, the first thing to think of when it comes to avatar/characters is to think of them as (Thomas, what are you doing?! Do not think of her THAT way. She is a willing participant in this very vital demonstration, not an object to be oogled. Well....ok...yes, she is very hot, but....ach, that is beside the point, now pay attention!)...ahem...think of them as "action figures" of a sort. (Yes, Gerald, like your little G.I. Joes or Star Wars figures.) In addition to creating clothing for them, you can also give them props to be a permanent part of their loadout. For the "Bad Teacher" avatar, we'll call her Elizabeth Halsey, since that is the character's name in the upcoming film, she has two sponges and a water hose. You can store the avatar with their accessories so they can be activated/deactivated as needed for your upcoming scenes. Elizabeth also has some "BLEND" overlays which will give her a wetlook appearance, but we're not worried about that right now. Let's look at Fig. 001  For this shot, Elizabeth will only need one sponge in her left hand, and the water hose in the right hand, so, let's activate them, and deactivate the right hand sponge. Now the next thing we wish to do is lay out a path around the truck for her to traverse. So, create the path, and edit as necessary. Done? Done. Right, onto figure 002 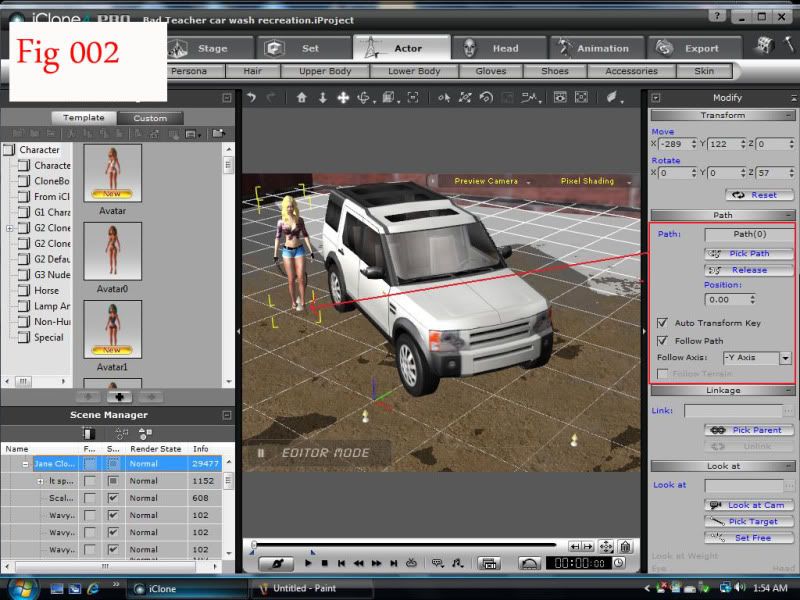 At the first frame of the soon to be made animation, place Elizabeth (make sure she is highlighted) at the start of the path, by clicking PICK PATH, and then moving the cursor to the first path point...the point of origin that you'd set down when creating your path. Since we are dealing with simple, flat terrain, you can set the "FOLLOW PATH" button in the PATH animation box. This will allow Elizabeth to track properly in her facing as she traverses the path.
"Incompetence will always prevail so long as evil men stand by and do nothing."
-Martok2112
|
|
|
|
|
martok2112
|
martok2112
Posted 13 Years Ago
|
|
Group: Forum Members
Last Active: 2 Weeks Ago
Posts: 1.6K,
Visits: 2.4K
|
In FIgure 003 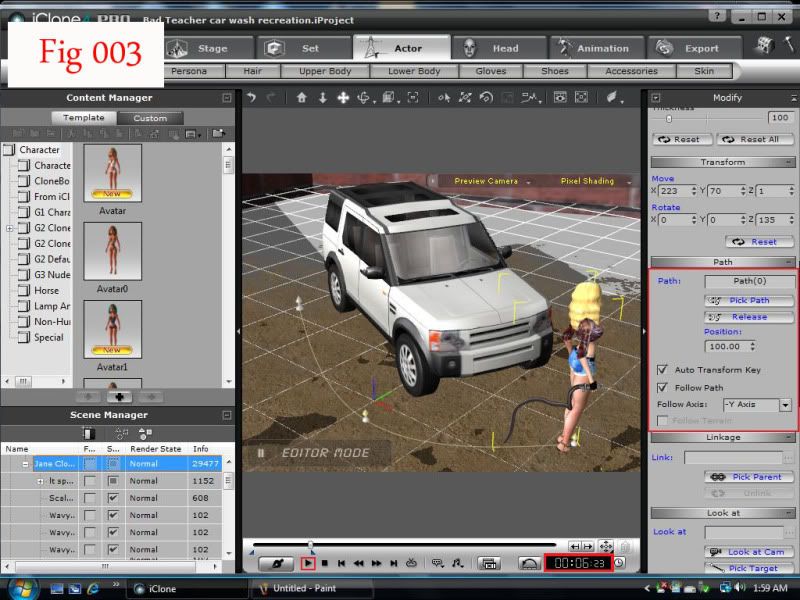 Set the length of time you wish the animation to carry on. For this, I've set the animation for about 4 seconds at first. Do this by moving the slider until you come up on about 4 seconds in the digital readout at the right of the playback bar. Now, set back to frame one and replay the animation to make sure that Elizabeth tracks properly along the path. If you are unhappy with the length of time it took for her to travel to the end point, you can always go into the TIMELINE and adjust the end path key frame and the end marker TRANSFORM keyframe. Move them to the right to increase the amount of time it takes for her to travel the path, move it to the left to decrease the amount of time. In this case, I thought she'd moved a bit too fast, so I moved the end PATH and TRANSFORM keyframes to the right until I got about six seconds worth of animation. Replay. Alright, I like this travel time, so we'll stick with that. Right, onto Fig. 004 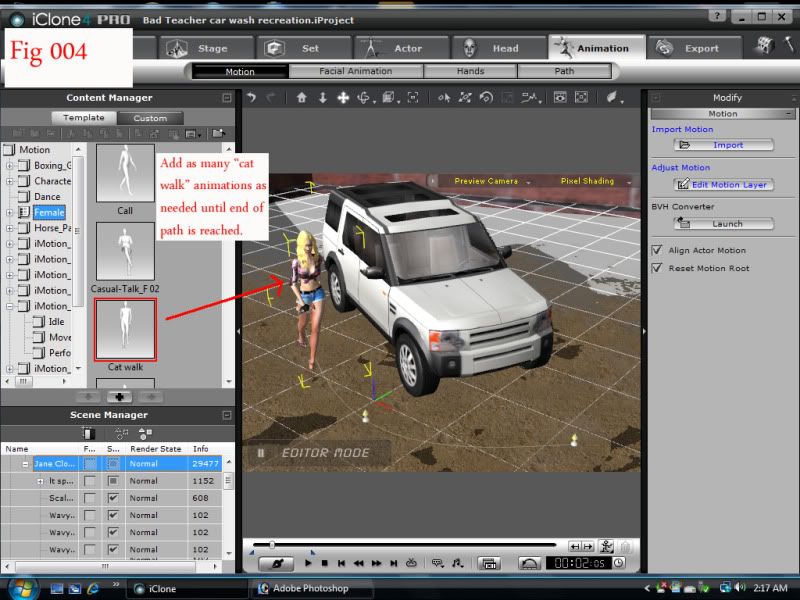 Ok, now that she's traversing the path properly, we can set about adding animations. So, select the following buttons: ANIMATION>MOTION>TEMPLATE>FEMALE and select "Cat Walk". Now, since we're back at frame one, double click on the "Cat Walk" animation loop, and it will apply to Elizabeth. As you can see, she's started her animation now with the cat walk. After the first loop has finished, the playback will pause. From here, you can either double click "Cat Walk" in the animation template, and lather, rinse, repeat (no pun intended) until you reach the end of the path. Or you can go into the TIMELINE, (see FIgure 004a) select JANE SEXY, MOTION, and then see the animation box for your first "Cat Walk". You can copy and paste this animation box until you reach the end of your path. Either method is acceptable. Fig 004a 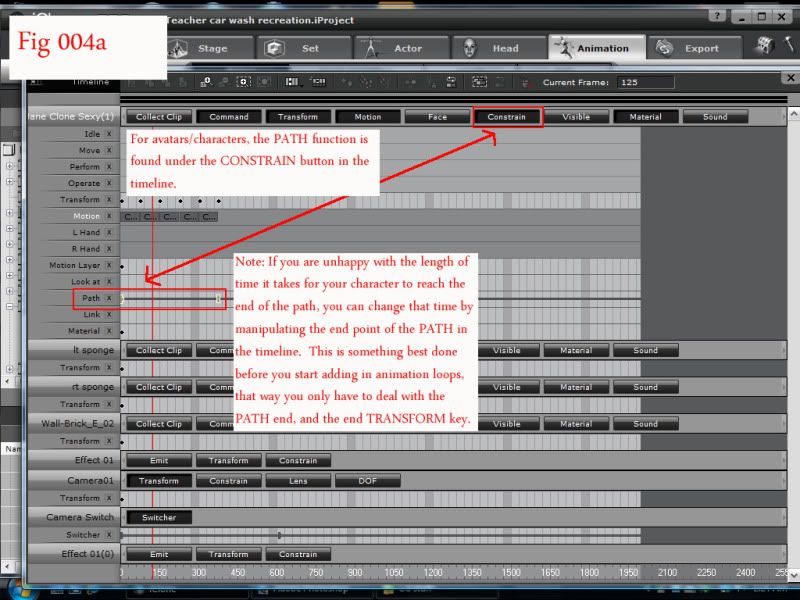
"Incompetence will always prevail so long as evil men stand by and do nothing."
-Martok2112
Edited
13 Years Ago by
martok2112
|
|
|
|
|
martok2112
|
martok2112
Posted 13 Years Ago
|
|
Group: Forum Members
Last Active: 2 Weeks Ago
Posts: 1.6K,
Visits: 2.4K
|
Now, playback the animation again with the "Cat Walks" in place. Now, as you can see, she is traversing the PATH, this time cat walking it, instead of just gliding along it. Well done. Moving on...Fig 004b 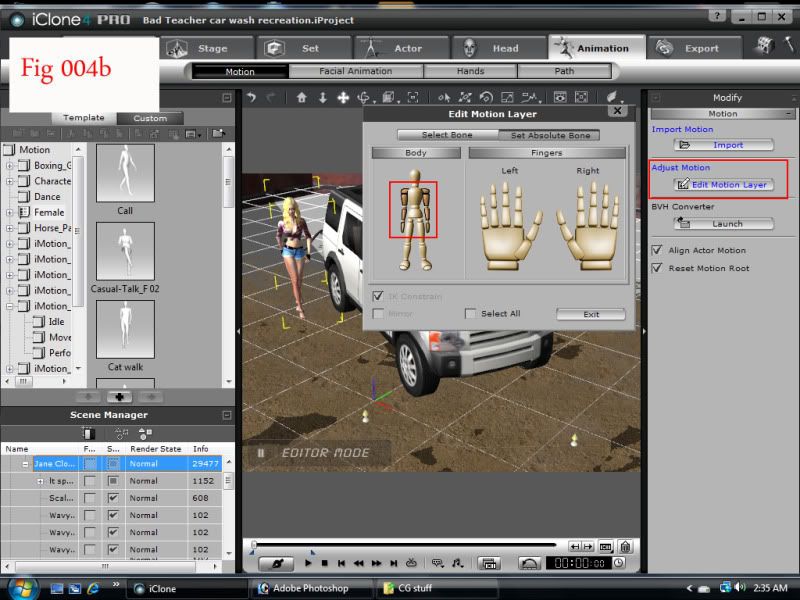 Alright, the animation and movement are in place, but now, we need to do a little tweaking. Go back to frame one, and while making sure that Elizabeth is still highlighted, click on ANIMATION, and EDIT MOTION LAYER under the ADJUST MOTION box on the right of the playback window. For our purposes, we're going to need Elizabeth to hose down the vehicle, while still executing her cat walk. With the EDIT MOTION LAYER activated, we now see the EDIT MOTION LAYER box being displayed. We want to select SET ABSOLUTE BONE. Now, as you'll notie in Fig 004b, I have highlighted (or browned out) her left and right arms, starting from the shoulder bones and down to her hands. This will effectively immobilize her arms during the catwalk animation. Go ahead and playback the scene, and now you will see that she is catwalking, but her arms are not moving. This now allows us to manipulate her arms to start hosing down/washing the vehicle. Fig 005 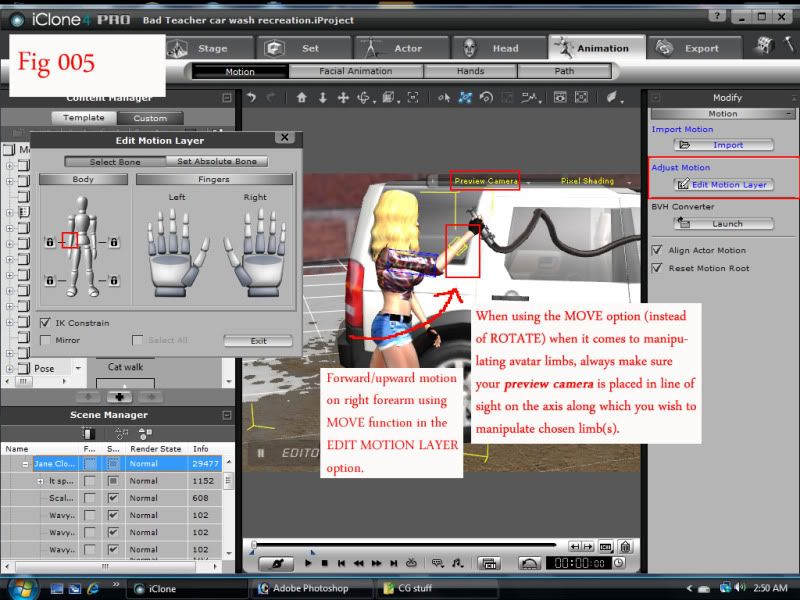 Now we begin to move her arms into the appropriate positions. (Michael, that'll be enough snarkery out of you, young man!....What do you mean is there such a word as "snarkery"?! Your impertinence will do you no credit in this class, sir!) As I was saying: Now we need to switch over to SELECT BONE in the EDIT MOTION LAYER window. Now, select her right forearm, and make sure you are in MOVE mode. Before moving her forearm, let us first adjust our PREVIEW camera, so that we are looking at Elizabeth from a profile (side) view. (Gerald, take that camera off her bum, and place it where I instructed you...this instant, lad!) Now, the reason we place the camera on this angle is so that when we move her forearm, we can move it forward. Now set your MOVE button, and then move her forearm so that it is ahead of her, and held slightly high...at about head level.
"Incompetence will always prevail so long as evil men stand by and do nothing."
-Martok2112
|
|
|
|
|
martok2112
|
martok2112
Posted 13 Years Ago
|
|
Group: Forum Members
Last Active: 2 Weeks Ago
Posts: 1.6K,
Visits: 2.4K
|
Fig 005a 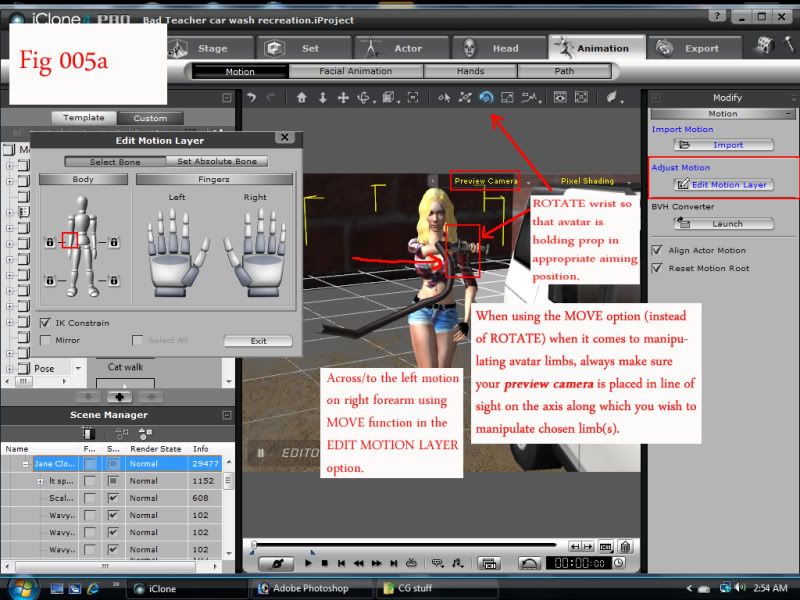 Now move the camera so that we are viewing Elizabeth from the front. (Zoom that camera out Stuart. I can see you oogling her cleavage from HERE!) Now, we can move her forearm a little bit so that it now starts to cross over to the left. (HER LEFT!) Switch to ROTATE mode so that we can ROTATE her wrist to properly aim the water hose. Click through the three rotation axes and adjust until you have the aim set. Fig 005b  While still in frame one, now might be a good time to have Elizabeth actually looking at her target. So, with the ACTOR box highlighted, click on LOOK AT>PICK TARGET, and then with the cursor, select the hood of the vehicle. Now give her another test playback. You will now see that she is holding the hose properly, and moving along the vehicle, whilst looking at it. Fig 005c 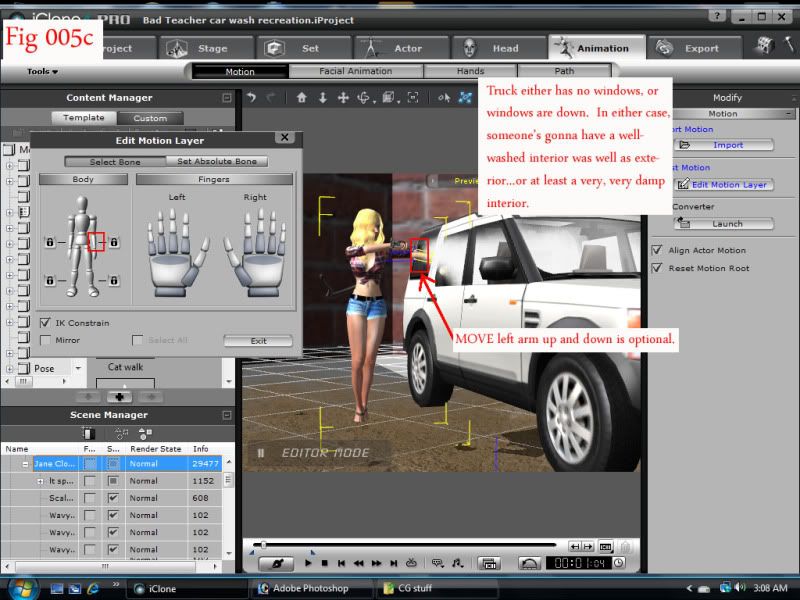 Alright, select the PICK DUMMY prop on Elizabeth in the SCENE MANAGER (lower left of the display) and expand it so that we can select its EFFECTS). TURN ON those effects so that the water hose is now actively spraying. Good. Now playback. Oh, dear. Umm....it looks like the owner might end up being a slight bit peeved at Elizabeth...although he should be peeved at himself for forgetting to roll his windows up. Anyhoo, nonsense aside, as you can now see, Elizabeth is walking around the vehicle, and actively hosing it down. We can also elect to move her left arm so that it appears she is rubbing down the vehicle while she walks up the path. Watch the playback again. Well done, lads. You have successfully applied Elizabeth to the path, and then added in the animations and tweaks afterward. You should now be able to create animations using characters along paths, and using whichever animations you desire. Remember the simple rule: PATH first, then ANIMATE.
"Incompetence will always prevail so long as evil men stand by and do nothing."
-Martok2112
|
|
|
|
|
mark
|
|
|
Group: Forum Members
Last Active: 2 days ago
Posts: 4.8K,
Visits: 16.4K
|
Great job! Love it Can we see the animation? mp

Click here to go to my YouTube Channel filled with iClone Tutes and Silly Stuff
Visit ANIMATED PROJECTIONS Powered by iCLONE
Intel Core i7 3960X @ 3300MHz Overclocked to 4999.7 MHz Sandy Bridge 24.0GB DDR3 @ 833MHz Graphic Display HP ZR30w
GeForce GTX 980Ti 6GB Microsoft Windows 7 Professional 64-bit SP1 ASUSTeK COMPUTER INC. P9X79 WS (LGA2011)
|
|
|
|
|
martok2112
|
martok2112
Posted 13 Years Ago
|
|
Group: Forum Members
Last Active: 2 Weeks Ago
Posts: 1.6K,
Visits: 2.4K
|
Yeah, I'll get to that later tonight. (My sleep schedule's all askew.) I have another tutorial I'm planning, using the same motif. Glad you liked it. Many thanks.
"Incompetence will always prevail so long as evil men stand by and do nothing."
-Martok2112
|
|
|
|
|
martok2112
|
martok2112
Posted 13 Years Ago
|
|
Group: Forum Members
Last Active: 2 Weeks Ago
Posts: 1.6K,
Visits: 2.4K
|
|
|
|
|
|
Keith_MPS
|
Keith_MPS
Posted 13 Years Ago
|
|
Group: Forum Members
Last Active: 2 Years Ago
Posts: 385,
Visits: 1.3K
|
Lord, whatever I done, just don't strike me blind for another two minutes.
Great stuff.
- Keith
|
|
|
|
|
martok2112
|
martok2112
Posted 13 Years Ago
|
|
Group: Forum Members
Last Active: 2 Weeks Ago
Posts: 1.6K,
Visits: 2.4K
|
gnasche (6/13/2011)
Lord, whatever I done, just don't strike me blind for another two minutes.
Great stuff.HA HA HA HA HA!!! Thank you, gnasche. I needed a good laugh, and thank you for the kind words.
"Incompetence will always prevail so long as evil men stand by and do nothing."
-Martok2112
|
|
|
|
|
Paumanok West
|
Paumanok West
Posted 13 Years Ago
|
|
Group: Forum Members
Last Active: 10 Years Ago
Posts: 2.5K,
Visits: 7.0K
|
Wow, that's a great animation, and certainly a great way to publish a tutorial--in text, so we can read it at our pace, and broken up into forum posts. Tell us about the origins of the hose and the water effects.
General Picture - animating now to life itself(tm)
Member of Content Wizards
|
|
|
|