|
Author
|
Message
|
|
Miranda (RL)
|
Miranda (RL)
Posted 4 Years Ago
|
|
Group: Administrators
Last Active: 2 Years Ago
Posts: 1.8K,
Visits: 11.2K
|
Substance Painter 2020.2.0 (6.2.0) introduces the new UV Tile workflow letting you paint across UDIMs, which is a great benefit to Character Creator users. In response, we developed a Substance Painter preset for users to easily transfer CC characters with compatible format between the two engines. Before CC version 3.31, users can export a fully-dressed character and its accessories to Substance Painter, however, users cannot benefit from the new "painting across UDIMs" feature because of the file format compatibility issues. From version 3.31, CC supports exporting file format specifically for Substance Painter, so users are allowed to paint across UV tiles now. This post will be broken down into parts for additional details:
- Export Substance Source
- Source File
- Import OBJ in Substance Painter
- Bake Mesh Maps
- Export Textures from Substance Painter
- Update Textures in Character Creator
Tutorial:
Edited
4 Years Ago by
Miranda (RL)
|
|
|
|
|
Miranda (RL)
|
Miranda (RL)
Posted 4 Years Ago
|
|
Group: Administrators
Last Active: 2 Years Ago
Posts: 1.8K,
Visits: 11.2K
|
Export Substance SourceExport Settings Once the character is made with all of the right settings, start the export process immediately. There are two methods to export. 1. Toolbar > Substance button > Export Substance Painter Source.  2. Menu > File > Substance Painter Pipeline. 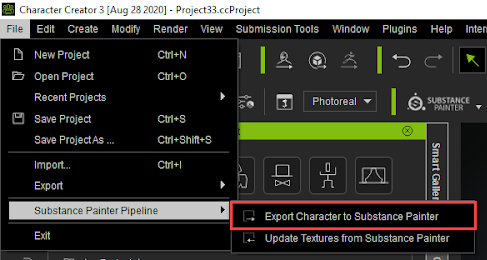 Suggested Character Pose for Export Suggested Character Pose for ExportPlease be noted that the current pose will be used for export, therefore, make sure the current current pose is easy to work with. For example, - Arms must not intersect with the body
- Thighs and calves should not intersect with one another
- Parts of the body should not have duplicate names
Material Name Check before Export
- Substance Painter makes use of materials, therefore, make sure that material names don’t repeat. Otherwise, the export will abort with a dialog request to modify the material names.
- If there is empty space in the material name, Substance Painter will automatically change it to three underscores: "___", which can't be recognized by CC. Therefore, empty spaces should be manually removed or replaced with single underscores “_” before export.
You can follow the steps below to check for proper naming convention
- Select the character in the Scene Manager.
- Select the material name table under the material list and sort it alphabetically.
- Check for duplicates and empty spaces in the material names.
 Duplicate and space containing names will elicit a warning message. These errors have to be fixed to permit exporting. 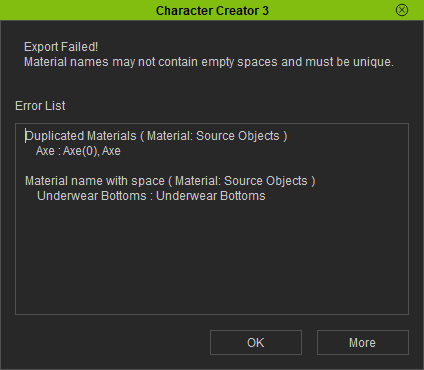 When export completes, CC will guide you to get the Substance Painter presets, which is a required step when exporting textures from Substance Painter.  Save the Avatar Save the Avatar
Remember to save the avatar after modifying the material names. Saving as project or avatar are both permitted, just make sure that the exported form of the character is kept when Update Texture is activated.
Edited
4 Years Ago by
Miranda (RL)
|
|
|
|
|
Miranda (RL)
|
Miranda (RL)
Posted 4 Years Ago
|
|
Group: Administrators
Last Active: 2 Years Ago
Posts: 1.8K,
Visits: 11.2K
|
Source File
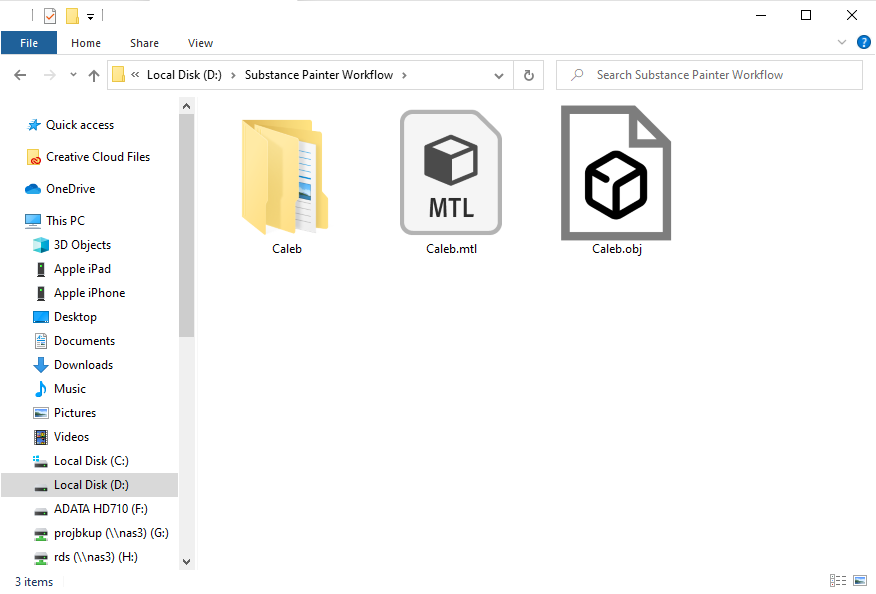
The exported source files will include an OBJ file and texture folder.
Texture folder containing the following: - The Std_Skin_Head folder will contain all of the UDIM material textures including the head, body, arms, legs, nails, and eyelashes.
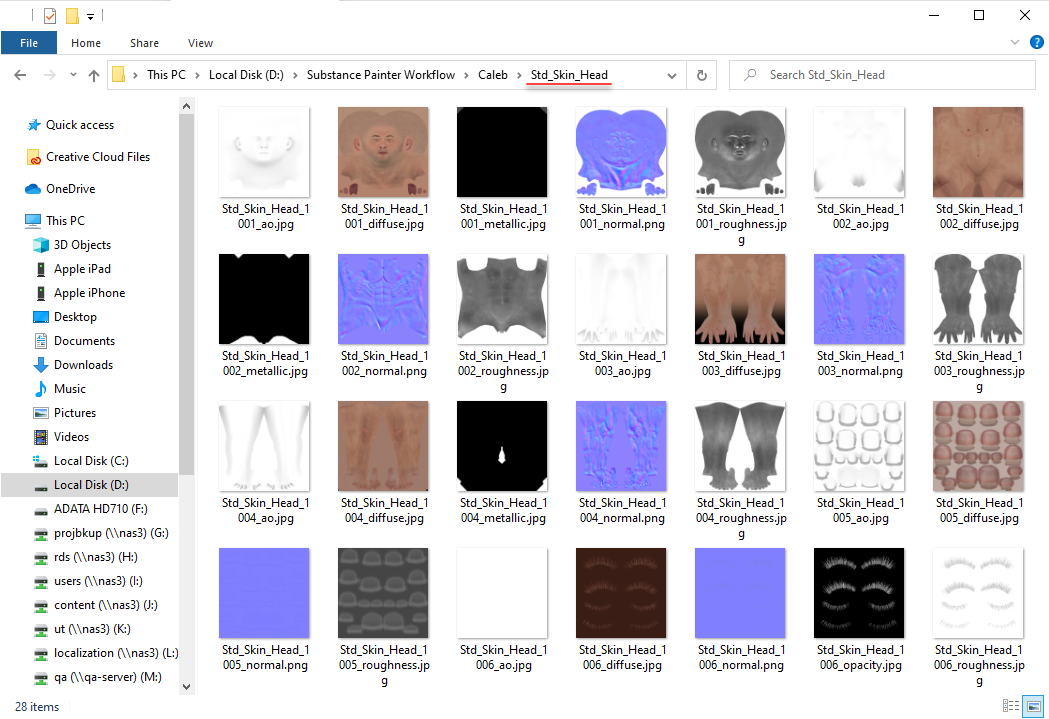
- Other textures will export into individual folders according to the material structure.
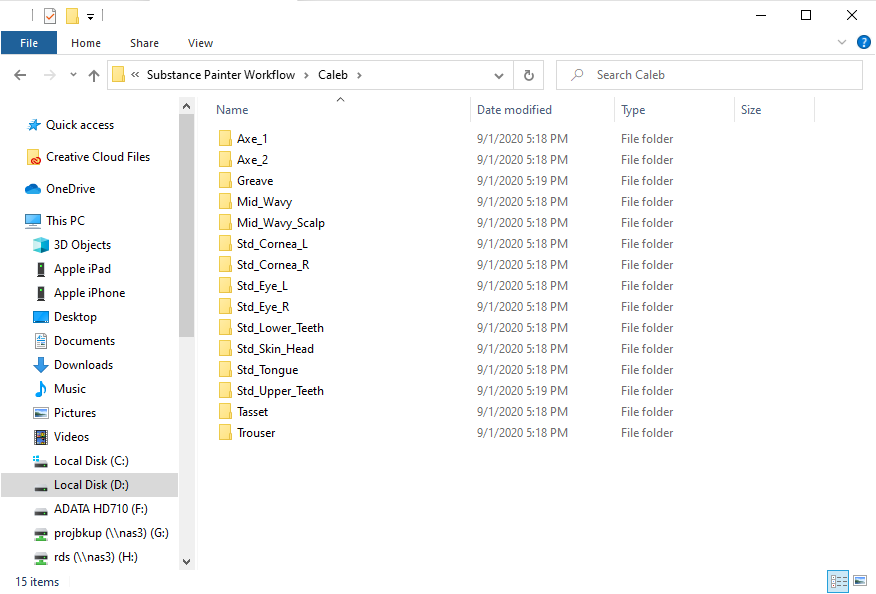
- Eye Element and Resource Maps will not be exported.
|
|
|
|
|
Miranda (RL)
|
Miranda (RL)
Posted 4 Years Ago
|
|
Group: Administrators
Last Active: 2 Years Ago
Posts: 1.8K,
Visits: 11.2K
|
Import OBJ in Substance Painter UDIM settings in Substance Painter
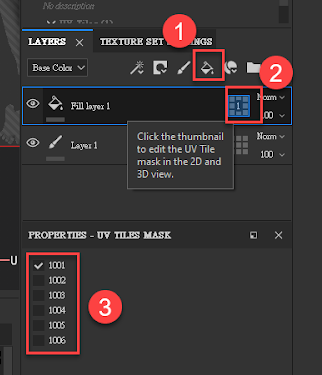
In Substance Painter, open the OBJ mesh file and activate Use UV Tile workflow. Select the Preserve UV Tile layout per material and enable painting across files option, and select the OpenGL as the Normal Map Format. 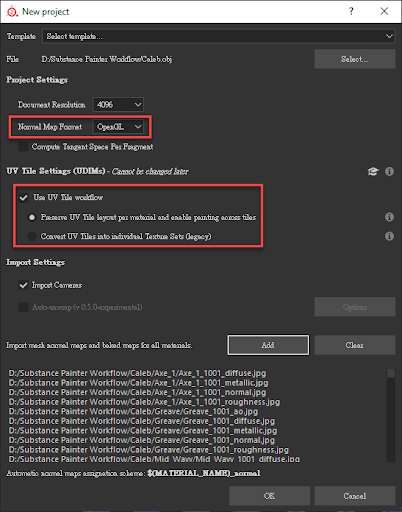 Verifying Texture Sets Verifying Texture Sets Multiple UV sets present under Std_Skin_Head in the Texture Set list, indicates UDIM data has been successfully imported.  Assigning UV Sets Assigning UV Sets - Import all the textures in order.
- Add a Fill layer.
- Click on the thumbnail to assign a UV set.
- Designate a UV set (identify the UDIM number by using the UV viewport).
 Load texture step:  Transparent Material Settings Transparent Material Settings Enable view-port semi-transparency for the PBR shader, in order to see the effect in Substance Painter (Regardless of the view-port settings, semi-transparency will always export properly). - Click on the button to the upper-right side of the Shader Settings panel.
- Click on the shader name (it's usually a PBR Metal Rough material).
- Click on the PBR Metal Rough with Alpha Blending.
* PBR Metal Rough with Alpha Test also contains an opacity channel, however, it only supports cut-off transparency, not semi-transparency (with gradient).
Open the Opacity channel and load a texture - Click on Add Channels inside the texture settings.
- Select Opacity.
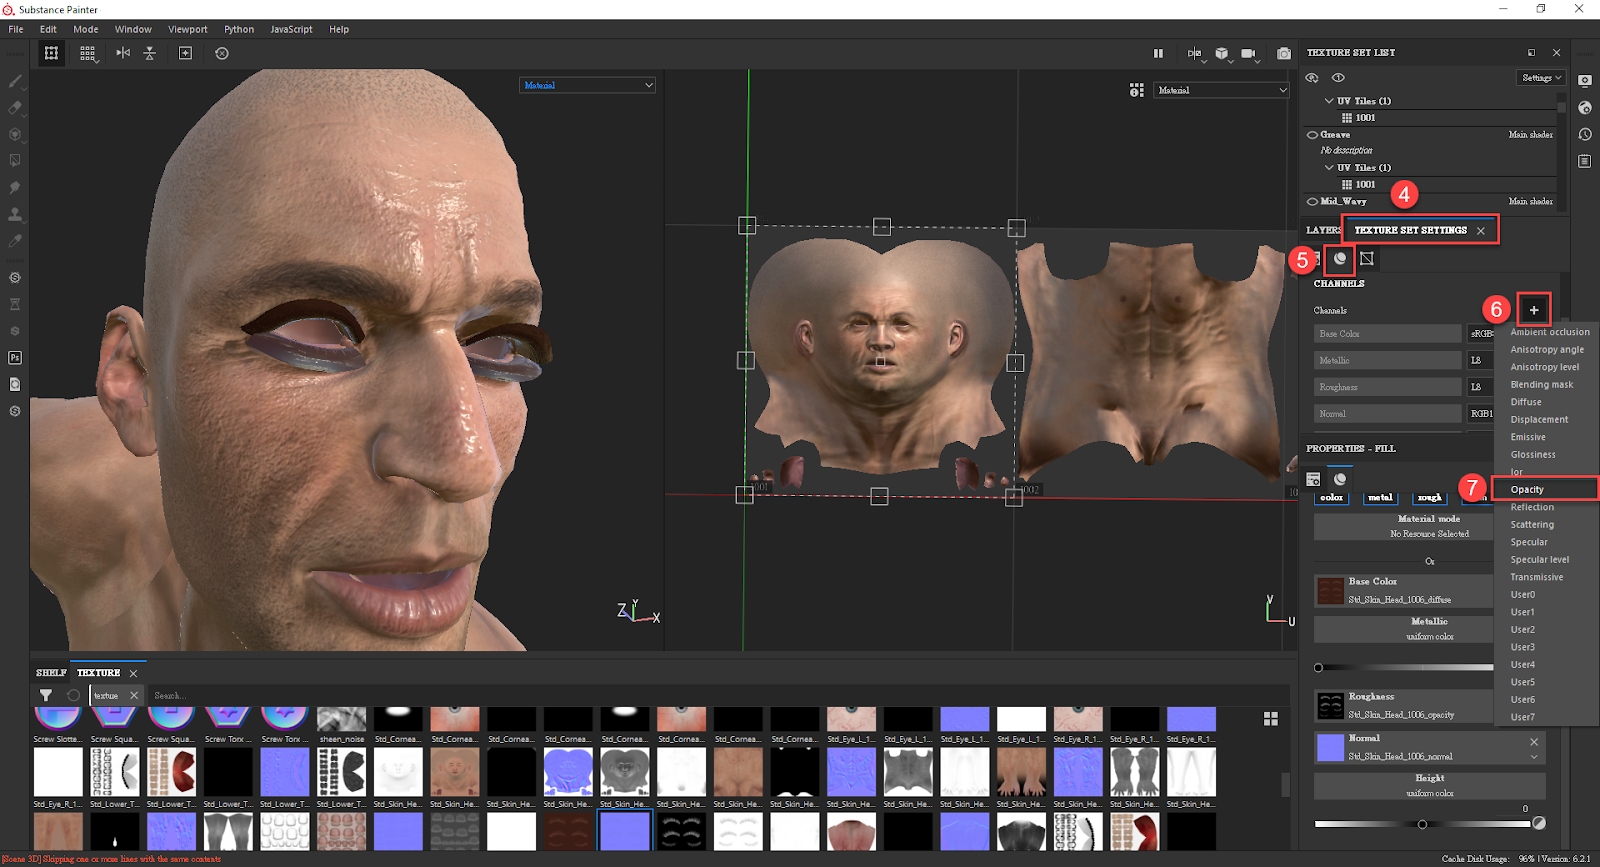
- Click on the Opacity button under Properties - Fill to open the channel.
- Load a texture.
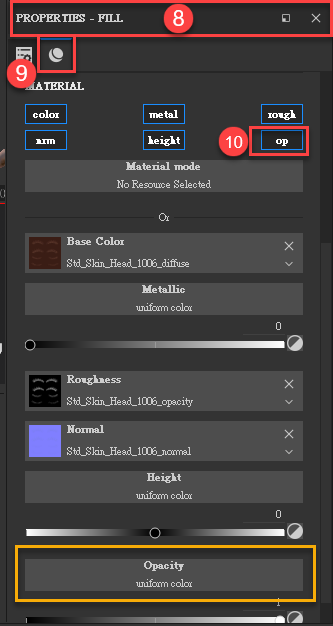
Result: 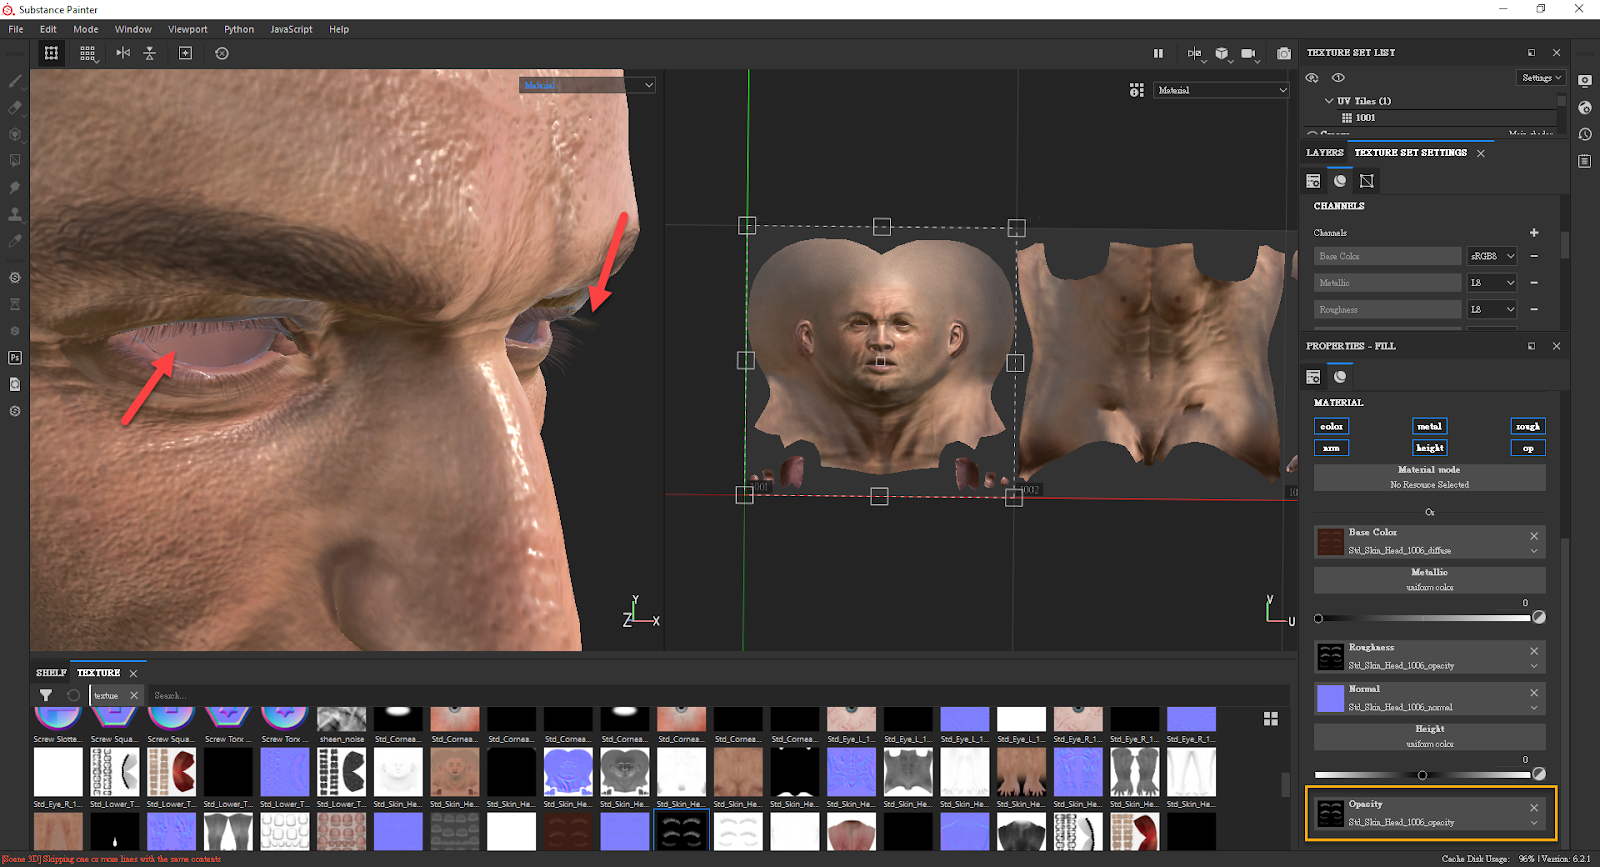
Edited
4 Years Ago by
Miranda (RL)
|
|
|
|
|
Miranda (RL)
|
Miranda (RL)
Posted 4 Years Ago
|
|
Group: Administrators
Last Active: 2 Years Ago
Posts: 1.8K,
Visits: 11.2K
|
Bake Mesh Maps 1. Click Bake Mesh Map in the Texture Set Settings panel. 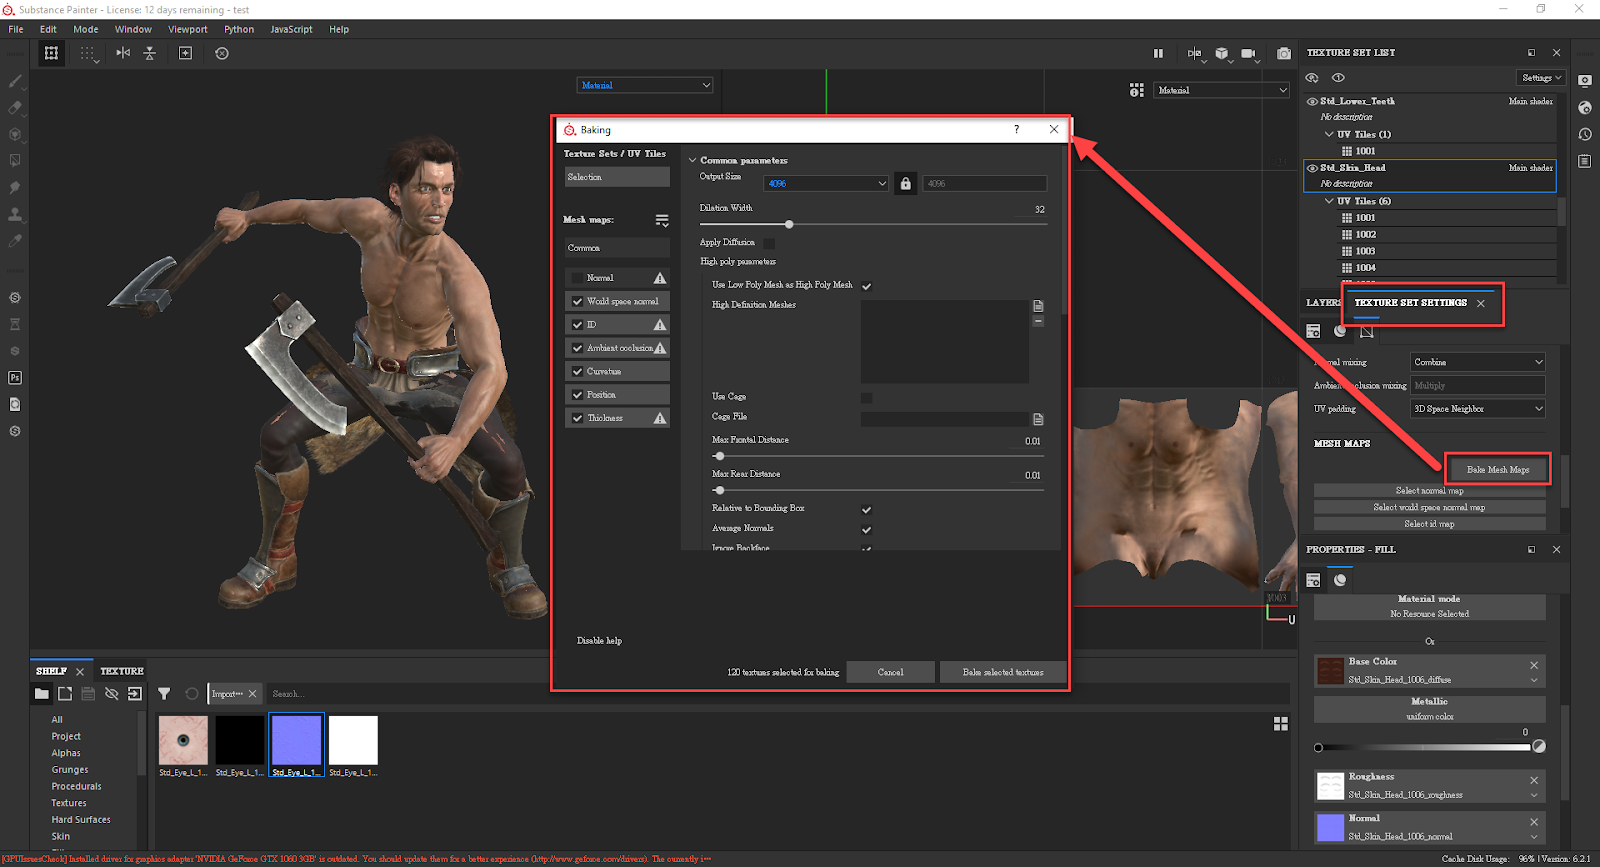 2. Select the desired Output Size. (default is 512). 3. Select the desired texture channels on the left-hand side. * Usually the CC normal map is used, therefore, there is no need for Substance Painter to create a normal map. 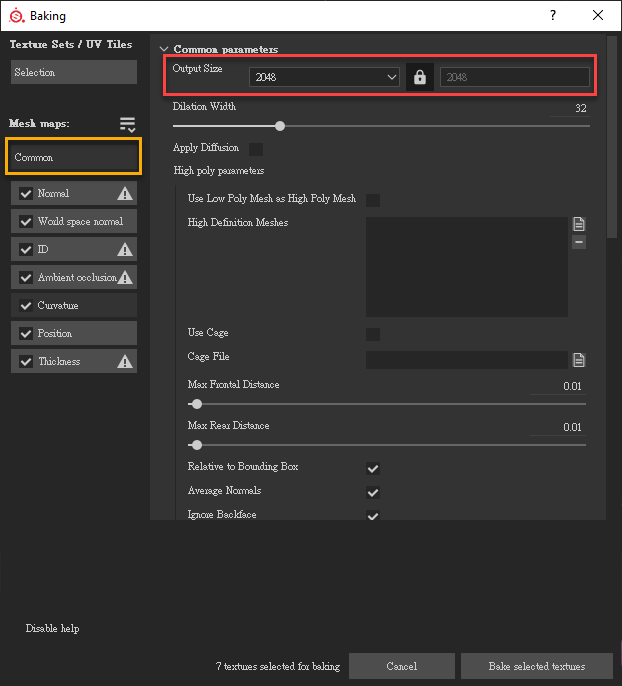 4. Click on Selection in the upper-left corner in order to pick the Texture Sets for creating material maps. 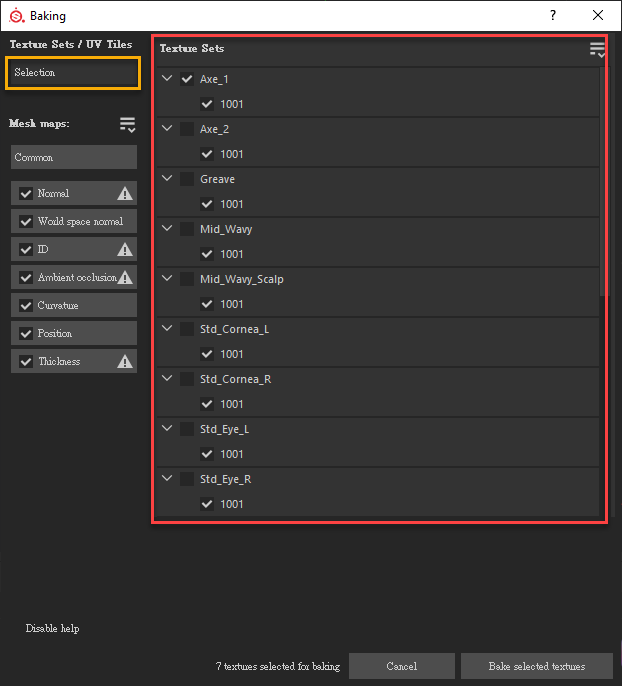 5. Select Curvature, and choose Generate from Normal Map (Deprecated) for the Method. This option is better than baking the textures directly, but you will need to load normal map first, for the material.
Once it's done, click the Bake Selected Textures button to generate textures. 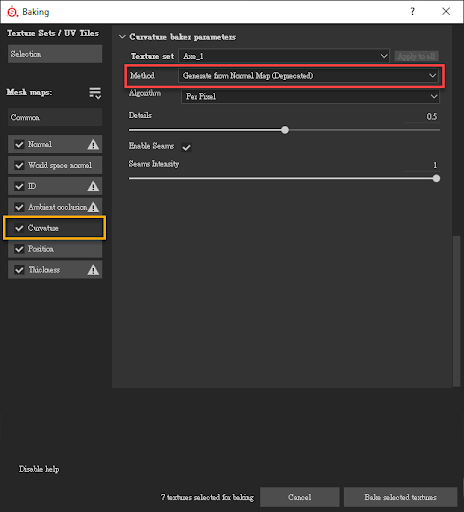 The final result: 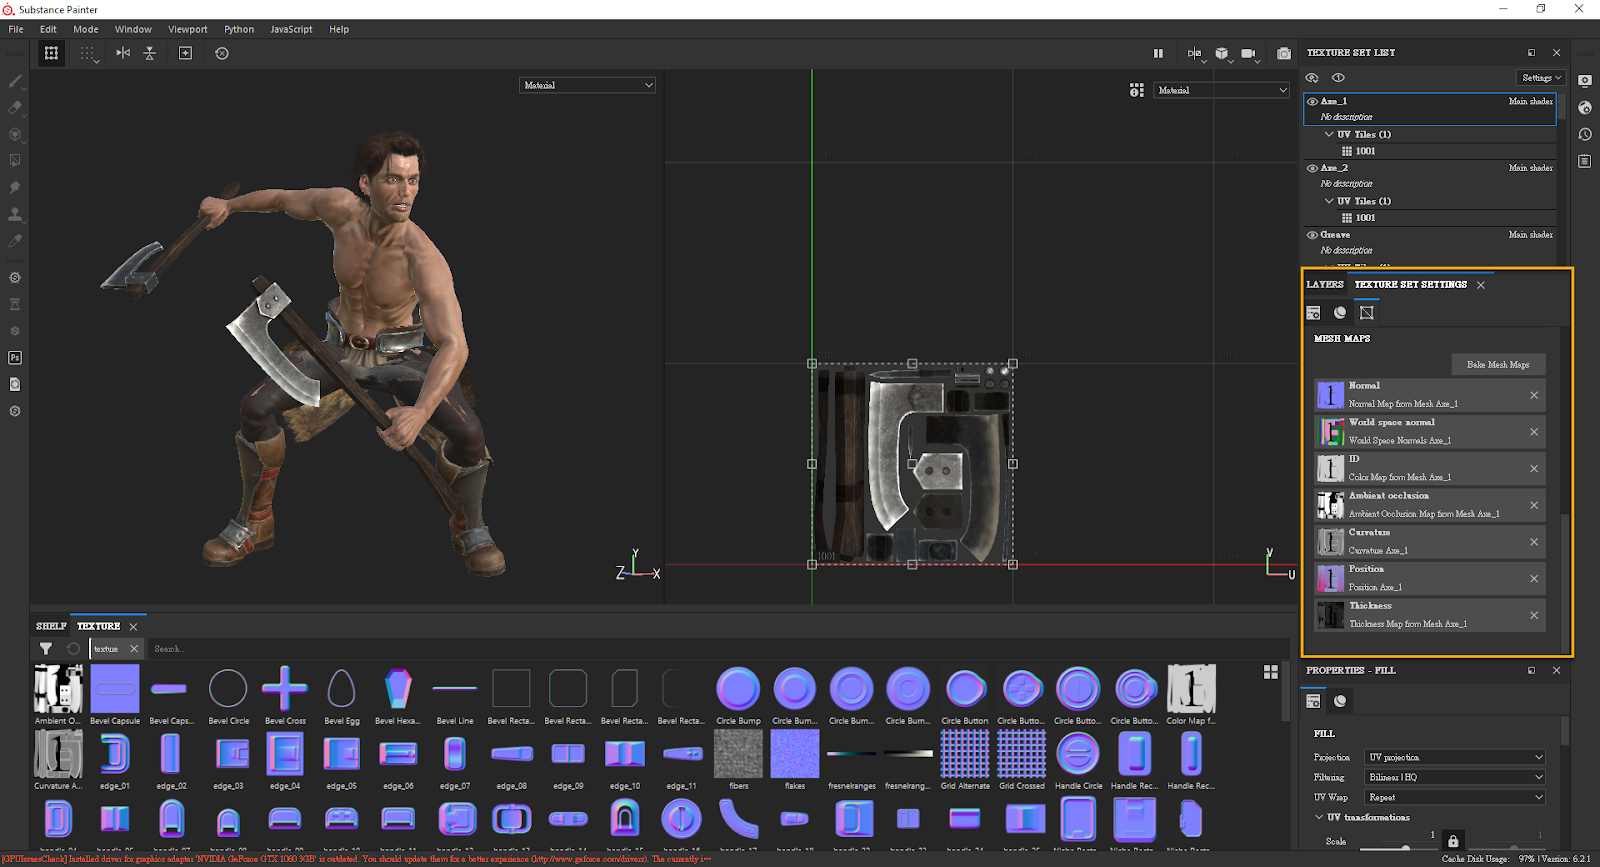
Edited
4 Years Ago by
Miranda (RL)
|
|
|
|
|
Miranda (RL)
|
Miranda (RL)
Posted 4 Years Ago
|
|
Group: Administrators
Last Active: 2 Years Ago
Posts: 1.8K,
Visits: 11.2K
|
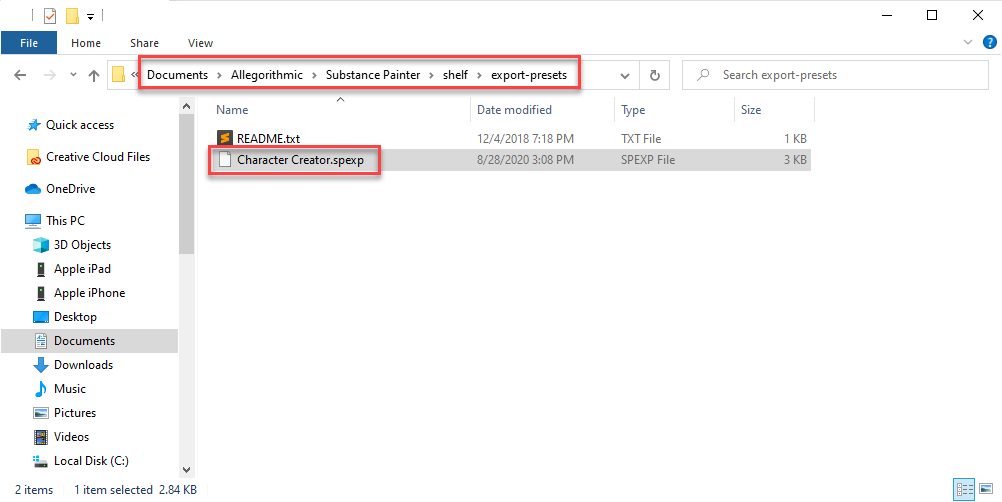
Export Textures from Substance Painter 1. Load the preset file to Substance Painter. Download the preset file: https://file.reallusion.com/cc/Character_Creator.spexp and place it in the export-presets directory. *Default route: C:\Users\(user name)\Documents\Allegorithmic\Substance Painter\shelf\export-presets
 2. Inside the Export Textures panel, select the materials and choose Character Creator as the Output template. The structure of exported textures will be consistent with CC's exported texture folder. 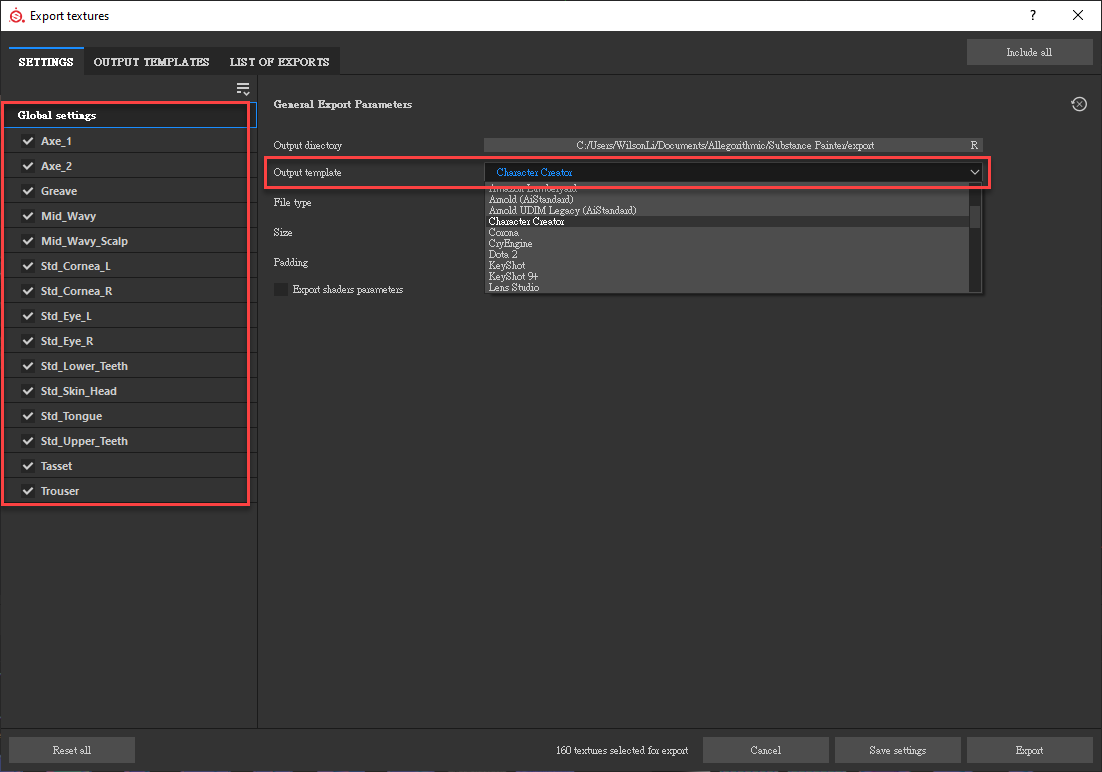
Edited
4 Years Ago by
Miranda (RL)
|
|
|
|
|
Miranda (RL)
|
Miranda (RL)
Posted 4 Years Ago
|
|
Group: Administrators
Last Active: 2 Years Ago
Posts: 1.8K,
Visits: 11.2K
|
Update Textures in Character CreatorBe sure to reload the exported avatar or project after the materials have been adjusted, so that the project will update with the correct materials. Use either method below to update the textures in CC: 1. Toolbar > Substance > Update Textures from Substance Painter.  2. Menu > File Update Textures from Substance Painter. 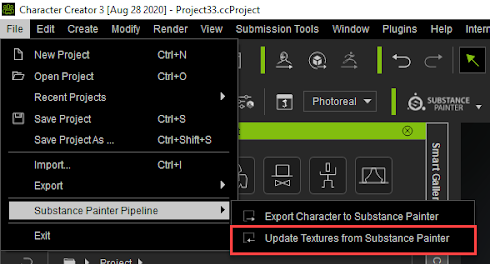 Once activated, select the Substance Painter export folder to update the textures. If any of the material folders fail to load, a warning message will pop up. You will have to manually check for non-matching material names or missing objects. Regardless of non-matching materials yielding error warnings, other materials inline with matching criteria, will still be updated. 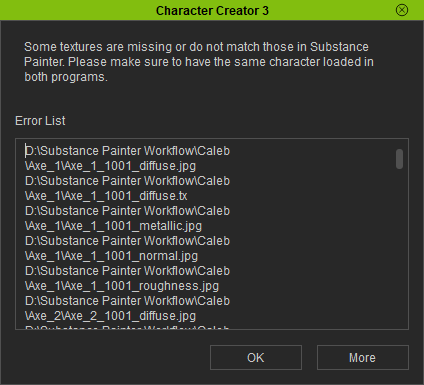
|
|
|
|
|
vidi
|
|
|
Group: Forum Members
Last Active: 2 Weeks Ago
Posts: 10.8K,
Visits: 40.2K
|
Great! That was exactly what I wanted Thank you ! 
liebe Grüße vidi
|
|
|
|
|
scottleroc
|
scottleroc
Posted 4 Years Ago
|
|
Group: Forum Members
Last Active: 2 Years Ago
Posts: 2,
Visits: 84
|
Just to inform you that when you click more, you get an error on your website  
|
|
|
|
|
Miranda (RL)
|
Miranda (RL)
Posted 4 Years Ago
|
|
Group: Administrators
Last Active: 2 Years Ago
Posts: 1.8K,
Visits: 11.2K
|
Hi vidi, Good to know it's helpful! Looking forward to your creation. Hi scottleroc, Thanks for your reminder! The link is fixed now. (It shall be redirected to this page before online manual update)
|
|
|
|