Profile Picture

My Personal Explanation Of UV maps

Posted By Delerna 5 Years Ago
You don't have permission to rate!
Author
Message
Delerna
Delerna
Posted 5 Years Ago
View Quick Profile
Distinguished Member

Distinguished Member (8.2K reputation)Distinguished Member (8.2K reputation)Distinguished Member (8.2K reputation)Distinguished Member (8.2K reputation)Distinguished Member (8.2K reputation)Distinguished Member (8.2K reputation)Distinguished Member (8.2K reputation)Distinguished Member (8.2K reputation)Distinguished Member (8.2K reputation)

Group: Forum Members
Last Active: 2 Years Ago
Posts: 1.5K, Visits: 14.8K
MAJOR DIFFERENCE BETWEEN 3D MODELS AND 2D TEXTURES

I got asked for help on this topic so here goes. I hope I explain it well enough.


3D and 2D has their own particular meaning. 
      3D has 3 dimensional. In other words there are 3 directions, Vertical, Horizontal and Axial
      2D has only 2 Dimensions, Vertical and Horizontal

This is the major point with texturing Models in any program like iClone
Models made in tools such as Blender are 3 Dimensional.........X,Y,Z
https://forum.reallusion.com/uploads/images/b8e8110f-0ba0-41b5-a2e3-2b10.png

But making textures in tools such as Paint.net are only 2 dimensional..........….X,Y
https://forum.reallusion.com/uploads/images/b0c9971d-9b3e-4370-bf9d-a6dc.png


So, in order to enable a 2D image to get added to a 3D model the person who makes the model must add a UV map to it. It is the UV map that enables a 2D image to get loaded onto the 3D model and it is the UV map that controls where the 2D texture parts get added onto the 3D model. The primary point is, the UV map can only be created by the person who made the model. People using the model in programs like iClone can not change the UV map. They can only use the UV map made by the person who made the model to see where they need to put their images in their 2D texture so things show up on the 3D model in the right place.


i7-3770 3.4GHz CPU 16 GB Ram   
GeForce GTX1080 TI 11GB
Windows 10 Pro 64bit
Edited
5 Years Ago by Delerna
Delerna
Delerna
Posted 5 Years Ago
View Quick Profile
Distinguished Member

Distinguished Member (8.2K reputation)Distinguished Member (8.2K reputation)Distinguished Member (8.2K reputation)Distinguished Member (8.2K reputation)Distinguished Member (8.2K reputation)Distinguished Member (8.2K reputation)Distinguished Member (8.2K reputation)Distinguished Member (8.2K reputation)Distinguished Member (8.2K reputation)

Group: Forum Members
Last Active: 2 Years Ago
Posts: 1.5K, Visits: 14.8K
HOW 3D MODELLERS CREATE THE UV MAP FOR THEIR MODEL
Once the modeller makes their model they must create a UV map so that 2D images can be used to texture the model.

Here is an explanation for how its done in Blender. All 3D modelling tools enable creation of UV maps for 3D models but the way its done can be different to how its done in Blender.
But its the completed UV map that ends up the same. And again, the key point is that it is totally up to the person who made the model as to how the UV map gets created.
No one else can change them in tools such as iClone. So how well the UV map enables 2D images to look on the model totally depends on the capability of the modeler.
Any UV map enables 2D textures to show up on the 3D model. But how easy it is to position the textures on the model depends totally on how well the modeller creates the UV map.
By the way, I didn't try to make this UV map well, I did it like this in order to try and show how difficult texturing the model can get if the UV map isn't done well.
You can still texture the model properly but it takes a lot of work positioning the 2D textures so they show up in the right place on the model.


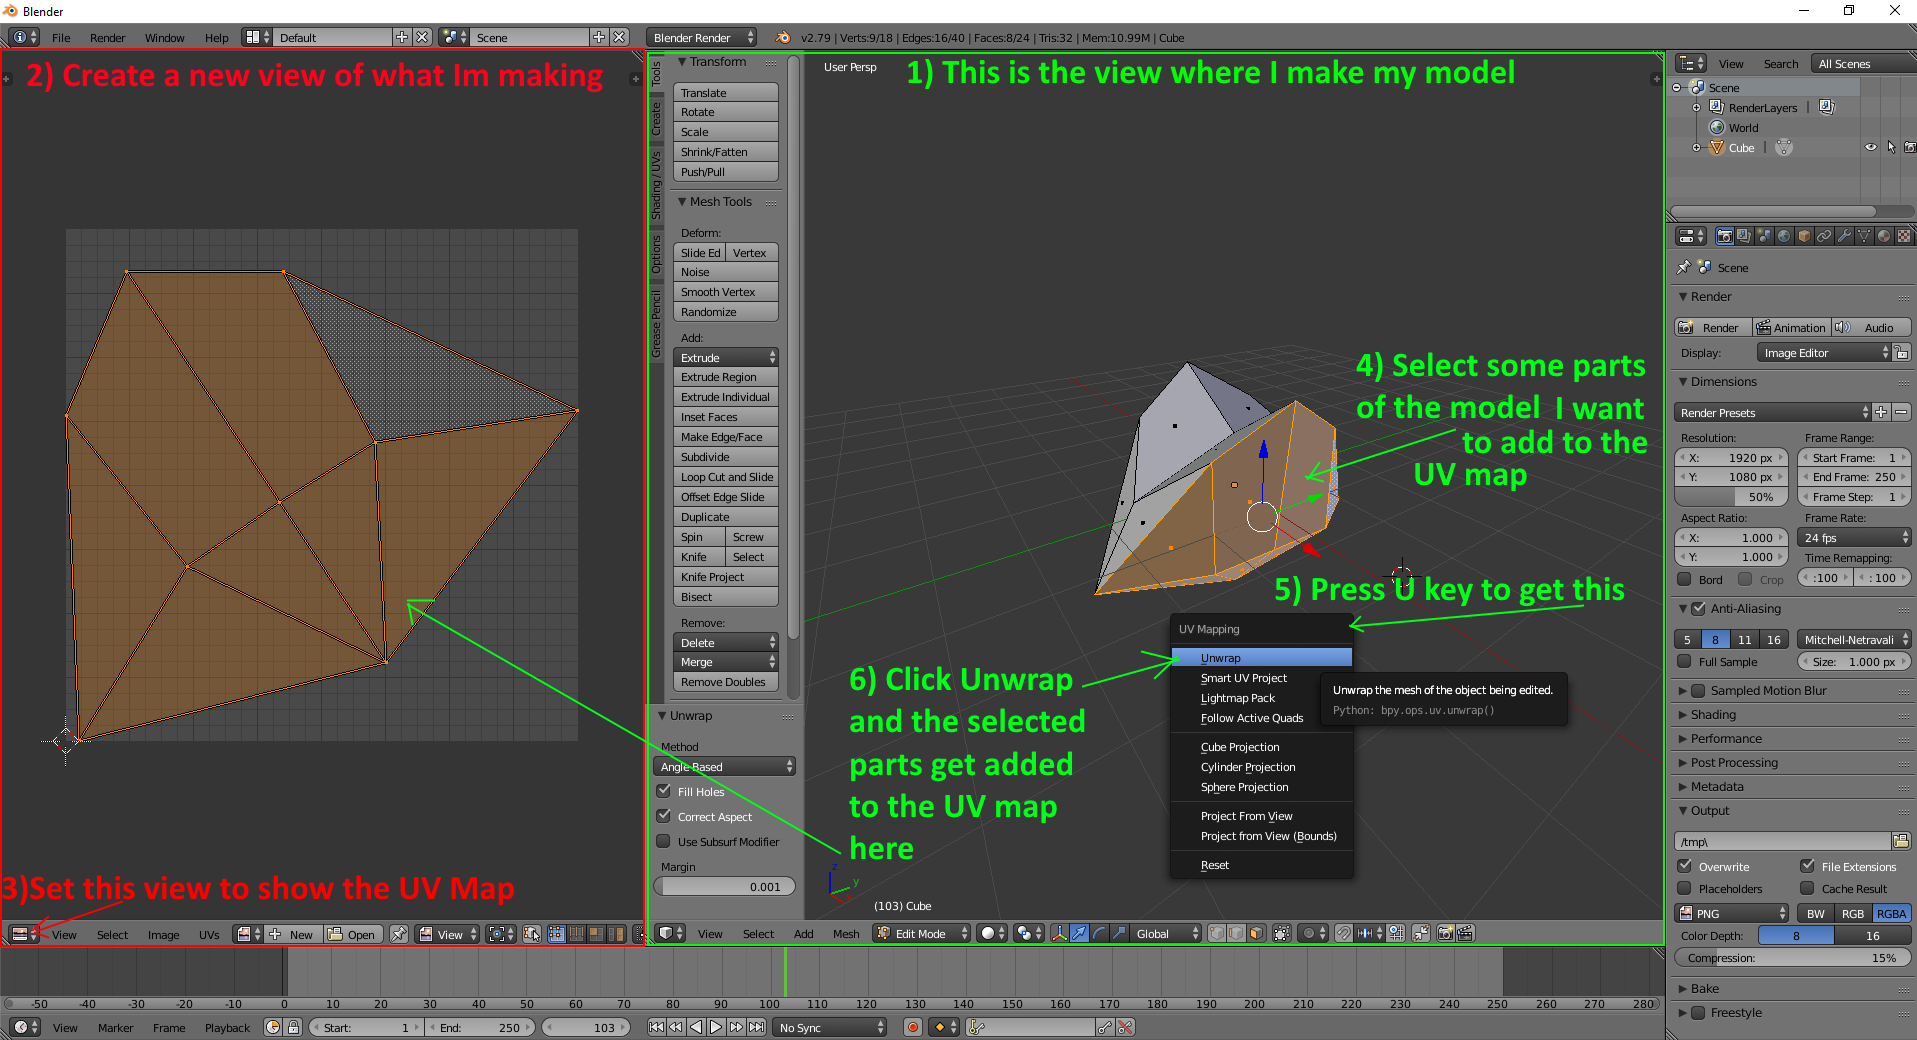
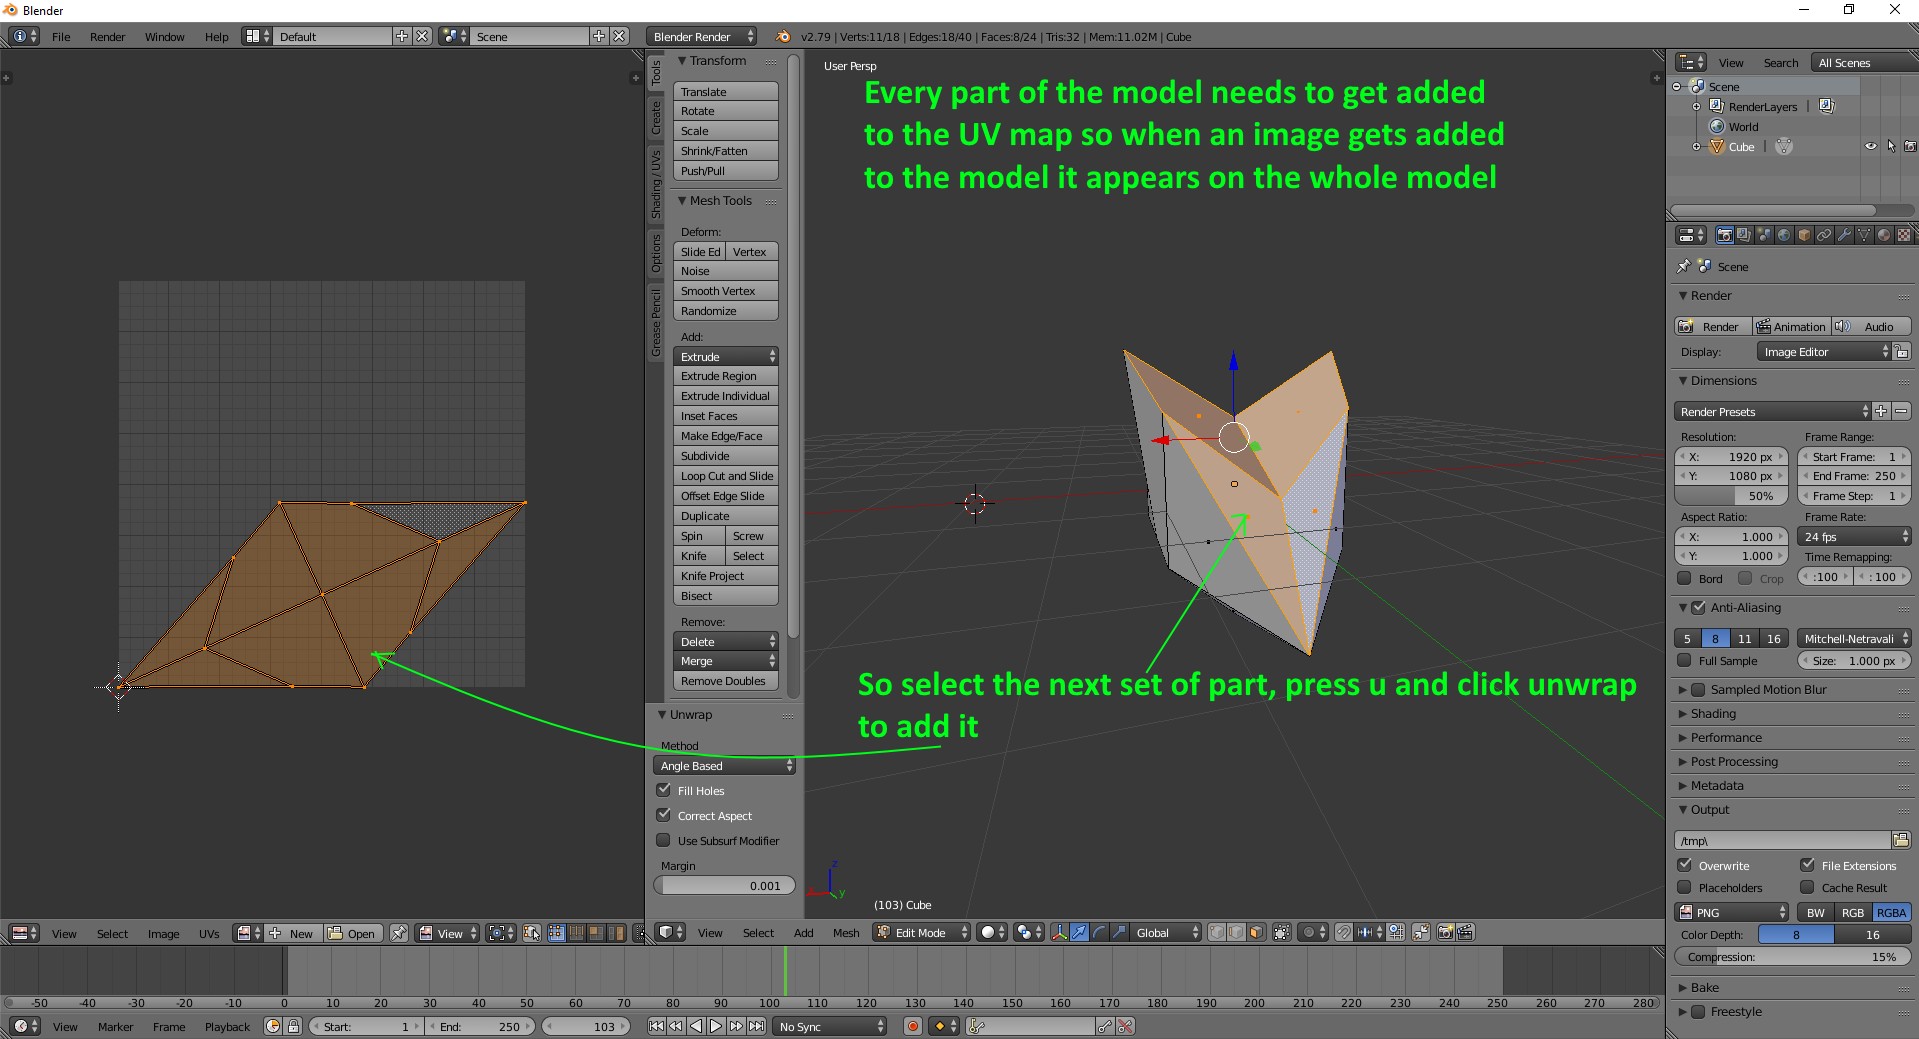
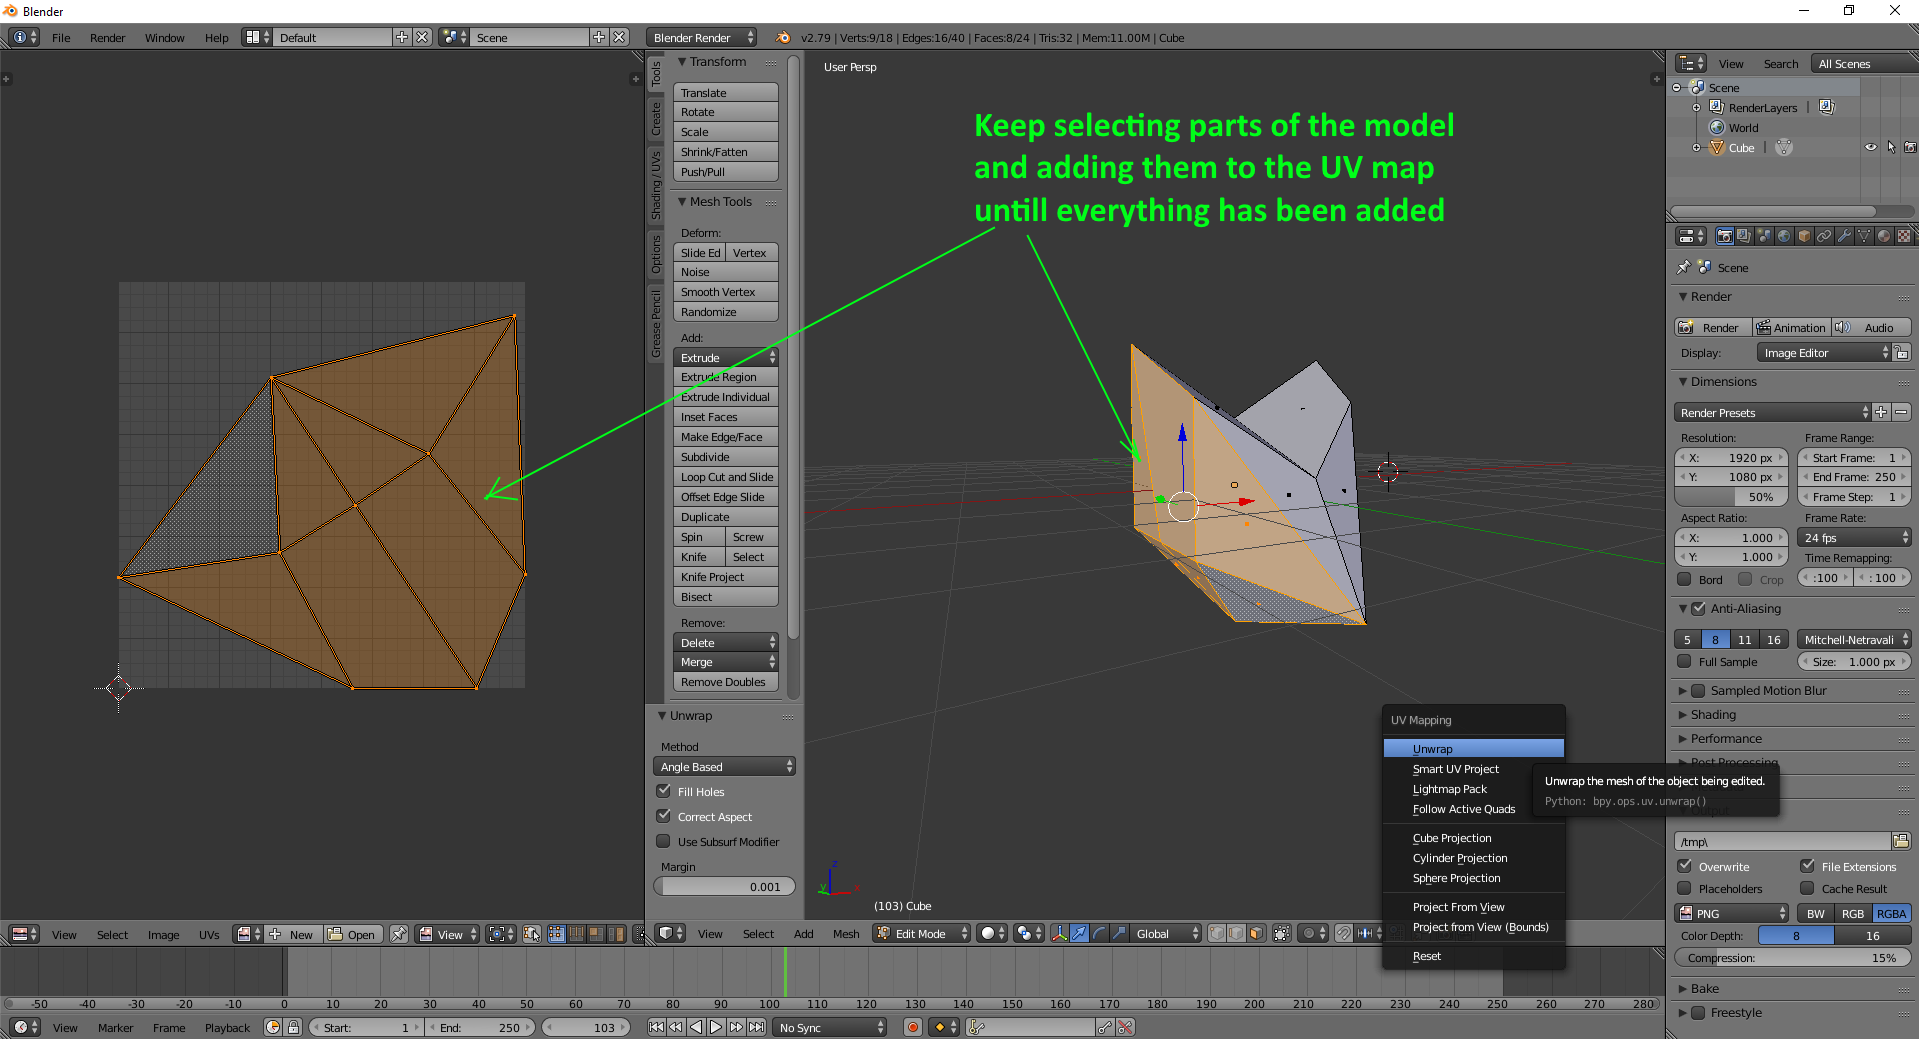
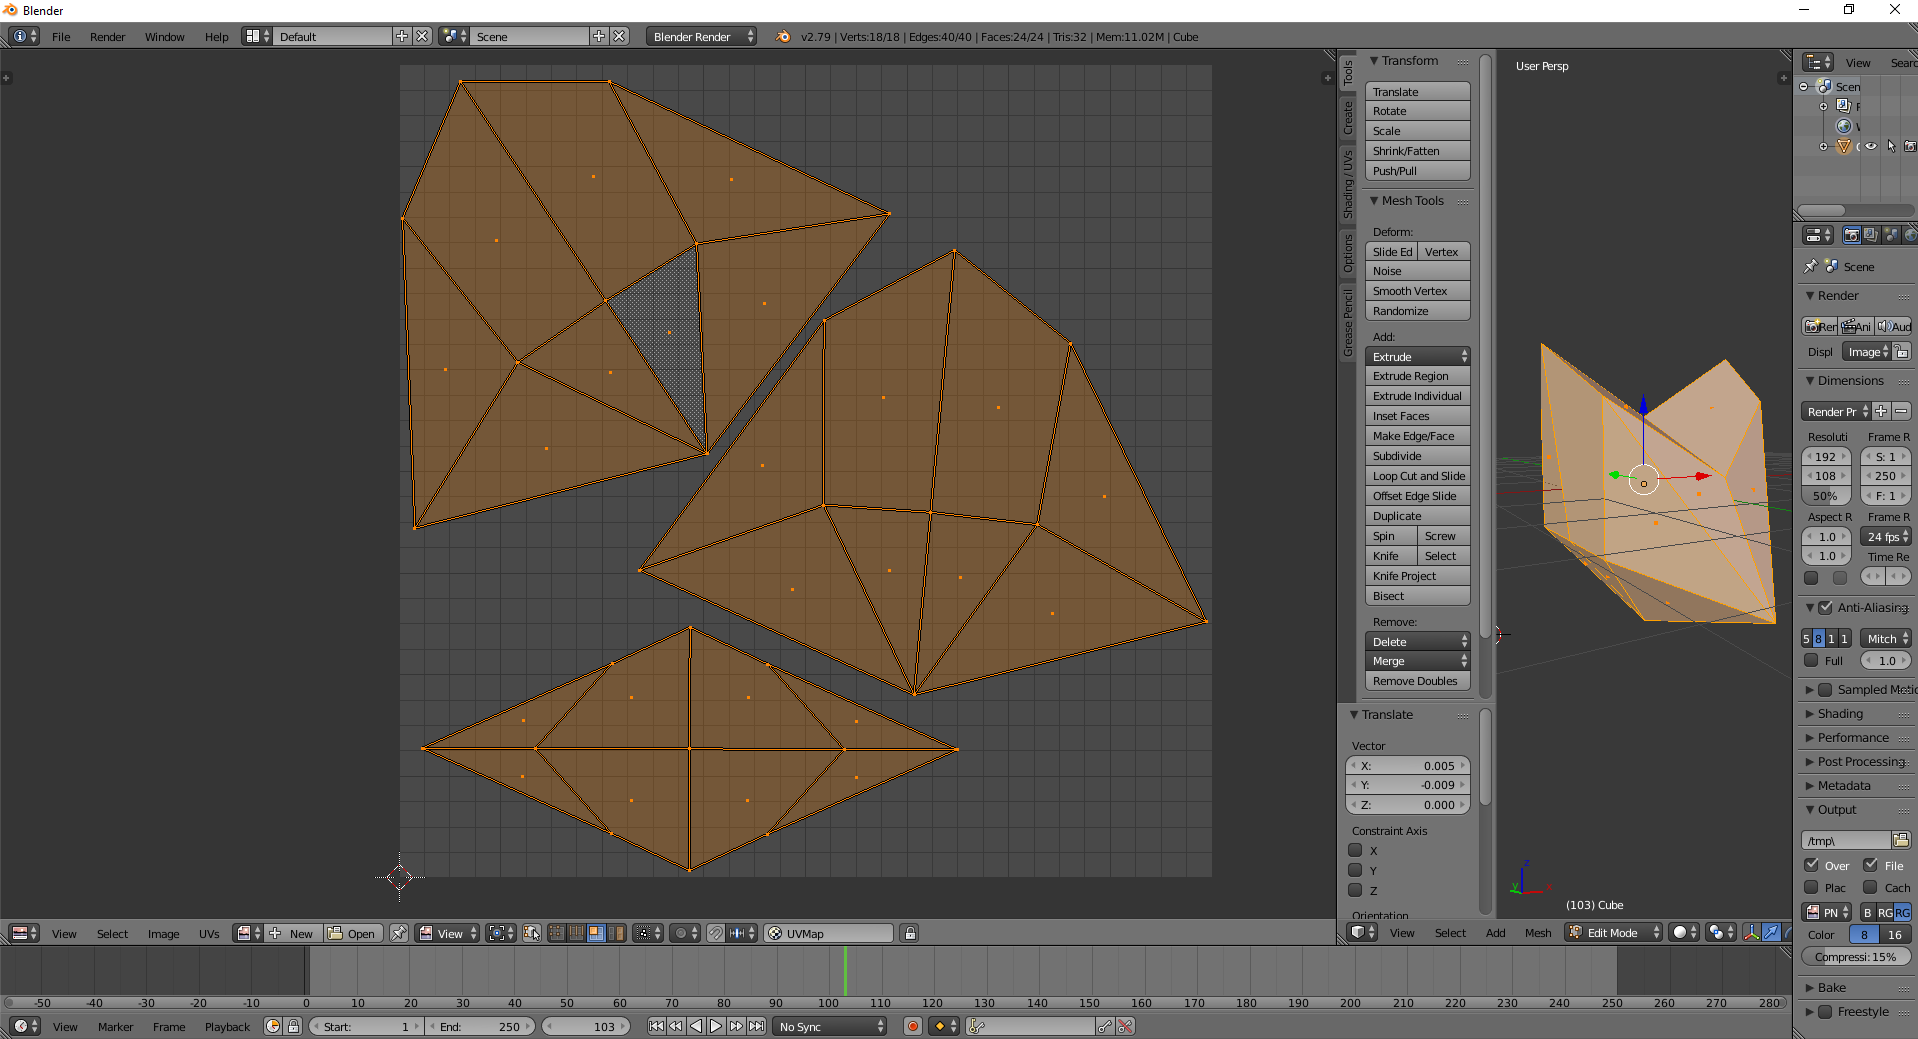
First up, these 3 images show one way of adding the models parts to the UV map. Exactly how its done depends on the model type and also making the UV map to make texturing the model as easy as possible.
One thing I see is its really hard to make it 100% perfect. Just got to get it as good as possible
https://forum.reallusion.com/uploads/images/b5939ab8-dfaf-402f-bb89-277d.png

https://forum.reallusion.com/uploads/images/a6a5a17f-4eb6-4d3e-ad86-ae96.png

https://forum.reallusion.com/uploads/images/4d343efb-d006-420e-9b4c-ba1d.png


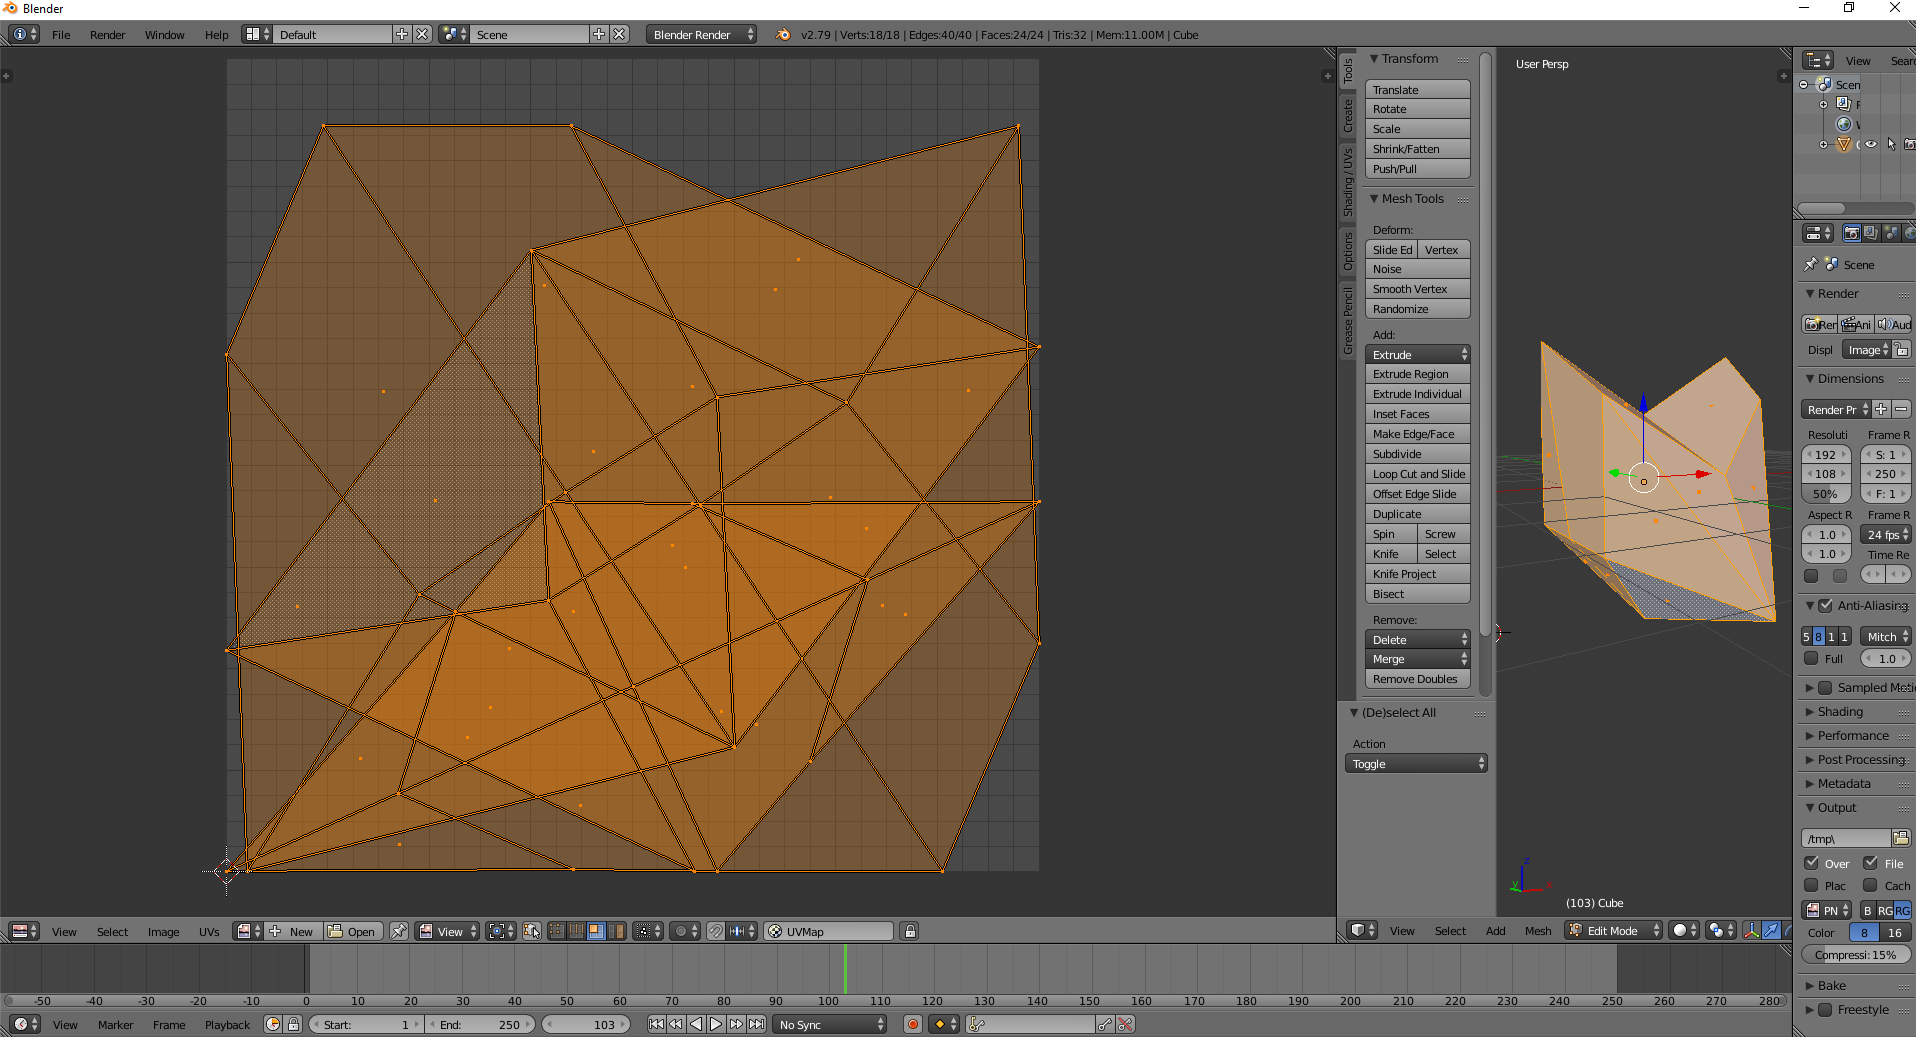
OK, once all the models parts have been added the UV map needs to have the parts scaled and positioned in the best way possible to make it so the 2D image works as well and as easy as possible.
These 2 images give a demo of that. The primary thing for people using it is that where I put the model parts I created shows where you need to put your 2D texture parts in the image so they show up on the correct place on the model

This image shows where the models items got added to the UV map. Texturing works with this although some parts of the model are over each other so the some parts of the texture that gets added to the model will appear in several places. That is fine for some models and not fine for others. It all depends on the model getting made and the types of images that might get loaded onto it. That's what makes deciding what the best way to create the UV map is and if someone starts doing texturing different to what the modeller thought would get used on the model then it works but it might make more work needed for the person using the model to create the texture they want to use.
https://forum.reallusion.com/uploads/images/935edc61-67f4-4f72-a869-1883.png

Anyway I decided here that I want no part of the image to show up in more than one place on the model so I scaled them down and then positioned them apart from each other.
It also matters which way I rotate them so the images added to the model not only show up in the right place but are also in the correct rotation. Mind you, certain parts of the image you create can also be rotated separately so they show up on the model in the right place and in the right direction. Another point I will make here is that the whole models parts are connected to each other but I set them in the UV map so there are 3 parts and they are not connected to each other. This can make it difficult to make a texture where there are lines that need to be aligned with each other. It can still be done but it means the lines in the images might need to get moved around so they end up in positions so they line up with each other in the model. This is a thing with UV mapping. Keeping everything connected together in the UV map so things line up properly more easily can make other problems. For example the edges now line up but the centers aren't straight anymore. So now you don't need to reposition things so they line up easily but getting lines to stay straight might mean the lines in the image need to get curved so they look straight in the model.
Hope that helps you to see that getting UV maps setup to cover everything to be 100% easily done is not possible. I for one try to make them as good as possible for what textures I think will be used on it.
https://forum.reallusion.com/uploads/images/af345bd3-7cc6-4da3-b7be-0418.png


i7-3770 3.4GHz CPU 16 GB Ram   
GeForce GTX1080 TI 11GB
Windows 10 Pro 64bit
Edited
5 Years Ago by Delerna
Delerna
Delerna
Posted 5 Years Ago
View Quick Profile
Distinguished Member

Distinguished Member (8.2K reputation)Distinguished Member (8.2K reputation)Distinguished Member (8.2K reputation)Distinguished Member (8.2K reputation)Distinguished Member (8.2K reputation)Distinguished Member (8.2K reputation)Distinguished Member (8.2K reputation)Distinguished Member (8.2K reputation)Distinguished Member (8.2K reputation)

Group: Forum Members
Last Active: 2 Years Ago
Posts: 1.5K, Visits: 14.8K
CONVERT THE MODEL FOR USE IN iCLONE
Just adding this to complete the method. Its not really about UV maps

Anyway, I generally save it from Blender as an fbx file

https://forum.reallusion.com/uploads/images/1de46e08-4ebe-4140-83b0-1001.png


Then load it into iclone 3Dexchange and make any adjustments I need.
Then I export it as a model for use in iClone

https://forum.reallusion.com/uploads/images/695350ea-f8d7-414e-8c3e-f665.png


i7-3770 3.4GHz CPU 16 GB Ram   
GeForce GTX1080 TI 11GB
Windows 10 Pro 64bit
Edited
5 Years Ago by Delerna
Delerna
Delerna
Posted 5 Years Ago
View Quick Profile
Distinguished Member

Distinguished Member (8.2K reputation)Distinguished Member (8.2K reputation)Distinguished Member (8.2K reputation)Distinguished Member (8.2K reputation)Distinguished Member (8.2K reputation)Distinguished Member (8.2K reputation)Distinguished Member (8.2K reputation)Distinguished Member (8.2K reputation)Distinguished Member (8.2K reputation)

Group: Forum Members
Last Active: 2 Years Ago
Posts: 1.5K, Visits: 14.8K
TEXTURING THE MODEL
Ok, here is the image I am loading onto the model
https://forum.reallusion.com/uploads/images/4fb731b1-4da9-4bdf-99ad-0dcb.png


And here is the result....ooooo yuk doesn't look great. How can I change the image so things show up correct?
OK, more posts coming to show how I do it.....how you do it? That's up to you, you will find a way that suits how you work.
https://forum.reallusion.com/uploads/images/e7c10c2d-0f64-4053-afa3-6ea9.png


i7-3770 3.4GHz CPU 16 GB Ram   
GeForce GTX1080 TI 11GB
Windows 10 Pro 64bit
Edited
5 Years Ago by Delerna
Delerna
Delerna
Posted 5 Years Ago
View Quick Profile
Distinguished Member

Distinguished Member (8.2K reputation)Distinguished Member (8.2K reputation)Distinguished Member (8.2K reputation)Distinguished Member (8.2K reputation)Distinguished Member (8.2K reputation)Distinguished Member (8.2K reputation)Distinguished Member (8.2K reputation)Distinguished Member (8.2K reputation)Distinguished Member (8.2K reputation)

Group: Forum Members
Last Active: 2 Years Ago
Posts: 1.5K, Visits: 14.8K
FINDING OUT WHICH PARTS OF THE UV MAP SHOWS UP ON WHICH PARTS OF THE MODEL

First I send a models base color to my 2D editor, I use paint.net mostly.
Then I send the models UV map to my 2D editor.
This image shows how to do that 

https://forum.reallusion.com/uploads/images/4991c635-8568-47b0-a4c5-d123.png

And here is the result in paint.net
https://forum.reallusion.com/uploads/images/1db8efe8-113b-4f79-8dc0-b4ee.png

In paint.net I go to the UV map and remove the black colors from it. Then I add another layer under it so I can draw on it.
My first drawing will be to help me understand which parts of the UV map show up on which parts of the 3D model.
Actually, I only do that if I am not sure which ones show up where on the model.

Here is a demo of doing that

https://forum.reallusion.com/uploads/images/4b8b2367-214f-4b49-b3a0-c93b.png

And here is the result of it in the models in iClone

https://forum.reallusion.com/uploads/images/bac3a923-8118-433e-b434-d23d.png

OK, so now I know which UV parts show up where on the 3D Model. In some cases I might even use more different colors on more of the parts so I know even more which UV parts show up on which parts of the model

Here are 2 images demonstrating what I mean

https://forum.reallusion.com/uploads/images/65e05429-4440-40bb-89dd-70d4.png
https://forum.reallusion.com/uploads/images/a4dd22cf-6f61-4ea5-ba20-466b.png


Anyway, now I have a good idea where to start putting the actual images I want to start adding to the model and I can also see what size I need to make them as well as where they need to be rotated so they are in the right direction.
I will be demonstrating that next


i7-3770 3.4GHz CPU 16 GB Ram   
GeForce GTX1080 TI 11GB
Windows 10 Pro 64bit
Edited
5 Years Ago by Delerna
Delerna
Delerna
Posted 5 Years Ago
View Quick Profile
Distinguished Member

Distinguished Member (8.2K reputation)Distinguished Member (8.2K reputation)Distinguished Member (8.2K reputation)Distinguished Member (8.2K reputation)Distinguished Member (8.2K reputation)Distinguished Member (8.2K reputation)Distinguished Member (8.2K reputation)Distinguished Member (8.2K reputation)Distinguished Member (8.2K reputation)

Group: Forum Members
Last Active: 2 Years Ago
Posts: 1.5K, Visits: 14.8K
START PROPPER TEXTURING

OK, here are a couple of photos I will start to use to texture the model. I will coppy the bits I want and past, scale and rotate them to fit the UVMap parts.
I will also delete the parts that aren't needed. What I show here is pretty rough because I am not spending that much time to make it perfect. Rather I am just demonstrating some of the methods I use.
Need to spend enough time to get these images to look more correct

https://forum.reallusion.com/uploads/images/1b76f38d-1d0d-458e-810c-1b32.jpg
https://forum.reallusion.com/uploads/images/661ec99c-f56b-46e5-86ca-48e1.jpg


Now, here is where I added the parts from the photo's that I wanted to use. Then I combined the needed layers into a single layer, coped it and then pasted it into the base color image and then save it so it updates iClones models

https://forum.reallusion.com/uploads/images/b880aaff-730a-4128-a158-25f8.png

And here is the result. I am stopping here. If anyone has questions I will try and add answers here in the posts I haven't added anything to yet.
By the way, I just dragged the base color into the bump map to make it look better. Really should at least convert it to black and white or even better, as a proper bump map... but still, it looks OK I think.
It does need more work to make it better and especially, me as the model maker should make the UV map better so its easier to get the images look better. But this is just a quick demo and not a proper model so this will do for this.

https://forum.reallusion.com/uploads/images/2822cd47-f9be-468b-b209-b282.png


i7-3770 3.4GHz CPU 16 GB Ram   
GeForce GTX1080 TI 11GB
Windows 10 Pro 64bit
Edited
5 Years Ago by Delerna
Delerna
Delerna
Posted 5 Years Ago
View Quick Profile
Distinguished Member

Distinguished Member (8.2K reputation)Distinguished Member (8.2K reputation)Distinguished Member (8.2K reputation)Distinguished Member (8.2K reputation)Distinguished Member (8.2K reputation)Distinguished Member (8.2K reputation)Distinguished Member (8.2K reputation)Distinguished Member (8.2K reputation)Distinguished Member (8.2K reputation)

Group: Forum Members
Last Active: 2 Years Ago
Posts: 1.5K, Visits: 14.8K
SETTING  UP iCLONES TEXTURE PROGRAM

https://forum.reallusion.com/uploads/images/a99c18ea-4213-4488-b9d6-e133.png


i7-3770 3.4GHz CPU 16 GB Ram   
GeForce GTX1080 TI 11GB
Windows 10 Pro 64bit
Edited
4 Years Ago by Delerna
Delerna
Delerna
Posted 5 Years Ago
View Quick Profile
Distinguished Member

Distinguished Member (8.2K reputation)Distinguished Member (8.2K reputation)Distinguished Member (8.2K reputation)Distinguished Member (8.2K reputation)Distinguished Member (8.2K reputation)Distinguished Member (8.2K reputation)Distinguished Member (8.2K reputation)Distinguished Member (8.2K reputation)Distinguished Member (8.2K reputation)

Group: Forum Members
Last Active: 2 Years Ago
Posts: 1.5K, Visits: 14.8K
keeping this to answer questions if needed

i7-3770 3.4GHz CPU 16 GB Ram   
GeForce GTX1080 TI 11GB
Windows 10 Pro 64bit
Edited
5 Years Ago by Delerna
Delerna
Delerna
Posted 5 Years Ago
View Quick Profile
Distinguished Member

Distinguished Member (8.2K reputation)Distinguished Member (8.2K reputation)Distinguished Member (8.2K reputation)Distinguished Member (8.2K reputation)Distinguished Member (8.2K reputation)Distinguished Member (8.2K reputation)Distinguished Member (8.2K reputation)Distinguished Member (8.2K reputation)Distinguished Member (8.2K reputation)

Group: Forum Members
Last Active: 2 Years Ago
Posts: 1.5K, Visits: 14.8K
keeping this to answer questions if needed

i7-3770 3.4GHz CPU 16 GB Ram   
GeForce GTX1080 TI 11GB
Windows 10 Pro 64bit
Edited
5 Years Ago by Delerna


Reading This Topic