This thread will be periodically edited and updated. New tricks will be inserted at the top of the thread—which means the thread is upside-down! Fun!
Texture Edits

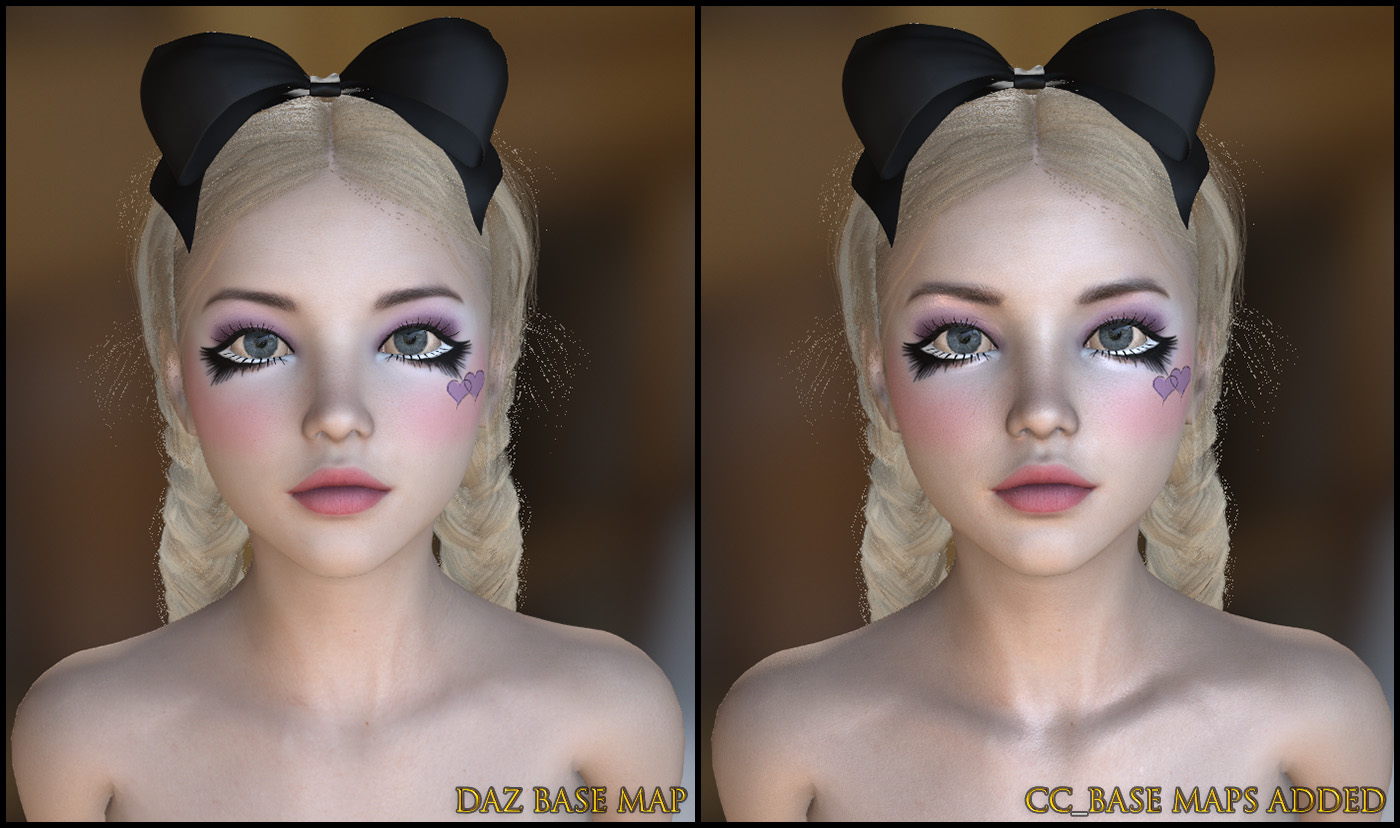
If you are using Daz and you want your characters to look professional, you had better come to grips with editing textures, friends...because every texture I've seen is flawed. Maybe they need to be blurry so that morph distortion goes unnoticed, I don't know, but here's a before and after to help you understand...
Note: The face on the right has CC Base AO & Roughness maps applied, Base Color map's Brightness decreased, Game Eyes with decreased Sclera Brightness, and some facial morphs applied.
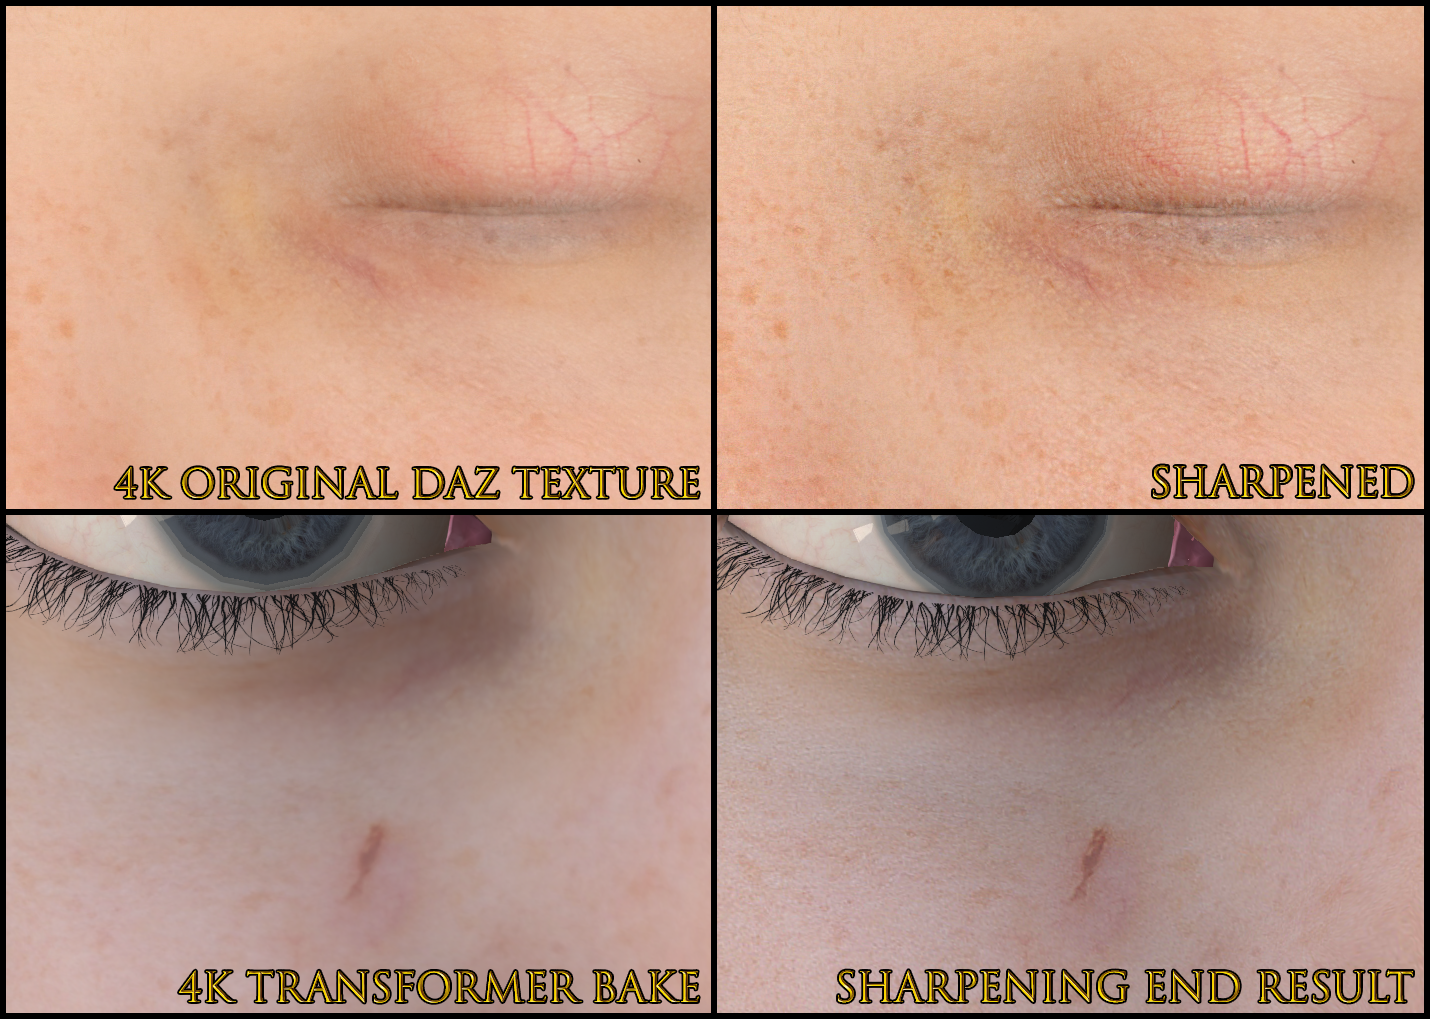
Please note I do not use 4K for anything; for performance reasons and total lack of textures at a quality level deserving of 4K. These details are retained when downsized to 2K. There are a couple ways to do sharpening with good results. The fast and easy way is to use Smart Sharpen, which I covered earlier...
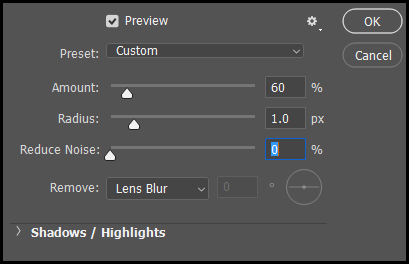
You can apply the filter a few times until you get the result you want. If parts of the texture are already sharp and others blurry (a common case with the lips), use the Reduce Noise slider (no more than 10%).
The other way is to use the Sharpen Tool to manually "paint" your sharpening—preferably on another layer so you can erase or tune the effect opacity. This is more work, but can produce a better result. You could even use a giant brush to sharpen the whole texture and then erase the parts that get overdone.
Makeup Overlay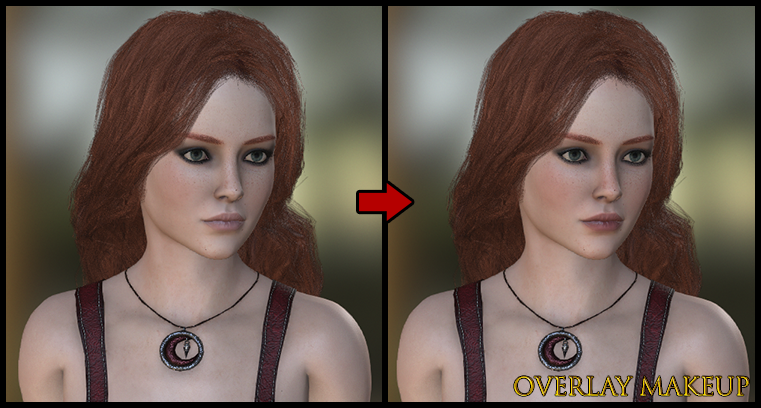
Make a new layer, set it to Overlay, use the default round brush at 0% hardness, ~20% flow & opacity, and a large size ~150-300px for a couple red splotches on the cheeks. Adjust the layer opacity if you overdid it, or use an eraser with similar settings. Decrease the brush size for the nose and lips. Very easy, potentially just a few clicks and no actual painting if you get the brush settings just right.
Amplify Normals
Besides blurry textures, a common problem with Daz is weak Normals. This is easy to fix. You can multiply the effects by making a duplicate layer set to Overlay, then Adjustments > Levels > Channel: Blue > Output Levels: change from 255 to 127. And, boom, your Normal strength is doubled. Erase parts that got overdone, or lower the opacity. Or you can duplicate the layer again to amplify further.
Iray Tonemapping
The Iray information can be found in
this post on page 2 of this thread.
Get Rid Of "Failed To Load Character: No Suitable Setup Profile Found" Error For Good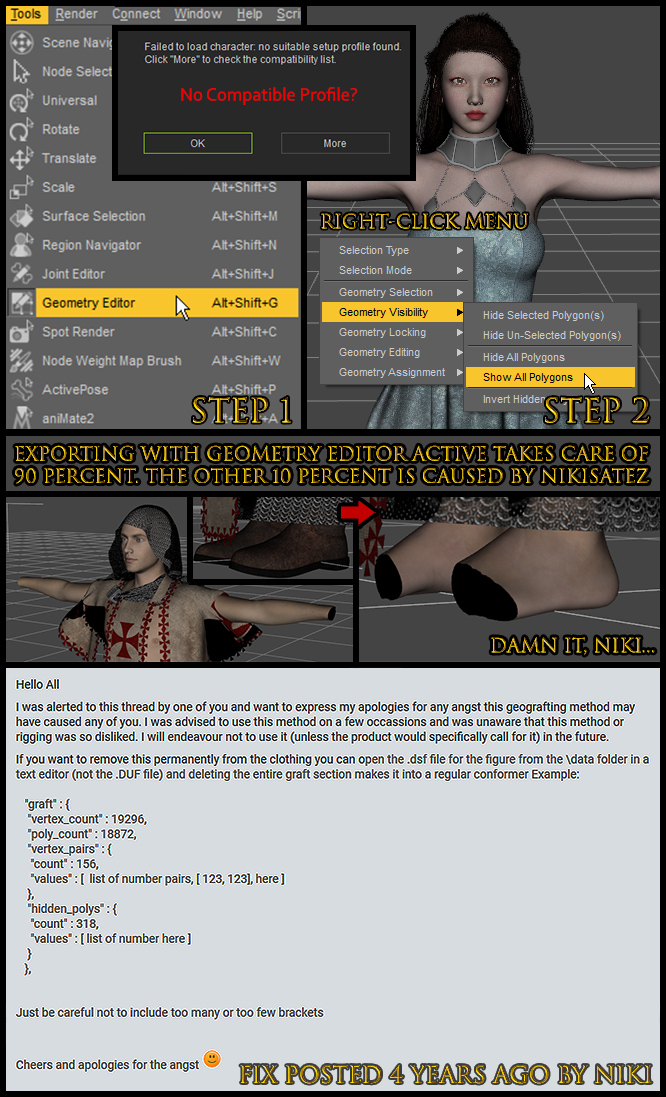 Hooded Cloaks & Troublesome Clothing
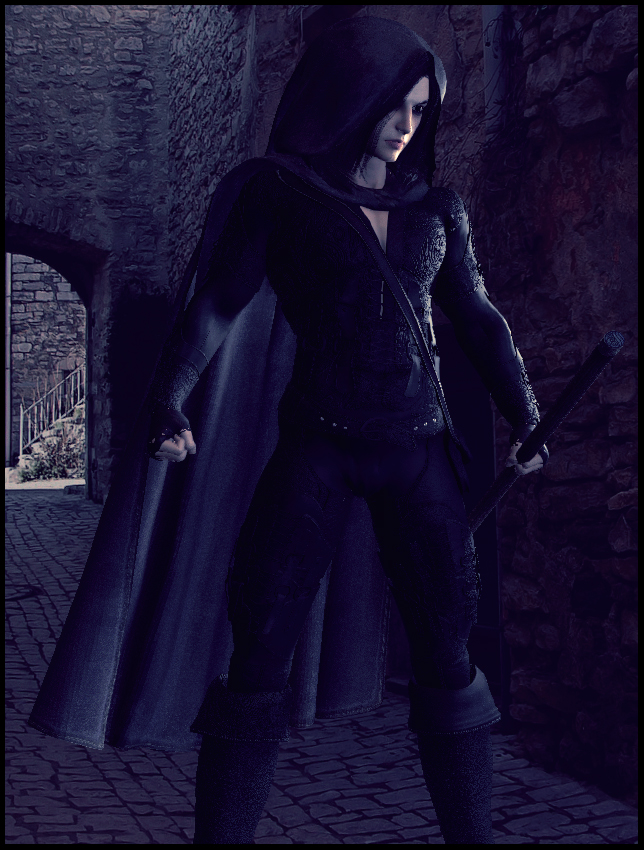
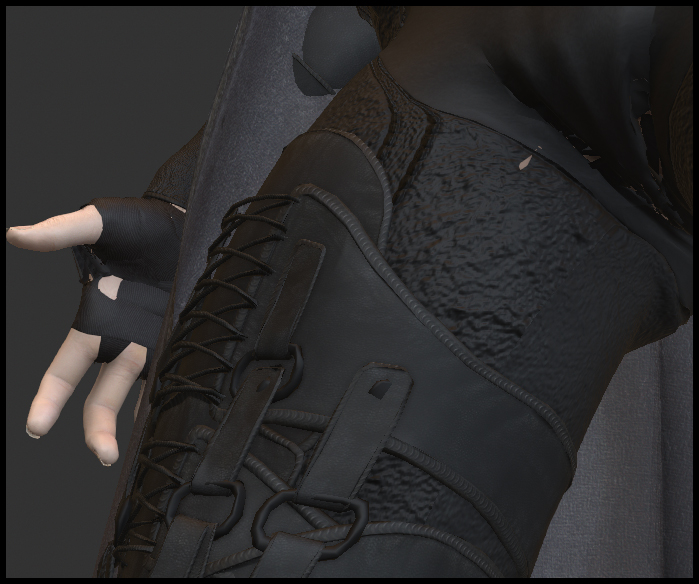
There is a Cloak profile for Cloth, but using Cloth will cause the mesh to warp when changing pose. I have had better luck getting these to (sort of) work as Accessories. The trick is to pick the right parent bone in the "Attach" section.of the first tab in the Modify panel. For a male character, I found it best to parent the cloak to CC_Base_Teeth01. Seriously. For a female character, CC_Base_NeckTwist02 turned out to work better. The result is not great, but it is better than nothing...if you are hell-bent on making a hooded cloak kind-of work, you can cycle through poses and sculpt the heck out of the mesh to resolve much of the poke-through...
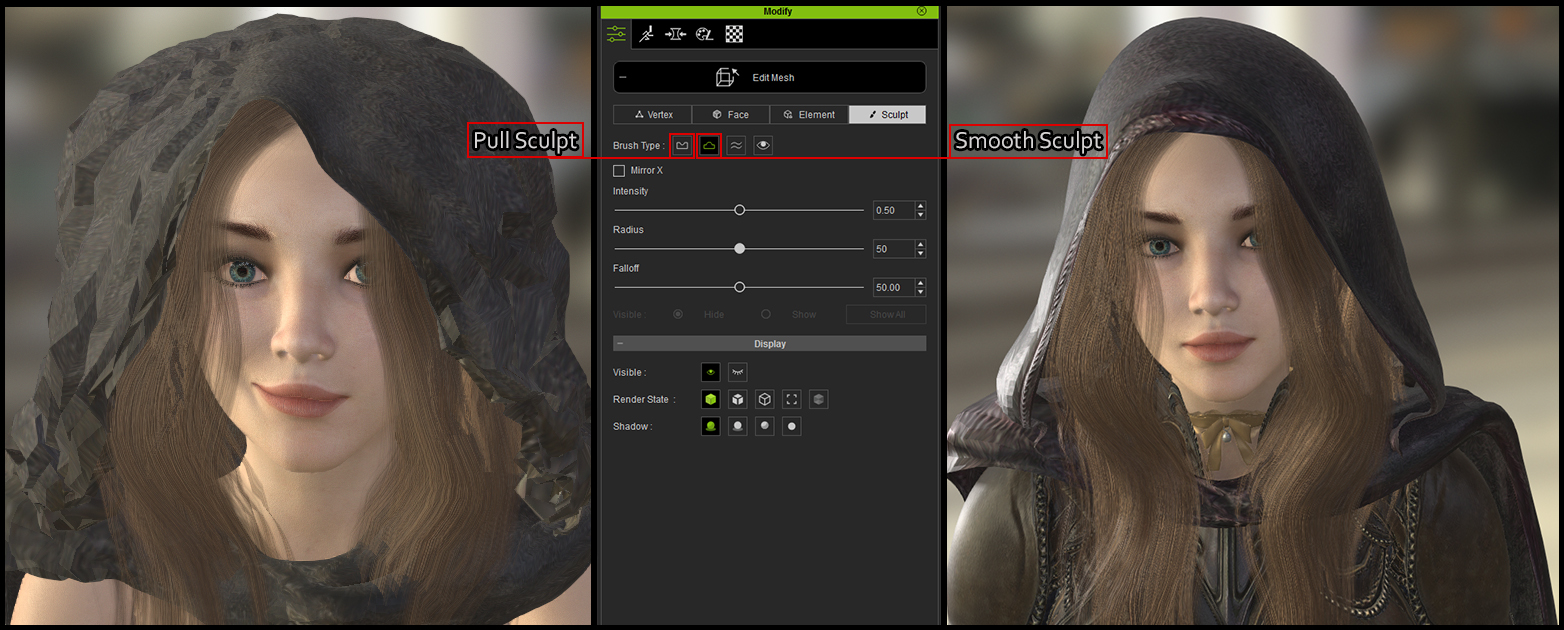
This requires quite a bit of practice to get right...I spent some hours being mesmerized by the Smooth Sculpt tool but, as a result of this effort, I am now in full command of all aspects of sculpting in CC3—it was worth the effort for that reason alone.
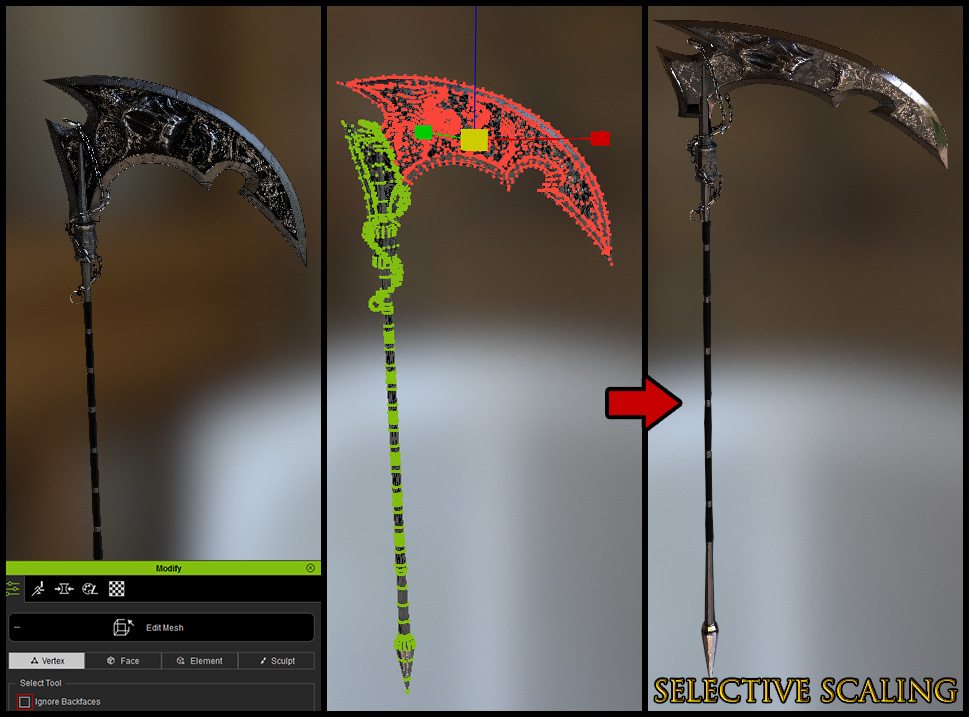
Basic Sculpting TechniquesIf you haven't tried any sculpting tools in CC3, you are
seriously missing out on some of the best features. Try the Smooth tool out right away. It is simply magic; it can repair a trashed mesh like the cloak shown in the previous image in no time. Another technique you absolutely must try is the Soft Selection in the Modify > Edit Mesh first tab (Vertex)...
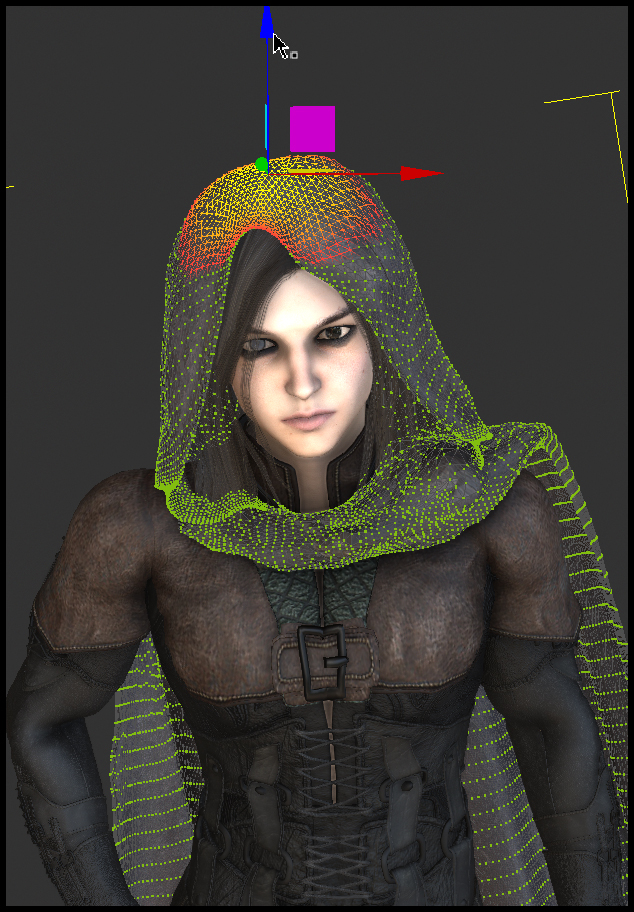
You just click a single point and then you can use the Transform (hotkey "W"), Rotate ("E"), and Scale ("R") toolbar items to reshape and repair your meshes. Once you have these basic sculpting techniques down, you can use them to achieve ~95% (occassionally even 99%) Polygon Reduction results, whereas you'd normally run against limits at around ~70% reduction. Try out selective scaling as well...
 Fixing Bad Intersections
Boots, the fingers of gloves, capes, etc. must not intersect. Mustaches must not droop over the upper lip. Apply corrective morphs prior to export to solve this problem. Always check your gloves after Transformer by applying a pose to spread the fingers. Check mustaches by opening the mouth...
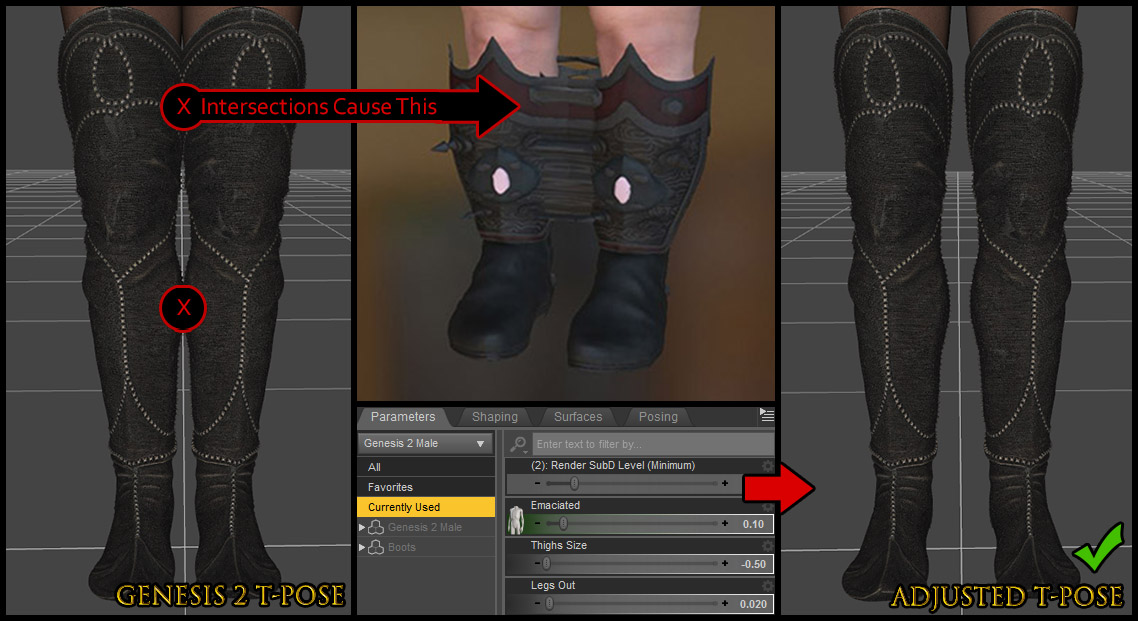
It is generally a good idea to use the base Genesis 1/2/3/8 models to export clothing instead of a custom character. The Genesis 2 Male is the exception, requiring minor corrections shown above. Exporting as OBJ and using the menu Create > Accessory option can often get around these problems.
Weld Vertices Modify > Weld Vertices; this does not work at all like you'd expect. It is not going to help you repair items such as this...
What it does is prevent this type of problem occuring in the first place
if you run it as soon as you import new clothing, before doing anything else. You should get into the habit of running it after every Daz import. Do it for each item individually.
Boosting Texture QualityAs far as tricks go, I consider this next one to be one to be a great secret. It seems simple, but it can be a total game-changer.
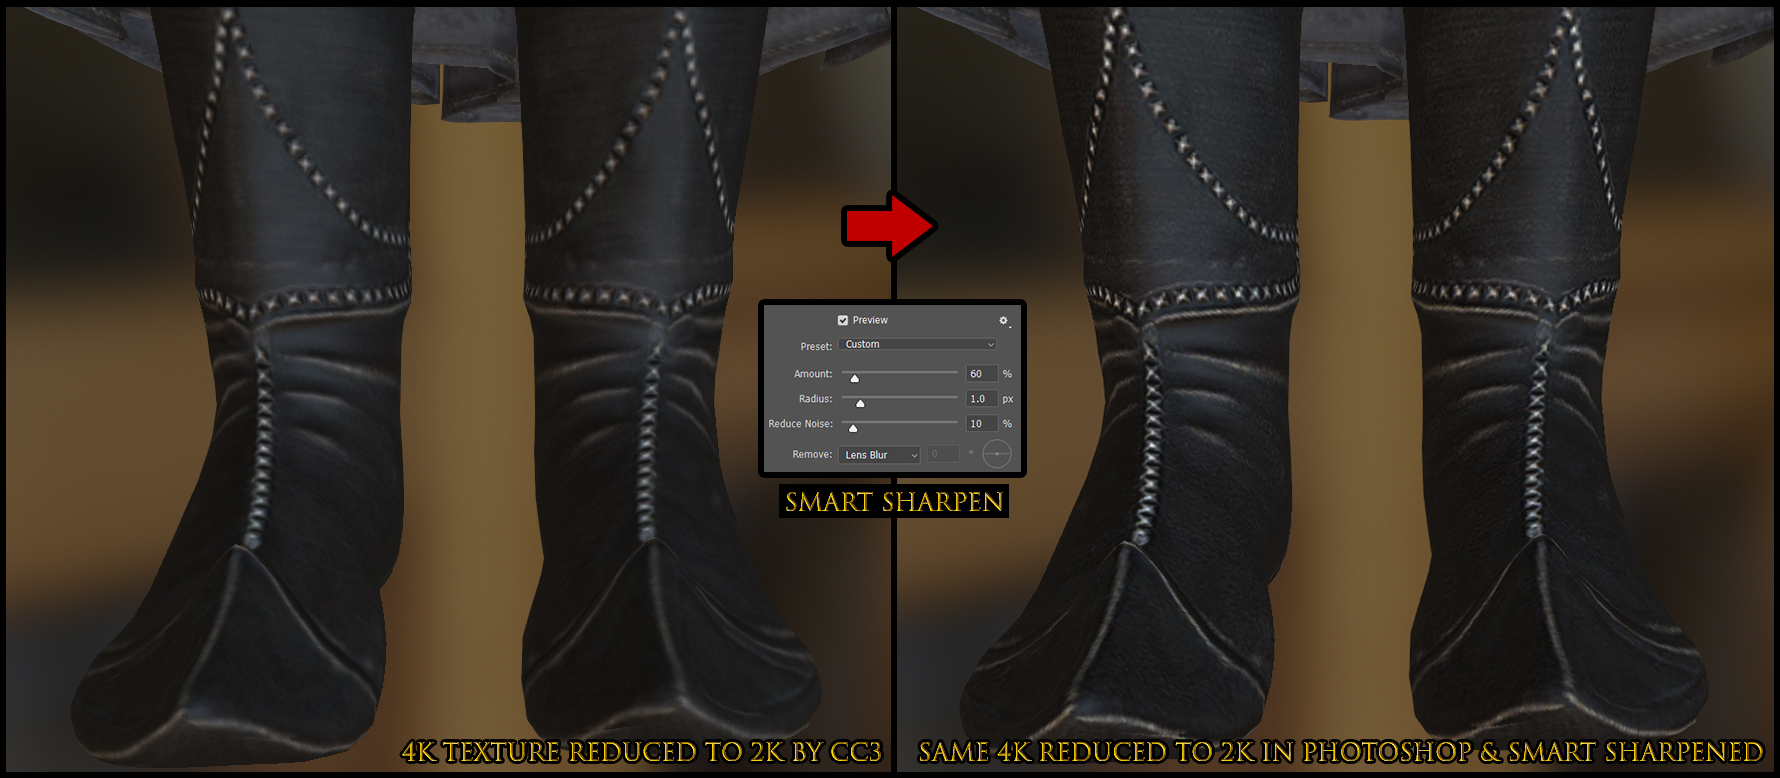
This can make 1K textures look very close to 2K. I am using this on almost every texture in Unity to gain a 50%
or greater performance increase (by eliminating 90% of 2K textures and using 1K instead—but there are many times when you want
just the Diffuse (or Normal) at 2K, and CC3 may be one such case). I am not exaggerating about the performance gain. Take 15 minutes to teach yourself how to create a Photoshop action to automatically do the following: 1: Resize 50%. 2: Smart Sharpen with the settings shown in the image (actually ~50% is more accurate than the 60% shown in the image—the extra sharpness is just a personal preference). 3: Save. 4: Close. You can automatically treat hundreds of textures in a few minutes if you so desire. This trick should also cut your render times down by more than 50%.
The general rule is that if you reduce a texture size by 50%, it needs to be Smart Sharpened. Also, I don't trust any other program than Photoshop to resize my textures while retaining quality.
Smoothing Out Transformer ErrorsI had this bright idea for a way to add more detail to the CC3 mesh...we know that Daz HD morphs won't export, but there are some non-HD detail morphs that will. When I say detail morphs, I'm talking about things like muscle definition, or aging morphs, or forehead wrinkles. So, I gave that a go and it really did not turn out well (a few of them did work out ok, so you have to experiment). Here's what happened, and how I fixed it...
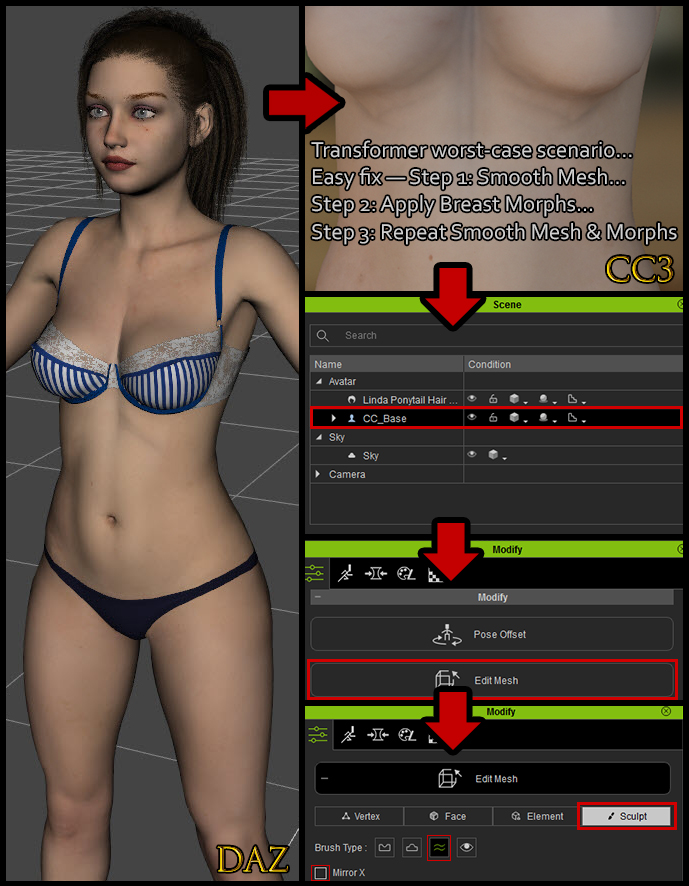
I use this technique all the time. Basically, instead of using Push/Pull, all you do is Smooth things down and then use your morphs to rebuild and reshape. This is so fast and easy, anyone can do it. It does not require artistic talent. You can even Smooth out both breasts at the same time with Mirror X. After this experience, I will spend less time working on details in Daz. You'll see why in a moment...
Detail Morphs in CC3It seems the CC Essential Morphs & Skin pack received a major stealth update and truly lives up to its name—at least, I certainly don't recall having all these detail morphs before...
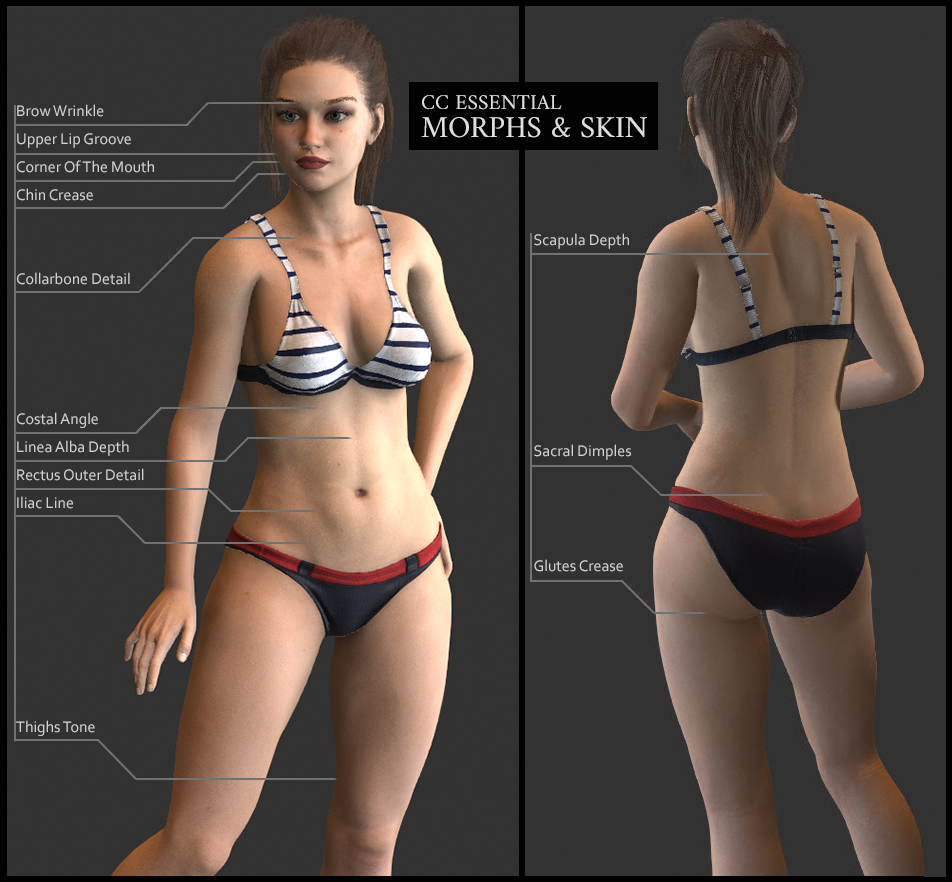
This really saved the day for me. All those morphs I was hoping (and failing) to get from Daz were right there in CC3. There are more detail morphs than shown in the image. I am hoping we can get even more of these in the future—maybe even a pack focused entirely on these—because it can totally substitute for a great deal of manual sculpting work.
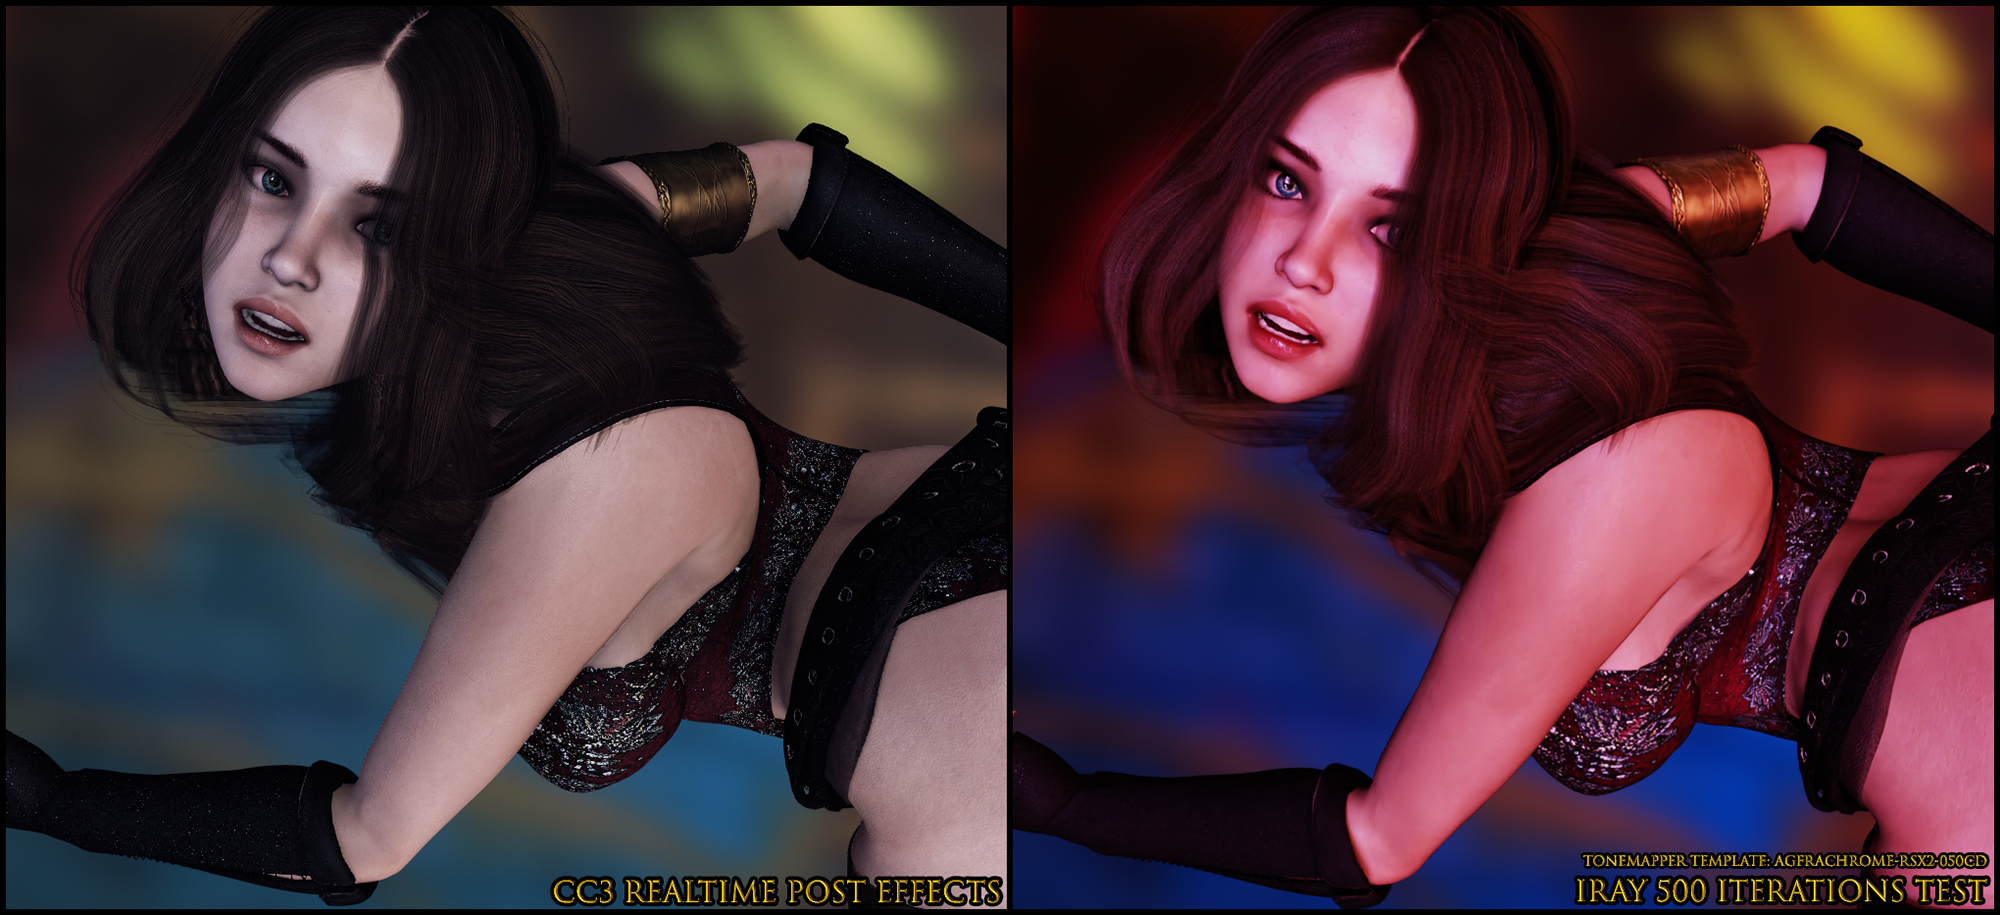
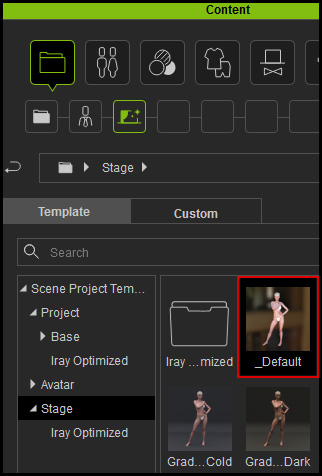
Adding Post EffectsBefore adding any Post Effects, you should know how to restore the default IBL when you want to get things back to normal. It is located here...
When you've finished working on a character, you can add some impressive eye-candy in just a few clicks. Please note that the Steps 1-3 in the following image are just a recommended starting point—the other settings have good effects too!
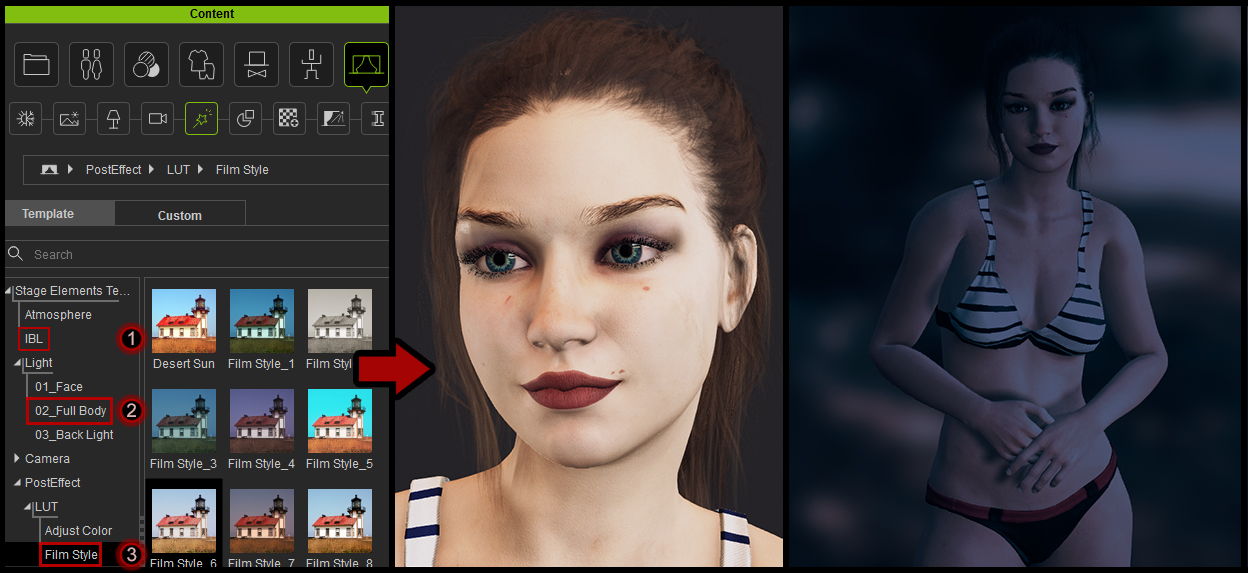
LUT's can be stacked for an interesting effect, as shown in the second image which has 3 LUT's applied. Applying Post Effects may automatically turn on effects like HDR, and may adjust your Shadows setting from 512 to 2K, and activate Global Illumination. This can impact your performance, so be sure to reset these effects when you are done. You can find them all in 4 tabs at the top of the Visual window. Also remember to delete the light from Step 2, which you will find in the Scene window. Additionally, you may find Ambient Occlusion has become deactivated—remember to reactivate it.
Adding CC_Base Maps to Daz CharactersI've got just the thing to boost your workflow. Here's a trick I shared in my previous thread,
Scyra's Exotic Tricks and Traps, but now it's even better than before...
As noted previously, Daz Normal Maps tend to either be of low quality or absent entirely. Fortunately, you've got a great starter set of Normals
and AO and Roughness maps that come with the CC_Base male & female models—and they look totally natural on your Daz characters. Best of all, they can be simply dragged & dropped, unlike Daz maps that must go through the Transformer process, requiring you to fill out the .INI Texture Profile. In fact, I plan to eliminate that process from my workflow altogether by collecting and recycling the few Daz Normals worth having, and using the CC_Base AO & Roughness maps on everything.
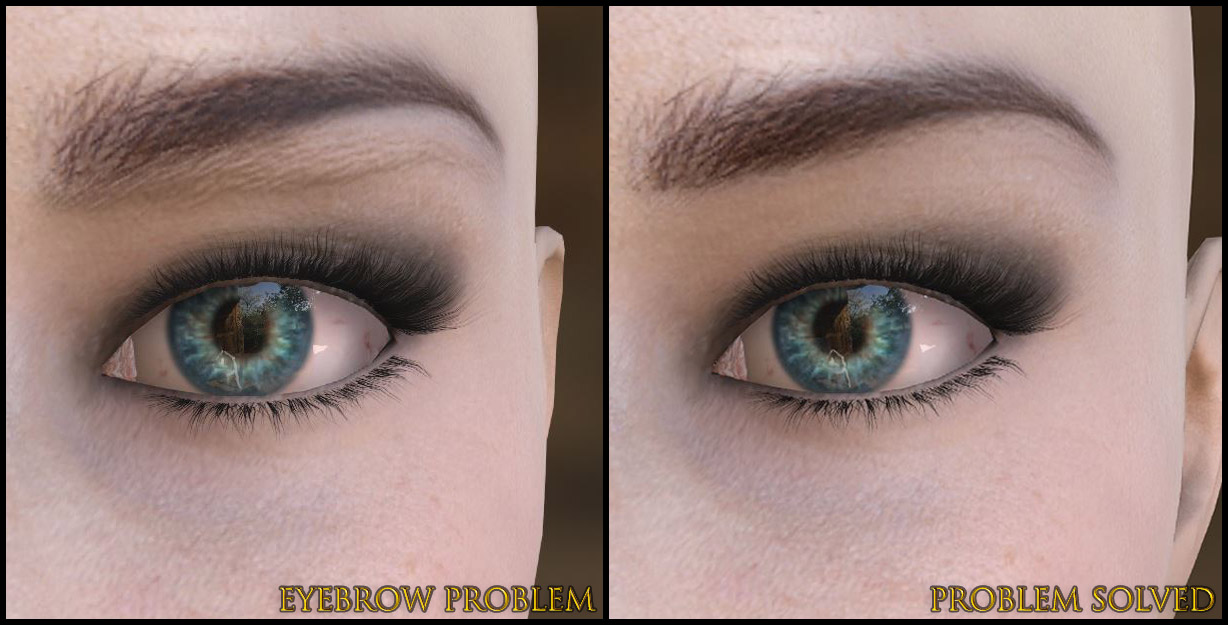
After saving out the CC_Base maps, one thing you should keep in mind is that the Roughness map will need to be inverted when applied to a Daz character, and its Brightness -15 will be the baseline setting instead of 0. Oh—and there is one other little problem...the eyebrow on the Normal is unlikely to match your Daz skin, but I've fixed that for you (female version only for the moment...). As a treat, you'll find I've attached two files to this post, one with the eyebrow Normal raised higher, the other with eyebrows erased. I am thinking this is ok to share this because it is completely useless to someone who does not own the other maps in the set (they will end up with a nasty neck seam), but if RL disagrees, please feel free to remove!
If you want to check your Normals to see if they're worth exporting, here's how you do it...
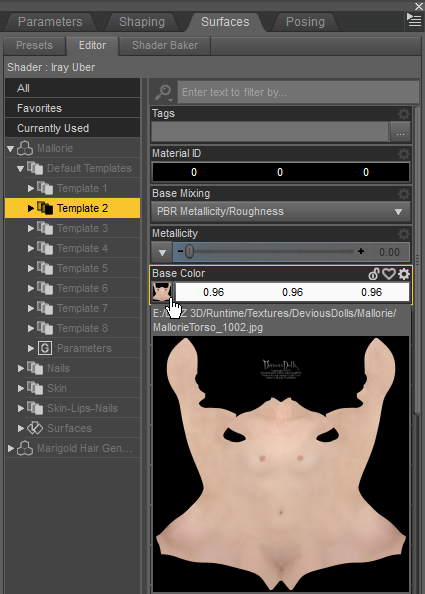
First you need to find a map under the Surfaces tab; they're usually found under Template 2, but you'll also find them under Surfaces tab > Surfaces. Click on the map and choose Browse... then copy the location and open it outside of Daz to inspect the maps. We've already established that the CC_Base Normals are good, so we can use that as a basis for comparison...
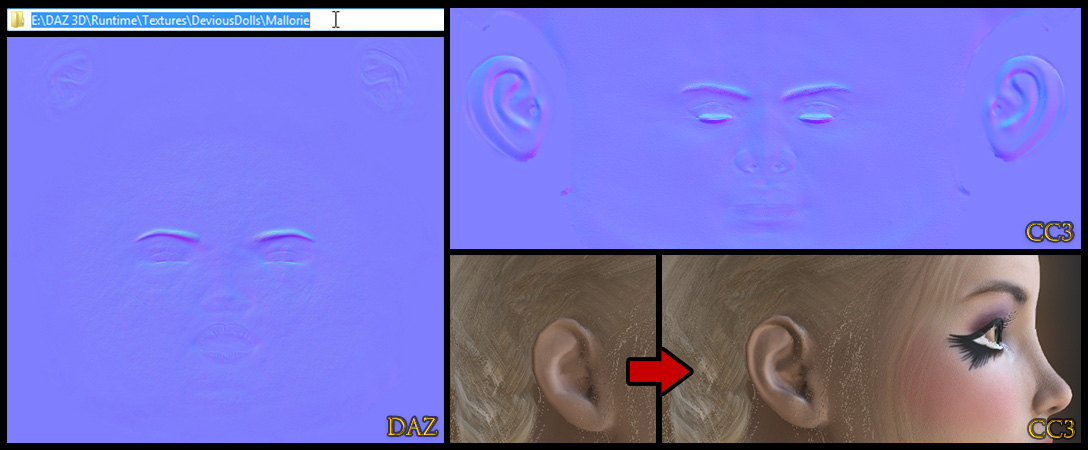
As far as Daz Normals go, I've seen worse (by the way, I love this artist, I think she's great), but look at what I'm going to lose if I use this Normal. I'd lose all of the ear detail.
If you have Photoshop, what you can do in this case is use the CC Base Normal ear details instead. Ensure the maps are the same size. then use Modify > Material > Texture Settings > Launch Texture and drag the CC Normal into the document. Select the Rectangular Marquee Tool, right-click > Rasterize Smart Object, then make a rectangular selection around the ear, hold the Shift key, and do the other ear, then Select > Inverse (Shift+ Ctrl+ I) and Delete.
Retaining DetailsBecause Daz high resolution morphs won't export, the first thing I always do when working on a new character is set the Resolution Level to Base. This results in a loss of some detail, but it can be trivial to regain most of that detail with regular morphs. To be clear, the Base Resolution export is going to happen whether you use this setting or not—this just lets you see what you're going to get. This character had high-res detail on the lips and the tip of the nose. When I changed the resolution to Base, the lips parted. Once, I fixed a similar issue by simply changing the SubDivision Algorithm parameter; didn't work this time. The fix is not as simple as adjusting the Mouth Open morph either—that change makes the jaw and overall facial structure appear diminished. Still, it only took a few minutes to fix this. Here's what I used (and I generally don't buy morphs so you should have most of these):
Mouth Open: -13.4 (must reapply after applying CC3 T-pose)
Jaw Height: -12
Lip Lower Size: 25
Lip Top Peak: 30
Mouth Curves: 15
Mouth Size: 8.5
Nose Tip Round: 18

Once you're inside CC3, you may still find some things not to your liking—like, "why are my giant knockers decagon-shaped?" Well, because, that's what Modify > Smooth Mesh > Tessellation (or a bra) is for. This is not an exportable feature, but if your target software or game engine is modern, it should also have this. Some use of CC Essential Morphs and a bit of Edit Mesh > Sculpt (Smooth) was used here...
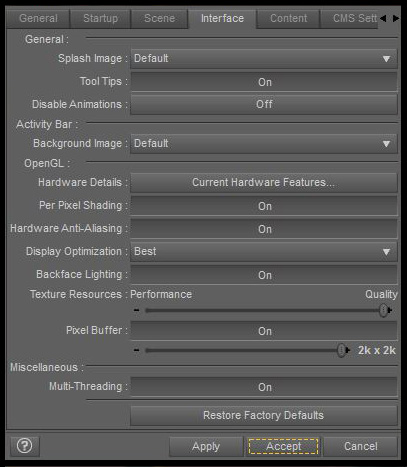
 Daz Preferences
Perhaps you are new to Daz. I've only been using it a couple months myself, but I've done a lot of reading. It's actually pretty easy program to get used to. You'll definitely want to go to Edit > Preferences and try out these settings. The Display Optimization setting is actually GPU acceleration, and it's disabled by default...
CC3 & Daz Tricks | CC3 to Unity workflow
Edited
5 Years Ago by
Scyra