26, December 2019 Update: Hair Shader mini-guide located
here.
A Common Question: Why does my character look different in Unity?
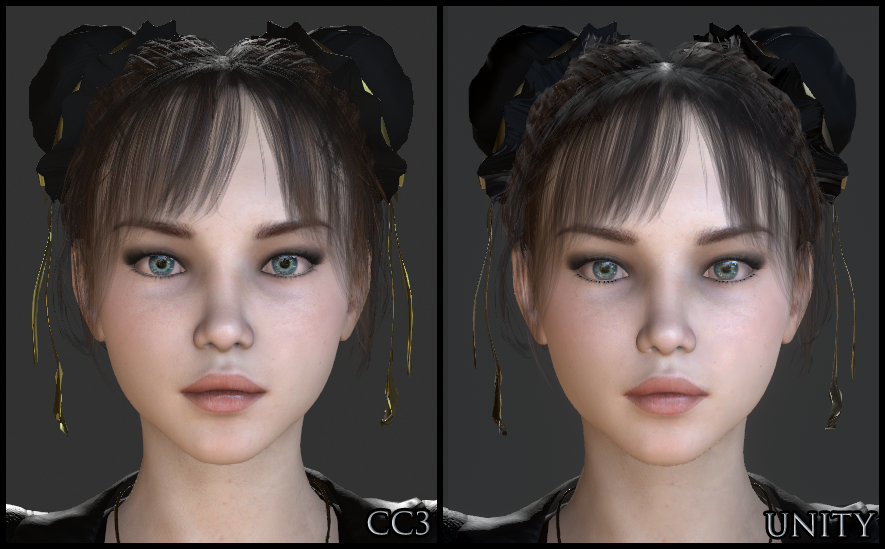
Let's aim for Digital Human realism in Unity. To get there, first we'll start out by emulating the basic CC3 look.
If we could then come close to the quality of Digital Humans within Unity, we'd be approaching industry standard graphics from inside our bedrooms. That'd be nice, right?
Replicating CC3 in Unity: Initial SetupI made a scene that looks close to CC3's Default Stage. I use this scene to import, adjust, and test characters. Because the lighting setup is similar, it helps me to notice and adjust any material import discrepancies. I'll post instructions so you can make this scene if you'd like. You may find it to be like a crash course..
I am modifying the default SampleScene for a new 2019.2 project using 3D with Extras template. It is the same for HDRP. Here is an image guide for the initial scene setup you may find helpful to clarify the instructions below...
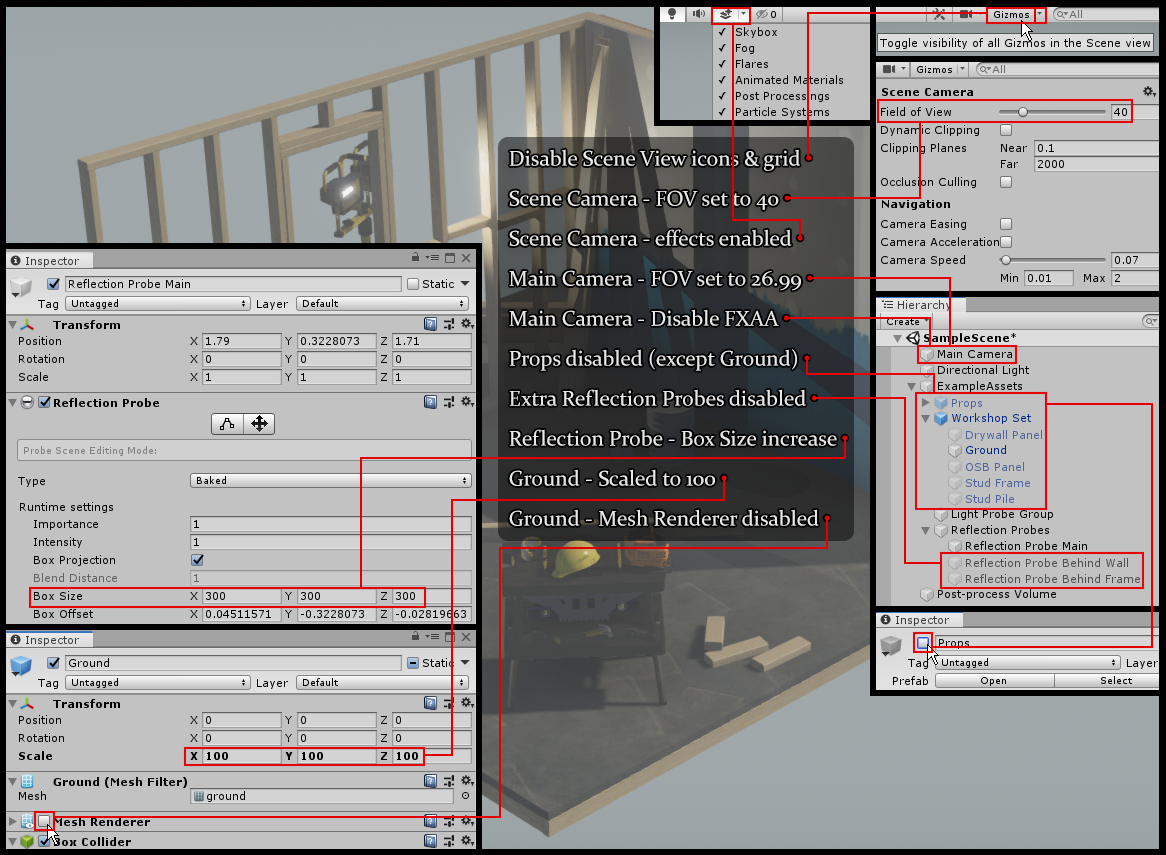
- Window > Package Manager > Update Post-processing (currently version 2.1.7)
- Disable Gizmo Icons & Grid
- In the Scene tab's menu bar, set the Scene View Camera Field of View to 40 & the Main Camera (Game View camera) to 26.99
- Disable FXAA on the Main Camera. This type of anti-aliasing degrades quality and is worse than none at all. I have 4x Multi Sampling set in Project Settings > Quality — this setting takes effect when setting "No Anti-aliasing" in the Post Process Layer component.
- In the Scene tab's menu bar, toggle all Scene View effects on: skybox, fog, and other effects.
- In Hierarchy, expand ExampleAssets and disable Props, expand Workshop Set and disable everything except Ground, expand Reflection Probes and disable all except Reflection Probe Main.
- Set Reflection Probe Main's Box Size to 300 for X, Y, & Z. This one proble will be used to cover a huge (empty) area.
- Scale the Ground to 100 for X, Y, & Z, and disable its Mesh Renderer component. The character will be able to run for a good ways on invisible ground.
It is a good time to import the Character Creator and iClone Auto Setup Script for Unity it is not already in your project. Current version 1.01 is officially for 2019.1 but works with the latest 2019.2. The generated Editor folder can safely be placed inside the CC_Assets folder if you'd like.
CC3 to Unity Export — Traps!Export a CC character with the proper settings. There are a few special settings you need to be aware of...

The Mouth Open as Morph adds an important corrective BlendShape and is not enabled by default. It is also important to include the Current Pose (export in T-Pose or one of the default CC pose presets). The default CC poses received a corrective update, and if you fail to include Current Pose, this will happen when you go into Play Mode...
 Shader Problems & Fixes
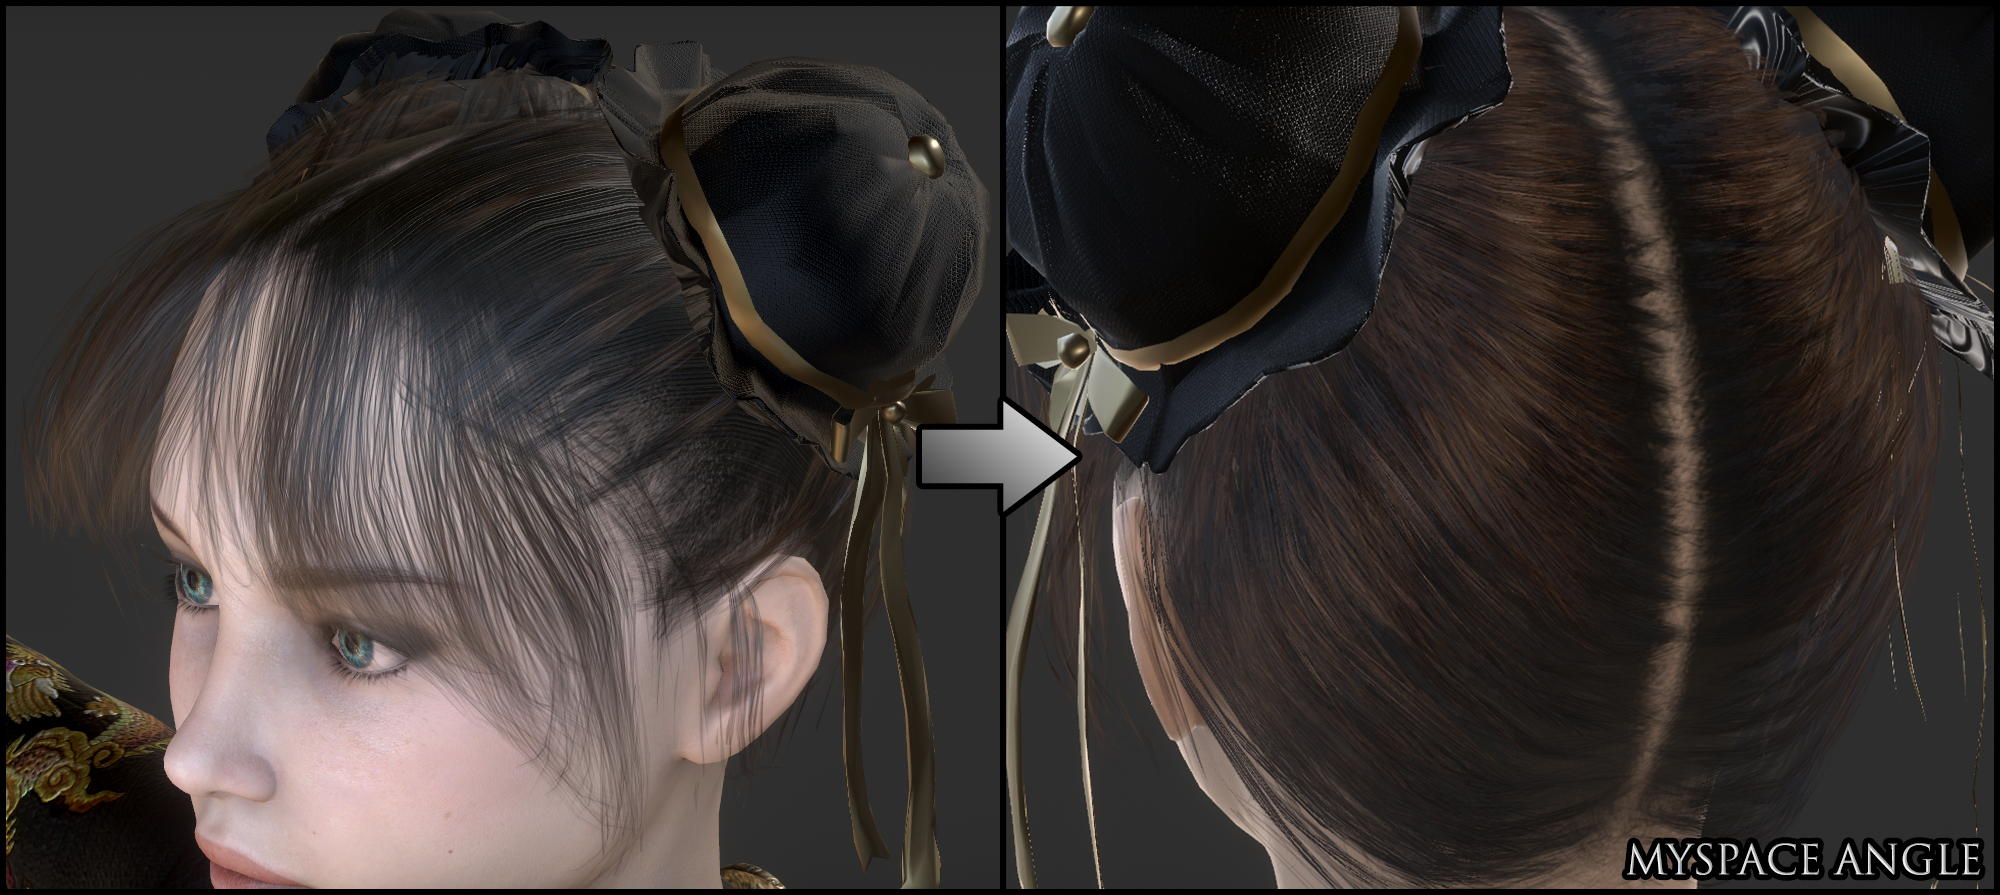
Remember to go into the Tools menu and disable Auto-Processing after import (and re-enable before next import). Characters imported into Unity will have clothing and hair transparency problems...
These are limitations with the aging Unity Standard Shader. It is a Unity problem and Reallusion cannot fix this. HDRP users will fare better because the new shader supports double-sided materials, which is the problem we see with the clothing. Because I am primarily working with non-HDRP at this time, I paid $5 for Azerilo's
Double Sided Standard Material shader to fix the clothing problem. I tried a few free double-sided shaders and found that they did not support PBR, and looked bad as a result. The hair problem is more complicated and will be covered in the next post.
Note: I use non-HDRP because I bought many assets that do not support HDRP. Standard Unity with paid assets can still compete with and overperform HDRP at the moment, but eventually there will be mass movement to HDRP as it becomes standard...
Another problem you may notice is that the Smooth Mesh options: Tessellation & Subdivision, are lacking in Unity. Again this is a shader issue, and HDRP will have Tessellation, but I paid $10 for the
Beast shader to solve the low poly breasts & butts issue in Unity...

Or you could just put some clothes on instead...
You will need to use it at the same setting on all body materials: head, arms, legs & body, else you will end up with seams between parts. It causes the mesh to inflate and look more like it is over 100K polycount rather than the actual Creation Base's 30K; the same way Smooth Mesh setting works in CC3. This can cause pokethrough for clothing and the scalp/hair if you didn't design with Smooth Mesh enabled in CC3. So, if you want to Tessellate the body but not the clothes, you should reflect that in your Smooth Mesh setting while designing. Game Base should also benefit but the single-material version will likely have problems (unintended things like eyeballs & teeth inflating). Tessellation is used sparingly due to performance concerns. Because the head already has a good polycount, Tessellation will have very little effect on it.
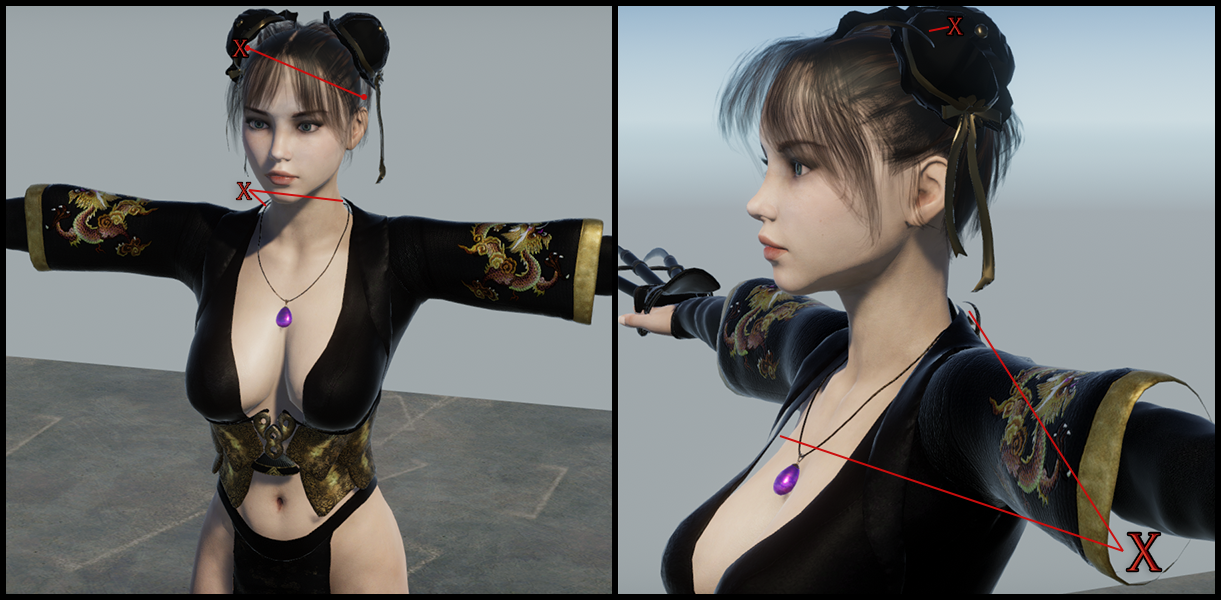
Tessellation also fixes Transformer mesh topology issues like you see here around the neck and shoulders...
 Replicating CC3 in Unity: Lighting Setup
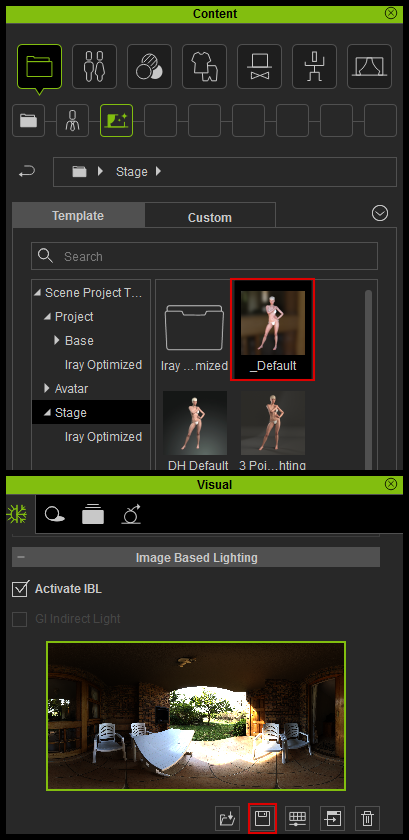
In CC3, apply the _Default stage and save out the IBL...
If you currently have a Digital Human Shader project open, pay attention when you load the _Default Stage: It will look like the skin just lost some detail...but rotate the IBL (or just set the Z to 130) and see how the skin detail reappears. Keep that in mind when you are doing lighting in Unity; the angle that light hits your Normal maps has a significant effect on appearance.
Using CC3 IBL's in Unity gives you great lighting for minimal effort. Here is visual guide to accompany the instructions (last two steps below are not shown in picture)...
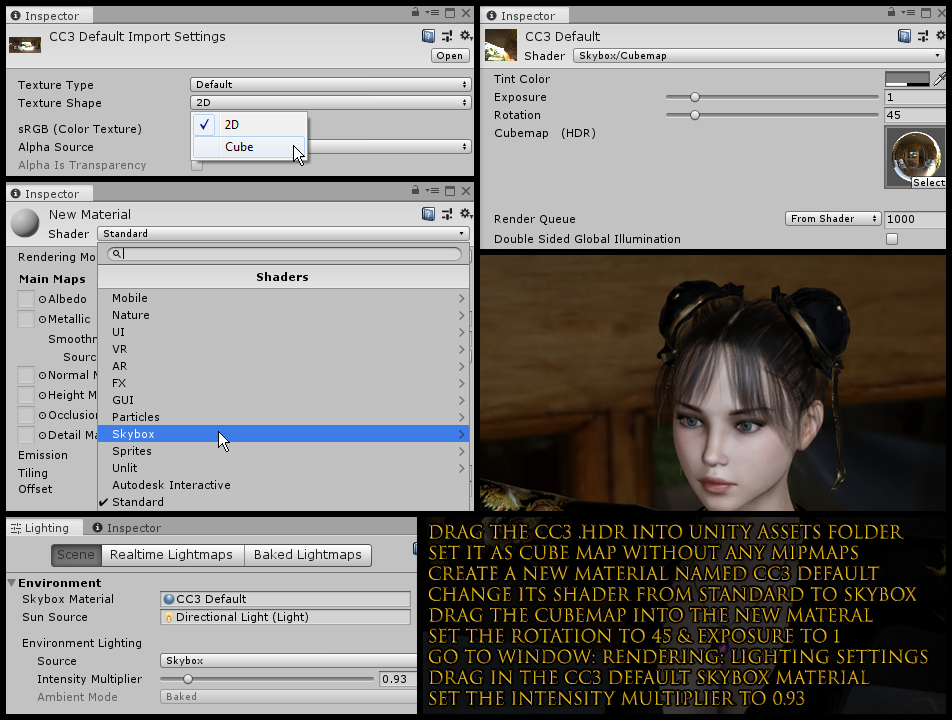
- Drag the CC3 HDR file into your Unity Assets (Projects) folder & set Texture Shape to Cube Map in the Import Settings. Do not Generate Mipmaps.
- Create a new material (Assets > Create > Material) and name it CC3 Default (or whatever you want) and change its shader to Skybox.
- Drag the Cubemap into the new materal and set the Rotation to 45 & Exposure to 1.
- Open Window > Rendering > Lighting Settings and drag in the CC3 Default skybox material. Set the Intensity Multiplier to 0.93.
- Scroll to Other Settings at the bottom of the Lighting settings and disable Fog (not shown in picture)
- Select your Directional Light and change the color to pure white, Intensity to 0.8, and Transform Rotation to X:25 Y:360 Z:-40 (not shown in picture)
Replicating CC3 in Unity: Post-processing / Final TouchesTo complete the CC3 Default look, some adjustments were made to the Post-process Volume at the bottom of the SampleScene Hierarchy...
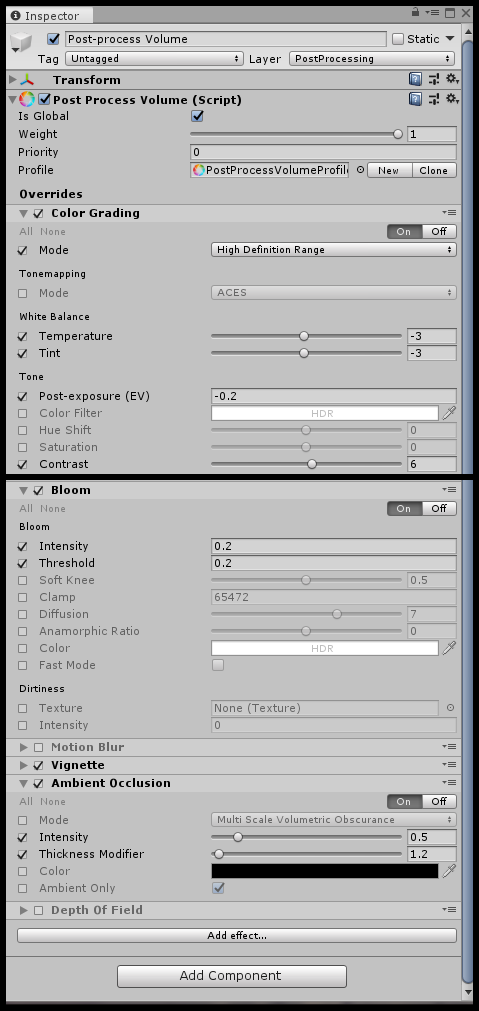
- Color Grading: Tonemapping (ACES) disabled | Temperature -3 | Tint -3 | Post-exposure (EV) -0.2 | Contrast +6
- Bloom: Intensity 0.2 | Threshold 0.2
- Motion Blur & Depth of Field: Disabled
- Ambiet Occlusion: Intensity 0.5 | Thickness Modifier 1.2
The HDR Cubemap skybox we imported is not a perfect match, but it can be toggled off in both CC3 & Unity to display a grey background. Go to Preferences > Colors > Scene > Background and set the Value to 22 and toggle off the Scene View skybox. Set the Main Camera Clear Flags to Solid Color. Besides hiding the Sky In CC3, also go to the Project panel 2D Background section and uncheck Activate Image to disable the gradient...
Besides the hair & eyelashes, which will be covered in the next post, here are the material settings I had to adjust to achieve this...
Eyes Smoothness from .7 to .95, Albedo Value from 100 to 90
Head, Arms, Legs, & Body Smoothness from .88 to .77 (can select all at once), Face Normal from 1 to 1.25
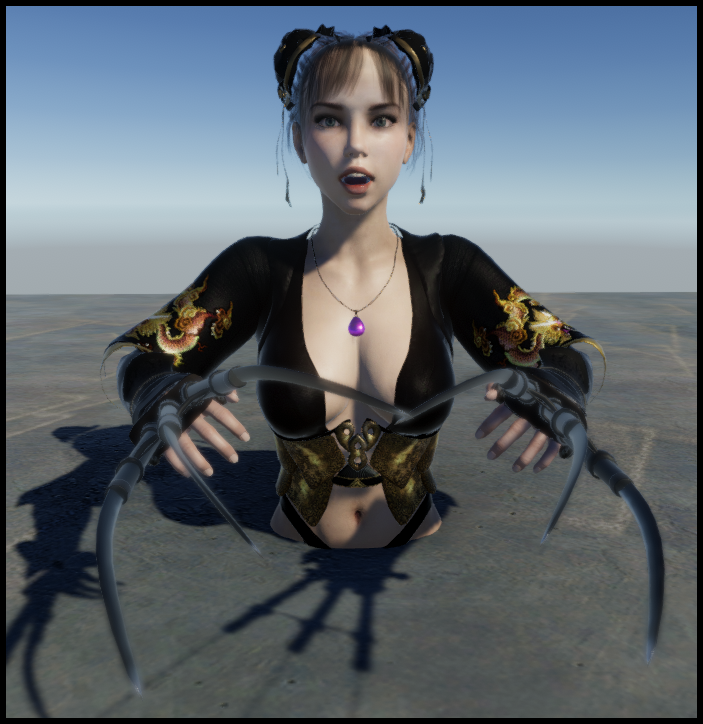
CC3 & Daz Tricks | CC3 to Unity workflow
Edited
5 Years Ago by
Scyra