Profile Picture

My Method Of Creating Hair Beards and Moustaches For CC Characters In Blender

Posted By Delerna 5 Years Ago
You don't have permission to rate!

My Method Of Creating Hair Beards and Moustaches For CC Characters In...

Author
Message
Delerna
Delerna
Posted 5 Years Ago
View Quick Profile
Distinguished Member

Distinguished Member (8.2K reputation)Distinguished Member (8.2K reputation)Distinguished Member (8.2K reputation)Distinguished Member (8.2K reputation)Distinguished Member (8.2K reputation)Distinguished Member (8.2K reputation)Distinguished Member (8.2K reputation)Distinguished Member (8.2K reputation)Distinguished Member (8.2K reputation)

Group: Forum Members
Last Active: 2 Years Ago
Posts: 1.5K, Visits: 14.8K
Introduction
I have been asked by a few people If I would show how I make hairs beards and moustaches and have decided to do so.
Key point is there are many ways to do this and which way is easiest depends on the person doing it. So I can only show my method. I am sure some people will see it to be not the best way but that's OK. Its just a way that works for me and I find it pretty easy to learn it.
I have a couple of other posts related to this

Here I show how I make clothes for CC characters in Blender. Again, its just my own method.
Here I show how I make those clothes so they flow on the character. It also shows how to export characters from CC for use in Blender, how to import it into Blender to make clothes, hairs, beards etc etc for CC characters and it also shows how to export it out of Blender with the clothes and how to import it back into CC.
Here is a link to a video tutorial made by 4U2GES on the 2nd post on that page. He shows how to make a breakable prop for iClone in CC and he shows a some things that opened my eyes. I will also be using this to improve myself.

This post is going to be quite similar with the one I showed for making clothes but this time it is focussing on making things for the head
And to state again, Modelling really needs to be something that interests you. It definitely takes plenty time to model things yourself.
I sell things I make because I want to help people who don't like modelling or can't afford the time necessary to make their own models. But I write these because I also like to help people who would like to make their own modelling but are un-shaw how things can be done in Blender.
Well, at least I like to TRY and help people, because I can only show things according to my own knowledge after all...……...


i7-3770 3.4GHz CPU 16 GB Ram   
GeForce GTX1080 TI 11GB
Windows 10 Pro 64bit
Edited
5 Years Ago by Delerna
Delerna
Delerna
Posted 5 Years Ago
View Quick Profile
Distinguished Member

Distinguished Member (8.2K reputation)Distinguished Member (8.2K reputation)Distinguished Member (8.2K reputation)Distinguished Member (8.2K reputation)Distinguished Member (8.2K reputation)Distinguished Member (8.2K reputation)Distinguished Member (8.2K reputation)Distinguished Member (8.2K reputation)Distinguished Member (8.2K reputation)

Group: Forum Members
Last Active: 2 Years Ago
Posts: 1.5K, Visits: 14.8K
PREPARING THE CHARACTER FOR MAKING OUTFITS
First off I always make Blender have no objects before I load the CC character because it makes less things to worry about when it becomes time to export my finished objects to be loaded into CC. Its mainly the Camera and lamp I am getting rid off because I often use the cube to make what I am working on for my character. But this time I am going to use a plane instead of the cube so I am deleting the cube also
https://forum.reallusion.com/uploads/images/fdc08e78-78b4-4f28-b798-735c.png

Next up I hide the characters bones after I load it because they often get in the way of visually watching what I am making.
Obviously when the thing I am making is finished I need to re-show everything that has been hidden so I can select everything that needs to be exported for loading back into iclone. Hiding any thing is done by selecting it and pressing the keyboards H key. Reshowing up everything that has been hidden is done by holding down the Alt key before pressing the keyboards H key
A key point to be aware of with hiding things in Blender is if you are in object mode when you hide something then when you goto edit mode it will still be hidden.
If you are in edit mode and select some parts and hide them then they will be hidden. If you then goto object mode then the things you hid in edit mode will not be hidden now. But if you go back to edit mode then they will be hidden again. It will stay like that until you are in edit mode and press Alt H to unhide everything that is hidden in the object that was selected when you goto edit mode.

https://forum.reallusion.com/uploads/images/a055daf3-6d6b-4d7d-9b1c-96cc.png


Hmmmm, not sure if this is necessary to say but just in case.
Object mode is where you can create as many separate objects that you want to make.

Edit mode is something you must choose one of the objects and when you go into edit mode that is where you can start adding and moving its vertexes edges and faces.
In edit mode you can also move,scale and rotate everything or just the certain parts that are selected.

In Object mode it is possible to move rotate and scale the object also but it only works with the whole object.


i7-3770 3.4GHz CPU 16 GB Ram   
GeForce GTX1080 TI 11GB
Windows 10 Pro 64bit
Edited
5 Years Ago by Delerna
Delerna
Delerna
Posted 5 Years Ago
View Quick Profile
Distinguished Member

Distinguished Member (8.2K reputation)Distinguished Member (8.2K reputation)Distinguished Member (8.2K reputation)Distinguished Member (8.2K reputation)Distinguished Member (8.2K reputation)Distinguished Member (8.2K reputation)Distinguished Member (8.2K reputation)Distinguished Member (8.2K reputation)Distinguished Member (8.2K reputation)

Group: Forum Members
Last Active: 2 Years Ago
Posts: 1.5K, Visits: 14.8K
MAKING BEARDS
Ok here is one way to start creating a beard using a plane. I think I prefer to use a cube but decided to show this way. Its all very similar anyway
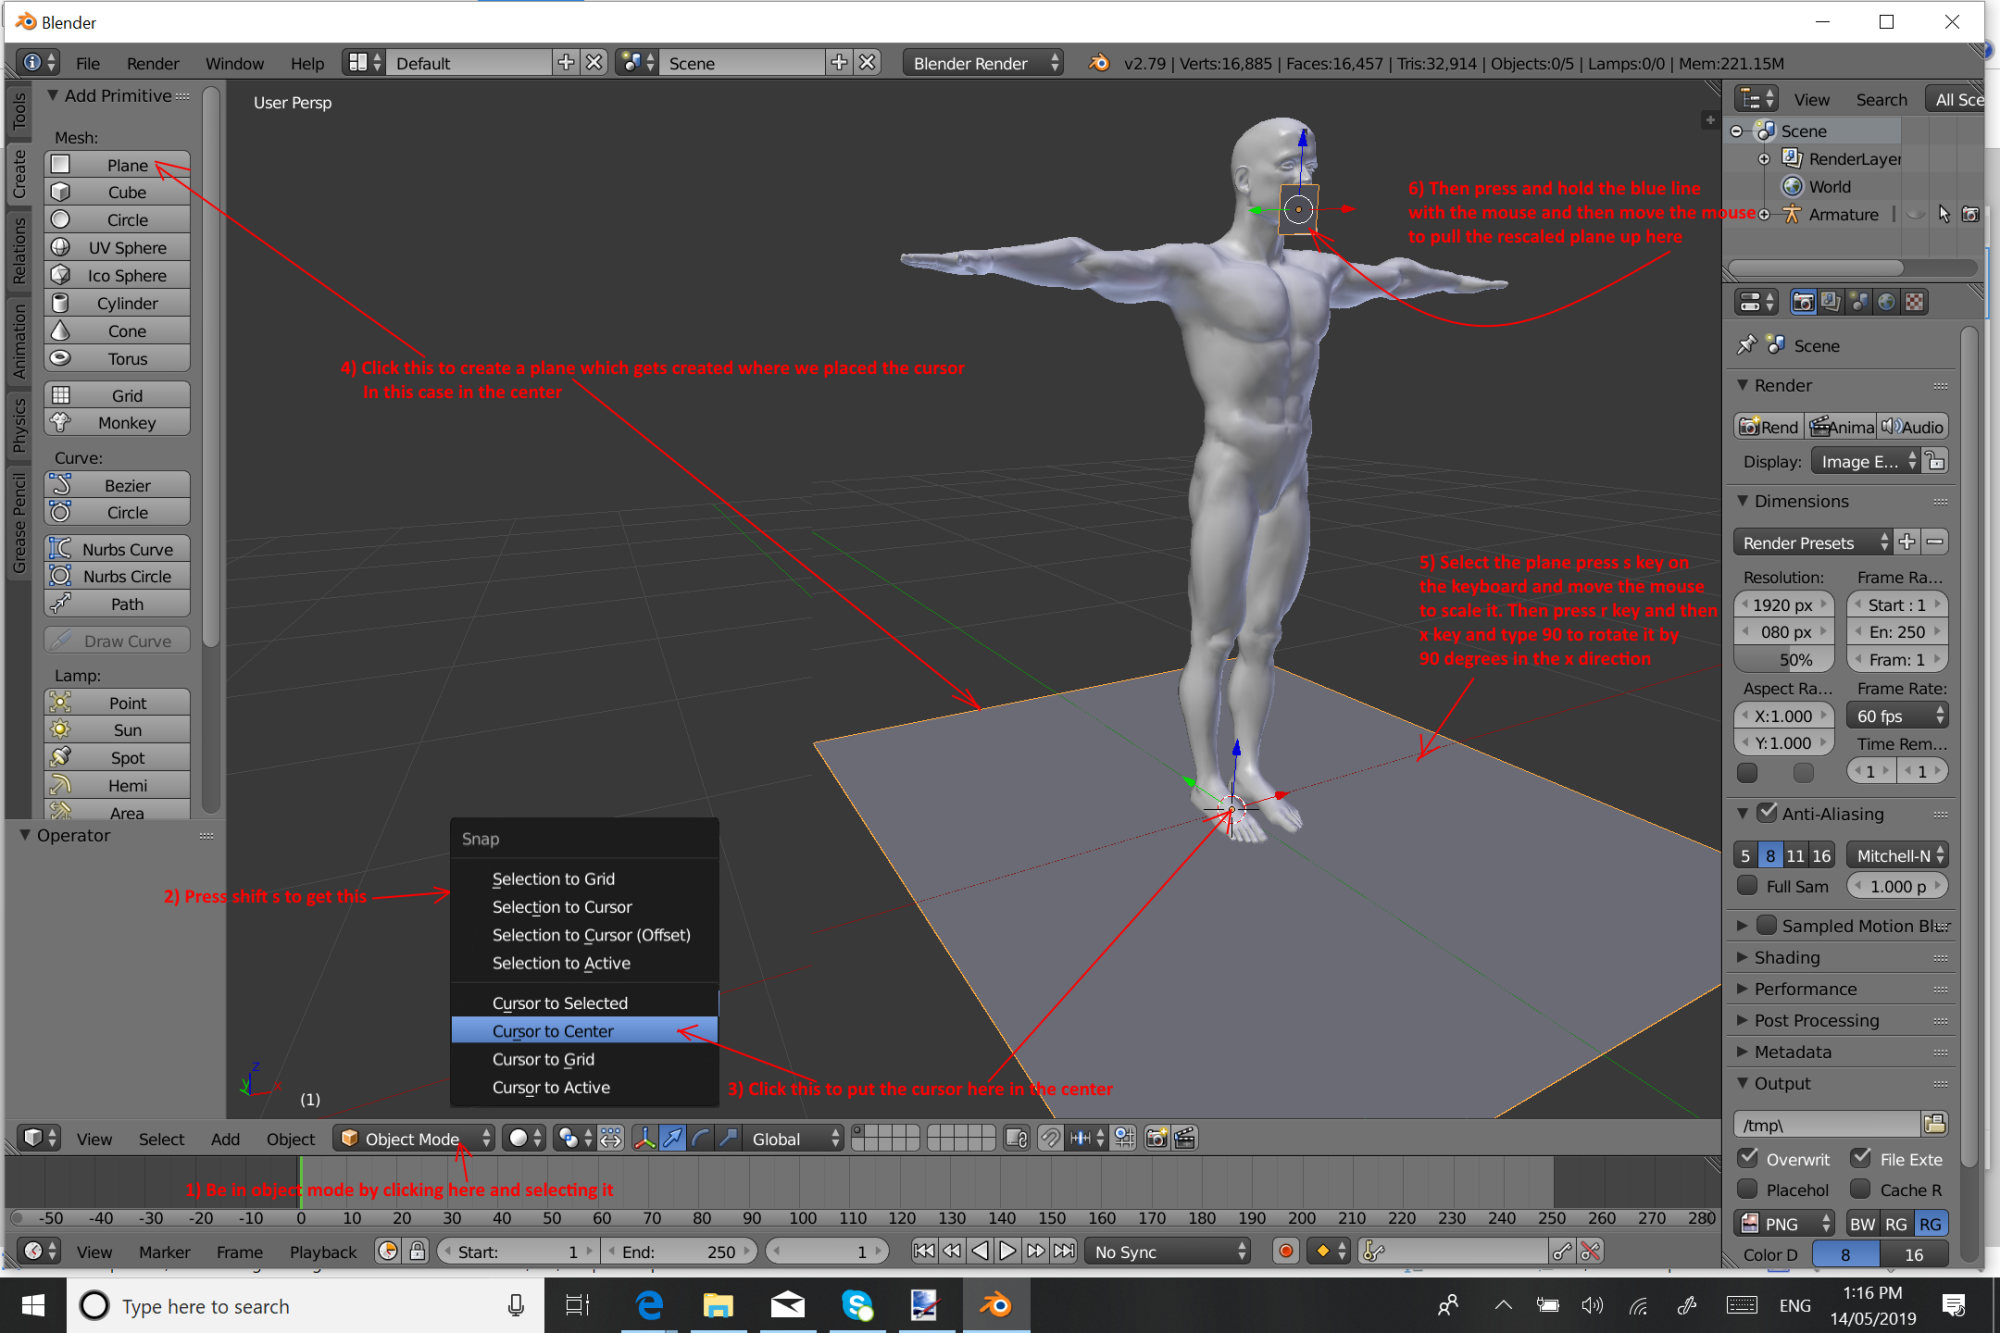
https://forum.reallusion.com/uploads/images/202e5a00-8262-417e-9a05-166c.png


First Important Modifier To Learn
This was also shown in the creating clothes but decided to specify it here too. It is a huge thing that saves me a lot of work because I only need to model the beard on one side of the face and the other side automatically follows it. Once I have the basic shape of what I am creating I may then click apply on the mirror modifier to complete and remove it. Then I can start working on each side separately to make them slightly different to each other. Mirror makes both sides exactly the same and cuts my work in half. Then apply it to start adding slight differences. A very common process for me.
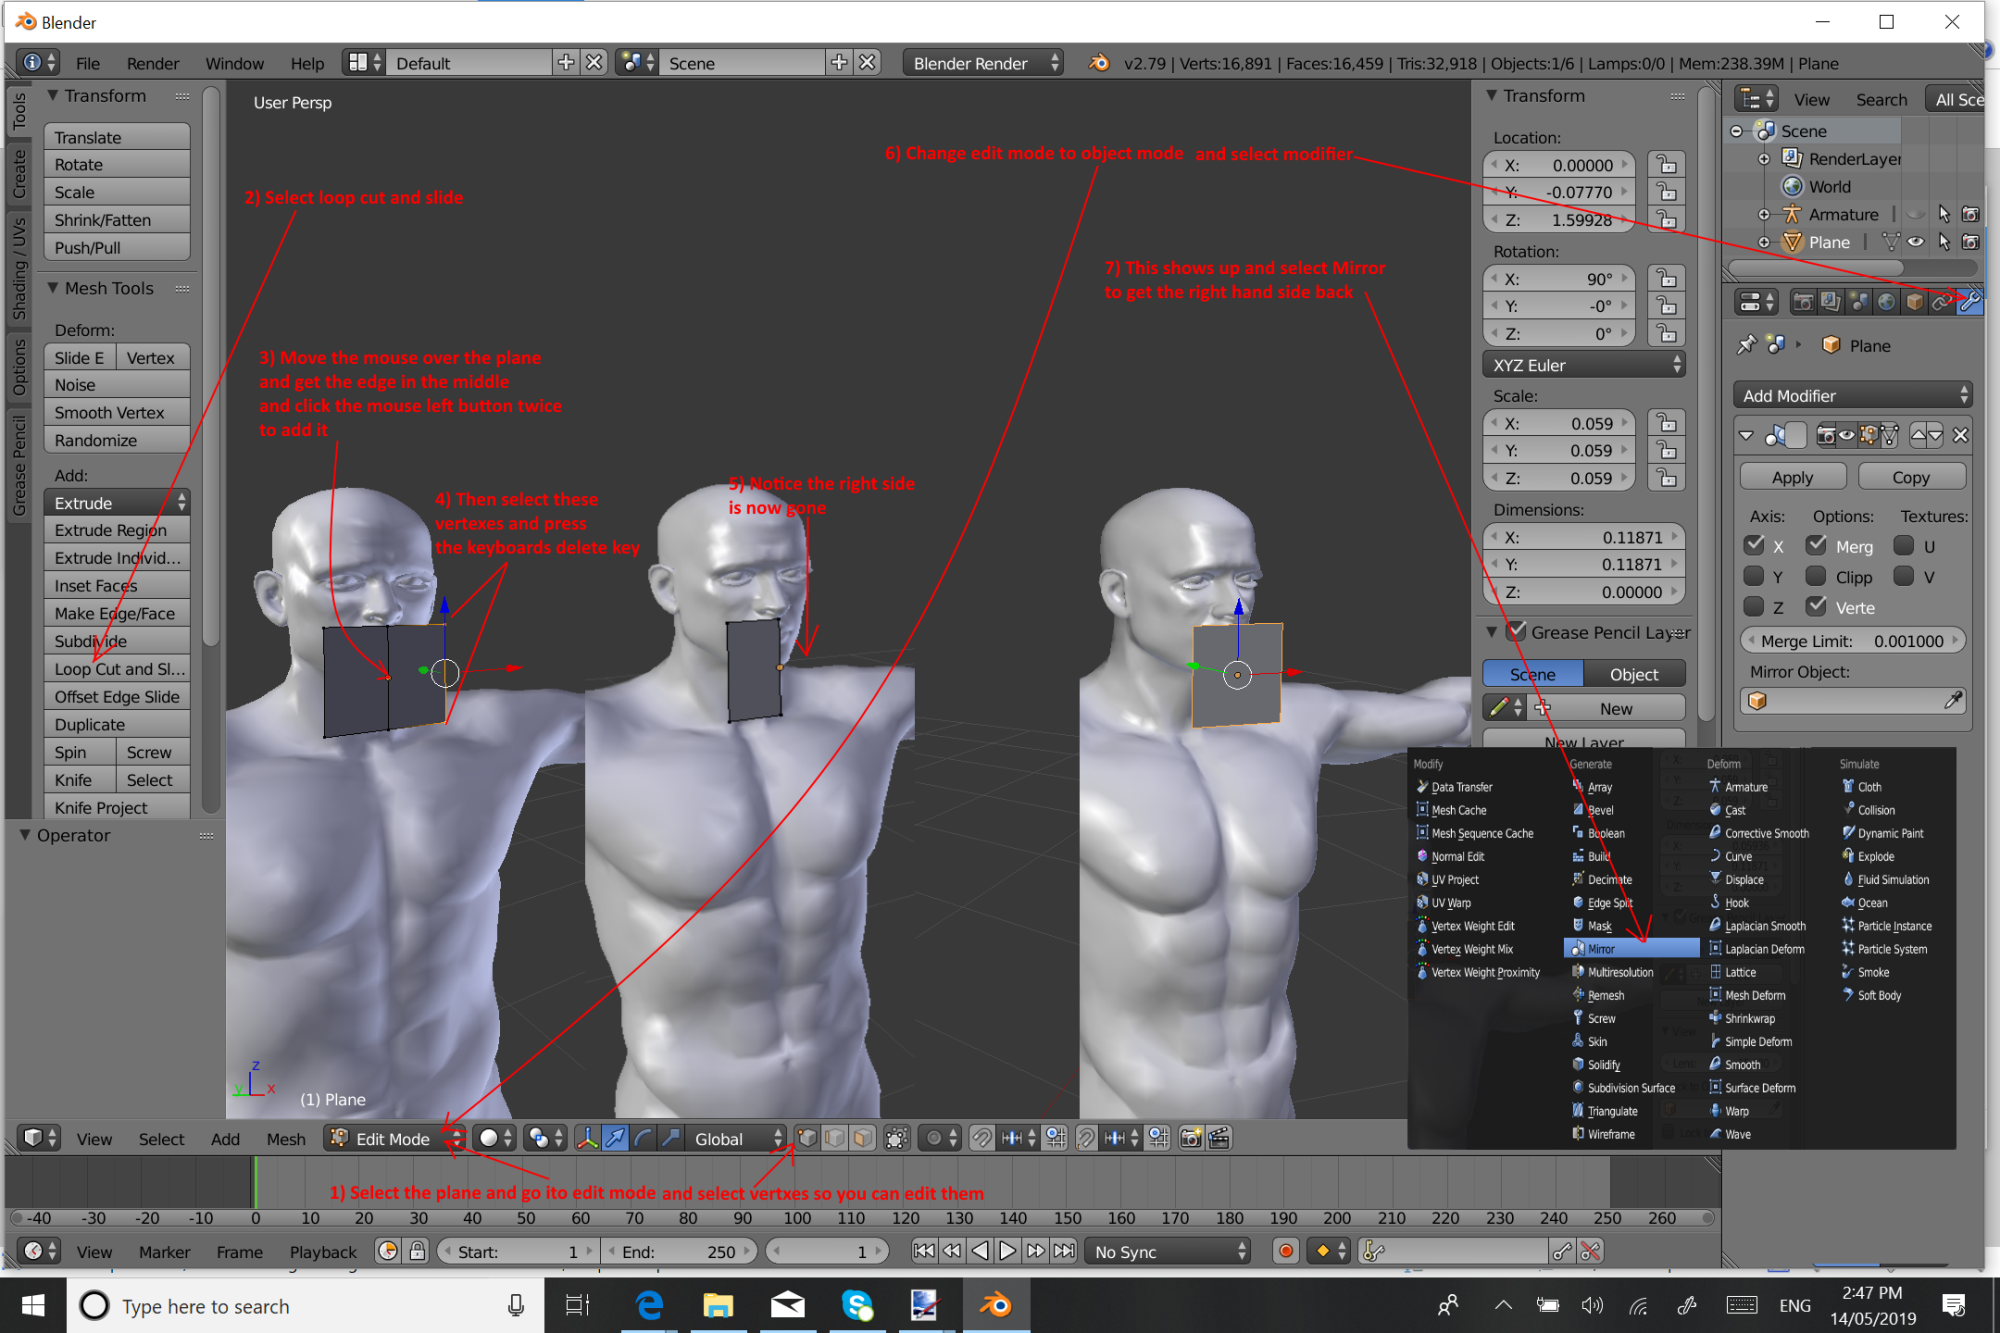
https://forum.reallusion.com/uploads/images/d307c45c-bd14-44a2-99b0-18d0.png

START MAKING THE BASIC SHAPE
I always keep the thing I am making as simple as possible at first. The less details I start with the less things I need to move around to get the shape correct. As it gets closer and closer to the shape I want I add a bit more edges so I can start improving its shape. Adding all the lines it needs at the start means a lot more moving work to get its shape right. So I always keep it simple and get its shape as close as I can get it before adding more edges.
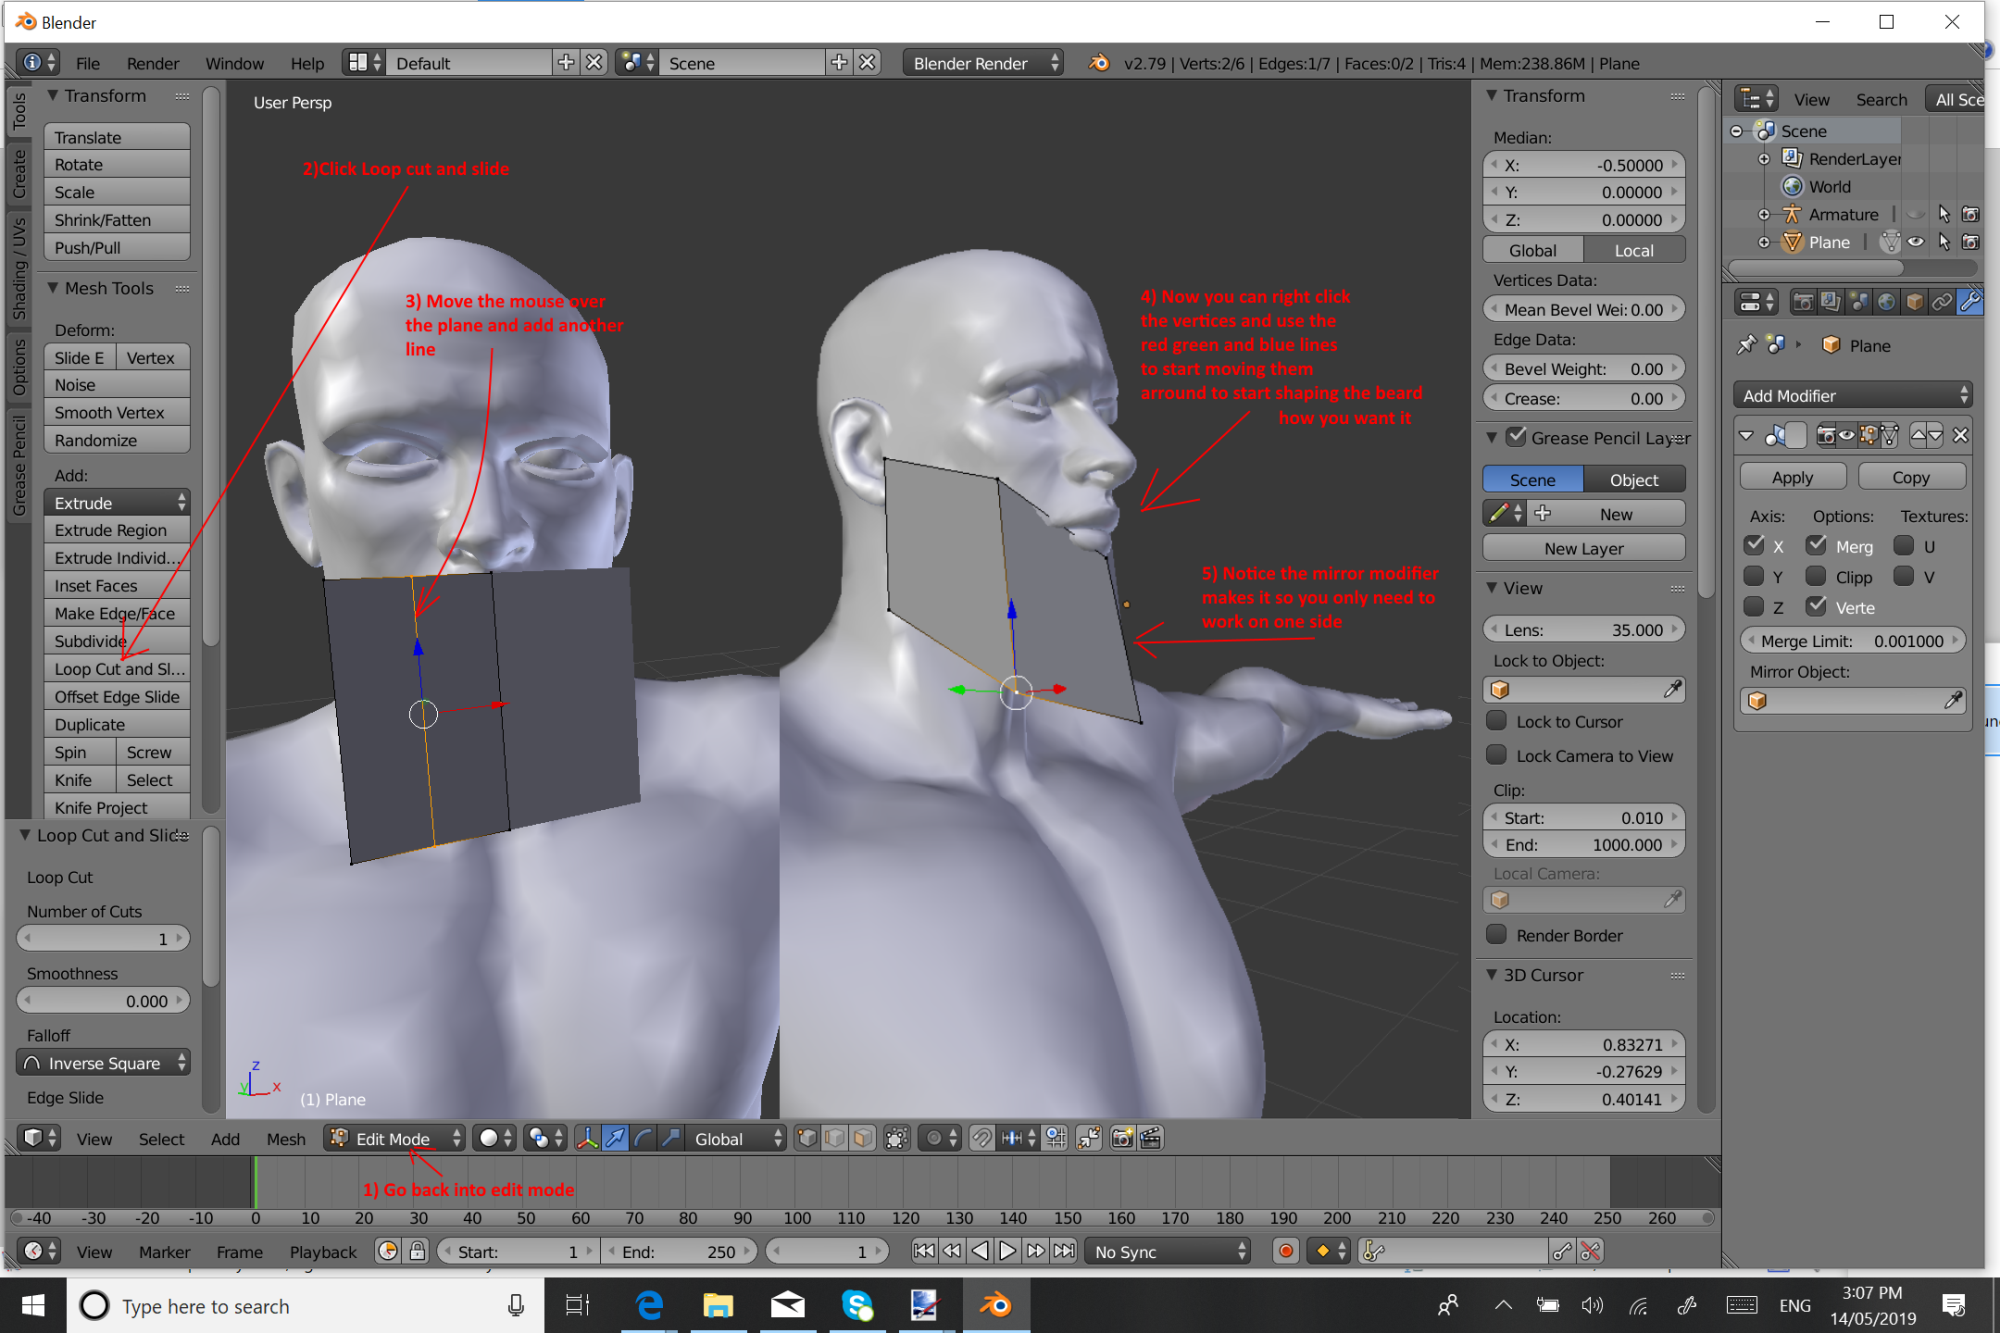
https://forum.reallusion.com/uploads/images/06ef5b23-f12e-426c-ad5b-27ec.png

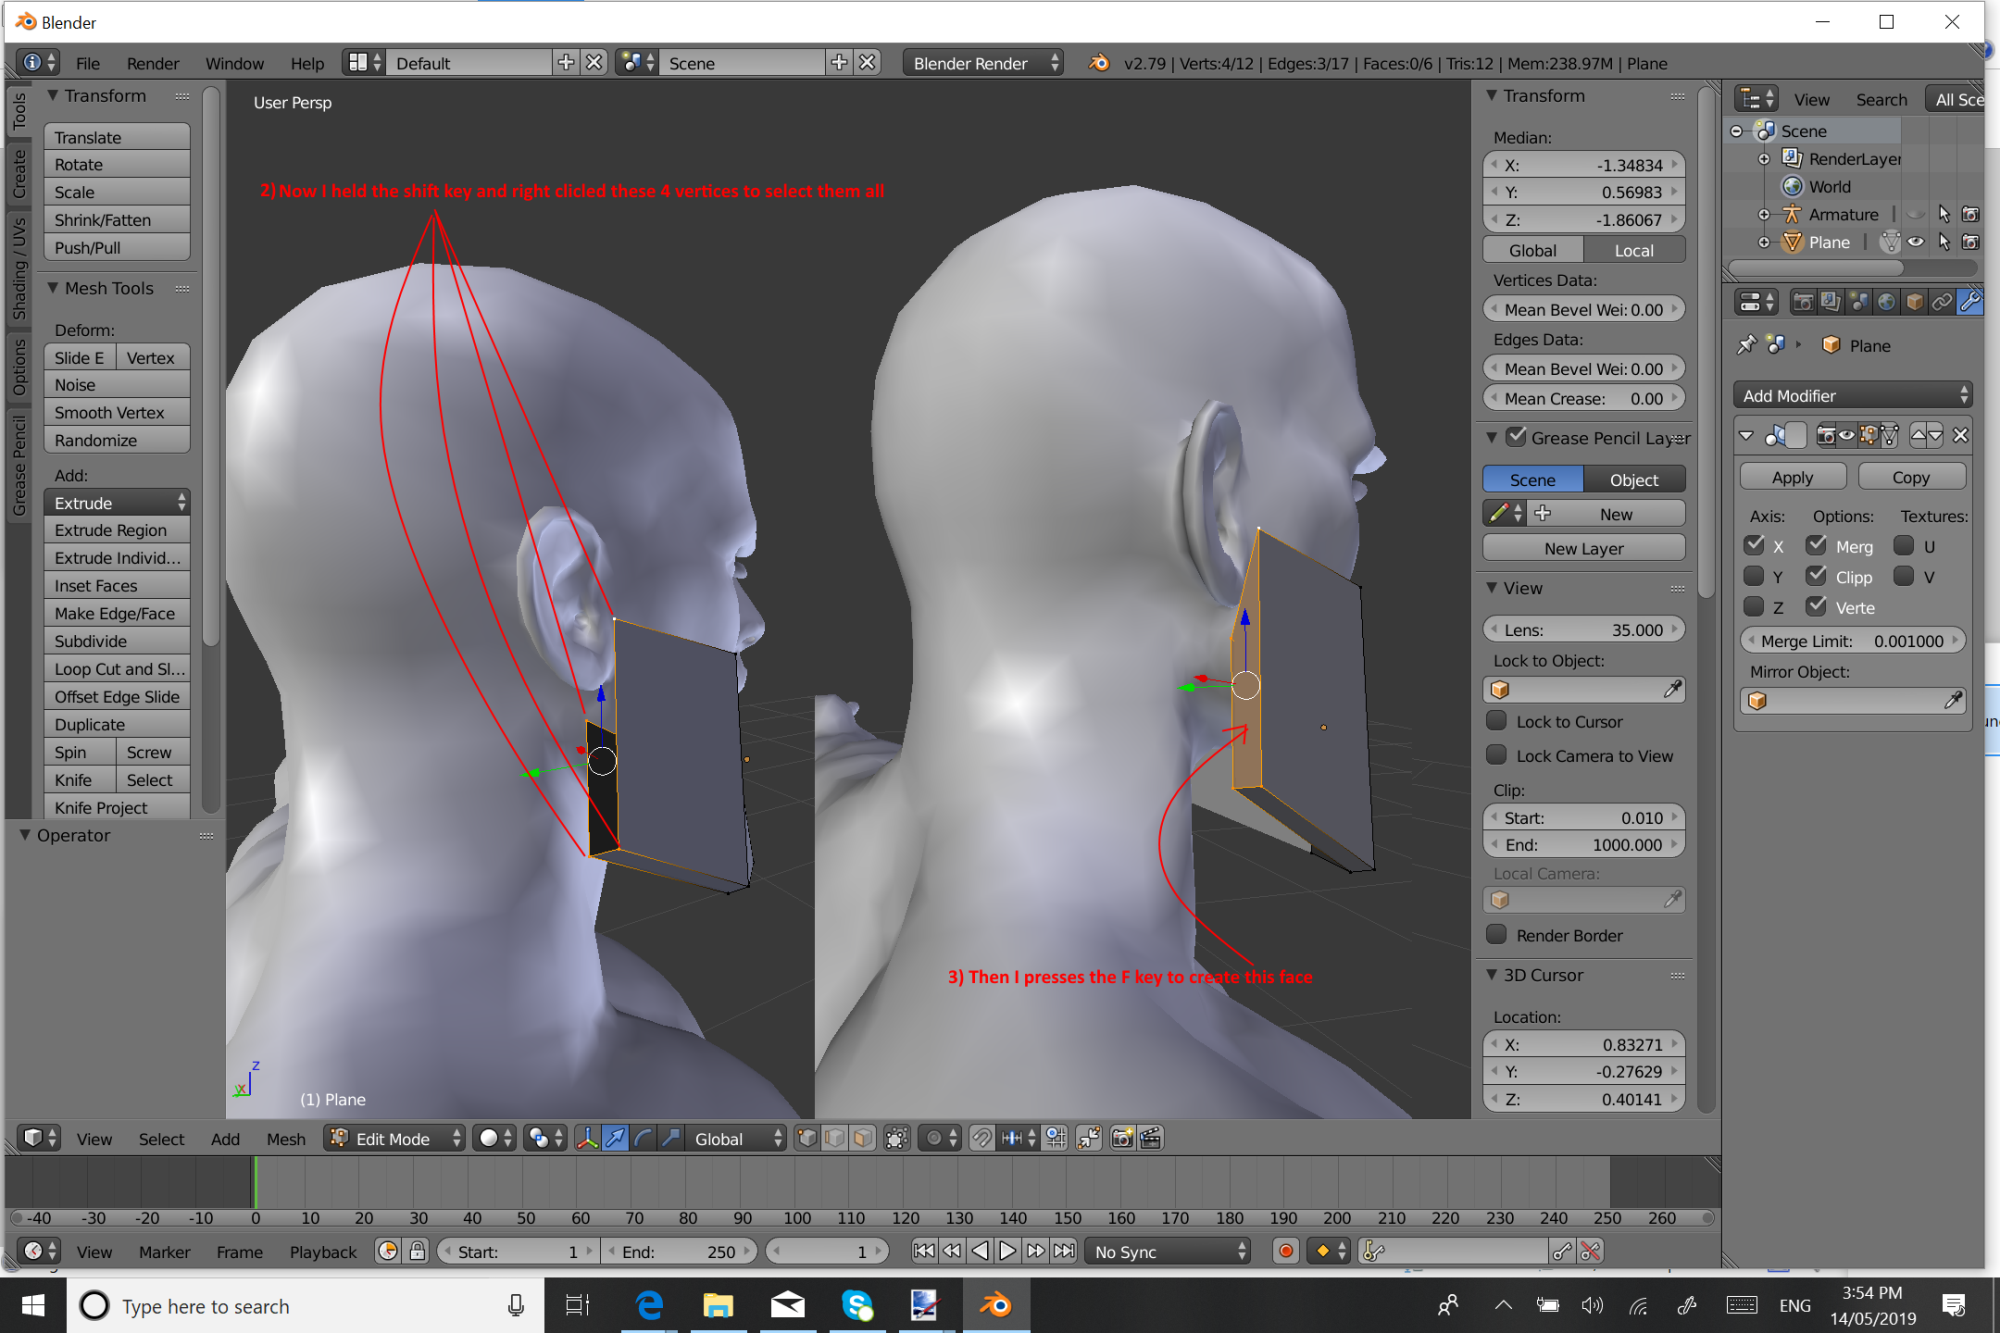
HOW TO ADD NEW ITEMS TO WHAT ALREADY EXISTS
Here I am showing the easy way to start adding new parts to what is already started. I select the vertices where I need new things added and then press the E key on the Keyboard. Pressing that key Extends what has been selected by adding new items to what is selected. Press enter to complete it and then I move the new thing created by dragging one of the red green or blue lines. Need to do this before selecting something else that way its easy to find the new parts.
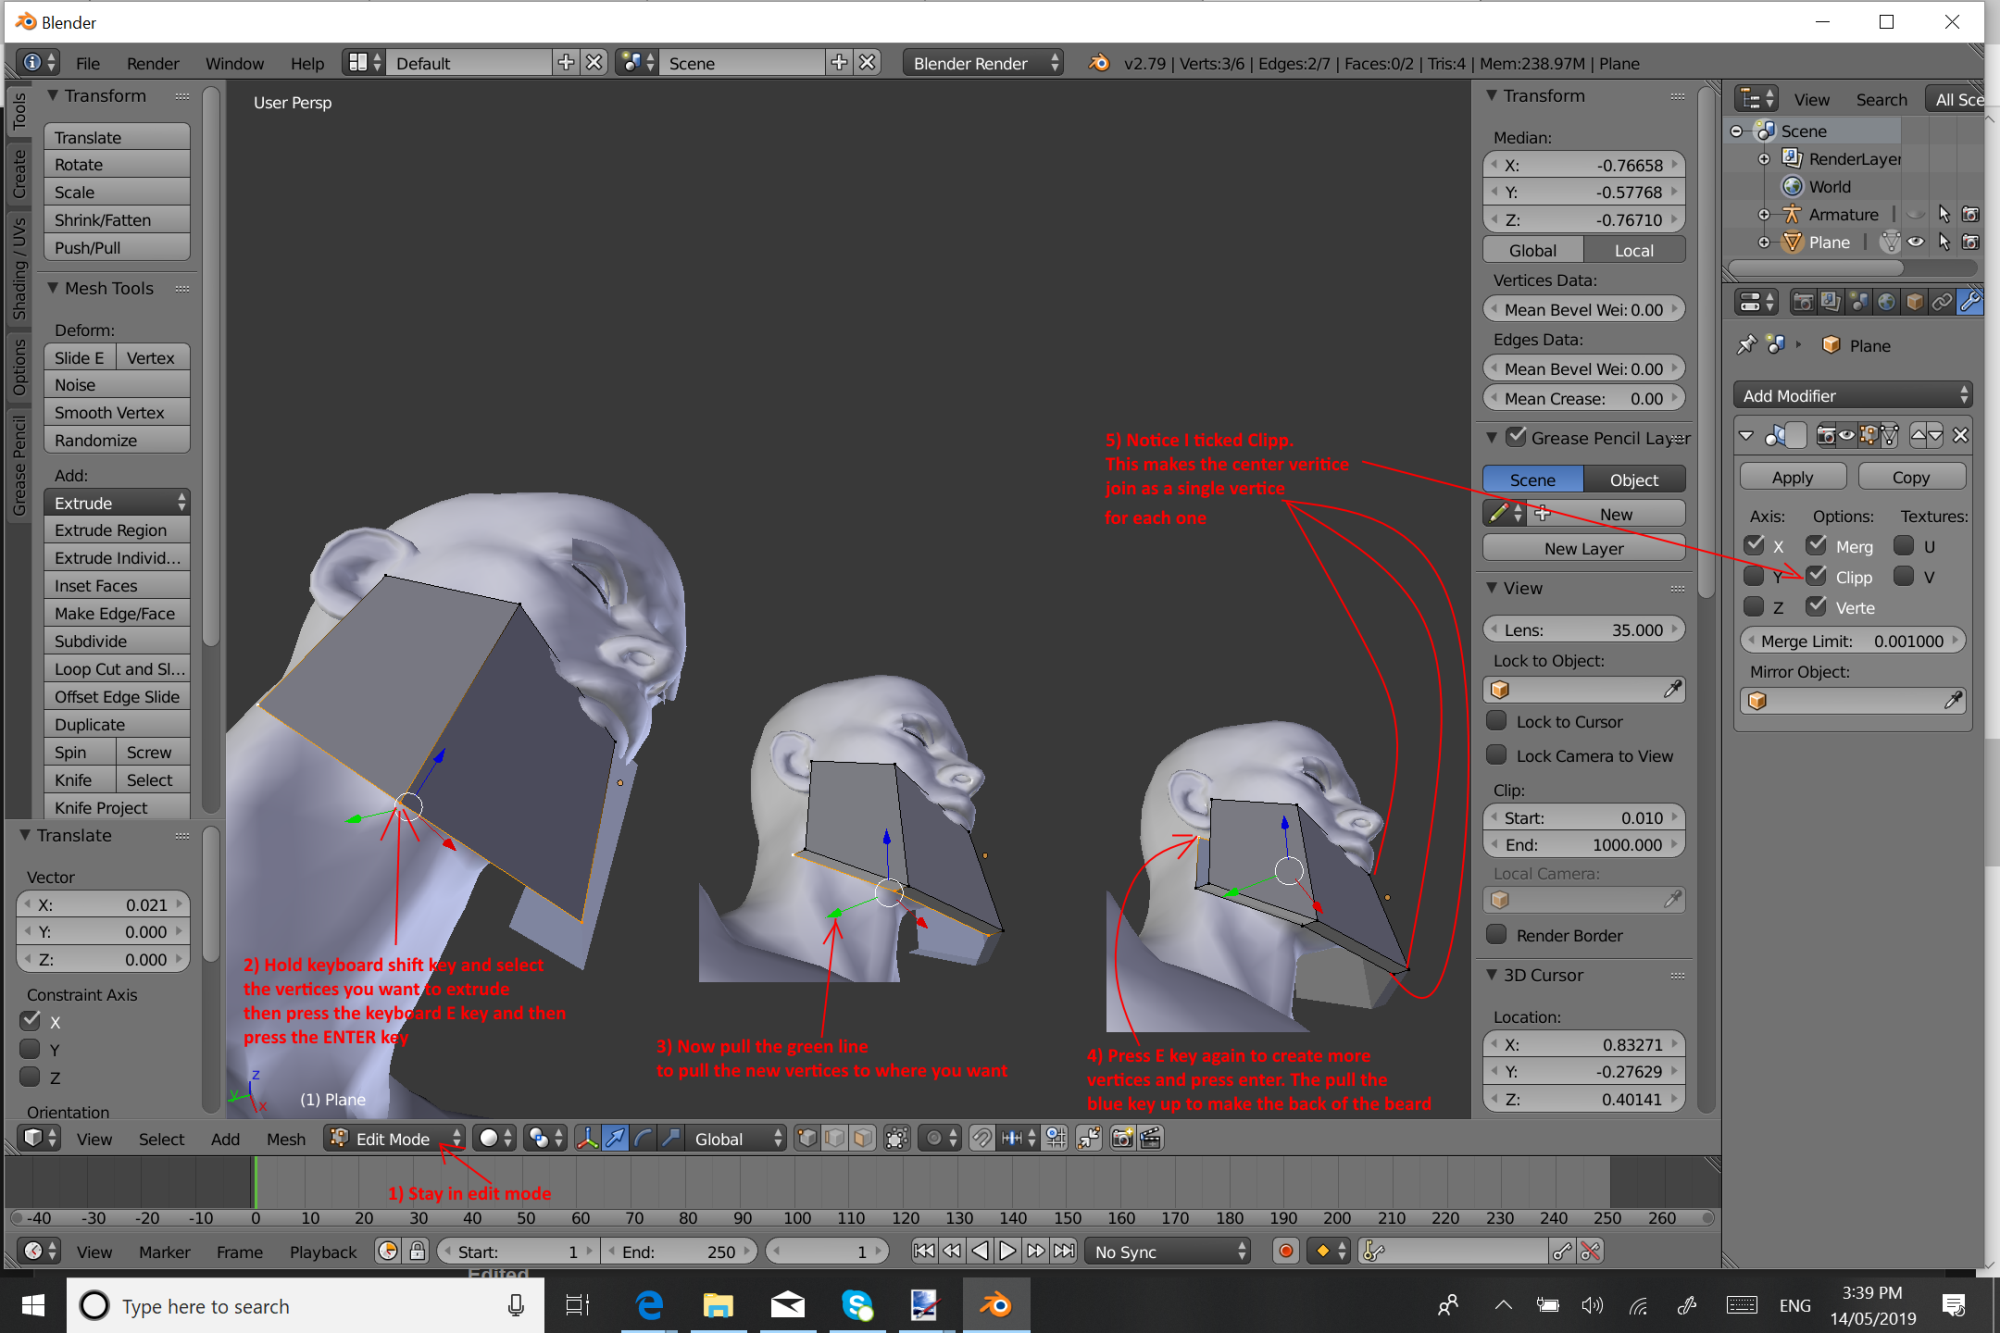
https://forum.reallusion.com/uploads/images/7b250ca8-edc5-4953-a678-4a38.png


HOW TO ADD FACES TO VERTICES THAT ARE EMPTY AND NEEDS A FACE ADDED
This is the only way I know how to do this and its certainly easy to remember. Press the F key to fill what has been selected with a face.
This is a pretty common thing to do in Blender when in edit mode and some also work in Object mode. 

Pressing a key to do something. For example 
    F to fill what is selected with a face. 
    R to rotate what is selected when you move your mouse, 
    S to scale what is selected when you move your mouse. 
    E to extend what is selected and you can move what is extended by moving your mouse and pressing Enter key when its where you want it. 
           However I generally press E and then Enter key immediately because I find I can  control where it moves to better by using the Red Green an Blue lines.  
   A to deselect what is already selected or if nothing is selected press A to select everything. 
   H to hide what is selected. 
   G to move what is selected by moving the mouse

Sometimes we can also press 2 keys for very specific actions. Example. 
   Press S to go into scale mode and then press Z so it only scales up and down or X so it scales in the X direction or Y so it scales in the Y direction 
                 when you move your mouse. 
   Press R to go into rotate mode and then press X to rotate it in the X direction only or Y to rotate it only in the Y direction or Z to rotate it only in the Z direction. 
   Press G and then press G again. This works good with vertices. It will make the selected vertices move along one of the edges they are connected to. 
             Which one they move along depends on which way you move the mouse.

I mentioned these ones only because I use them very often. There are many others. Google search with  Blender keyboard shortcuts and you will find many many many and you might find you like some I don't and therefore didn't mention.
https://forum.reallusion.com/uploads/images/45445ac4-d7df-41cf-a6b5-980a.png

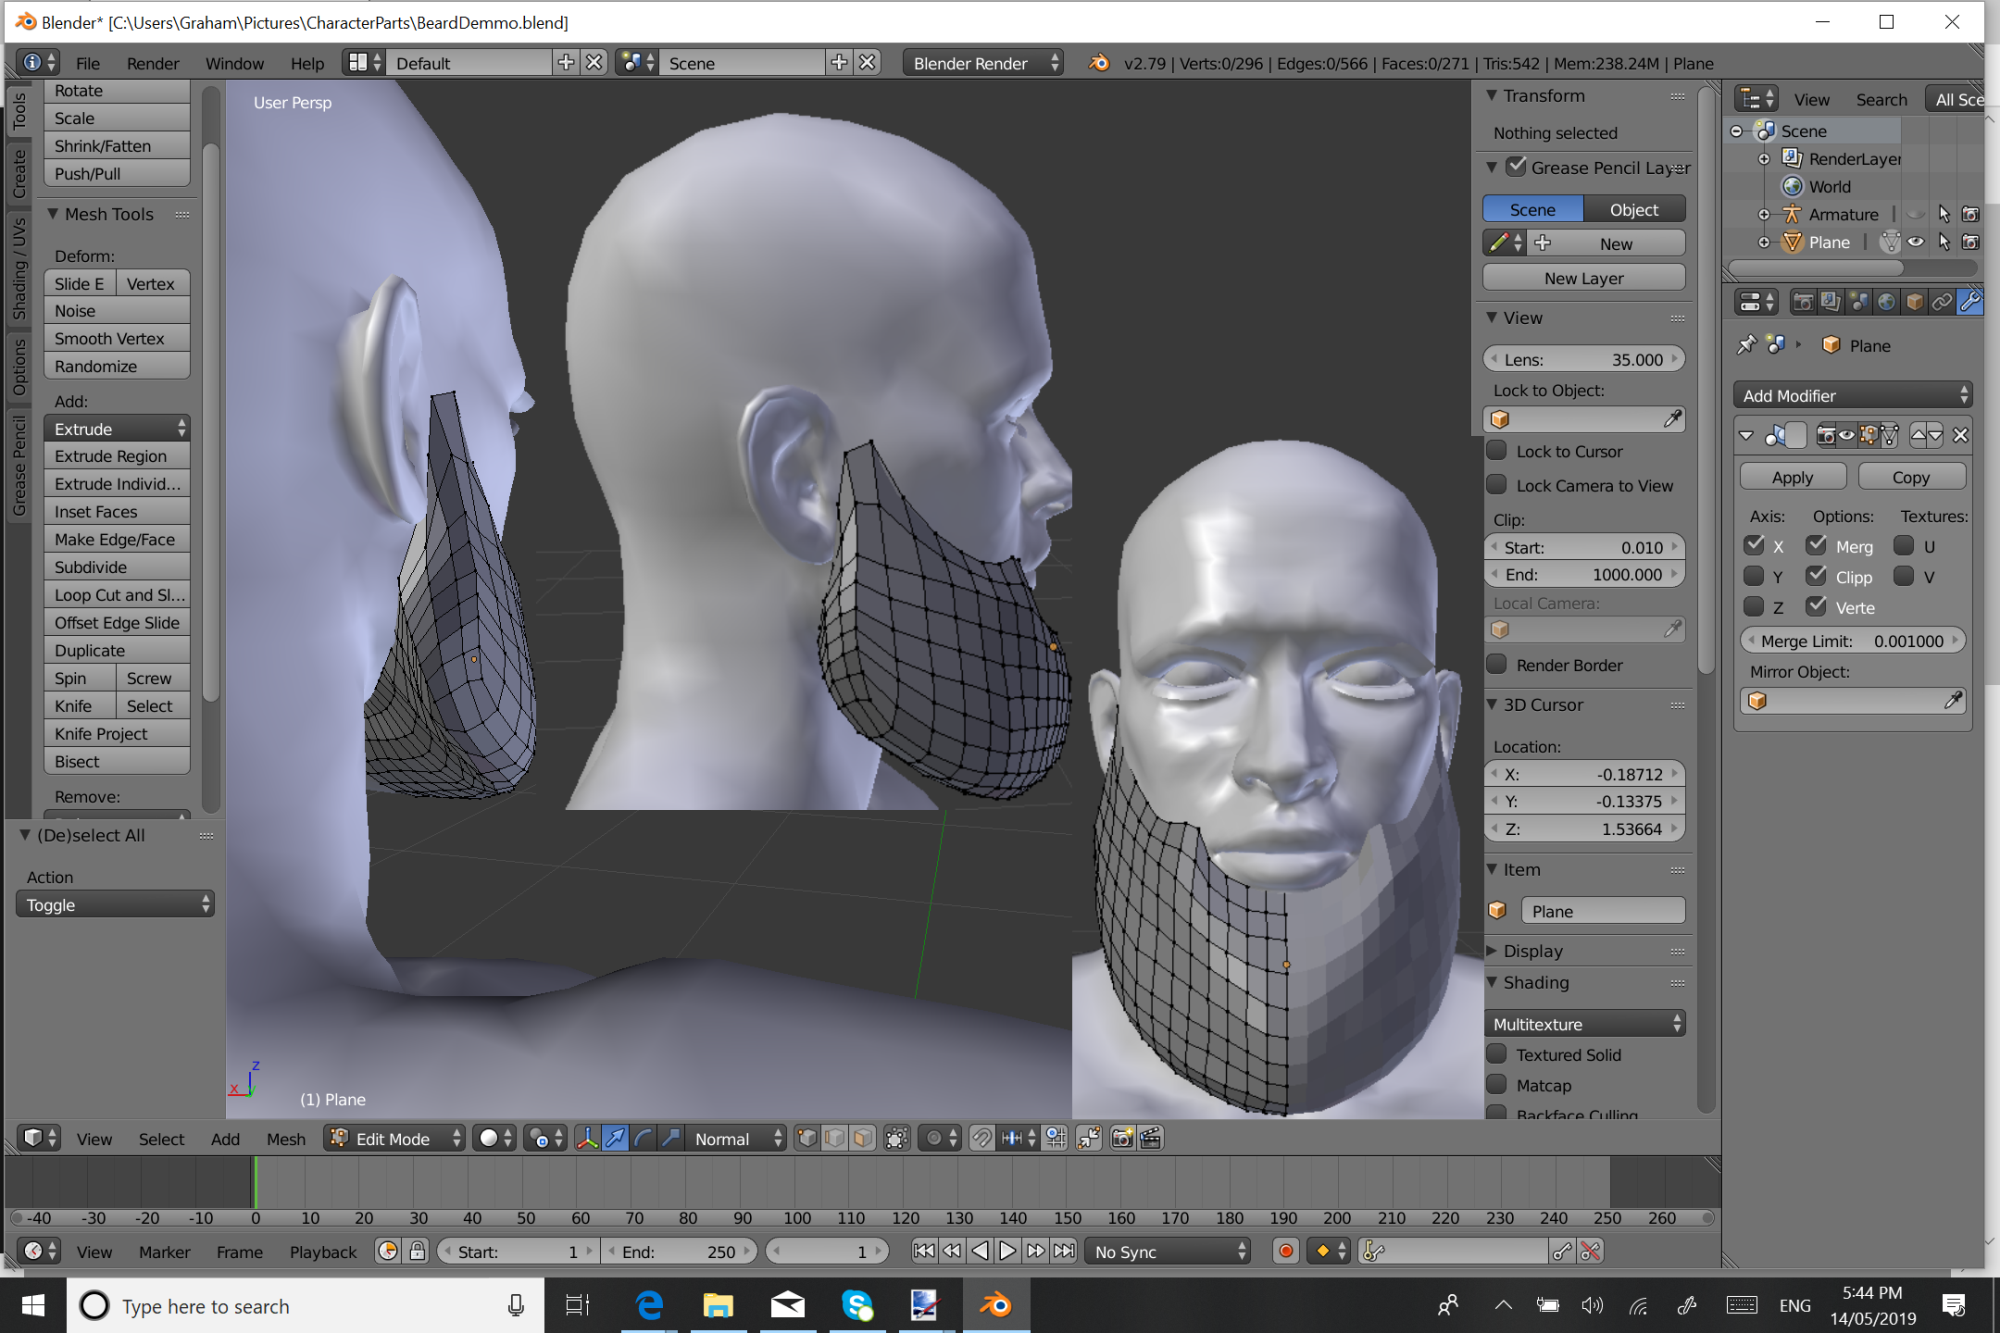
SHAPING THE BEARD
Now I add a few extra lines to the beard by using the Loop Cut And Slide tool. Then I select  vertices and move them to get the basic shape of the beard roughly how I want it to look. Then I add some more lines and move vertices again to get the shape more smooth although I don't try to make it totally smooth. Still working on the beard. The image below just shows some basics. More work to do it yet but once finished I will be applying the mirror modifier to get rid of it and keep the beard how it is when finished making the basic shape. Then I will be showing how I add extra things to it to give it the shape of hairs. You will get what I am saying when I do that but this hair in my store shows what I mean
https://forum.reallusion.com/uploads/images/ae0dea5a-b6c2-4c27-9648-4be4.png

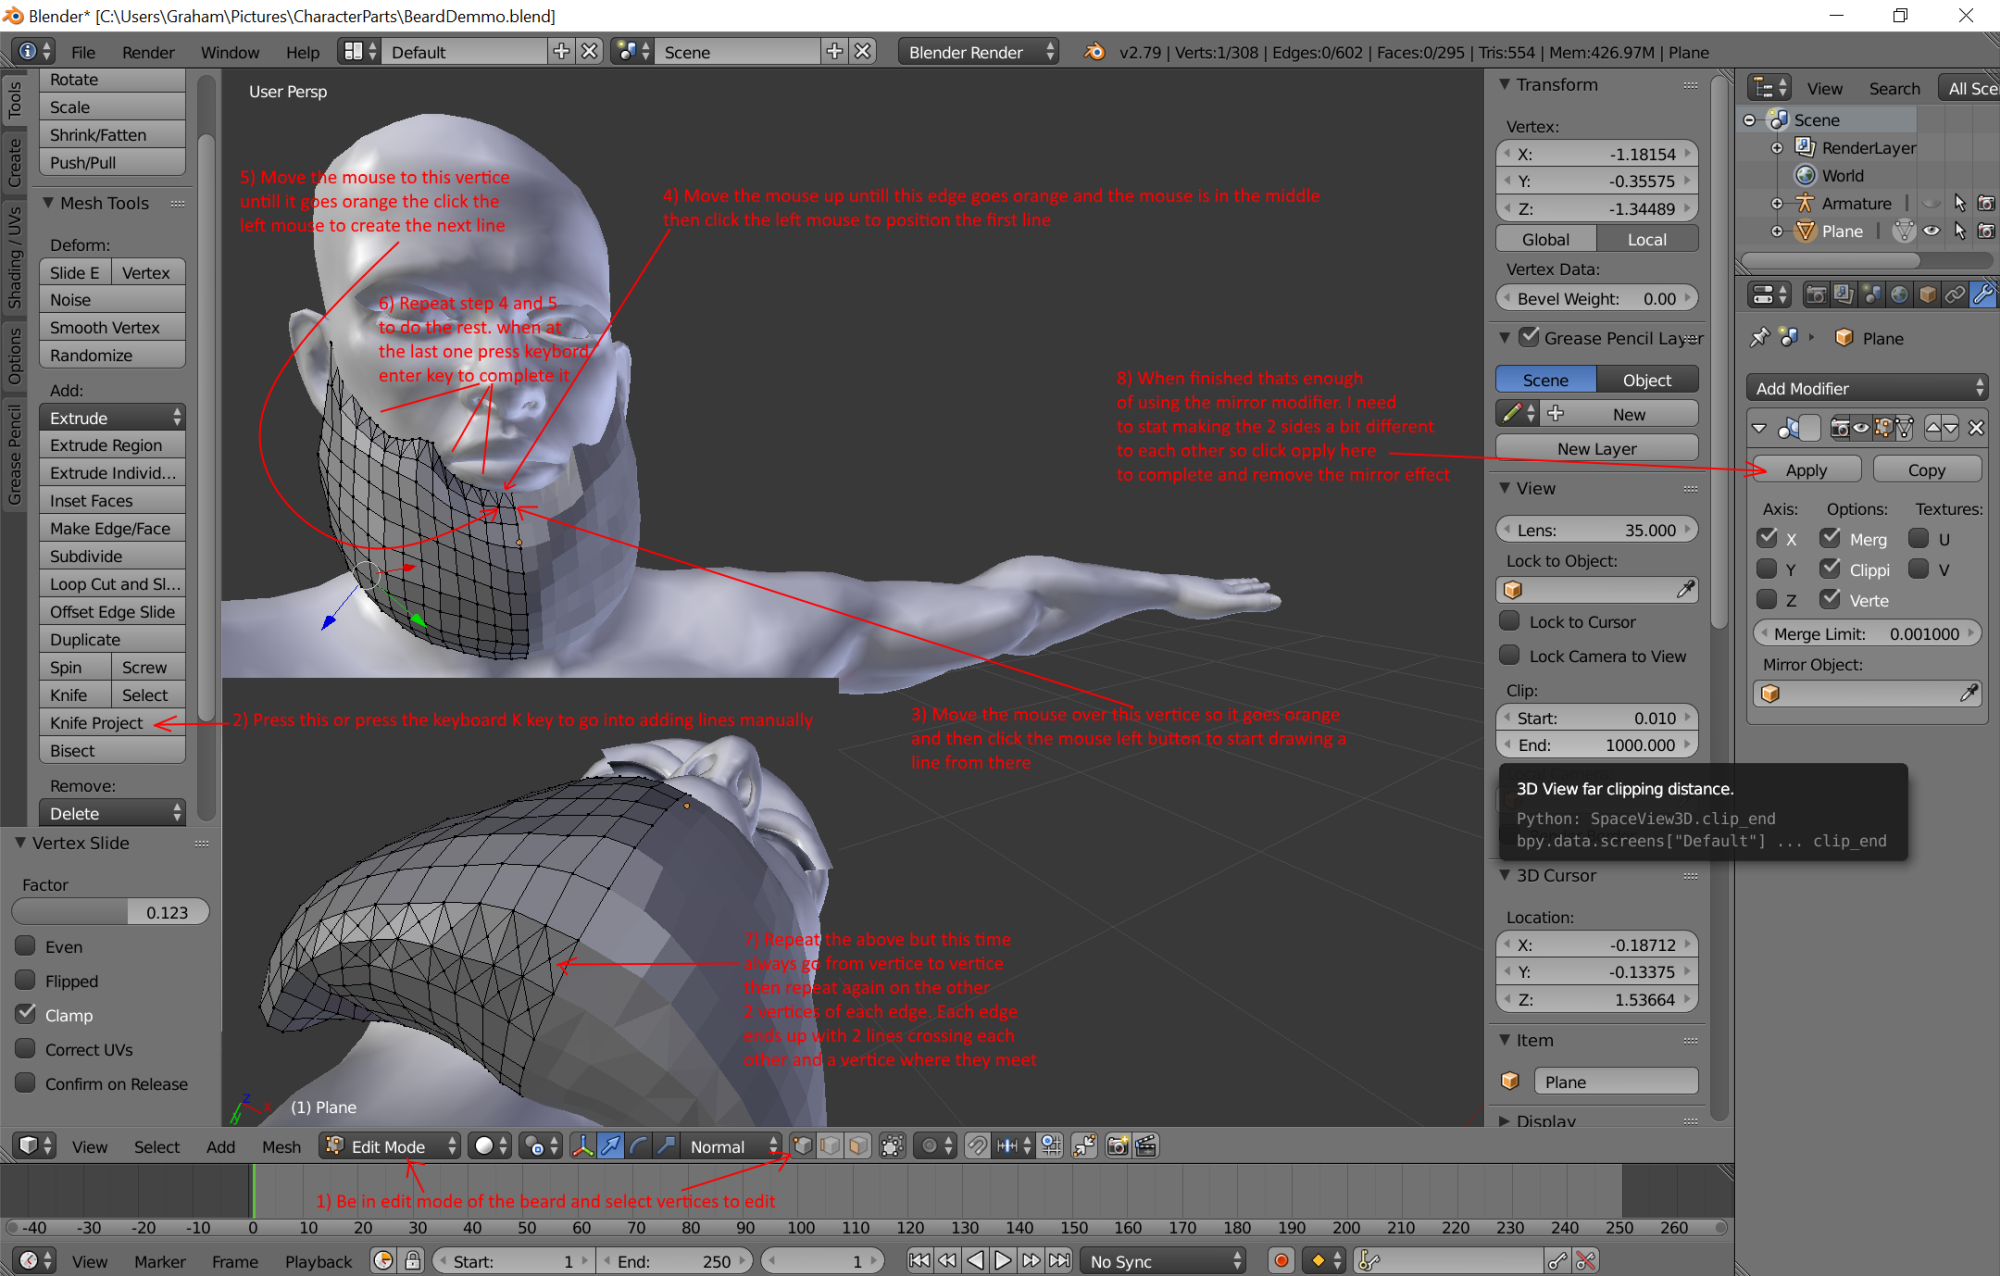
START MAKING BETTER SHAPES FOR HAIR


To do this I manually add lines to the parts I want to do this too and then complete the mirror modifier to remove it so I can make each side slightly different to each other from now on
https://forum.reallusion.com/uploads/images/551c7acf-15b8-4f51-89a5-f121.png

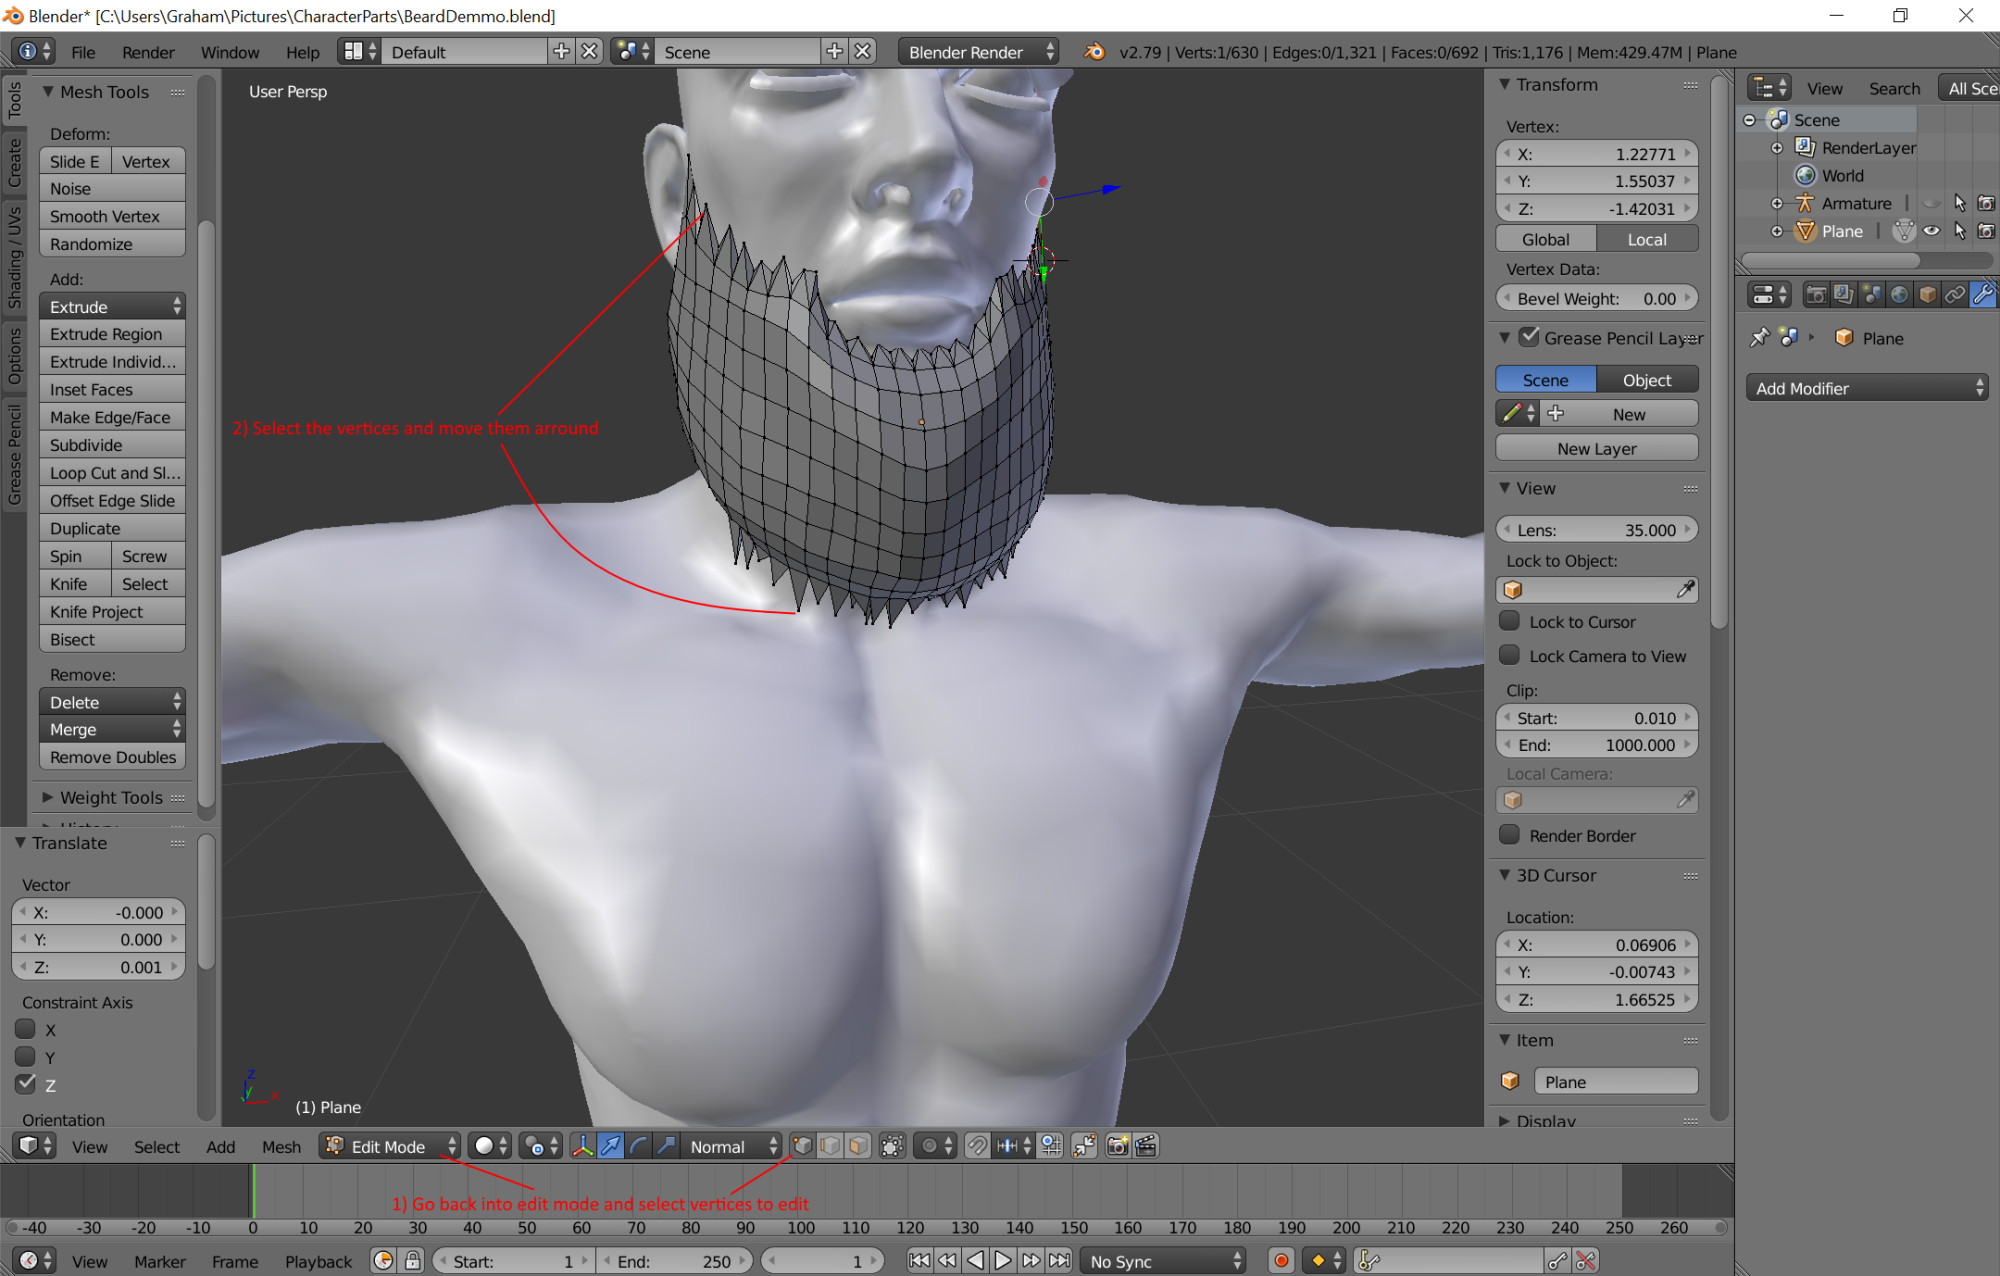
Then I start moving vertices around to start making the bear look more hairy. I don't try to make it perfect looking because it can make the model use up too much of my computers resources. I highly rely highly on the texturing and bump mapping to make it look more like hair but adding some of this to the model helps make the texturing work better and easier to do. I haven't done it with this because I am just showing methods to use rather than making a good model but  I also use a real photo of the hair I am wanting to make as a guide on what to do and where to do it.
https://forum.reallusion.com/uploads/images/d8edeaeb-561b-4949-9a2b-e047.png

The final part of my modelling the beard is to start moving edges in and out to help it look more hairy. Again I rely highly on the texturing and bump mapping but doing this is helpful on making the texturing work better
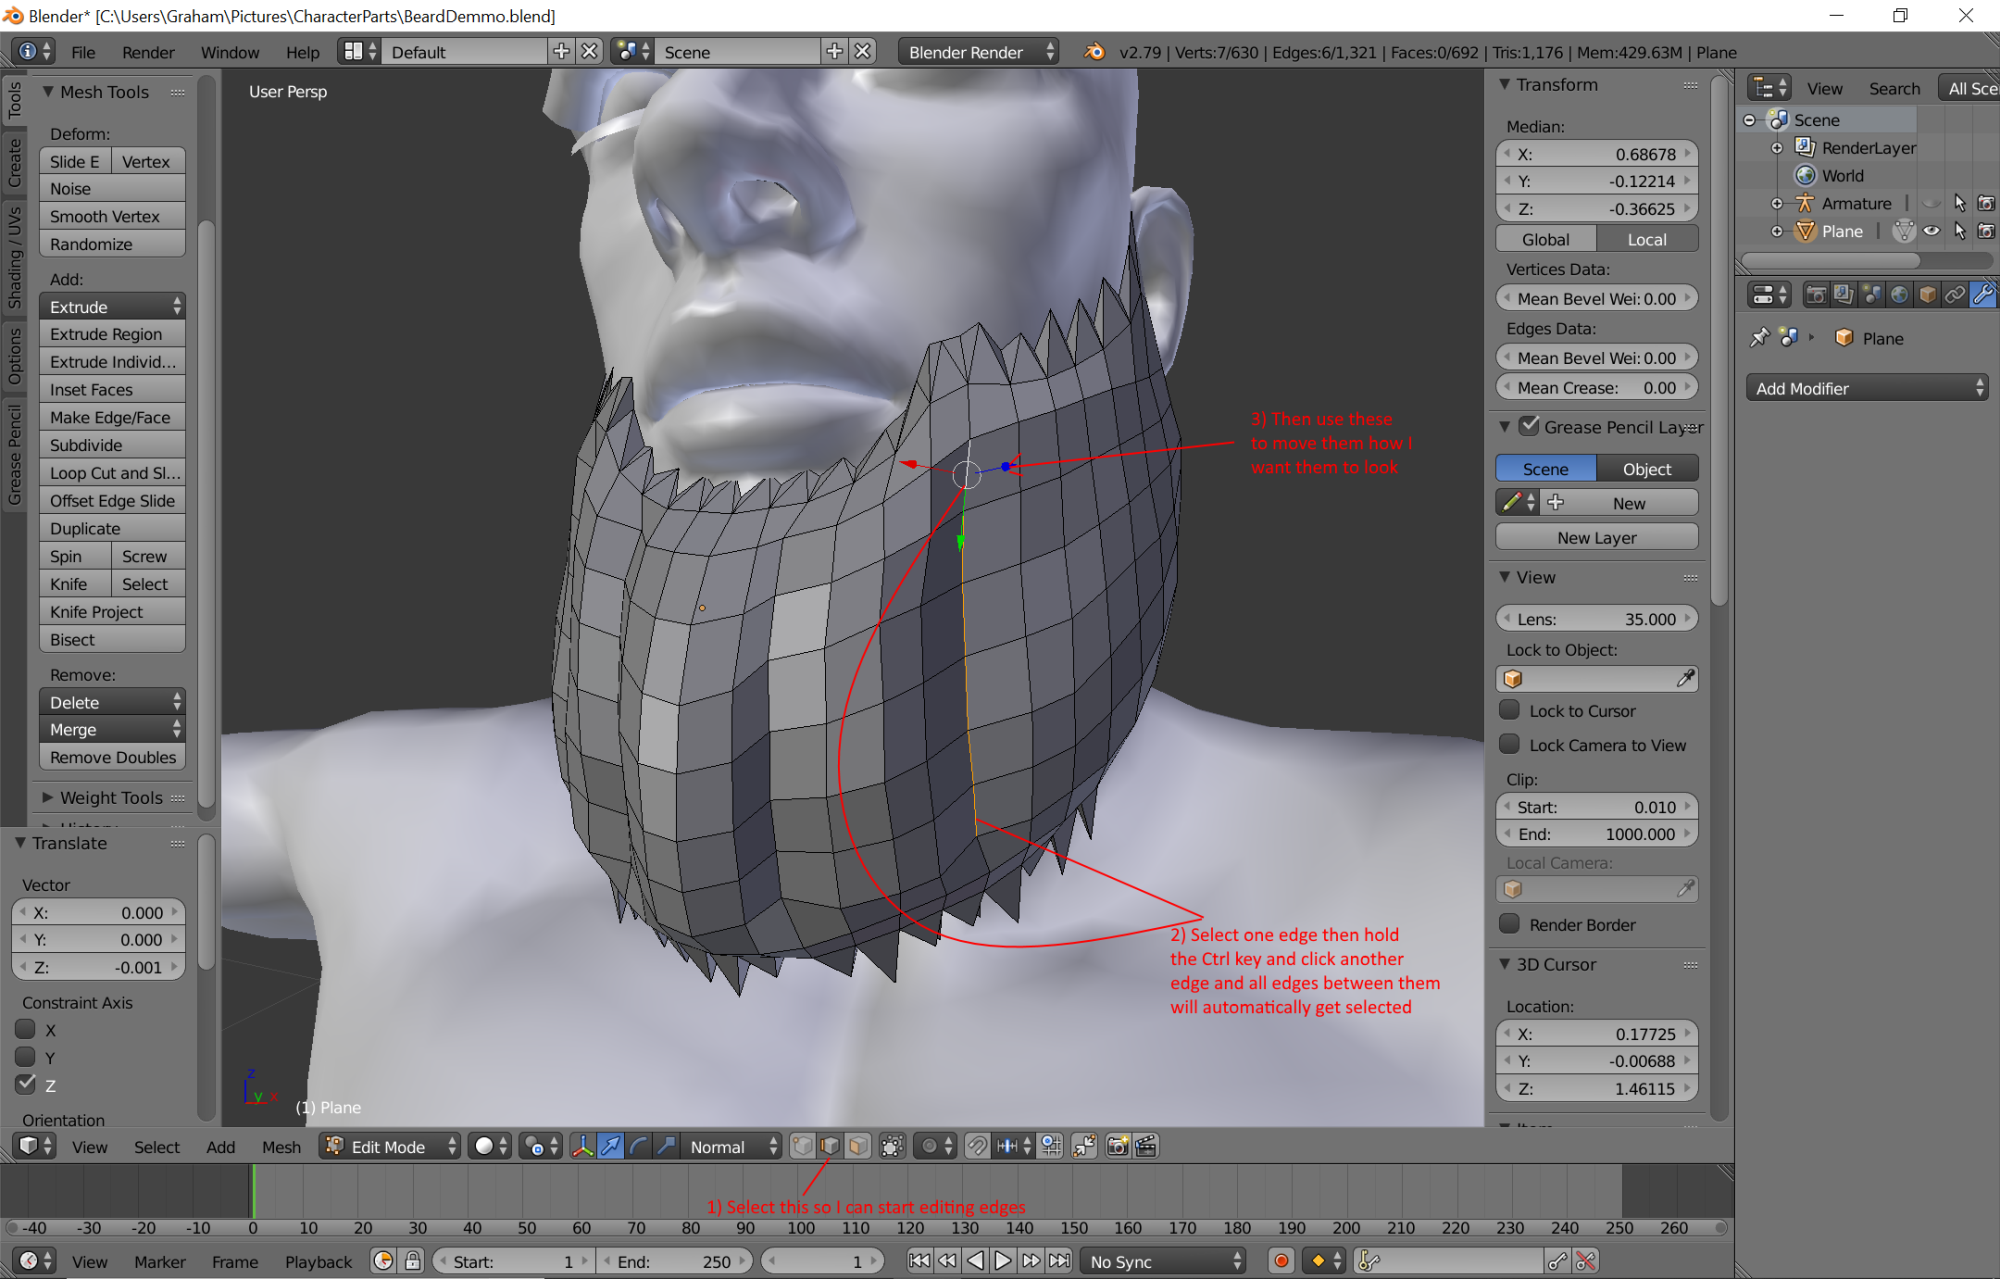
https://forum.reallusion.com/uploads/images/92693fad-5039-40ca-a1d9-deef.png

OK its not too bad but really needs more work that I'm not going to do here because I am just trying to show the methods I use rather that show you a good model So I am now going to start working on the next post to show how to attach the model to the head in Blender so it follows the character when we send it to iClone and animate it. I will also be showing how to create a UV map so it can also be textured. Besides, once you start getting used to using Blender to make things like this and you have gone through making a couple you will start finding your own way to do things because Blender is starting to make sence to you. Providing that it is something that interests you of course. I think that is the most important thing for anything we do.


i7-3770 3.4GHz CPU 16 GB Ram   
GeForce GTX1080 TI 11GB
Windows 10 Pro 64bit
Edited
5 Years Ago by Delerna
Delerna
Delerna
Posted 5 Years Ago
View Quick Profile
Distinguished Member

Distinguished Member (8.2K reputation)Distinguished Member (8.2K reputation)Distinguished Member (8.2K reputation)Distinguished Member (8.2K reputation)Distinguished Member (8.2K reputation)Distinguished Member (8.2K reputation)Distinguished Member (8.2K reputation)Distinguished Member (8.2K reputation)Distinguished Member (8.2K reputation)

Group: Forum Members
Last Active: 2 Years Ago
Posts: 1.5K, Visits: 14.8K
GET THE OUTFIT FOLLOWING THE CHARACTERS ANIMATION PROPERLY
If we don't get into this then the model I made would need to be exported and loaded into iClone through 3DExchange and loaded as a prop which may not work with CC.
If I export the character and the model now so it can be loaded into CC then as the image shows the beard will not stick with the character through animations. And besides, I don't think it would load into CC anyway. So now we need to look into how to correct all of this.
https://forum.reallusion.com/uploads/images/4cf53b6c-4100-43da-bbad-1f78.png

LINK THE OBJECT TO THE BONES

It is the bones that get animated and they control how models vertices attached to them move when we animate them. The characters vertices are already attached to the proper bones that controls them but the new object I made, the beard, is still all on its one un-attached to the bones and that's why it isn't moving.
There are 2 things we need to do to accomplish this. 

First we must connect the beard object to the bones and here is how to do that.
https://forum.reallusion.com/uploads/images/9694317d-c05c-4118-a0b2-7744.png

It still won't move with the animation though because even though it is now linked to the bones, none of the beards vertices are weight mapped to it yet.
To do that we need to do this
https://forum.reallusion.com/uploads/images/549398a1-fa15-4761-bd70-80d6.png


And then this so the beards vertices get attached to the correct bones. How this happens is because we selected the body first and then the beard and then told Blender to copy the bone settings from the characters body vertice that is closest to each of beards vertices. This saves us from having to manually paint the weight mapping to each of the beards vertices ourselves. This helps us a lot but its not always perfect. I will be covering that soon
https://forum.reallusion.com/uploads/images/f9acba6b-b517-48bf-b40c-d965.png


Anyway here is the initial result of automatically setting the beards weight painting to automatically follow how the body has been set
https://forum.reallusion.com/uploads/images/e7ea7355-aa8f-4f16-8cfd-f3c6.png

FIXING WEIGHT PAINTING PROBLEMS
Yea, here comes the fun...….not ….. LOL
OK, First thing I do is remove all Bones connected to the bears that won't get used at all..EG Legs.
Probably the easiest way to tell is to select each bone it its list 1 by 1 and check the objects colors. If everything is dark blue then this means that bone is not used by that object. Dark blue means the weight painting value is 0. IE that bone has no effect to it in animations. So keep any bones that show up colors other than the dark blue. and remove the rest.

Now in this image you might notice that the bottom of the beard is acting a bit strange in animation. This is because it is partially connected to the characters chest so when the character raises his head those parts don't raise with it. Rather they stay connected to the chest to some degree. And this is what we need to do here, animate the character and watch how things move. When you find something that moves strange then we need to adjust the weight map settings so it works better.
Sorry, I can't say what must be done. You need to learn by trial and error and eventually you start to understand which parts should be changed and which parts shouldn't.
That's how I do it. I am getting better at deciding what needs to be done.....I think.
Here is something that might help you understand what I am saying here. I could just delete the Spine02 bone all together and that would solve the problem when the character rotates his head up, the beard will follow the head much better. However, depending on how long the beard is, if the character rotates his head down the beard may penetrate his clothes and his chest and look bad. So maybe we keep the Spine02 bone and just make its affect less by lowering the weight paint values  to much less. That way they will follow the head up a bit better and when the head goes down the small levels will help the beard not penetrate the chest so easily. How much should we reduce it by? Year good question and I can't answer it. All I can do is make small adjustments, animate the character to see how effective what I did works, repeat repeat repeat or undo undo undo until I get the best result that I can. I will be demonstrating some of this next......Good luck people. Really, its not as difficult as what I have said might sound....but its not really easy either. I find trial and error is what teaches me what works best
https://forum.reallusion.com/uploads/images/fc86a2b1-0c77-48d1-89b0-9770.png


i7-3770 3.4GHz CPU 16 GB Ram   
GeForce GTX1080 TI 11GB
Windows 10 Pro 64bit
Edited
5 Years Ago by Delerna
Delerna
Delerna
Posted 5 Years Ago
View Quick Profile
Distinguished Member

Distinguished Member (8.2K reputation)Distinguished Member (8.2K reputation)Distinguished Member (8.2K reputation)Distinguished Member (8.2K reputation)Distinguished Member (8.2K reputation)Distinguished Member (8.2K reputation)Distinguished Member (8.2K reputation)Distinguished Member (8.2K reputation)Distinguished Member (8.2K reputation)

Group: Forum Members
Last Active: 2 Years Ago
Posts: 1.5K, Visits: 14.8K
reply 5

i7-3770 3.4GHz CPU 16 GB Ram   
GeForce GTX1080 TI 11GB
Windows 10 Pro 64bit
Delerna
Delerna
Posted 5 Years Ago
View Quick Profile
Distinguished Member

Distinguished Member (8.2K reputation)Distinguished Member (8.2K reputation)Distinguished Member (8.2K reputation)Distinguished Member (8.2K reputation)Distinguished Member (8.2K reputation)Distinguished Member (8.2K reputation)Distinguished Member (8.2K reputation)Distinguished Member (8.2K reputation)Distinguished Member (8.2K reputation)

Group: Forum Members
Last Active: 2 Years Ago
Posts: 1.5K, Visits: 14.8K
reply 6

i7-3770 3.4GHz CPU 16 GB Ram   
GeForce GTX1080 TI 11GB
Windows 10 Pro 64bit
Delerna
Delerna
Posted 5 Years Ago
View Quick Profile
Distinguished Member

Distinguished Member (8.2K reputation)Distinguished Member (8.2K reputation)Distinguished Member (8.2K reputation)Distinguished Member (8.2K reputation)Distinguished Member (8.2K reputation)Distinguished Member (8.2K reputation)Distinguished Member (8.2K reputation)Distinguished Member (8.2K reputation)Distinguished Member (8.2K reputation)

Group: Forum Members
Last Active: 2 Years Ago
Posts: 1.5K, Visits: 14.8K
reply 7

i7-3770 3.4GHz CPU 16 GB Ram   
GeForce GTX1080 TI 11GB
Windows 10 Pro 64bit
Delerna
Delerna
Posted 5 Years Ago
View Quick Profile
Distinguished Member

Distinguished Member (8.2K reputation)Distinguished Member (8.2K reputation)Distinguished Member (8.2K reputation)Distinguished Member (8.2K reputation)Distinguished Member (8.2K reputation)Distinguished Member (8.2K reputation)Distinguished Member (8.2K reputation)Distinguished Member (8.2K reputation)Distinguished Member (8.2K reputation)

Group: Forum Members
Last Active: 2 Years Ago
Posts: 1.5K, Visits: 14.8K
reply 8

i7-3770 3.4GHz CPU 16 GB Ram   
GeForce GTX1080 TI 11GB
Windows 10 Pro 64bit
Delerna
Delerna
Posted 5 Years Ago
View Quick Profile
Distinguished Member

Distinguished Member (8.2K reputation)Distinguished Member (8.2K reputation)Distinguished Member (8.2K reputation)Distinguished Member (8.2K reputation)Distinguished Member (8.2K reputation)Distinguished Member (8.2K reputation)Distinguished Member (8.2K reputation)Distinguished Member (8.2K reputation)Distinguished Member (8.2K reputation)

Group: Forum Members
Last Active: 2 Years Ago
Posts: 1.5K, Visits: 14.8K
reply 9

i7-3770 3.4GHz CPU 16 GB Ram   
GeForce GTX1080 TI 11GB
Windows 10 Pro 64bit
Delerna
Delerna
Posted 5 Years Ago
View Quick Profile
Distinguished Member

Distinguished Member (8.2K reputation)Distinguished Member (8.2K reputation)Distinguished Member (8.2K reputation)Distinguished Member (8.2K reputation)Distinguished Member (8.2K reputation)Distinguished Member (8.2K reputation)Distinguished Member (8.2K reputation)Distinguished Member (8.2K reputation)Distinguished Member (8.2K reputation)

Group: Forum Members
Last Active: 2 Years Ago
Posts: 1.5K, Visits: 14.8K
reply 10

i7-3770 3.4GHz CPU 16 GB Ram   
GeForce GTX1080 TI 11GB
Windows 10 Pro 64bit


Reading This Topic