|
Author
|
Message
|
|
Miranda (RL)
|
Miranda (RL)
Posted 5 Years Ago
|
|
Group: Administrators
Last Active: 2 Years Ago
Posts: 1.8K,
Visits: 11.2K
|
Introduction
The process of bringing an animated CC character into the Unity can be tedious. This is exacerbated by the inordinate amount of time it would take to manually assign every material property, adjust texture settings, modify animation properties, model configuration, along with other complicated manual tasks. In response, we are providing this plugin to trim your production time by automating the aforementioned idiosyncrasies. Starting from Beta 1.0 released on 11/30/2018 till now, we have been working on updating the auto-setup procedure. In Beta 2.0, skin material was supplemented with a Detail Map along with proper subsurface scattering (SSS) settings for HDRP Rendering Pipeline. The Official " Character Creator & iClone Auto Setup" 1.01 has been released on 8/29/2019, please see the full release note for details. InstallationThe Character Creator & iClone Auto Setup can be manually installed into Unity folder in order to be applicable in Unity. - Download the installation file.
- Execute the file and you will get an Auto Setup folder under C:\Program Files\Reallusion\Shared Plugins\Auto Setup by default.
- Open the sub-folder named Unity, and you will find three folders which indicate different versions of Unity.
- Open the folder ideal for your version of Unity, and drag the unitypackage to the Assets folder in Unity.
- The Editor folder and the CC_Assets folder will be automatically generated under the Assets folder after installed.
For the full installation guide and online manual, please check HERE. We will provide 3 template scripts from which you can use according to your needs. 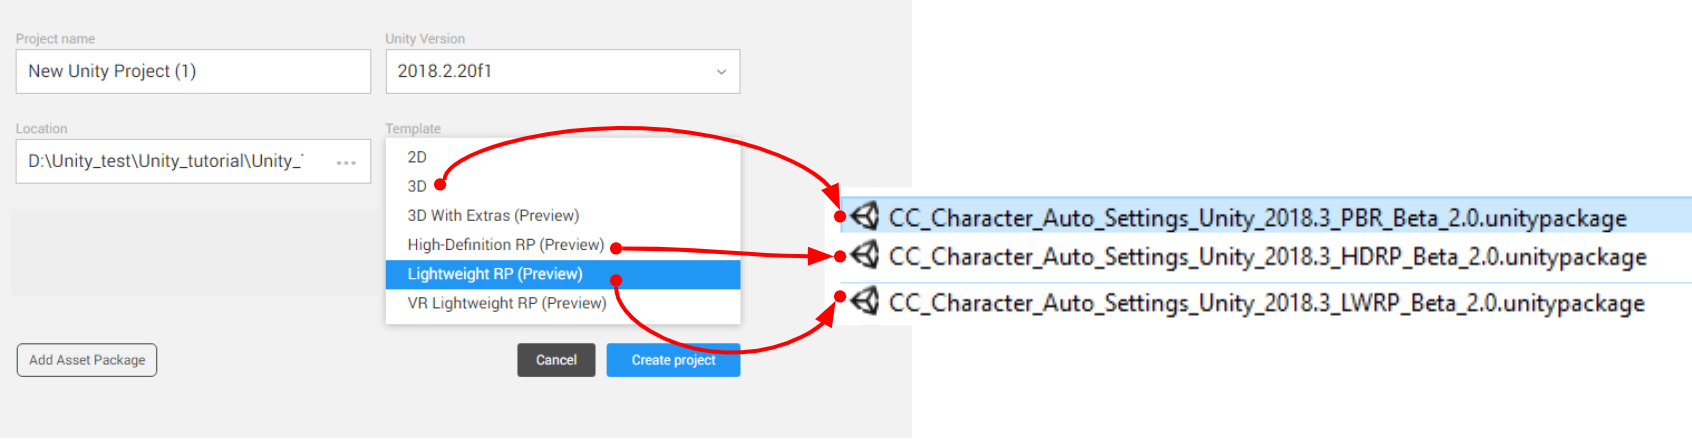 Tutorialshttps://www.reallusion.com/character-creator/tutorial.html#unityProcess Overview Tutorialshttps://www.reallusion.com/character-creator/tutorial.html#unityProcess OverviewRelated InformationImportant Notice: Update Guide for Existing UsersIf you have installed the Beta version before, please visit Reallusion FAQ to check How to Remove and How to Update the auto-setup tool. Script Download & Update HistoryTo download the Character Creator & iClone Auto Setup, and find the update history, please check HERE.
Edited
5 Years Ago by
Miranda (RL)
|
|
|
|
|
Miranda (RL)
|
Miranda (RL)
Posted 5 Years Ago
|
|
Group: Administrators
Last Active: 2 Years Ago
Posts: 1.8K,
Visits: 11.2K
|
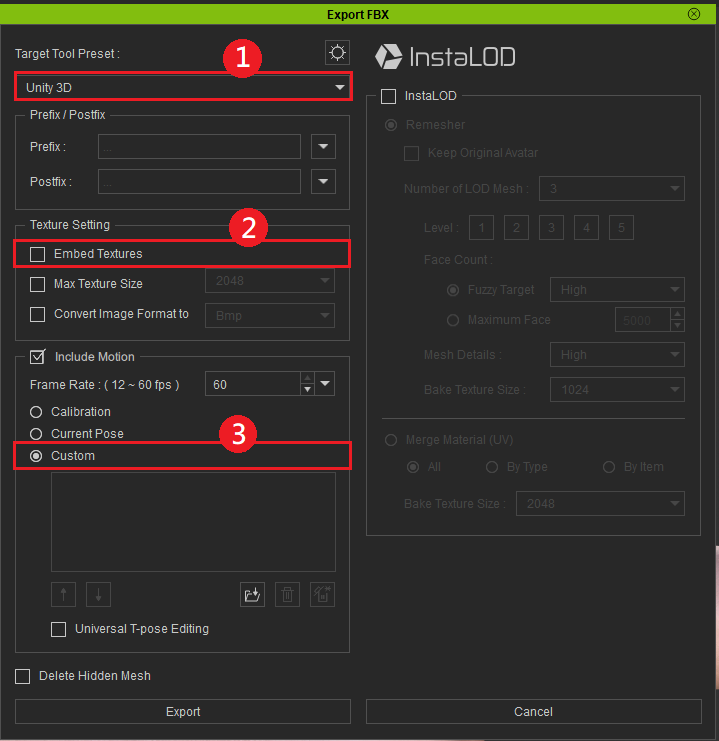
Step 1 - Export FBX from Character Creator 3- Choose the Target Tool Preset as Unity 3D.
- Uncheck the Embed Textures option. Auto-Setup Script will automatically connect all textures to the proper channels in Unity.
- Characters and motions can be exported from Character Creator. If one needs motions from iClone, please save them in rlMotion or iMotionPlus format and bring them into the Character Creator workflow.
*From CC v3.04 onward, the T-pose will be automatically included as the first motion for character retargeting when the preset type is Unity 3D.
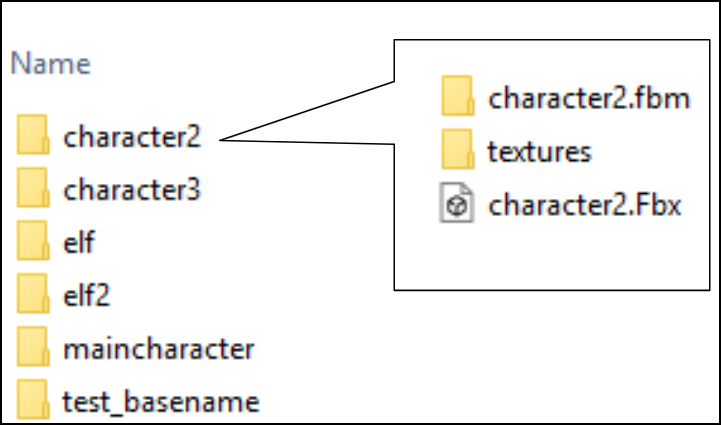
- Please create a new folder for each new character import. Importing multiple characters into the same folder directory will create problems with texture map configurations.
Edited
5 Years Ago by
Miranda (RL)
|
|
|
|
|
Miranda (RL)
|
Miranda (RL)
Posted 5 Years Ago
|
|
Group: Administrators
Last Active: 2 Years Ago
Posts: 1.8K,
Visits: 11.2K
|
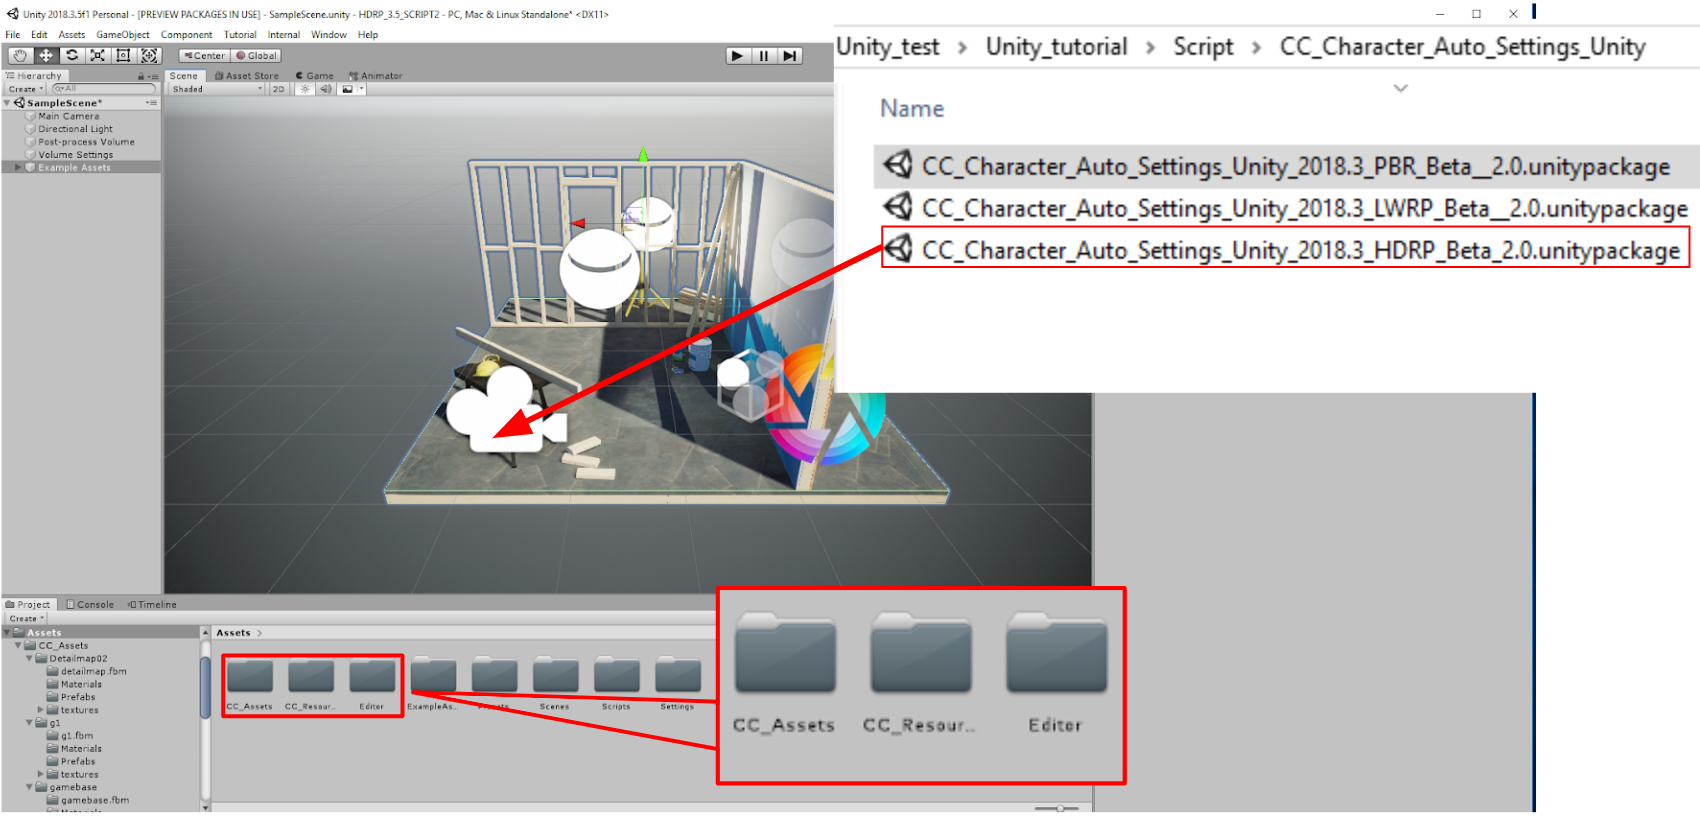
Step 2 - Download and Install the Auto-Setup ScriptThere are two ways to install the Auto-Setup Script in Unity. The Editor folder and the CC_Assets folder will be automatically generated under the Assets folder after installed. - Drag the Auto-Setup Script to the Assets folder in Unity
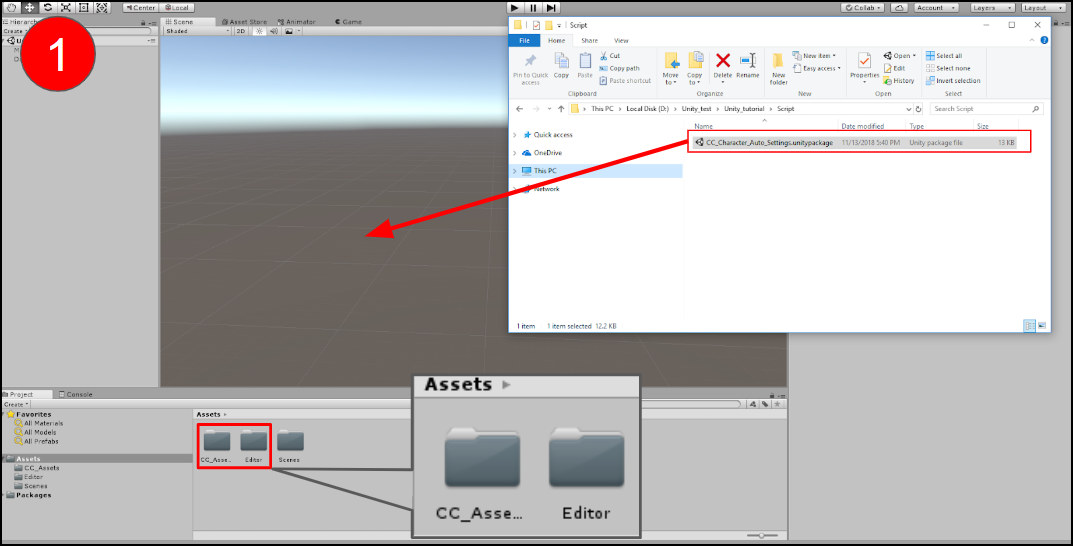
- Import the Auto-Setup Script by right-clicking the Assets folder.
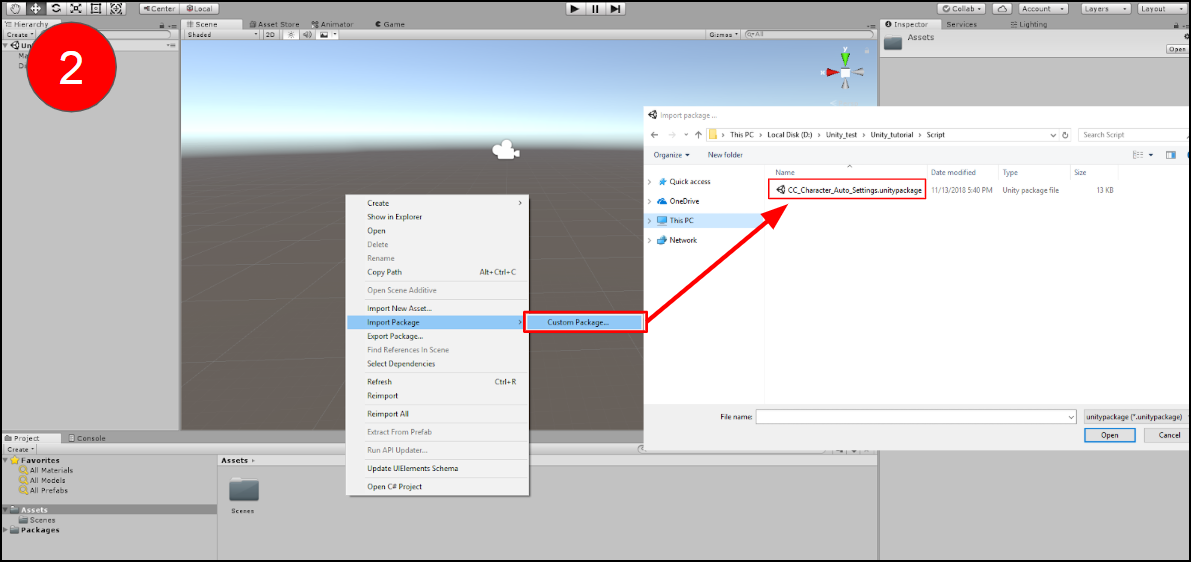
If you are installing HDRP script, the Editor folder, the CC_Assets folder, and the CC_Resource folder will be automatically generated under the Assets folder. - Take method 1 for example - drag the Auto-Setup Script to the Assets folder in Unity
Edited
5 Years Ago by
Miranda (RL)
|
|
|
|
|
Miranda (RL)
|
Miranda (RL)
Posted 5 Years Ago
|
|
Group: Administrators
Last Active: 2 Years Ago
Posts: 1.8K,
Visits: 11.2K
|
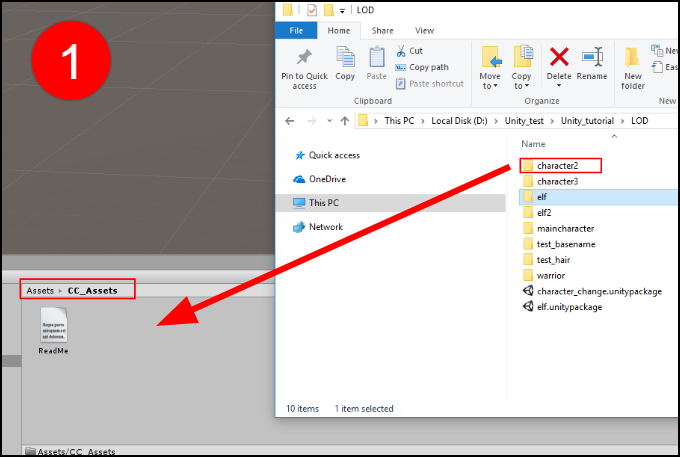
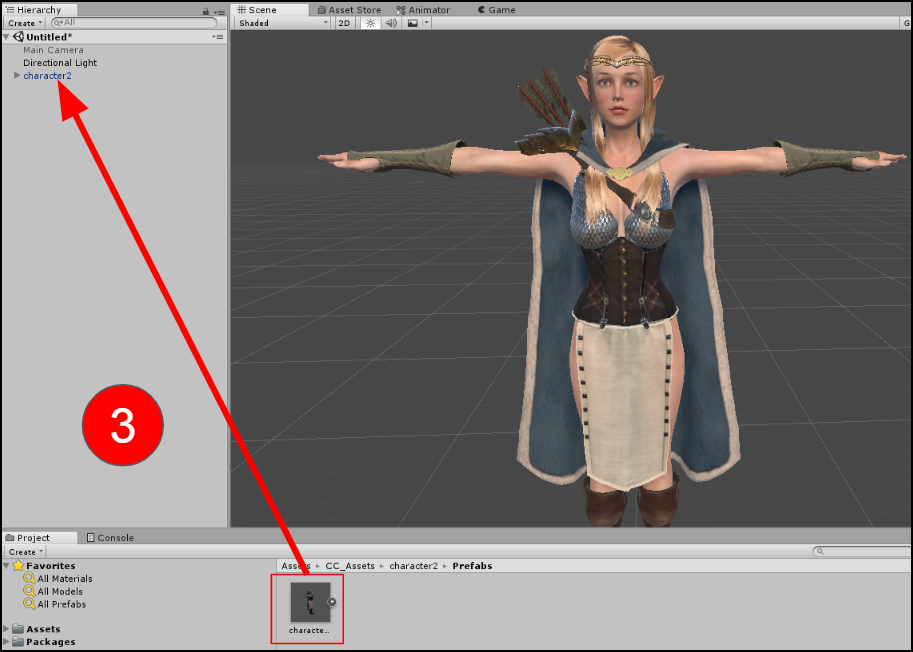
Step 3 - Import the FBX File into Unity to Prompt Auto-Setup Process- Drag the exported folder which contains .fbm, textures, .fbx to the CC_Assets Folder.
- There will be a Prefabs folder, a Materials folder, and an animator controller file generated after processing.
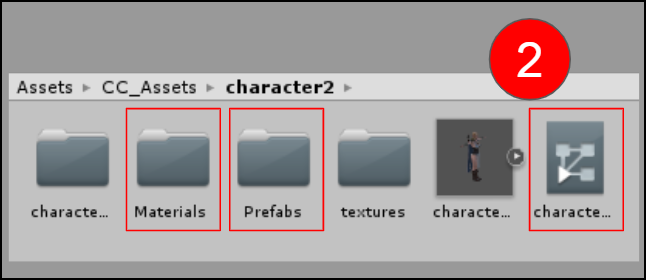
- Character will be shown up after dragging the file (.prefab) under the Prefabs folder to the scene.
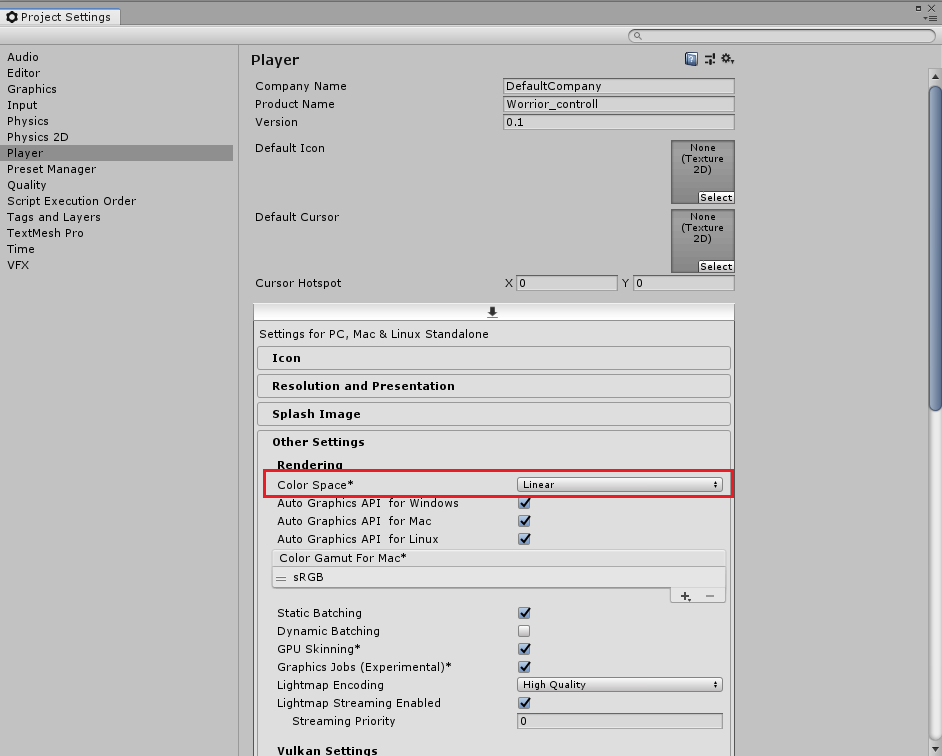
- We recommend changing the project Color Space to "Linear" for consistency with the visual representation in Character Creator, especially for metallic and roughness material effects.
Edited
5 Years Ago by
Miranda (RL)
|
|
|
|
|
Miranda (RL)
|
Miranda (RL)
Posted 5 Years Ago
|
|
Group: Administrators
Last Active: 2 Years Ago
Posts: 1.8K,
Visits: 11.2K
|
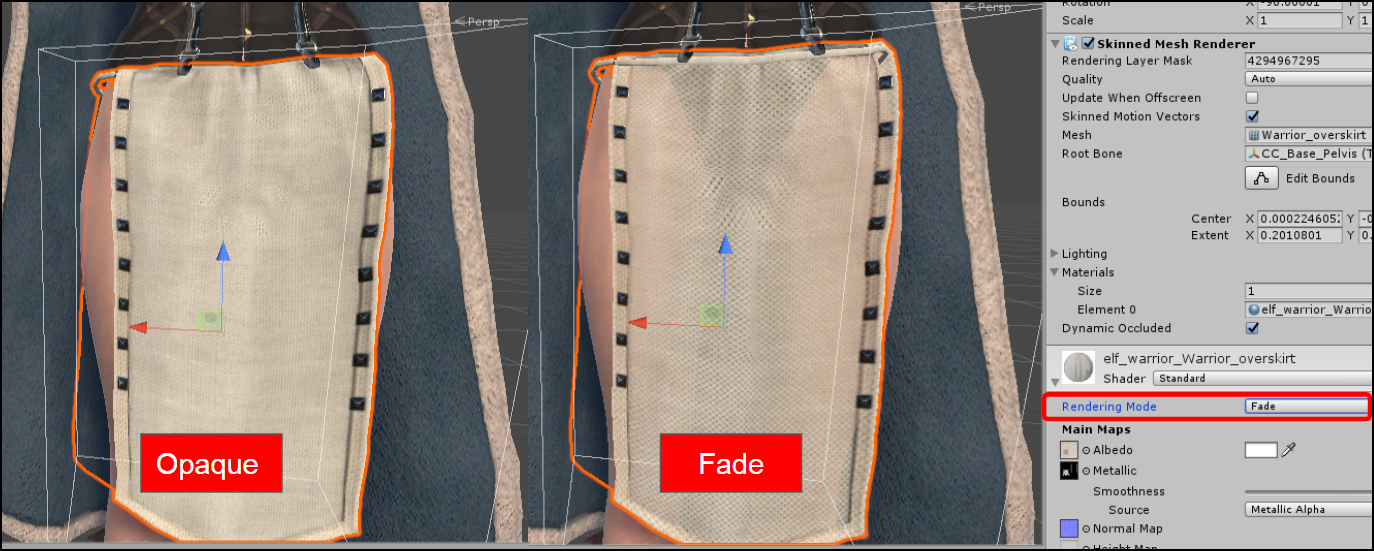
Step 4 - Adjust Some Settings in Unity (Optional)- Correct the Rendering Mode for each element. Take the warrior overskirt for reference.
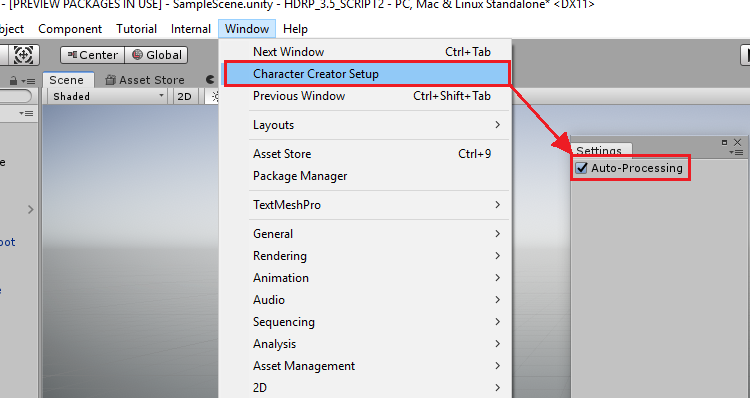
- Before adjusting the settings of the imported CC assets, make sure that Character Creator Setup > Auto-Processing is turned off. These adjustments can include tweaking motions and replacing materials.
Edited
5 Years Ago by
Miranda (RL)
|
|
|
|
|
Miranda (RL)
|
Miranda (RL)
Posted 5 Years Ago
|
|
Group: Administrators
Last Active: 2 Years Ago
Posts: 1.8K,
Visits: 11.2K
|
Important Considerations
To run the auto-processing effectively, please read the following notices first:
- There is only full support for Character Creator 3 G1 and G3 characters with FBX being the primary format of exchange.
- Characters and motions should all be exported from Character Creator. Be aware that characters processed directly from iClone or 3DXchange may need some manual re-assignments for motion re-targeting.
- Please import each character separately as unexpected issues may arise from importing multiple characters at once; such as improper linkages to texture files.
- Some special keywords in the naming of FBX file and/or materials can interfere with the auto-processing procedure. Since the following keywords are used to identify specific features for configuration, it is best to avoid using them: diffuse - ao - normal - metallicAlpha - metallic - roughness - glow - specular - transparency - hair - eyelash - ga_skin_body - skin - loop LOD0~N
- There is no support for auto-assignment of Blend, Displacement and Reflection channels.
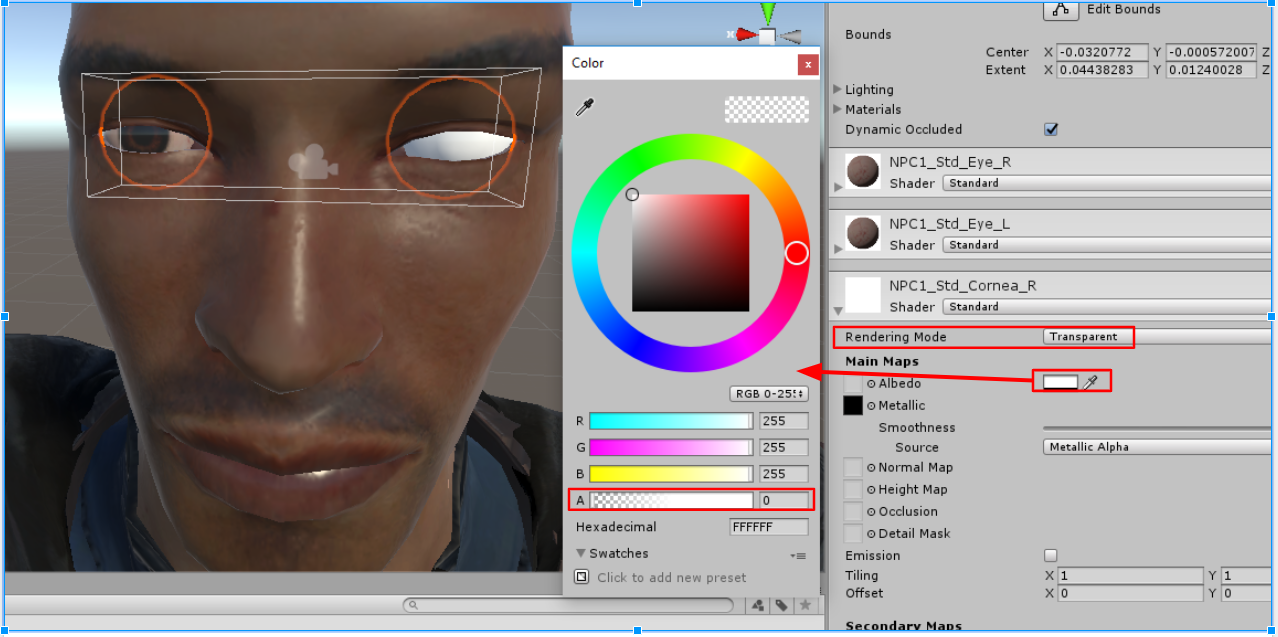
- Daz characters in CC that have not undergone replacement for the eyeballs will cause the eyes to turn white when imported into Unity. This issue will be addressed in a future update (Script Beta 1.1), for now, one can easily remedy this issue by changing the cornea material's Rendering Mode to Transparent and changing the Albedo alpha to zero in Unity.
- Unity and Character Creator calculates mesh normals in a fundamentally different manner which can cause mesh edges to appear hard inside Unity. Fix this by trying out different settings for the Normal & Tangents > Normals parameter. However, before doing so, don't forget to disable Auto-Processing.
- Character mouth will be open if applying motions without jaw bone value like Mixamo's. You can refer to this WORKAROUND to fix the issue.
Edited
5 Years Ago by
Miranda (RL)
|
|
|
|
|
Jfrog
|
|
|
Group: Forum Members
Last Active: Last Week
Posts: 696,
Visits: 4.7K
|
Hi Miranda, Thanks for the update! I made a quick test exporting a CC3 character. For me the default skin looks really overcook (brown) and overwet . This was using the HD script within an HD project. I don't have much time to try it now but will do more tests soon. I am just curious to see if someone else had the same problem. Thanks again.
Ryzen R9 5950x, RTX 3090, 128Gb Ram ,2 x 2 TB Samsung 980 Pro M.2 SSD
Horror Stories in VR
Immersive Sound VR
Immersive Sound VR on Oculus TV
|
|
|
|
|
Miranda (RL)
|
Miranda (RL)
Posted 5 Years Ago
|
|
Group: Administrators
Last Active: 2 Years Ago
Posts: 1.8K,
Visits: 11.2K
|
Hi Jfrog,
Do you have any updates on this case?
If it's duplicated, please provide some images for reference, thanks!
|
|
|
|
|
Jfrog
|
|
|
Group: Forum Members
Last Active: Last Week
Posts: 696,
Visits: 4.7K
|
Hi Miranda, My apologizes for the delay. I finally had the time to do more tests with the HD pipeline this morning. It seems to work pretty well. I can't recreate the dark skin color I had in my first test (probably something I was doing wrong) and lowering the smoothness value for both the body and head solved the wet skin look issue. Thank you for the quick reply.  Ryzen R9 5950x, RTX 3090, 128Gb Ram ,2 x 2 TB Samsung 980 Pro M.2 SSD
Horror Stories in VR
Immersive Sound VR
Immersive Sound VR on Oculus TV
Edited
5 Years Ago by
Jfrog
|
|
|
|
|
Miranda (RL)
|
Miranda (RL)
Posted 5 Years Ago
|
|
Group: Administrators
Last Active: 2 Years Ago
Posts: 1.8K,
Visits: 11.2K
|
|
|
|
|