Profile Picture

My Modular Architecture Workflows For iClone

Posted By Delerna 6 Years Ago
Rated 5 stars based on 1 vote.
Author
Message
Delerna
Delerna
Posted 6 Years Ago
View Quick Profile
Distinguished Member

Distinguished Member (8.2K reputation)Distinguished Member (8.2K reputation)Distinguished Member (8.2K reputation)Distinguished Member (8.2K reputation)Distinguished Member (8.2K reputation)Distinguished Member (8.2K reputation)Distinguished Member (8.2K reputation)Distinguished Member (8.2K reputation)Distinguished Member (8.2K reputation)

Group: Forum Members
Last Active: 2 Years Ago
Posts: 1.5K, Visits: 14.8K
This is some examples of how I use my my modular architecture objects to create scenes


i7-3770 3.4GHz CPU 16 GB Ram   
GeForce GTX1080 TI 11GB
Windows 10 Pro 64bit
Edited
6 Years Ago by Delerna
Delerna
Delerna
Posted 6 Years Ago
View Quick Profile
Distinguished Member

Distinguished Member (8.2K reputation)Distinguished Member (8.2K reputation)Distinguished Member (8.2K reputation)Distinguished Member (8.2K reputation)Distinguished Member (8.2K reputation)Distinguished Member (8.2K reputation)Distinguished Member (8.2K reputation)Distinguished Member (8.2K reputation)Distinguished Member (8.2K reputation)

Group: Forum Members
Last Active: 2 Years Ago
Posts: 1.5K, Visits: 14.8K
ADDING THE ORIEL WINDOWS TO A BUILDING SO YOU CAN SEE INTO THE BUILDING

ONE WAY OF MAKING A BUILDING
https://forum.reallusion.com/uploads/images/0d51b6d5-e16f-4f65-acb7-9eef.png

Here is one way of starting to make a building

ADDING THE WINDOWS SHOWS UP THE WALL
https://forum.reallusion.com/uploads/images/e1b23576-a017-44e2-adb3-0913.png

OOPS, The walls are showing up through the windows. That's not how it should be Crazy


USING OPACITY MAPS TO MAKE HOLES IN THE WALL
https://forum.reallusion.com/uploads/images/511d6895-4a21-49bb-ad39-b881.png

I try not to make them the right size yet. Just try to start them in the right places


THE INITIAL RESULT
https://forum.reallusion.com/uploads/images/4f400530-b1a8-4eff-afd1-725b.png

Yep, now I can see through the walls into the building. Just need to adjust its sizes now.


INCREASING THE HOLE SIZES
https://forum.reallusion.com/uploads/images/f3d99d62-6fa1-4a23-be6f-738d.png

My process is to make a small change, save it, check it in iClone, if not far enough make another small change, save it and check iClone again.
I have 2 screens on my computer so doing that is very easy. Its almost like making the change within iClone itself. Not quite but almost.


DECREASING THE HOLES SIZES
https://forum.reallusion.com/uploads/images/a15d658a-d726-4704-a7b8-9d57.png

Usually I adjust just one side of the black rectangle and save it so I can check it in iClone. If I have moved it too far then I will just go back to paint.net, undo it and move it again a little less. Save and check.
But sometimes I do several and undoing will also undo all the things that are correct. That is when I do this.

THE FINAL RESULT
https://forum.reallusion.com/uploads/images/379b5301-6054-4fa1-8364-697e.png

When I say the final result I only mean for adding the windows to the wall.
Still need to add a door and a standard window at the top. Also need to add a floor and a roof and furnishings etc inside the building.
For the wall I did consider making walls with the holes modelled but I figure that it would need tons of walls made to suit all the variations of buildings.
That's why I decided to use reallusion's Plane prop and opacity maps for the window and door holes. Now I can scale and move them on the building however I want and I just need to generate an opacity may to suit the design


i7-3770 3.4GHz CPU 16 GB Ram   
GeForce GTX1080 TI 11GB
Windows 10 Pro 64bit
Edited
6 Years Ago by Delerna
Delerna
Delerna
Posted 6 Years Ago
View Quick Profile
Distinguished Member

Distinguished Member (8.2K reputation)Distinguished Member (8.2K reputation)Distinguished Member (8.2K reputation)Distinguished Member (8.2K reputation)Distinguished Member (8.2K reputation)Distinguished Member (8.2K reputation)Distinguished Member (8.2K reputation)Distinguished Member (8.2K reputation)Distinguished Member (8.2K reputation)

Group: Forum Members
Last Active: 2 Years Ago
Posts: 1.5K, Visits: 14.8K
Here is an image of a scene I am going to make with my Modular props as well as others that came with iClone by default
I am not going to worry about the texturing very much for this because I am doing this to demonstrate how I use my Modular props to make things
https://forum.reallusion.com/uploads/images/1d40259a-c142-4791-916c-3d6d.jpg


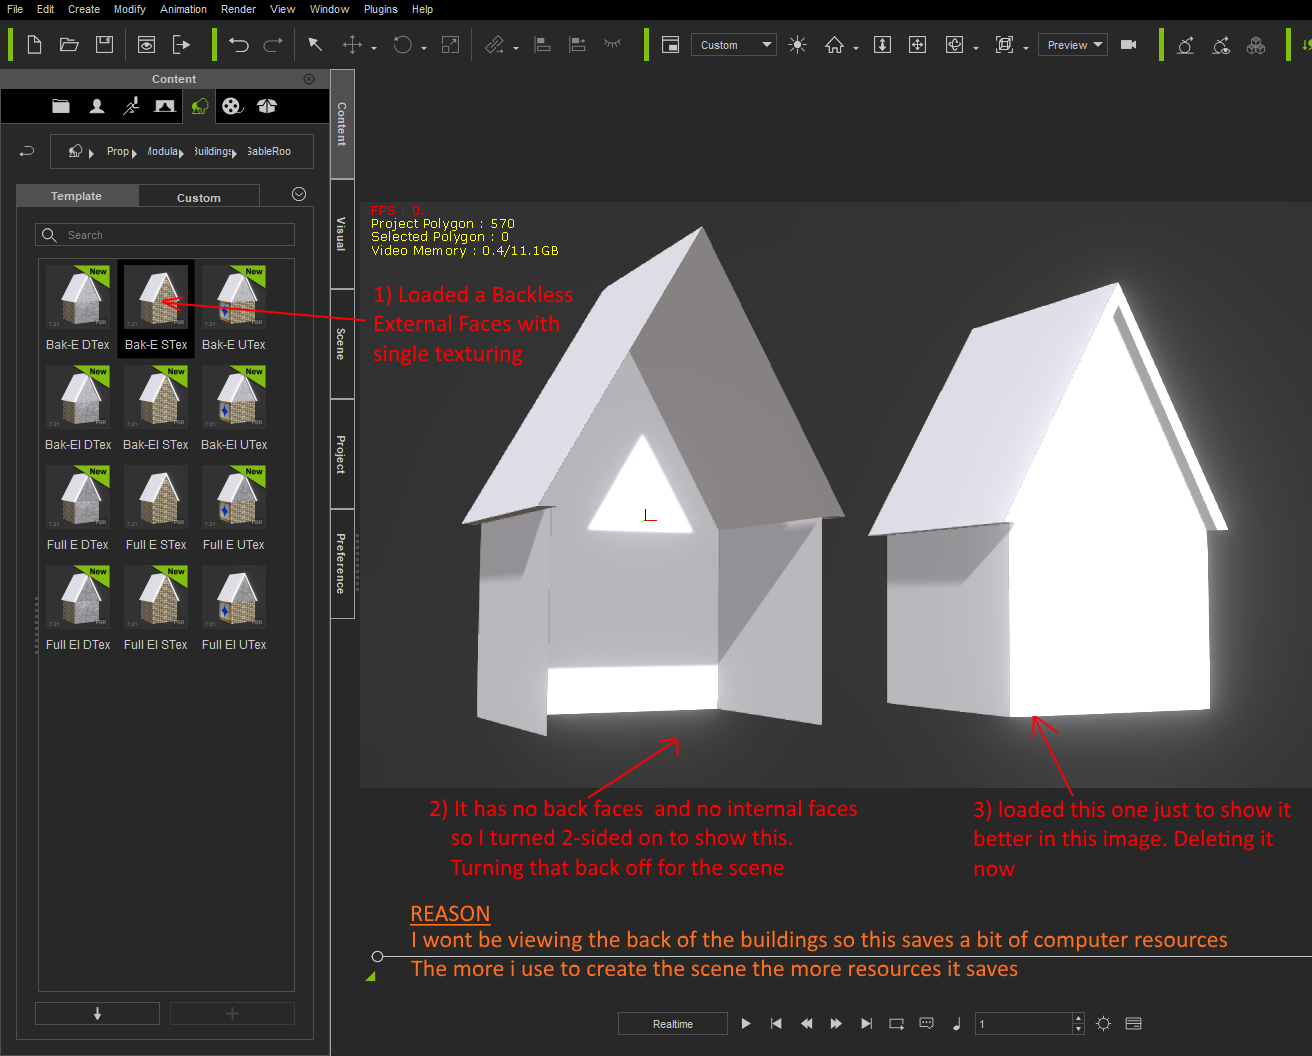
First up I load one of the Gable roof modules that suits the scene I want to make. The one I'm using here doesn't have any faces on the back of the object. Using that because I wont be showing the back of the scene so It will save some resources on my computer. Especially as I star adding more and more of them.

https://forum.reallusion.com/uploads/images/d04e9fb1-fd79-42df-b6eb-471e.png


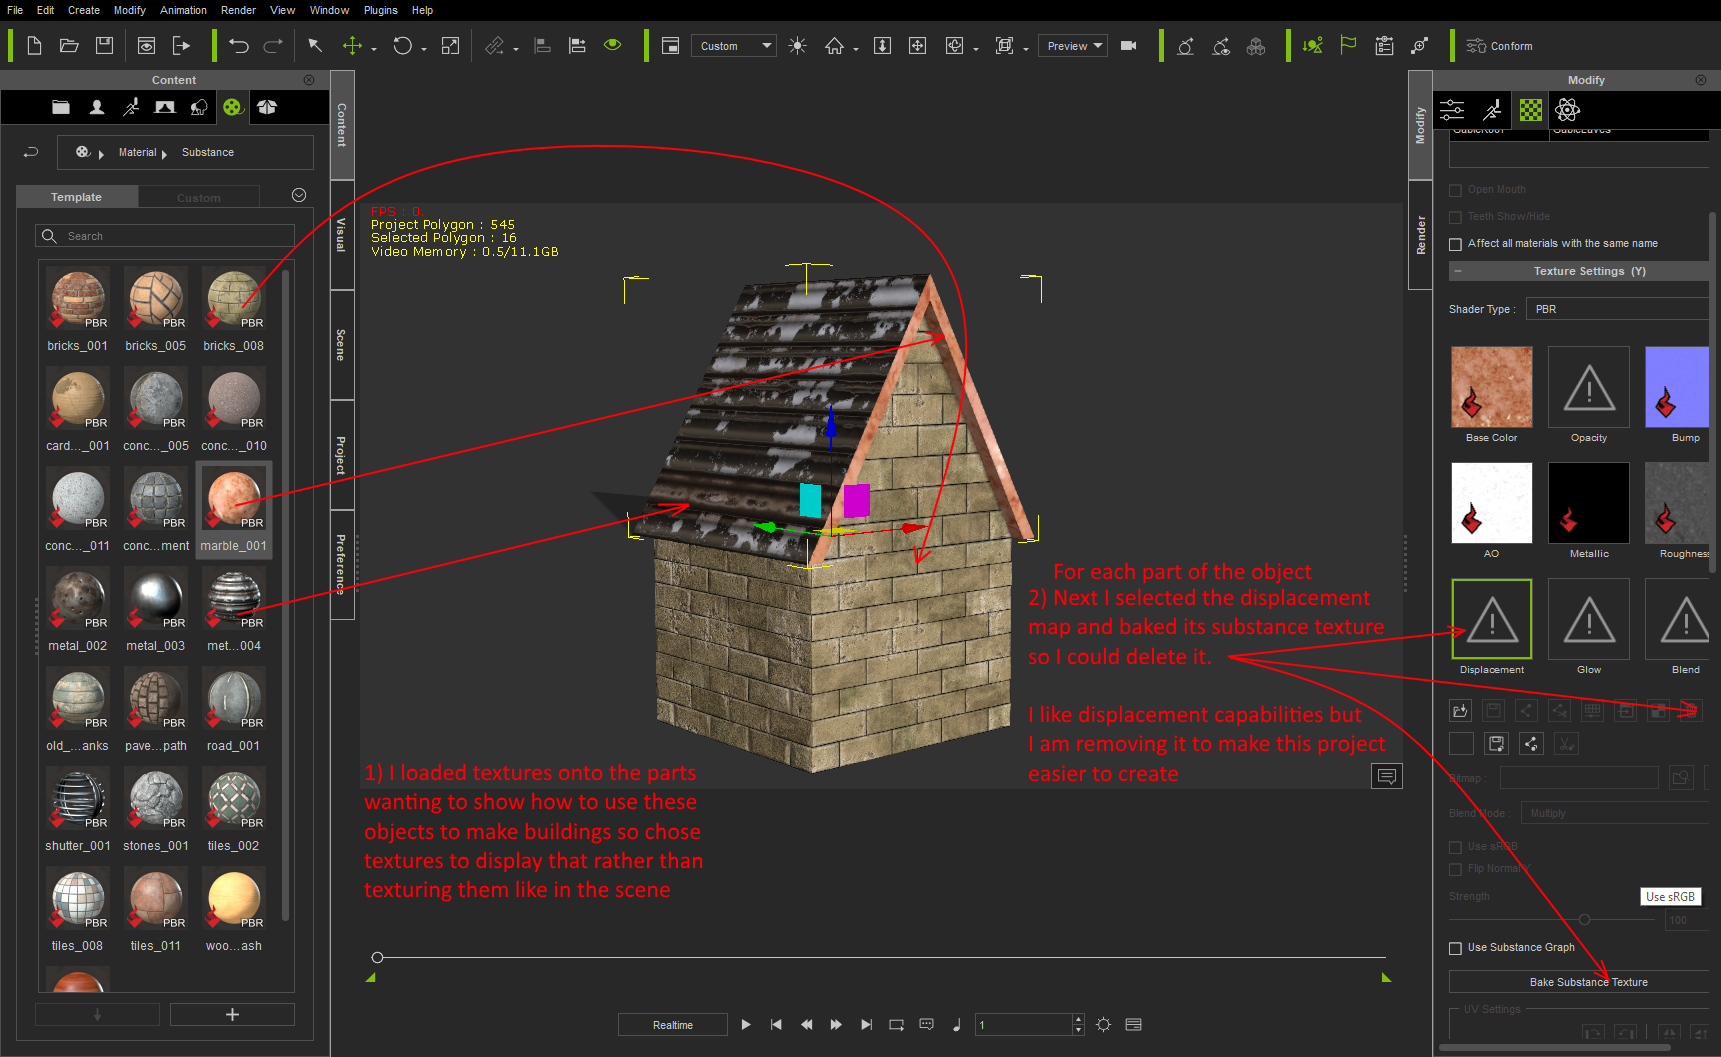
Next up I texture the object. All the buildings in the scene have pretty much the same texture in all of them. So texturing this one and then duplicating it will save me some time. Also, because I will be duplicating this a lot it means the texture should only be needed in memory once which saves resources again. You can also copy/past textures from one prop to another which does the same thing. Dragging the same texture from the content panel onto many props will waste your resources.
https://forum.reallusion.com/uploads/images/7ebdc119-58bc-4b1a-a445-87f7.png


I have put these Gable Roof Building props to try and make it so I can scale its parts differently. Here is a video that demonstrates how it works. I think the video makes it easier to see how it works that showing it in images. 
All parts are attached to a plane that can be used as a floor in the top half
Selecting that means you can scale everything and I recommend that you can scale them in X,Y and Z directions
Inside the main prop there is a roof and a walls prop. 
     Selecting the roof means you can scale the roof and the walls inside the roof without scaling the bottom set of walls
     Selecting the Walls means you can scale the bottom set of walls without scaling the roof and its inner walls
For both of these I recommend that you only scale them in the Z direction
Inside the roof prop is the Gable Roof which also includes the Gables Eaves.
If you scale the length of the building the eaves might become too long. Selecting the Gable roof enables you to scale it so the length of the eaves fits the building better
I recommend that you only scale this in the Y direction.
This video demonstrates all those scaling recommendations.


Next Up I start duplicating and loading other different Gable roof buildings that will be needed to make the scene
https://forum.reallusion.com/uploads/images/8a30f9a0-21b7-4f23-bffc-92ae.png


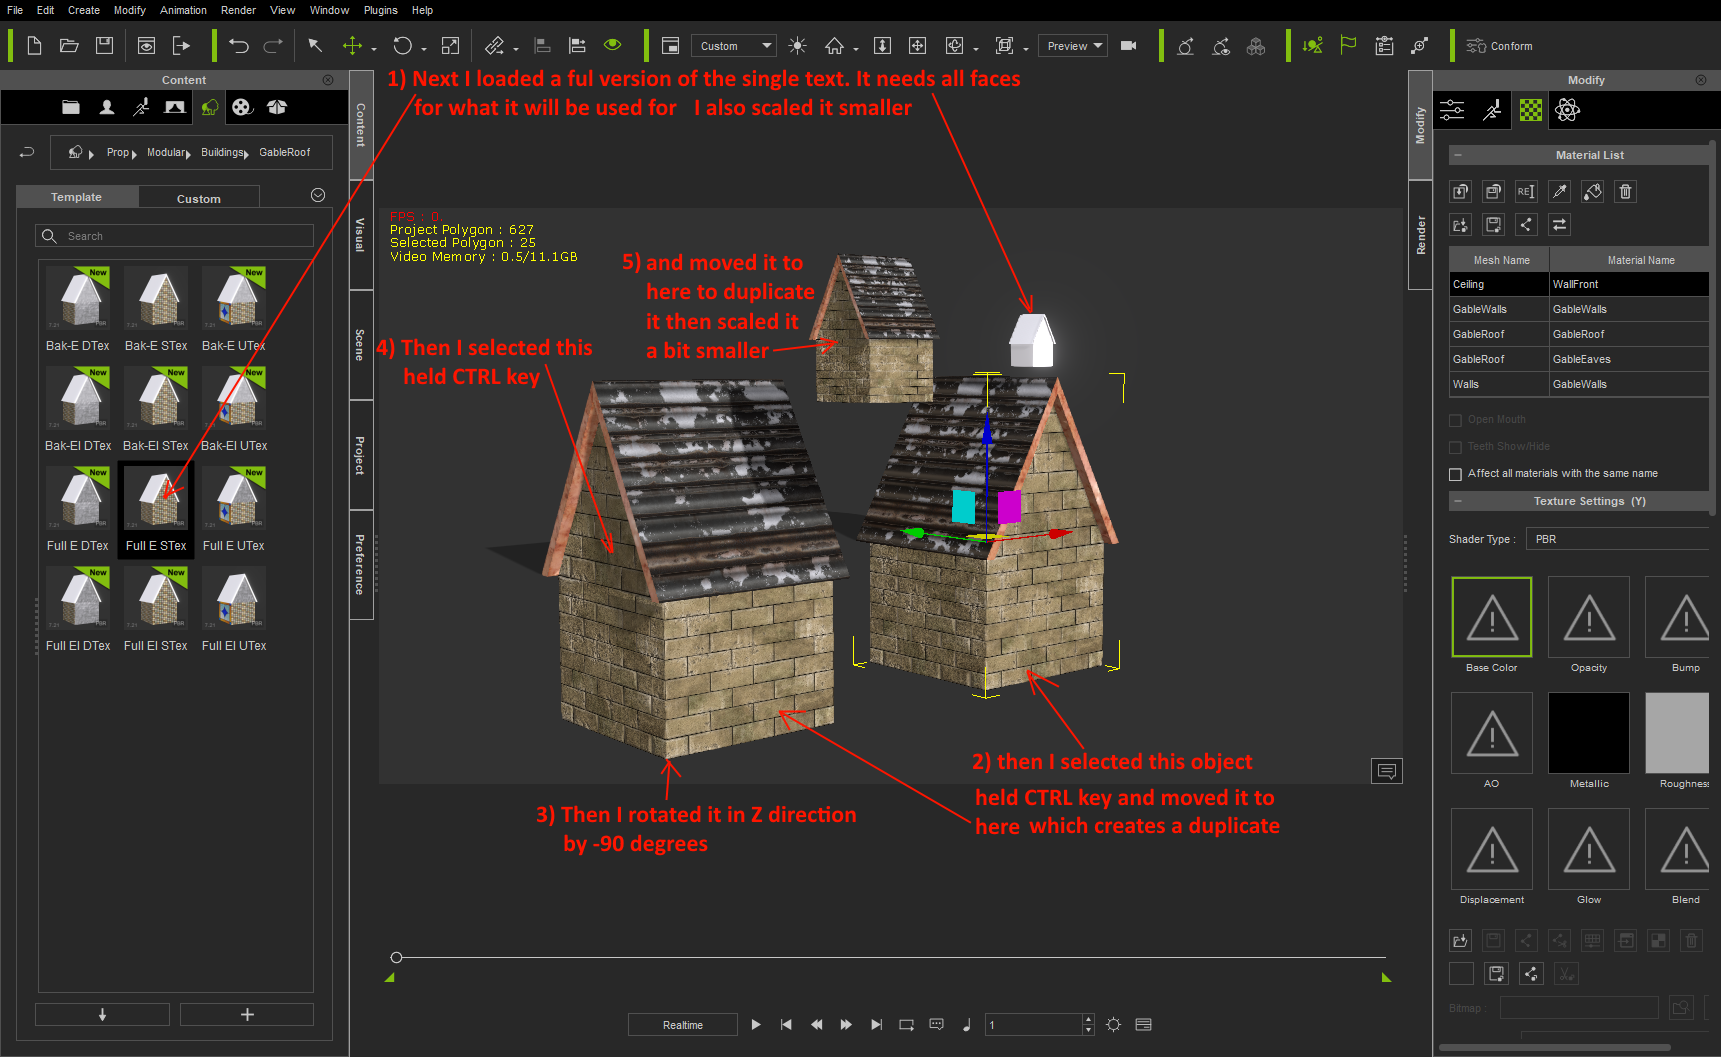
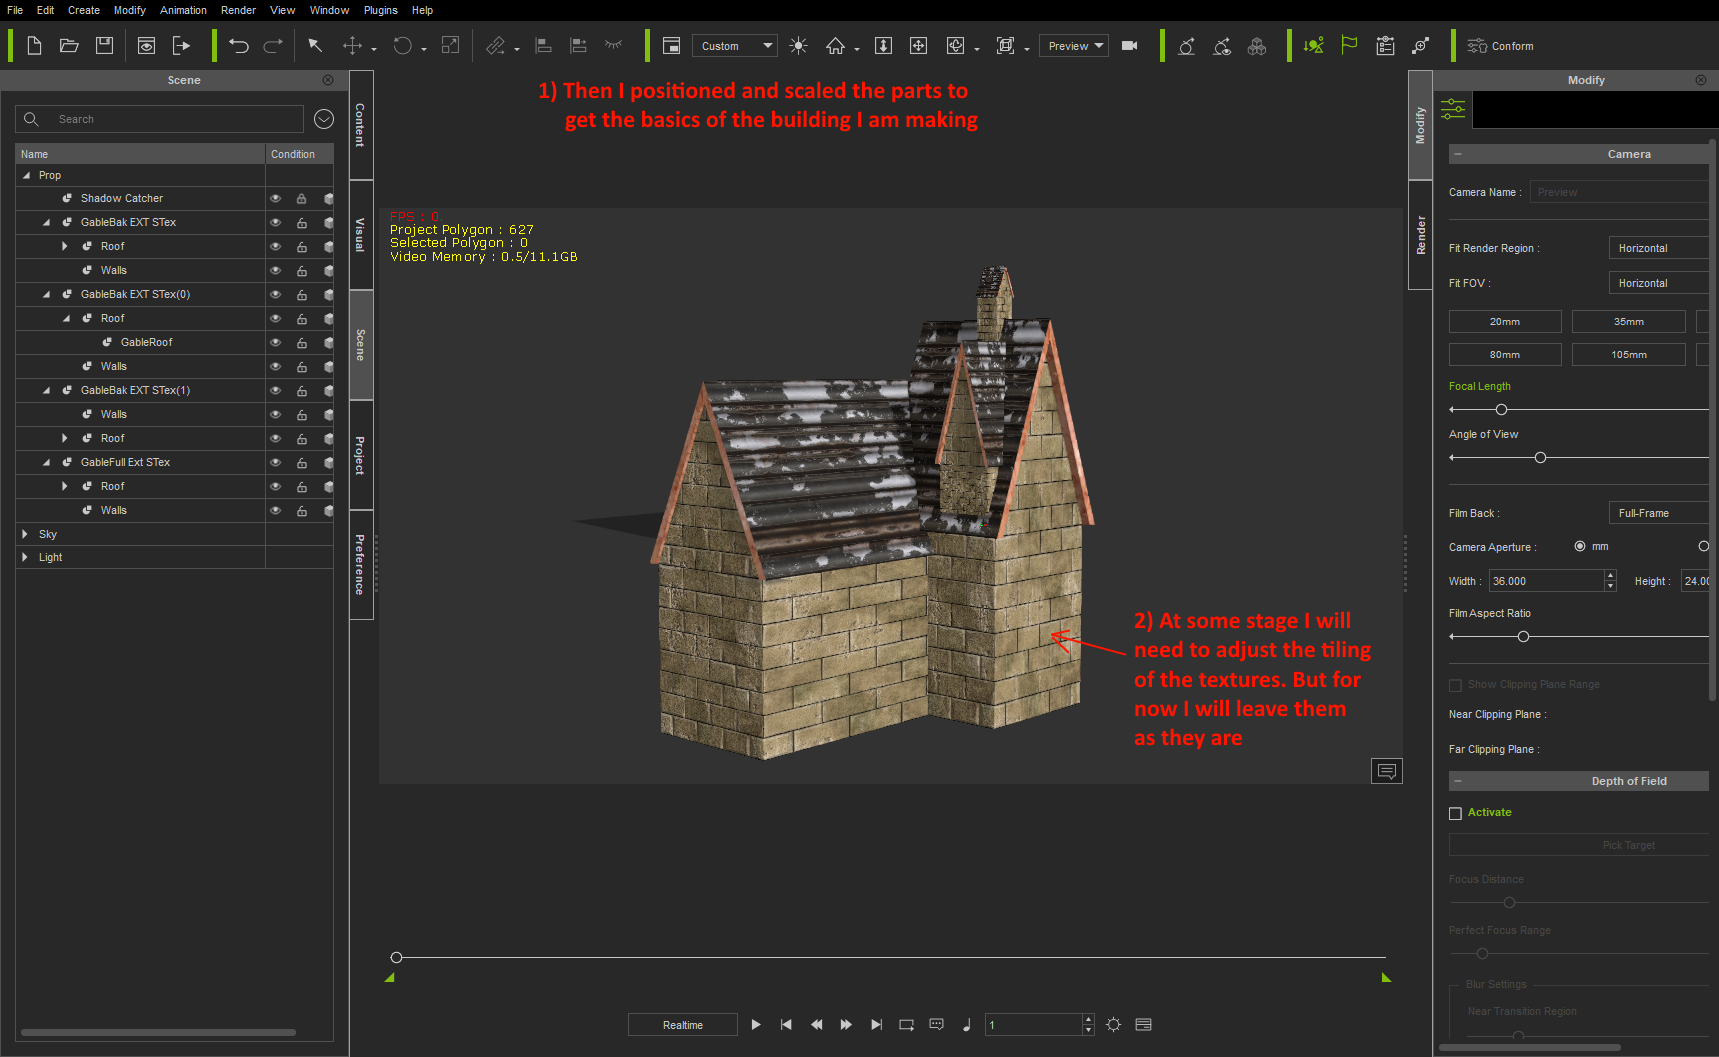
And then I start positioning them and scaling them to make the building

https://forum.reallusion.com/uploads/images/36565081-3822-4d53-be22-68a6.png


Now I start adding the other modular items to construct the building. In this case I am adding an Oriel window.

https://forum.reallusion.com/uploads/images/cd0256a0-e780-4bdd-ac30-3a95.png

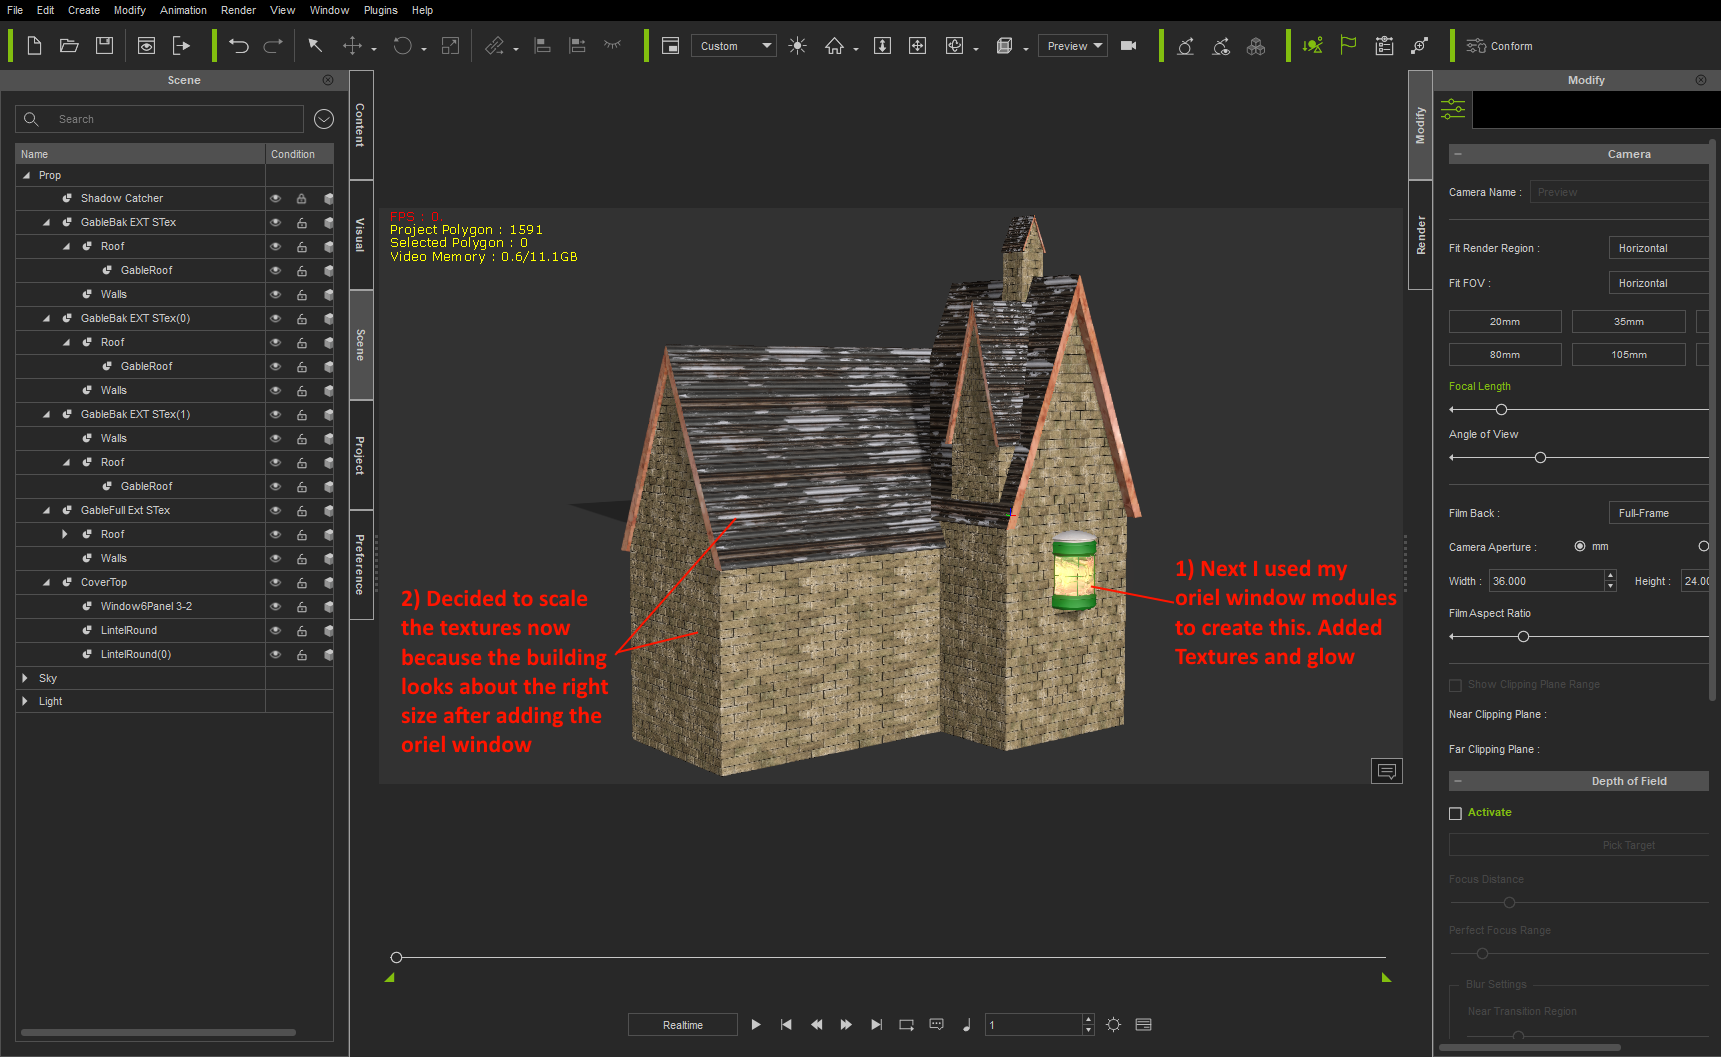
Here is what I have so far
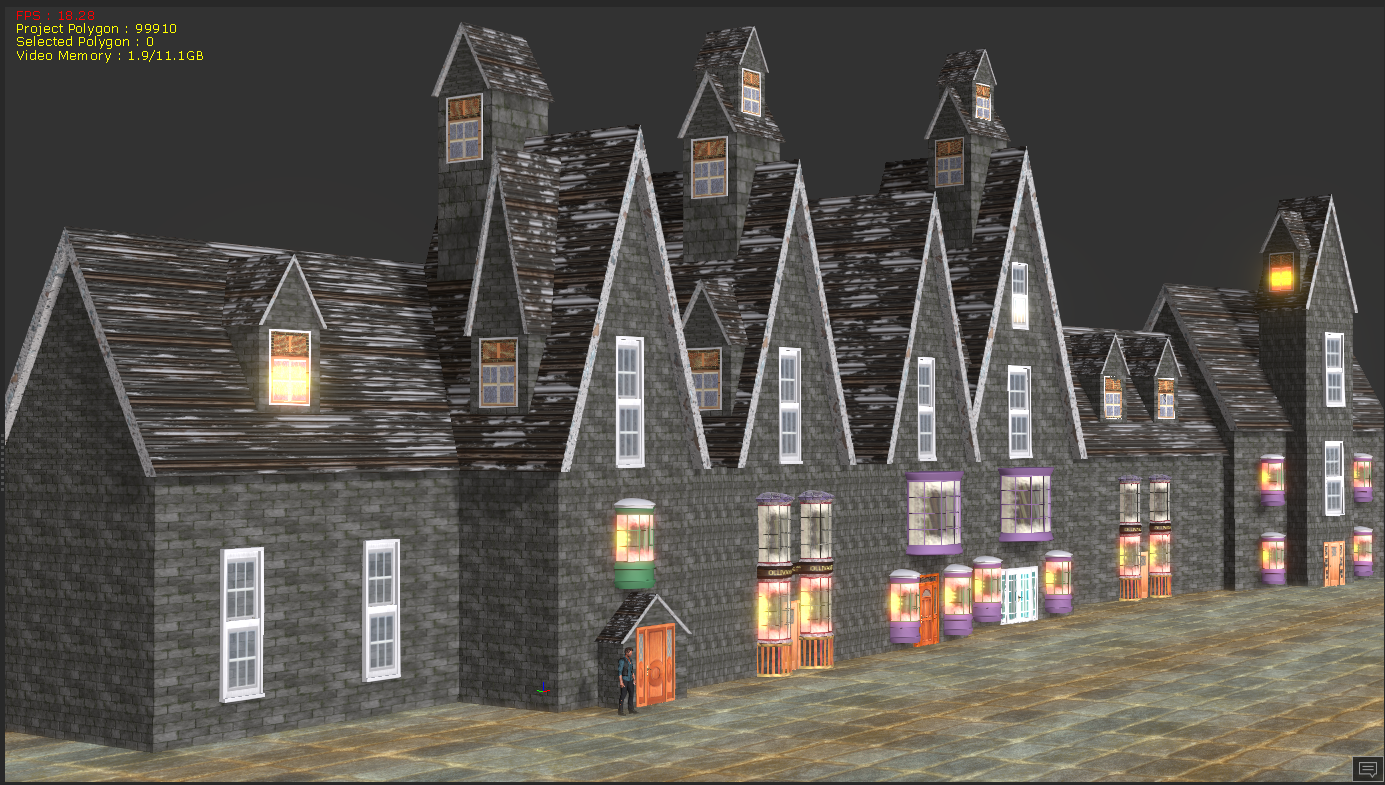
I realised I needed to use opacity maps for windows and doors and doing that with single texture versions puts the holes on all walls. So I restarted with the Unique texturing versions I only takes up 1.9 GB and there is a character included.

I have used iClones texturing abilities with texturing props I have bought from Reallusion. Except for the windows and doors which I am happy that I bought from GrannyJ quite some time ago. They work well in the sceen I think. The rest of the content is just my Gable buildings and Oriel windows. Oh, and the road and the wall bits between some of the buildings are just iClones  PlaneA and PlaneB props.
https://forum.reallusion.com/uploads/images/a1023e26-5cc3-4f25-8375-d548.png


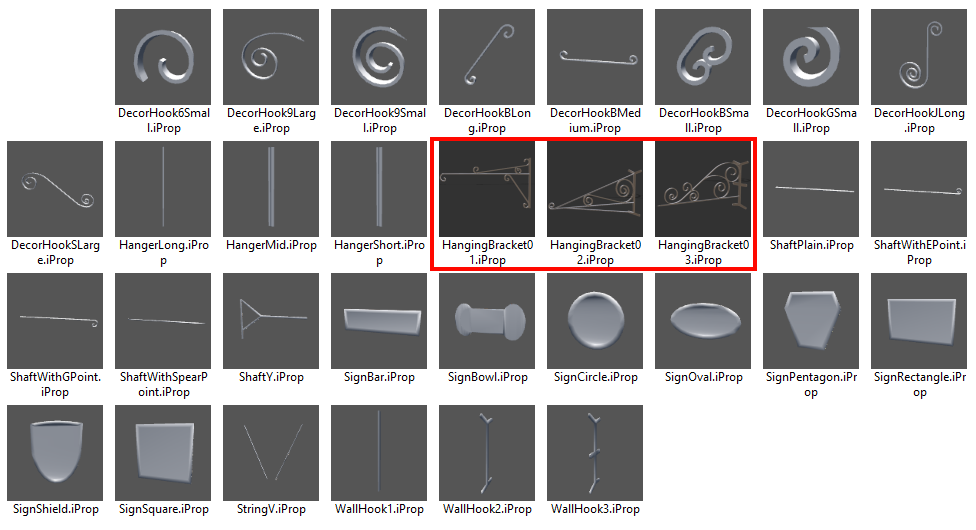
So now I am working on publishing my next set of contents tomorrow which I will be using to expand this scene. They are hanging bracked pieces that can be used to create many styles of signs for the buildings.
In this image the 3 in the red square are 3 I have put together by combining the parts that suit what I wanted to make for this scene. There are also several bar sign shapes for hanging off the Hanging brackets I make. I think I will need to add a couple more styles of strings than just the 1 in this image.
https://forum.reallusion.com/uploads/images/7d208ed4-fc52-4f32-b8fd-72a3.png


i7-3770 3.4GHz CPU 16 GB Ram   
GeForce GTX1080 TI 11GB
Windows 10 Pro 64bit
Edited
6 Years Ago by Delerna
Delerna
Delerna
Posted 6 Years Ago
View Quick Profile
Distinguished Member

Distinguished Member (8.2K reputation)Distinguished Member (8.2K reputation)Distinguished Member (8.2K reputation)Distinguished Member (8.2K reputation)Distinguished Member (8.2K reputation)Distinguished Member (8.2K reputation)Distinguished Member (8.2K reputation)Distinguished Member (8.2K reputation)Distinguished Member (8.2K reputation)

Group: Forum Members
Last Active: 2 Years Ago
Posts: 1.5K, Visits: 14.8K
HANGING BRACKET SIGNS

CREATE A HANGING BRACKET
Load the parts needed to create the a bracket style to suit what I need
Then I scale, rotate and position them to make the bracket I want and then I save it. This one I saved is surrounded by a red rectangle
https://forum.reallusion.com/uploads/images/2731355b-b59c-436c-b342-7e51.png


CREATE A HANGING BRACKET SIGN
Load the hanging bracket, sign shape and string I want to use to make a sign.
To texture the sign I sent the diffuse and UV map to my 2D editor. Need an image on the prop to do that so I just load anything onto it.
https://forum.reallusion.com/uploads/images/3ee9e569-29e0-4535-bcd8-249c.png


TEXTURING THE HANGING BRACKET SIGN
I just used one of realusions metal substance textures for the hanging bracket.
The project I am working on in this workflow is for a harry potter video I am working on for my own personal pleasure. 
So I don't mind using a photo I got from the internet to texture the sign.
Here is the image I am using and I selected and copied the sign image I want to use

https://forum.reallusion.com/uploads/images/3129e7ae-7224-435e-9731-261d.png

In the UV map image I held CTRL key and used the majic wand to select and delete the background color. Oh and turned the hardness down to 10% so it wouldn't select everything
Next I added a new layer to the UVMap image and moved it below the UVMap layer. Then I pasted the copied sign into the new layer and adjusted it to fit the prop using the UV map as a guide


https://forum.reallusion.com/uploads/images/52dca10f-43ae-4a1d-b3a4-7237.png

When I think I have it I copy the layer of the image and paste it into the Diffuse image I sent from iClone and then save it. It updates iClone so I can check it looks OK.
Come back and adjust the UV map version copy and past it back into the Diffuse image and save it again and check iClone. Repeat until satisfied.

https://forum.reallusion.com/uploads/images/0998a3e3-2794-45d2-829e-de3b.png


And now here is my scene with a few hanging bracket signs added

https://forum.reallusion.com/uploads/images/b7caa73e-db6a-4937-8e2b-8aef.png


i7-3770 3.4GHz CPU 16 GB Ram   
GeForce GTX1080 TI 11GB
Windows 10 Pro 64bit
Edited
6 Years Ago by Delerna
Delerna
Delerna
Posted 6 Years Ago
View Quick Profile
Distinguished Member

Distinguished Member (8.2K reputation)Distinguished Member (8.2K reputation)Distinguished Member (8.2K reputation)Distinguished Member (8.2K reputation)Distinguished Member (8.2K reputation)Distinguished Member (8.2K reputation)Distinguished Member (8.2K reputation)Distinguished Member (8.2K reputation)Distinguished Member (8.2K reputation)

Group: Forum Members
Last Active: 2 Years Ago
Posts: 1.5K, Visits: 14.8K
workflow

i7-3770 3.4GHz CPU 16 GB Ram   
GeForce GTX1080 TI 11GB
Windows 10 Pro 64bit
Delerna
Delerna
Posted 6 Years Ago
View Quick Profile
Distinguished Member

Distinguished Member (8.2K reputation)Distinguished Member (8.2K reputation)Distinguished Member (8.2K reputation)Distinguished Member (8.2K reputation)Distinguished Member (8.2K reputation)Distinguished Member (8.2K reputation)Distinguished Member (8.2K reputation)Distinguished Member (8.2K reputation)Distinguished Member (8.2K reputation)

Group: Forum Members
Last Active: 2 Years Ago
Posts: 1.5K, Visits: 14.8K
Workflow

i7-3770 3.4GHz CPU 16 GB Ram   
GeForce GTX1080 TI 11GB
Windows 10 Pro 64bit


Reading This Topic