|
Author
|
Message
|
|
dmwierz1
|
dmwierz1
Posted 6 Years Ago
|
|
Group: Forum Members
Last Active: 6 Years Ago
Posts: 32,
Visits: 103
|
I'm looking for details on how to use the Morph-based Head tool in CTA3 from a photo. Yes, I have the video training with the dog's head. The narrator basically only says "Move the line here and there, and you're good", without explaining what the moves and changes do.
The PDF on the Reallusion site says (seriously): "A face fitting wizard will appear, follow it to create your head."..."follow it"? Follow it how? That's not a lot of help. Neither is the online user manual.
Specifically, I'm looking for what, exactly, are the functions of the items listed below? I'm an engineer, so please be specific. 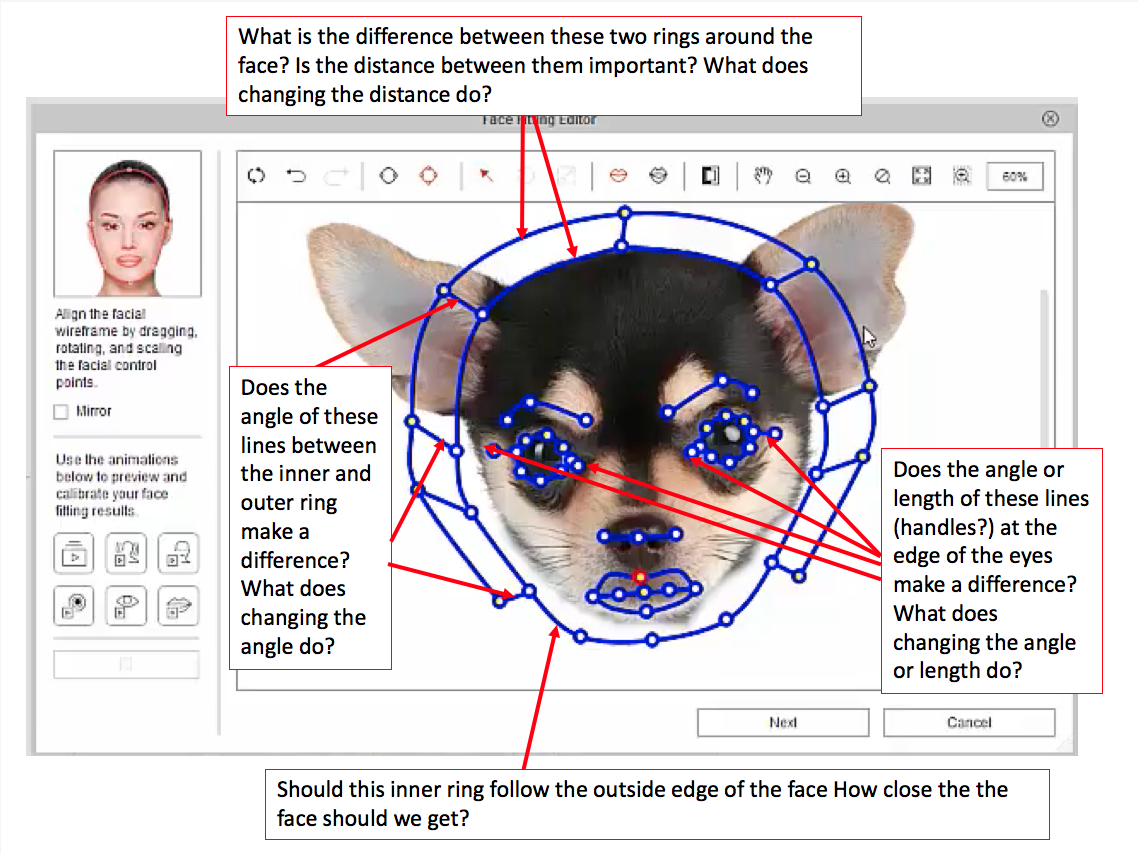
Thanks in advance.
Edited
6 Years Ago by
dmwierz1
|
|
|
|
|
theschemer
|
theschemer
Posted 6 Years Ago
|
|
Group: Forum Members
Last Active: Last Year
Posts: 1.4K,
Visits: 2.9K
|
dmwierz1 (4/19/2018)
I'm looking for details on how to use the Morph-based Head tool in CTA3 from a photo. Yes, I have the video training with the dog's head. The narrator basically only says "Move the line here and there, and you're good", without explaining what the moves and changes do.
The PDF on the Reallusion site says (seriously): "A face fitting wizard will appear, follow it to create your head."..."follow it"? Follow it how? That's not a lot of help. Neither is the online user manual.
Specifically, I'm looking for what, exactly, are the functions of the items listed below? I'm an engineer, so please be specific.
Thanks in advance. For the top question, the inner ring should conform to the face shape. The outer ring controls the hair or large ears etc. In other words, the outer ring allows things outside of the face to move. But you need to use it carefully with other than one color backgrounds as the background will also contort and not look very good until you tweak and adjust it. Play around with it and watch the video and you will soon see what I am saying. Left question: The angles are just for fine tuning and their use will be likely obvious to fine tune what I said above. Bottom question: It is best to try to get that ring as best as you can to follow the contour of the face. The "dots" can be moved up and down too to better help with that. Right question: Those just change the amount of the morphing that will affect the eyebrows. You can adjust them exact to follow a persons eyebrow, or put it not exact to achieve the desired effect you are after. Again, experiment from one extreme to another and you will see its capability. Hope that helps, TS
|
|
|
|
|
dmwierz1
|
dmwierz1
Posted 6 Years Ago
|
|
Group: Forum Members
Last Active: 6 Years Ago
Posts: 32,
Visits: 103
|
theschemer (4/19/2018)
dmwierz1 (4/19/2018)
I'm looking for details on how to use the Morph-based Head tool in CTA3 from a photo. Yes, I have the video training with the dog's head. The narrator basically only says "Move the line here and there, and you're good", without explaining what the moves and changes do.
The PDF on the Reallusion site says (seriously): "A face fitting wizard will appear, follow it to create your head."..."follow it"? Follow it how? That's not a lot of help. Neither is the online user manual.
Specifically, I'm looking for what, exactly, are the functions of the items listed below? I'm an engineer, so please be specific.
Thanks in advance. For the top question, the inner ring should conform to the face shape. The outer ring controls the hair or large ears etc. In other words, the outer ring allows things outside of the face to move. But you need to use it carefully with other than one color backgrounds as the background will also contort and not look very good until you tweak and adjust it. Play around with it and watch the video and you will soon see what I am saying. Left question: The angles are just for fine tuning and their use will be likely obvious to fine tune what I said above. Bottom question: It is best to try to get that ring as best as you can to follow the contour of the face. The "dots" can be moved up and down too to better help with that. Right question: Those just change the amount of the morphing that will affect the eyebrows. You can adjust them exact to follow a persons eyebrow, or put it not exact to achieve the desired effect you are after. Again, experiment from one extreme to another and you will see its capability. Hope that helps, TS TS, very helpful. Thanks. So, let me ask further:
"Left question: The angles are just for fine tuning and their use will be likely obvious to fine tune what I said above." Well, the challenge I face is changes are far from obvious. I can use the "demo" buttons on the left, but this is exactly why I'm asking for specific replies. I mentioned I'm an engineer, right? That's why I'm looking to understand the WHAT and HOW behind the "face fitting wizard" and not just experiment until something looks right. This kind of experimenting rarely results in repeatable results. If I understand how the tool is designed, and what each dot/line/ring does, I can much better understand what I need to do to get the desired results.
"Right question: Those just change the amount of the morphing that will affect the eyebrows. You can adjust them exact to follow a persons eyebrow, or put it not exact to achieve the desired effect you are after. Again, experiment from one extreme to another and you will see its capability." I don't fully understand. The lines that attach to the corners of the eyes affects the eyebrows? How? What does changing their angle, or their length, or even their location, do, specifically, to the eyebrows? Make the lines longer, what happens? Angle them up/down, what happens?
Thanks again. This is helpful, and I'm getting more comfortable with using these tools.
|
|
|
|
|
theschemer
|
theschemer
Posted 6 Years Ago
|
|
Group: Forum Members
Last Active: Last Year
Posts: 1.4K,
Visits: 2.9K
|
dmwierz1 (4/19/2018)
theschemer (4/19/2018)
dmwierz1 (4/19/2018)
I'm looking for details on how to use the Morph-based Head tool in CTA3 from a photo. Yes, I have the video training with the dog's head. The narrator basically only says "Move the line here and there, and you're good", without explaining what the moves and changes do.
The PDF on the Reallusion site says (seriously): "A face fitting wizard will appear, follow it to create your head."..."follow it"? Follow it how? That's not a lot of help. Neither is the online user manual.
Specifically, I'm looking for what, exactly, are the functions of the items listed below? I'm an engineer, so please be specific.
Thanks in advance. For the top question, the inner ring should conform to the face shape. The outer ring controls the hair or large ears etc. In other words, the outer ring allows things outside of the face to move. But you need to use it carefully with other than one color backgrounds as the background will also contort and not look very good until you tweak and adjust it. Play around with it and watch the video and you will soon see what I am saying. Left question: The angles are just for fine tuning and their use will be likely obvious to fine tune what I said above. Bottom question: It is best to try to get that ring as best as you can to follow the contour of the face. The "dots" can be moved up and down too to better help with that. Right question: Those just change the amount of the morphing that will affect the eyebrows. You can adjust them exact to follow a persons eyebrow, or put it not exact to achieve the desired effect you are after. Again, experiment from one extreme to another and you will see its capability. Hope that helps, TS TS, very helpful. Thanks. So, let me ask further:
"Left question: The angles are just for fine tuning and their use will be likely obvious to fine tune what I said above." Well, the challenge I face is changes are far from obvious. I can use the "demo" buttons on the left, but this is exactly why I'm asking for specific replies. I mentioned I'm an engineer, right? That's why I'm looking to understand the WHAT and HOW behind the "face fitting wizard" and not just experiment until something looks right. This kind of experimenting rarely results in repeatable results. If I understand how the tool is designed, and what each dot/line/ring does, I can much better understand what I need to do to get the desired results. Well, the angles are most going to effect and image that has a background where you can adjust them to keep said background movement to a minimum or completely keep it still when the head moves. You will always have the best results with a "masked out" character when you bring in an image to create a character from. This makes setting these lines less important as they control anything within them to morph when the character moves. That results in the area around the head to morph and look less realistic. I can only say that any of the dots and lines are there to focus the morphing exactly where it needs to be without any bleed over to an area that needs to remain still. Does that help??
"Right question: Those just change the amount of the morphing that will affect the eyebrows. You can adjust them exact to follow a persons eyebrow, or put it not exact to achieve the desired effect you are after. Again, experiment from one extreme to another and you will see its capability." I don't fully understand. The lines that attach to the corners of the eyes affects the eyebrows? How? What does changing their angle, or their length, or even their location, do, specifically, to the eyebrows? Make the lines longer, what happens? Angle them up/down, what happens?
Oops, my bad. I thought the lines were pointing to the to the eyebrow lines. The lines you are referring to just allow you to better shape the eye as eyes come in many different shapes. I mainly worry about the eye shape and just put the one extension line in the tear duct and the other one to follow the crease in the eye. I never thought much about what that line does other than allow you to change the shape of the overall eye such as in the case of a round eye vs an almond shape eye. I will see if I can experiment and better explain this later today when I get some spare time.
Thanks again. This is helpful, and I'm getting more comfortable with using these tools.
Edited
6 Years Ago by
theschemer
|
|
|
|
|
dmwierz1
|
dmwierz1
Posted 6 Years Ago
|
|
Group: Forum Members
Last Active: 6 Years Ago
Posts: 32,
Visits: 103
|
T, yes that helps a little more. If only I could experiment more readily, I'd be able to try your suggestions out, but unfortunately, my new CTA3 installation not only crashes randomly, it won't let me save my projects or elements of any projects.
I've got a trouble ticket in for both these issues.
I'd REALLY like to love CTA3, but honestly, it's not terribly user friendly, and it seem REALLY buggy. For now, I'm just not going to use it for any deadline or client-directed work.
Thanks again.
|
|
|
|
|
dmwierz1
|
dmwierz1
Posted 6 Years Ago
|
|
Group: Forum Members
Last Active: 6 Years Ago
Posts: 32,
Visits: 103
|
Wait a minute: I just found this tutorial, which is for CrazyTalk 8, but is a LOT more detailed than what's included in the CTA3 manual:
Edited
6 Years Ago by
dmwierz1
|
|
|
|
|
theschemer
|
theschemer
Posted 6 Years Ago
|
|
Group: Forum Members
Last Active: Last Year
Posts: 1.4K,
Visits: 2.9K
|
dmwierz1 (4/19/2018)
Wait a minute: I just found this tutorial, which is for CrazyTalk 8, but is a LOT more detailed than what's included in the CTA3 manual:
Glad you found that as I was going to suggest looking at the CrayTalk8 tutorials as they are pretty much the same and likely use the same code behind the scenes. I looked at one online and was going to mention it but had to go walk my dog.  So while I was out in the woods I thought about mentioning that when I got back in here. Here are a couple of good links. Lots of good info there: https://www.youtube.com/watch?v=FTAsVPg19cohttps://www.youtube.com/watch?v=Pfh1eC51Rx8TS P.S. I don't know about your crashing problems but make sure your video card is up to snuff and has the latest drivers.
|
|
|
|