Profile Picture

My CC Flowing Clothes Workflow :- Blender To iClone

Posted By Delerna 7 Years Ago
Rated 5 stars based on 2 votes.
Author
Message
Delerna
Delerna
Posted 7 Years Ago
View Quick Profile
Distinguished Member

Distinguished Member (8.2K reputation)Distinguished Member (8.2K reputation)Distinguished Member (8.2K reputation)Distinguished Member (8.2K reputation)Distinguished Member (8.2K reputation)Distinguished Member (8.2K reputation)Distinguished Member (8.2K reputation)Distinguished Member (8.2K reputation)Distinguished Member (8.2K reputation)

Group: Forum Members
Last Active: 2 Years Ago
Posts: 1.5K, Visits: 14.8K
Introduction
Due to a request from Pitapan I am going to present the ideas I have behind creating cloth flowing clothes for CC characters.
I will present the ideas I have that help me create what I consider to be reasonable physics cloth flow according to my understanding and capabilities and how I like to model.
This is not going to be a tutorial that shows how to do things because there are already plenty of those. Instead I will try and focus on how I resolve problems such as cloth penetration.
I will be building this topic over the next week or 2.......I hope. Might take longer depending on whether what I have to say is found helpful or not.

If anyone finds anything I have to say to be helpful for them then I will find doing this to have been worth the effort.


UPDATES
1st Mar 2017 :- added 2nd Post called   CC Character Preparation
1st Mar 2017 :- added 3rd Post called    Modelling The Clothes For Effective Cloth Flow
2nd Mar 2017 :- Added 4th Post called      Preparing The Clothes For Rigging In Blender
2nd Mar 2017 :- Added Create The Clothings UVMap to the 4th Post
2nd Mar 2017 :- Added Export The Character And Clothings For iClone to the 4th Post
2nd Mar 2017 :- Added 5th Post called Testing The Cloth Flow In iClone
3rd Mar 2017 :- Added some more comments to Testing the cloth flow in iClone 5th Post
3rd Mar 2017 :- Added 6th Post called Weight Painting The Clothes
4th Mar 2017 :- Added Separate UVMAP Into Selectable Groups to the 
6th Post
4th Mar 2017 :- Added animation test to the 6th Post

And that pretty much covers my workflow. Is it the best way to do it? Probably not but it works for me and I rely on doing things how they work for me and learning better ways as I progress.
And there would be my main suggestion "learn by doing". Work on things and don't get too frustrated over problems. I find I learn the most from things that don't work.

I will continue with some suggestions and ideas though

7th May 2017 :- Added 7th Post called Creating Multi Layered Flowing Clothes
10th May 2017 :- Added a heading to 2nd post Method of getting FBX files for 3DXchange pro version
1st Oct 2017 :- Created a demo of my workflow for modelling clothes in Blender HERE
7th Feb 2018 :- Added how I prevent cloth penetration in the 9th post


i7-3770 3.4GHz CPU 16 GB Ram   
GeForce GTX1080 TI 11GB
Windows 10 Pro 64bit
Edited
6 Years Ago by Delerna
Delerna
Delerna
Posted 7 Years Ago
View Quick Profile
Distinguished Member

Distinguished Member (8.2K reputation)Distinguished Member (8.2K reputation)Distinguished Member (8.2K reputation)Distinguished Member (8.2K reputation)Distinguished Member (8.2K reputation)Distinguished Member (8.2K reputation)Distinguished Member (8.2K reputation)Distinguished Member (8.2K reputation)Distinguished Member (8.2K reputation)

Group: Forum Members
Last Active: 2 Years Ago
Posts: 1.5K, Visits: 14.8K


CC CHARACTER PREPARATION


EXPORT CC CHARACTER as FBX
https://forum.reallusion.com/uploads/images/83182c5d-b0bd-4fe3-910f-47aa.png


I export my CC characters without motion calibration for 2 reasons

  1)  It takes a long time to FBX export a character with the clothes I have made from Blender when   it includes calibrated motions.
       Characters without calibration   export from Blender much faster
   2) I began creating clothes with calibrated   characters because they supposedly assist you to check that the clothes will follow the characters animation while modeling/rigging them in Blender 
       But I find that while calibration certainly helps to make the clothes follow animations very well in Blender, when I send the character and clothes into iClone it just doesn't work the same.
       Also I find that the time it takes to check the animation in Blender is pointless because I have to check it out in iClone again anyway.
       So for me the long time to export calibrated characters isn't worth the benefits it provides. 
       I prefer to export the character faster and test the animation completely within iClone. This is only my opinion though.

I save my CC FBX character into a \Base\FBX folder and I have a naming convention
BFNC for Base Female Non Calibrated
BMFC for Base Male Non Calibrated

METHOD OF GETTING FBX FILES FOR 3DXCHANGE PRO VERSION
The above can only be done if you have the Pipeline version of 3DXchange
If you own the Pro version you can still create your own clothes by downloading the 3 FBX files for Base Male, Base Female and Base Neutral from here
https://www.reallusion.com/character-creator/custom-outfit.html#clothes
The only thing with this is that you don't get any other characters to develop clothes for such as Base Heavy male or Base Heavy Female etc.
You have to create the clothes on one of these 3 characters and hope the cloth conforming works well enough.
There is a way around this though.
    1) Create your clothing on one of these 3 characters
    2) Save the cloth by itself as an OBJ file from Blender
    3) Export the FBX from blender and import it into CC as described in TESTING THE CLOTH FLOW IN ICLONE
    4) In CC Save the clothing
    5) Load the Heavy Male Character and add the clothing to him
    6) Send the character and clothing to iClone
    7) Send the character and clothing to 3DXchange.
    8) Export the character as OBJ from the replace mesh  (I will correct this description when I get home)
    9) Import the OBJ character into Blender. Import the cloth you saved as OBJ in step 2.
  10) In Blender adjust the cloth to fit the character
  11) Export the cloth again as OBJ from Blender
  12) Go back to 3DXchange and select the cloth
  13) Goto replace mesh and replace it with the cloth OBJ file you modified to fit the Heavy Male.
  14) In 3DXchange send the chacter and cloth back to iClone
  15) In iClone send the character and cloth back to CC
  16) In CC save the cloth and now you have a version of the outfit that fits heavy characters better.
Note: You could also edit the mesh in CC if it doesn't need to be modified much


IMPORT FBX CHARACTER INTO BLENDER
The first thing I do here is load iclone and by default it loads with 3 objects that are not needed for modelling things for iClone characters.
They are a camera, a lamp and a cube. I delete these by being in Object Mode and pressing the keyboard a key once or twice to select all three of them. Then press the keyboards belet key and press belete in the pane that pops up.


Now I import the FBX character
https://forum.reallusion.com/uploads/images/f86aad46-af8d-431c-a7c9-bc8d.png


SAVE THE CHARACTER AS A BLENDER FILE
https://forum.reallusion.com/uploads/images/bbbdbadd-6afa-427e-9a49-4f8e.png


Now whenever I want to create some clothes I no longer need to do these 3 steps. I already have the Base blender file without any clothes.
Just load it into Blender and save it to a new folder named to suit the clothing I am going to make.
For example I might do a gown for a base female character so I name it BFNC_Gown_Mirrored01.blender

That way I always know it is a non calibrated base female and it is my first sequence of creating the gown because it still has the mirror modifier
I usually start with a simple mesh for 01 and  then each time I increase the detail I save it with the next number.
That way if I do something wrong I can easily go back to the previous version.
Also if any of these versions are a good starting point for something new that I want to make I can just reload whichever version and resave it.

I originally started doing this when I was weight painting the clothes in blender because a few times after I tested the flowing in iClone I saw a problem and went back to Blender and modified the weight painting or the meshing according to what I thought might fix it. Problem was my thoughts sometimes made the problem worse or completely ruined what I had done.
Now by always doing changes on a new version number I can easily go back to what I had before I made the change.


i7-3770 3.4GHz CPU 16 GB Ram   
GeForce GTX1080 TI 11GB
Windows 10 Pro 64bit
Edited
5 Years Ago by Delerna
Delerna
Delerna
Posted 7 Years Ago
View Quick Profile
Distinguished Member

Distinguished Member (8.2K reputation)Distinguished Member (8.2K reputation)Distinguished Member (8.2K reputation)Distinguished Member (8.2K reputation)Distinguished Member (8.2K reputation)Distinguished Member (8.2K reputation)Distinguished Member (8.2K reputation)Distinguished Member (8.2K reputation)Distinguished Member (8.2K reputation)

Group: Forum Members
Last Active: 2 Years Ago
Posts: 1.5K, Visits: 14.8K

MODELLING THE CLOTHING FOR EFFECTIVE CLOTH FLOW
For me the most difficult part of creating clothes that flow is getting the clothes to move with the body correctly and preventing cloth penetration through the body and through itself.
Also I need to decide what parts of the cloth should flow and what parts don't need to. And I find that depends greatly on the type of clothing I am attempting to make
So when I start creating my clothing that is what I focus on most of all. I stay clear of adding any mesh detail. I give no consideration to how I am going to texture the clothes.
Those things are much easier than getting the cloth flow working. So I get cloth flowing reasonably before I add those things

So first of all, I select the bones and press the H key to hide them (alt/H will unhide them) 
Then I create my cloth mesh so that it has the basic shape of what I want to make but I keep the mesh as simple as possible.

That way I can easily weight paint the vertices and then send the character and clothes to iClone so I can see how the cloth flow is going to work.
Having all the detail in my mesh just makes that more complicated.
Most likely I will do what I think will work but find that the mesh shape isn't quite right or the weight painting doesn't do what I thought.
Having the cloth with full detail makes modifying the mesh and or the weight painting frustrating for me.

So I start testing the cloth flow with the cloth mesh as simple as possible.
This image shows my outfit created and then I set the draw type to Wire so I can see the body through the cloth
Then I tick the wire and Draw all edges options to ensure I can see all of my mesh.

Why?
One way to prevent cloth penetrating the body is to have plenty of space between the body and the cloth.
However I also like my clothing to look as realistic as possible and in my opinion that requires the cloth to be as close to the body as possible
With this setup I can easily see the space between the body and cloth.
I can send the character to iClone and check to see which parts of the mesh need to be moved further away.
I already have the mesh as close to the body as I think it needs to be so it is always needed to be pulled away from the body in certain places.

Having the mesh as simple as possible makes these adjustments easier for me.
Finally, My first send to iClone for testing the cloth flow is with how Blender weight maps the cloth with the Transfer Weights option.
For most of the clothing this is good enough and testing it in iClone lets me see what I need to modify manually and what I can leave as how Blender painted it


https://forum.reallusion.com/uploads/images/20c0c5f8-fbb8-4692-88aa-d40b.png


i7-3770 3.4GHz CPU 16 GB Ram   
GeForce GTX1080 TI 11GB
Windows 10 Pro 64bit
Edited
7 Years Ago by Delerna
Delerna
Delerna
Posted 7 Years Ago
View Quick Profile
Distinguished Member

Distinguished Member (8.2K reputation)Distinguished Member (8.2K reputation)Distinguished Member (8.2K reputation)Distinguished Member (8.2K reputation)Distinguished Member (8.2K reputation)Distinguished Member (8.2K reputation)Distinguished Member (8.2K reputation)Distinguished Member (8.2K reputation)Distinguished Member (8.2K reputation)

Group: Forum Members
Last Active: 2 Years Ago
Posts: 1.5K, Visits: 14.8K

PREPARING THE CLOTHES FOR RIGGING IN BLENDER

TRANSFER THE CHARACTERS SKIN BONE RIGGING SETTINGS TO THE CLOTHING
https://forum.reallusion.com/uploads/images/bc370258-bed2-4253-bacc-cbce.png


At the top of the picture above are 2 images.
The one at the left illustrates the setup for rigging the clothing before performing the steps in the 2 images at the bottom. ie, there is no weight painting setup on the clothing yet
The one at the right illustrates the setup for  rigging the clothing after performing the steps in the 2 images at the bottom. ie Now the clothing is setup with weight painting from the characters skin.

At the bottom of the picture above are 2 images
The one at the left illustrates the steps to attach the clothing to the armature so you can get vertice groups on the clothing based off the armatures bones
The one at the right illustrates the steps to copy the weight painting from the characters skin to the  clothing. It copies the values to the clothes vertices from the skins vertices that are closest to it

REMOVE THE UNUSEABLE AND UNUSED VERTICE GROUPS AND SORT THEM INTO A MEANINGFUL ORDER
https://forum.reallusion.com/uploads/images/1d1fa8d4-6cef-4552-a214-8039.png

The image above illustrates, as far as I am aware anyway, all the vertice groups that can be used for weight painting the clothes.
Any vertice group not in this list cant be used for weight painting the clothing. If you use any not in this list then CC will most likely crash when you import the FBX character back into CC.
That statement is not completely true. There are vertice groups from the feet, toes, hands, fingers and head that can be used. But this is body clothing so I have ignored those.

I also sort the vertice groups in a way that helps me find the group that I want to manually manipulate the weight mapping for.
For me I put the forearms at the top, followed by the elbows, upper arms and work my way to the neck. Then I continue from the top of the body down to the calfs

Final point, this clothing has nothing on the forearms or the elbows so I will end up removing those vertice groups also

CREATE THE CLOTHINGS UV MAP
https://forum.reallusion.com/uploads/images/f7efd3f7-ee2b-410f-b20b-758b.png


As stated earlier, I don't worry about texturing at this stage because I am focused on making sure this clothing is going to flow. However you must have a UV map otherwise CC will fail to import the FBX file I export from Blender. However I also have a use for the UV map to assist me when I start manually manipulating the weight painting. One difficulty I find with weight painting is preventing myself from accidentally painting some vertices that I didn't mean to. I use the UV map so I can select the parts of the clothing I want to weight map. That prevents the pars of the clothing that are not selected from having the weight mapping accidentally changed while I pain what I have selected. There are other ways of doing this but this is the one I find easiest for now. I will describe how I do that when I get to the weight painting topic. The point of me saying this now is that any UV mapping I do at this stage is not meant for texturing the clothing. It is totally intended to help me with mesh adjustments and weight mapping. When I finish the clothing I throw the UV mapping I create now and redo it completely for the purpose of finalising the clothings texturing.
Hopefully this will make more sense when I describe and explain what I am doing in the weight painting topic. Yes, I consider weight painting and manipulating the mesh to improve cloth flow as the same topic. So the weight painting topic will include weight painting as well as meshing manipulation ideas I get

EXPORT THE CHARACTER AND CLOTHING READY FOR ICLONE
https://forum.reallusion.com/uploads/images/1b7eecb2-4470-4abe-bd79-7272.png

Not sure the image requires any extra comments. Some key points perhaps.
If you hid the bones so they aren't in the way while you modelled make sure you unhide them before exporting or CC will fail to load it .Ensure your in object mode and press alt/h to unhide everything.
When you get to step 3 and 4 make sure selected objects is checked and add leaf bones is unchecked or you will get lots of red warning messages when you import it into CC


i7-3770 3.4GHz CPU 16 GB Ram   
GeForce GTX1080 TI 11GB
Windows 10 Pro 64bit
Edited
7 Years Ago by Delerna
Delerna
Delerna
Posted 7 Years Ago
View Quick Profile
Distinguished Member

Distinguished Member (8.2K reputation)Distinguished Member (8.2K reputation)Distinguished Member (8.2K reputation)Distinguished Member (8.2K reputation)Distinguished Member (8.2K reputation)Distinguished Member (8.2K reputation)Distinguished Member (8.2K reputation)Distinguished Member (8.2K reputation)Distinguished Member (8.2K reputation)

Group: Forum Members
Last Active: 2 Years Ago
Posts: 1.5K, Visits: 14.8K

TESTING THE CLOTH FLOW IN ICLONE

IMPORT THE FBX FILE INTO CC
https://forum.reallusion.com/uploads/images/33044459-8d9e-4994-a33d-0b52.png

Again, not much to say here. In step 4. That is where any errors and warnings will get displayed. The most common one for me is I exported the FBX file from blender and forgot to check and uncheck those 2 options.  I do that all the time.....rolling my eyesWow

ADD A DIFFUSE TEXTURE
https://forum.reallusion.com/uploads/images/d504dd5c-b684-4ee4-9635-e77f.png

Next I enable and then disable the appearance editor. Then I send the UV map image to my 2D editor (I use Krita it is free and fantastic) and save it so I can use it as my diffuse map.

WHY.
I find that when I send the character to iClone to test the cloth flow, having the UV map visible on the outfit helps me to identify which parts of the mesh is not working well and which parts are working fine

CREATE THE CLOTH FLOW WEIGHT MAP
https://forum.reallusion.com/uploads/images/5f7195ba-5858-4ce7-b05e-f5a9.png

ADD THE WEIGHT MAP TO THE CLOTHING
https://forum.reallusion.com/uploads/images/ccee9713-6c71-4402-a60a-37bb.png


TEST CLOTH ANIMATION WITH CLOTHFLOW PHYSICS
send the character from CC to iClone. Import a persona into the character(I like Heidi persona). Goto frame 20 and then add some of Heidies performs
I like the catwalk and Dance Graceful. If clothflow works well with those then I believe I have pretty much any kind of animation covered for effective clothflow. Maybe add stand to sit and sit to stand.

Hey, that's not too bad. A few problems and the most obvious one is leg and bottom penetrations. These can be fixed by adjusting the collision shapes.
Also an opacity map on the characters body can help hide any minor penetrations after the collision shapes are adjusted as best as possible
However I also notice severe penetration at the ankles and the collision shapes wont fix that. I actually knew this was going to happen. I actually let it happen so I could demonstrate how to identify the cause and how to fix it.  I will cover that in the next post
Also the mesh between the legs stretches a bit. Another one to cover in the next thread.
Another issue I see is the sleeves


OK lets now
TEST CLOTH ANIMATION WITHOUT CLOTHFLOW

Oh my that looks horrible. It really highlights the issues seen with cloth flow enabled.

And there is a major point in my opinion. Cloth flow hides a lot of issues and mistakes with how the clothing has been weight painted.
If you are always going to use cloth flow on your clothes then good weight painting may not be so necessary as when you animate the clothes without physics


i7-3770 3.4GHz CPU 16 GB Ram   
GeForce GTX1080 TI 11GB
Windows 10 Pro 64bit
Edited
7 Years Ago by Delerna
Delerna
Delerna
Posted 7 Years Ago
View Quick Profile
Distinguished Member

Distinguished Member (8.2K reputation)Distinguished Member (8.2K reputation)Distinguished Member (8.2K reputation)Distinguished Member (8.2K reputation)Distinguished Member (8.2K reputation)Distinguished Member (8.2K reputation)Distinguished Member (8.2K reputation)Distinguished Member (8.2K reputation)Distinguished Member (8.2K reputation)

Group: Forum Members
Last Active: 2 Years Ago
Posts: 1.5K, Visits: 14.8K

WEIGHT PAINTING THE CLOTHES

https://forum.reallusion.com/uploads/images/013c2676-ec48-4fb8-80d7-bac7.png

OK, ignoring the issue that collision shapes should fix for now, I will now take a look at the 2 major ones. The vertices between the legs and the vertices at the ankles.
Go back to Blender and check

out the weight mapping.

INVESTIGATE THE VERTEX WEIGHT PAINTING
https://forum.reallusion.com/uploads/images/a63097b4-12c4-49cb-b753-f05c.png

Aha now I see the problem
1) The vertices at the bottom just above the feet have no weight painting at all. How come?   Ohhhhhh when I deleted the vertice groups that I cant use for weight painting or don't need for this clothing......I deleted the feet. Those vertices were painted on the foot vertice groups. So deleting them also deleted the weight painting on those vertices and now those vertices have zero weight painting. That should tell us a primary hint for the future. Whenever we animate or clothes and there are vertices that do not move with the character then the most likely cause is those vertices have zero weight painting relating to the characters bones and that is why they ignore the characters movement.

2) There is a sharp weight painting edge between the legs and that is why the shirt motion between the legs is not smooth.


 I will look into fixing both of those now, send it back to iClone and test if the fixes I made actually do what I expect.

SEPARATE UVMAP INTO SELECTABLE GROUPS

https://forum.reallusion.com/uploads/images/cbedafc8-ed45-4271-8fd4-bfe5.png

Under normal circumstances I probably would not do this step for this clothing. I am doing it now to demonstrate a method I use to help me weight paint something more complex than this. For example when I have multiple layers on the clothing and I want to paint the layer that is underneath another I can select the part of the cloth that is in the way and hide it.  I also find this helpful when I am moving vertices to adjust the shape of the clothing. Select and hide the part that is in the way. I do this with multi layered clothing because I make all the layers in the same object so that I can use iclones self collision physics to assist in preventing one layer from penetrating another during animation. This will make more sense I hope when I get to that topic. Another benefit behind doing this that I find is remembering which vertices I decided to paint to a selected vertice group (my memory is getting bad)

Here is an image that illustrates the basics of how I control myself while weight painting
https://forum.reallusion.com/uploads/images/0b245f5f-0637-45f8-a7ec-d3f8.png

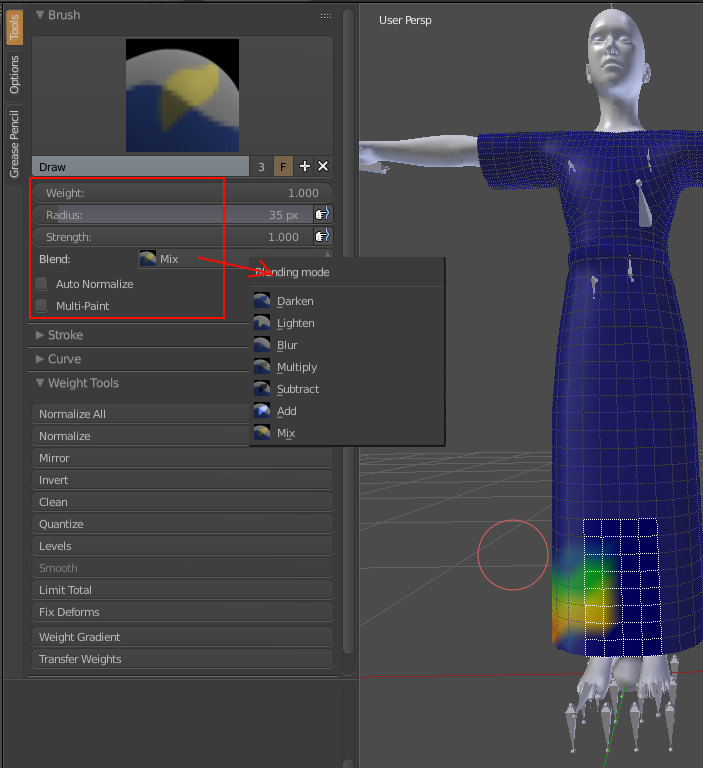
And here are the weight painting tools
https://forum.reallusion.com/uploads/images/b6e3ec53-05cc-411c-80dc-b9ce.png


There are plenty of tutorials  on uTube for this but I will explain the basics according to my workflow
WEIGHT:- This controls how much the vertice is effected by the bone that the vertice group belongs to.
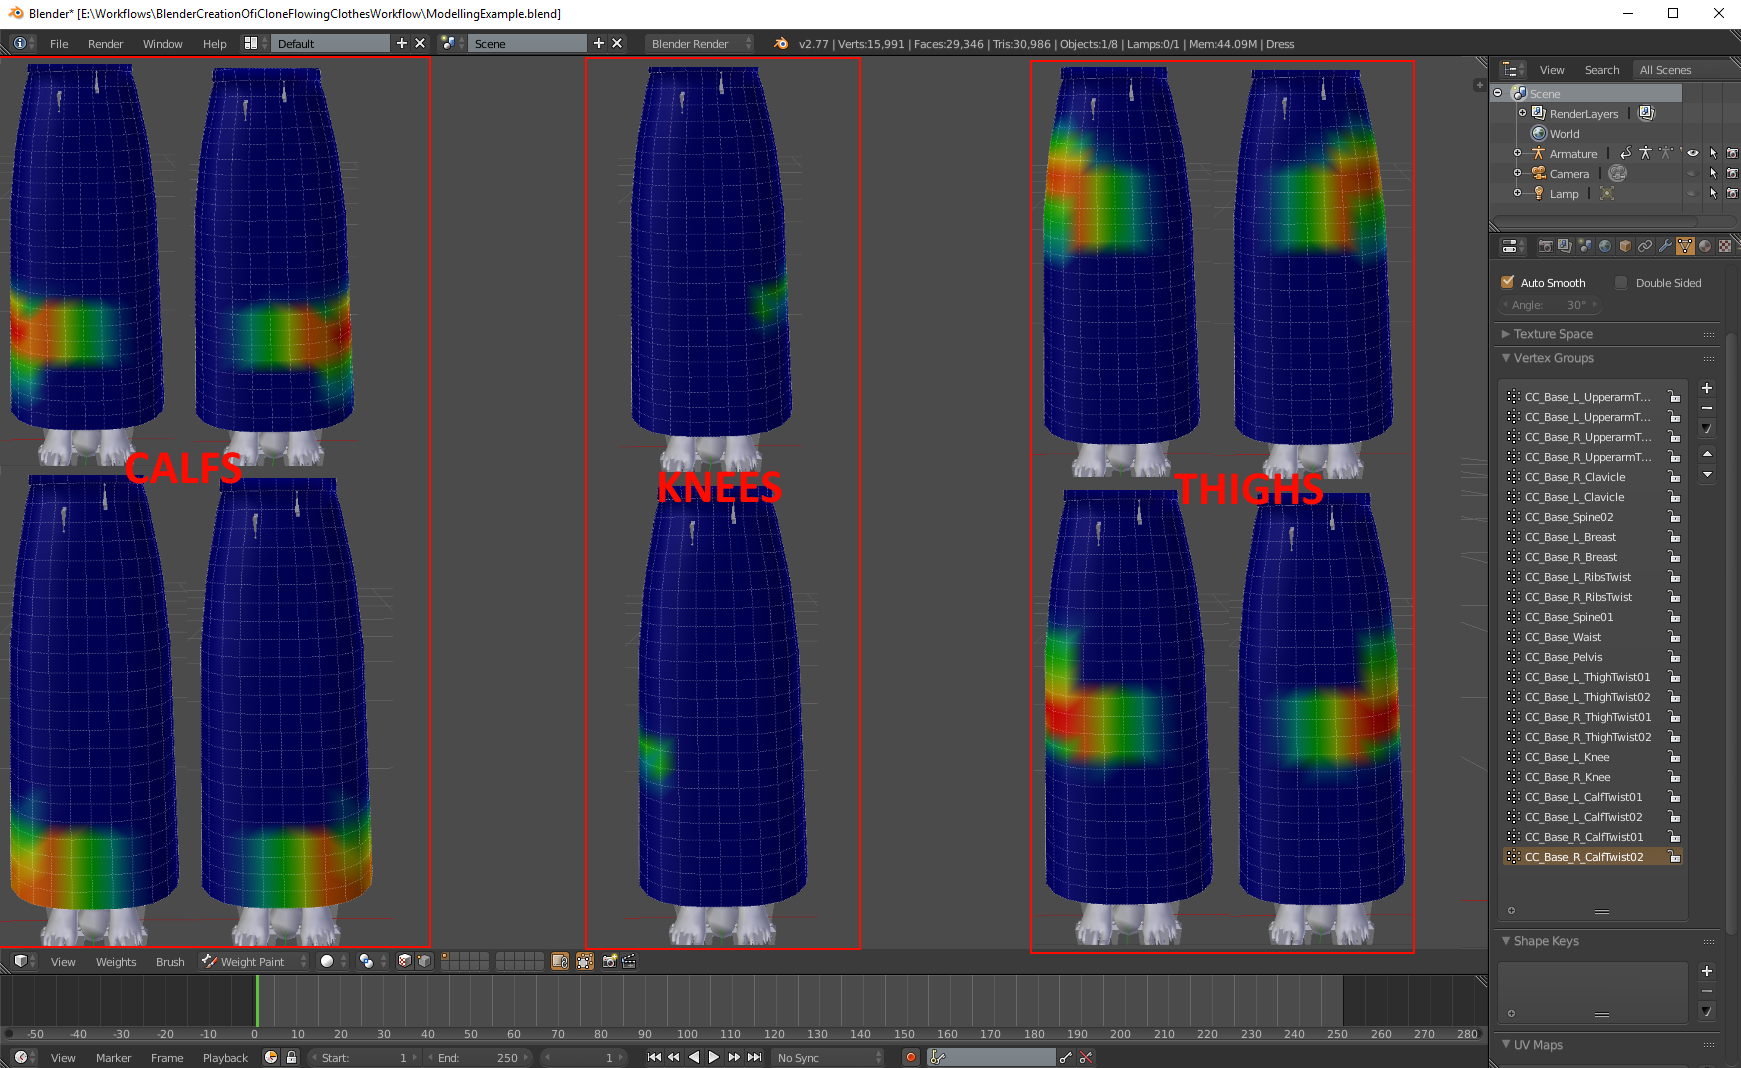
                  0 (blue) means the bone wont effect that vertice movement at all 
                  0.25 (light blue) means the vertice movement is 25% effected by that bone
                  0.5 (green) means the vertice movement is 50% effected by that bone 
                  0.75 (yellow) means the vertice movement is 75% effected by that bone 
                  1 (red) means the vertice movement is 100% effected by that bone
                  and of course you can set the weight to any value between 0 and 1

RADIUS:- This controls the size of the paint brush. You can also control it with
                 [ key to make it smaller            ] key to make it larger

STRENGTH: This controls how close to the weight value you set the vertice will be set to each time you click it
                so if set to weight=1 and strength=1 then the vertice will go red as soon as you click on it
                                 weight=1 and strength=0.5 then the vertice will go green when you click it and then red if you click it again
BLEND:- This controls the type of painting the brush performs I mostly use Mix but occasionally I use subtract and add
             assuming strength=1
              MIX : the vertices weight value will be set to the value in WEIGHT when you click it
             ADD: the vertices weight value will be incremented by the value in WEIGHT when you click it
             SUBTRACT: yes similar to add but in reverse.

And here is my first attempt at fixing the weight mapping.
NOTE: As a web applications developer I tend to do small changes and then test the change because If I do a lot of changes and when I test it, it gets broken then determining what broke it takes a lot of searching.
I do the same with this. Make a small change and test it, make the next change and test it etc etc until I am satisfied that theproduct is finalized
https://forum.reallusion.com/uploads/images/6f316e5f-dce6-4401-93c3-b069.png

Ok so lets go and check how its working now


This time I sent the character with clothing to iClone  twice
Once for animation with clothflow and once for animation without clothflow
This helps me to see and determine possible fixes. This is starting to look better but still there are some problems
1) I think the dress is a bit too tight at the bottom which is causing some stronger penetration when the characters legs spread apart widely
    So I will increase its size a bit.
2) I also looked at the gown sideways in blender and the skirt is pretty flat at its front and a bit too close to the legs
    so I will round it up a bit and increase the distance a bit between the legs and the dress. 
    That should also fix the cloth penetration at the front of the legs a bit
https://forum.reallusion.com/uploads/images/04b7891c-c496-4b8d-860d-b533.png

3) On the one without cloth flow there is a bit of stretching happening at the knees like it was between the legs in the first test.
    However at this stage it looks OK with the cloth flow so I might not worry about that. Not sure yet.

I think I have pretty much shown my complete workflow for getting cloth flow working so I think I will end this topic here unless anyone has any questions that I think will be useful to answer here.
Another point is I don't try to get the cloth flow working absolutely perfect at this stage. Just get it basically working. Because I will add detail later which will require more adjustments so I don't do the finalized weight painting until I know I have finished the modelling

Oh By the way.
I generally keep my character and animations in iclone open all the time. Save it as a project so I can reload it another day.
Also if I modify the collision shapes on the character in iClone then I send the character back to CC remove the outfit and save the character.
That way when I bring a modified outfit into CC I can save the outfit, load the character with the modified collision shapes. Load my outfit onto that character
Then I can make sure the character is selected in iClone and then send the new character and clothing to from CC to iClone. That will replace the character in iClone but keep the animation.
Just speeds up the process of testing. Yes I often export from blender and import to CC for testing many times an hour when trying to get the cloth flow working


I want to show next how I get multi layers working and I will use this outfit to show that by extruding an apron from the belt
So I will make the adjustments in 1 and 2 above and test them.
Then I will add the apron and come back into the next topic of cloth flowing multi layers
The workflow here is pretty much the same as what I have covered, I just have some suggestions so the rest of what I post will not be workflows.
Rather they will be demonstrations of issues and suggestions for fixing them


i7-3770 3.4GHz CPU 16 GB Ram   
GeForce GTX1080 TI 11GB
Windows 10 Pro 64bit
Edited
7 Years Ago by Delerna
Delerna
Delerna
Posted 7 Years Ago
View Quick Profile
Distinguished Member

Distinguished Member (8.2K reputation)Distinguished Member (8.2K reputation)Distinguished Member (8.2K reputation)Distinguished Member (8.2K reputation)Distinguished Member (8.2K reputation)Distinguished Member (8.2K reputation)Distinguished Member (8.2K reputation)Distinguished Member (8.2K reputation)Distinguished Member (8.2K reputation)

Group: Forum Members
Last Active: 2 Years Ago
Posts: 1.5K, Visits: 14.8K

CREATING MULTI LAYERED FLOWING CLOTHES

Ok, now we are really getting into the experiment stage. First and foremost I want to say that these are only things I have tried that worked for what I was making. Definitely not saying this is the way it must be done its just things I have tried that worked for me and what I was making. If anyone has better ideas I for one would love to hear them.
I was going to add an apron to the dress I made above but with iClone 7 and making things for my store I just had trouble finding the time to do it. So I am going to demonstrate my process with some of the items from my store. Images at the bottom to show what I say now.  I really want to stress.....this is my (non professional) way of doing this. These are just some suggestions for you to consider.

My first multi layer outfit was my Egyptian Old Kingdom Guard
The Edit mesh image on the left shows how I modeled it first up and the image in the center shows how the second layer was penetrating the first layer.
It is all the same object so I could use self collision to stop the penetration but it just didn't completely work.
So, the edit mesh image to the right shows that by pulling the second layer further away from the under layer that was enough to prevent the penetration.
I did it a few times and tested it. Pull it out a bit and test. Nope still penetrated. Pull it out a bit more and test repeatedly until finally, yay it doesn't penetrate now.

My next multi layer outfit was my Fransiscan Monk
The rope parts hanging down from the waist penetrated the frock no matter how far I pulled them away from it. Well without pulling them out to an unreasonable distance anyway.
I figured that it was because they are a lot narrower than the piece on the Egyptian outfit.
So I joined the 2 ropes together so they were similar to the Egyptians and used transparence on the textures in CC to hide them. That worked. The 2 ropes even still flowed individually enough

Later I made my Catholic Pope Outfit

I can till you this one was very difficult to get working. No matter what I did the strap on the belt penetrated the frock.
The only thing I could think that was causing it was that the strap was not as close to the center as the others.
So eventually I thought. OK if it insists on penetrating then why bother fighting it.
Connect another part to it and make it transparent. That part will penetrate the frock but you wont see that penetration because it is invisible. That part will then hit the legs collision shape and stop the part that is visible from going any closer to the frock. And wow, that worked.

SUMMARY
Ok, from all of that there is one primary observation in my opinion. There is no single method that will work for everything. The method you use, I believe, will depend totally on the style of outfit you are making. Just because something works for outfit 1 doesn't necessarily mean its going to work for outfit 2. I think anyone who gets into creating flowing clothes is in for a shock. It aint easy...at least, I find it aint easy LOL.  But I also find it incredibly satisfying when I finally get it to work.

By the way. I keep saying that I am not a professional.  By that I don't mean I cant make good stuff. What I mean is that I have not been taught to do this stuff professionally. For the most part I have taught myself all of this  through trial and error and persistence. It has taken me many years to get here. Also I am not totally self taught. There has been much help through tips and suggestions from many helpful people on this forum. And there lies the primary reason why I am doing this. If anything I write here is helpful to anyone then great.

Finally, I believe if you want to get into doing this stuff then don't worry that you don't know the best of everything. Just go with the knowledge you have and do the best you can. You will learn as you progress. I can guarantee it.  I am a programmer and in programming I don't believe there is a best way to do anything. If it does what is intended and it performs well enough for the users to be satisfied then that is main thing that matters. I think the same is true here. Obviously we want to do it the best way possible and so we should. But I don't think that is so critical. Get it to do what is intended and get it to perform well enough. That's the primary thing in my book


https://forum.reallusion.com/uploads/images/32e963a4-e123-43a9-ba9d-bd08.png

https://forum.reallusion.com/uploads/images/7f9653e8-b00d-4721-bbcb-4260.png

https://forum.reallusion.com/uploads/images/3ddeaa6e-33a7-421d-b559-0c5d.png


i7-3770 3.4GHz CPU 16 GB Ram   
GeForce GTX1080 TI 11GB
Windows 10 Pro 64bit
Edited
7 Years Ago by Delerna
Delerna
Delerna
Posted 7 Years Ago
View Quick Profile
Distinguished Member

Distinguished Member (8.2K reputation)Distinguished Member (8.2K reputation)Distinguished Member (8.2K reputation)Distinguished Member (8.2K reputation)Distinguished Member (8.2K reputation)Distinguished Member (8.2K reputation)Distinguished Member (8.2K reputation)Distinguished Member (8.2K reputation)Distinguished Member (8.2K reputation)

Group: Forum Members
Last Active: 2 Years Ago
Posts: 1.5K, Visits: 14.8K

WEIGH MAPPING THE CLOTHES FOR PHYSICS FLOWING CLOTHS

This is the tough one. Making multi-layered clothes that flow without cloth penetration is lots of fun

I have added this post as a place to add what I present later on


i7-3770 3.4GHz CPU 16 GB Ram   
GeForce GTX1080 TI 11GB
Windows 10 Pro 64bit
Edited
7 Years Ago by Delerna
Delerna
Delerna
Posted 7 Years Ago
View Quick Profile
Distinguished Member

Distinguished Member (8.2K reputation)Distinguished Member (8.2K reputation)Distinguished Member (8.2K reputation)Distinguished Member (8.2K reputation)Distinguished Member (8.2K reputation)Distinguished Member (8.2K reputation)Distinguished Member (8.2K reputation)Distinguished Member (8.2K reputation)Distinguished Member (8.2K reputation)

Group: Forum Members
Last Active: 2 Years Ago
Posts: 1.5K, Visits: 14.8K

PREVENTING CLOTH PENETRATION

Yes this is probably the most difficult, time consuming and frustrating part of making your own clothes. At least it is in my book. I am showing how I do this but whether this is the best way or not is definitely unknown to me. This is a high learning process for me too. So these are just suggestions according to my theories, observations and experiments. I would definitely love to see suggestions and corrections for what I say here. It is really just theories I have.

STEP 1: ADJUST THE CHARACTERS COLLISION SHAPES TO SUIT THE CLOTHES
Hide the clothes so you will be able to see the collision shapes and enable you to see them all as you adjust them to fit the character as best as possible
https://forum.reallusion.com/uploads/images/7bcd589d-38e7-4faa-ba2c-8ffc.jpg


Here are some suggestions I use to adjust the collision shapes. I almost always use capsule shapes because they curve to the body best. Although I wish they had more capabilities so they can be made to fit the body better. For example, I wish I could scale the top separately to the bottom. Legs are thick near the hip and thin near the knee but you cant scale any of the collision shapes to fit that shape. So I tend to use 2 collision shapes on the thigh so I can get them to fit the thigh better. But its still not ideal as far as I am concerned. Come on reallusion, please do something to improve this.
https://forum.reallusion.com/uploads/images/5e278a3e-b5ea-48bb-803c-4b3b.jpg


STEP 2 ADJUST THE CLOTHES AND THE SHAPES SO THEY DONT PENETRATE THE CLOTHES MUCH
I'm not 100% sure my theories are correct here but I think if the collision shapes are not underneath the clothes then instead of pushing the clothes away from the body they push the clothes into the body and cause severe cloth penetration. I say I am not sure about it because you can see in the image the chest collision shapes penetrate the clothing but they still push the clothes away from the body. But I have noticed that under certain circumstances what I am saying happens and if I re-model the clothing to pull the cloth further away from the body so the collision shape is under the cloth then that effect disappears. So it seems correct to me.
https://forum.reallusion.com/uploads/images/66ed12cb-351d-43a1-990a-d983.jpg


STEP 3 ADJUST THE CLOTHES PHYSICS EFFECTS

This is what I work on after I get the collision shapes fitting everything as best as I can. I will think about suggestions and add them as I find any that makes sence. But all I can say for now is play with the settings one at a time, do some animations so you can see what it does.
https://forum.reallusion.com/uploads/images/b2107ded-5058-4bc2-ab50-db33.jpg


STEP 4 :- USE OPACITY MAPES TO HIDE PENETRATIONS THAT YOU CAN'T FIX

Yep I often cant get rid of all penetrations so this is the final thing I do to get rid of the penetrations that are remaining after I cant think what else to do.
And yes, If you check some reallusion tutorials you will see that even they recommend this solution.

https://forum.reallusion.com/uploads/images/adc0fd53-1951-437f-9510-9943.jpg


A FINAL POINT
https://forum.reallusion.com/uploads/images/d5381c3a-5d53-4455-8b47-456c.jpg


i7-3770 3.4GHz CPU 16 GB Ram   
GeForce GTX1080 TI 11GB
Windows 10 Pro 64bit
Edited
6 Years Ago by Delerna
Delerna
Delerna
Posted 7 Years Ago
View Quick Profile
Distinguished Member

Distinguished Member (8.2K reputation)Distinguished Member (8.2K reputation)Distinguished Member (8.2K reputation)Distinguished Member (8.2K reputation)Distinguished Member (8.2K reputation)Distinguished Member (8.2K reputation)Distinguished Member (8.2K reputation)Distinguished Member (8.2K reputation)Distinguished Member (8.2K reputation)

Group: Forum Members
Last Active: 2 Years Ago
Posts: 1.5K, Visits: 14.8K

I have added this post as a place to add what I present later on


i7-3770 3.4GHz CPU 16 GB Ram   
GeForce GTX1080 TI 11GB
Windows 10 Pro 64bit
Edited
7 Years Ago by Delerna


Reading This Topic