Profile Picture

Material Resizing

Posted By dereklin130 8 Years Ago
You don't have permission to rate!
Author
Message
dereklin130
dereklin130
Posted 8 Years Ago
View Quick Profile
Senior Member

Senior Member (413 reputation)Senior Member (413 reputation)Senior Member (413 reputation)Senior Member (413 reputation)Senior Member (413 reputation)Senior Member (413 reputation)Senior Member (413 reputation)Senior Member (413 reputation)Senior Member (413 reputation)

Group: Forum Members
Last Active: 8 Years Ago
Posts: 4, Visits: 45
I am having hard time finding out how to resize the material. Let's say I got an image of a sign board like this and i would like to use it on my material.  

Not sure why but how can I resize it so that it can fit properly along side the cylinder? 

Image result for signboard do not cross

So far, my material is something like this as shown: 

https://forum.reallusion.com/uploads/images/9f0f6f10-e8be-4741-9b7c-75d9.png


any advice on resizing the material?

RobertoColombo
RobertoColombo
Posted 8 Years Ago
View Quick Profile
Distinguished Member

Distinguished Member (10.2K reputation)Distinguished Member (10.2K reputation)Distinguished Member (10.2K reputation)Distinguished Member (10.2K reputation)Distinguished Member (10.2K reputation)Distinguished Member (10.2K reputation)Distinguished Member (10.2K reputation)Distinguished Member (10.2K reputation)Distinguished Member (10.2K reputation)

Group: Forum Members
Last Active: 3 Years Ago
Posts: 1.6K, Visits: 3.0K
Hi,

perhaps other ppl have better solutions, but what i would do is to extract the UV image (there is a button in the material panel to do this) and then plug your image over it using a photo editor.

Cheers

  Roberto


My PC:
OS: Windows 10 Pro English 64-bit / CPU: Intel i7-9700 3.6GHz / MB: ASUS ROG Strix Z390  RAM: 32GB DDR4 2.6GHz / HD: 2TB+3TB  /  
SSD: 2x512GB Samsung 860 EVO + 1x2TB Samsung
VB: Palit GTX2080 TI GamingPro 11GB / AB: embedded in the MB and VB (audio from the MOTU M4 I/F) / DirectX: 12

Kevin.S
Kevin.S
Posted 8 Years Ago
View Quick Profile
Distinguished Member

Distinguished Member (10.4K reputation)Distinguished Member (10.4K reputation)Distinguished Member (10.4K reputation)Distinguished Member (10.4K reputation)Distinguished Member (10.4K reputation)Distinguished Member (10.4K reputation)Distinguished Member (10.4K reputation)Distinguished Member (10.4K reputation)Distinguished Member (10.4K reputation)

Group: Forum Members
Last Active: Last Year
Posts: 1.2K, Visits: 71.8K
you can adjust tiling size

https://forum.reallusion.com/uploads/images/e7eeb68f-5d59-4046-ae10-979.jpeg


Freelance Artist Kevin.S


https://forum.reallusion.com/uploads/images/57cedd8e-58c4-42ce-b2f4-9646.png https://forum.reallusion.com/uploads/images/5a59e070-66a0-4914-b0a5-b2dc.png 

Email: animatemyart@gmail.com - Web Site:  www.animatemyart.com
dereklin130
dereklin130
Posted 8 Years Ago
View Quick Profile
Senior Member

Senior Member (413 reputation)Senior Member (413 reputation)Senior Member (413 reputation)Senior Member (413 reputation)Senior Member (413 reputation)Senior Member (413 reputation)Senior Member (413 reputation)Senior Member (413 reputation)Senior Member (413 reputation)

Group: Forum Members
Last Active: 8 Years Ago
Posts: 4, Visits: 45
I tried adjusting the tiling size but somehow it only reduce horizontally but not vertically.

and thank for the advice kevin.S and RobertoColombo BigGrin
Rampa
Rampa
Posted 8 Years Ago
View Quick Profile
Distinguished Member

Distinguished Member (35.8K reputation)Distinguished Member (35.8K reputation)Distinguished Member (35.8K reputation)Distinguished Member (35.8K reputation)Distinguished Member (35.8K reputation)Distinguished Member (35.8K reputation)Distinguished Member (35.8K reputation)Distinguished Member (35.8K reputation)Distinguished Member (35.8K reputation)

Group: Forum Members
Last Active: 4 hours ago
Posts: 8.1K, Visits: 60.5K
Leave the tiling at 1 in both dimensions. Your issue is that the UV is different than what your expecting. If you look at the little square in the diffuse channel, you'll see a couple circles and a rectangle. That image matches the UV that is currently on the cylinder. So......Try this.

Double click the diffuse and load your traffic sign image. You'll probably see a corner of it mapped on the circular face of the clinder. It's fine.

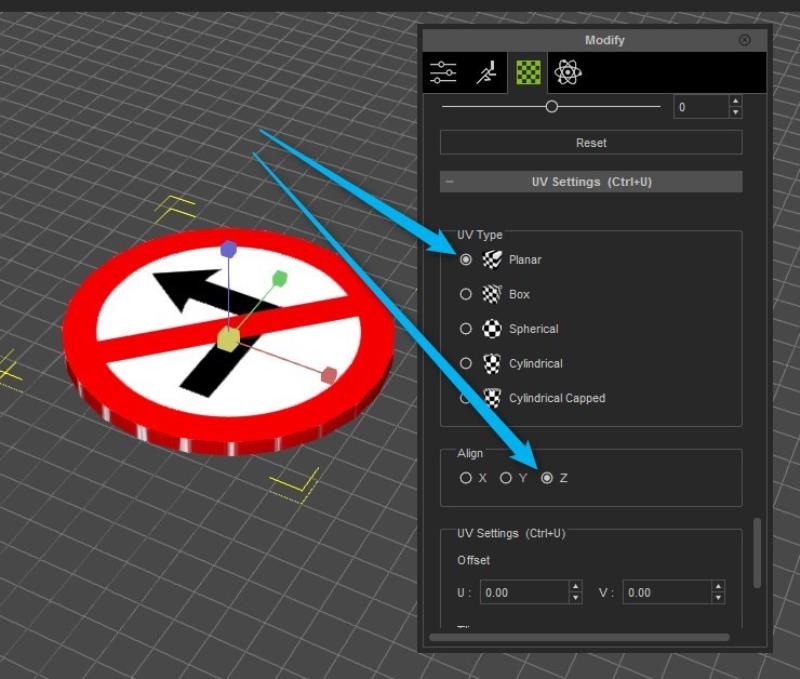
Scroll down to the bottom of the texture panel to the UV section.
Set the UV type to Planar, and the align to Z.

https://forum.reallusion.com/uploads/images/2735032f-0192-42a1-99b6-753a.jpg

Cricky
Cricky
Posted 8 Years Ago
View Quick Profile
Skype ID= learn.iclone

Skype ID= learn.iclone (13.4K reputation)Skype ID= learn.iclone (13.4K reputation)Skype ID= learn.iclone (13.4K reputation)Skype ID= learn.iclone (13.4K reputation)Skype ID= learn.iclone (13.4K reputation)Skype ID= learn.iclone (13.4K reputation)Skype ID= learn.iclone (13.4K reputation)Skype ID= learn.iclone (13.4K reputation)Skype ID= learn.iclone (13.4K reputation)

Group: Forum Members
Last Active: 2 Years Ago
Posts: 2.8K, Visits: 13.8K
Roberto Got it right .. use the image you have and then place it over the original diffuse for the cylinder and then use the UV as a Guide for where you want it placed.  

Each face of a default cylinder has a circle defining its area, and you can cover both with the same image for a front and back appearance.. one will point left and the other right depending on how you spin it.

https://forum.reallusion.com/uploads/images/53dfe955-1891-4b10-92b4-6b24.jpg


SKYPE ID: rc.650

http://city.reallusion.com/store/ModuleExpand.aspx?id=GS634545170497417354&mdid=18866

http://city.reallusion.com/ContentTag.aspx?tagname=Cricky&AuthorID=20081020688550191201#]Reallusion Store Content

" If I had Alzheimer's (Old Timers), would I know it? "


Reading This Topic