|
Author
|
Message
|
|
AdventDestiny
|
AdventDestiny
Posted 8 Years Ago
|
|
Group: Forum Members
Last Active: 4 Years Ago
Posts: 39,
Visits: 755
|
So I'm back, with some new insights and plans. I've had a chance to watch some of the videos I purchased from one Michael Pavlovich, and I have to say that they are worth the money, if you don't have the time to hunt down the information for free. You see, the whole series of over a hundred videos that make up his Creature Production series essentially walks you through the entire process of creating a game ready monster [which would probably translate to pretty much any other character, barring things like clothing]. The first part, which can be purchased separately for $20, goes through blocking out a shape, refining it into a high-poly mesh, and polypainting. Then we move to the second part [also $20], which focuses on retopology, baking the UV for export, then creation of the texture maps, and finally ending with rendering, all in all totally approximately 16 hours, plus two hours of bonus tutorials on model posing in ZBrush, if you buy the whole $40 package. Since I don't want to turn this topic into a discussion of tutorials, I'll quickly some it up by my experience of it so far, as I haven't watched it all; there are some videos in the second part of the series that may not be of use for some of you, as it goes into other programs like Maya and Substance Painter. Fortunately he usually provides alternative methods within ZBrush to work with texturing and retoplogy. Also, I feel that ultimately the only way to get anything out of this is to watch ALL the videos in order, otherwise you risk missing tips on ZBrush function that could prove very vital for a quick and efficient workflow. I think it's worth the money, especially if you're in a hurry to learn what you need to make a full and complete product, but it's still going to take time to get what you need from the series. Easily a 9 out of 10! Now, back to my work. Upon analyzing some of the videos, and attempting to use the techniques I watched on the Character Creator model, I discovered that it may not be possible to work the way I want with the pre-made model; basically, I don't have the control over it I need, which means I may have to create a new model from scratch. While it would be a time drain, it would give me far more control, and watching the Pavlovich series while working should speed the process up. I try and see if I can use ZRemesher to alter the topology of the CC model, maybe that would give me the control I need without having to start from scratch, but if that doesn't work then I'll begin making a new model. I'm also going to re-evaluate my mood board and reference, expand it to try and capture more details and personality in the appearance. I'm also got a set plan for how to animate the project. I'll start in ZBrush, then once done modeling I'll probably move it into Substance Painter and Designer for textures, then move it into Blender to rig it for animation, before finally taking it into Unreal Engine 4 for animation in Sequencer. Before I go, here are some new sketches for the Siren; the first is just another take on the jaw design, while the second is an early exploration into having her "hair fins" lift up when aggressive, a very obvious nod to the Spitter from the original Jurassic Park, which has sort of been an inspiration for the entire concept since the beginning! I'm also leaving a YouTube link that is a preview for the Creature Production video series, and from that page there's a link to Gumroad where you can purchase the series. Good night! 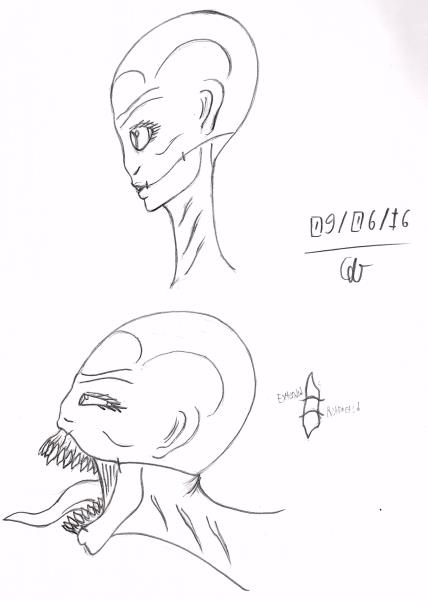 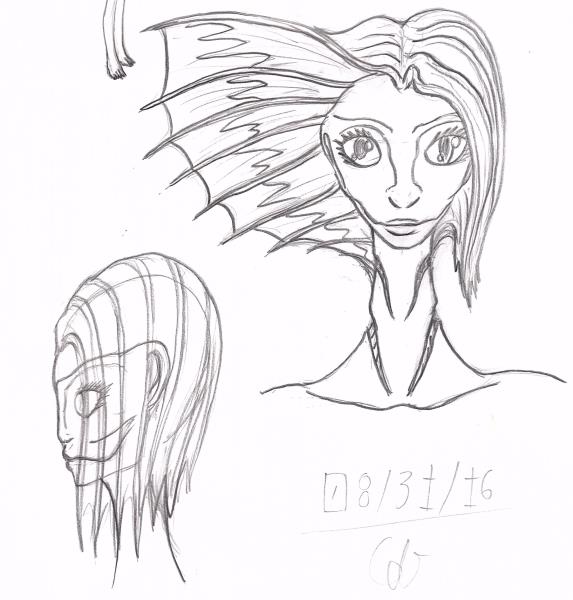
|
|
|
|
|
AdventDestiny
|
AdventDestiny
Posted 8 Years Ago
|
|
Group: Forum Members
Last Active: 4 Years Ago
Posts: 39,
Visits: 755
|
Fortunately I've begun work on the final [without a doubt this time!] model for the contest. I watched all the Blockout videos in the Michael Pavlovich series, which helped a lot in guiding me constructing a new sculpt from scratch. Obviously this is far from complete, but already I'm very happy about how this piece came together, it certainly was the quickest and easiest humanoid model I've created by hand so far! 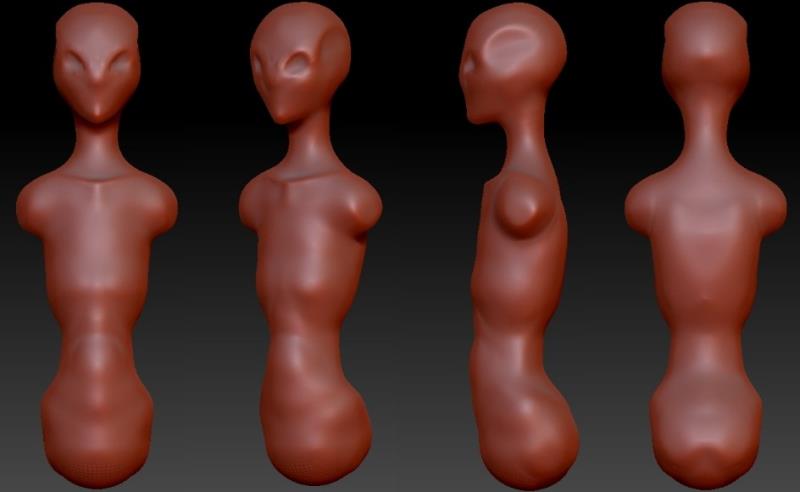 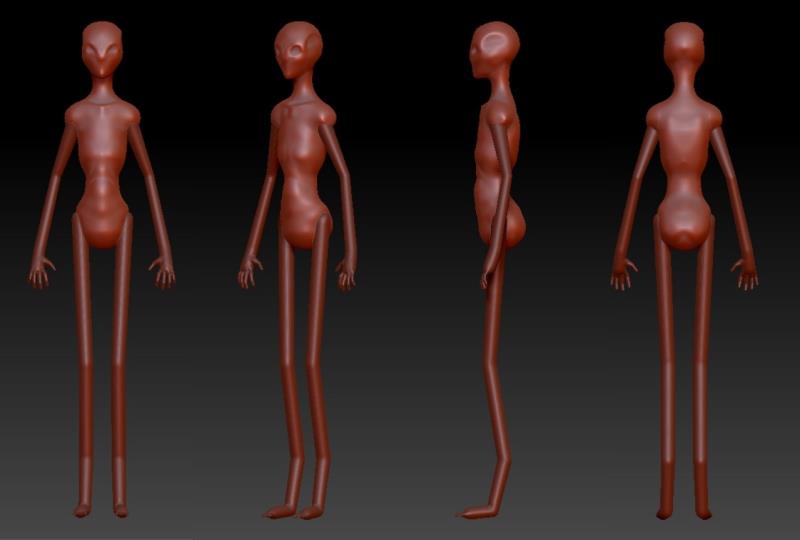 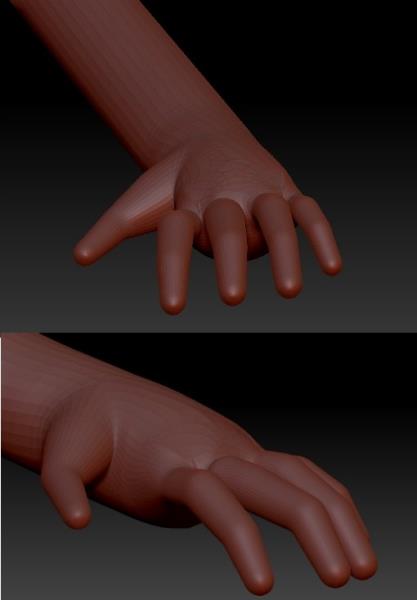 The torso began as a simple sphere, which I than began sculpting on while using Dynamesh. After creating the basic shape of the head and neck, I decided to try out a technique from the videos that demonstrated the use of the Insert Mesh, in this case I inserted several new spheres and a cylinder, and combined them to form the torso... I actually did more with that than Pavlovich did in his demonstration! With Dynamesh, it really is very easy to just take a couple of random models and fuse them into entirely new shapes! Then I inserted two ZSpheres, which I used to create the arms and legs by applying an Adaptive Skin to each set before deleting the ZSpheres and replacing them with the Adaptive Skins. The thing that I'm the most happy with is just how well the fingers turned out, I mean look at them! Probably the second or third time I've ever tried to make ZSphere fingers, and even with a low resolution they look like actual functional fingers! Hopefully I won't ruin them when I finalize the details of the sculpt. As for the toes, well they're not as impressive, but still they aren't half bad for a noob!
|
|
|
|
|
AdventDestiny
|
AdventDestiny
Posted 8 Years Ago
|
|
Group: Forum Members
Last Active: 4 Years Ago
Posts: 39,
Visits: 755
|
Sorry for the absence, been meaning to post more updates, but kept getting distracted. It really is an uphill battle, fighting against the part of yourself that doesn't want to move forward for whatever reasons, fear, a need to be perfect, etc. I've been refining the model, using another technique from the Pavlovich videos that let me fine tune the silhouette, which I referenced from an actress with a physical build very similar to the one I want for my character. 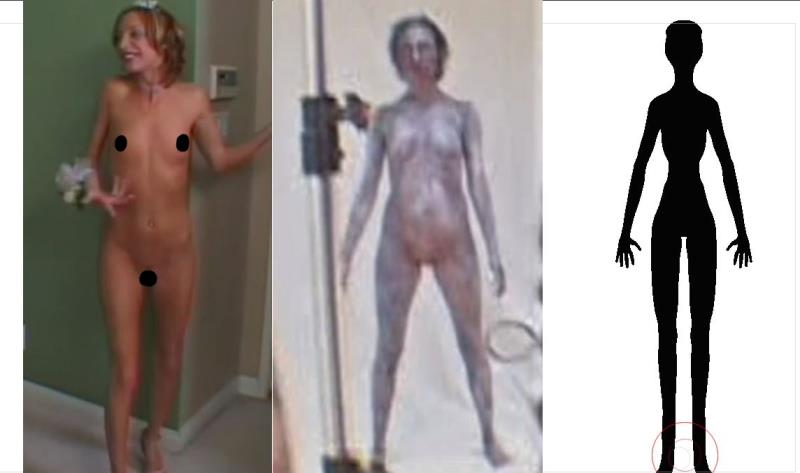 Before Before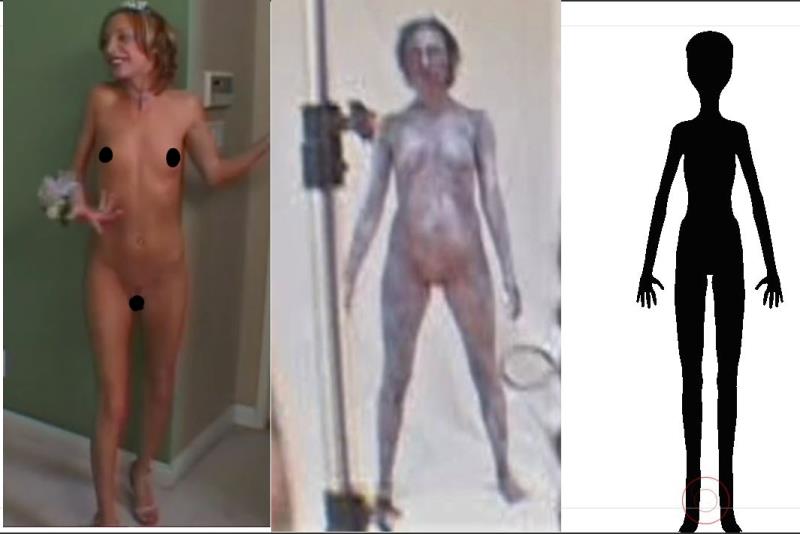 After After
I admit, I'm actually glad I decided not to use a CC model, doing it this way gives me far more control over the style of the model, and it really didn't take long to create this model. I've since moved on to some additional modeling, nothing final, still exploring with creating a form that is both attractive but different from a human. 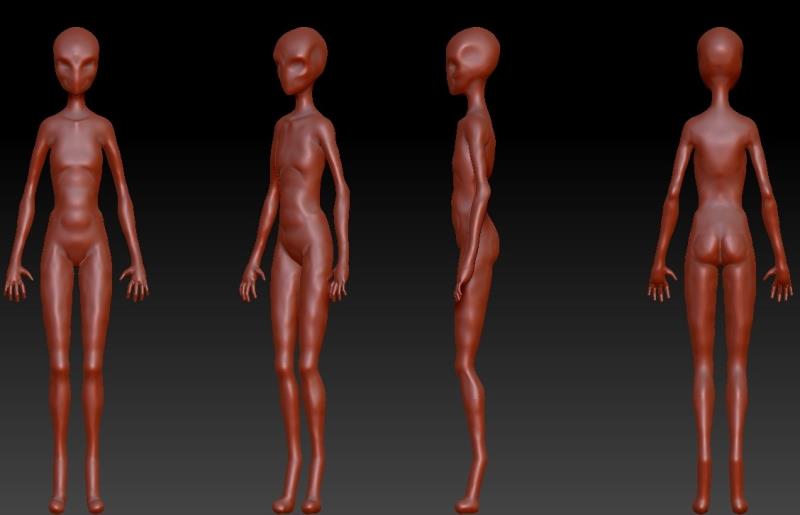 [Accidental Baboon Butt!] [Accidental Baboon Butt!]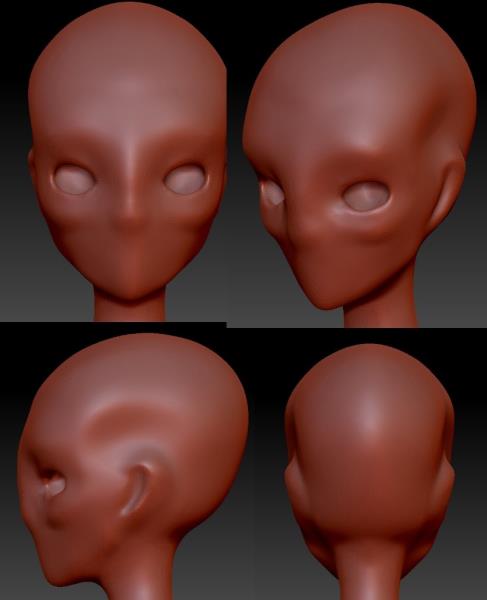 I've also been working on her bio, what kind of character she is. I knew from the start that I was working on a monster character, something that would be at home in a monster movie or survival horror game, so like any memorable monster I wanted to make her a metaphor for something. Going the usual sex = death, femme fatale route felt too clichéd, so I eventually settled on the idea of the Siren representing our fear of being consumed by our inner desires and fantasies, specifically those of a sexual nature. The Siren is a member of a species of primal fish that evolved specifically to hunt humans. They exude a sort of intoxicating pheromone, essentially shutting down the fight or flight response center of the victim's brain, leaving them in a drunken topor. Basically, you're fully conscious and aware, but unable to resist as she and her sisters begin eating you alive.  Messed up I know, though I feel that this also serves as a reflection for the fear of loss of freedom or control, something that I imagine men in particular are not accustomed to having to deal with. Messed up I know, though I feel that this also serves as a reflection for the fear of loss of freedom or control, something that I imagine men in particular are not accustomed to having to deal with.
At this point in the contest, I feel my only chance at winning any sort of reward is through my creativity and character development, I've already had to scrap my hope for creating a full short film, though I should hopefully be able to do a short character animation. I also need to start planning a script for that animation, I figure that the essential quality of her character is a decidedly cat-like personality; seemingly curious, in an almost uncomfortably sensual way, but really she's just playing with her food! Now if I can figure out how to do this in a tasteful manner...
|
|
|
|
|
AdventDestiny
|
AdventDestiny
Posted 8 Years Ago
|
|
Group: Forum Members
Last Active: 4 Years Ago
Posts: 39,
Visits: 755
|
Did some more work on the mesh, starting with the feet, which were always a problem from the beginning. I originally created a set of toes during the ZSphere phase of the model creation, but discovered that the toes were too small, and the feet were too long; you see, she's digigrade, meaning she stands on her toes, so obviously she wouldn't have a prominent foot lying flat along the ground. I smoothed out the whole area, then went to work using the Dam_Standard brush to cut into the surface, before using Snakehook to pull out the toes. 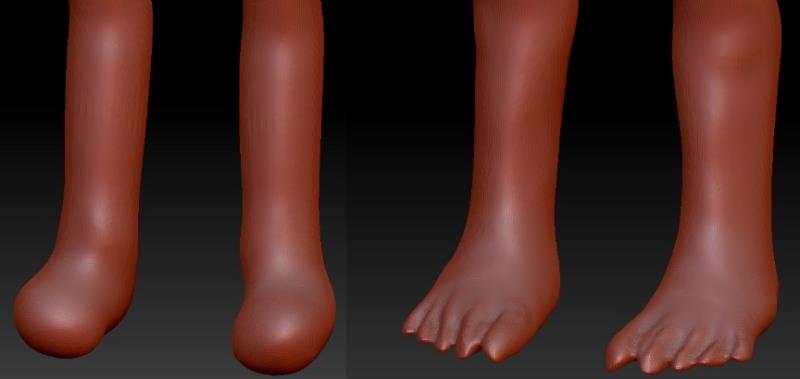 They look unfinished [which they are], but in this current state it actually captures the feel of webbing between her toes, perfect for an amphibious character! After that I continued to tweak the main mesh, while also sculpting preliminary features on the face, getting a better idea of what kind of face would work with large, anime style eyes; whether the model is meant to be realistic or stylized, I imagine her eyes would be bigger than normal.  Still not there yet though, though I do have some anime references I'd like to work in. I'm also currently working on a finalized design for her fins. I decided to adopt the fin arrangement that 3levan added to my original color sketch, though I think I'm going to change her fin colors to something more sea green, and purple eyes mixed with green, just feels more complimentary to the main blue color scheme.
|
|
|
|
|
AdventDestiny
|
AdventDestiny
Posted 8 Years Ago
|
|
Group: Forum Members
Last Active: 4 Years Ago
Posts: 39,
Visits: 755
|
This is my latest update of the Siren character mesh, further fine tuning of the proportions, including realigning the shoulders and legs, and lowering the curve of her back. 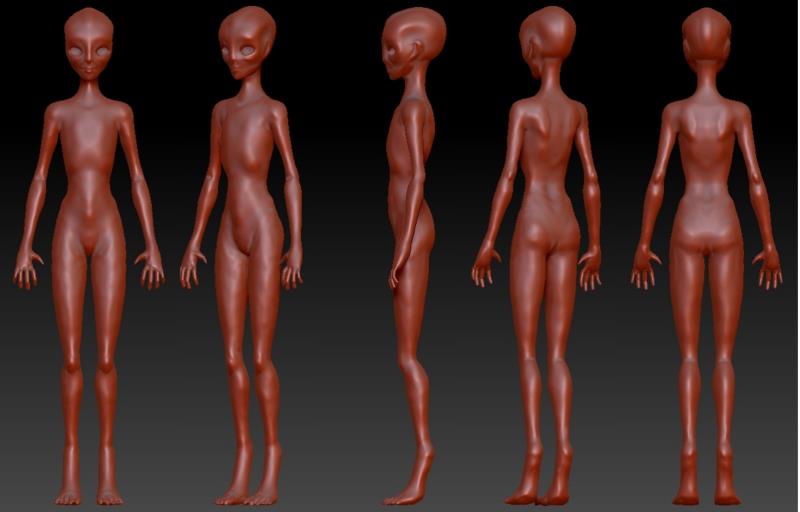 Honestly though, there's just something I feel doesn't look right, it doesn't feel like the character as she is in my head, my imagination I mean. I don't know why, maybe its just not fully detailed, or maybe there's something wrong with the proportions, I don't know? Anybody else here see something that doesn't work, don't be afraid to be honest, I really want to be 100% satisfied with the form before moving into high-poly detailing and texturing of this model.
|
|
|
|
|
mazartok
|
mazartok
Posted 8 Years Ago
|
|
Group: Forum Members
Last Active: 8 Years Ago
Posts: 5,
Visits: 54
|
HI, i´m looking for a creator to model and rig a 3d character for me. I´ll pay for that. Someone is interested?
|
|
|
|
|
AdventDestiny
|
AdventDestiny
Posted 8 Years Ago
|
|
Group: Forum Members
Last Active: 4 Years Ago
Posts: 39,
Visits: 755
|
To VinceDN, thanks for the suggestion, I didn't actually get to use it before figuring out what was the problem, but I'm sure it'll come in handy in the near future! I decided to import some reference anatomy pics from a CG modeling book I own, which proved very helpful, as it allowed me to determine what was off anatomically speaking, and after some trial and error [which ultimately resulted in the destruction of my beautifully crafted fingers  ], I managed to work the model to roughly correspond with the build of the reference. 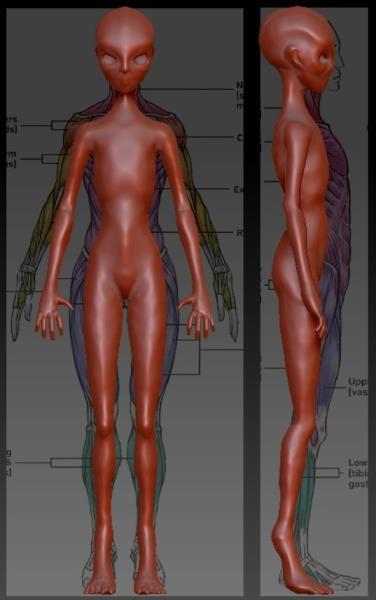 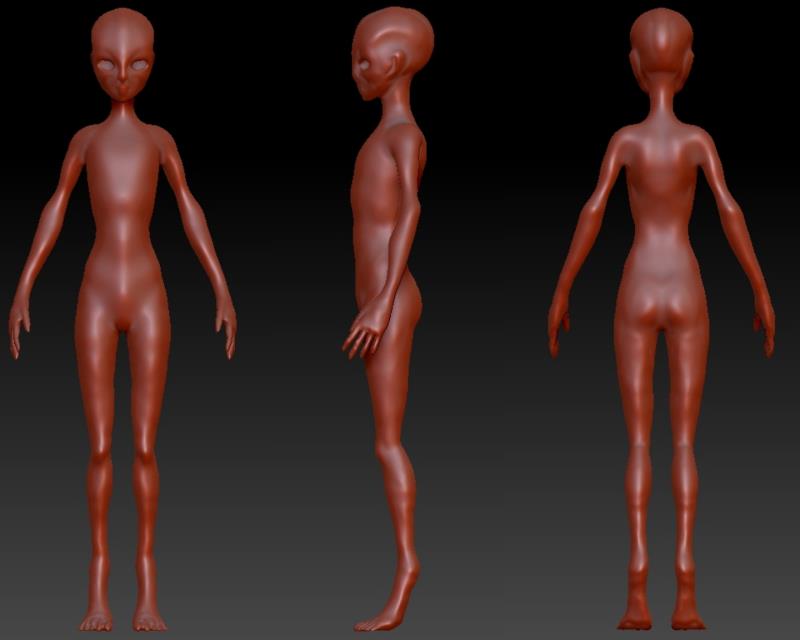 Now it's not a perfect match, but that was the point, the Siren's proportions are different, ultimately very thin, but not so thin that too many bones would be showing. Now I just need to study some other references of models with slimmer builds to get it right. At this point I'm planning on splitting the model into individual pieces [Head and neck, torso, arms, and legs], so that I can begin working in higher levels of detail in specific areas.
|
|
|
|
|
AdventDestiny
|
AdventDestiny
Posted 8 Years Ago
|
|
Group: Forum Members
Last Active: 4 Years Ago
Posts: 39,
Visits: 755
|
I've finally gotten started on the "hair" for my character. Technically its not hair, but a pair of fins that flow along the sides of her head like hair, and can be raised like a frill when aggressive or alarmed [if I can figure out how to rig and animate it!] 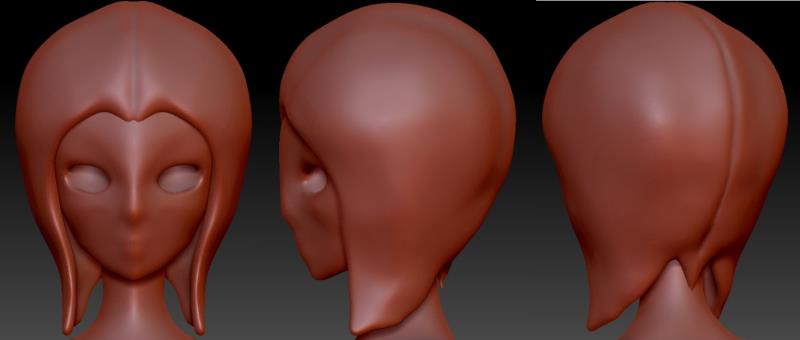 Working on the hairline may prove tricky, but all in all it looks pretty good. I created the hair in ZBrush by creating a Mask in the general shape of the "hair", then in the Subtool menu used Extract to create a new subtool from the mask. Took a bit of tinkering with the scaling to find a balance between thick enough to sculpt with, but not so thick as to look like an afro!
|
|
|
|
|
AdventDestiny
|
AdventDestiny
Posted 8 Years Ago
|
|
Group: Forum Members
Last Active: 4 Years Ago
Posts: 39,
Visits: 755
|
Did some more work, various tweaks and modifications. I decided that she needed a longer neck and smaller head, so I used Transpose Master to make a full change of both the body and hair mesh. I also pushed in the shoulders, always felt the upper torso was too wide. As you will notice, I've refined the fins on her head, establishing the... whatever those supporting branches are, they give the hair tension when outstretched, like the finger bones of a bat's wings. 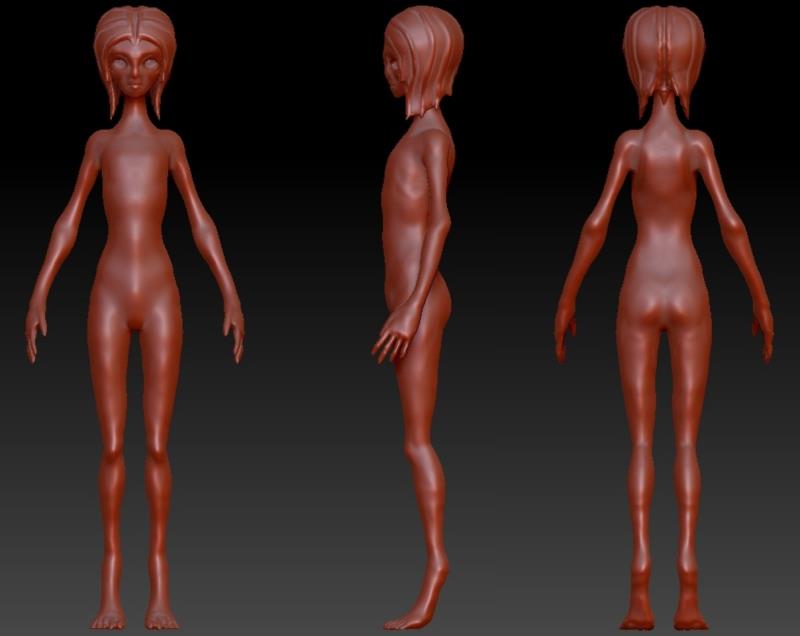 I also decided to begin the process of adding the fins, starting with some simple webbing between the fingers and under the arms. A happy accident pictured on the far right provided the template for some webbing going down from the arm pits to the ribs, although with hindsight I may have tried inserting a mesh instead, probably will fix this later. 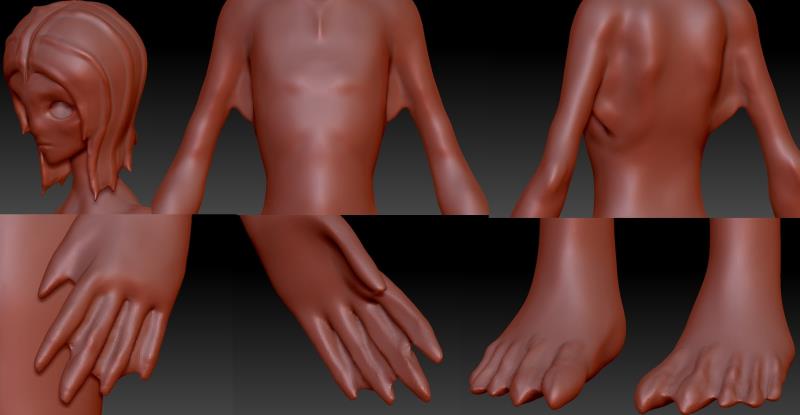 I used an inserted Circle Mesh and aligned it between her fingers to create the webbing. Piece of advice, inserting a Circle Mesh lacks a backside, meaning if you look at it from the wrong direction, it'll disappear. You'll have to use a Geometry option called Close Gaps to fill it, then you'll have to go into the Brush menu, go into Auto Masking, then turn on Backface Auto Mask, which basically prevents the mesh from indenting in one side when sculpting on the other... otherwise trying to use anything but the Inflate Brush will effectively turn a paper thin mesh inside out! I used Dynamesh to fuse the modified Circle Mesh into the fingers, and after a couple fixes they look great! I also tweaked her feet a bit, trying to give her two prominent toes like a raptor, minus the sickle toe, while the others are more humanoid.
|
|
|
|
|
AdventDestiny
|
AdventDestiny
Posted 8 Years Ago
|
|
Group: Forum Members
Last Active: 4 Years Ago
Posts: 39,
Visits: 755
|
I've begun preparing for more finalized modeling, starting by splitting the body into multiple pieces so that I can sculpt higher levels of detail without straining my computer. I also managed to find a sneaky use of that last Character Creator model I was going to use as a template. I had split that model into multiple subtools, and I managed to import the jaws, teeth, and tongue, so that way I don't have to make a new set from scratch! So technically, my entry does use a Character Creator model, or rather some pieces of it. I also took the liberty of changing the material properties, because I've heard other ZBrush artists say that the default matcap red material isn't as effective for creative sculpting. So I changed it to a gray clay material, and I have to say I agree, it looks better, makes it a little easier to see subtle surface details that'll be needed for the higher poly sculpting phase. 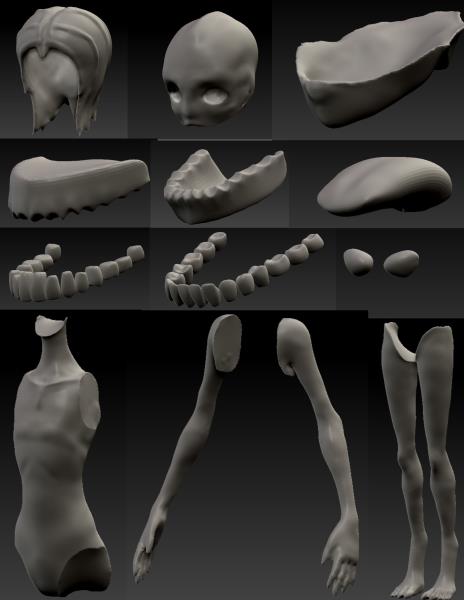 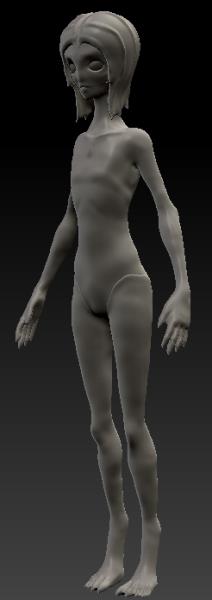 I plan on more closely studying anatomy references to get much finer details, and will also begin work on creating the fins and modifying the jaw so that it more comfortably fits into the mouth. Hopefully I can get this all done in time to get started with polypainting and texture baking, then animation... you know unfortunately I'm getting the feeling I'm not going to get it done in time, not that it'd make much of a difference, I've already seen at least half a dozen other artists whose work are much more worthy of the grand prizes than mine. Regardless, I'll carry on to the very end if I have to!
|
|
|
|