Alon Dan (12/14/2015)
.........So... the "real" final timing I will get will be based on the "Realtime" mode?
and the "By Frame" will be just to test physics?
because while I'm animating in iClone I need to know which of these modes I should based on consider timing, since I add lots of keyframes on the timeline manually.
The fps settings in iClone have been confusing users for a long time. My simple advice is to forget about it during production, and to concentrate on just the time. In the Project settings - Ctrl+Shift+P - you can set the timeline to display either Frames or Time.
Exporting a final video render from iClone is the only time that a user can select the desired number of fps - and then only when exporting an AVI file or an image sequence as mpg and wmv are restricted to 30 fps.
The Default Project is set at 1800 Frames, or 30 seconds. At 24 fps you would end up rendering 720 frames, either in an AVI or as an image sequence, and this is where things can get tricky in iClone when setting keyframes.
In this screen shot the timeline shows the Current Frame as 60 Frames:

But the Time setting shows 00:00:59.
Here the Time setting shows 00:01:00
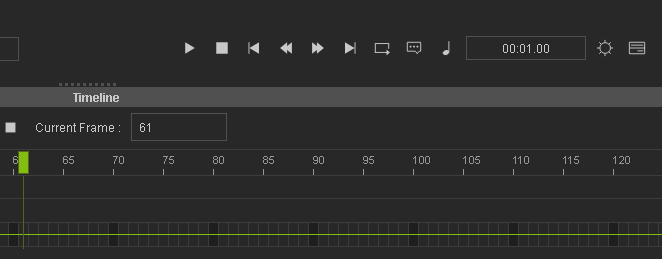
But the Current frame is 61.
Rendering an image sequence at 24 fps using either of the above Timeline cursor positions results in exactly 24 images.
Trying to get accurate frame settings for use in a final render at 24/25 fps is impossible in iClone due to the fact that the fractions of a second are locked to 60 frames, and not to any internationally recognised timecode setting using hh:mm:ss:ff:.
The only chance to obtain any sort of timing accuracy is to view the scene in "Realtime" mode, and setting keyframes while keeping a careful eye on the "Time" setting under the scene window.
Gerry
System: Win 10 Pro (21H2), Asus X99-E WS, CPU i7-5930K -3,5 GHz, 32 GB DDR4 2666-16 RAM, NVidia GTX 1080 Ti GPU - 11 GB VRAM(Driver Studio-536.99), Samsung 850 Pro 512 GB SSD, 6 TB HD storage.