Profile Picture

Vector Displacement - Help?

Posted By Alon Dan 9 Years Ago
You don't have permission to rate!
Author
Message
Alon Dan
Problem.png
Alon Dan
Posted 9 Years Ago
View Quick Profile
Distinguished Member

Distinguished Member (3.0K reputation)Distinguished Member (3.0K reputation)Distinguished Member (3.0K reputation)Distinguished Member (3.0K reputation)Distinguished Member (3.0K reputation)Distinguished Member (3.0K reputation)Distinguished Member (3.0K reputation)Distinguished Member (3.0K reputation)Distinguished Member (3.0K reputation)

Group: Forum Members
Last Active: 3 Years Ago
Posts: 136, Visits: 350
Hello All,
I'm trying to make vector displacement work in iClone but I'm not sure what I'm doing wrong and need some help to solve this.

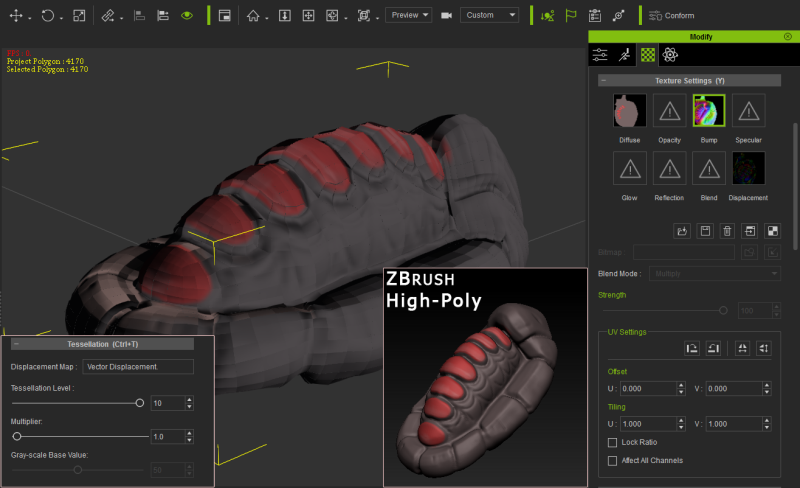
This is what I've done while testing this:
1 - Created something in ZBrush (High Poly).
2 - ZRemeshed it to get a Low-Poly version from the original High-Poly version.
3 - UV mapped, and did some poly paint to have a very basic Diffuse Map (texture color).
4 - Exported the Maps I need for this test:  Vector Displacement, Normal Map, Texture from Polypaint (diffuse map).
5 - Exported the Low-Poly version .OBJ 

So far so good for this test I do, now for the problem:
1 - I've Imported the Low-Poly version .OBJ to 3DXchange.
2 - I've imported the maps:  Normal Map, Diffuse Map (can't see a way to import Vector Displacement map in 3DXchange).
3 - Apply to iClone, and there I've imported the Vector Displacement Map.

The problem is that I'm not sure what I do wrong but I can only see the Low-Poly .OBJ ugly faces even with the Vector Displacement import, I thought it will also SMOOTH the object but I think I do something wrong and not sure how do I get to see the very detailed (not these ugly low-poly faces, but the smooth details of the vector displacement map)

Can somebody please tell me what I did wrong, maybe I skipped something? 
Sorry about my bad English and thanks ahead!

https://forum.reallusion.com/uploads/images/0368c051-bd50-4be2-a1fa-fde9.png

urbanlamb
urbanlamb
Posted 9 Years Ago
View Quick Profile
Distinguished Member

Distinguished Member (4.2K reputation)Distinguished Member (4.2K reputation)Distinguished Member (4.2K reputation)Distinguished Member (4.2K reputation)Distinguished Member (4.2K reputation)Distinguished Member (4.2K reputation)Distinguished Member (4.2K reputation)Distinguished Member (4.2K reputation)Distinguished Member (4.2K reputation)

Group: Forum Members
Last Active: 2 Years Ago
Posts: 1.2K, Visits: 3.5K
your put a normal map or grey bump map in the bump map space and a vector displacement map in the displacement slot.  At the moment your displacement map is black = zero change make a normal map and a vector map or a bump map and a vector map. You need to use both.  The bump map you have looks like a vector map to me so put that where the slot is black now and create a basic normal map for the slot that contains the vector map.  

~~~~~~~~~~~~~~~~~~~~~~~~~~~~~~~~~~~~~~~~~~~~~~~~~~~~~~~~
"You have brains in your head. You have feet in your shoes. You can steer yourself in any direction you choose. You're on your own, and you know what you know. And you are the guy who'll decide where to go."
                                                                                                                                                                                                                                                                                     Dr. Seuss

Edited
9 Years Ago by urbanlamb
Alon Dan
Alon Dan
Posted 9 Years Ago
View Quick Profile
Distinguished Member

Distinguished Member (3.0K reputation)Distinguished Member (3.0K reputation)Distinguished Member (3.0K reputation)Distinguished Member (3.0K reputation)Distinguished Member (3.0K reputation)Distinguished Member (3.0K reputation)Distinguished Member (3.0K reputation)Distinguished Member (3.0K reputation)Distinguished Member (3.0K reputation)

Group: Forum Members
Last Active: 3 Years Ago
Posts: 136, Visits: 350
urbanlamb (11/16/2015)
your put a normal map or grey bump map in the bump map space and a vector displacement map in the displacement slot.  At the moment your displacement map is black = zero change make a normal map and a vector map or a bump map and a vector map. You need to use both.  The bump map you have looks like a vector map to me so put that where the slot is black now and create a basic normal map for the slot that contains the vector map.  


Thanks for the quick reply!
Actually the Vector Disp slot is not black it's an .EXR file with many colors in it, it's hard to see in the screenshot I guess because around the colors there is lots of black (for no details area).
In the Bump map slot I chose Normal because it is not a bump but a normal map, and that's why it's not a grey for the old bump.

Also, whatever I do it's not smoothing the low-poly .OBJ I'm not even sure if my problem is related to the maps...
I did try to use the Realtime Smooth but there is no change.
I had the same problem with 3DCoat if I remember correctly so I think the problem is not related to the maps... I think they are fine, but I have no idea why all my low-poly .OBJ doesn't look smoother. I'm not talking about the details of the displacement but the tessellation maybe? I'm not sure...

So... any idea what am I still doing wrong?
urbanlamb
urbanlamb
Posted 9 Years Ago
View Quick Profile
Distinguished Member

Distinguished Member (4.2K reputation)Distinguished Member (4.2K reputation)Distinguished Member (4.2K reputation)Distinguished Member (4.2K reputation)Distinguished Member (4.2K reputation)Distinguished Member (4.2K reputation)Distinguished Member (4.2K reputation)Distinguished Member (4.2K reputation)Distinguished Member (4.2K reputation)

Group: Forum Members
Last Active: 2 Years Ago
Posts: 1.2K, Visits: 3.5K
dont use the exr files I find they dont work most of the time...  convert it to a png or tga file and use that.   Technically the exr files should work, but they dont seem to work reliably.  
Turn on the wireframe mode and see if the tesselation is working and render out a screenshot you will see it better there.   


~~~~~~~~~~~~~~~~~~~~~~~~~~~~~~~~~~~~~~~~~~~~~~~~~~~~~~~~
"You have brains in your head. You have feet in your shoes. You can steer yourself in any direction you choose. You're on your own, and you know what you know. And you are the guy who'll decide where to go."
                                                                                                                                                                                                                                                                                     Dr. Seuss

Edited
9 Years Ago by urbanlamb
Alon Dan
Alon Dan
Posted 9 Years Ago
View Quick Profile
Distinguished Member

Distinguished Member (3.0K reputation)Distinguished Member (3.0K reputation)Distinguished Member (3.0K reputation)Distinguished Member (3.0K reputation)Distinguished Member (3.0K reputation)Distinguished Member (3.0K reputation)Distinguished Member (3.0K reputation)Distinguished Member (3.0K reputation)Distinguished Member (3.0K reputation)

Group: Forum Members
Last Active: 3 Years Ago
Posts: 136, Visits: 350
When I convert the exr (32bit float) to .PNG it it's looking much worse, like the object explode all over to many pieces hehe BigGrin
When I use only the Diffuse and the Vectore Disp (the .EXR because it works better for now), the interesting thing is that once I switch the object to wireframe as you suggested it looks very dense and good compare to the shaded mode which is very blocky... 

Is there any chance it's related to the size of the .OBJ ?   is that a known problem or something, because when I first imported the object to 3DXchange it says that the object is too small or something and it looks really small compare to the Human-Size mark.

https://forum.reallusion.com/uploads/images/0903e26e-afcd-4992-b3c0-cd42.png
https://forum.reallusion.com/uploads/images/d57c7eaa-bb3e-4221-8ec3-2331.png
Rampa
Rampa
Posted 9 Years Ago
View Quick Profile
Distinguished Member

Distinguished Member (35.8K reputation)Distinguished Member (35.8K reputation)Distinguished Member (35.8K reputation)Distinguished Member (35.8K reputation)Distinguished Member (35.8K reputation)Distinguished Member (35.8K reputation)Distinguished Member (35.8K reputation)Distinguished Member (35.8K reputation)Distinguished Member (35.8K reputation)

Group: Forum Members
Last Active: 36 minutes ago
Posts: 8.1K, Visits: 60.5K
Try upping the "Tesselation" value. It is different than the real-time smoothing. The settings are just under the Substance settings in the texture tab.

Also, in 3DX, you need to smooth the model to remove the faceting.
Edited
9 Years Ago by rampa
Alon Dan
Alon Dan
Posted 9 Years Ago
View Quick Profile
Distinguished Member

Distinguished Member (3.0K reputation)Distinguished Member (3.0K reputation)Distinguished Member (3.0K reputation)Distinguished Member (3.0K reputation)Distinguished Member (3.0K reputation)Distinguished Member (3.0K reputation)Distinguished Member (3.0K reputation)Distinguished Member (3.0K reputation)Distinguished Member (3.0K reputation)

Group: Forum Members
Last Active: 3 Years Ago
Posts: 136, Visits: 350
rampa (11/16/2015)
Try upping the "Tesselation" value. It is different than the real-time smoothing. The settings are just under the Substance settings in the texture tab.

Also, in 3DX, you need to smooth the model to remove the faceting.


Thanks rampa! The smoothing on 3DXchange... that's probably the problem! Smile
I'm trying to understand how to get it as much as closer to the original shape, the default is 45... 
Is there a "secret" number that works on most objects, can you please tell me more from your experience with the auto smooth in 3DX ?

I'm still experimenting but it's not so blocky anymore... that's a HUGE progress, I appreciate your help!

Rampa
Rampa
Posted 9 Years Ago
View Quick Profile
Distinguished Member

Distinguished Member (35.8K reputation)Distinguished Member (35.8K reputation)Distinguished Member (35.8K reputation)Distinguished Member (35.8K reputation)Distinguished Member (35.8K reputation)Distinguished Member (35.8K reputation)Distinguished Member (35.8K reputation)Distinguished Member (35.8K reputation)Distinguished Member (35.8K reputation)

Group: Forum Members
Last Active: 36 minutes ago
Posts: 8.1K, Visits: 60.5K
I usually just type in 99 if I want totally smooth, because it's easy. You would use a lesser number if you want creases for some angles. It is in degrees, so a setting of 45 would only smooth up to 45 degrees.
Alon Dan
Alon Dan
Posted 9 Years Ago
View Quick Profile
Distinguished Member

Distinguished Member (3.0K reputation)Distinguished Member (3.0K reputation)Distinguished Member (3.0K reputation)Distinguished Member (3.0K reputation)Distinguished Member (3.0K reputation)Distinguished Member (3.0K reputation)Distinguished Member (3.0K reputation)Distinguished Member (3.0K reputation)Distinguished Member (3.0K reputation)

Group: Forum Members
Last Active: 3 Years Ago
Posts: 136, Visits: 350
rampa (11/16/2015)
I usually just type in 99 if I want totally smooth, because it's easy. You would use a lesser number if you want creases for some angles. It is in degrees, so a setting of 45 would only smooth up to 45 degrees.


That's great! I'm playing with it to see the different results. Smile

I think that my Vector Displacement Map need some tweaking in the settings of ZBrush but that's too complicated...
Sometimes I get weird cracks all over, and some more weird results... but when I only use Diffuse map and Normal Map it looks nice, but it's not as much as detailed as I can get with the Vector Disp, I guess I'll  have to do so many experiments, hope I'll get it to work.
Rampa
Rampa
Posted 9 Years Ago
View Quick Profile
Distinguished Member

Distinguished Member (35.8K reputation)Distinguished Member (35.8K reputation)Distinguished Member (35.8K reputation)Distinguished Member (35.8K reputation)Distinguished Member (35.8K reputation)Distinguished Member (35.8K reputation)Distinguished Member (35.8K reputation)Distinguished Member (35.8K reputation)Distinguished Member (35.8K reputation)

Group: Forum Members
Last Active: 36 minutes ago
Posts: 8.1K, Visits: 60.5K
Displacement does not work across UV lines. It's basically a rendering trick that your GPU can do, so what looks like new geometry is not there in the actual model. Your GPU is rendering a new surface, and if it's offset from the actual surface at the UV seam, it will appear to "cracked".


Reading This Topic