Profile Picture

Help: Weightmap Issue With Custom Cloth

Posted By Lord Ashes 7 Years Ago
You don't have permission to rate!
Author
Message
Lord Ashes
Lord Ashes
Posted 7 Years Ago
View Quick Profile
Distinguished Member

Distinguished Member (20.8K reputation)Distinguished Member (20.8K reputation)Distinguished Member (20.8K reputation)Distinguished Member (20.8K reputation)Distinguished Member (20.8K reputation)Distinguished Member (20.8K reputation)Distinguished Member (20.8K reputation)Distinguished Member (20.8K reputation)Distinguished Member (20.8K reputation)

Group: Forum Members
Last Active: Last Week
Posts: 1.3K, Visits: 1.6K
A while back I found a link to a Blender tutorial (somewhere on the forum) for creating Custom Cloth. The general gist was to take the custom clothing mesh, parent it to the iClone figure armature, transfer weights from CC Body to the custom cloth, export as FBX and import into Character Creator.

I followed this tutorial and managed to create some custom cloth bases. However, I ran into a problem when creating skirts and/or dresses because the transfer of the weight mapping from the CC Body would cause the bottom portion of the cloth to act like pants instead of a skirt/dress. I inquired about this on the forum and my conclusion was confirmed: I needed to modify the weight maps for the shirt/dress portion to correct the behavior.

I studied how to do this in Blender and discovered that it wasn't too hard. At least the process of editing the weight maps was not difficult but painting it would be more difficult.

As I understand it, weight maps just indicate how much areas of the mesh (cloth) bends/stretches to follow bending of the armature bones. An area of 0% (for any given bone) means the mesh remains static when the bone is bent. An area of 100% (for any given bone) means that area of the mesh fully follows the bending of that bone. However, all of this is relative to the bending of bones of the parent armature and in no way connected to a physical point in space. Thus if the armature position is changed, it has not effect on the mesh - only bending of the armature bones causes mesh bending/stretching according to the weight paint.

As a starting point, I wanted to take the default CC Dress and change the weight maps so that the skirt portion would have 0% weight mapping. I realize this would not be correct mapping for a dress but I just wanted to try that as a starting point. As I understood weight mapping, this should have created a static skirt which would not be affected by bending bones (e.g. character walking). I imagined this would probably generate legs that go right through the cloth since they would have no effect of the skirt portion of the dress.

What I got instead was very unexpected...When I placed the dress on a character in iClone and had the character walk, parts of the dress seemed to stick to the character/dress's initial location while the rest of the dress moved with the character. See below video. As far as I understand, no matter what kind of a weight map is applied, it should never cause such a "sticky situation". In the video I have hidden the character mesh so that the dress itself is more visible.

Can anyone suggest what is going on here and why I am not getting the result I expected?


On a related note, I recall that when weight painting the cloth in Blender, I had to create Empty Weight Groups and then transfer the Weight Maps from CC Body to the cloth. I recall Blender's Automatic Weight Map option did not work (i.e. created an FBX file that could not be imported into CC). Is there any way to get around this? (i.e. be able to use the Blender Automatic Weight Mapping as a starting point) 


"We often compare ourselves to the U.S. and often they come out the best, but they only have the right to bear arms while we have the right to bare breasts"
Bowser and Blue, Busting The Breast
Delerna
Delerna
Posted 7 Years Ago
View Quick Profile
Distinguished Member

Distinguished Member (8.2K reputation)Distinguished Member (8.2K reputation)Distinguished Member (8.2K reputation)Distinguished Member (8.2K reputation)Distinguished Member (8.2K reputation)Distinguished Member (8.2K reputation)Distinguished Member (8.2K reputation)Distinguished Member (8.2K reputation)Distinguished Member (8.2K reputation)

Group: Forum Members
Last Active: 2 Years Ago
Posts: 1.5K, Visits: 14.8K


As a starting point, I wanted to take the default CC Dress and change the weight maps so that the skirt portion would have 0% weight mapping. I realize this would not be correct mapping for a dress but I just wanted to try that as a starting point. As I understood weight mapping, this should have created a static skirt which would not be affected by bending bones (e.g. character walking). I imagined this would probably generate legs that go right through the cloth since they would have no effect of the skirt portion of the dress.
.................
What I got instead was very unexpected...

Yes, that is one of the many experiments I have tried. And what you expected is what happened. The legs just go straight through the cloth without affecting the skirt at all. However, I did not get the effect you are getting. The clothing moved along with the character fine. Just the legs didn't even know the skirt was there at all. without having that to check  I cant say what the problem is but I would try and determine which vertices are doing that and then go back to blender and check the bone rigging values on those vertices and compare them with the vertices that aren't doing that. That might give you a hint to what is causing it.
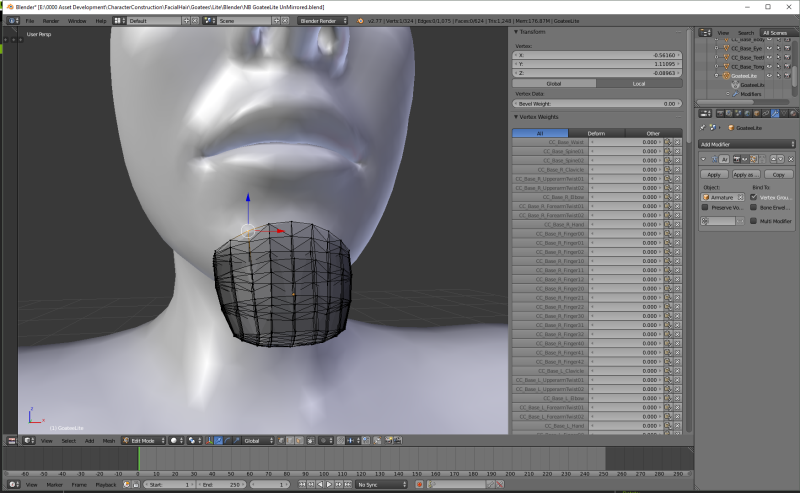
Here is an image illustrating where to check the rigging values on any vertice
https://forum.reallusion.com/uploads/images/e602469d-d2d8-42bb-bc18-a584.png


The general gist was to take the custom clothing mesh, parent it to the iClone figure armature, transfer weights from CC Body to the custom cloth, export as FBX and import into Character Creator.

That sounds like how I do the clothes I have in my store

I followed this tutorial and managed to create some custom cloth bases. However, I ran into a problem when creating skirts and/or dresses because the transfer of the weight mapping from the CC Body would cause the bottom portion of the cloth to act like pants instead of a skirt/dress. I inquired about this on the forum and my conclusion was confirmed: I needed to modify the weight maps for the shirt/dress portion to correct the behavior.

How to make the skirt act more like a skirt?
After transferring the skin rigging to the clothing mesh I do some manual rigging on the skirts vertices between the legs.

Here Is one method I have tried
I will keep this explanation simple by describing what I do with just one of the legs twist bones..... to make it easier to read.
I select the left leg and then make the center column between the legs at the front and back of the skirt .5
The next column of vertices towards the right leg I make .4
The next column of vertices towards the right leg I make .3
The next column of vertices towards the right leg I make .2
The next column of vertices towards the right leg I make .1
From the center column again
The next column towards the left leg I make .6
The next column towards the left leg I make .7
The next column towards the left leg I make .8
The next column towards the left leg I make .9

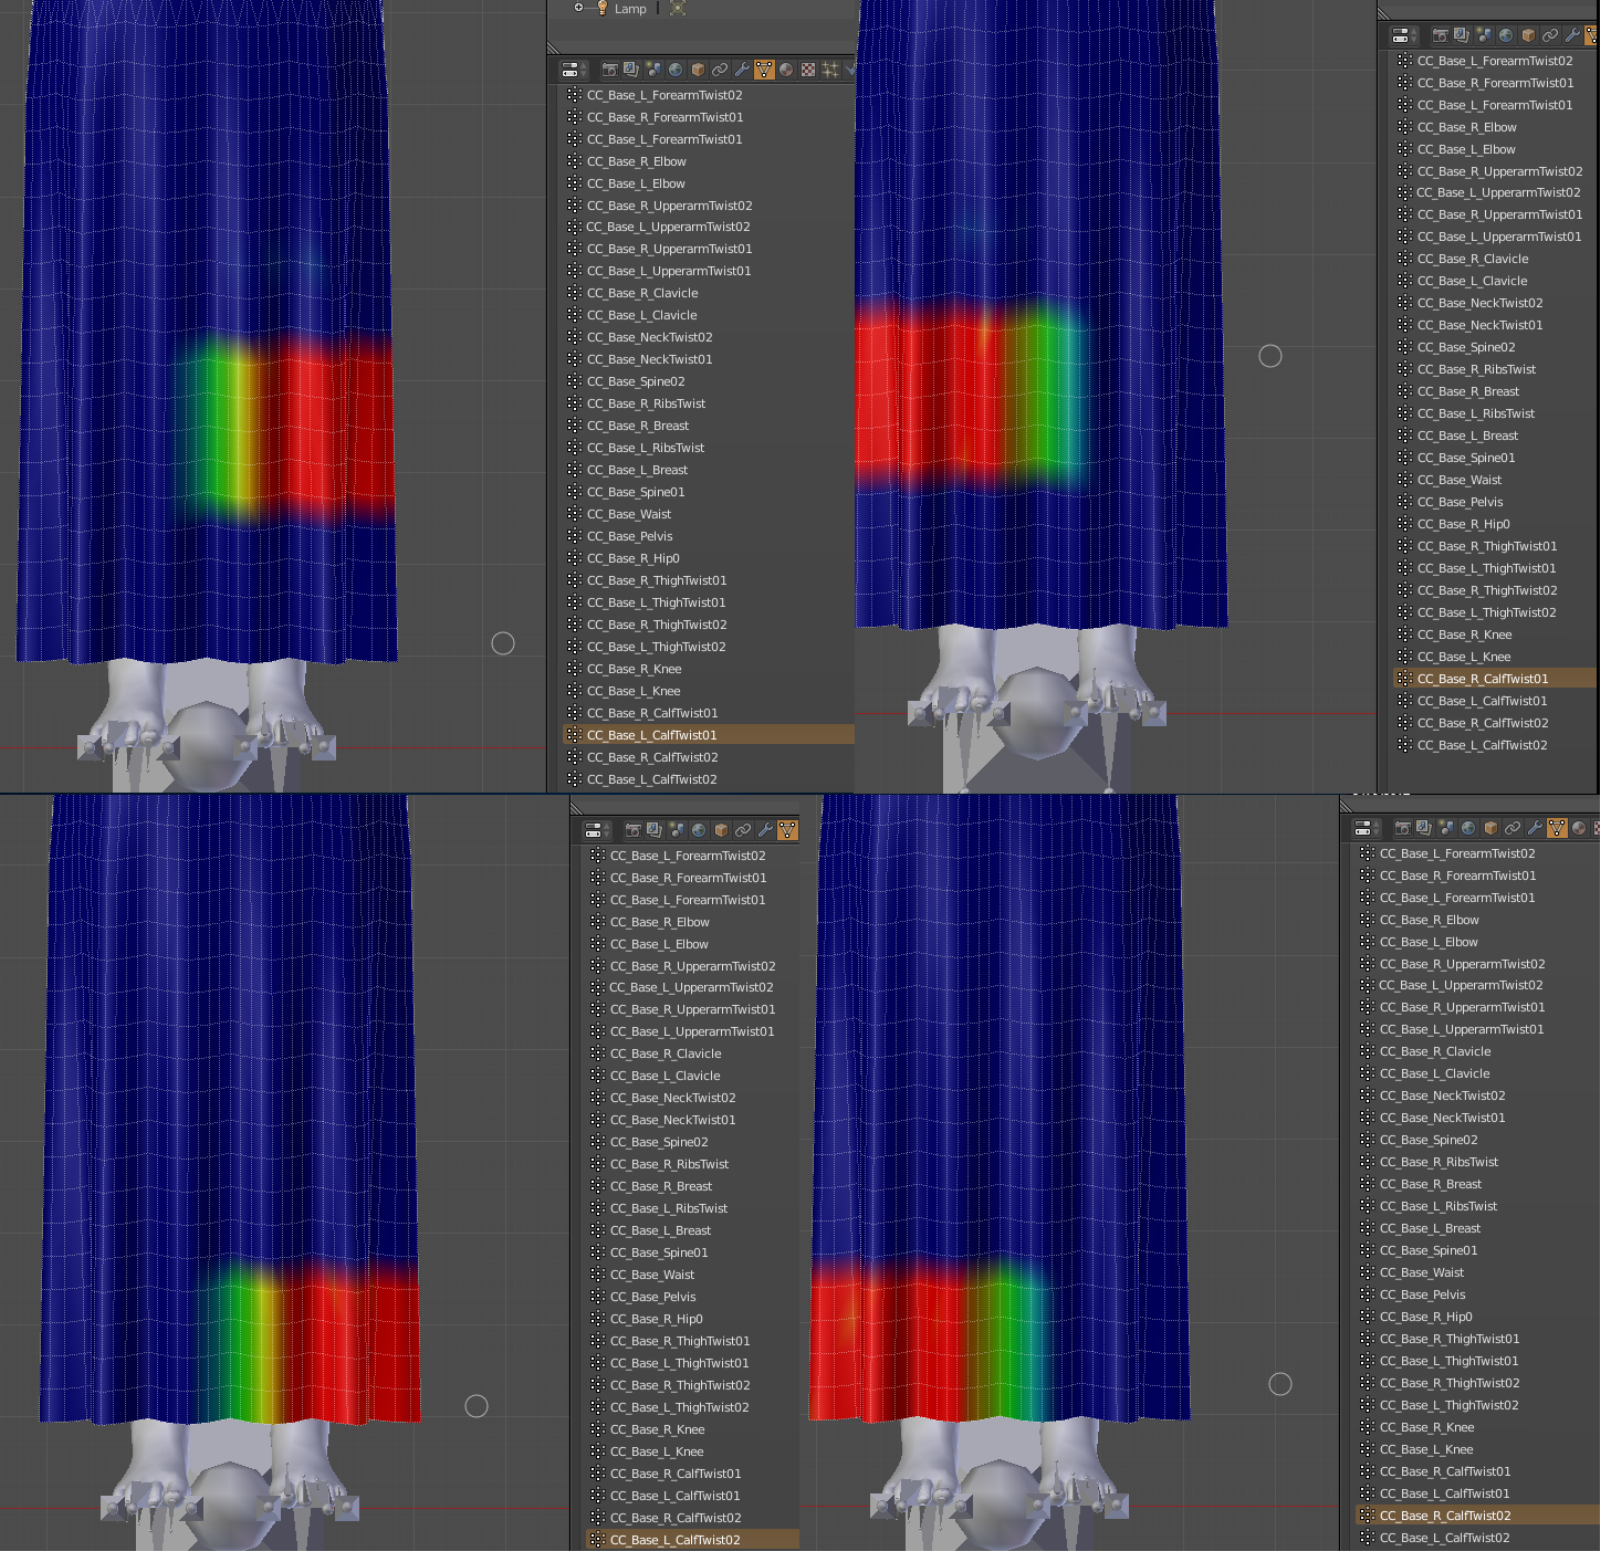
Then I repeat that on the right leg. That way, all the vertices I have changed add up to 1 and during animation in iclone both legs move the vertices between the legs so they flow like a skirt instead of like pants.
A picture is worth 1000 words so here are 4 images put together to illustrate what I am saying
https://forum.reallusion.com/uploads/images/e47c694d-1ff1-4468-b872-4362.png

and a video of how it looks


i7-3770 3.4GHz CPU 16 GB Ram   
GeForce GTX1080 TI 11GB
Windows 10 Pro 64bit
Lord Ashes
Lord Ashes
Posted 7 Years Ago
View Quick Profile
Distinguished Member

Distinguished Member (20.8K reputation)Distinguished Member (20.8K reputation)Distinguished Member (20.8K reputation)Distinguished Member (20.8K reputation)Distinguished Member (20.8K reputation)Distinguished Member (20.8K reputation)Distinguished Member (20.8K reputation)Distinguished Member (20.8K reputation)Distinguished Member (20.8K reputation)

Group: Forum Members
Last Active: Last Week
Posts: 1.3K, Visits: 1.6K
Thanks. To figure out what the skirt weight maps should look like (before you provided your thoughtful info), I cheated. I exported a skirt in DAZ Studio and looked what its weight maps looked like...so I know what I need to achieve.

I just don't understand how any weight painting could be causing part of the mesh to "stick". I mean even if the whole mesh was 0% (blue) then it should just be a static mesh. However, when I do the same with the exact same mesh except that I don't modify the weight painting, it works as expected (i.e. acts like pants but does not "stick").

"We often compare ourselves to the U.S. and often they come out the best, but they only have the right to bear arms while we have the right to bare breasts"
Bowser and Blue, Busting The Breast
Lord Ashes
Lord Ashes
Posted 7 Years Ago
View Quick Profile
Distinguished Member

Distinguished Member (20.8K reputation)Distinguished Member (20.8K reputation)Distinguished Member (20.8K reputation)Distinguished Member (20.8K reputation)Distinguished Member (20.8K reputation)Distinguished Member (20.8K reputation)Distinguished Member (20.8K reputation)Distinguished Member (20.8K reputation)Distinguished Member (20.8K reputation)

Group: Forum Members
Last Active: Last Week
Posts: 1.3K, Visits: 1.6K
Delerna (2/16/2017)

And a video of how it looks

Is your Multigown available in the Marketplace? If you are NOT selling it, would you mind making the FBX available for reference? I actually wanted to do this with the CC Dress but I only have 3DXChange Pro (not Pipeline) and thus I can't export FBX files (to preserve the weight maps).


"We often compare ourselves to the U.S. and often they come out the best, but they only have the right to bear arms while we have the right to bare breasts"
Bowser and Blue, Busting The Breast
animagic
animagic
Posted 7 Years Ago
View Quick Profile
Distinguished Member

Distinguished Member (32.5K reputation)Distinguished Member (32.5K reputation)Distinguished Member (32.5K reputation)Distinguished Member (32.5K reputation)Distinguished Member (32.5K reputation)Distinguished Member (32.5K reputation)Distinguished Member (32.5K reputation)Distinguished Member (32.5K reputation)Distinguished Member (32.5K reputation)

Group: Forum Members
Last Active: 7 hours ago
Posts: 15.7K, Visits: 30.5K
Lord Ashes (2/16/2017)
Delerna (2/16/2017)

And a video of how it looks

Is your Multigown available in the Marketplace? If you are NOT selling it, would you mind making the FBX available for reference? I actually wanted to do this with the CC Dress but I only have 3DXChange Pro (not Pipeline) and thus I can't export FBX files (to preserve the weight maps).

Helping out with some marketing: http://city.reallusion.com/ContentPreview.aspx?i=JCC989bf8cb55ccf3fe1&g=.


https://forum.reallusion.com/uploads/images/436b0ffd-1242-44d6-a876-d631.jpg

vidi
vidi
Posted 7 Years Ago
View Quick Profile
Distinguished Member

Distinguished Member (31.5K reputation)Distinguished Member (31.5K reputation)Distinguished Member (31.5K reputation)Distinguished Member (31.5K reputation)Distinguished Member (31.5K reputation)Distinguished Member (31.5K reputation)Distinguished Member (31.5K reputation)Distinguished Member (31.5K reputation)Distinguished Member (31.5K reputation)

Group: Forum Members
Last Active: Last Week
Posts: 10.8K, Visits: 40.2K
I mean even if the whole mesh was 0% (blue) then it should just be a static mesh.  

Are you sure it is blue for every bone ?
every bone has its own WM . You need to check all bones vertex influence  

-------------------------------------------------------------------
liebe Grüße vidi


Lord Ashes
Lord Ashes
Posted 7 Years Ago
View Quick Profile
Distinguished Member

Distinguished Member (20.8K reputation)Distinguished Member (20.8K reputation)Distinguished Member (20.8K reputation)Distinguished Member (20.8K reputation)Distinguished Member (20.8K reputation)Distinguished Member (20.8K reputation)Distinguished Member (20.8K reputation)Distinguished Member (20.8K reputation)Distinguished Member (20.8K reputation)

Group: Forum Members
Last Active: Last Week
Posts: 1.3K, Visits: 1.6K
vidi (2/16/2017)
I mean even if the whole mesh was 0% (blue) then it should just be a static mesh.  

Are you sure it is blue for every bone ?
every bone has its own WM . You need to check all bones vertex influence  

Thanks for the clarification but I am aware of that. I went through all the bones and made sure that none of them caused any weighting on the skirt portion.
I think something else is going on because even if they did have weighting then they should respond to the bones bending but not "stick" (i.e. the cloth would bend/stretch with respect to the bones but not the character's initial position).


"We often compare ourselves to the U.S. and often they come out the best, but they only have the right to bear arms while we have the right to bare breasts"
Bowser and Blue, Busting The Breast
Lord Ashes
Lord Ashes
Posted 7 Years Ago
View Quick Profile
Distinguished Member

Distinguished Member (20.8K reputation)Distinguished Member (20.8K reputation)Distinguished Member (20.8K reputation)Distinguished Member (20.8K reputation)Distinguished Member (20.8K reputation)Distinguished Member (20.8K reputation)Distinguished Member (20.8K reputation)Distinguished Member (20.8K reputation)Distinguished Member (20.8K reputation)

Group: Forum Members
Last Active: Last Week
Posts: 1.3K, Visits: 1.6K
I tried again this time I just modified a few of the bones and that seem to work correctly...I did not get the "stick".
It almost seems that if you set too much of the bones to 0% weight (or maybe some bones to 0% weight) then the problem appears.

"We often compare ourselves to the U.S. and often they come out the best, but they only have the right to bear arms while we have the right to bare breasts"
Bowser and Blue, Busting The Breast
Lord Ashes
Lord Ashes
Posted 7 Years Ago
View Quick Profile
Distinguished Member

Distinguished Member (20.8K reputation)Distinguished Member (20.8K reputation)Distinguished Member (20.8K reputation)Distinguished Member (20.8K reputation)Distinguished Member (20.8K reputation)Distinguished Member (20.8K reputation)Distinguished Member (20.8K reputation)Distinguished Member (20.8K reputation)Distinguished Member (20.8K reputation)

Group: Forum Members
Last Active: Last Week
Posts: 1.3K, Visits: 1.6K
Delerna (2/16/2017)

A picture is worth 1000 words so here are 4 images put together to illustrate what I am saying

I tried your suggested weight map. I doubted them a bit because the body weight maps had the weight map gradient going vertically as well. But for the most part the suggested weight maps worked.
I definitely did not get the "stick" effect and walking and dancing seem to be okay...need a bit of a fix one one but otherwise OK.
However, I don't seem to be getting the nice bendable flow that you get in the gown. My dress bends to accommodate the bones but it is fairly rigid. Are you using weight painting for the bones AND physics weight maps? I tried to provide a simple Physics weight map (black on top, white on bottom) and this caused the hip area of the dress to go "inside" the body. I'm guessing I need a gradient from black to white instead of a rigid step.   

"We often compare ourselves to the U.S. and often they come out the best, but they only have the right to bear arms while we have the right to bare breasts"
Bowser and Blue, Busting The Breast
Delerna
Delerna
Posted 7 Years Ago
View Quick Profile
Distinguished Member

Distinguished Member (8.2K reputation)Distinguished Member (8.2K reputation)Distinguished Member (8.2K reputation)Distinguished Member (8.2K reputation)Distinguished Member (8.2K reputation)Distinguished Member (8.2K reputation)Distinguished Member (8.2K reputation)Distinguished Member (8.2K reputation)Distinguished Member (8.2K reputation)

Group: Forum Members
Last Active: 2 Years Ago
Posts: 1.5K, Visits: 14.8K
Yes absolutely
If you want the cloth to flow realistically then physics weight mapping is a must have. And yes grey scale from the top to the bottom.
what I mean by "The top" can vary.
For my multigown the top was at the waist, if memory serves me correctly.
For my multismock the top was on the breasts. so gradient mapped from top to bottom black to white or black to light grey depending on how you want it to flow.

Just a note on my discoveries.
I find that getting cloth flow to work properly is the most complicated, difficult, time consuming, frustrating and infuriating part of creating clothes.
However, when I finally get it working I also find it the most satisfying ego bumping achievement LOL
It definitely needs a good combination between your bone rigging in blender and the physics weight mapping in iClone that depends a lot on the type of clothing you are making.

I often just do a very basic meshing of a clothing and then try different ways of rigging and weight mapping just to see what effects it has and hopefully improve my capabilities.
When making actual clothes I now keep the meshing as simple as possible and get the cloth flowing right.
Once the cloth flow is right I then start adding mesh details I need.
I used to totally make the mesh first and then get the cloth flow but found that difficult to get cloth flowing right because of how I constructed the mesh.

Not saying the way I do it now is the best way but its the way I find easiest, at least for now. Who knows, I will probably make more discoveries and change my workflow again.
But I recommend, start simple and gradually work towards more complicated clothing. What you figure out with the simple stuff will assist you when you start making more complicated clothes. That's what I find anyway


i7-3770 3.4GHz CPU 16 GB Ram   
GeForce GTX1080 TI 11GB
Windows 10 Pro 64bit
Edited
7 Years Ago by Delerna


Reading This Topic